Table of Contents for
Learning Node.js Development

Version ebook / Retour

Cover image for bash Cookbook, 2nd Edition Learning Node.js Development by Andrew Mead Published by Packt Publishing, 2018
  1. Learning Node.js Development
  2. Title Page
  3. Copyright and Credits
  4. Learning Node.js Development
  5. Packt Upsell
  6. Why subscribe?
  7. PacktPub.com
  8. Contributor
  9. About the author
  10. Packt is searching for authors like you
  11. Table of Contents
  12. Preface
  13. Who this book is for
  14. What this book covers
  15. To get the most out of this book
  16. Download the example code files
  17. Conventions used
  18. Get in touch
  19. Reviews
  20. Getting Set Up
  21. Node.js installation
  22. Node.js version confirmation
  23. Installing Node
  24. Verifying installation
  25. What is Node?
  26. Differences between JavaScript coding using Node and in the browser
  27. Why use Node
  28. Blocking and non-blocking software development
  29. The working of blocking I/O
  30. The working non-blocking I/O
  31. Blocking and non-blocking examples using Terminal
  32. Node community – problem solving open source libraries
  33. Different text editors for node applications
  34. Hello World – creating and running the first Node app
  35. Creating the Node application
  36. Running the Node application
  37. Summary
  38. Node Fundamentals – Part 1
  39. Module basics
  40. Using case for require()
  41. Initialization of an application
  42. The built-in module to use require()
  43. Creating and appending files in the File System module
  44. The OS module in require()
  45. Concatenating user.username
  46. Using template strings
  47. Require own files
  48. Making a new file to load other files
  49. Exporting files from note.js to use in app.js
  50. A simple example of the working of the exports object
  51. Exporting the functions
  52. Exercise – adding a new function to the export object
  53. Solution to the exercise
  54. Third-party modules
  55. Creating projects using npm modules
  56. Installing the lodash module in our app
  57. Installation of lodash
  58. Using the utilities of lodash
  59. Using the _.isString utility
  60. Using _.uniq
  61. The node_modules folder
  62. Global modules
  63. Installing the nodemon module
  64. Executing nodemon
  65. Getting input
  66. Getting input from the user inside the command line
  67. Accessing the command-line argument for the notes application
  68. Adding if/else statements
  69. Exercise – adding two else if clauses to an if block
  70. Solution to the exercise
  71. Getting the specific note information
  72. Summary
  73. Node Fundamentals – Part 2
  74. yargs
  75. Installing yargs
  76. Running yargs
  77. Working with the add command
  78. Working with the list command
  79. The read command
  80. Dealing with the errors in parsing commands
  81. The remove command
  82. Fetching command
  83. JSON
  84. Converting objects into strings
  85. Defining a string and using in app as an object
  86. Converting a string back to an object
  87. Storing the string in a file
  88. Writing the file in the playground folder
  89. Reading out the content in the file
  90. Adding and saving notes
  91. Adding notes
  92. Adding notes to the notes array
  93. Fetching new notes
  94. Trying and catching code block
  95. Making the title unique
  96. Refactoring
  97. Moving functionality into individual functions
  98. Working with fetchNotes
  99. Working with saveNotes
  100. Testing the functionality
  101. Summary
  102. Node Fundamentals – Part 3
  103. Removing a note
  104. Using the removeNote function
  105. Printing a message of removing notes
  106. Reading note
  107. Using the getNote function
  108. Running the getNote function
  109. The DRY principle
  110. Using the logNote function
  111. Debugging
  112. Executing a program in debug mode
  113. Working with debugging
  114. Using debugger inside the notes application
  115. Listing notes
  116. Using the getAll function
  117. Advanced yargs
  118. Using chaining syntax on yargs
  119. Calling the .help command
  120. Adding the options object
  121. Adding the title
  122. Adding the body
  123. Adding support to the read and remove commands
  124. Adding the titleOption and bodyOption variables
  125. Testing the remove command
  126. Arrow functions
  127. Using the arrow function
  128. Exploring the difference between regular and arrow functions
  129. Exploring the arguments array
  130. Summary
  131. Basics of Asynchronous Programming in Node.js
  132. The basic concept of asynchronous program
  133. Illustrating the async programming model
  134. Call stack and event loop
  135. A synchronous program example
  136. The call stack
  137. Running the synchronous program
  138. A complex synchronous program example
  139. An async program example
  140. The Node API in async programming
  141. The callback queue in async programming
  142. The event loop
  143. Running the async code
  144. Callback functions and APIs
  145. The callback function
  146. Creating the callback function
  147. Running the callback function
  148. Simulating delay using setTimeout
  149. Making request to Geolocation API
  150. Using Google Maps API data in our code
  151. Installing the request package
  152. Using request as a function
  153. Running the request
  154. Pretty printing objects
  155. Using the body argument
  156. Making up of the HTTPS requests
  157. The response object
  158. The error argument
  159. Printing data from the body object
  160. Printing the formatted address
  161. Printing latitude and longitude
  162. Summary
  163. Callbacks in Asynchronous Programming
  164. Encoding user input
  165. Installing yargs
  166. Configuring yargs
  167. Printing the address to screen
  168. Encoding and decoding the strings
  169. Encoding URI component
  170. Decoding URI component
  171. Pulling the address out of argv
  172. Callback errors
  173. Checking error in Google API request
  174. Adding the if statement for callback errors
  175. Adding if else statement to check body status property
  176. Testing the body status property
  177. Abstracting callbacks
  178. Refactoring app.js and code into geocode.js file
  179. Working on request statement
  180. Creating geocode file
  181. Adding callback function to geocodeAddress
  182. Setting up the function in geocodeAddress function in app.js
  183. Implementing the callback function in geocode.js file
  184. Testing the callback function in geocode.js file
  185. Wiring up weather search
  186. Exploring working of API in the browser
  187. Exploring the actual URL for code
  188. Making a request for the weather app using the static URL
  189. Error handling in the the callback function
  190. Another way of error handling
  191. Testing the error handling in callback
  192. Chaining callbacks together
  193. Refactoring our request call in weather.js file
  194. Defining the new function getWeather in weather file
  195. Providing weather directory in app.js
  196. Passing the arguments in the getWeather function
  197. Printing errorMessage in the getWeather function
  198. Implementing getWeather callback inside weather.js file
  199. Adding dynamic latitude and longitude
  200. Changing console.log calls into callback calls
  201. Chaining the geocodeAddress and getWeather callbacks together
  202. Moving getWeather call into geocodeAddress function
  203. Replacing static coordinates with dynamic coordinates
  204. Testing the chaining of callbacks
  205. Summary
  206. Promises in Asynchronous Programming
  207. Introduction to ES6 promises
  208. Creating an example promise
  209. Calling the promise method then
  210. Running the promise example in Terminal
  211. Error handling in promises
  212. Merits of promises
  213. Advanced promises
  214. Providing input to promises
  215. Returning the promises
  216. Promise chaining
  217. Error handling in promises chaining
  218. The catch method
  219. The request library in promises
  220. Testing the request library
  221. Weather app with promises
  222. Fetching weather app code from the app.js file
  223. Axios documentations
  224. Installing axios
  225. Making calls in the app-promise file
  226. Making axios request
  227. Error handling in axios request
  228. Error handling with ZERO_RESULT body status
  229. Generating the weather URL
  230. Chaining the promise calls
  231. Summary
  232. Web Servers in Node
  233. Introducing Express
  234. Configuring Express
  235. Express docs website
  236. Installing Express
  237. Creating an app
  238. Exploring the developer tools in the browser for the app request
  239. Passing HTML to res.send
  240. Sending JSON data back
  241. Error handling in the JSON request
  242. The static server
  243. Making an HTML page
  244. The head tag
  245. The body tag
  246. Serving the HTML page in the Express app
  247. The call to app.listen
  248. Rendering templates
  249. Installing the hbs module
  250. Configuring handlebars
  251. Our first template
  252. Getting the static page for rendering
  253. Injecting data inside of templates
  254. Rendering the template for the root of the website
  255. Advanced templates
  256. Adding partials
  257. Working of partial
  258. The Header partial
  259. The Handlebars helper
  260. Arguments in Helper
  261. Express Middleware
  262. Exploring middleware
  263. Creating a logger
  264. Printing message to file
  265. The maintenance middleware without the next object
  266. Testing the maintenance middleware
  267. Summary
  268. Deploying Applications to Web
  269. Adding version control
  270. Installing Git
  271. Git on macOS
  272. Git on Windows
  273. Testing the installation
  274. Turning the node-web-server directory into a Git repository
  275. Using Git
  276. Adding untracked files to commit
  277. Making a commit
  278. Setting up GitHub and SSH keys
  279. Setting up SSH keys
  280. SSH keys documentations
  281. Working on commands
  282. Generating a key
  283. Starting up the SSH agent
  284. Configuring GitHub
  285. Testing the configuration
  286. Creating a new repository
  287. Setting up the repository
  288. Deploying the node app to the Web
  289. Installing Heroku command-line tools
  290. Log in to Heroku account locally
  291. Getting SSH key to Heroku
  292. Setting up in the application code for Heroku
  293. Changes in the server.js file
  294. Changes in the package.json file
  295. Making a commit in Heroku
  296. Running the Heroku create command
  297. Summary
  298. Testing the Node Applications – Part 1
  299. Basic testing
  300. Installing the testing module
  301. Testing a Node project
  302. Mocha – the testing framework
  303. Creating a test file for the add function
  304. Creating the if condition for the test
  305. Testing the squaring a number function
  306. Autorestarting the tests
  307. Using assertion libraries in testing Node modules
  308. Exploring assertion libraries
  309. Chaining multiple assertions
  310. Multiple assertions for the square function
  311. Exploring usage of expect with bogus test
  312. Using toBe and toNotBe to compare array/objects
  313. Using the toEqual and toNotEqual assertions
  314. Using toInclude and toExclude
  315. Testing the setName method
  316. The asynchronous testing
  317. Creating the asyncAdd function using the setTimeout object
  318. Writing the test for the asyncAdd function
  319. Making assertion for the asyncAdd function
  320. Adding the done argument
  321. The asynchronous testing for the square function
  322. Creating the async square function
  323. Writing test for asyncSquare
  324. Making assertions for the asyncSquare function
  325. Summary
  326. Testing the Node Applications – Part 2
  327. Testing the Express application
  328. Setting up testing for the Express app
  329. Testing the Express app using SuperTest
  330. The SuperTest documentation
  331. Creating a test for the Express app
  332. Writing the test for the Express app
  333. Testing our first API request
  334. Setting up custom status
  335. Adding flexibility to SuperTest
  336. Creating an express route
  337. Writing the test for the express route
  338. Organizing test with describe()
  339. Adding describe() for individual methods
  340. Adding the route describe block for the server.test.js file
  341. Test spies
  342. Creating a test file for spies
  343. Creating a spy
  344. Setting up spies assertions
  345. More details out of spy assertion
  346. Swapping of the function with spy
  347. Installing and setting up the rewire function
  348. Replacing db with the spy
  349. Writing a test to verify swapping of the function
  350. Summary
  351. Conclusion
  352. Another Book You May Enjoy
  353. Leave a review - let other readers know what you think

Running the Heroku create command

The next step in the process will be to run a command called heroku create from the Terminal. heroku create needs to get executed from inside your application:

heroku create

Just like we run our Git commands, when I run heroku create, a couple things are going to happen:

  • First up, it's going to make a real new application over in the Heroku web app
  • It's also going to add a new remote to your Git repository

Now remember we have an origin remote, which points to our GitHub repository. We'll have a Heroku remote, which points to our Heroku Git repository. When we deploy to the Heroku Git repository, Heroku is going to see that. It will take the changes and it will deploy them to the Web. When we run Heroku create, all of that happens:

Now we do still have to push up to this URL in order to actually do the deploying process, and we can do that using git push followed by heroku:

git push heroku

The brand new remote was just added because we ran heroku create. Now pushing it this time around will go through the normal process. You'll then start seeing some logs.

These are logs coming back from Heroku letting you know how your app is deploying. It's going through the entire process, showing you what happens along the way. This will take about 10 seconds and at the very end we have a success message—Verifying deploy... done:

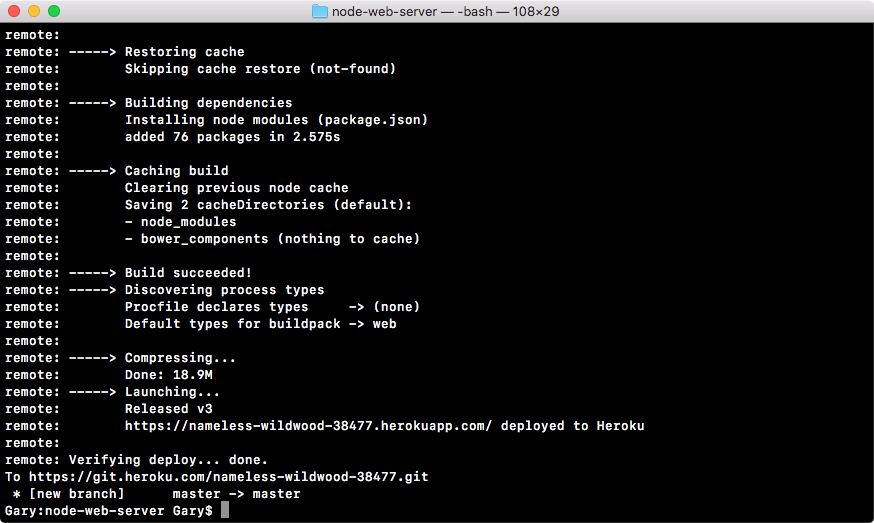
It also verified that the app was deployed successfully and that did indeed pass. From here we actually have a URL we can visit (https://sleepy-retreat-32096.herokuapp.com/). We can take it, copy it, and paste it in the browser. What I'll do instead is use the following command:

heroku open

The heroku open will open up the Heroku app in the default browser. When I run this, it will switch over to Chrome and we get our application showing up just as expected:

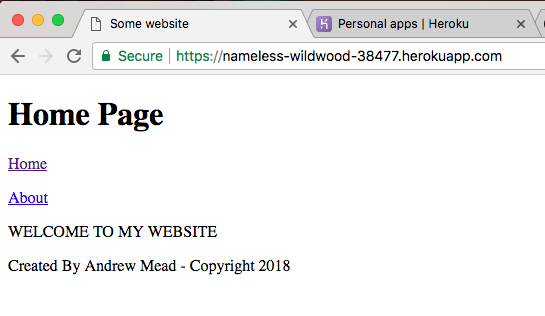
We can switch between pages and everything works just like it did locally. Now we have a URL and this URL was given to us by Heroku. This is the default way Heroku generates app URLs. If you have your own domain registration company, you can go ahead and configure its DNS to point to this application. This will let you use a custom URL for your Heroku app. You'll have to refer to the specific instructions for your domain registrar in order to do that, but it can indeed be done.

Now that we have this in place, we have successfully deployed our Node applications live to Heroku, and this is just fantastic. In order to do this, all we had to do is make a commit to change our code and push it up to a new Git remote. It could not be easier to deploy our code.

You can also manage your application by going back over to the Heroku dashboard. If you give it a refresh, you should see that brand new URL somewhere on the dashboard. Remember mine was sleepy retreat. Yours is going to be something else. If I click on the sleepy retreat, I can view the app page:

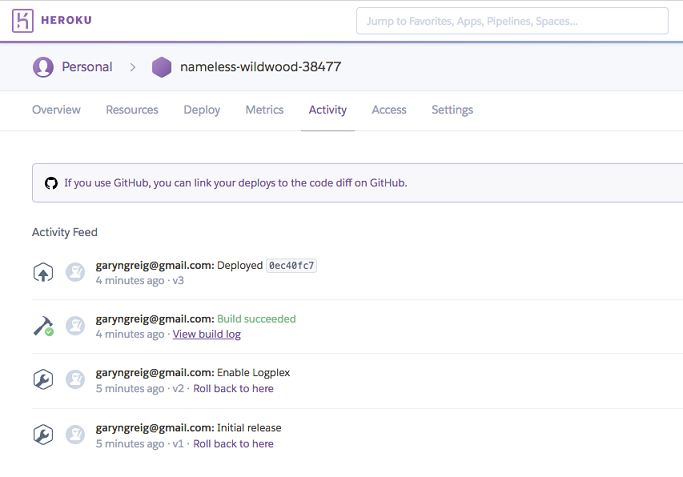
Here we can do a lot of configuration. We can manage Activity and Access so we can collaborate with others. We have metrics, we have Resources, all sorts of really cool stuff. With this in place, we are now done with our basic deploying section.

In the next section, your challenge will be to go through that process again. You'll add some changes to the Node app. You'll commit them, deploy them, and view them live in the Web. We'll get started by creating the local changes. That means I'll register a new URL right here using app.get.

We'll create a new page/projects, which is why I have that as the route for my HTTP get handler. Inside the second argument, we can specify our callback function, which will get called with request and response, and like we do for the other routes above, the root route and our about route, we'll be calling response.render to render our template. Inside the render arguments list, we'll provide two.

The first one will be the file name. The file doesn't exist, but we can still go ahead and call render. I'll call it projects.hbs, then we can specify the options we want to pass to the template. In this case, we'll set page title, setting it equal to Projects with a capital P. Excellent! Now with this in place, the server file is all done. There are no more changes there.

What I'll do is go ahead and go to the views directory, creating a new file called projects.hbs. In here, we'll be able to configure our template. To kick things off, I'm going to copy the template from the about page. Since it's really similar, I'll copy it. Close about, paste it into projects, and I'm just going to change this text to project page text would go here. Then we can save the file and make our last change.

The last thing we want to do is update the header. We now have a brand new projects page that lives at /projects. So we'll want to go ahead and add that to the header links list. Right here, I'll create a new paragraph tag and then I'll make an anchor tag. The text for the link will be Projects with a capital P and the href, which is the URL to visit when that link is clicked. We'll set that equal to /projects, just like we did for about, where we set it equal to /about.

Now that we have this in place, all our changes are done and we are ready to test things out locally. I'll fire up the app locally using Node with server.js as the file. To start, we're up on localhost 3000. So over in the browser, I can move to the localhost tab, as opposed to the Heroku app tab, and click on Refresh. Right here we have Home, which goes to home, we have About which goes to about, and we have Projects which does indeed go to /projects, rendering the projects page. Project page text would go here. With this in place we're now done locally.

We have the changes, we've tested them, now it's time to go ahead and make that commit. That will happen over inside the Terminal. I'll shut down the server and run Git status. This will show me all the changes to my repository as of the last commit. I have two modified files: the server file and the header file, and I have my brand new projects file. All of this looks great. I want to add all of this to the next commit, so I can use a Git add with the . to do just that.

Now before I actually make the commit, I do like to test that the proper things got added by running Git status. Right here I can see my changes to be committed are showing up in green. Everything looks great. Next up, we'll run a Git commit to actually make the commit. This is going to save all of the changes into the Git repository. A message for this one would be something like adding a project page.

With a commit made, the next thing you needed to do was push it up to GitHub. This will back our code up and let others collaborate on it. I'll use Git push to do just that. Remember we can leave off the origin remote as origin is the default remote, so if you leave off a remote it'll just use that anyway.

With our GitHub repository updated, the last thing to do is deploy to Heroku and we do that by pushing up the Git repository, using Git push, to the Heroku remote. When we do this, we get our long list of logs as the Heroku server goes through the process of installing our npm modules, building the app, and actually deploying it. Once it's done, we'll get brought back to the Terminal like we are here, and then we can open up the URL in the browser. Now I can copy it from here or run Heroku open. Since I already have a tab open with the URL in place, I'll simply give it a refresh. Now you might have a little delay as you refresh your app. Sometimes starting up the app right after a new app was deployed can take about 10 to 15 seconds. That will only happen as you first visit it. Other times where you click on the Refresh button, it should reload instantly.

Now we have the projects page and if I visit it, everything looks awesome. The navbar is working great and the projects page is indeed rendering at /projects. With this in place, we are now done. We've gone through the process of adding a new feature, testing it locally, making a Git commit, pushing it up to GitHub, and deploying it to Heroku. We now have a workflow for building real-world web applications using Node.js. This also brings a close to this section.