Learning Node.js Development
Learn the fundamentals of Node.js, and deploy and test Node.js applications on the web
![]()
BIRMINGHAM - MUMBAI

![]()
Copyright © 2018 Packt Publishing
All rights reserved. No part of this book may be reproduced, stored in a retrieval system, or transmitted in any form or by any means, without the prior written permission of the publisher, except in the case of brief quotations embedded in critical articles or reviews.
Every effort has been made in the preparation of this book to ensure the accuracy of the information presented. However, the information contained in this book is sold without warranty, either express or implied. Neither the author, nor Packt Publishing or its dealers and distributors, will be held liable for any damages caused or alleged to have been caused directly or indirectly by this book.
Packt Publishing has endeavored to provide trademark information about all of the companies and products mentioned in this book by the appropriate use of capitals. However, Packt Publishing cannot guarantee the accuracy of this information.
Acquisition Editor: Ben Renow-Clarke
Content Development Editor: Monika Sangwan
Technical Editors: Anupam Tiwari, Gaurav Gavas
Copy Editors: Safis Editing, Tom Jacob
Project Editor: Suzanne Coutinho
Proofreader: Safis Editing
Indexer: Pratik Shirodkar
Production Coordinator: Nilesh Mohite
First published: January 2018
Production reference: 1300118
Published by Packt Publishing Ltd.
Livery Place
35 Livery Street
Birmingham
B3 2PB, UK.
ISBN 978-1-78839-554-0

Mapt is an online digital library that gives you full access to over 5,000 books and videos, as well as industry leading tools to help you plan your personal development and advance your career. For more information, please visit our website.
Spend less time learning and more time coding with practical eBooks and Videos from over 4,000 industry professionals
Improve your learning with Skill Plans built especially for you
Get a free eBook or video every month
Mapt is fully searchable
Copy and paste, print, and bookmark content
Did you know that Packt offers eBook versions of every book published, with PDF and ePub files available? You can upgrade to the eBook version at www.PacktPub.com and as a print book customer, you are entitled to a discount on the eBook copy. Get in touch with us at service@packtpub.com for more details.
At www.PacktPub.com, you can also read a collection of free technical articles, sign up for a range of free newsletters, and receive exclusive discounts and offers on Packt books and eBooks.
Andrew Mead is a full-stack developer living in beautiful Philadelphia! He launched his first Udemy course in 2014 and had a blast teaching and helping others. Since then, he has launched 3 courses with over 21,000 students and over 1,900 5-star reviews.
Andrew currently teaches Node, Gulp, and React. Before he started teaching, he created a web app development company. He has helped companies of all sizes launch production web applications to their customers. He has had the honor of working with awesome companies such as Siemens, Mixergy, and Parkloco. He has a Computer Science degree from Temple University, and he has been programming for just over a decade. He loves creating, programming, launching, learning, teaching, and biking.
If you're interested in becoming an author for Packt, please visit authors.packtpub.com and apply today. We have worked with thousands of developers and tech professionals, just like you, to help them share their insight with the global tech community. You can make a general application, apply for a specific hot topic that we are recruiting an author for, or submit your own idea.
Welcome to Learning Node.js Development. This book is packed with a ton of content, projects, challenges and real-world examples, all designed to teach you Node by doing. This means you'll be getting your hands dirty early on in the upcoming chapters writing some code, and you'll be writing code for every project. You will be writing every line of code that powers our applications. Now, we would require a text editor for this book. We have various text editor options that you can use. I always recommend using Atom, which you can find at atom.io. It's free, open-source, and it's available for all operating systems, namely Linux, macOS, and Windows. It's created by the folks behind GitHub.
All the projects in the book are fun to build and they were designed to teach you everything required to launch your own Node app, from planning to development and testing to deploying. Now, as you launch these different Node applications and move through the book, you will run into errors, which is bound to happen. Maybe something doesn't get installed as expected, or maybe you try to run an app and instead of getting the expected output, you get a really long obscure error message. Don't worry, I am there to help. I'll show you tips and tricks to get pass through those errors in the chapters. Let's go ahead and get to it.
This book targets anyone looking to launch their own Node applications, switch careers, or freelance as a Node developer. You should have a basic understanding of JavaScript in order to follow this book.
Chapter 1, Getting Set Up, talks about what Node is and why you want to use it. In this chapter, you'll learn Node installation and by the end of the chapter, you'll be able to run your first Node application.
Chapter 2, Node Fundamentals - Part 1, talks about building Node applications. The Node Fundamentals topic has been divided into 3 parts. Part 1 of this topic includes module basics, requiring own files, and third-party NPM modules.
Chapter 3, Node Fundamentals - Part 2, continues our discussion on some more Node fundamentals. This chapter explores yargs, JSON, the addNote function, and refactor, moving functionality into individual functions and testing the functionality.
Chapter 4, Node Fundamentals - Part 3, includes things such as read and write from the file system. We'll look into advanced yargs configuration, debugging broken apps, and some new ES6 functions.
Chapter 5, Basics of Asynchronous Programming in Node.js, covers basic concepts, terms, and technologies related to the async programming, making it super-practical and using it in our weather application.
Chapter 6, Callbacks in Asynchronous Programming, is the second part of async programming in Node. We'll look into callbacks, HTTPS requests, and error handling inside of our callback functions. We'll also look into the forecast API and fetching real-time weather data for our address.
Chapter 7, Promises in Asynchronous Programming, is the third and last part of async programming in Node. This chapter focuses on Promises, how it works, why they are useful, and so on. At the end of this chapter, we'll use Promises in our weather app.
Chapter 8, Web Servers in Node, talks about Node web servers and integrating version control into Node applications. We'll also introduce a framework called Express, one of the most important NPM libraries.
Chapter 9, Deploying Applications to Web, talks about deploying the applications to the Web. We'll be using Git, GitHub, and deploy our live app to the Web using these two services.
Chapter 10, Testing the Node Applications- Part 1, talks about how we can test our code to make sure it is working as expected. We'll work on setting up for testing and then writing our test cases. We'll look into the basic testing framework and asynchronous testing.
Chapter 11, Testing the Node Application - Part 2, continues our journey of testing Node applications. In this chapter, we'll work on testing the Express applications and look into some advanced methods of testing.
A web browser, we'll be using Chrome throughout the course book but any browser will do, and Terminal, sometimes known as the command line on Linux or the Command Prompt on Windows. Atom as the text editor. The following list of modules will be used throughout the course of this book:
You can download the example code files for this book from your account at www.packtpub.com. If you purchased this book elsewhere, you can visit www.packtpub.com/support and register to have the files emailed directly to you.
You can download the code files by following these steps:
Once the file is downloaded, please make sure that you unzip or extract the folder using the latest version of:
The code bundle for the book is also hosted on GitHub at https://github.com/PacktPublishing/Learning-Node.js-Development. We also have other code bundles from our rich catalog of books and videos available at https://github.com/PacktPublishing/. Check them out!
There are a number of text conventions used throughout this book.
CodeInText: Indicates code words in text, database table names, folder names, filenames, file extensions, pathnames, dummy URLs, user input, and Twitter handles. Here is an example: "Mount the downloaded WebStorm-10*.dmg disk image file as another disk in your system."
A block of code is set as follows:
console.log('Starting app.js');

const fs = require('fs');
const _ = require('lodash');
const yargs = require('yargs');
When we wish to draw your attention to a particular part of a code block, the relevant lines or items are set in bold:
const argv = yargs.argv;
var command = process.argv[2];
console.log('Command:', command);
console.log('Process', process.argv);
console.log('Yargs', argv);
Any command-line input or output is written as follows:
cd hello-world
node app.js
Bold: Indicates a new term, an important word, or words that you see onscreen. For example, words in menus or dialog boxes appear in the text like this. Here is an example: "Select System info from the Administration panel."
Feedback from our readers is always welcome.
General feedback: Email feedback@packtpub.com and mention the book title in the subject of your message. If you have questions about any aspect of this book, please email us at questions@packtpub.com.
Errata: Although we have taken every care to ensure the accuracy of our content, mistakes do happen. If you have found a mistake in this book, we would be grateful if you would report this to us. Please visit www.packtpub.com/submit-errata, selecting your book, clicking on the Errata Submission Form link, and entering the details.
Piracy: If you come across any illegal copies of our works in any form on the Internet, we would be grateful if you would provide us with the location address or website name. Please contact us at copyright@packtpub.com with a link to the material.
If you are interested in becoming an author: If there is a topic that you have expertise in and you are interested in either writing or contributing to a book, please visit authors.packtpub.com.
Please leave a review. Once you have read and used this book, why not leave a review on the site that you purchased it from? Potential readers can then see and use your unbiased opinion to make purchase decisions, we at Packt can understand what you think about our products, and our authors can see your feedback on their book. Thank you!
For more information about Packt, please visit packtpub.com.
In this chapter, you'll get your local environment set up for the rest of the book. Whether you're on macOS, Linux, or Windows, we'll install Node and look at exactly how we can run Node applications.
We'll talk about what Node is, why you would ever want to use it, and why you would want to use Node as opposed to something like Rails, C++, Java, or any other language that can accomplish similar tasks. By the end of this chapter, you will be running your very first Node application. It's going to be simple, but it is going to get us to the path to creating real-world production Node apps, which is the goal of this book.
More specifically, we'll cover the following topics:
Before we start talking about what Node is and why it's useful, you need to first install Node on your machine, because in the next couple of sections, we'll want to run a little bit of Node code.
Now, to get started, we just need two programs—a browser, I'll be using Chrome throughout the book, but any browser will do, and Terminal. I'll use Spotlight to open up Terminal, which is what it's known as on my operating system.
If you're on Windows, look for the Command Prompt, you can search using the Windows key and then by typing command prompt, and on Linux, you're looking for the command line, although depending on your distribution it might be called Terminal or Command Prompt.
Now, once you have that program open, you'll see a screen, as shown in the following screenshot:

Essentially, it's waiting for you to run a command. We'll run quite a few commands from Terminal throughout the book. I'll discuss it in a few sections later, so if you've never used this before, you can start navigating comfortably.
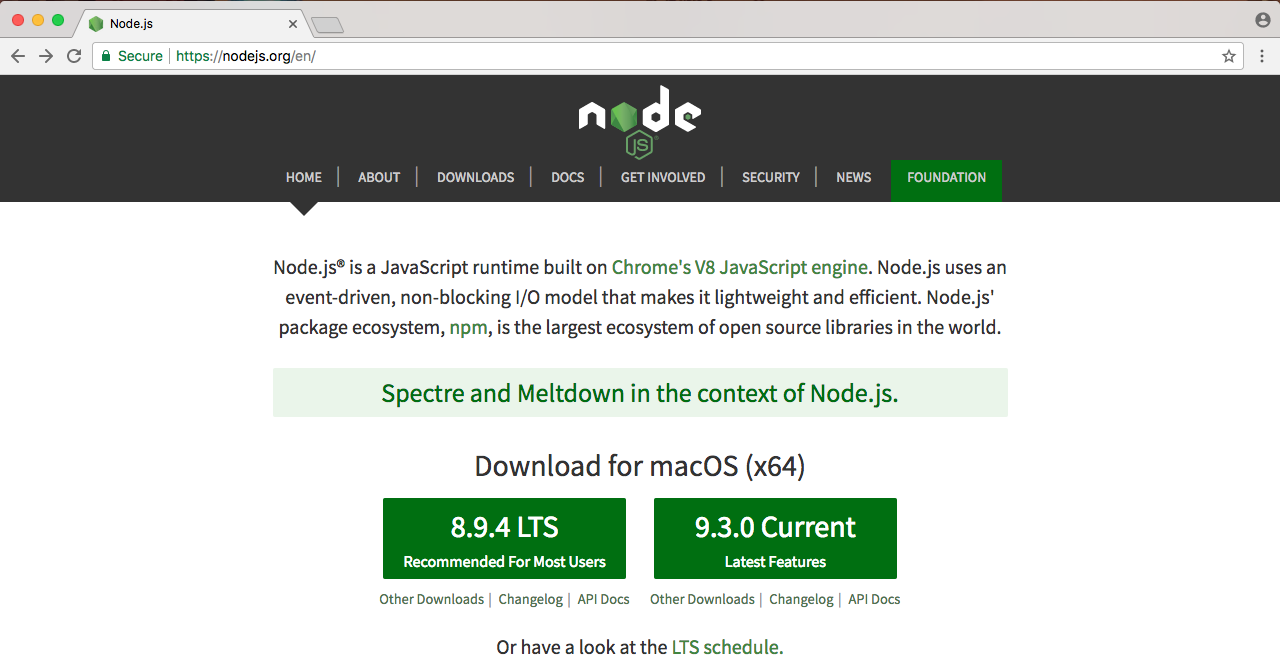
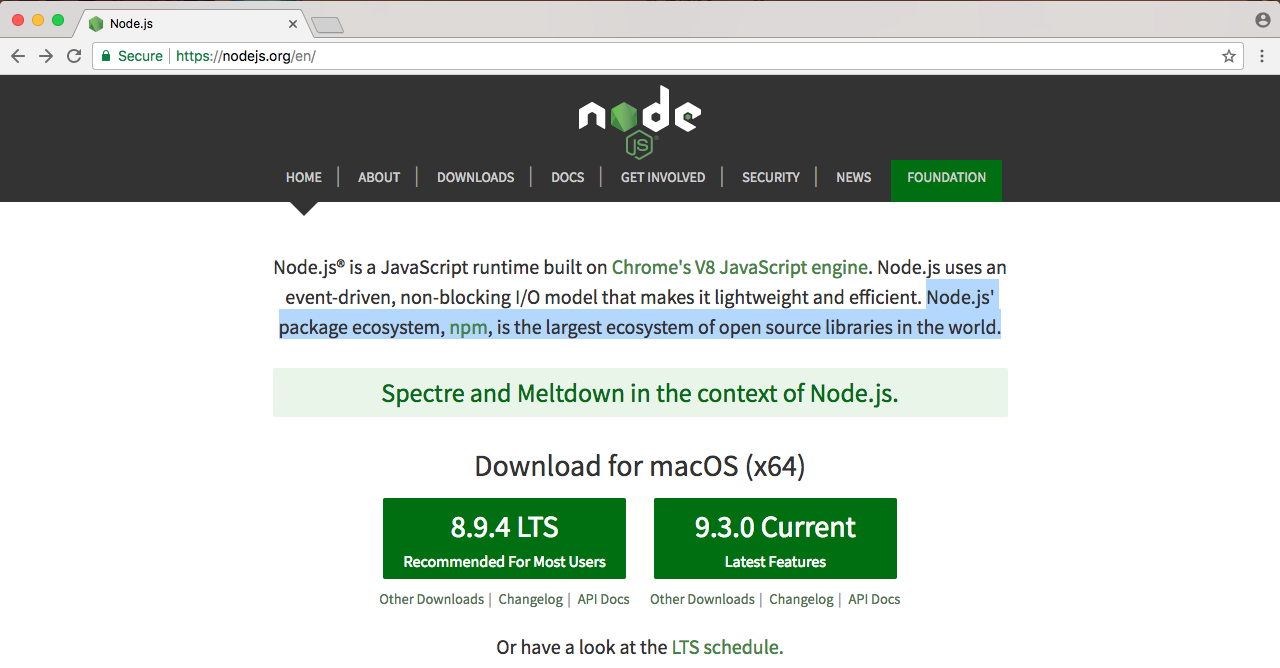
In the browser, we can head over to nodejs.org to grab the installer for the latest version of Node(as shown here). In this book, we'll use the most recent version, version 9.3.0:
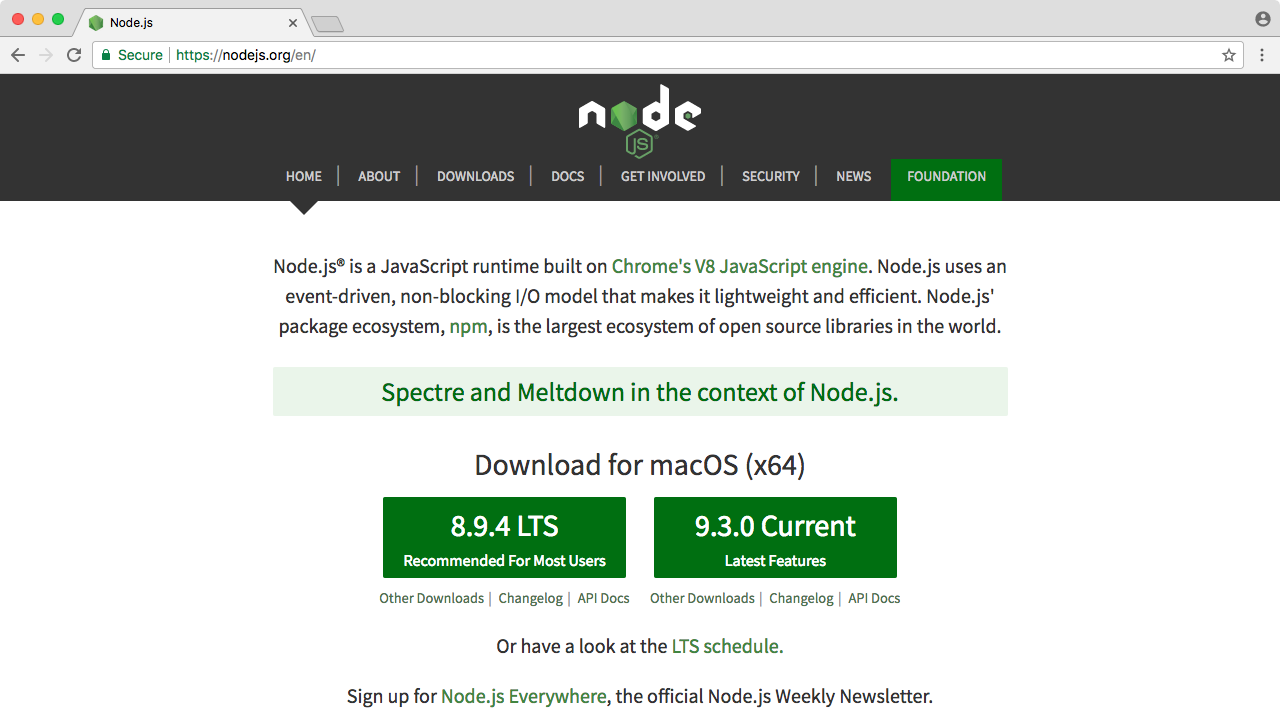
ES6 is the next version of JavaScript and it comes with a lot of great enhancements we'll be using throughout the book. If you look at the following image, Node.js Long Term Support Release Schedule (https://github.com/nodejs/LTS), you can see that the current Node version is V8, out in April 2017:
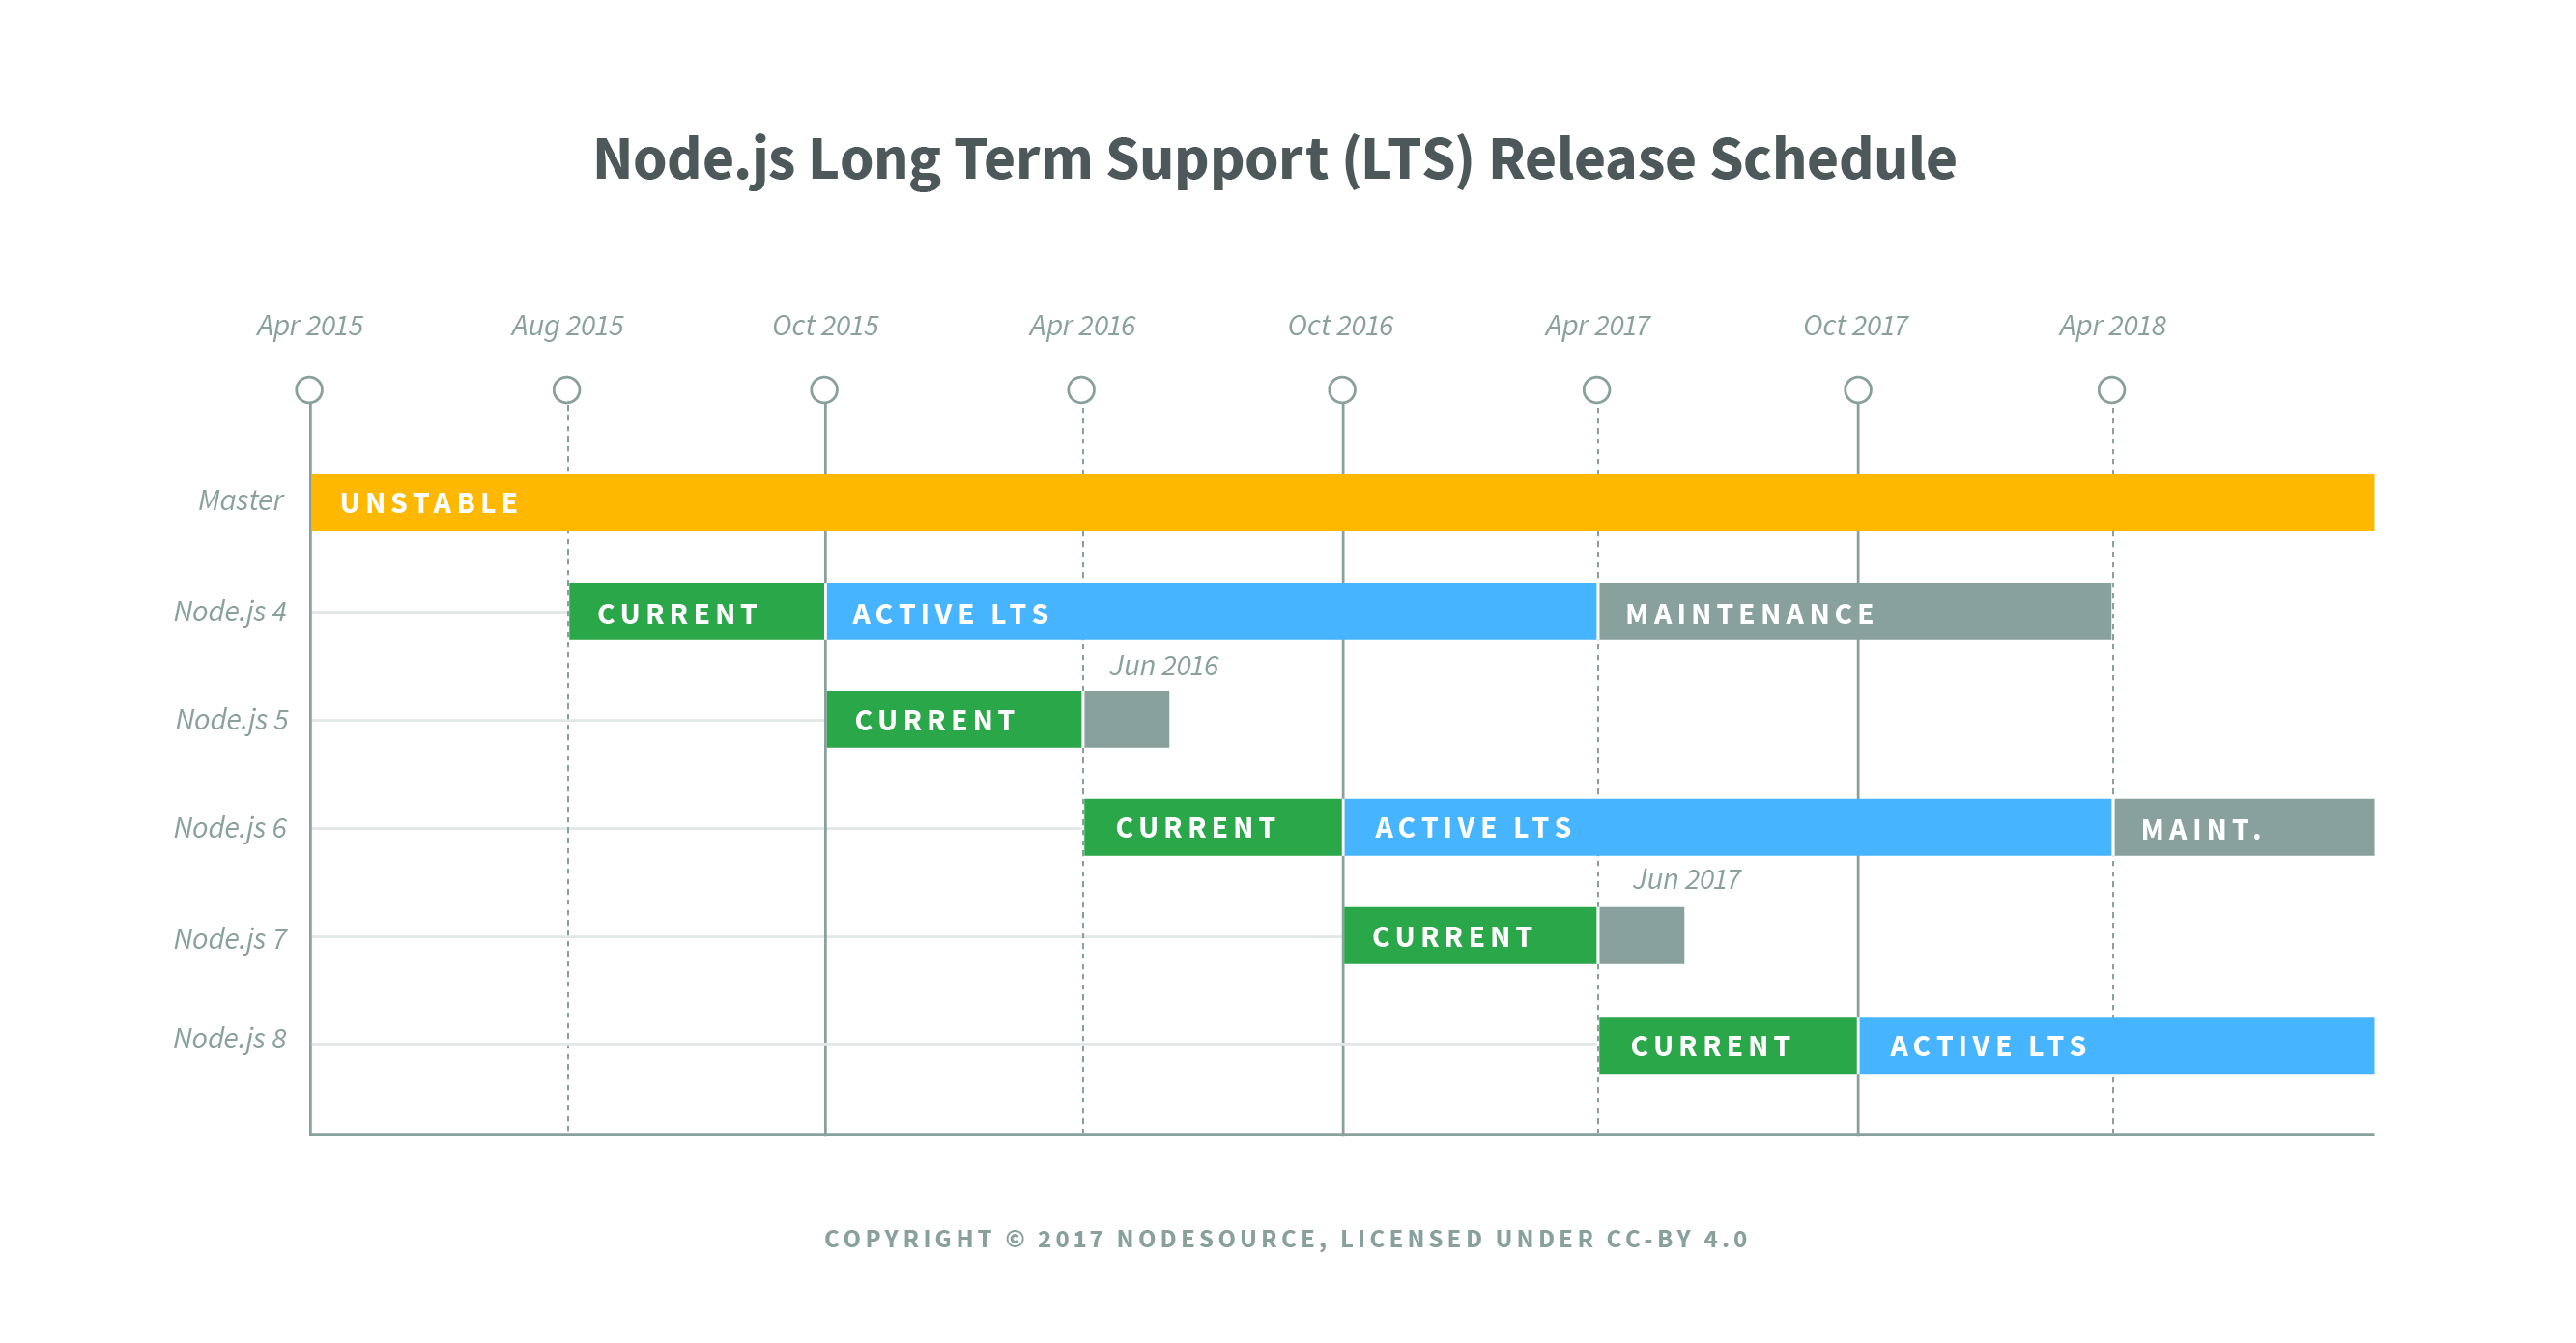
Before going further, I would like to talk about the Node release cycle. What I have in the preceding image is the official release cycle, this is released by Node. You'll notice that only next to the even Node numbers do you find the active LTS, the blue bar, and the maintenance bar. Now, LTS stands for long-term support, and this is the version that's recommended for most users. I'd recommend that you stick with the currently offered LTS option (Node v 8.9.4 LTS), though anything on the left-hand side will do, this is shown as the two green buttons on nodejs.org.
Now, as you can see, the major version numbers, bump every six months. Regardless of any sort of big overarching change, this happens like clockwork even if nothing drastic has changed. It's not like Angular where jumping from 1.0 to 2.0 was almost like using a completely different library. This is just not the case with Node, what you're getting from this book is the latest and greatest Node has to offer.
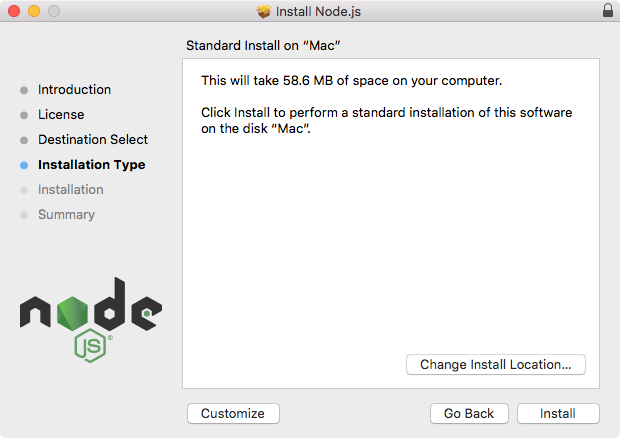
Once the version is confirmed and selected, all we have to do is to click the required version button on the Node website (nodejs.org) and download the installer. The installer is one of those basic click Next a few times and you're done type of installers, there's no need to run any fancy commands. I'll start the installer. As shown in the following screenshot, it'll just ask a few questions, then let's click on Next or Continue through all of them:
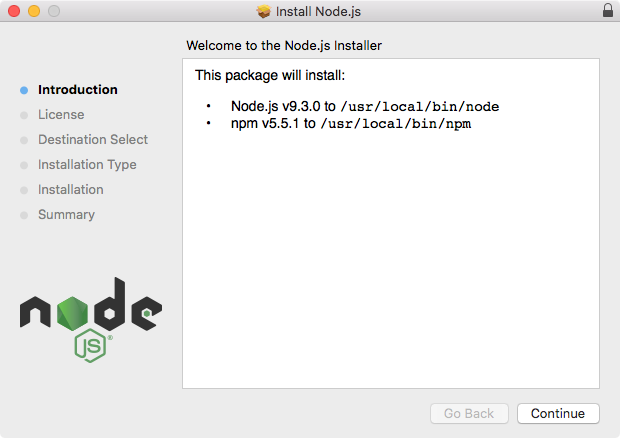
You might want to specify a custom destination, but if you don't know what that means, and you don't usually do it when installing programs, skip that step too. Here, in the next screenshot, you can see that I'm using just 58.6 MB, no problem.
I'll run the installer by entering my password. And once I enter my password, it should really only take a couple of seconds to get Node installed:
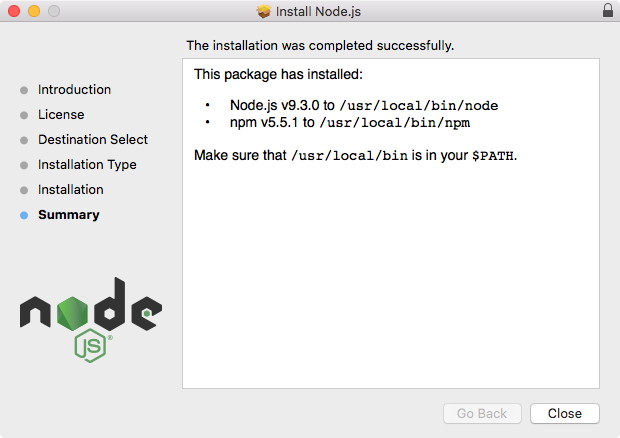
As shown in the following screenshot, we have a message that says The installation was completed successfully, which means we are good to go:
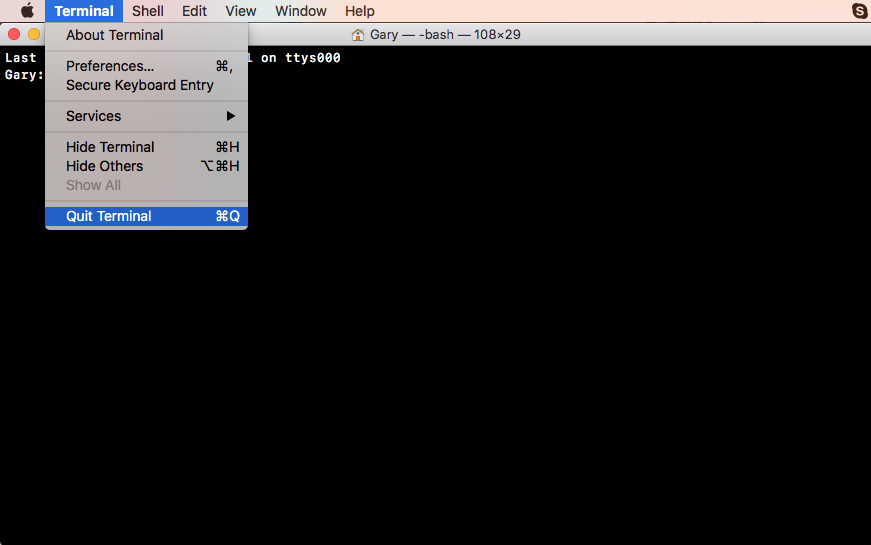
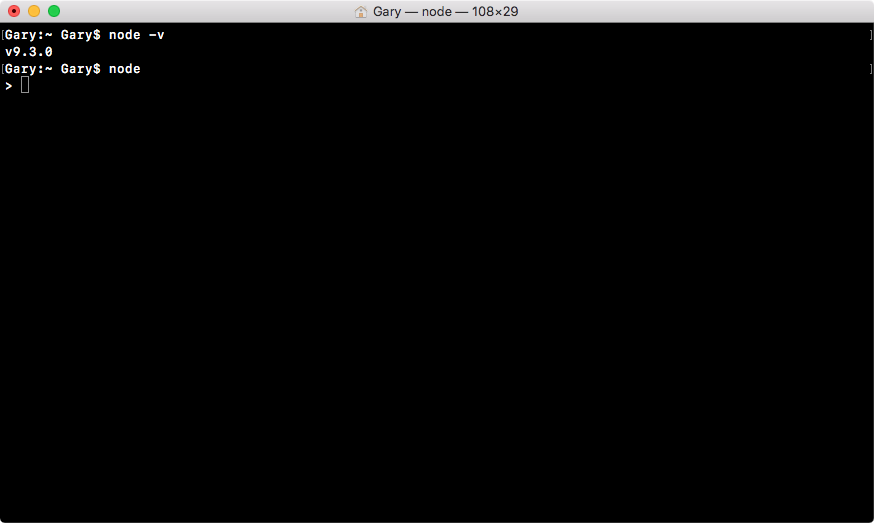
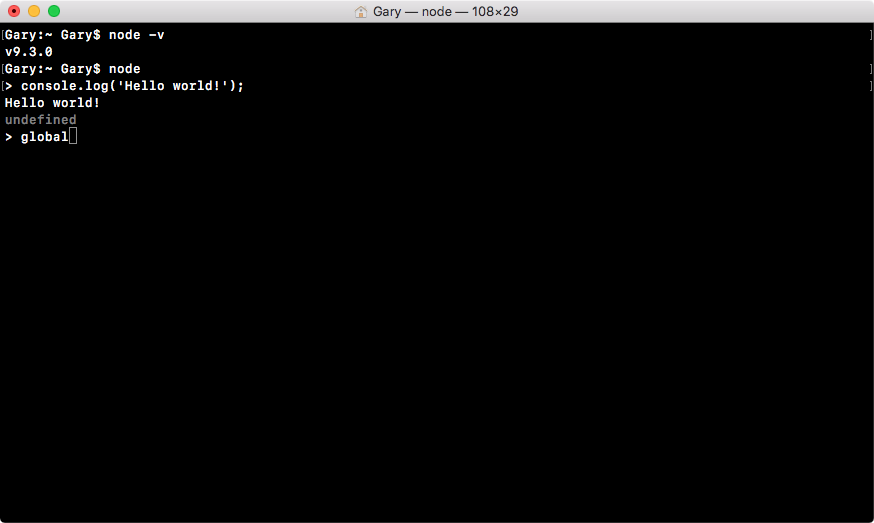
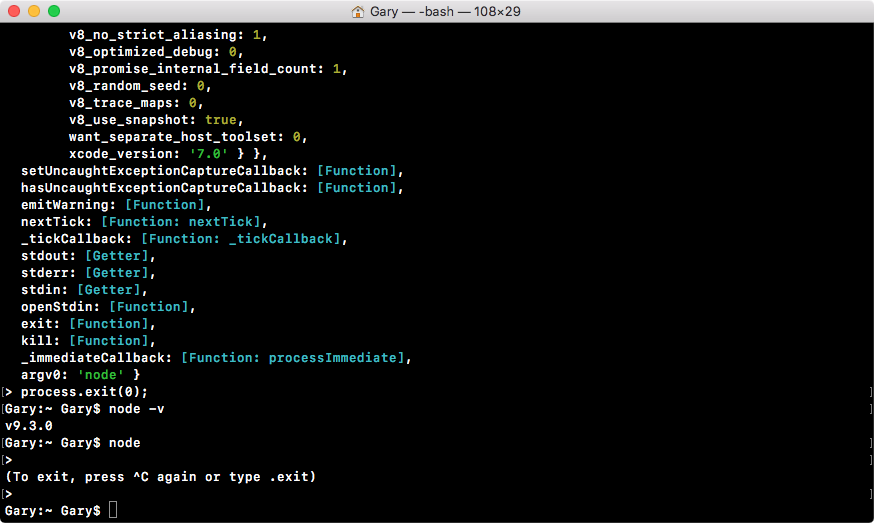
Now that Node has been installed successfully, we can go ahead and verify that by running Node from Terminal. Inside Terminal, I'll shut it down by going to Quit Terminal and open it up again:
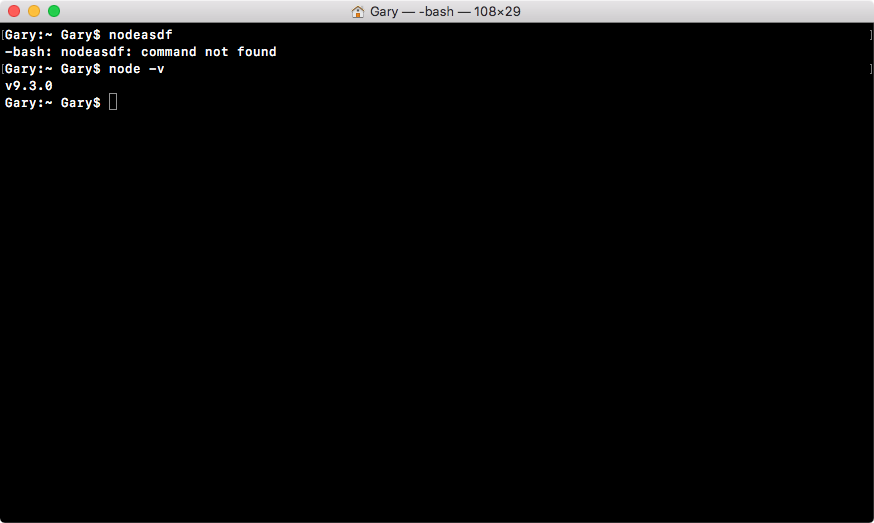
In our case, we restarted things and we can run our brand new command so, we'll type it:
node -v
What we're doing in this command is we're running the Node command, and we're passing in what's called a flag, a hyphen sign followed by a letter. It could be a, it could be j, or in our case it's v. This command will print the version of Node currently installed.
We might get an error like this:
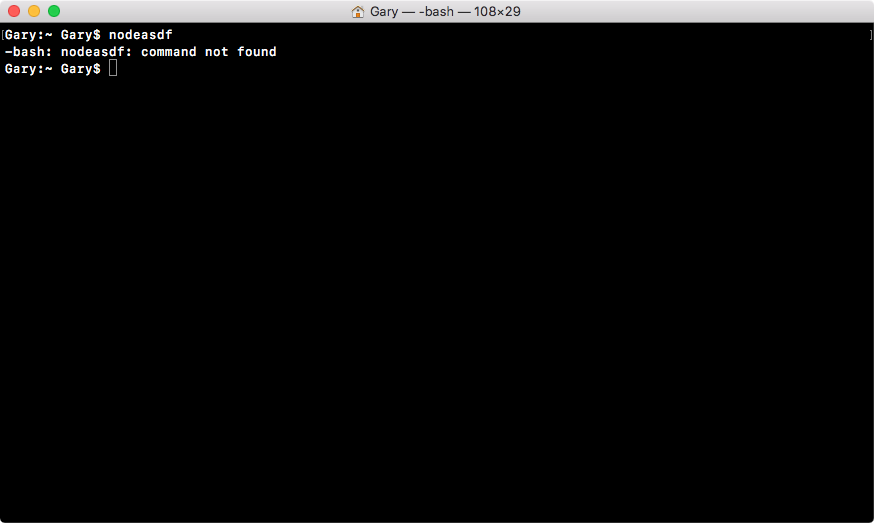
If you try to run a command that doesn't exist, such as nodeasdf, you'll see command not found. If you see this, it usually means the Node installer didn't work correctly, or you haven't run it in the first place.
In our case though, running Node with the v flag should result in a number. In our case, it's version 9.3.0. If you do have Node installed, and you see something like the following screenshot, then you are done. In the next section, we'll start exploring exactly what Node is.
Node came about when the original developers took JavaScript, something you could usually only run inside the browser, and they let it run on your machine as a standalone process. This means that we could create applications using JavaScript outside the context of the browser.
Now, JavaScript previously had a limited feature set. When I used it in the browser, I could do things such as update the URL and remove the Node logo, adding click events or anything else, but I couldn't really do much more.
With Node, we now have a feature set that looks much more similar to other languages, such as Java, Python, or PHP. Some of these are as follows:
These were things that were not possible in the past, and they are because of Node.
Now, both Node and the JavaScript that gets executed inside of your browser, they're both running on the exact same engine. It's called the V8 JavaScript runtime engine. It's an open source engine that takes JavaScript code and compiles it into much faster machine code. And that's a big part of what makes Node.js so fast.
Machine code is low-level code that your computer can run directly without needing to interpret it. Your machine only knows how to run certain types of code, for example, your machine can't run JavaScript code or PHP code directly without first converting it into low-level code.
Using this V8 engine, we can take our JavaScript code, compile it to much quicker machine code, and execute that. This is where all those new features come in. The V8 engine is written in a language called C++. So if you want to extend the Node language, you don't write Node code, you write C++ code that builds off of what V8 already has in place.
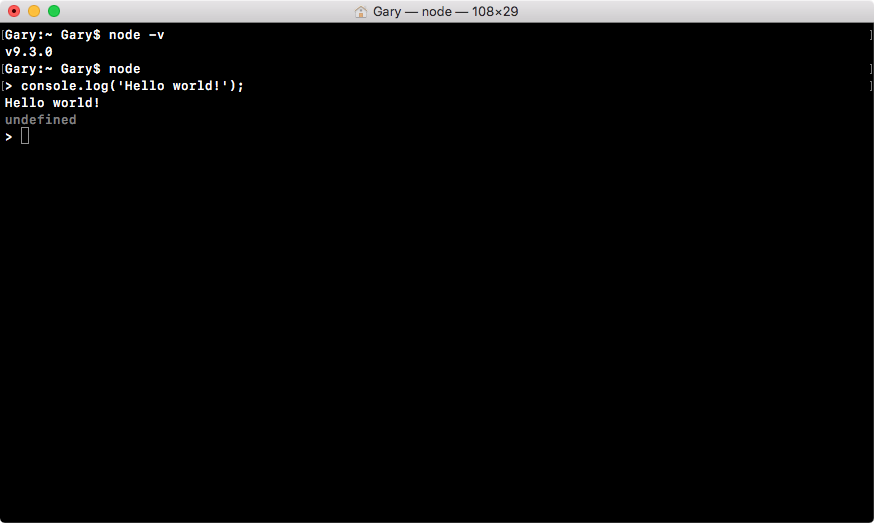
Speaking of JavaScript code, let's start writing some inside Terminal. Now, throughout the book, we'll be creating files and executing those files, but we can actually create a brand new Node process by running the node command.
Referring to the following screenshot, I have a little right caret, which is waiting for JavaScript Node code, not a new command-prompt command:
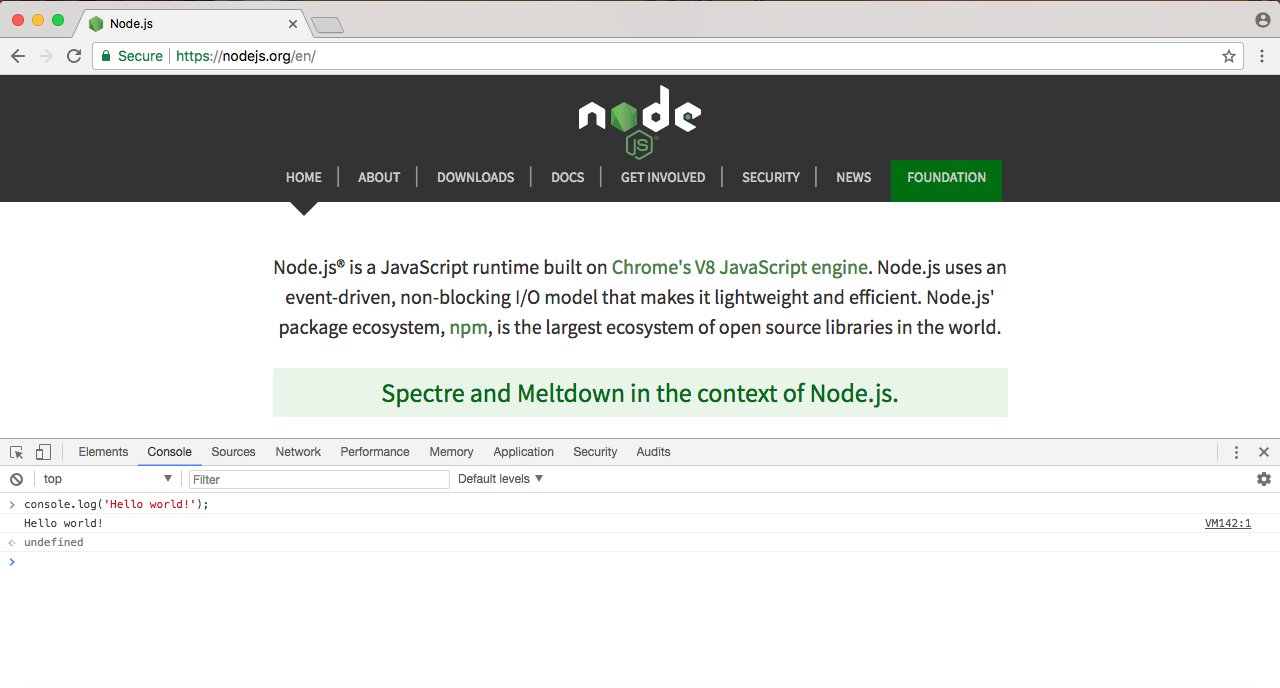
This means that I can run something like console.log, which, as you probably already know, logs a message to the screen. log is a function, so I'll call it as such, opening and closing my parentheses, and passing in a string inside two single quotes, a message Hello world!, as shown in the following command line:
console.log('Hello world!');
This will print Hello world to the screen. If I hit enter, Hello world! prints just like you'd expect, as shown in the following code output:
Now, what actually happened behind the scenes? Well, this is what Node does. It takes your JavaScript code, it compiles it into machine code, and executes it. In the preceding code, you can see it executed our code, printing out Hello world!. Now, the V8 engine is running behind the scenes when we execute this command, and it's also running inside the Chrome browser.
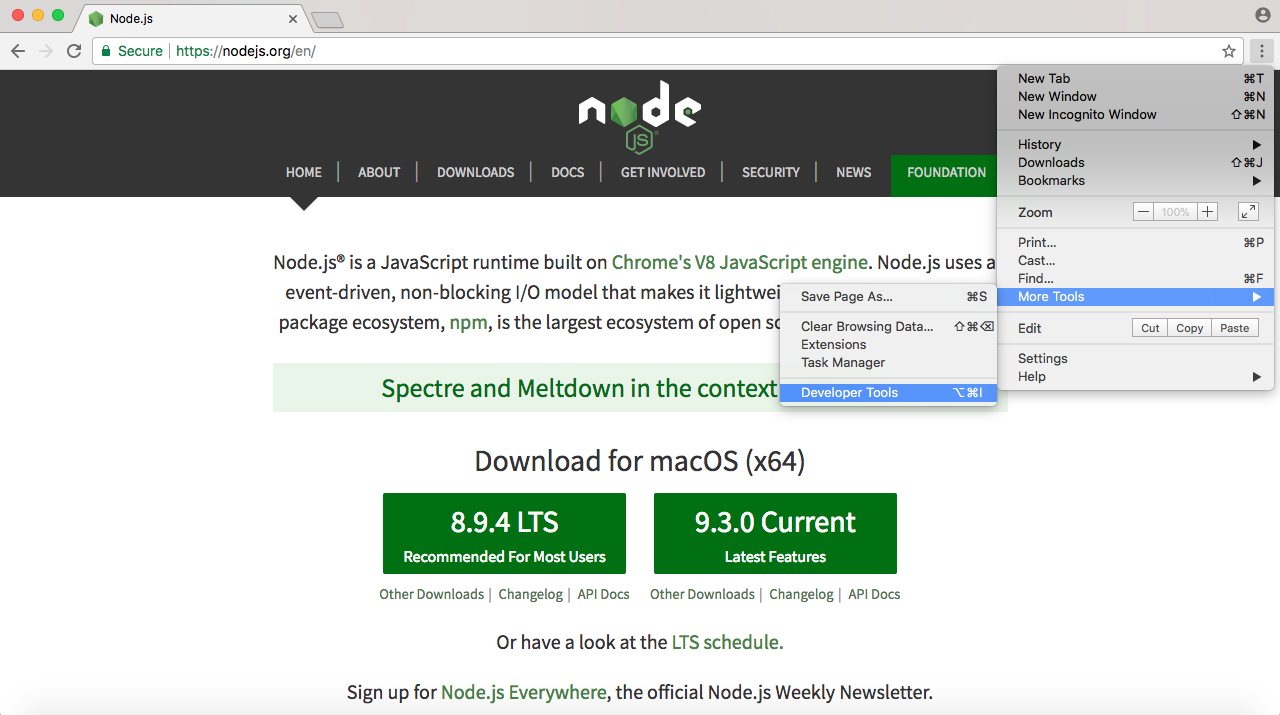
If I open up the developer tools in Chrome by going to Settings | More Tools | Developer Tools:
I can ignore most of the things. I'm just looking for the Console tab, as shown in the following screenshot:
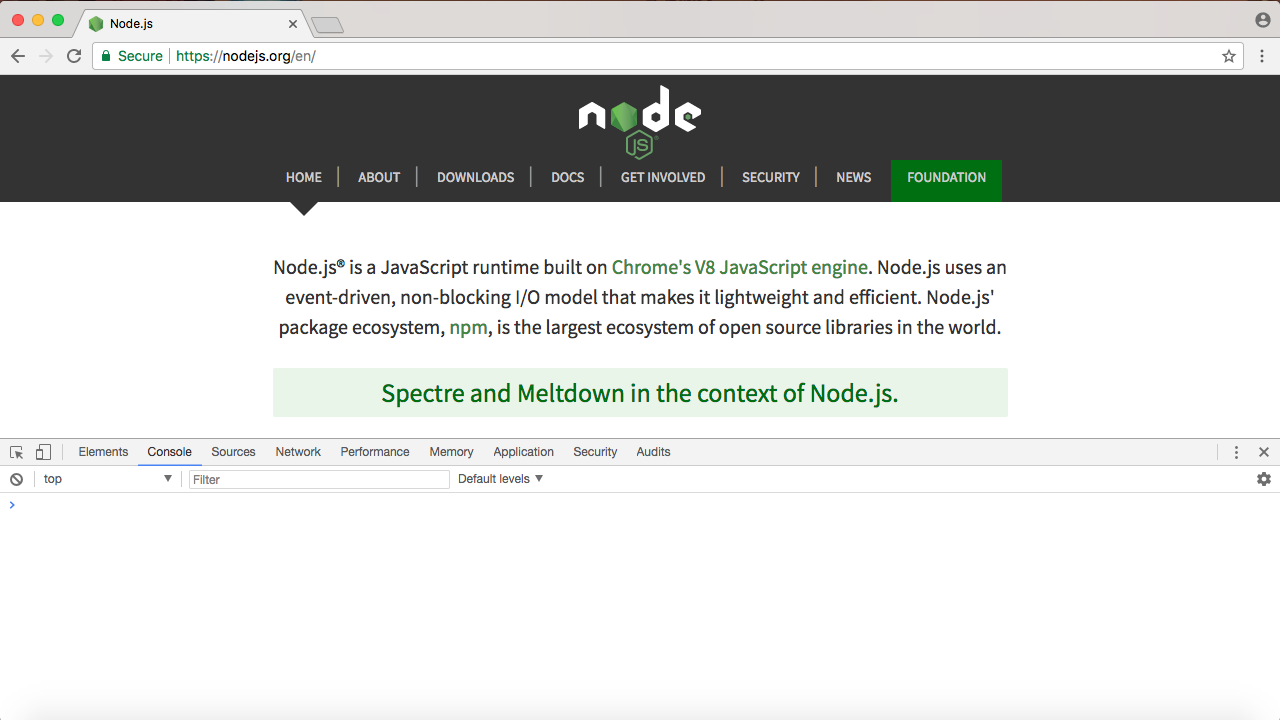
The preceding screenshot showing the console is a place where we can run some JavaScript code. I can type the exact same command, console.log('Hello world!'); and run it:
As you can see in the preceding screenshot, Hello world! prints to the screen, which is the exact same result we got when we ran it up earlier using Terminal. In both cases, we're running it through the V8 engine, and in both cases the output is the same.
Now, we already know that the two are different. Node has features such as filesystem manipulation, and the browser has features such as manipulating what's shown inside the window. Let's take a quick moment to explore their differences.
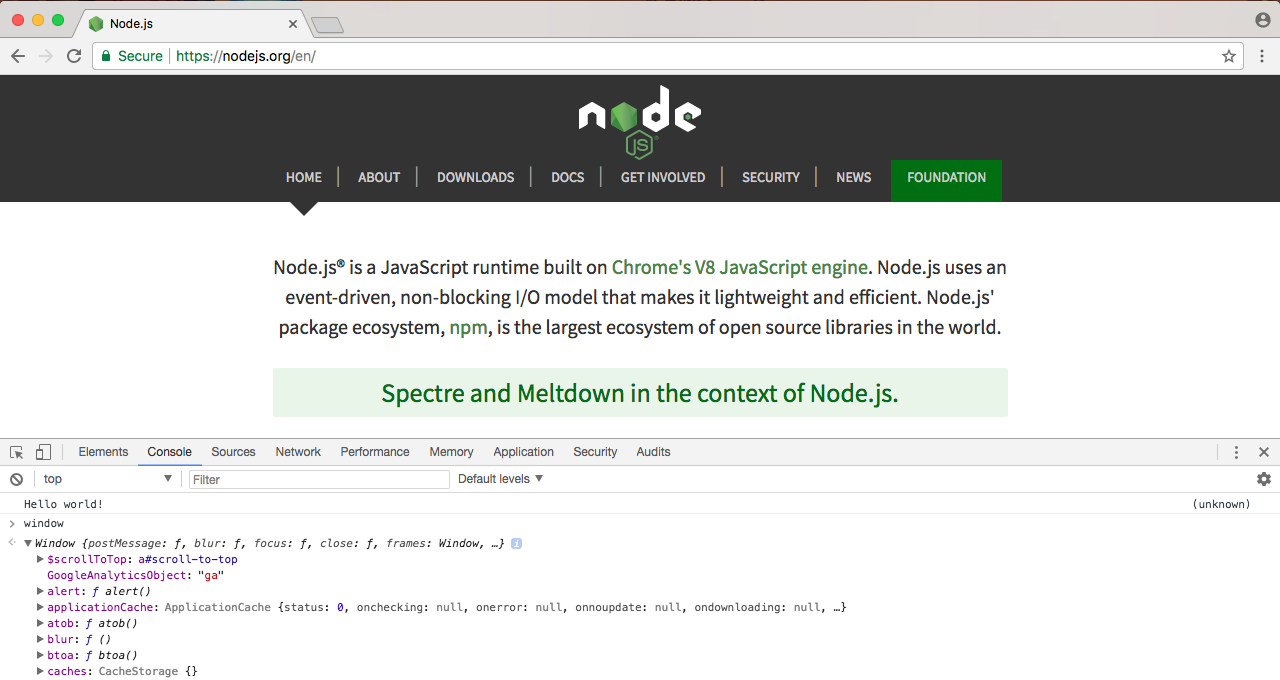
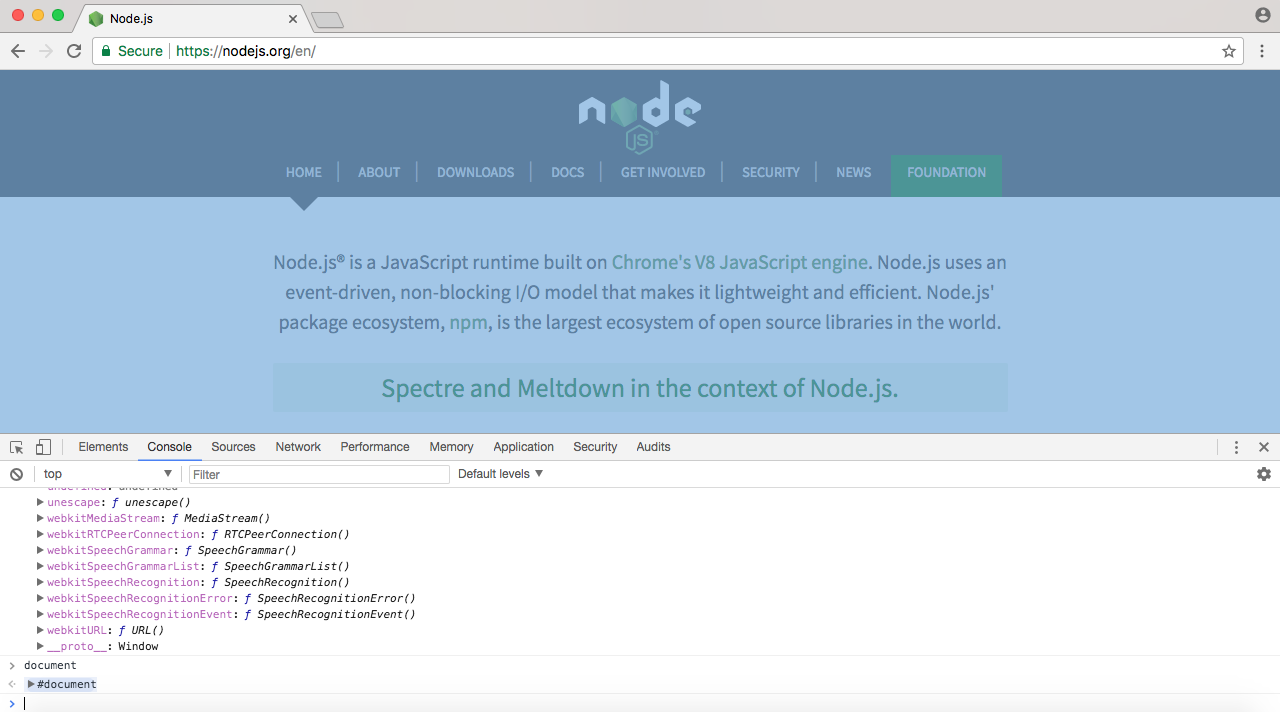
Inside the browser, you've probably used window if you've done any JavaScript development:

Window is the global object, it stores basically everything you have access to. In the following screenshot, you can see things such as array, we have all sorts of CSS manipulation and Google Analytics keywords; essentially every variable you create lives inside Window:
We have something similar inside Node called global, as shown here:
It's not called window because there is no browser window in Node, thus it is called global. The global object stores a lot of the same things as window. In the following screenshot, you can see methods that might be familiar, such as setTimeout and setInterval:
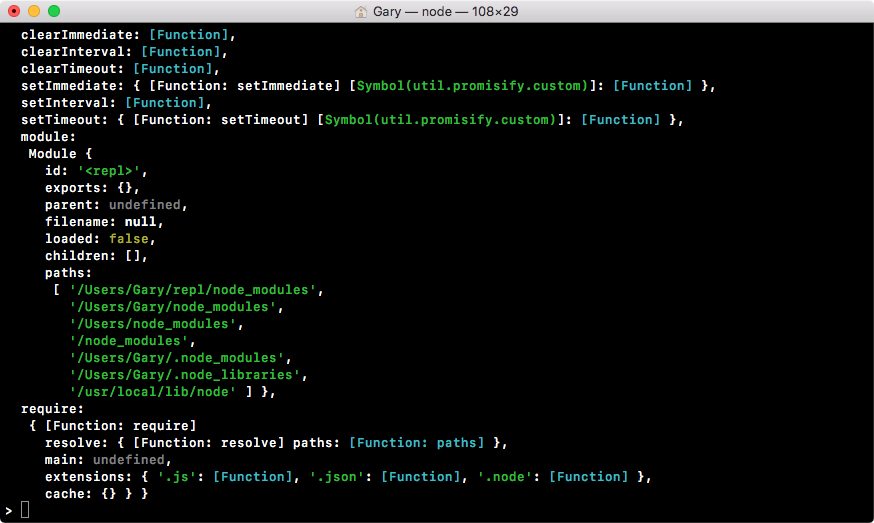
If we look at this code screenshot, we have most of the things that are defined inside the window, with some exceptions, as shown in the following screenshot:
Now, inside the Chrome browser, I also have access to document:
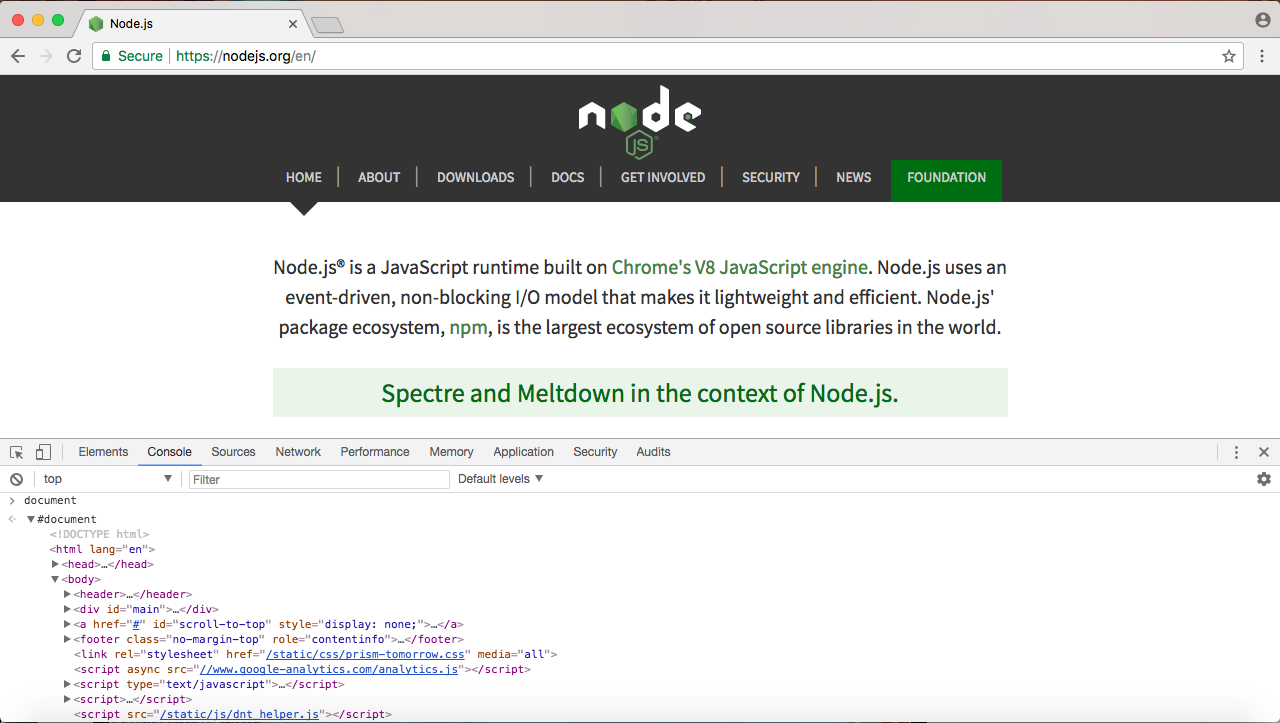
The document object stores a reference to the Document Object Model (DOM) in the Node website. The document object shows exactly what I have inside the browser's viewport, as shown in the following screenshot:
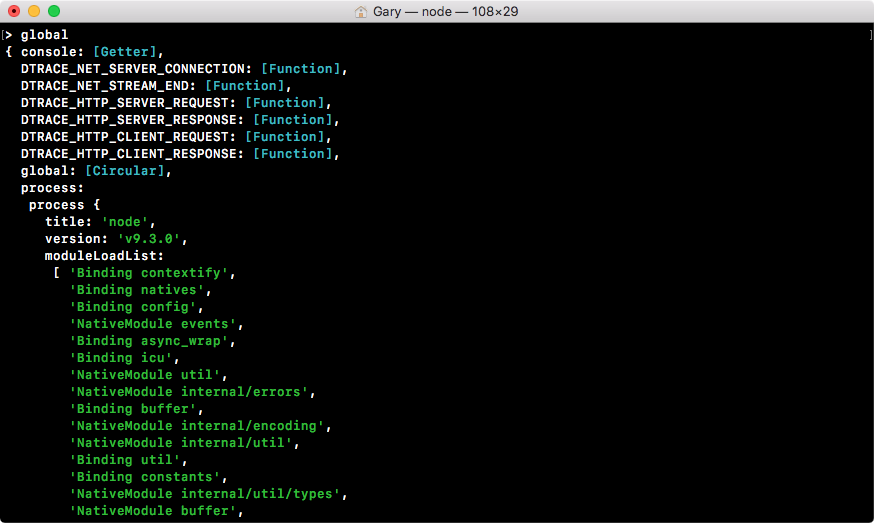
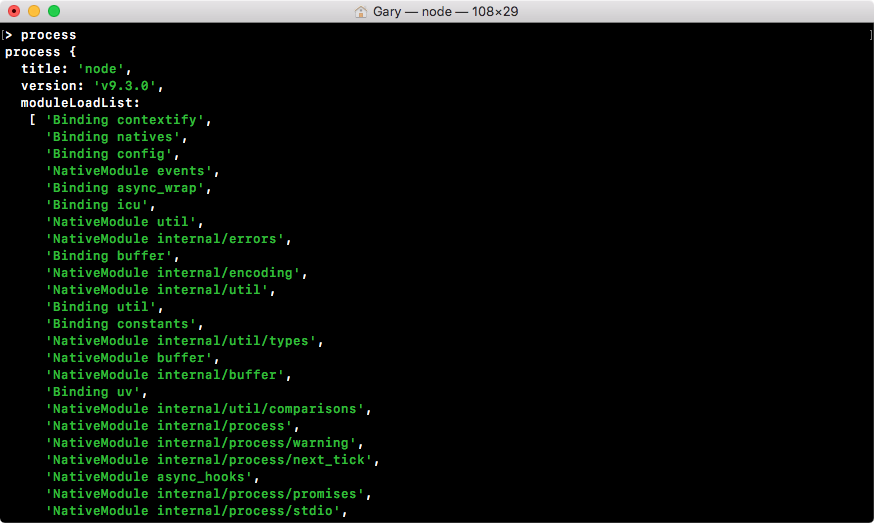
I can make changes to the document to update what gets shown up on the browser's viewport. Now, obviously we don't have this HTML document inside Node, but we do have something similar, which is called process. You can view it by running process from Node, and in the following screenshot, we have a lot of information about the specific Node process that's being executed:
There's also methods available here to shut down the current Node process. What I'd like you to do is run the process.exit command, passing in as an argument the number zero, to say that things exited without error:
process.exit(0);
When I run this command, you can see I'm now back at the command prompt, as shown in the following screenshot:
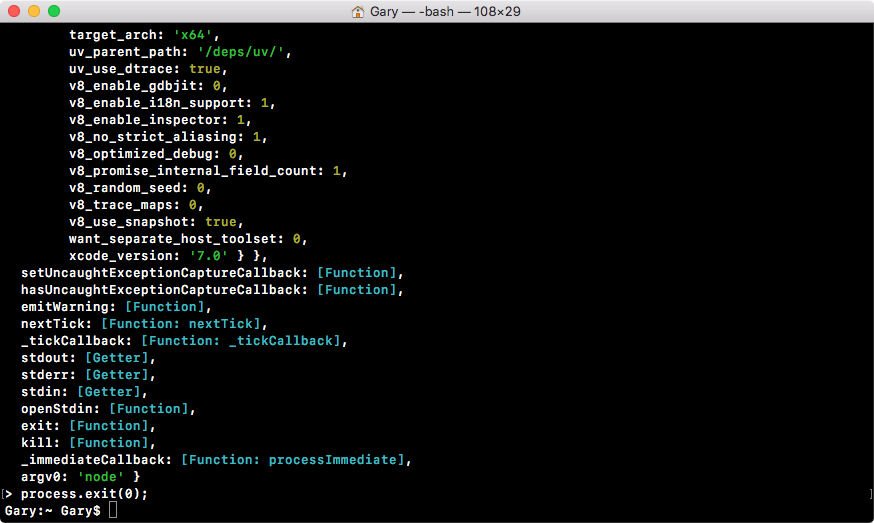
I've left Node, and I'm at a place where I can run any regular command prompt command, such as checking my Node version. I can always get back into Node by running node, and I can leave it without using the process.exit command by using control + C twice.
Now, I'm back at my regular command prompt. So, these are the notable differences, obviously inside the browser you have the viewable area, window gets changed to global, and a document basically becomes process. Now, obviously that's a generalization, but those are some of the big picture changes. We'll be exploring all the minutiae throughout the book.
Now, when someone asks you what is Node? You can say Node's a JavaScript runtime that uses the V8 engine. When they ask you what the V8 engine is, you can say the V8 engine is an open source JavaScript engine written in C++ that takes JavaScript code and compiles it to machine code. It's used inside Node.js and it's used in the Chrome browser.
In this section, we'll cover the why behind Node.js. Why is it so good at creating backend apps? And why is it becoming so popular with companies such as Netflix, Uber and Walmart, who are all using Node.js in production?
As you might have noticed since you're taking this course, when people want to learn a new backend language, more and more they're turning to Node as the language they want to learn. The Node skillset is in hot demand, for both frontend developers who need to use Node day to day to do things such as compile their applications, to engineers who are creating applications and utilities using Node.js. All of this has made Node the backend language of choice.
Now, if we look at the homepage of Node, we have three sentences, as shown in the following screenshot:
In the previous section, we addressed the first sentence. We took a look at what Node.js is. There's only three sentences in the image, so in this section, we'll take a look at the second two sentences. We'll read them now, then we'll break it down, learning exactly why Node is so great.
The first sentence, Node.js uses an event-driven, non-blocking I/O model that makes it lightweight and efficient; we'll explore all of this now. The second sentence we'll explore at the end of the section—Node.js' packaged ecosystem, npm, is the largest ecosystem of open source libraries in the world. Now, these two sentences have a ton of information packed into them.
We'll go over a few code examples, we'll dive into some charts and graphs, and we'll explore what makes Node different and what makes it so great.
Node is an event-driven, non-blocking language. Now, what is I/O? I/O is something that your application does all of the time. When you're reading or writing to a database, that is I/O, which is short form for input/output.
This is the communication from your Node application to other things inside of the Internet of Things. This could be a database read and write request, you may be changing some files on your filesystem, or you may be making an HTTP request to a separate web server, such as a Google API for fetching a map for the user's current location. All of these use I/O, and I/O takes time.
Now, the non-blocking I/O is great. That means while one user is requesting a URL from Google, other users can be requesting a database file read and write access, they can be requesting all sorts of things without preventing anyone else from getting some work done.
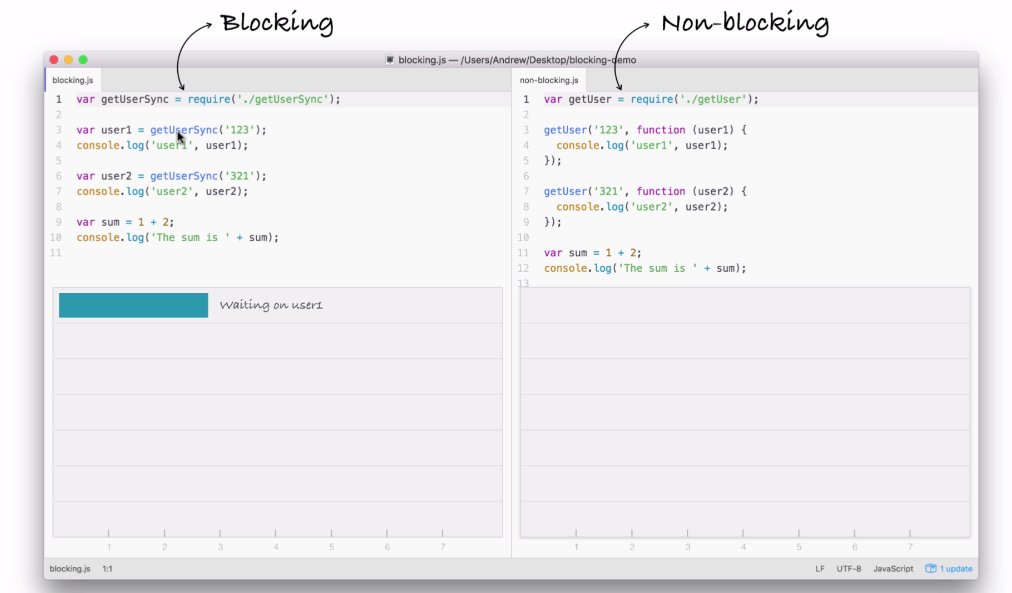
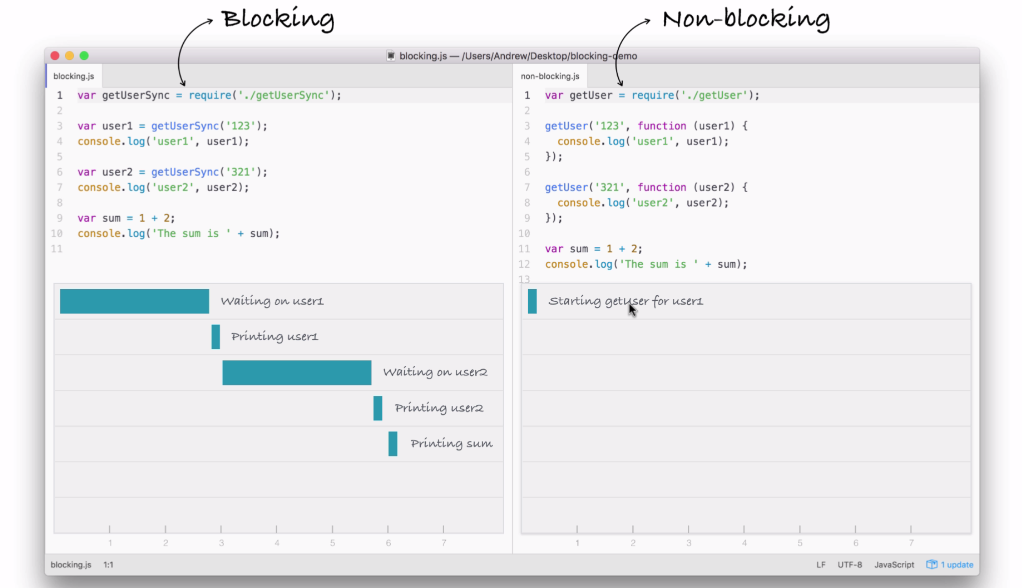
Let's go ahead and take a look at the differences between blocking and non blocking software development:
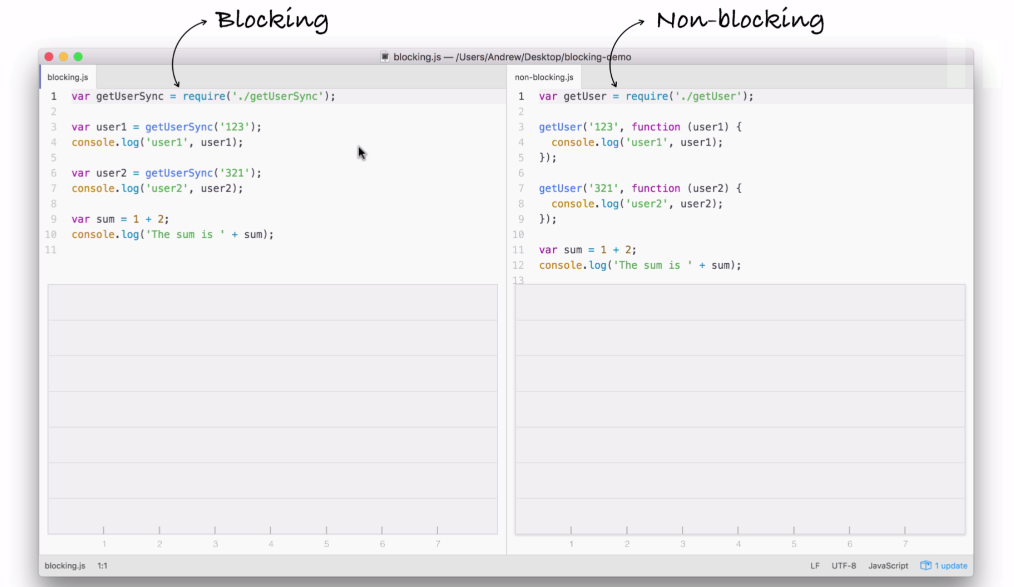
In the preceding screenshot, I have two files that we'll be executing. But before going to that, first let's explore how each of these files operates, the steps that are required in order to finish the program.
This will help us understand the big differences between blocking, which I have on the left side of the image, which is not what Node uses, and non-blocking is on the right side, which is exactly how all of our Node applications in the book are going to operate.
You don't have to understand the individual details, such as what require is, in order to understand what's going on in this code example. We'll be breaking things down in a very general sense. The first line on each code is responsible for fetching a function that gets called. This function will be our simulated I/O function that is going to a database, fetching some user data and printing it to the screen.
Refer to the preceding code image. After we load in the function, both files try to fetch a user with an ID of 123. When it gets that user, it prints it to the screen with the user1 string first, and then it goes on and it fetches the user with 321 as the ID. And it prints that to the screen. And finally both files add up 1 + 2, storing the result, which is 3, in the sum variable and print it to the screen.
Now, while they all do the same thing, they do it in very different ways. Let's break down the individual steps. In the following code image, we'll go over what Node executes and how long it takes:
You can consider the seconds shown in the preceding screenshot; it doesn't really matter, it's just to show the relative operating speed between the two files.
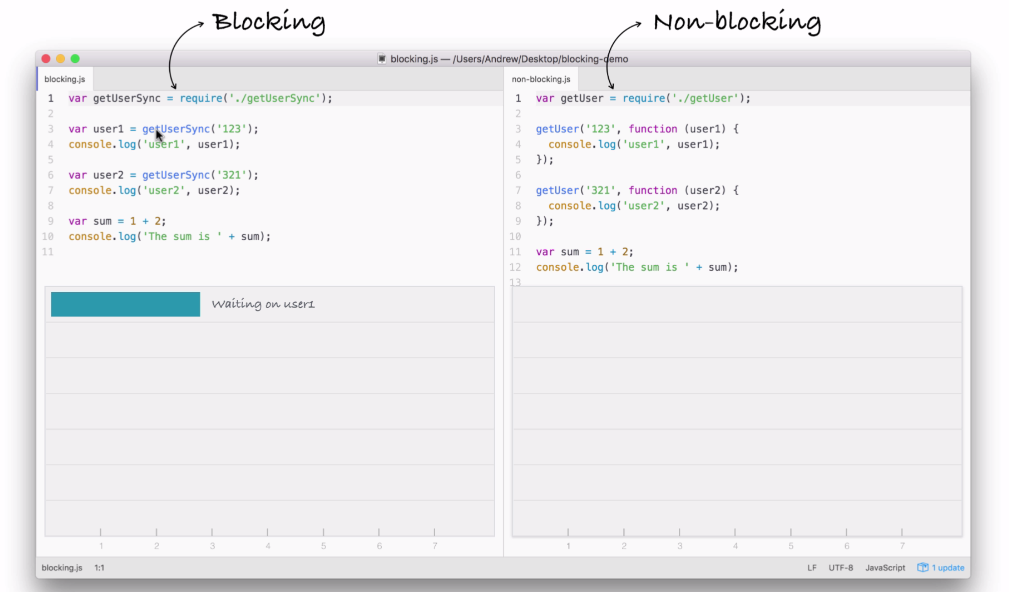
The blocking example can be illustrated as follows:
The first thing that happens inside our blocking example, as shown in the preceding screenshot, is that we fetch the user on line 3 in the code:
var user1 = getUserSync('123');
Now, this request requires us to go to a database, which is an I/O operation to fetch that user by ID. This takes a little bit of time. In our case, we'll say it takes three seconds.
Next, on line 4 in the code, we print the user to the screen, which is not an I/O operation and it runs right away, printing user1 to the screen, as shown in the following code:
console.log('user1', user1);
As you can see in the following screenshot, it takes almost no time at all:
Next up, we wait on the fetching of user2:
var user2 = getUserSync('321');
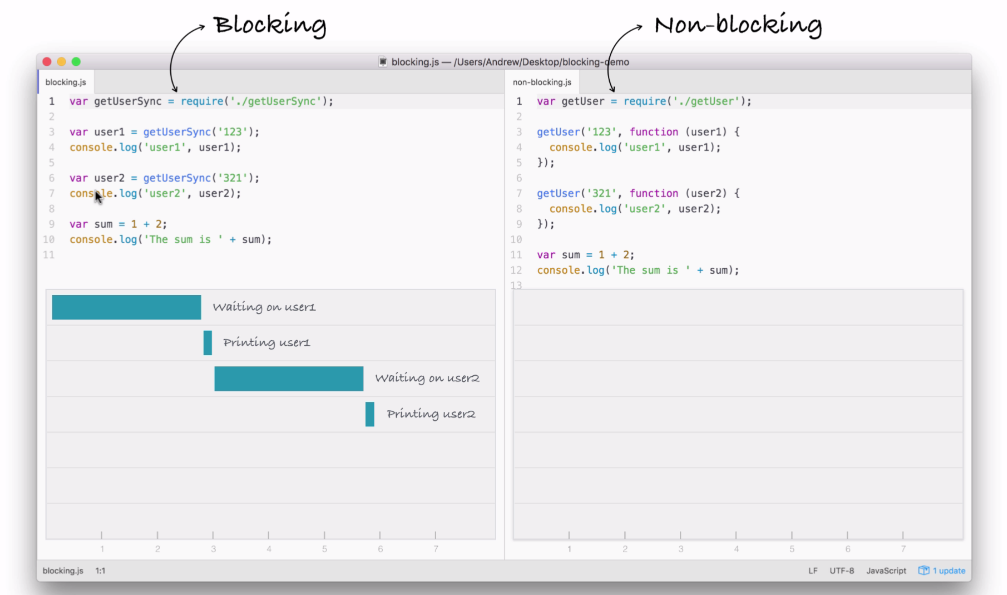
When user2 comes back, as you might expect, we print it to the screen, which is exactly what happens on line 7:
console.log('user2', user2);
Finally, we add up our numbers and we print it to the screen:
var sum = 1 + 2;
console.log('The sum is ' + sum);
None of this is I/O, so right here we have our sum printing to the screen in barely any time.
This is how blocking works. It's called blocking because while we're fetching from the database, which is an I/O operation, our application cannot do anything else. This means our machine sits around idle waiting for the database to respond, and can't even do something simple like adding two numbers and printing them to the screen. It's just not possible in a blocking system.
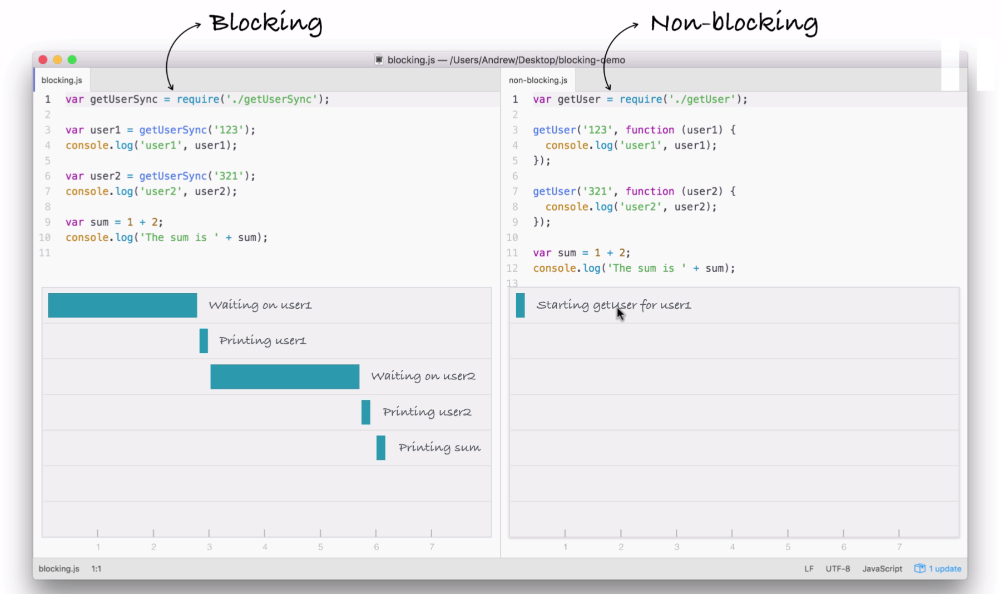
In our non-blocking example, this is how we'll be building our Node applications.
Let's break this code example down line by line. First up, things start much the same way as we discussed in the blocking example. We'll start the getUser function for user1, which is exactly what we did earlier:
But we're not waiting, we're simply kicking off that event. This is all part of the event loop inside Node.js, which is something we'll be exploring in detail.
Notice it takes a little bit of time; we're just starting the request, we're not waiting for that data. The next thing we do might surprise you. We're not printing user1 to the screen because we're still waiting for that request to come back, instead we start the process of fetching our user2 with the ID of 321:
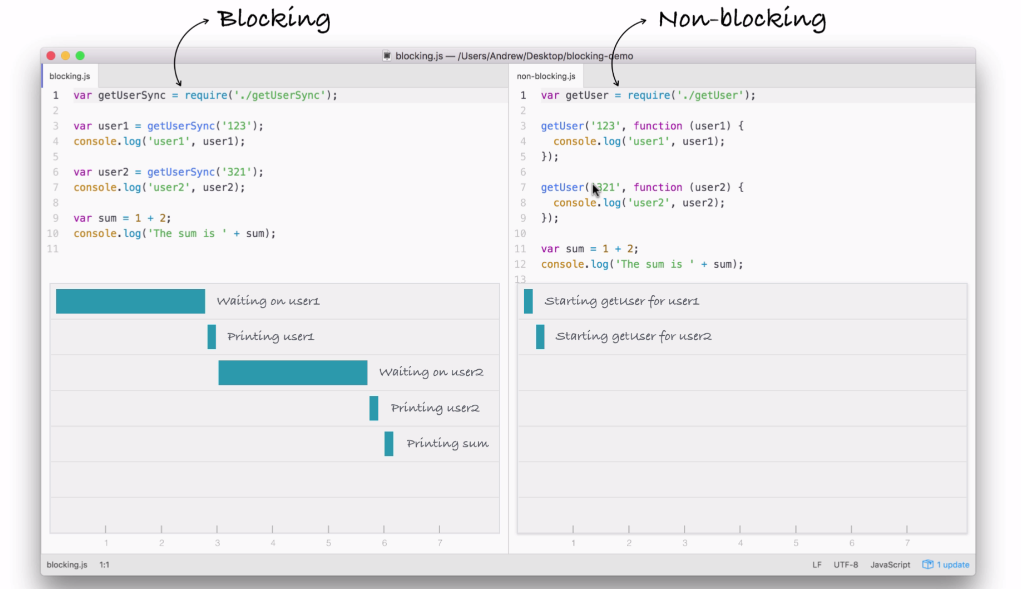
In this part of the code, we're kicking off another event, which takes just a little bit of time to do-it is not an I/O operation. Now, behind the scenes, the fetching of the database is I/O, but starting the event, calling this function is not, so it happens really quickly.
Next up, we print the sum. The sum doesn't care about either of the two user objects. They're basically unrelated, so there's no need to wait for the users to come back before I print that sum variable, as shown in the following screenshot:
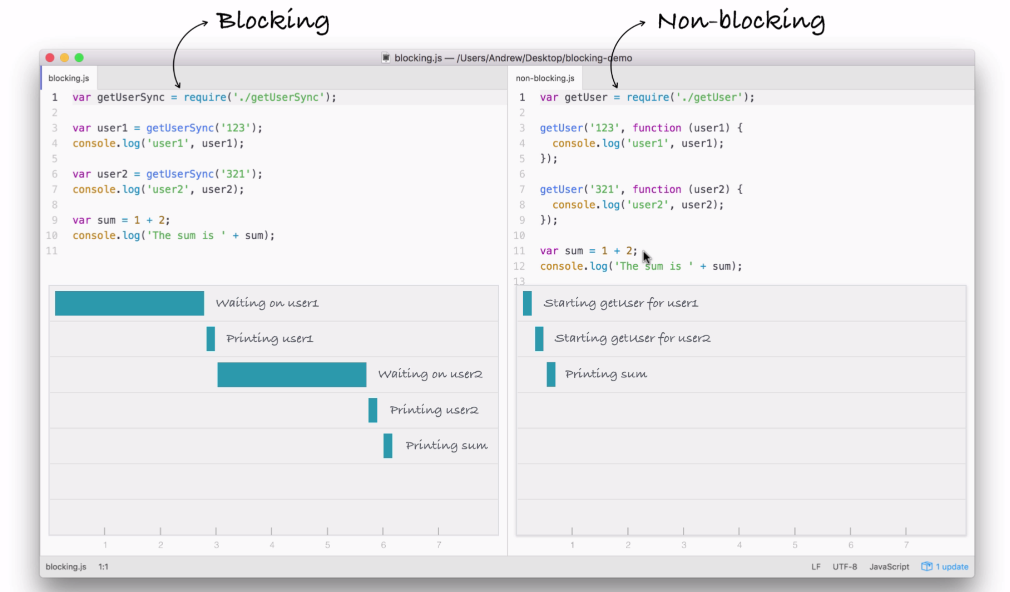
What happens after we print the sum? Well, we have the dotted box, as shown in the following screenshot:
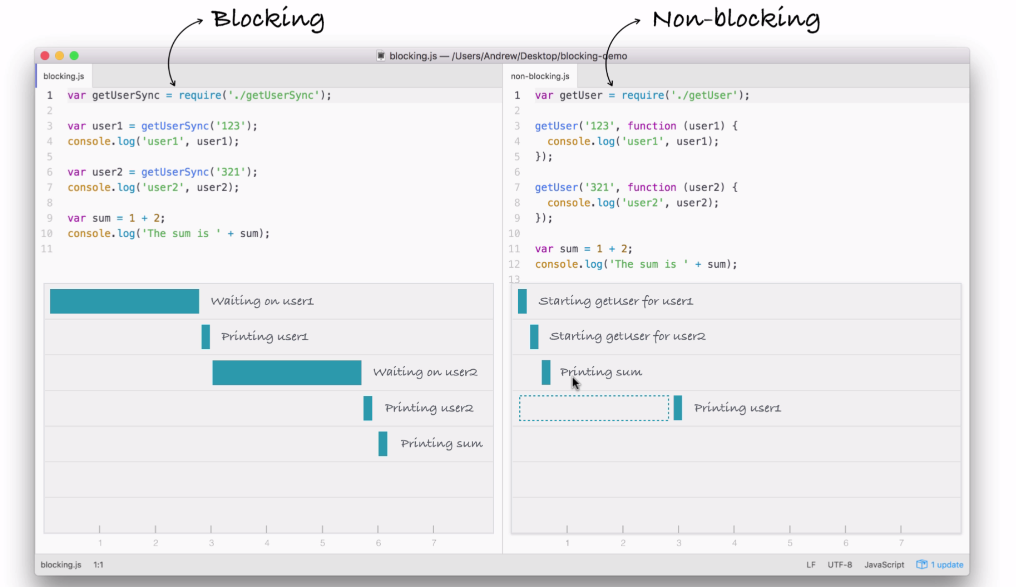
This box signifies the simulated time it takes for our event to get responded to. Now, this box is the exact same width as the box in the first part of the blocking example (waiting on user1), as shown here:
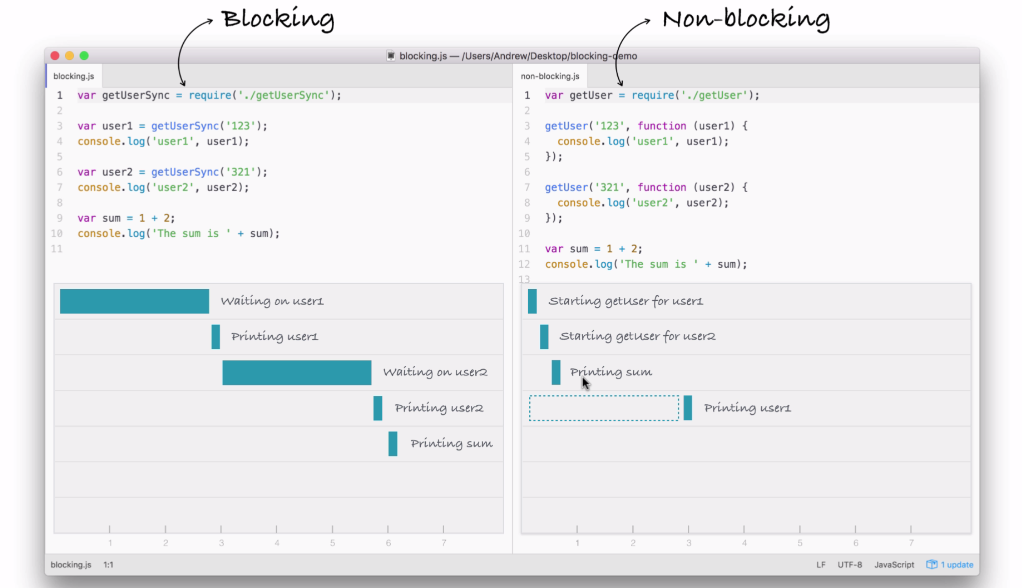
Using non-blocking doesn't make our I/O operations any faster, but what it does do is it lets us run more than one operation at the same time.
In the non-blocking example, we start two I/O operations before the half second mark, and in between three and a half seconds, both come back, as shown in the following screenshot:

Now, the result here is that the entire application finishes much quicker. If you compare the time taken in executing both the files, the non-blocking version finishes in just over three seconds, while the blocking version takes just over six seconds. A difference of 50%. This 50% comes from the fact that in blocking, we have two requests each taking three seconds, and in non-blocking, we have two requests each taking three seconds, but they run at the same time.
Using the non-blocking model, we can still do stuff like printing the sum without having to wait for our database to respond. Now, this is the big difference between the two; blocking, everything happens in order, and in non-blocking we start events, attaching callbacks, and these callbacks get fired later. We're still printing out user1 and user2, we're just doing it when the data comes back, because the data doesn't come back right away.
Inside Node.js, the event loop attaches a listener for the event to finish, in this case for that database to respond back. When it does, it calls the callback you pass in the non-blocking case, and then we print it to the screen.
In a blocking context, we could handle two requests on two separate threads, but that doesn't really scale well, because for each request we have to beef up the amount of CPU and RAM resources that we're using for the application, and this sucks because those threads, are still sitting idle. Just because we can spin up other threads doesn't mean we should, we're wasting resources that are doing nothing.
In the non-blocking case, instead of wasting resources by creating multiple threads, we're doing everything on one thread. When a request comes in, the I/O is non-blocking so we're not taking up any more resources than we would be if it never happened at all.
Let's run these examples in real time and see what we get. And we have the two files (blocking and non-blocking files) that we saw in the previous section.
We'll run both of these files, and I'm using the Atom editor to edit my text files. These are things we'll be setting up later in the section, this is just for your viewing purpose, you don't need to run these files.
Now, the blocking and non-blocking files, will both get run and they'll do similar things to those we did in the previous section, just in a different way. Both use I/O operations, getUserSync and getUser, that take five seconds apiece. The time is no different, it's just the order they execute in that makes the non-blocking version much quicker.
Now, to simulate and show how things work, I'll add a few console.log statements as shown in the following code example, console.log('starting user1'), console.log('starting user2').
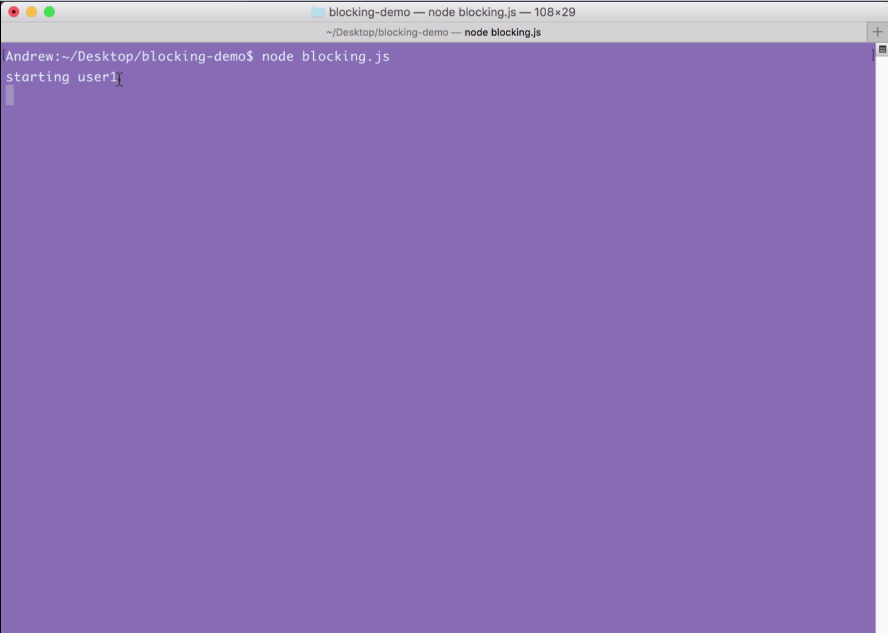
This will let us visualize how things work inside Terminal. By running node blocking.js, this is how we run files. We type node and we specify the filename, as shown in the following code:
node blocking.js
When I run the file, we get some output. starting user1 prints to the screen and then it sits there:
Now, we have the user1 object printing to the screen with the name Andrew, and starting user2 prints to the screen, as shown in the following code output:
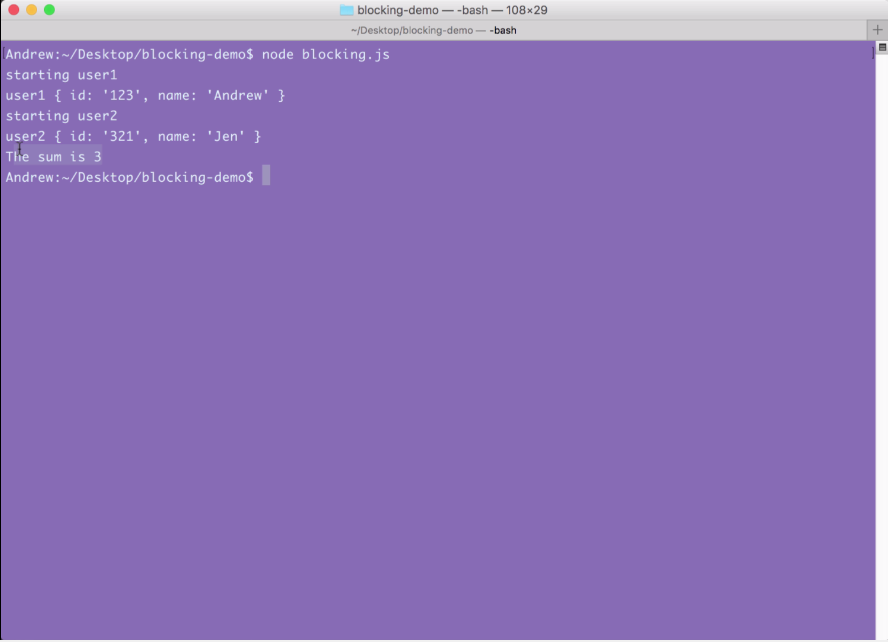
After that, the user2 object comes back around five seconds later with the name of Jen.
As shown in the preceding screenshot, our two users have printed to the screen, and at the very end our sum, which is 3, prints to the screen; everything works great.
Notice that starting user1 was immediately followed by the finishing of user1, and starting user2 was immediately followed by the finishing of user2 because this is a blocking application.
Now, we'll run the non-blocking file, which I've called non-blocking.js. When I run this file, starting user1 prints, starting user2 prints, then the sum prints all back to back:
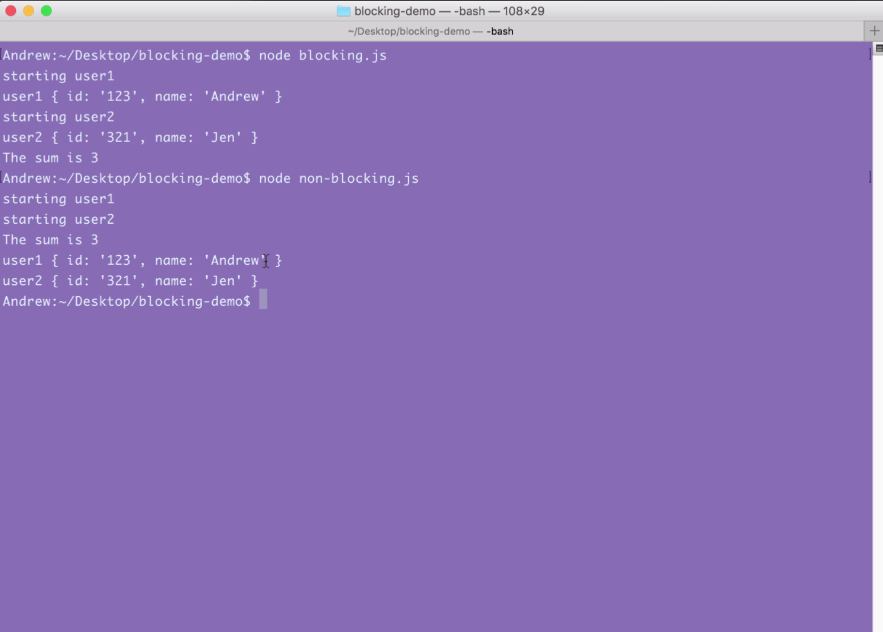
Around 5 seconds later, at basically the same time, user1 and user2 both print to the screen.
This is how non-blocking works. Just because we started an I/O operation doesn't mean we can't do other things, such as starting another one and printing some data to the screen, in this case just a number. This is the big difference, and this is what makes non-blocking apps so fantastic. They can do so many things at the exact same time without having to worry about the confusion of multi-threading applications.
Let's move back into the browser and take a look at those sentences again in the Node website:

Node.js uses an event-driven, non-blocking I/O model that makes it lightweight and efficient, and we saw that in action.
Because Node is non-blocking, we were able to cut down the time our application took by half. This non-blocking I/O makes our apps super quick, this is where the lightweight and efficient comes into play.
Now, let's go to the last sentence on the Node website, as shown in the following screenshot:
Node.js' package ecosystem, npm, is the largest ecosystem of open-source libraries in the world. This is what really makes Node fantastic. This is the cherry on top-the community, the people every day developing new libraries that solve common problems in your Node.js applications.
Things such as validating objects, creating servers, and serving up content live using sockets. There's libraries already built for all of those so you don't have to worry about this. This means that you can focus on the specific things related to your application without having to create all this infrastructure before you can even write real code, code that does something specific to your apps use case.
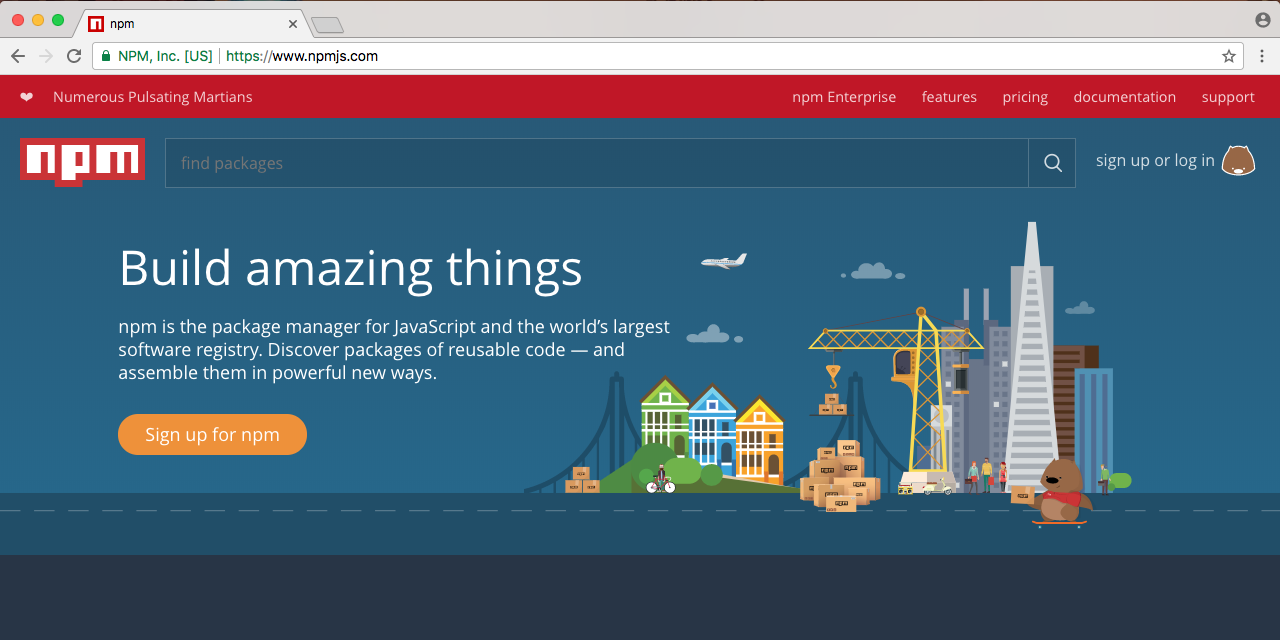
Now, npm, which is available on npmjs.org, is the site we'll be turning to for a lot of third-party modules:
If you're trying to solve a problem in Node that sounds generic, chances are that someone's already solved it. For example, if I want to validate some objects, let's say I want to validate that a name property exists and that there's an ID with a length of three. I could go into Google or go into npm; I usually choose Google, and I could Google search npm validate object.
When I google that, I'll just look for results from npmjs.com, and you can find the first three or so are from that:
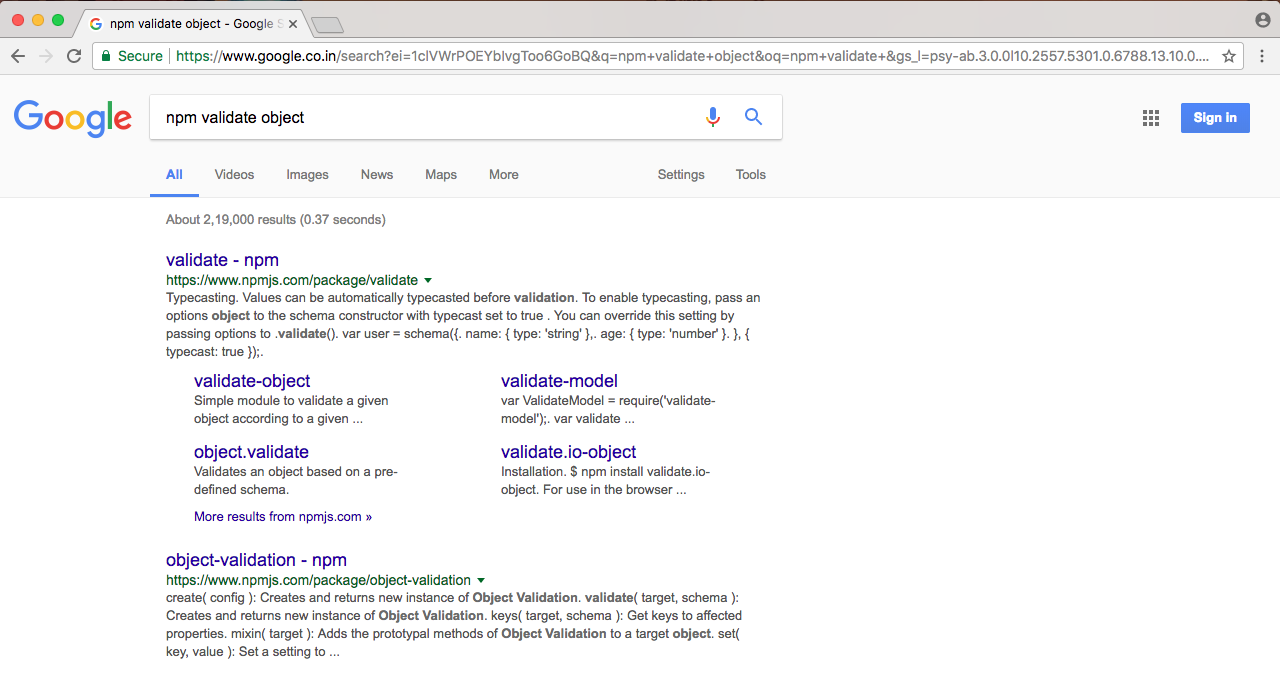
I can click the first one, and this will let me explore the documentation and see if it's right for me:
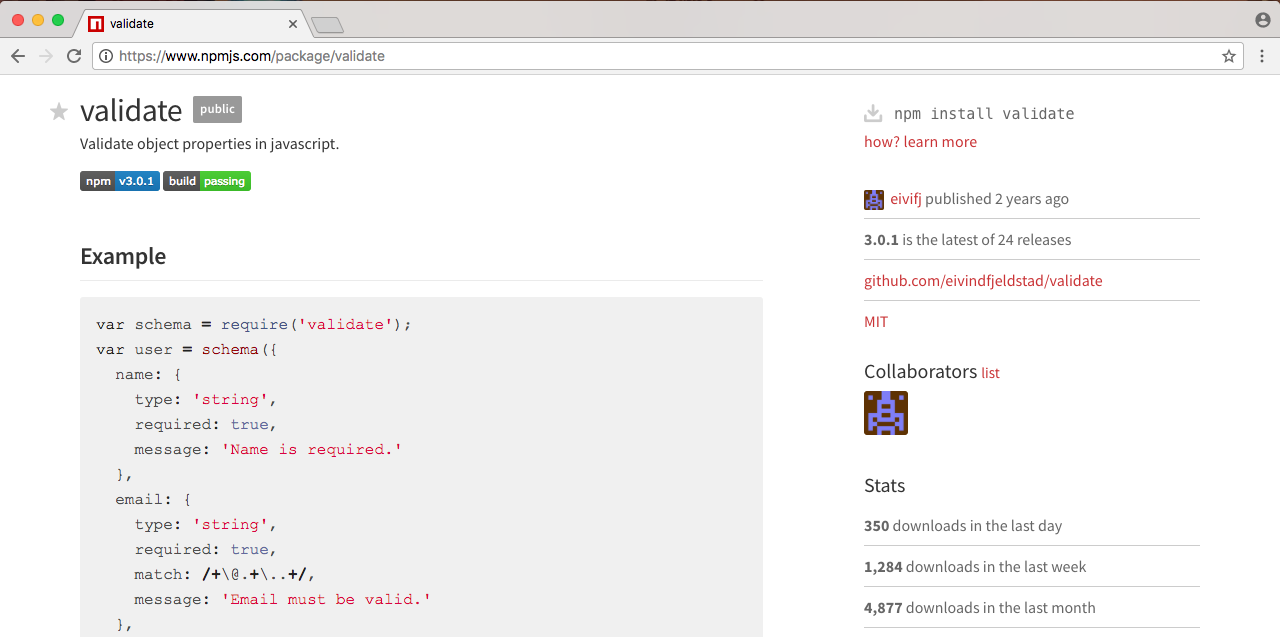
This one looks great, so I can add it to my app without any effort.
Now, we'll go through this process. Don't worry, I'm not going to leave you high and dry on how to add third-party modules. We'll be using a ton of them in the book because this is what real Node developers do. They take advantage of the fantastic community of developers, and that's the last thing that makes Node so great.
This is why Node has come to the position of power that it currently sits at, because it's non-blocking, meaning it's great for I/O applications, and it has a fantastic community of developers. So, if you ever want to get anything done, there's a chance someone already wrote the code to do it.
This is not to say you should never use Rails or Python or any other blocking language again, that is not what I'm getting at. What I'm really trying to show you is the power of Node.js and how you can make your applications even better. Languages like Python have things such as the library Twisted, which aims to add non-blocking features to Python. Though the big problem is all of the third-party libraries, as they are still written in a blocking fashion, so you're really limited as to which libraries you can use.
Since Node was built non-blocking from the ground up, every single library on npmjs.com is non-blocking. So you don't have to worry about finding one that's non blocking versus blocking; you can install a module knowing it was built from the ground up using a non blocking ideology.
In the next couple of sections, you'll be writing your very first app and running it from Terminal.
In this section, I want to give you a tour of the various text editors you can use for this book. If you already have one you love using, you can keep using the one you have. There's no need to switch editors to get anything done in this book.
Now, if you don't have one and you're looking for a few options, I always recommend using Atom, which you can find at atom.io. It's free, open source, and it's available on all operating systems, Linux, macOS, and Windows. It's created by the folks behind GitHub and it's the editor that I'll be using inside of this book. There's an awesome community of theme and plug-in developers so you really can customize it to your liking.
Now, aside from Atom there are a few other options. I've heard a lot of people talking about Visual Studio Code. It is also open source, free, and available on all operating systems. If you don't like Atom, I highly recommend you check this out, because I've heard so many good things by word of mouth.
Next up, we always have Sublime Text, which you can find at sublimetext.com. Now, Sublime Text is not free and it's not open source, but it's a text editor that a lot of folks do enjoy using. I prefer Atom because it's very similar to Sublime Text, though I find it snappier and easier to use, plus it's free and open source.
Now, if you are looking for a more premium editor with all of the bells and whistles in IDE as opposed to a text editor, I always recommend JetBrains. None of their products are free, though they do come with a 30-day free trial, but they really are the best tools of the trade. If you find yourself in a corporate setting or you're at a job where the company is willing to pay for an editor, I always recommend that you go with JetBrains. All of their editors come with all of the tools you'd expect, such as version control integration, debugging tools, and deploying tools built in.
So, take a moment, download the one you want to use, play around with it, make sure it fits your needs, and if not, try another one.
In this section, you will be creating and running your very first Node app. Well, it will be a simple one. It'll demonstrate the entire process, from creating files to running them from Terminal.
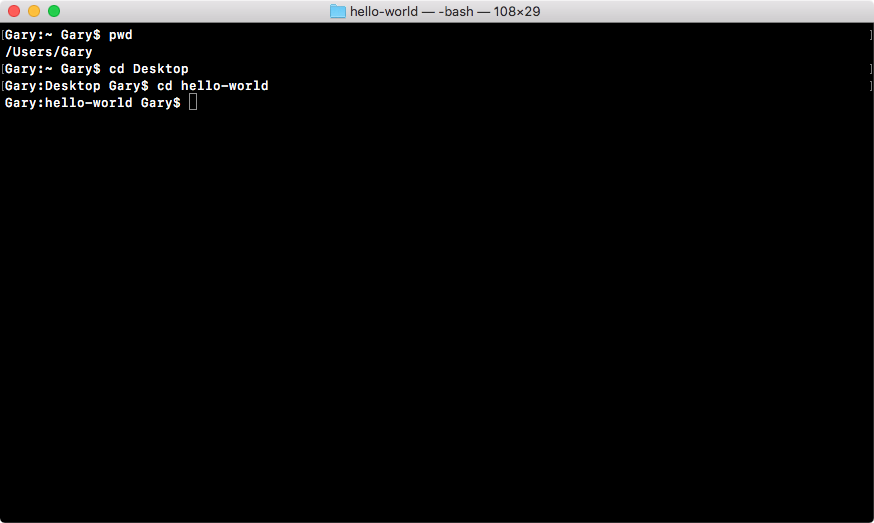
The first step will be to create a folder. Every project we create will go live inside of its own folder. I'll open up the Finder on macOS and navigate to my desktop. What I'd like you to do is open up the desktop on your OS, whether you're on Linux, Windows, or macOS, and create a brand new folder called hello-world.
Now I'll use command + O (Ctrl + O for Windows users) to open up, and I'll navigate to the desktop and double-click my hello-world folder, as shown here:
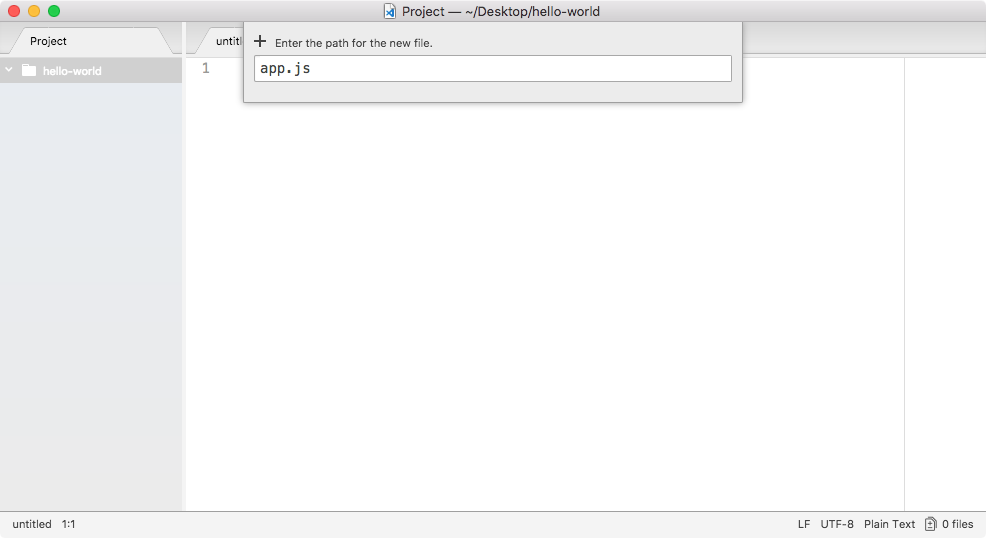
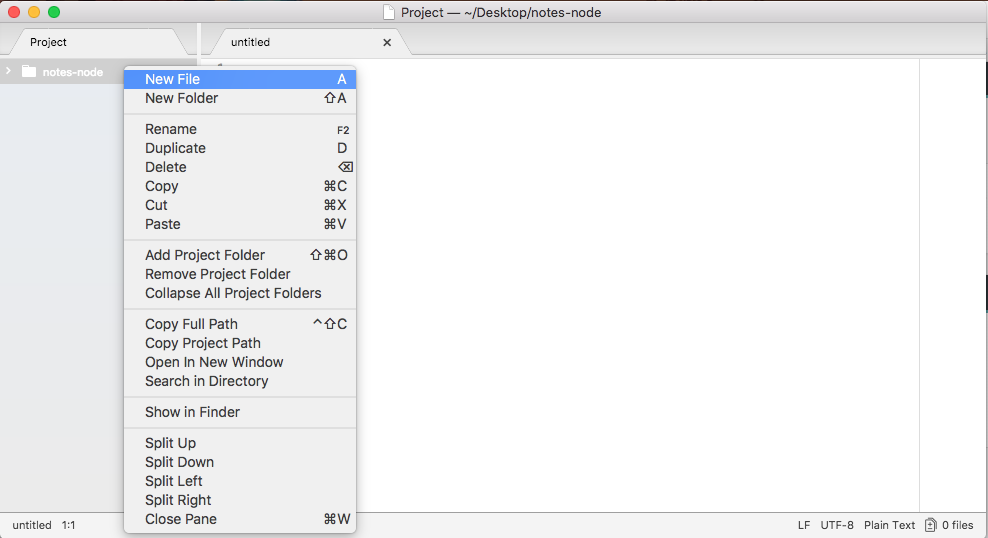
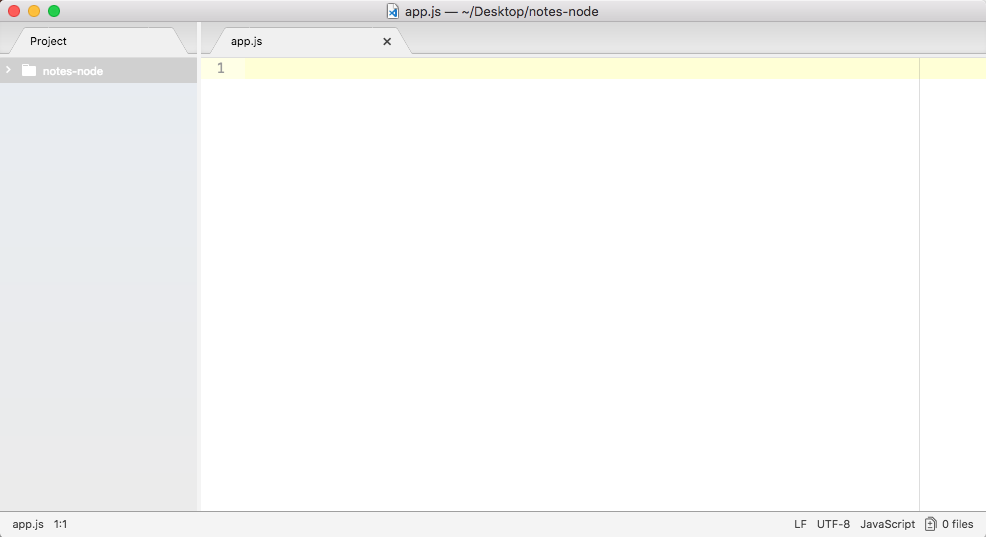
On the left I have my files, which are none. So, let's create a new one. I'll make a new file in the root of the project, and we'll call this one app.js, as shown here:
This will be the only file we have inside our Node application, and in this file we can write some code that will get executed when we start the app.
In the future, we'll be doing crazy stuff like initializing databases and starting web servers, but for now we'll simply use console.log, which means we're accessing the log property on the console object. It's a function, so we can call it with parentheses, and we'll pass in one argument as string, Hello world!. I'll toss a semicolon on the end and save the file, as shown in the following code:
console.log('Hello world!');
This will be the first app we run.
Now that we have our app.js file, the only thing left to do is to run it, and we'll do that over in Terminal. Now, to run this program, we have to navigate into our project folder. If you're not familiar with Terminal, I'll give you a quick refresher.
You can always figure out where you are using pwd on Linux or macOS, or the dir command on Windows. When you run it, you'll see something similar to the following screenshot:
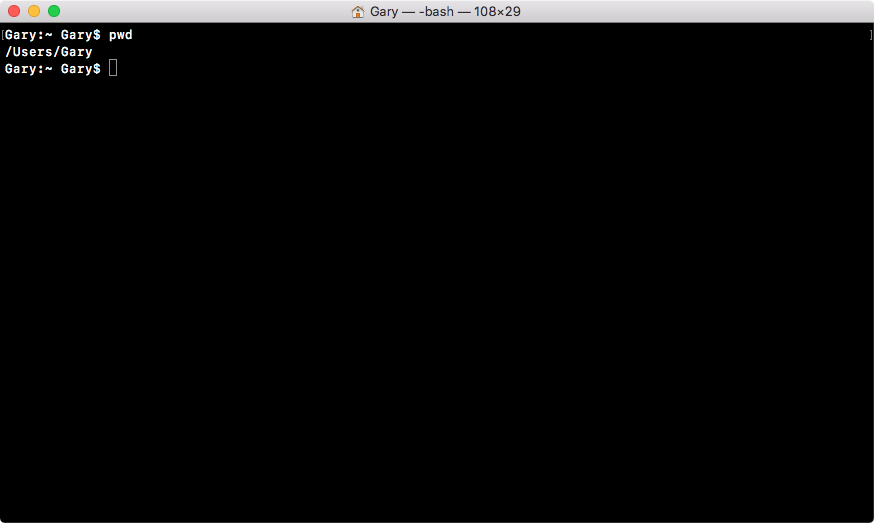
I'm in the Users folder, and then I'm in my user folder, and my user name happens to be Gary.
We can use cd to navigate into the desktop, and here we are:
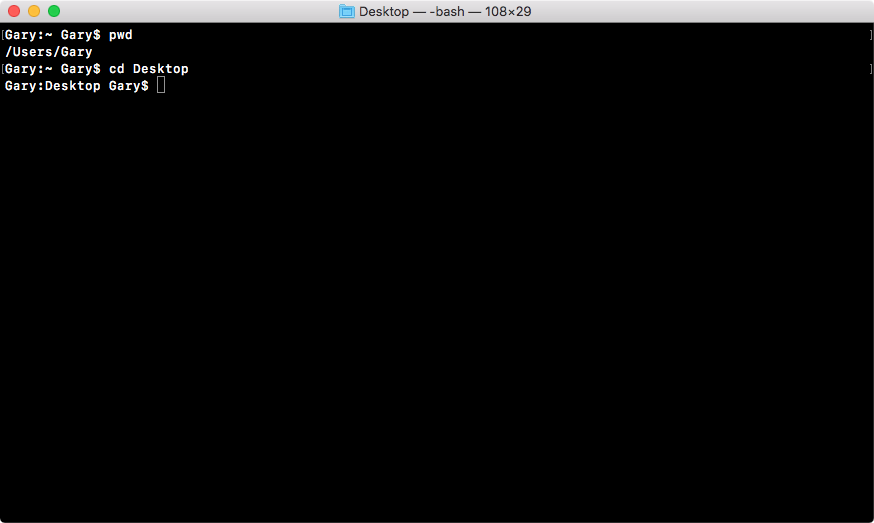
Now we're sitting in the desktop. The other command you can run from anywhere on your computer is cd /users/Gary/desktop. And this will navigate to your desktop, no matter what folder you're located in. The command cd desktop, requires you to be in the user directory to work correctly.
Now we can start by cd-ing into our project directory, which we called hello-world, as shown in the following command:
cd hello-world
With the following screenshot:
Once we're in this directory, we can run at the ls command on Linux or Mac (which is the dir command on Windows) to see all of our files, and in this case we just have one, we have app.js:
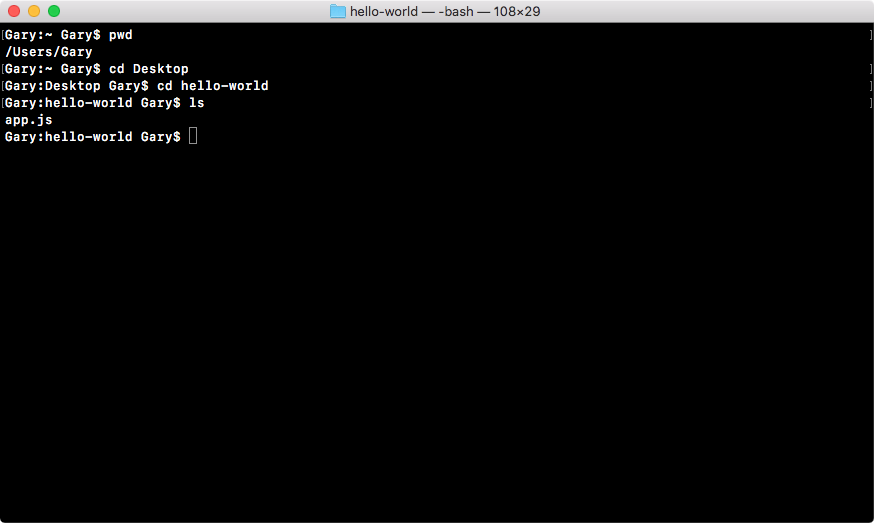
This is the file we'll run.
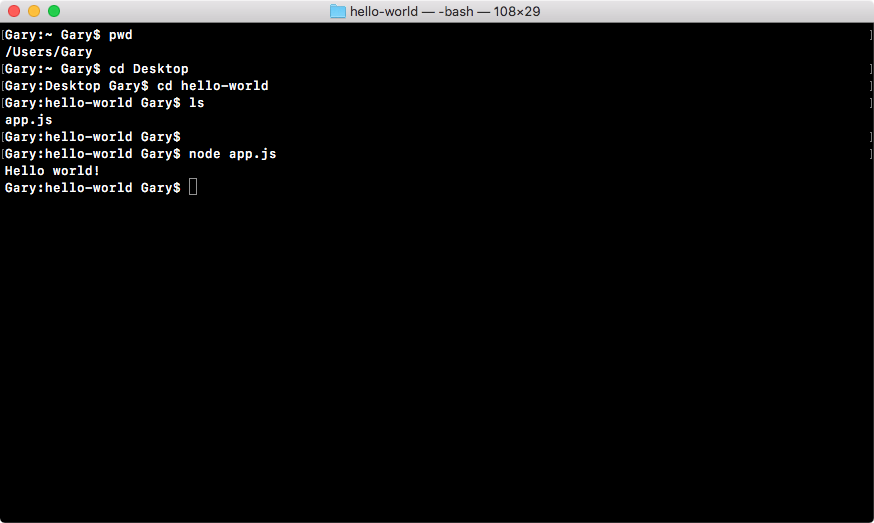
Now, before you do anything else, make sure you are in the hello-world folder and you should have the app.js file inside. If you do, all we'll do is run the node command followed by a space so we can pass in an argument, and that argument will be the filename, app.js as shown here:
node app.js
Once you have this in place, hit enter and there we go, Hello world! prints to the screen, as shown here:
And that is all it takes to create and run a very basic Node application. While our app doesn't do anything cool, we'll be using this process of creating folders/files and running them from Terminal throughout the book, so it's a great start on our way to making real-world Node apps.
In this chapter, we touched base with the concept of Node.js. We took a look at what Node is and we learned that it's built on top of the V8 JavaScript engine. Then we explored why Node has become so popular, its advantages and its disadvantages. We took a look at the different text editors we can choose from and, at the end, you created your very first Node application.
In the next chapter, we'll dive in and create our first app. I am really excited to start writing real-world applications.
In this chapter, you'll learn a ton about building Node applications, and you'll actually build your first Node application. This is where all the really fun stuff is going to start.
We'll kick things off by learning about all of the modules that come built in to Node. These are objects and functions that let you do stuff with JavaScript you've never been able to do before. We'll learn how to do things, such as reading and writing from the filesystem, which we'll use in the Node's application to persist our data.
We'll also be looking at third-party npm modules; this is a big part of the reason that Node became so popular. The npm modules give you a great collection of third-party libraries you can use, and they also have really common problems. So you don't have to rewrite that boilerplate code over and over again. We'll be using a third-party module in this chapter to help with fetching input from the user.
The chapter will specifically cover the following topics:
In this section, you will finally learn some Node.js code, and we'll kick things off by talking about modules inside Node. Modules are units of functionality, so imagine I create a few functions that do something similar, such as a few functions that help with math problems, for example, add, subtract, and divide. I could bundle those up as a module, call it Andrew-math, and other people could take advantage of it.
Now, we'll not be looking at how to make our own module; in fact, we will be looking at how we can use modules, and that will be done using a function in Node, called require(). The require() function will let us do three things:
If you have all of your code in one file, it will be really hard to test, maintain, and update. Now, require() isn't that bad. In this section, we'll explore the first use case for require().
We'll take a look at two built-in modules; we'll figure out how to require them and how to use them, and then we'll move on to starting the process of building that Node application.
The first step we'll take inside of the Terminal is that we'll make a directory to store all of these files. We'll navigate from our home directory to the desktop using the cd Desktop command:
cd Desktop
Then, we'll make a folder to store all of the lesson files for this project.
Now, we'll make that folder using the mkdir command, which is the short form for make directory. Let's call the folder notes-node, as shown in the following code:
mkdir notes-node
We'll make a note app in Node so that notes-node seems appropriate. Then we'll cd into notes-node, and we can get started playing around with some of the built-in modules:
cd notes-node
These modules are built in, so there's no need to install anything in Terminal. We can simply require them right inside of our Node files.
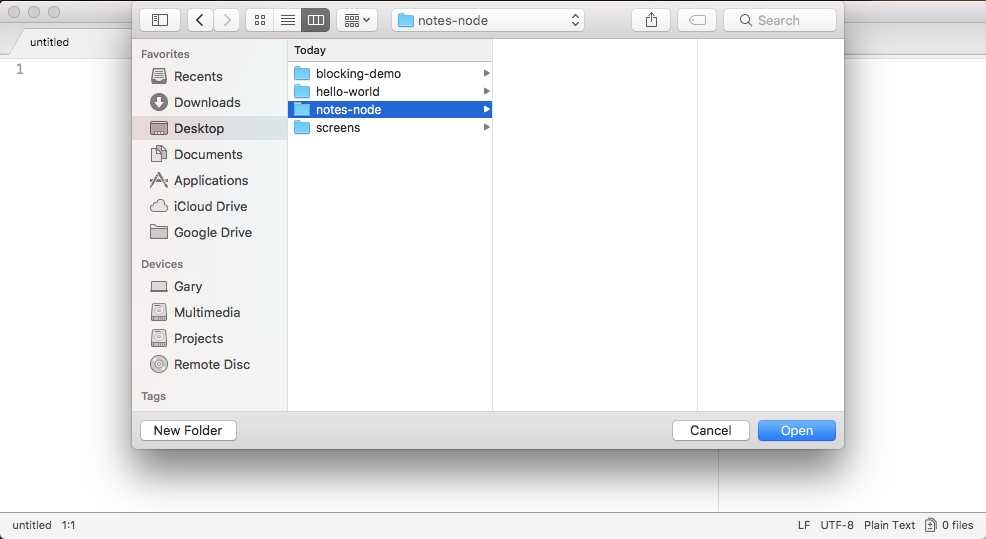
The next step in the process is to open up that directory inside the Atom text editor. So open up the directory we just created on the Desktop, and you will find it there, as shown in the following screenshot:
Now, we will need to make a file, and we'll put that file in the root of the project:
We'll call this file app.js, and this is where our application will start:
We will be writing other files that get used throughout the app, but this is the only file we'll ever be running from Terminal. This is the initialization file for our application.
Now, to kick things off, the first thing I will do is to use console.log to print Starting app, as shown in the following code:
console.log('Starting app');
After we call the console.log starting app, we'll load in a built-in module using require().
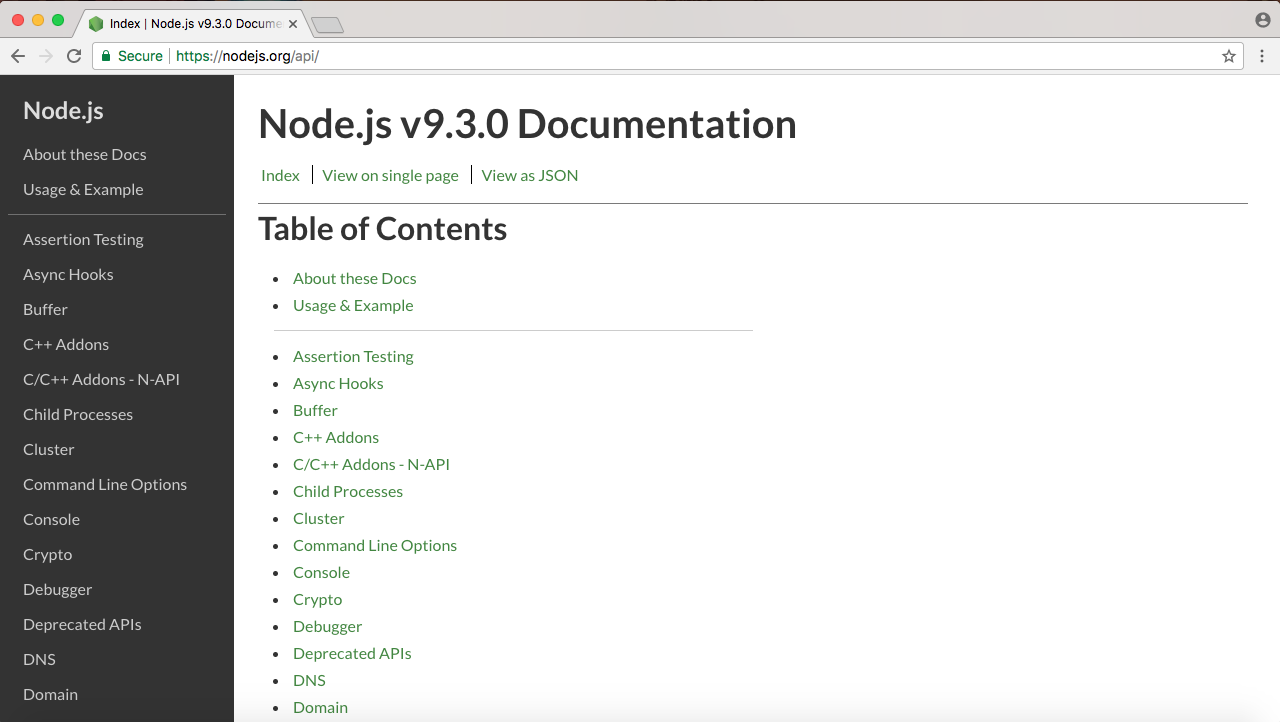
To view Node.js API docs, go to nodejs.org/api. When you go to this URL, you'll be greeted with a long list of built-in modules. Using the File System module we'll create a new file and the OS module. The OS module will let us fetch things such as the username for the currently logged-in user.
To kick things off though, we will start with the File System module. We'll go through the process of creating a file and appending to it:
When you view a docs page for a built-in module, whether it's File System or a different module, you'll see a long list of all the different functions and properties that you have available to you. The one we'll use in this section is fs.appendFile.
If you click on it, it will take you to the specific documentation, and this is where we can figure out how to use appendFile, as shown in the following screenshot:
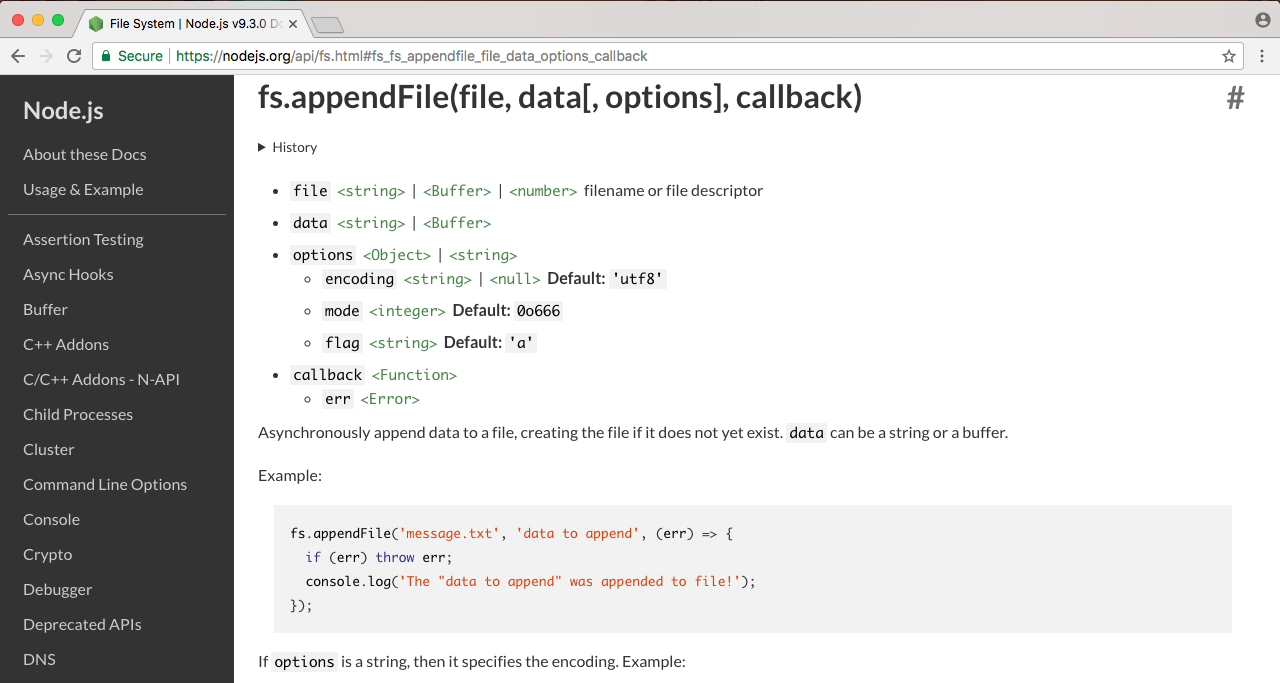
Now, appendFile is pretty simple. We'll pass to it two string arguments (shown in the preceding screenshot):
This is all we need to provide in order to call fs.appendFile. Before we can call fs.appendFile, we need to require it. The whole point of requiring is to let us load in other modules. In this case, we'll load in the fs module from app.js.
Let's create a variable that will be a constant, using const.
Then we'll give it a name, fs and set it equal to require(), as shown in the following code:
const fs = require()
Here, require() is a function that's available to you inside any of your Node.js files. You don't have to do anything special to call it, you simply call it as shown in the preceding code. Inside the argument list, we'll just pass one string.
In our case, we'll pass in the module name, which is fs and toss in a semicolon at the end, as shown in the following code:
const fs = require('fs');
This will tell Node that you want to fetch all of the contents of the fs module and store them in the fs variable. At this point, we have access to all of the functions available on the fs module, which we explored over in the docs, including fs.appendFile.
Back in Atom, we can call the appendFile by calling fs.appendFile, passing in the two arguments that we'll use; the first one will be the filename, so we add greetings.txt, and the second one will be the text you want to append to the file. In our case, we'll append Hello world!, as shown in the following code:
fs.appendFile('greetings.txt', 'Hello world!');
Let's save the file, as shown in the preceding command, and run it from Terminal to see what happens.
// Orignal line
fs.appendFile('greetings.txt', 'Hello world!');

// Option one
fs.appendFile('greetings.txt', 'Hello world!', function (err){
  if (err) {
    console.log('Unable to write to file');
  }
});

// Option two
fs.appendFileSync('greetings.txt', 'Hello world!');
In the preceding code, we have the original line that we have inside our program.
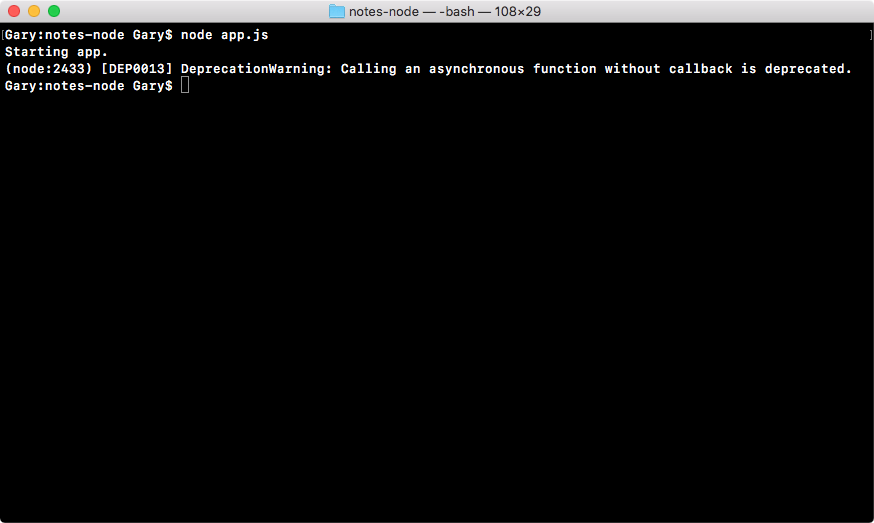
In Option one here is to add a callback as the third argument to the append file. This callback will get executed when either an error occurs or the file successfully gets written too. Inside option one, we have an if statement; if there is an error, we simply print a message to the screen, Unable to write to file.
Now, our second option in the preceding code, Option two, is to call appendFileSync, which is a synchronous method (we'll talk more about that later); this function does not take the third argument. You can type it as shown in the preceding code and you won't get the warning.
So, pick one of these two options if you see the warning; both will work much the same.
If you are on v6, you can stick with the the original line, shown at the top of the preceding code, although you might as well use one of the two options below that line to make your code a little more future proof.
Fear not, we'll be talking about asynchronous and synchronous functions, as well as callback functions, extensively throughout the book. What I'm giving you here in the code is just a template, something you can write in your file to get that error removed. In a few chapters, you will understand exactly what these two methods are and how they work.
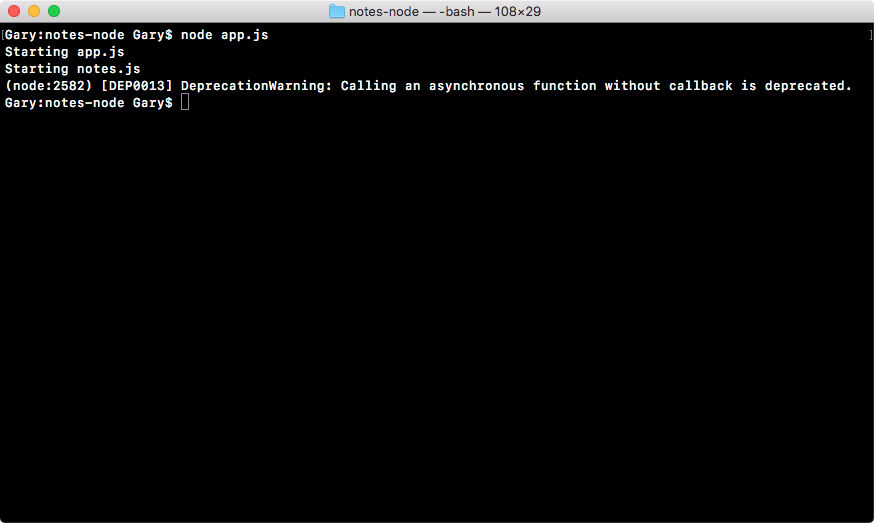
If we do the appending over in Terminal, node app.js, we'll see something pretty cool:
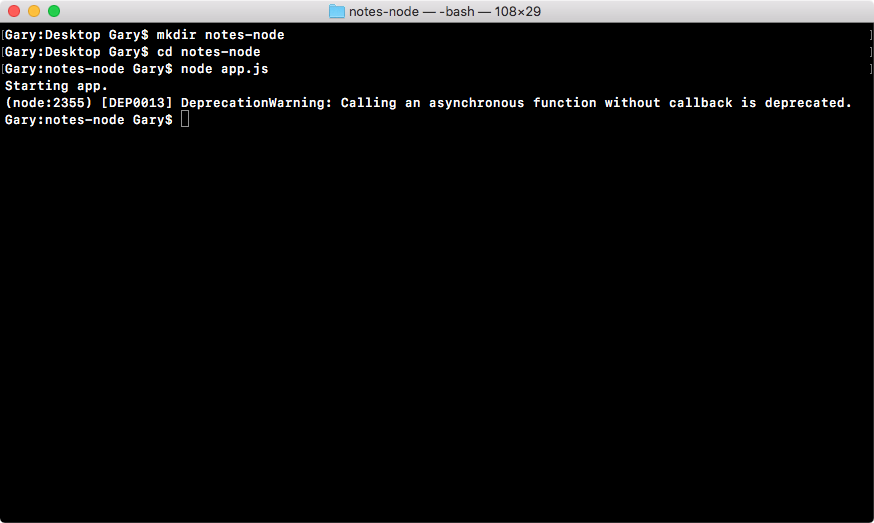
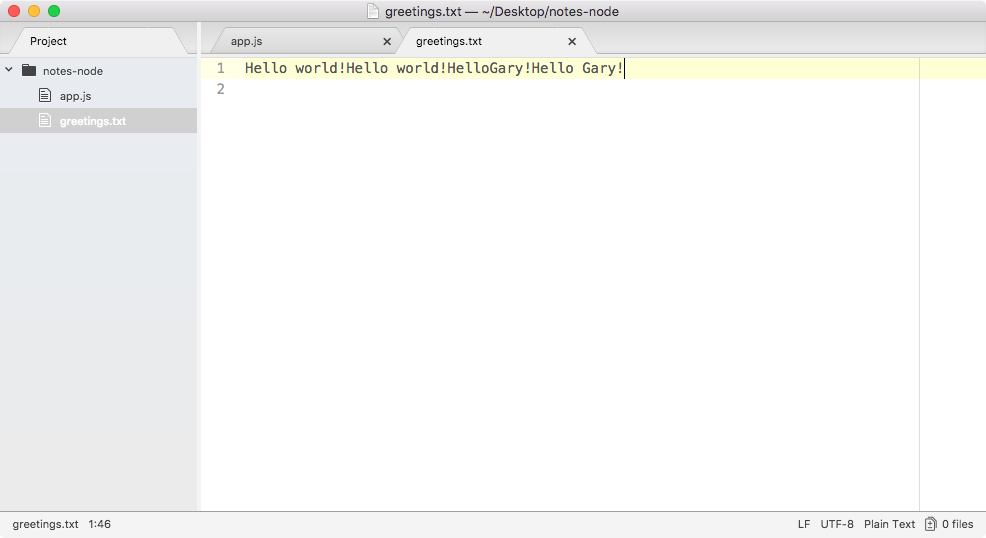
As shown in the preceding code, we get our one console.log statement, Starting app.. So we know the app started correctly. Also, if we head over into Atom, we'll actually see that there's a brand new greetings.txt file, as shown in the following code. This is the text file that was created by fs.appendFile:
console.log('Starting app.');

const fs = require('fs');

fs.appendFile('greetings.txt', 'Hello world!');
Here, fs.appendFile tries to append greetings.txt to a file; if the file doesn't exist, it simply creates it:
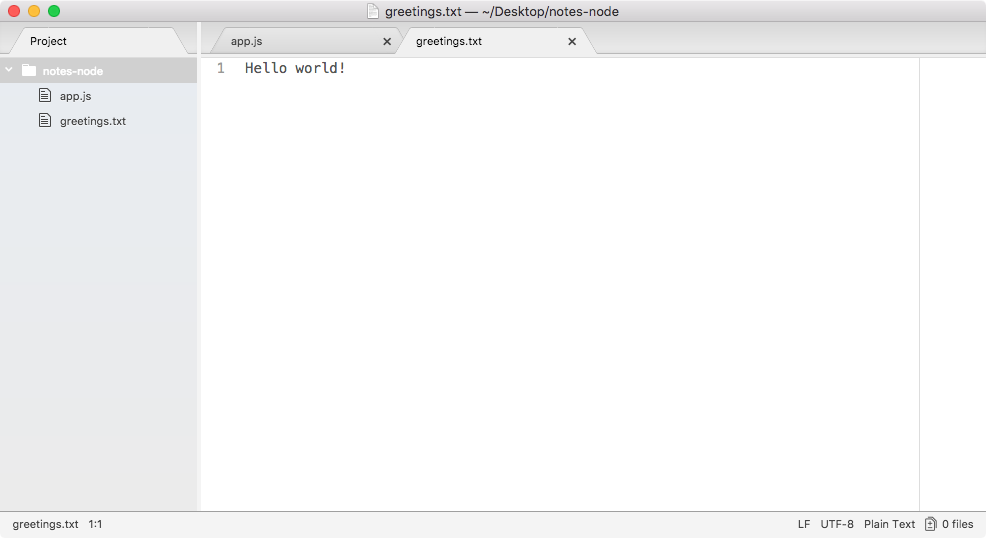
You can see that we have our message, Hello world! in the greetings.txt file, printing to the screen. In just a few minutes, we were able to load in a built-in Node module and call a function that lets us create a brand new file.
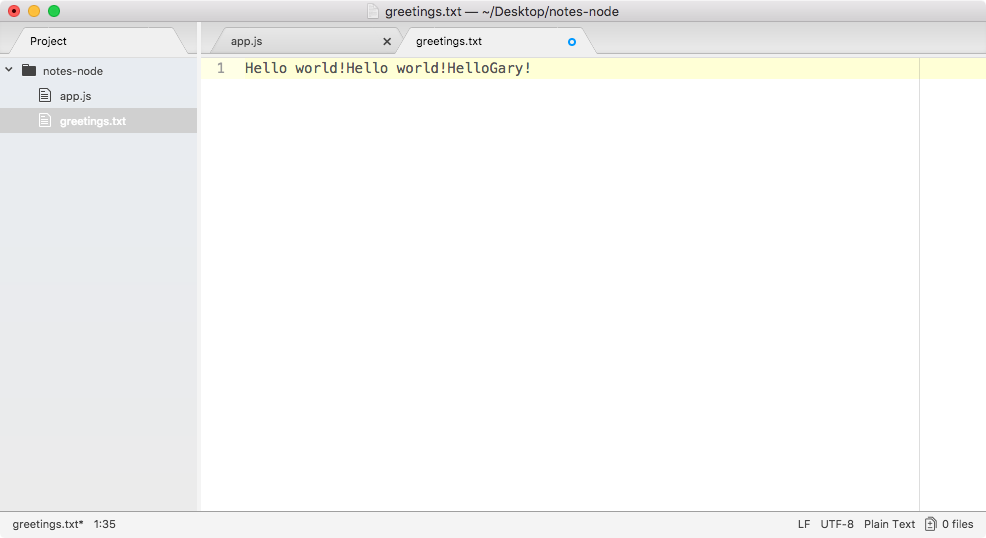
If we call it again by rerunning the command using the up arrow key and the enter key, and we head back into the contents of greetings.txt, you can see this time around that we have Hello world! twice, as shown here:
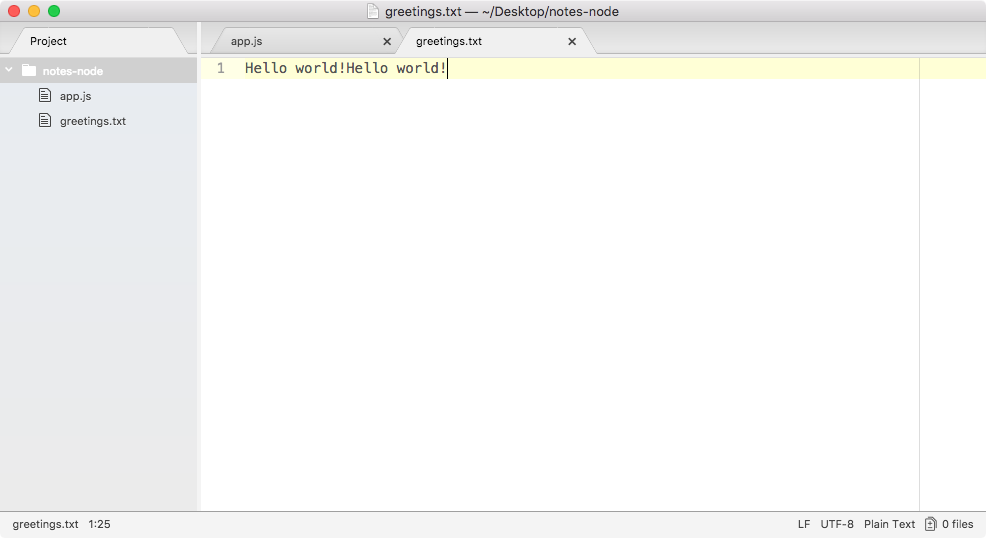
It appended Hello world! one time for each time we ran the program. We have an application that creates a brand new file on our filesystem, and if the file already exists, it simply adds to it.
Once we have created and appended the greetings.txt file, we'll customize this greeting.txt file. To do this, we'll explore one more built-in module. We'll be using more than just appendFile in the future. We'll be exploring other methods. For this section, the real goal is to understand require(). The require() function lets us load in the module's functionality so that we can call it.
The second module that we'll be using is OS, and we can view it in the documentation. In the OS module, we'll use the method defined at the very bottom, os.userInfo([options]):
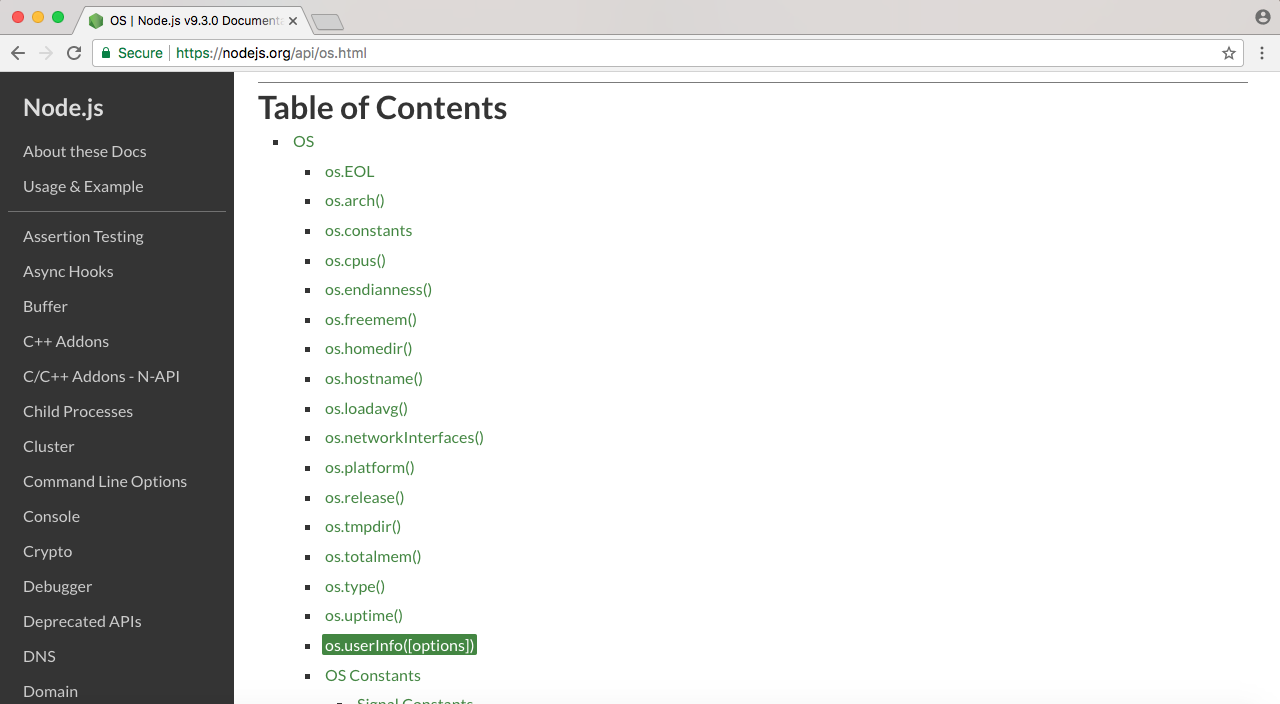
The os.userInfo([options]) method gets called and returns various information about the currently logged-in user, such as the username, and this is what we'll pull off:
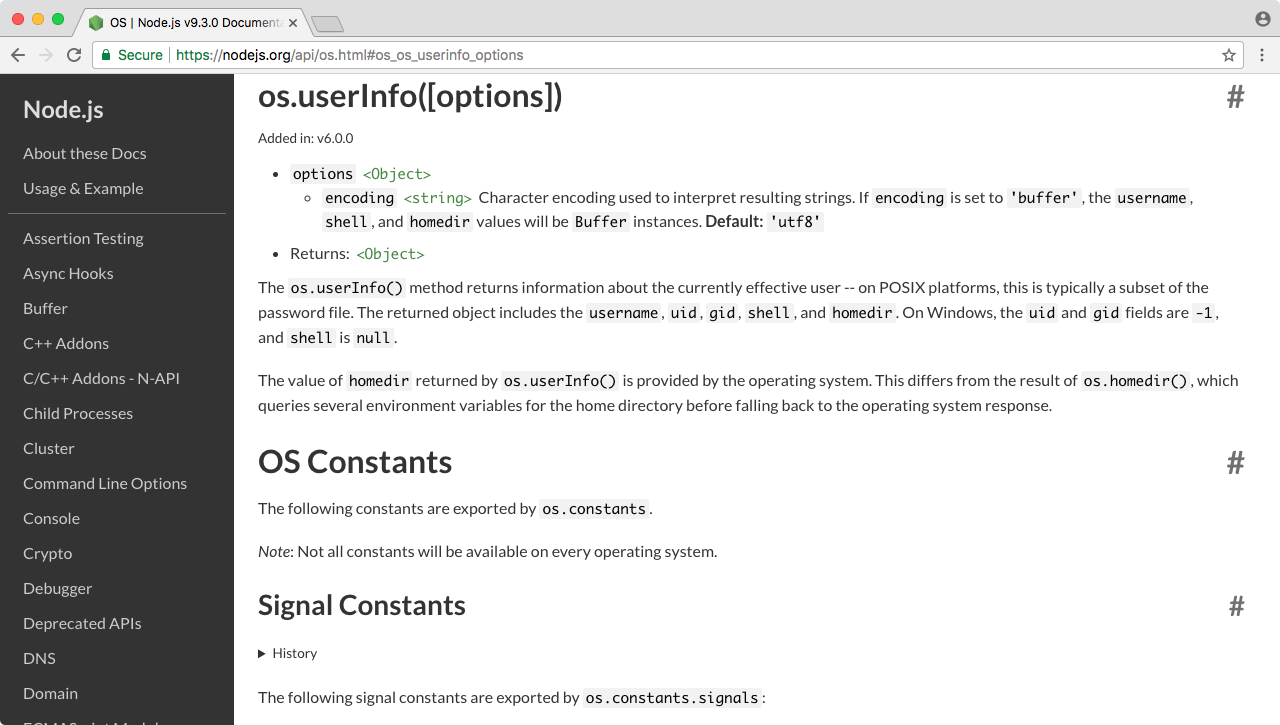
Using the username that comes from the OS, we can customize the greeting.txt file so that instead of Hello world! it can say Hello Gary!.
To get started, we have to require OS. This means that we'll go back inside Atom. Now, just below where I created my fs constant, I'll create a new constant called os, setting it equal to require(); this gets called as a function and passes one argument, the module name, os, as shown here:
console.log('Starting app.');

const fs = require('fs');
const os = require('os');

fs.appendFile('greetings.txt', 'Hello world!');
From here, we can start calling methods available on the OS module, such as os.userInfo([optional]).
Let's make a new variable called user to store the result. The variable user will get set equal to os.userInfo, and we can call userInfo without any arguments:
console.log('Starting app.');

const fs = require('fs');
const os = require('os');

var user = os.userInfo();

fs.appendFile('greetings.txt', 'Hello world!');
Now, before we do anything with the fs.appendFile line, I'll comment it out and print the contents of the user variable using console.log:
console.log('Starting app.');

const fs = require('fs');
const os = require('os');

var user = os.userInfo();
console.log(user);
// fs.appendFile('greetings.txt', 'Hello world!');
This will let us explore exactly what we get back. Over in Terminal, we can rerun our program using the up arrow key and enter key, and right here in the following code, you see that we have an object with a few properties:
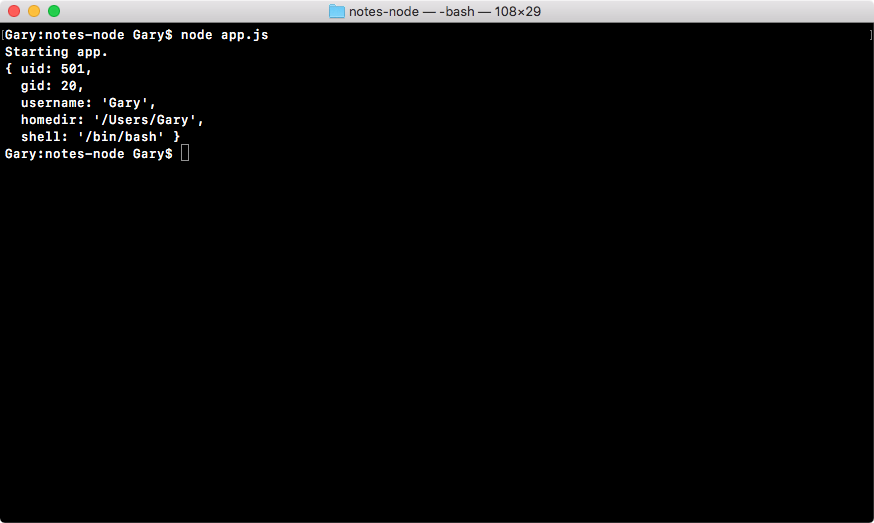
We have uid, gid, username, homedir, and shell. Depending on your OS, you'll not have all of these, but you should always have the username property. This is the one we care about.
This means that back inside Atom, we can use user.username inside of appendFile. I'll remove the console.log statement and uncomment our call to fs.appendFile:
console.log('Starting app.');

const fs = require('fs');
const os = require('os');

var user = os.userInfo();

fs.appendFile('greetings.txt', 'Hello world!');
Now, where we have world in the fs.appendFile, we'll swap it with user.username. There are two ways we can do this.
The first way is to remove world! and concatenate user.username. Then we can concatenate another string using the + (plus) operator, as shown in the following code:
console.log('Starting app.');

const fs = require('fs');
const os = require('os');

var user = os.userInfo();

fs.appendFile('greetings.txt', 'Hello' + user.username + '!');
Now if we run this, everything is going to work as expected. Over in Terminal, we can rerun our app. It prints Starting app:
Over in the greetings.txt file, you should see something like Hello Gary! printing to the screen, as shown here:
Using the fs module and the os module, we were able to grab the user's username, create a new file, and store it.
The second way to swap world with user.username in the fs.appendFile is, using an ES6 feature known as template strings. Template strings start and end with the ` (tick) operator, which is available to the left of the 1 key on your keyboard. Then you type things as you normally would.
This means that we'll first type hello, then we'll add a space with the ! (exclamation) mark, and just before !, we will put the name:
console.log('Starting app.');

const fs = require('fs');
const os = require('os');

var user = os.userInfo();

fs.appendFile('greetings.txt', `Hello !`);
To insert a JavaScript variable inside your template string, you use the $ (dollar) sign followed by opening and closing curly braces. Then we will just reference a variable such as user.username:
console.log('Starting app.');

const fs = require('fs');
const os = require('os');

var user = os.userInfo();

fs.appendFile('greetings.txt', `Hello ${user.username}!`);
This is all it takes to use template strings; it's an ES6 feature available because you're using Node v6. This syntax is much easier to understand and update than the string/concatenation version we saw earlier.
If you run the code, it will produce the exact same output. We can run it, view the text file, and this time around, we have Hello Gary! twice, which is what we want here:
With this in place, we are now done with our very basic example and we're ready to start creating our own files for our notes application and requiring them inside app.js in the next section.
First up, you learned that we can use require to load in modules. This lets us take existing functionality written by either the Node developers, a third-party library, or ourselves, and load it into a file so that it can be reusable. Creating reusable code is essential for building large apps. If you have to build everything in an app every time, no one would ever get anything done because they would get stuck at building the basics, things such as HTTP servers and web servers. There are already modules for such stuff, and we'll be taking advantage of the great npm community. In this case, we used two built-in modules, fs and os. We loaded them in using require and we stored the module results inside two variables. These variables store everything available to us from the module; in the case of fs, we use the appendFile method, and in the case of OS, we use the userInfo method. Together, we were able to grab the username and save it into a file, which is fantastic.
In this section, you will learn how to use require() to load in other files that you created inside your project. This will let you move functions outside app.js into more specific files; this will make your application easier to scale, test, and update. To get started, the first thing we'll do is to make a new file.
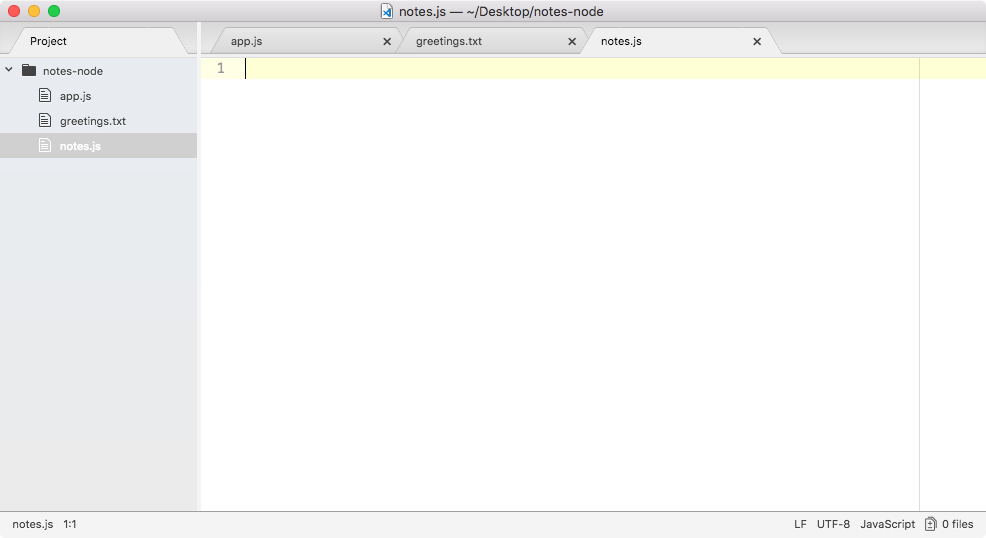
In the context of our notes app, the new file will store various functions for writing and reading notes. As of now, you don't need to worry about that functionality, as we'll get into the detail later in the section, but we will create the file where it will eventually live. This file will be notes.js, and we'll save it inside the root of our application, right alongside app.js and greetings.txt, as shown here:
For the moment, all we'll do inside notes is to use console.log to print a little log showing the file has been executed using the following code:
console.log('Starting notes.js');
Now, we have console.log on the top of notes and one on the top of app.js. I'll change console.log in the app.js from Starting app. to Starting app.js. With this in place, we can now require the notes file. It doesn't export any functionality, but that's fine.
We'll look at how to export stuff later in the section. For now though, we'll load our module in much the same way we loaded in the built-in Node modules.
Let's make const; I'll call this one notes and set it equal to the return result from require():
console.log('Starting app.js');

const fs = require('fs');
const os = require('os');
const notes = require('');

var user = os.userInfo();

fs.appendFile('greetings.txt', `Hello ${user.username}!`);
Inside the parentheses, we will pass in one argument that will be a string, but it will be a little different. In the previous section, we typed in the module name, but what we have in this case is not a module, but a file, notes.js. What we need to do is to tell Node where that file lives using a relative path.
Now, relative paths start with ./ (a dot forward slash), which points to the current directory that the file is in. In this case, this points us to the app.js directory, which is the root of our project notes-node. From here, we don't have to go into any other folders to access notes.js, it's in the root of our project, so we can type its name, as shown in the following code:
console.log('Starting app.js');

const fs = require('fs');
const os = require('os');
const notes = require('./notes.js');

var user = os.userInfo();

fs.appendFile('greetings.txt', `Hello ${user.username}!`);
With this in place, we can now save app.js and see what happens when we run our application. I'll run the app using the node app.js command:
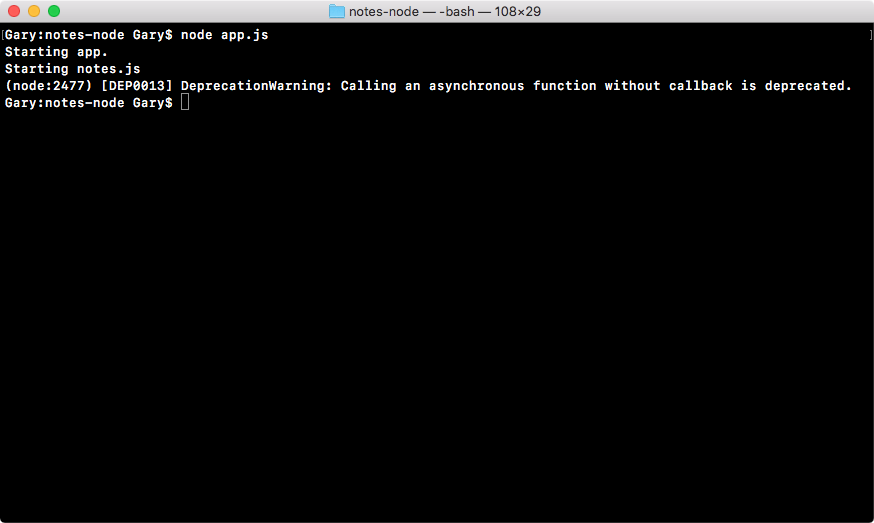
As shown in the preceding code output, we get our two logs. First, we get Starting app.js and then we get Starting notes.js. Now, Starting notes.js comes from the note.js file, and it only runs because we required the file inside of app.js.
Comment out this command line from the app.js file, as shown here:
console.log('Starting app.js');

const fs = require('fs');
const os = require('os');
// const notes = require('./notes.js');

var user = os.userInfo();

fs.appendFile('greetings.txt', `Hello ${user.username}!`);
Save the file, and rerun it from Terminal; you can see the notes.js file never executes because we never explicitly touch it.
We never call it inside Terminal as we do in the preceding example, and we never require.
For now though, we will be requiring it, so I'll uncomment that line.
For now though, the focus will be to export something from notes.js which we can use in app.js. Inside notes.js (actually, inside all of our Node files), we have access to a variable called module. I'll use console.log to print module to the screen so that we can explore it over in Terminal, as shown here:
console.log('Starting notes.js');

console.log(module);
Let's rerun the file to explore it. As shown in the following screenshot, we get a pretty big object, that is, different properties related to the notes.js file:
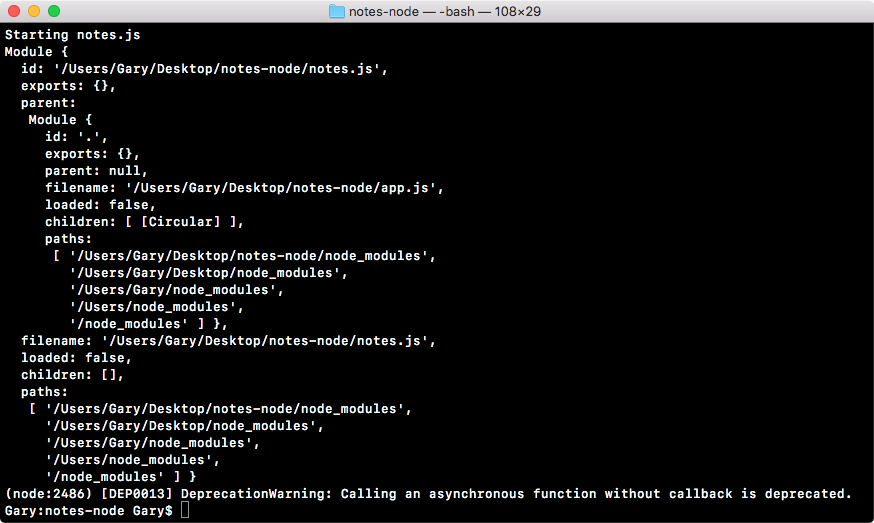
Now, to tell the truth, we'll not be using most of these properties. We have things such as id, exports, parent, and filename. The only one property we'll ever use in this book is exports.
The exports object on the module property and everything on this object gets exported. This object gets set as the const variable, notes. This means that we can set properties on it, they will get set on notes, and we can use them inside app.js.
Let's take a quick look at how that works. What we'll do is to define an age property using module.exports, the object we just explored over in Terminal. Also, we know that it's an object because we can see it in the preceding screenshot (exports: {}); this means that I can add a property, age, and set it equal to my age, which is 25, as shown here:
console.log('Starting notes.js');

module.exports.age = 25;
Then I can save this file and move into app.js to take advantage of this new age property. The const variable notes will be storing all of my exports, in the present case, just age.
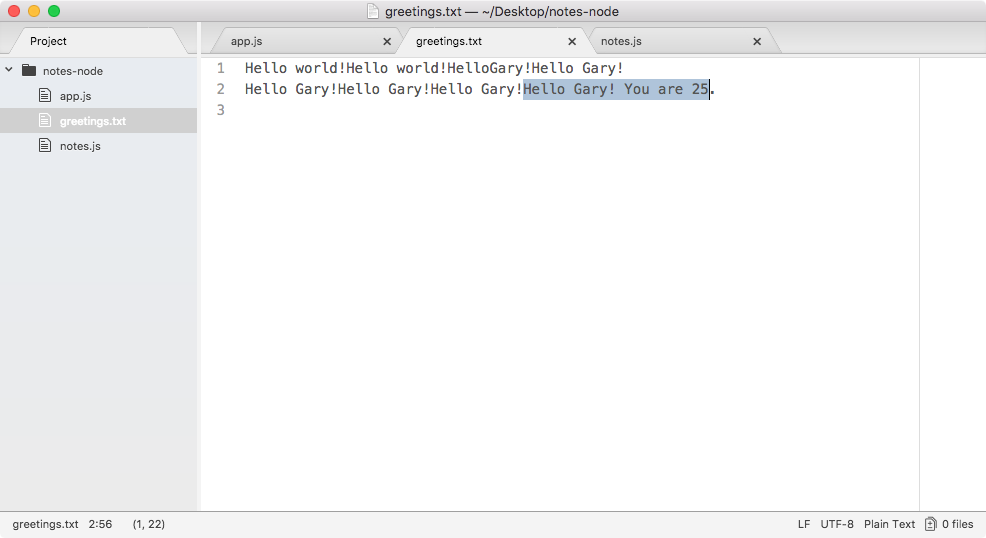
In fs.appendFile, after the greeting.txt file, I'll add You are followed by the age. Inside template strings, we will use $ with curly braces, notes.age, and a period at the end, as shown here:
console.log('Starting app.js');

const fs = require('fs');
const os = require('os');
const notes = require('./notes.js');

var user = os.userInfo();

fs.appendFile('greetings.txt', `Hello ${user.username}! You are ${notes.age}.`);
Now our greeting should say Hello Gary! You are 25. It's getting the 25 value from our separate file (that is, note.js), which is fantastic.
Let's take a quick moment to rerun the program over in Terminal using the up arrow key and enter keys:
Back inside the app, we can open greetings.txt, and as shown in the following screenshot, we have Hello Gary! You are 25:
Using require(), we were able to require a file that we created, and this file stored some properties that were advantageous to the rest of the project.
Now, obviously, the preceding example is pretty contrived. We'll not be exporting static numbers; the real goal of exports is to be able to export functions that get used inside app.js. Let's take a quick moment to export two functions. In the notes.js file, I'll set module.exports.addnote equal to a function; the function keyword followed by opening and closing parentheses, which is followed by the curly braces:
console.log('Starting notes.js');

module.exports.addNote = function () {

}
Now, throughout the course, I'll be using arrow functions where I can, as shown in the preceding code. To convert a regular ES5 function into an arrow function, all you do is remove the function keyword and replace it with an => sign right between the parentheses and the opening curly braces, as shown here:
console.log('Starting notes.js');

module.exports.addNote = () => {

}
For now though, we'll keep things really simple, using console.log to print addNote. This will let us know that the addNote function was called. We'll return a string, 'New note', as shown here:
console.log('Starting notes.js');

module.exports.addNote = () => {
  console.log('addNote');
  return 'New note';
};
Now, the addNote function is being defined in notes.js, but we can take advantage of it over in app.js.
Let's take a quick second to comment out both the appendFile and user line in app.js:
console.log('Starting app.js');

const fs = require('fs');
const os = require('os');
const notes = require('./notes.js');


// var user = os.userInfo();
//
// fs.appendFile('greetings.txt', `Hello ${user.username}! You are ${notes.age}.`);
I'll add a variable, call the result, (res for short), and set it equal to the return result from notes.addNote:
console.log('Starting app.js');

const fs = require('fs');
const os = require('os');
const notes = require('./notes.js');

var res = notes.addNote();


// var user = os.userInfo();
//
// fs.appendFile('greetings.txt', `Hello ${user.username}! You are ${notes.age}.`);
Now, the addNote function is a dummy function for the moment. It doesn't take any arguments and it doesn't actually do anything, so we can call it without any arguments.
Then we'll print the result variable, as shown in the following code, and we would expect the result variable to be equal to the New note string:
console.log('Starting app.js');

const fs = require('fs');
const os = require('os');
const notes = require('./notes.js');

var res = notes.addNote();
console.log(res);

// var user = os.userInfo();
//
// fs.appendFile('greetings.txt', `Hello ${user.username}! You are ${notes.age}.`);
If I save both of my files (app.js and notes.js) and rerun things from Terminal, you can see that New note prints to the screen at the very end and just before addNote prints:
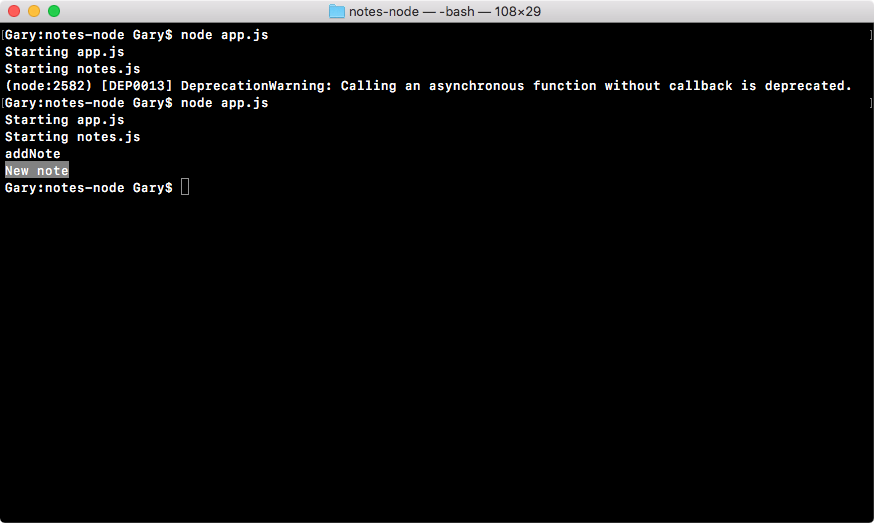
This means that we successfully required the notes file we called addNote, and its return result was successfully returned to app.js.
Using this exact pattern, we'll be able to define our functions for adding and removing notes over in our notes.js file, but we'll be able to call them anywhere inside of our app, including in app.js.
Now it's time for a quick challenge. What I'd like you to do is make a new function in notes.js called add. This add function will get set on the exports object.
This add function will take two arguments, a and b; it'll add them together and return the result. Then over in app.js, I'd like you to call that add function, passing in two numbers, whatever you like, such as 9 and -2, then print the result to the screen and make sure it works correctly.
So, take a moment, create that add function inside notes.js, call it inside app.js, and make sure the proper result prints to the screen. How'd it go? Hopefully, you were able to make that function and call it from app.js.
The first step in the process will be to define the new function. In notes.js, I'll set module.exports.add equal to that function, as shown here:
console.log('Starting notes.js');

module.exports.addNote = () => {
  console.log('addNote');
  return 'New note';
};

module.exports.add =
Let's set it equal to an arrow function. If you used a regular function, that is perfectly fine, I just prefer using the arrow function when I can. Also, inside parentheses, we will be getting two arguments, we'll be getting a and b, as shown here:
console.log('Starting notes.js');

module.exports.addNote = () => {
  console.log('addNote');
  return 'New note';
};

module.exports.add = (a, b) => {

};
All we need to do is return the result, which is really simple. So we'll enter return a + b:
console.log('Starting notes.js');

module.exports.addNote = () => {
  console.log('addNote');
  return 'New note';
};

module.exports.add = (a, b) => {
  return a + b;
};
Now, this was the first part of your challenge, defining a utility function in notes.js; the second part was to actually use it over in app.js.
In app.js, we can use our function by printing the console.log result with a colon : (this is just for formatting). As the second argument, we'll print the actual results, notes.add. Then, we'll add up two numbers; we'll add 9 and -2, as shown in this code:
console.log('Starting app.js');

const fs = require('fs');
const os = require('os');
const notes = require('./notes.js');

console.log('Result:', notes.add(9, -2));

// var user = os.userInfo();
//
// fs.appendFile('greetings.txt', `Hello ${user.username}! You are ${notes.age}.`);
The result in this case should be 7. If we run the program you can see that we get just that, 7 prints to the screen:
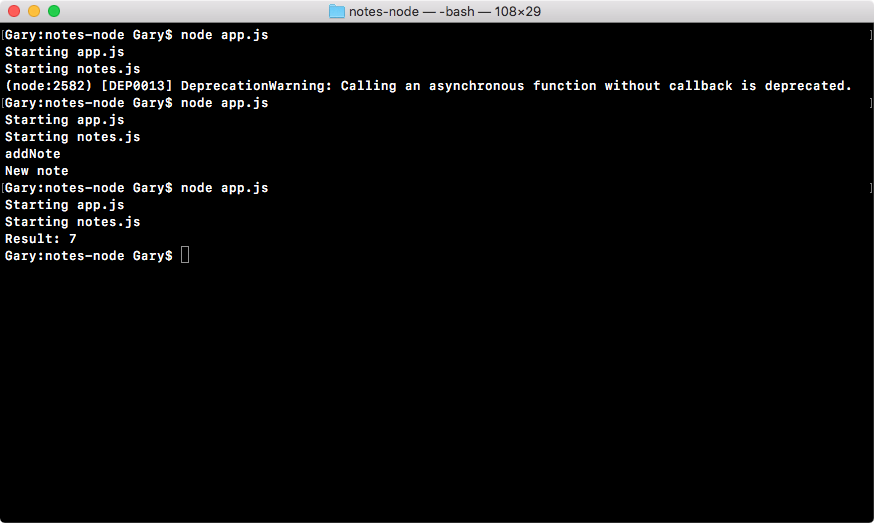
If you were able to get this, congratulations, you successfully completed one of your first challenges. These challenges will be sprinkled throughout the book and they'll get progressively more complex. But don't worry, we'll keep the challenges pretty explicit; I'll tell you exactly what I want and exactly how I want it done. Now, you can play around with different ways to do it, the real goal is to just get you writing code independent of following someone else's lead. That is where the real learning happens.
In the next section, we will explore how to use third-party modules. From there, we'll start building the notes application.
You now know two out of the three ways to use require(), and in this section, we'll explore the last way, which is to require a package you've installed from npm. As I mentioned in the first chapter, npm is a big part of what makes Node so fantastic. There is a huge community of developers that have created thousands of packages that already solve some of the most common problems in Node applications. We will be taking advantage of quite a few packages throughout the book.
Now, in the npm packages, there's nothing magical, it's regular Node code that aims to solve a specific problem. The reason you'd want to use it is so you don't have to spend all your time writing these utility functions that already exist; not only do they exist, they've been tested, they've been proven to work, and others have used them and documented them.
Now, with all that said, how do we get started? Well, to get started, we actually have to run a command from the Terminal to tell our application we want to use npm modules. This command will be run over in the Terminal. Make sure you've navigated inside your project folder and inside the notes-node directory. Now, when you installed Node, you also installed something called npm.
We will be running some npm commands and you can test that you have it installed by running npm, a space, and -v (we're running npm with the v flag). This should print the version, as shown in the following code:
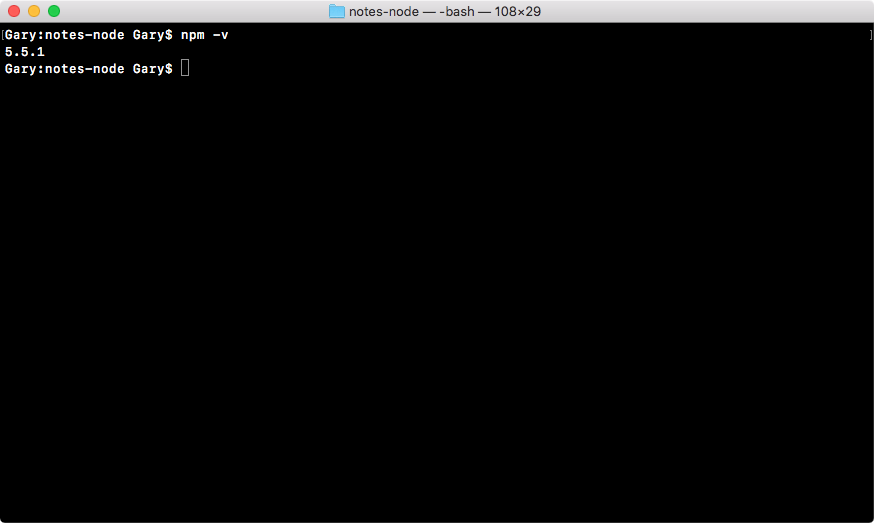
It's okay if your version is slightly different, that's not important; what is important is that you have npm installed.
Now, we'll run a command called npm init in Terminal. This command will prompt us to fill out a few questions about our npm project. We can run the command and we can cycle through the questions, as shown in the following screenshot:
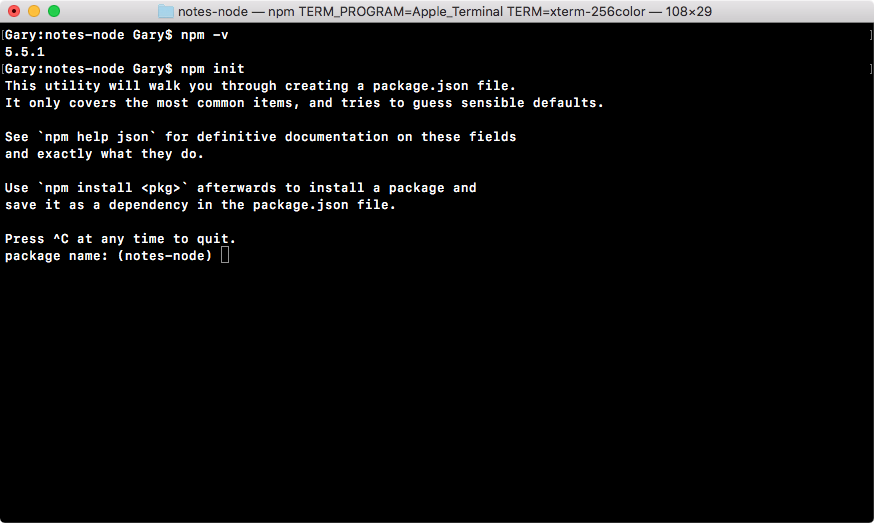
In the preceding screenshot, at the top is a quick description of what's happening, and down below it'll start asking you a few questions, as shown in the following screenshot:
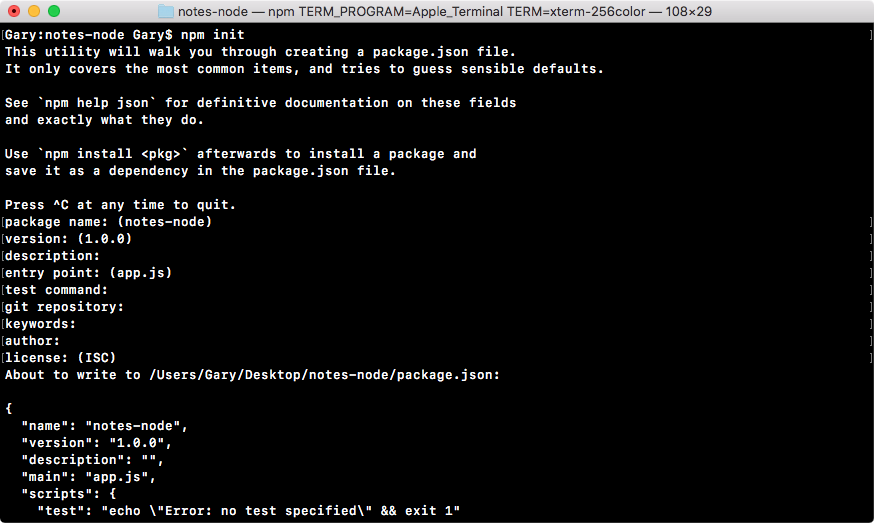
The questions include the following:
After answering these questions, if we hit enter, we'll get the following on our screen and a final question:

Now, I want to dispel the myth that this command is doing anything magical. All this command is doing is creating a single file inside your project. It'll be in the root of the project and it's called package.json, and the file will look exactly like the preceding screenshot.
To the final question, as shown down below in the preceding image, you can hit enter or type yes to confirm that this is what you want to do:
Now that we have created the file, we can actually view it inside our project. As shown in the following code, we have the package.json file:
{
  "name": "notes-node",
  "version": "1.0.0",
  "description": "",
  "main": "app.js",
  "scripts": {
    "test": "echo \"Error: no test specified\" && exit 1"
  },
  "author": "",
  "license": "ISC"
}
And this is all it is, it's a simple description of your application. Now, as I mentioned, we'll not be publishing our app to npm, so a lot of this information really isn't important to us. What is important, though, is that package.json is where we define the third-party modules we want to install in our application.
To install a module in the app, we will run a command over in the Terminal. In this chapter, we'll be installing a module called lodash. The lodash module comes with a ton of utility methods and functions that make developing inside Node or JavaScript a heck of a lot easier. To take a look at what exactly we're getting into, let's move into the browser.
We'll to go to https://www.npmjs.com. Then we'll search for the package, lodash, and you can see it comes up, as shown in the following screenshot:
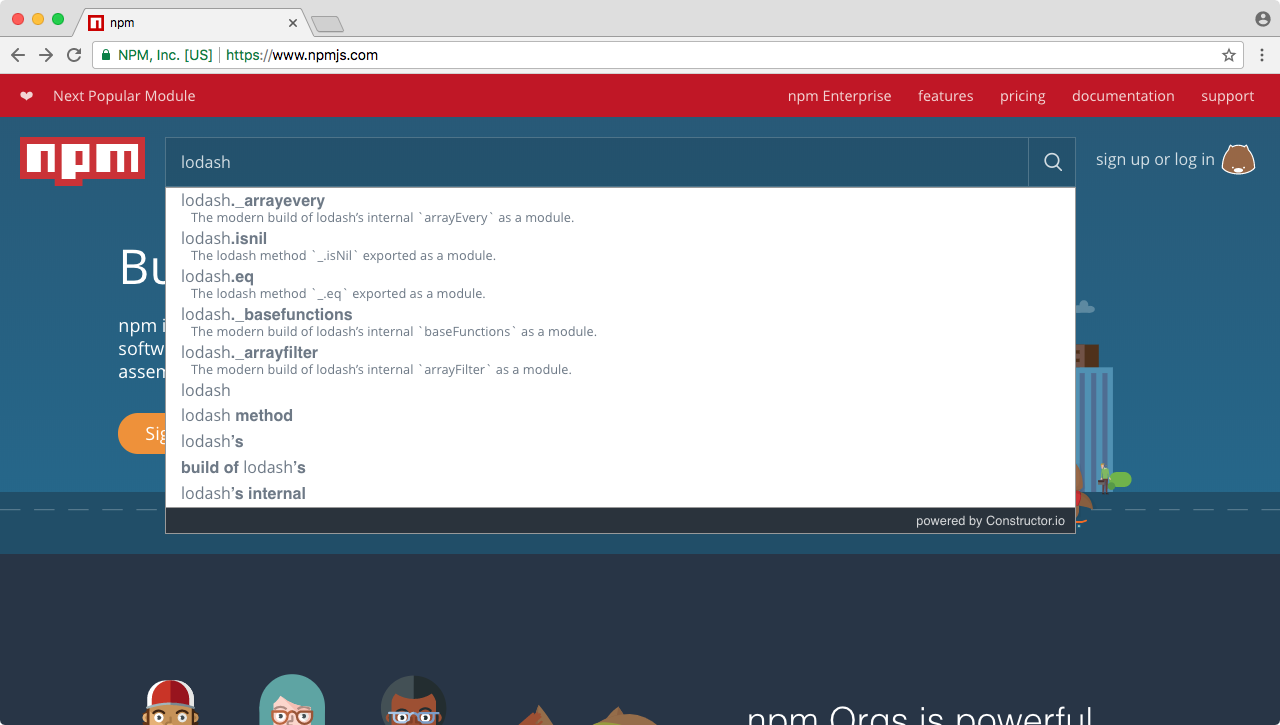
When you click on it, you should be taken to the package page, and the package page will show you a lot of statistics about the module and the documentation, as shown here:
Now, I use the lodash package page when I'm looking for new modules; I like to see how many downloads it has and when it was last updated. On the package page, you can see it was updated recently, which is great it means the package is most likely compatible with the latest versions of Node, and if you go further down the page, you can see this is actually one of the most popular npm packages, with over a million downloads a day. We will be using this module to explore how to install npm modules and how to actually use them in a project.
To install lodash, the first thing you need to grab is just a module name, which is lodash. Once you have that information, you're ready to install it.
Coming to Terminal, we'll run the npm install command. After installing, we'll specify the module, lodash. Now, this command alone would work; what we'll also do, though, is provide the save flag.
The npm install lodash command will install the module, and the save flag, -- (two) hyphens followed by the word save, will update the contents of the package.json file. Let's run this command:
npm install loadsh --save
The preceding command will go off to the npm servers and fetch the code and install it inside your project, and any time you install an npm module, it'll live in your project in a node_modules folder.
Now, if you open that node_modules folder, you'll see the lodash folder as shown in the following code. This is the module that we just installed:
{
  "name": "notes-node",
  "version": "1.0.0",
  "description": "",
  "main": "app.js",
  "scripts": {
    "test": "echo \"Error: no test specified\" && exit 1"
  },
  "author": "",
  "license": "ISC",
  "dependencies": {
    "lodash": "^4.17.4"
  }
}
As you can see over in package.json in the preceding figure, we've also had some updates automatically take place. There's a new dependencies attribute that has an object with key value pairs, where the key is the module we want to use in our project and the value is the version number, in this case, the most recent version, version 4.17.4. With this in place, we can now require our module inside the project.
Over inside app.js, we can take advantage of everything that comes in lodash by going through the same process of requiring it. We'll make a const, we'll name that const _, (which is a common name for the lodash utility library), and we'll set it equal to require(). Inside the require parentheses, we'll pass in the module name exactly as it appears in the package.json file. This is the same module name you used when you ran npm install. Then, we'll type lodash, as shown here:
console.log('Starting app.js');

const fs = require('fs');
const os = require('os');
const _ = require('lodash');
const notes = require('./notes.js');

console.log('Result:', notes.add(9, -2));

// var user = os.userInfo();
//
// fs.appendFile('greetings.txt', `Hello ${user.username}! You are ${notes.age}.`);
Now, the order of operations is pretty important here. Node will first look for a core module with the name lodash. It'll not find one because there is no core module, so the next place it will look is the node_modules folder. As shown in the following code, it will find lodash and load that module, returning any of the exports it provides:
console.log('Starting app.js');

const fs = require('fs');
const os = require('os');
const _ = require('lodash');
const notes = require('./notes.js');

console.log('Result:', notes.add(9, -2));

// var user = os.userInfo();
//
// fs.appendFile('greetings.txt', `Hello ${user.username}! You are ${notes.age}.`);
With the exports in place, we can now take advantage of some of the utilities that come with Lodash. We'll quickly explore two in this section, and we'll be exploring more throughout the book since Lodash is basically just a set of really handy utilities. Before we do, we should take a look at the documentation so we know exactly what we're getting into.
On the npm page, click the lodash link given there, or go to lodash.com and click the API Documentation page, as shown here:
You can view all of the various methods you have available to you, as shown in the following screenshot:
In our case, we'll be using command + F (Ctrl + F for Windows users) to search for _.isString. Then in the docs, we can click on it, opening it up in the main page, as shown in the following screenshot:
The _.isString is a utility that comes with lodash, and it returns true if the variable you pass in is a string, and it returns false if the value you pass in is not a string. And we can prove that by using it over in Atom. Let's use this.
To use the _.isString utility, we'll add console.log in app.js to show the result to the screen and we'll use _.isString, passing in a couple of values. Let's pass in true first, then we can duplicate this line and we'll pass in a string such as Gary, as shown here:
console.log('Starting app.js');

const fs = require('fs');
const os = require('os');
const _ = require('lodash');
const notes = require('./notes.js');

console.log(_.isString(true));
console.log(_.isString('Gary'));

// console.log('Result:', notes.add(9, -2));

// var user = os.userInfo();
//
// fs.appendFile('greetings.txt', `Hello ${user.username}! You are ${notes.age}.`);
We can run our project over in the Terminal using the same command we've used previously, node app.js, to run our file:
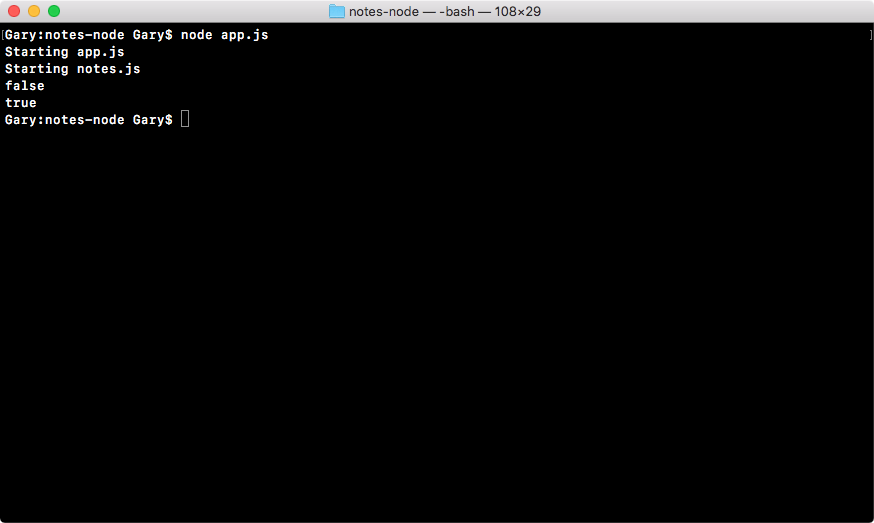
When we run the file, we get our two prompts that we've started both files, and we get false and then true. false comes because the Boolean is not a string, and true comes up because Gary is indeed a string, so it passes the test of _.isString. This is one of the many utility functions that comes bundled with lodash.
Now, lodash can do a lot more than simple type checking. It comes with a bunch of other utility methods we can take advantage of. Let's explore one more utility.
Back inside the browser, we can use command + F again to search for a new utility, which is _.uniq:
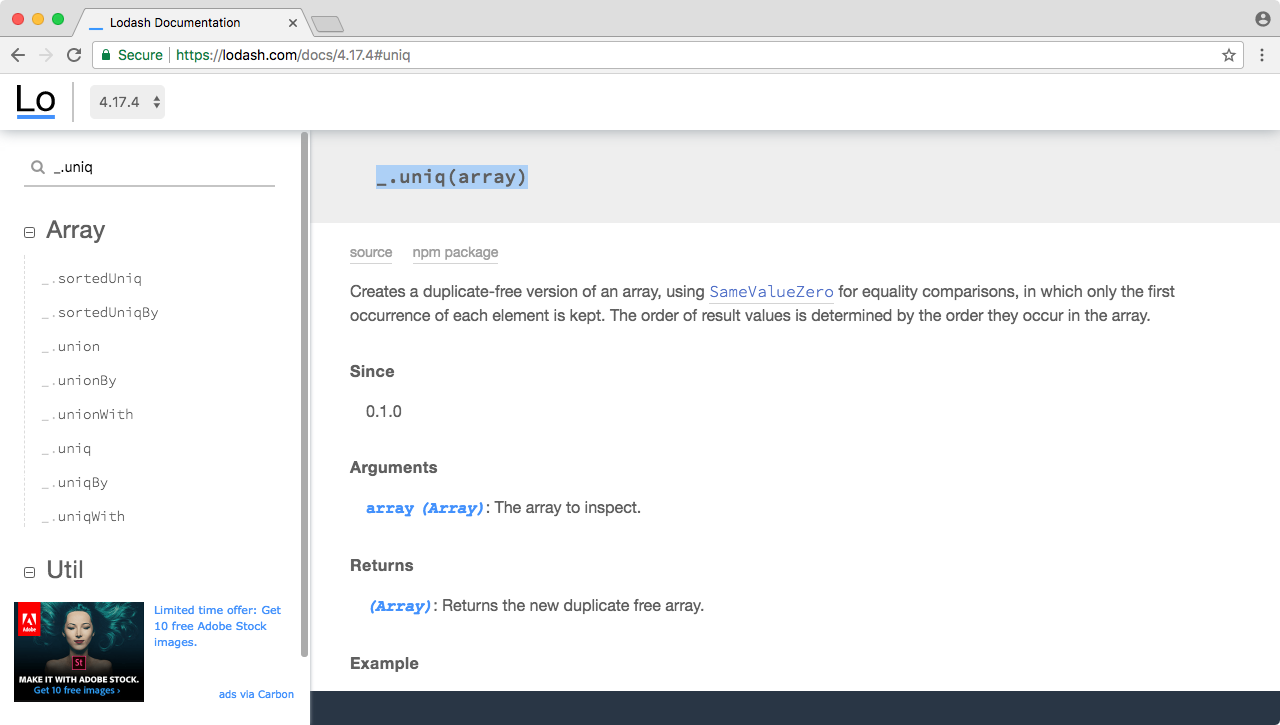
This unique method, simply takes an array and it returns that array with all duplicates removed. That means if I have the same number a few times or the same string, it'll remove any duplicates. Let's run this.
Back inside Atom, we can add this utility into our project, we'll comment out our _.isString calls and we will make a variable called filteredArray. This will be the array without the duplicates, and what we'll do is call, after the equal sign, _.uniq.
Now, as we know, this takes an array. And since we're trying to use the unique function, we'll pass in an array with some duplicates. Use your name twice as a string; I'll use my name once, followed by the number 1, followed by my name again. Then I can use 1, 2, 3, and 4 as shown here:
console.log('Starting app.js');

const fs = require('fs');
const os = require('os');
const _ = require('lodash');
const notes = require('./notes.js');

// console.log(_.isString(true));
// console.log(_.isString('Gary'));
var filteredArray = _.uniq(['Gary', 1, 'Gary', 1, 2, 3, 4]);
console.log();

// console.log('Result:', notes.add(9, -2));

// var user = os.userInfo();
//
// fs.appendFile('greetings.txt', `Hello ${user.username}! You are ${notes.age}.`);
Now, if things go as planned, we should get an array with all the duplicates removed, which means we'll have one instance of Gary, one instance of 1, and then 2, 3, and 4, which don't have duplicates.
The last thing to do is to print that using console.log so we can view it inside the Terminal. I'll pass in this filteredArray variable to our console.log statement as shown in the following code:
console.log('Starting app.js');

const fs = require('fs');
const os = require('os');
const _ = require('lodash');
const notes = require('./notes.js');

// console.log(_.isString(true));
// console.log(_.isString('Gary'));
var filteredArray = _.uniq(['Gary', 1, 'Gary', 1, 2, 3, 4]);
console.log(filteredArray);

// console.log('Result:', notes.add(9, -2));

// var user = os.userInfo();
//
// fs.appendFile('greetings.txt', `Hello ${user.username}! You are ${notes.age}.`);
From here, we can run our project inside Node. I'll use the last command, then I can press the enter key, and you can see we get our array with all duplicates removed, as shown in the following code output:
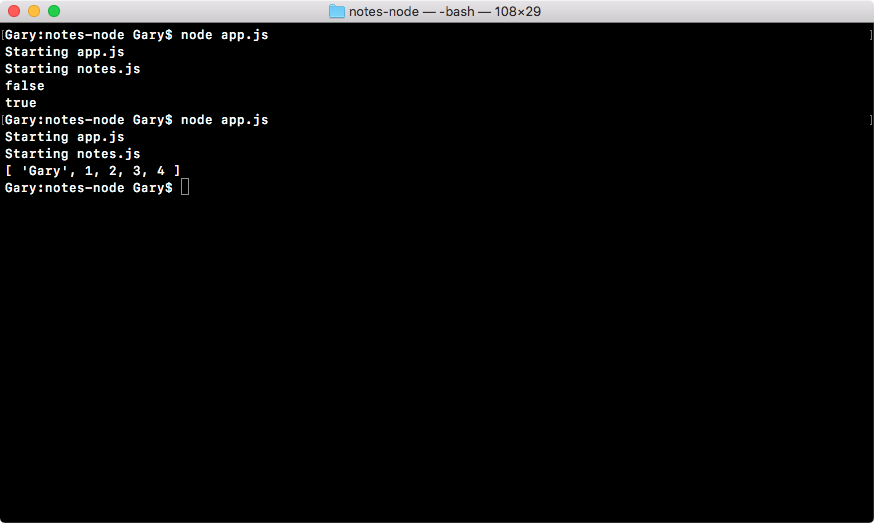
We have one instance of the string Gary, one instance of the number 1, and then we have 2, 3, 4, exactly what we expected.
The lodash utility really is endless. There are so many functions that it can be kind of overwhelming to explore at first, but as you start creating more JavaScript and Node projects, you'll find yourself solving a lot of the same problems over and over again when it comes to sorting, filtering, or type checking, and in that case, it's best to use a utility such as lodash to get that lifting done. The lodash utility is great for the following reasons:
If there were any issues, they've been sorted out by now.
Now that you know how to use a third-party module, there is one more thing I want to discuss. That is the node_modules folder in general. When you take your Node project and you put it on GitHub, or you're copying it around or sending it to a friend, the node_modules folder really shouldn't be taken with you.
The node_modules folder contains generated code. This is not code you've written and you should never make any updates to the files inside Node modules because there's a pretty good chance they'll get overwritten next time you install some modules.
In our case, we've already defined the modules and the versions inside package.json as shown in the following code because we used that handy save flag:
{
  "name": "notes-node",
  "version": "1.0.0",
  "description": "",
  "main": "app.js",
  "scripts": {
    "test": "echo \"Error: no test specified\" && exit 1"
  },
  "author": "",
  "license": "ISC",
  "dependencies": {
    "lodash": "^4.17.4"
  }
}
This actually means we can delete the node_modules folder completely. Now, we can copy the folder and give it to a friend, we can put it on GitHub, or whatever we want to do. When we want to get that node_modules folder back, all we have to do inside the Terminal is run the npm install command without any module names or any flags.
This command, when run without any names or flags, is going to load in your package.json file, grab all of the dependencies and install them. After running this command, the node_modules folder is going to look exactly as it looked before we deleted it. Now, when you are using Git and GitHub, instead of deleting the node_modules folder, you'll just ignore it from your repository.
Now, what we have explored so far is a process we'll be going through a lot more throughout the book. So if npm still seems foreign or you're not quite sure why it's even useful, it will become clear as we do more with our third-party modules, rather than just type checking or looking for unique items in an array. There's a ton of power behind the npm community and we'll be harnessing that to our fullest as we make real-world apps.
One of the major complaints I get is the fact that students have to restart the app from the Terminal every time they want to see the changes they just made inside their text editor. So, in this section, we'll take a look at how we can automatically restart our app as we make changes to the file. That means if I change from Gary to Mike and save it, it will automatically restart over in the Terminal.
Now, to automatically restart our app as we make changes to a file, we have to install a command-line utility, and we'll do this using npm. To get started, we'll go to Google Chrome (or the browser you are using) and head over to https://www.npmjs.com, as we did previously in the Installing the lodash module in our app section, and the module we're looking for is called nodemon.
The nodemon will be responsible for watching our app for changes and restarting the app when those changes occur. Right here, as we see in the following screenshot, we can view the docs for nodemon as well as various other things such as current version numbers and so on:
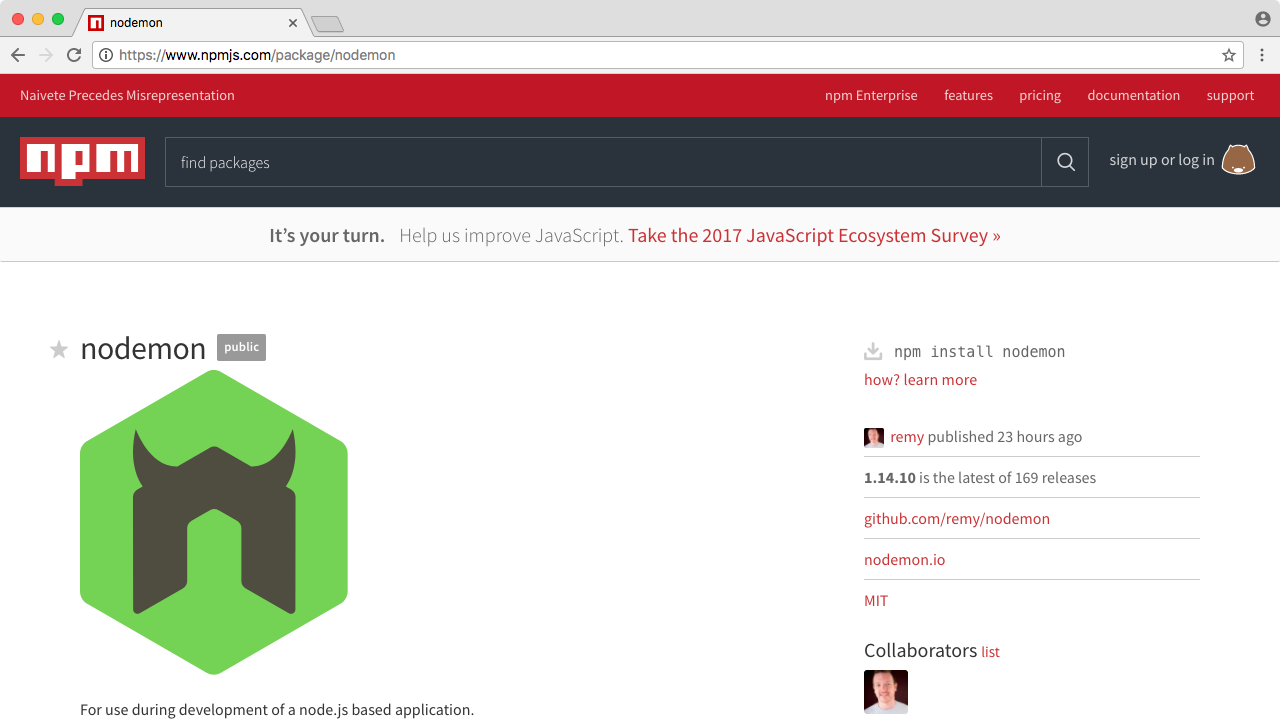
You will also notice that it's a really popular module, with over 30,000 downloads a day. Now, this module is a little different from the one we used in the last section, that is, lodash. The lodash got installed and added into our project's package.json file as shown in the following code block:
{
 "name": "notes-node",
 "version": "1.0.0",
 "description": "",
 "main": "app.js",
 "scripts": {
 "test": "echo \"Error: no test specified\" && exit 1"
 },
 "author": "",
 "license": "ISC",
 "dependencies": {
 "lodash": "^4.17.4"
 }
}
That means it went into our node_modules folder and we were able to require it in our app.js file (refer to the previous section for more detail). Nodemon, however, works a little differently. It's a command-line utility that gets executed from the Terminal. It will be a completely new way of starting our application, and to install modules to be run from the command line, we have to tweak the install command that we used in the last section.
For now, we can start off much the same way, though. We'll use npm install and type the name just like we did in the Installing the lodash module in our app section, but instead of using the save flag, we'll use the g flag, which is short for global, as shown here:
npm install nodemon -g
This command installs nodemon as a global utility on your machine, which means it'll not get added to your specific project and you'll never require nodemon. Instead, you'll be running the nodemon command from Terminal, as shown here:
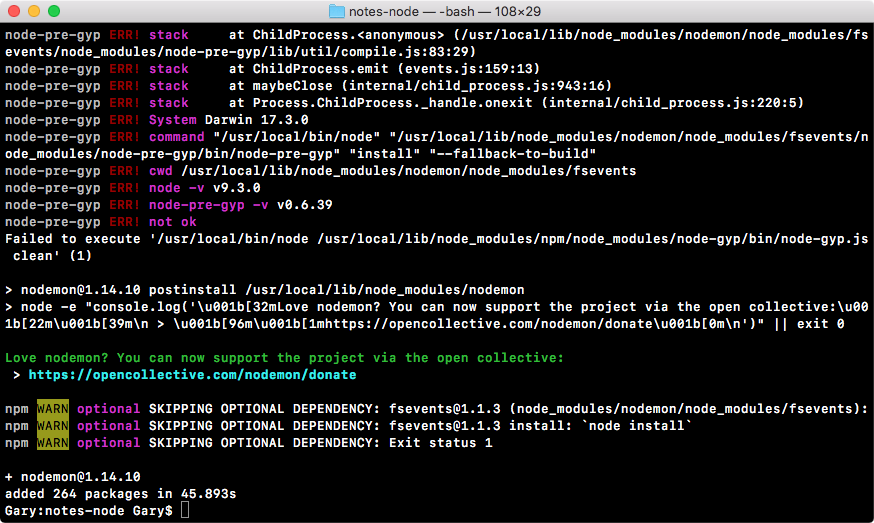
When we install nodemon using the preceding command, it'll go off to npm and fetch all of the code that comes with nodemon.
And it'll add it into the installation where Node and npm live on your machine, outside the project you're working on.
The npm install nodemon -g command could be executed from anywhere in your machine; it does not need to be executed from the project folder since it doesn't actually update the project at all. With this in place, though, we now have a brand new command on our machine, nodemon.
Nodemon will get executed as Node did, where we type the command and then we type the file we want to start. In our case, app.js is the root of our project. When you run it, you'll see a few things, as shown here:

We'll see a combination of our app's output, along with nodemon logs that show you what's happening. As shown in the preceding code, you can see the version nodemon is using, the files it's watching, and the command it actually ran. Now, at this point, it's waiting for more changes; it already ran through the entire app and it'll keep running until another change happens or until you shut it down.
Inside Atom, we'll make a few changes to our app. Let's get started by changing Gary to Mike in app.js, and then we'll change the filteredArray variable to var filteredArray = _.uniq(['Mike']), as shown in the following code:
console.log('Starting app.js');

const fs = require('fs');
const os = require('os');
const _ = require('lodash');
const notes = require('./notes.js');

// console.log(_.isString(true));
// console.log(_.isString('Gary'));
var filteredArray = _.uniq(['Mike']);
console.log(filteredArray);
Now, I'll be saving the file. In the Terminal window, you can see the app automatically restarted, and within a split second, the new output is shown on the screen:
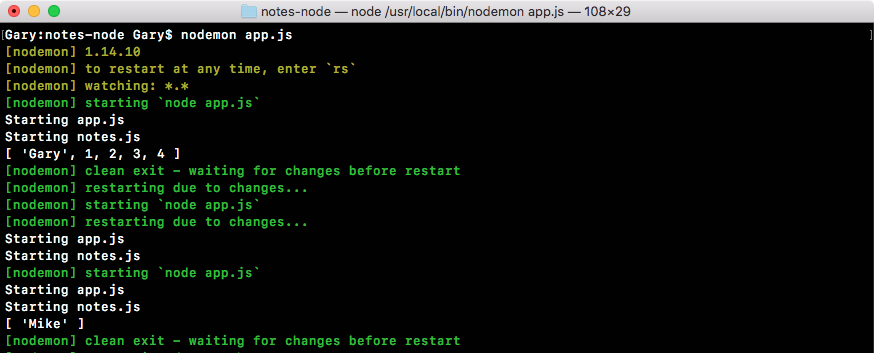
As shown in the preceding screenshot, we now have our array with one item of string, Mike. And this is the real power of nodemon.
You can create your applications and they will automatically restart over in the Terminal, which is super useful. It'll save you a ton of time and a ton of headaches. You won't have to switch back and forth every time you make a small tweak. This also prevents a ton of errors where you are running a web server, you make a change, and you forget to restart the web server. You might think your change didn't work as expected because the app is not working as expected, but in reality, you just never restarted the app.
For the most part, we will be using nodemon throughout the book since it's super useful. It's only used for development purposes, which is exactly what we're doing on our local machine. Now, we'll move forward and start exploring how we can get input from the user to create our notes application. That will the topic of the next few sections.
Before we get started, we should clean up a lot of the code we've already written in this section. I'll remove all of the commented-out code in app.js. Then, I'll simply remove os, where we have fs, os and lodash, since we'll not be using it throughout the project. I'll also be adding a space between the third-party and Node modules and the files I've written, which are as follows:
console.log('Starting app.js');

const fs = require('fs');
const _ = require('lodash');


const notes = require('./notes.js');
I find this to be a good syntax that makes it a lot easier to quickly scan for either third-party or Node modules, or the modules that I've created and required.
Next up, over in notes.js, we'll remove the add function; this was only added for demonstration purposes, as shown in the following figure. Then we can save both the notes.js and app.js files, and nodemon will automatically restart:
console.log('Starting notes.js');

module.exports.addNote = () => {
  console.log('addNote');
  return 'New note';
};

module.exports.add = (a, b) => {
  return a + b;
};
Now we can remove the greetings.txt file. That was used to demonstrate how the fs module works, and since we already know how it works, we can wipe that file. And last but not least, we can always shut down nodemon using Ctrl + C. Now we're back at the regular Terminal.
And with this in place, now we should move on, figuring out how we can get input from the user, because that's how users can create notes, remove notes, and fetch their notes.
If a user wants to add a note, we need to know the note's title as well as the body of the note. If they want to fetch a note, we need to know the title of the note they want to fetch, and all this information needs to come into our app. And note apps, don't really do anything cool until they get this dynamic user input. This is what makes your scripts useful and awesome.
Now, throughout the book, we'll be creating note apps that get input from the user in a lot of different ways. We'll be using socket I/O to get real-time info from a web app, we'll be creating our own API so other websites and servers can make Ajax requests to our app, but in this section, we'll start things off with a very basic example of how to get user input.
We'll be getting input from the user inside the command line. That means when you run the app in the command line, you'll be able to pass in some arguments. These arguments will be available inside Node, and then we can do other things with them, such as create a note, delete a note, or return a note.
To start things off, let's run our app from the Terminal. We'll run it pretty similarly to how we ran it in the earlier sections: we'll start with node (I'm not using nodemon since we'll be changing the input), then we'll use app.js, which is the file we want to run, but then we can still type other variables.
If we want to add a note, that might look as a command shown in the following code:
node app.js add
This command will add a note; we can remove a note using the remove command, as shown here:
node app.js remove
And we could list all of our notes using the list command:
node app.js list
Now, when we run this command, the app is still going to work as expected. Just because we passed in a new argument doesn't mean our app is going to crash:
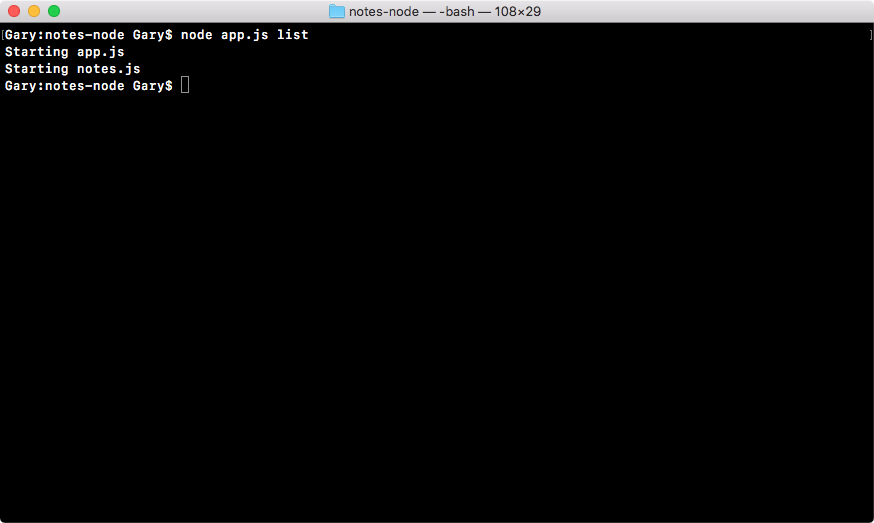
And we actually have access to the list argument already, we're just not using it inside the application.
To access the command-line arguments your app was initialized with, you'll want to use that process object that we explored in the first chapter.
We can log out all of the arguments using console.log to print them to the screen; it's on the process object, and the property we're looking for is argv.
Now save app.js and it'll look like the following:
console.log('Starting app.js');

const fs = require('fs');
const _ = require('lodash');

const notes = require('./notes.js');

console.log(process.argv);
Then we'll rerun this file:
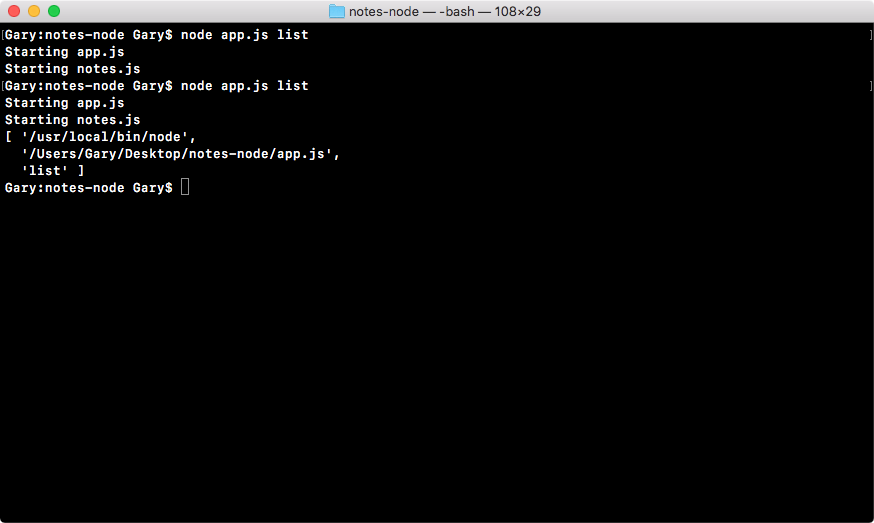
Now, as shown in the preceding command output, we have three items which are as follows:
That means we can access that third item in the array, and that will be the command for our notes application.
Let's access the command-line argument in the array now. We'll make a variable called command, and set it equal to process.argv, and we'll grab the item in the third position (which is list, as shown in the preceding command output), which is the index of two as shown here:
var command = process.argv[2];
Then we can log that out to the screen by logging out command the string. Then, as the second argument, I'll pass in the actual command that was used:
console.log('Command: ' , command);
And this is just a simple log to keep track of how the app is getting executed. The cool stuff is going to come when we add if statements that do different things depending on that command.
Let's create an if/else block below the console.log('Command: ', command);. We'll add if (command === 'add'), as shown here:
console.log('Starting app.js');

const fs = require('fs');
const _ = require('lodash');

const notes = require('./notes.js');

var command = process.argv[2];
console.log('Command: ', command);

if (command === 'add')
In this case, we'll go through the process of adding a new note. Now, we're not specifying the other arguments here, such as the title or the body (we'll discuss that in later sections). For now, if the command does equal add, we'll use console.log to print Adding new note, as shown in the following code:
console.log('Starting app.js');

const fs = require('fs');
const _ = require('lodash');

const notes = require('./notes.js');

var command = process.argv[2];
console.log('Command: ', command);

if (command === 'add') {
  console.log('Adding new note');
}
And we can do the exact same thing with a command such as list. We'll add else if (command === 'list'), as shown here:
console.log('Starting app.js');

const fs = require('fs');
const _ = require('lodash');

const notes = require('./notes.js');

var command = process.argv[2];
console.log('Command: ', command);

if (command === 'add') {
  console.log('Adding new note');
} else if (command === 'list')
If the command does equal the string list, we'll run the following block of code using console.log to print Listing all notes. We can also add an else clause if there is no command, which is console.log ('Command not recognized'), as shown here:
console.log('Starting app.js');

const fs = require('fs');
const _ = require('lodash');

const notes = require('./notes.js');

var command = process.argv[2];
console.log('Command: ', command);

if (command === 'add') {
  console.log('Adding new note');
} else if (command === 'list') {
  console.log('Listing all notes');
} else {
  console.log('Command not recognized');
}
With this in place, we can now rerun our app for a third time, and this time around, you'll see we have the command equal to list, and listing all notes shows up, as shown in the following code:
if (command === 'add') {
  console.log('Adding new note');
} else if (command === 'list') {
  console.log('Listing all notes');
} else {
  console.log('Command not recognized');
}
This means we were able to use our argument to run different code. Notice that we didn't run Adding new note and we didn't run Command not recognized. We could, however, switch the node app.js command from list to add, and in that case, we'll get Adding new note printing, as shown in the following screenshot:
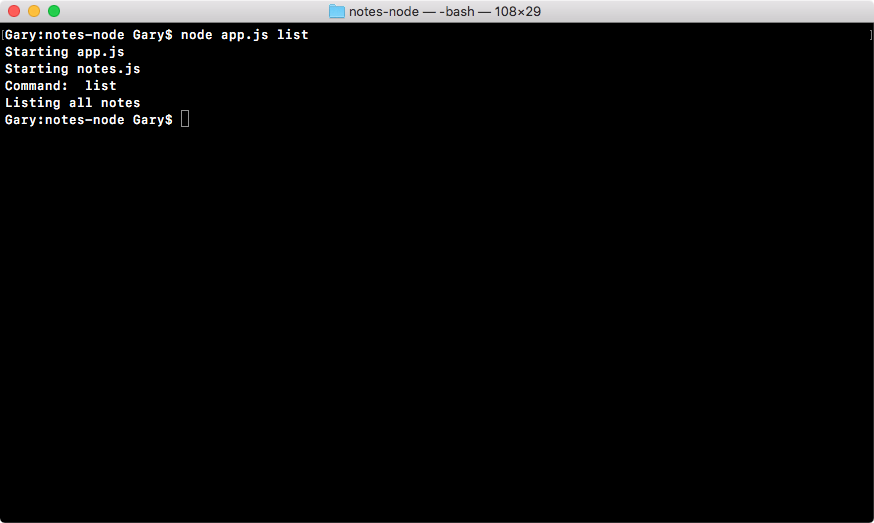
And if we run a command that doesn't exist, for example read, you can see Command not recognized prints as shown in the following screenshot:

Now, what I'd like you to do is add two more else if clauses to our if block, which will be as follows:
All you have to do is add the else if statement for both of them, and then just put a quick console.log printing something like Fetching note or Removing note.
Take a moment to knock that out as your challenge for this section. Once you add those two else if clauses, run both of them from the Terminal and make sure your log shows up. If it does show up, you are done, you can move ahead with this section.
For the solution, the first thing I'll do is to add an else if for read. I'll open and close my curly braces and hit enter right in the middle so everything gets formatted correctly.
In the else if statement, I'll check whether the command variable equals the string read, as shown here:
console.log('Starting app.js');

const fs = require('fs');
const _ = require('lodash');

const notes = require('./notes.js');

var command = process.argv[2];
console.log('Command: ', command);

if (command === 'add') {
  console.log('Adding new note');
} else if (command === 'list') {
  console.log('Listing all notes');
} else if () {

} else {
  console.log('Command not recognized');
}
For now, we'll use console.log to print Reading note:
console.log('Starting app.js');

const fs = require('fs');
const _ = require('lodash');

const notes = require('./notes.js');

var command = process.argv[2];
console.log('Command: ', command);

if (command === 'add') {
  console.log('Adding new note');
} else if (command === 'list') {
  console.log('Listing all notes');
} else if (command === 'read') {

} else {
  console.log('Command not recognized');
}
The next thing you need to do is add an else if clause that checks whether the command equals remove. In the else if, I'll open and close my condition and hit enter just as I did in the previous else if clause; this time, I'll add if the command equals remove, we want to remove the note. And in that case, all we'll do is to use console.log to print Reading note, as shown in the following code:
console.log('Starting app.js');

const fs = require('fs');
const _ = require('lodash');

const notes = require('./notes.js');

var command = process.argv[2];
console.log('Command: ', command);

if (command === 'add') {
  console.log('Adding new note');
} else if (command === 'list') {
  console.log('Listing all notes');
} else if (command === 'read') {
  console.log('Reading note');
} else {
  console.log('Command not recognized');
}
And with this in place, we are done. If we refer to the code block, we've added two new commands we can run over in the Terminal, and we can test those:
if (command === 'add') {
  console.log('Adding new note');
} else if (command === 'list') {
  console.log('Listing all notes');
} else if (command === 'read') {
  console.log('Reading note');
} else {
  console.log('Command not recognized');
}
First up, I'll run node app.js with the read command, and Reading note shows up:
console.log('Starting app.js');

const fs = require('fs');
const _ = require('lodash');

const notes = require('./notes.js');

var command = process.argv[2];
console.log('Command: ', command);

if (command === 'add') {
  console.log('Adding new note');
} else if (command === 'list') {
  console.log('Listing all notes');
} else if (command === 'read') {
  console.log('Reading note');
} else if (command == 'remove') {
  console.log('Removing note');
} else {
  console.log('Command not recognized');
}
Then I'll rerun the command; this time, I'll be using remove. And when I do that, Removing note prints to the screen, as shown in this screenshot:
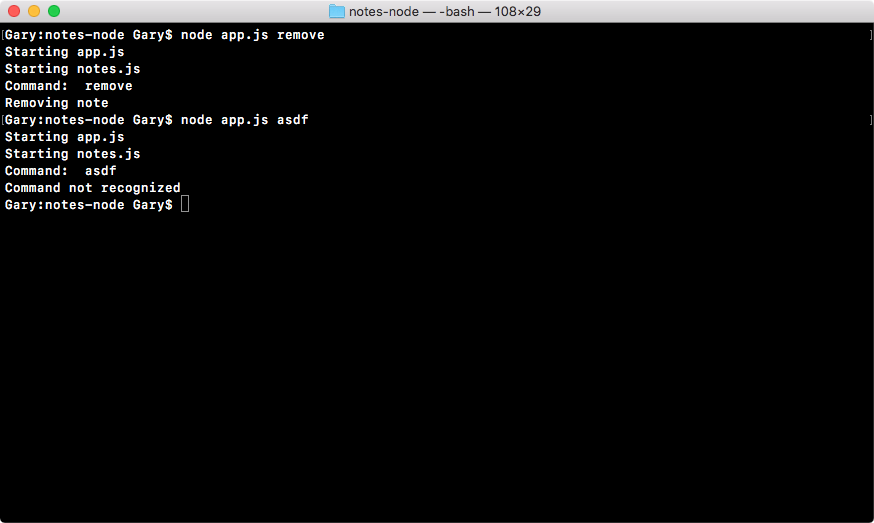
I'll wrap up my testing using a command that doesn't exist, and when I run that, you can see Command not recognized shows up.
Now, what we did in the previous subsection is step 1. We now have support for various commands. The next thing we need to figure out is how we'll get more specific information. For example, which note do you want to remove? Which note do you want to read? And what do you want the note text to be in the case of adding a note? This is all information we need to get from the Terminal.
Now, getting it is going to be pretty similar to what we did earlier, and to show you what it looks like, we'll print the entire argv object once again, using the following command:
console.log(process.argv);
Over in the Terminal, we can now run a more complex command. Let's say we want to remove a note using the node app.js remove command, and we'll do that by its title. We might use the title argument, which looks like the following code:
node app.js remove --title
In this title argument, we have -- (two) hyphens followed by the argument name, which is title, followed by the = (equals) sign. Then we can type our note title. Maybe the note title is secrets. This will pass the title argument into our application.
Now, there are a couple of different ways you could format the title argument, which are as follows:
node app.js remove --title=secrets
node app.js remove --title="secrets 2"
No matter how you choose to format your argument, these are all valid ways to pass in the title.
For the moment, I'll keep the = (equals) sign and the quotes and rerun the command:
node app.js remove --title="secrets 2"
When I run the command, you can see in the following code output that we have our two arguments:
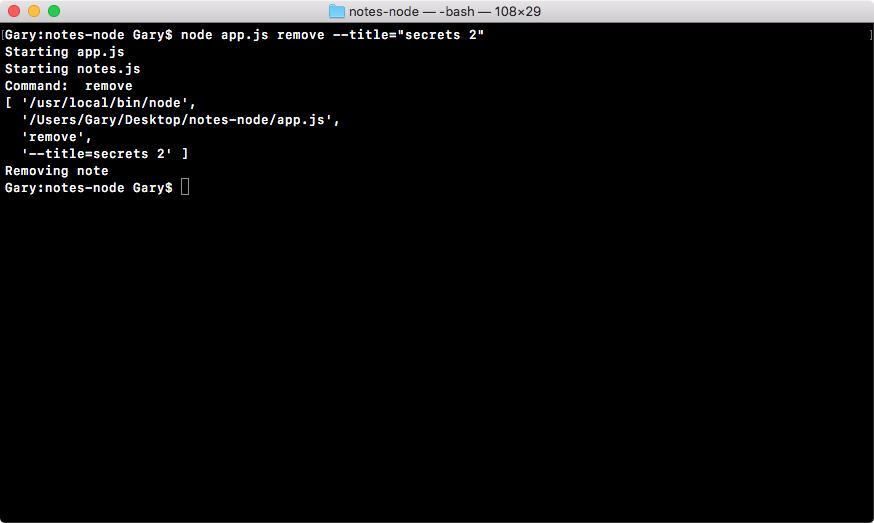
These are the arguments that we don't need, then we have our remove command, which is the third one, and we now have a new fourth string, the title that is equal to secrets 2. And our argument was successfully passed into the application. The problem is that it's not very easy to use. In the fourth string, we have to parse out the key, which is title, and the value, which is secrets 2.
When we used the command, which was the third argument in the previous section, it was a lot easier to use inside our app. We simply pulled it out of the arguments array and we referenced it by using the command variable and checking whether it equaled add, list, read, or remove.
Things get a lot more complex as we use different styles for passing in the arguments. If we rerun the last command with a space instead of an = (equals) sign, as shown in the following code, which is perfectly valid, our arguments array now looks completely different:
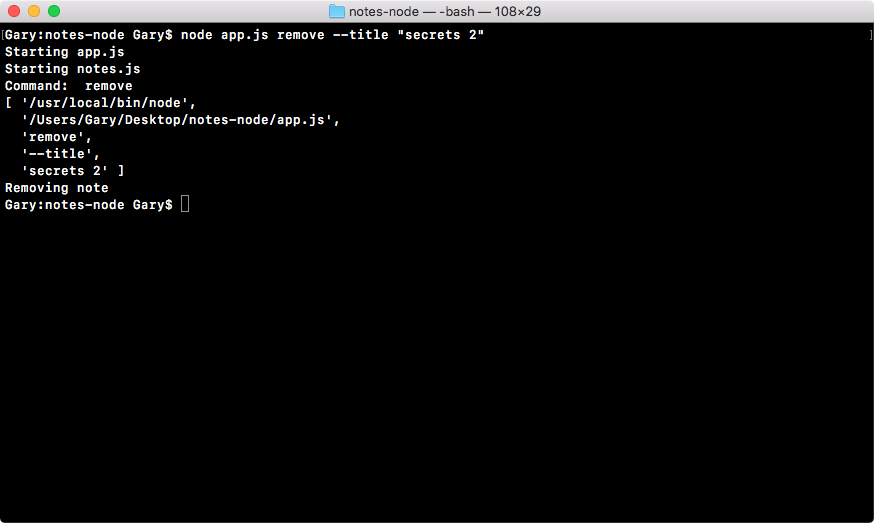
In the preceding code output, you can see that we have the title as the fourth item, and we have the value, which is secrets 2, as the fifth, which means we have to add other conditions for parsing. And this turns into a pain really quickly, which is why we will not do it.
We'll use a third-party module called yargs in the next chapter to make parsing the command-line arguments effortless. Instead of having strings, as shown in this one or the one we discussed earlier, we'll get an object where the title property equals the secrets 2 string. That will make it super easy to implement the rest of the notes application.
Now, parsing certain types of command-line arguments, such as key value pairs, becomes a lot more complex, which is why, in the next chapter, we'll be using yargs to do just that.
In this chapter, we learned how to use require to load in modules that come with Node.js. We created our files for our notes application and required them inside app.js. We explored how to use built-in modules and we explored how to use modules we defined. We found out how to require other files that we created, and how to export things such as properties and functions from those files.
We explored npm a little bit, how we can use npm init to generate a package.json file, and how we can install and use third-party modules. Next, we explored the nodemon module, using it to automatically restart our app as we make changes to a file. Last, we learned how to get input from the user, which is needed to create the notes application. We learned that we can use command-line arguments to pass data into our app.
In the next chapter, we'll explore some more interesting Node fundamental concepts, including yargs, JSON, and Refactor.
In this chapter, we'll continue our discussion on some more node fundamentals. We'll explore yargs, and we'll see how to parse command-line arguments using process.argv and yargs. After that, we'll explore JSON. JSON is nothing more than a string that looks kind of like a JavaScript object, with the notable differences being that it uses double quotes instead of single quotes and all of your property names—like name and age, in this case—require quotes around them. We'll look into how to convert an object into a string, then define that string, use it, and convert it back to an object.
After we've done that, we'll fill out the addNote function. Finally, we'll look into refactor, moving the functionality into individual functions and testing the functionality.
More specifically, we'll go through following topics:
In this section, we will use yargs, a third-party npm module, to make the process of parsing much easier. It will let us access things such as title and body information without needing to write a manual parser. This is a great example of when you should look for an npm module. If we don't use a module, it would be more productive for our Node application to use a third-party module that has been tested and thoroughly vetted.
To get started, we'll install the module, then we'll add it into the project, parsing for things such as a title of the body, and we'll call all the functions that will get defined over in notes.js. If the command is add, we'll call add note, so on.
Now, let's view the documents page for yargs. It's always a good idea to know what you're getting yourself into. If you search for yargs on Google, you should find the GitHub page as your first search result. As shown in the following screenshot, we have the GitHub page for the yargs library:
Now, yargs is a very complex library. It has a ton of features for validating all sorts of input, and it has different ways in which you can format that input. We will start with a very basic example, although we will be introducing more complex examples throughout this chapter.
We'll now move into Terminal to install this module inside of our application. To do this, we'll use npm install followed by the module name, yargs, and in this case, I'll use the @ sign to specify the specific version of the module I want to use, 11.0.0, which is the most recent version at the time of writing. Next, I'll add the save flag, which, as we know, updates the package.json file:
npm install yargs@11.0.0 --save
Now that we've installed yargs, we can move over into Atom, inside of app.js, and get started with using it. The basics of yargs, the very core of its feature set, is really simple to take advantage of. The first thing we'll do is to require it up, as we did with fs and lodash in the previous chapter. Let's make a constant and call it yargs, setting it equal to require('yargs'), as shown here:
console.log('Starting app.js');

const fs = require('fs');
const _ = require('lodash');
const yargs = require('yargs');

const notes = require('./notes.js');

var command = process.argv[2];
console.log('Command:', command);
console.log(process.argv);

if (command === 'add') {
  console.log('Adding new note');
} else if (command === 'list') {
  console.log('Listing all notes');
} else if (command === 'read') {
  console.log('Reading note');
} else if (command === 'remove') {
  console.log('Removing note');
} else {
  console.log('Command not recognized');
}
From here, we can fetch the arguments as yargs parses them. It will take the same process.argv array that we discussed in the previous chapter, but it goes behind the scenes and parses it, giving us something that's much more useful than what Node gives us. Just above the command variable, we can make a const variable called argv, setting it equal to yargs.argv, as shown here:
console.log('Starting app.js');

const fs = require('fs');
const _ = require('lodash');
const yargs = require('yargs');

const notes = require('./notes.js');

const argv = yargs.argv;
var command = process.argv[2];
console.log('Command:', command);
console.log(process.argv);

if (command === 'add') {
  console.log('Adding new note');
} else if (command === 'list') {
  console.log('Listing all notes');
} else if (command === 'read') {
  console.log('Reading note');
} else if (command === 'remove') {
  console.log('Removing note');
} else {
  console.log('Command not recognized');
}
The yargs.argv module is where the yargs library stores its version of the arguments that your app ran with. Now we can print it using console.log, and this will let us take a look at the process.argv and yargs.argv variables; we can also compare them and see how yargs differs. For the command where we use console.log to print process.argv, I'll make the first argument a string called Process so that we can differentiate it in Terminal. We'll call console.log again. The first argument will be the Yargs string, and the second one will be the actual argv variable, which comes from yargs:
console.log('Starting app.js');

const fs = require('fs');
const _ = require('lodash');
const yargs = require('yargs');

const notes = require('./notes.js');

const argv = yargs.argv;
var command = process.argv[2];
console.log('Command:', command);
console.log('Process', process.argv);
console.log('Yargs', argv);

if (command === 'add') {
  console.log('Adding new note');
} else if (command === 'list') {
  console.log('Listing all notes');
} else if (command === 'read') {
  console.log('Reading note');
} else if (command === 'remove') {
  console.log('Removing note');
} else {
  console.log('Command not recognized');
}
Now we can run our app (refer to the preceding code block) a few different ways and see how these two console.log statements differ.
First up, we'll run at node app.js with the add command, and we can run this very basic example:
node app.js add
We already know what the process.argv array looks like from the previous chapter. The useful information is the third string inside of the array, which is 'add'. In the fourth string, Yargs gives us an object that looks very different:
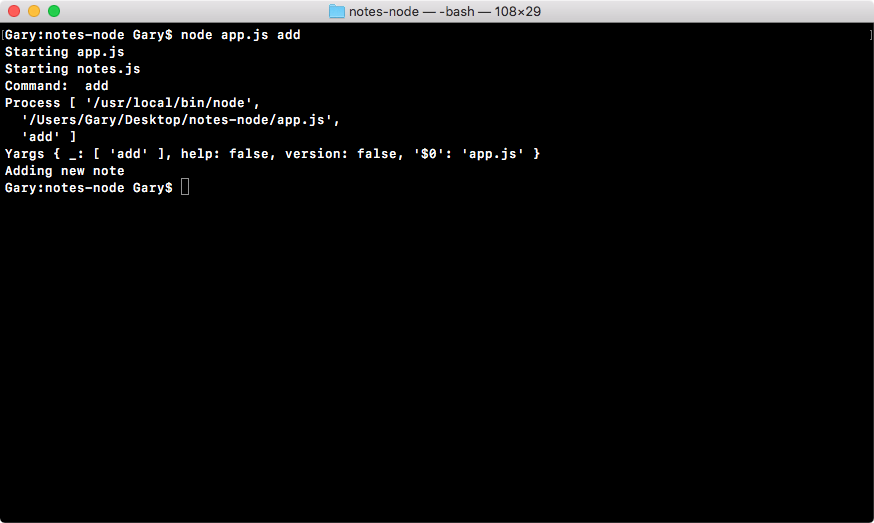
As shown in the preceding code output, first we have the underscore property, then commands such as add are stored.
If I were to add another command, say add, and then I were to add a modifier, say encrypted, you would see that add would be the first argument and encrypted the second, as shown here:
node app.js add encrypted
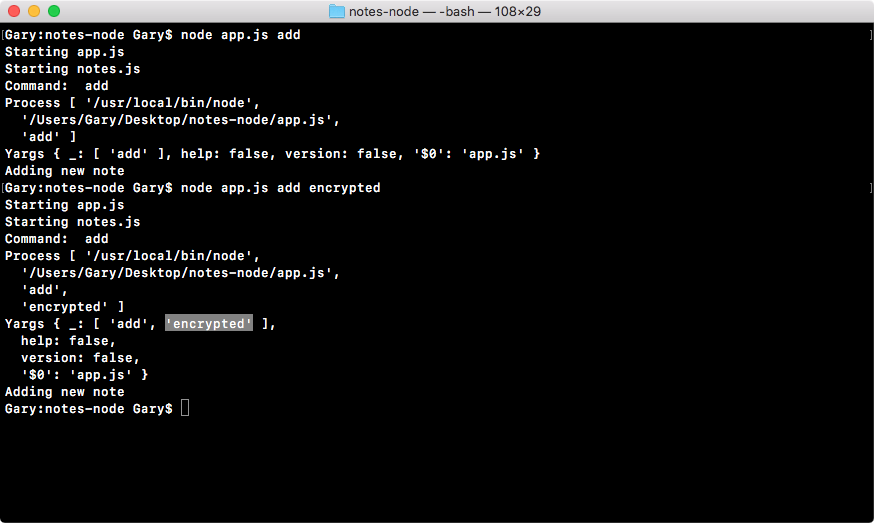
So far, yargs really isn't shining. This isn't much more useful than what we have in the previous example. Where it really shines is when we start passing in key-value pairs, such as the title example we used in the Getting input section of Node Fundamentals - Part 1 in chapter 2. I can set my title flag equal to secrets, press enter, and this time around, we get something much more useful:
node app.js add --title=secrets
In the following code output, we have the third string that we would need to parse in order to fetch the value and the key, and in the fourth string, we actually have a title property with a value of secrets:
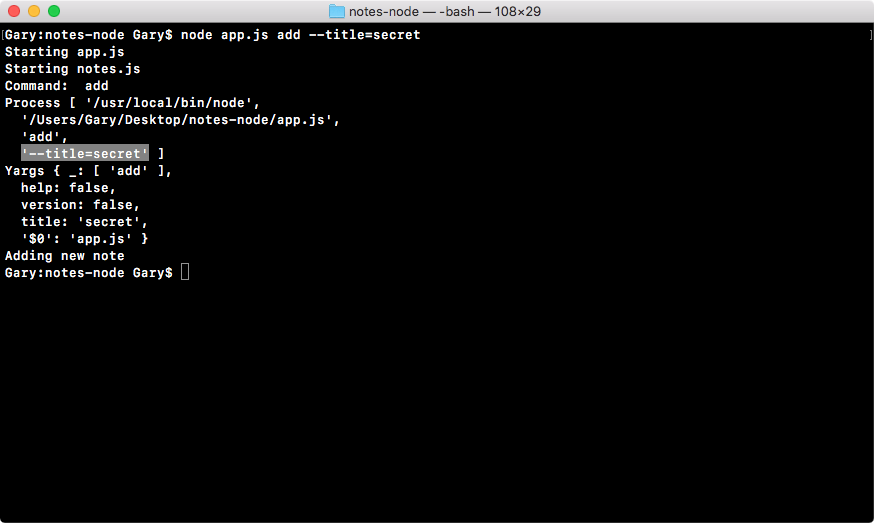
Also, yargs has built-in parsing for all the different ways you could specify this.
We can insert a space after title, and it will still work just as it did before; we can add quotes around secrets, or add other words, like secrets from Andrew, and it will still parses it correctly, setting the title property to the secrets from Andrew string, as shown here:
node app.js add --title "secrets from Andrew"
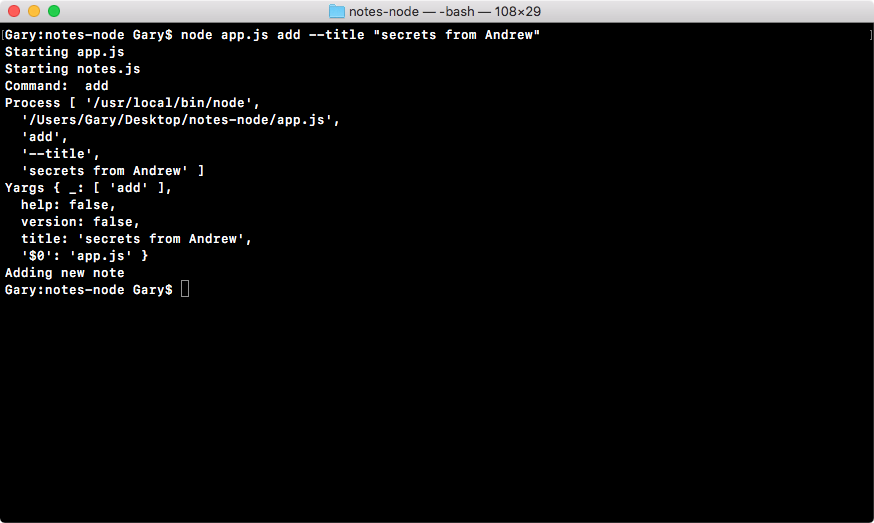
This is where yargs really shines! It makes the process of parsing your arguments a lot easier. This means that inside our app, we can take advantage of that parsing and call the proper functions.
Let's work with the add command, for example, for parsing your arguments and calling the functions. Once the add command gets called, we want to call a function defined in notes, which will be responsible for actually adding the note. The notes.addNote function will get the job done. Now, what do we want to pass to the addNote function? We want to pass in two things: the title, which is accessible on argv.title, as we saw in the preceding example; and the body, argv.body:
console.log('Starting app.js');

const fs = require('fs');
const _ = require('lodash');
const yargs = require('yargs');

const notes = require('./notes.js');

const argv = yargs.argv;
var command = process.argv[2];
console.log('Command:', command);
console.log('Process', process.argv);
console.log('Yargs', argv);

if (command === 'add') {
  console.log('Adding new note');
  notes.addNote(argv.title, argv.body);
} else if (command === 'list') {
  console.log('Listing all notes');
} else if (command === 'read') {
  console.log('Reading note');
} else if (command === 'remove') {
  console.log('Removing note');
} else {
  console.log('Command not recognized');
}
Now that we have notes.addNote in place, we can remove our console.log statement, which was just a placeholder, and we can move into the notes application notes.js.
Inside notes.js, we'll get started by making a variable with the same name as the method we used over app.js and addNote, and we will set it equal to an anonymous arrow function, as shown here:
var addNote = () => {

};
Now, this alone isn't too useful, because we're not exporting the addNote function. Below the variable, we can define module.exports in a slightly different way. In previous sections, we added properties onto exports to export them. We can actually define an entire object that gets set to exports, and in this case, we can set addNote equal to the addNote function defined in preceding code block:
module.exports = {
  addNote: addNote
};
In the preceding code, we're setting an object equal to module.exports, and that object has a property, addNote, which points to the addNote function we defined as a variable in the preceding code block.
Once again, addNote: and addNote are identical inside of ES6. We will be using the ES6 syntax for everything throughout this book.
Now I can take my two arguments, title and body, and actually do something with them. In this case, we'll call console.log and Adding note, passing in the two arguments as the second and third argument to console.log, title and body, as shown here:
var addNote = (title, body) => {
  console.log('Adding note', title, body);
};
Now we're in a pretty good position to run the add command with title and body and see if we get exactly what we'd expect, which is the console.log statement shown in the preceding code to print.
Over in Terminal, we can start by running the app with node app.js, and then specify the filename. We'll use the add command; which will run the appropriate function. Then, we'll pass in title, setting it equal to secret, and then we can pass in body, which will be our second command-line argument, setting that equal to the string, This is my secret:
node app.js add --title=secret --body="This is my secret"
In this command, we specified three things: the add command the title argument, which gets set to secret; and the body argument, which gets set to "This is my secret". If all goes well, we'll get the appropriate log. Let's run the command.
In the following command output, you can see Adding note secret, which is the title; and This is my secret, which is the body:
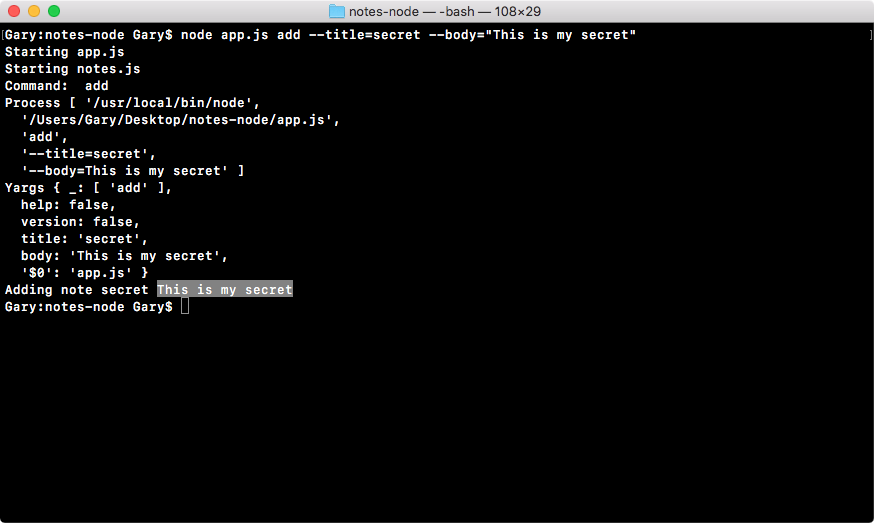
With this in place, we now have one of our methods set up and ready to go. The next thing that we'll do is convert the other commands we have—the list, read, and remove commands. Let's look into one more command, and then you'll do the other two by yourself as exercises.
Now, with the list command, I'll remove the console.log statement and call notes.getAll, as shown here:
console.log('Starting app.js');

const fs = require('fs');
const _ = require('lodash');
const yargs = require('yargs');

const notes = require('./notes.js');

const argv = yargs.argv;
var command = process.argv[2];
console.log('Command:', command);
console.log('Process', process.argv);
console.log('Yargs', argv);

if (command === 'add') {
  notes.addNote(argv.title, argv.body);
} else if (command === 'list') {
  notes.getAll();
} else if (command === 'read') {
  console.log('Reading note');
} else if (command === 'remove') {
  console.log('Removing note');
} else {
  console.log('Command not recognized');
}
At some point, notes.getAll will return all of the notes. Now, getAll doesn't take any arguments since it will return all of the notes regardless of the title. The read command will require a title, and remove will also require the title of the note you want to remove.
For now, we can create the getAll function. Inside notes.js, we'll go through that process again. We'll start by making a variable, calling it getAll, and setting it equal to an arrow function, which we've used before. We start with our arguments list, then we set up the arrow (=>), which is the equal sign and the greater than sign. Next, we specify the statements we want to run. Inside our code block, we'll run console.log(Getting all notes), as shown here:
var getAll = () => {
  console.log('Getting all notes');
};
The last step to the process after adding that semicolon will be to add getAll to the exports, as shown in the following code block:
module.exports = {
  addNote,
  getAll
};
Now that we have getAll in notes.js in place, and we've wired it up in app.js, we can run things over in Terminal. In this case, we'll run the list command:
node app.js list
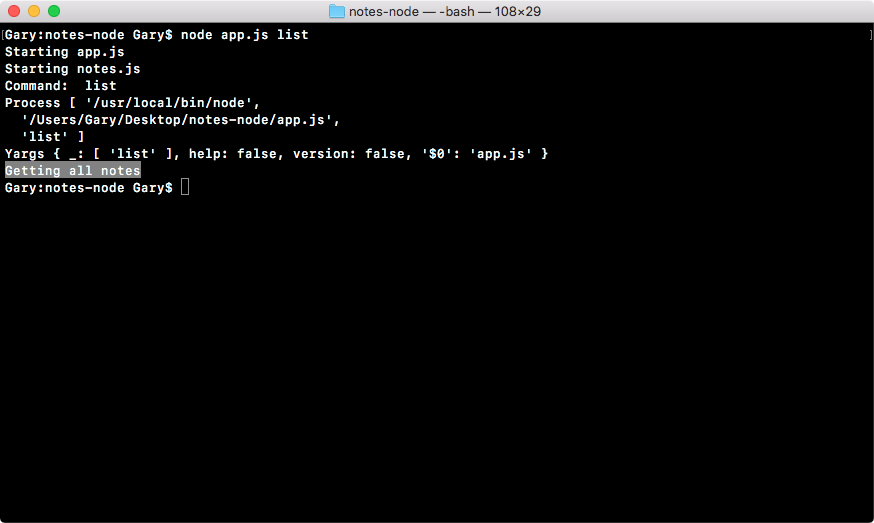
In the preceding code output, you can see at the bottom that Getting all notes prints to the screen. Now that we have this in place, we can remove console.log('Process', process.argv) from the command variable in app.js. The resultant code will look like the following code block:
console.log('Starting app.js');

const fs = require('fs');
const _ = require('lodash');
const yargs = require('yargs');

const notes = require('./notes.js');

const argv = yargs.argv;
var command = process.argv[2];
console.log('Command:', command);
console.log('Yargs', argv);

if (command === 'add') {
  notes.addNote(argv.title, argv.body);
} else if (command === 'list') {
  notes.getAll();
} else if (command === 'read') {
  console.log('Reading note');
} else if (command === 'remove') {
  console.log('Removing note');
} else {
  console.log('Command not recognized');
}
We will keep the yargs log around since we'll be exploring the other ways and methods to use yargs throughout the chapter.
Now that we have the list command in place, next, I'd like you to create a method for the read and remove commands.
When the read command is used, we want to call notes.getNote, passing in title. Now, title will get passed in and parsed using yargs, which means that we can use argv.title to fetch it. And that's all we have to do when it comes to calling the function:
console.log('Starting app.js');

const fs = require('fs');
const _ = require('lodash');
const yargs = require('yargs');

const notes = require('./notes.js');

const argv = yargs.argv;
var command = process.argv[2];
console.log('Command:', command);
console.log('Yargs', argv);

if (command === 'add') {
  notes.addNote(argv.title, argv.body);
} else if (command === 'list') {
  notes.getAll();
} else if (command === 'read') {
  notes.getNote(argv.title);
} else if (command === 'remove') {
  console.log('Removing note');
} else {
  console.log('Command not recognized');
}
The next step is to define getNote, because currently it doesn't exist. Over in notes.js, right below the getAll variable, we can make a variable called getNote, which will be a function. We'll use the arrow function, and it will take an argument; it will take the note title. The getNote function takes the title, then it returns the body for that note:
var getNote = (title) => {

};
Inside getNote, we can use console.log to print something like Getting note, followed by the title of the note you will fetch, which will be the second argument to console.log:
var getNote = (title) => {
  console.log('Getting note', title);
};
This is the first command, and we can now test it before we go on to the second one, which is remove.
Over in Terminal, we can use node app.js to run the file. We'll be using the new read command, passing in a title flag. I'll use a different syntax, where title gets set equal to the value outside of quotes. I'll use something like accounts:
node app.js read --title accounts
This accounts value will read the accounts note in the future, and it will print it to the screen, as shown here:
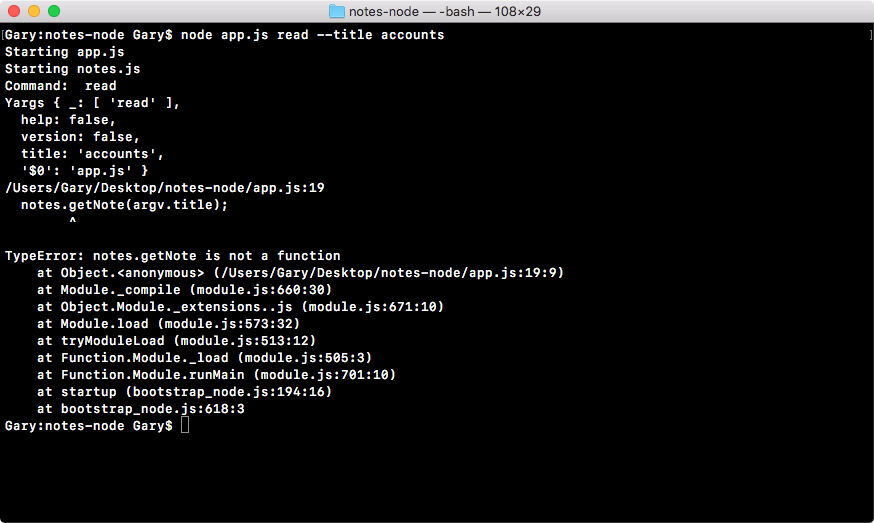
As you can see in the preceding code output, we get an error, which we'll debug now.
Getting an error is not the end of the world. Getting an error usually means that you have a small typo or you forgot one step in the process. So, we'll first figure out how to parse through these error messages, because the error messages you get in the code output can be pretty daunting. Let's refer to the code output error here:

As you can see, the first line shows you where the error occurred. It's inside of our app.js file, and the number 19 after the colon is the line number. It shows you exactly where things went bad. The TypeError: notes.getNote is not a function line is telling you pretty clearly that the getNote function you tried to run doesn't exist. Now we can take this information and debug our app.
In app.js, we see that we call notes.getNote. Everything looks great, but when we move into notes.js, we realize that we never actually exported getNote. This is why when we try to call the function, we get getNote is not a function. All we have to do to fix that error message is export getNote, as shown here:
module.exports = {
  addNote,
  getAll,
  getNote
};
Now when we save the file and rerun the app from Terminal, we'll get what we expect—Getting note followed by the title, which is accounts, as shown here:
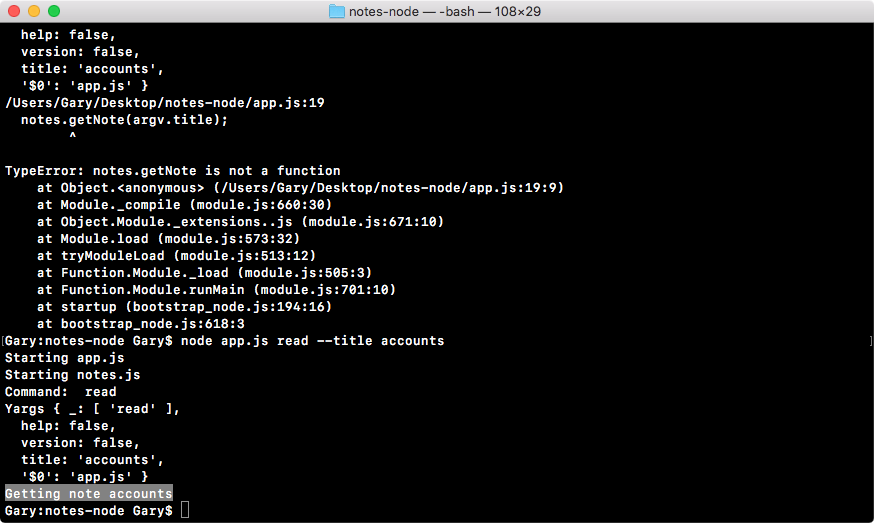
This is how we can debug our error messages. Error messages contain really useful information. For the most part, the first couple of lines are code that you've written, and the other ones are internal Node code or third-party modules. In our case, the first line of the stack trace is important, as it shows exactly where the error occurred.
Now, since the read command is working, we can move on to the last one, which is the remove command. Here, I'll call notes.removeNote, passing in the title, which as we know is available in argv.title:
console.log('Starting app.js');

const fs = require('fs');
const _ = require('lodash');
const yargs = require('yargs');

const notes = require('./notes.js');

const argv = yargs.argv;
var command = process.argv[2];
console.log('Command:', command);
console.log('Yargs', argv);

if (command === 'add') {
  notes.addNote(argv.title, argv.body);
} else if (command === 'list') {
  notes.getAll();
} else if (command === 'read') {
  notes.getNote(argv.title);
} else if (command === 'remove') {
  notes.removeNote(argv.title);
} else {
  console.log('Command not recognized');
}
Next up, we'll define the removeNote function over inside of our notes API file, right below the getNote variable:
var removeNote = (title) => {
 console.log('Removing note', title);
};
Now, removeNote will work much the same way as getNote. All it needs is the title; it can use this information to find the note and remove it from the database. This will be an arrow function that takes the title argument.
In this case, we'll print the console.log statement, Removing note; then, as the second argument, we'll simply print title back to the screen to make sure that it's going through the process successfully. This time around, we'll export our removeNote function; we'll define it using the ES6 syntax:
module.exports = {
  addNote,
  getAll,
  getNote,
  removeNote
};
The last thing to do is test it and make sure it works. We can reload the last command using the up arrow key. We change read to remove, and that is all we need to do. We're still passing in the title argument, which is great, because that is what remove needs:
node app.js remove --title accounts
When I run this command, we get exactly what we expected. Removing note prints to the screen, as shown in the following code output, and then we get the title of the note that we're supposed to be removing, which is accounts:
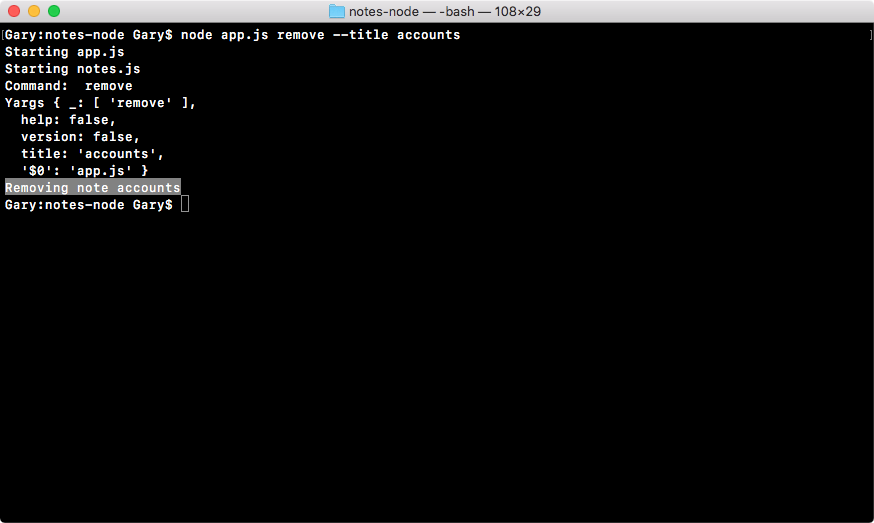
This looks great! That is all it takes to use yargs to parse your arguments.
With this, we now have a place to define all of that functionality, for saving, reading, listing, and removing notes.
The last thing I want to discuss before we wrap up this section is—how we fetch command.
As we know, command is available in the _ property as the first and only item. This means that in the app.js, var command statement, we can set command equal to argv, then ._, and then we'll use [] to grab the first item in the array, as shown in the following code:
console.log('Starting app.js');

const fs = require('fs');
const _ = require('lodash');
const yargs = require('yargs');

const notes = require('./notes.js');

const argv = yargs.argv;
var command = argv._[0];
console.log('Command:', command);
console.log('Yargs', argv);

if (command === 'add') {
  notes.addNote(argv.title, argv.body);
} else if (command === 'list') {
  notes.getAll();
} else if (command === 'read') {
  notes.getNote(argv.title);
} else if (command === 'remove') {
  notes.removeNote(argv.title);
} else {
  console.log('Command not recognized');
}
With this in place, we now have the same functionality, but we'll use yargs everywhere. If I rerun the last command, we can test that the functionality still works. And it does! As shown in the following command output, we can see that Command: remove shows up:
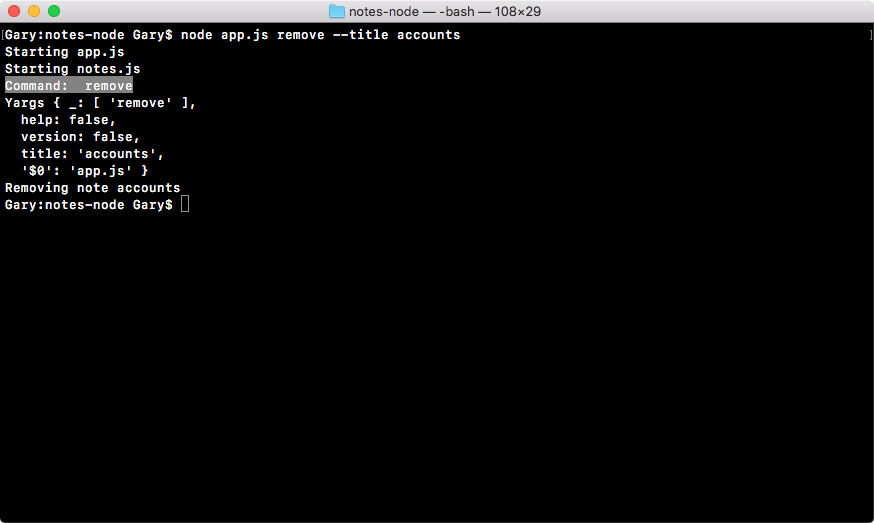
Next, we'll look into filling out the individual functions. We'll take a look first at how we can use JSON to store our notes inside our file system.
Now that you know how to parse command-line arguments using process.argv and yargs, you've solved the first piece to the puzzle for the notes application. Now, how do we get that unique input from the user? The second piece to the puzzle is to solve how we store this information.
When someone adds a new note, we want to save it somewhere, preferably on the filesystem. So the next time they try to fetch, remove, or read that note, they actually get the note back. To do this, we'll need to introduce something called JSON. If you're already familiar with JSON, you probably know it is super popular. It stands for JavaScript Object Notation, and it's a way to represent JavaScript arrays and objects using a string. Now, why would you ever want to do that?
Well, you might want to do that because strings are just text, and that's pretty much supported anywhere. I can save JSON to a text file, and then I can read it later, parse it back into a JavaScript array or object, and do something with it. This is exactly what we'll take a look at in this section.
To explore JSON and how it works, let's go ahead and make a new folder inside our project called playground.
In the playground folder, we'll make a file called json.js, this is where we can explore how JSON works. To get started, let's make a very simple object.
Let's first make a variable called obj, setting it equal to an object. On this object, we'll just define one property, name, and set it equal to your first name; I'll set this one equal to Andrew, as shown here:
var obj = {
  name: 'Andrew'
};
Now, let's assume that we want to take this object and work on it. Let's say we want to, for example, send it between servers as a string and save it to a text file. To do this, we'll need to call one JSON method.
Let's take a moment to define a variable to store the result, stringObj, and we'll set it equal to JSON.stringify, as shown here:
var stringObj = JSON.stringify(obj);
The JSON.stringify method takes your object, in this case, the obj variable, and returns the JSON-stringified version. This means that the result stored in stringObj is actually a string. It's no longer an object, and we can take a look at that using console.log. I'll use console.log twice. First up, we'll use the typeof operator to print the type of the string object to make sure that it actually is a string. Since typeof is an operator, it gets typed in lowercase, there is no camel casing. Then, you pass in the variable whose type you want to check. Next up, we can use console.log to print the contents of the string itself, printing out the stringObj variable, as shown here:
console.log(typeof stringObj);
console.log(stringObj);
What we've done here is we've taken an object, converted it into a JSON string, and printed it onto the screen. Over in Terminal, I'll navigate into the playground folder using the following command:
cd playground
We can now use node to run our json.js file. When we run the file, we see two things:
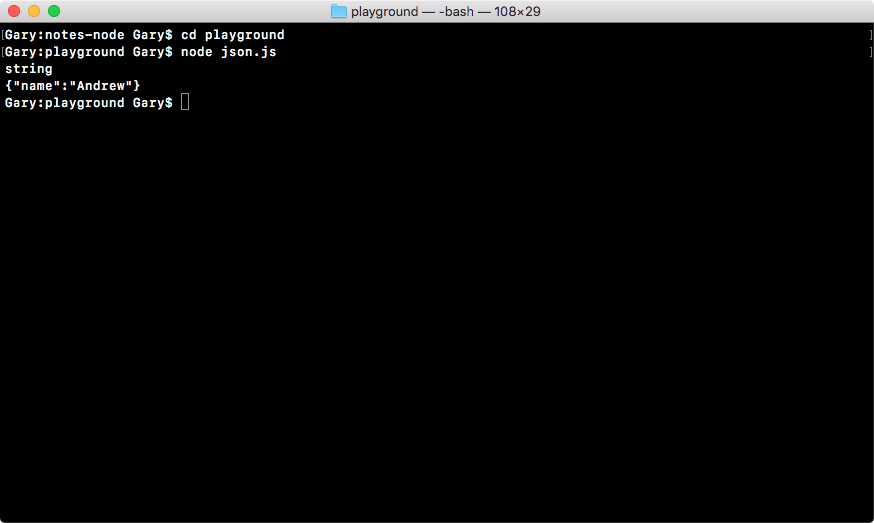
As shown in the preceding code output, first, we will get our type, which is a string, and this is great, because remember, JSON is a string. Next, we will get our object, which looks pretty similar to a JavaScript object, but there are a few differences. These differences are as follows:
Now, JSON doesn't just support string values, you can use an array, a Boolean, a number, or anything else. All of those types are perfectly valid inside of your JSON. In this case, we have a very simple example where we have a name property and it's set to "Andrew".
This is the process of taking an object and converting it into a string. Next up, we'll define a string and convert that into an object we can actually use in our app.
Let's get started by making a variable called personString, and we'll to set it equal to a string using single quotes since JSON uses double quotes inside of itself, as shown here:
var personString = '';
Then we'll define our JSON in the quotes. We'll start by opening and closing some curly braces. We'll use double quotes to create our first attribute, which we'll call name, and we'll set that attribute equal to Andrew. This means that after the closing quote, we'll add :; then we'll open and close double quotes again and type the value Andrew, as shown here:
var personString = '{"name": "Andrew"}';
Next up, we can add another property. After the value, Andrew, I'll create another property after the comma, called age, which will be set equal to a number. I can use my colon and then define the number without the quotes, in this case, 25:
var personString = '{"name": "Andrew","age": 25}';
You can go ahead and use your name and your age, obviously, but make sure the rest looks identical to what you see here.
Now, let's say we get the earlier-defined JSON from a server or we grab it from a text file. Currently, it's useless; if we want to get the name value, there is no good way to do that because we're using a string, so personString.name doesn't exist. What we need to do is take the string and convert it back into an object.
To convert the string back to object, we'll use the opposite of JSON.stringify, which is JSON.parse. Let's make a variable to store the result. I'll create a person variable and it will be set equal to JSON.parse, passing in as the one and only argument the string you want to parse, in this case, the person string, which we defined earlier:
var person = JSON.parse(personString);
Now, this variable takes your JSON and converts it from a string back into its original form, which could be an array or an object. In our case, it converts it back into an object, and we have the person variable as an object, as shown in the preceding code. Also, we can prove that it's an object using the typeof operator. I'll use console.log twice, just like we did previously.
First up, we'll print typeof person, and then we'll print the actual person variable, console.log(person):
console.log(typeof person);
console.log(person);
With this in place, we can now rerun the command in Terminal; I'll actually start nodemon and pass in json.js:
nodemon json.js
As shown in the following code output, you can now see that we're working with an object, which is great, and we have our regular object:
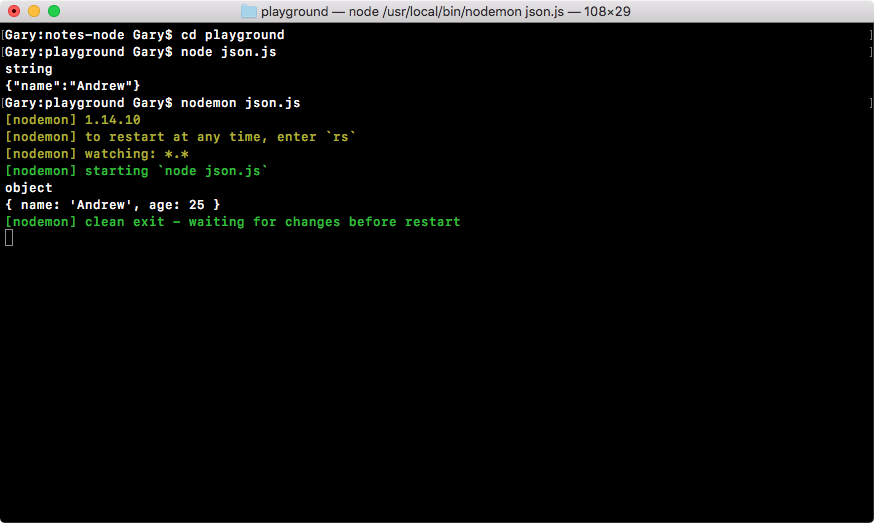
We know that Andrew is an object because it's not wrapped in double quotes; the values don't have any quotes, and we use single quotes for Andrew, which is valid in JavaScript, but it's not valid in JSON.
This is the entire process of taking an object, converting it to a string, and then taking the string and converting it back into the object, and this is exactly what we'll do in the notes app. The only difference is that we'll be taking the following string and storing it in a file, then later on, we'll be reading that string from the file using JSON.parse to convert it back to an object, as shown in the following code block:
// var obj = {
//  name: 'Andrew'
// };
// var stringObj = JSON.stringify(obj);
// console.log(typeof stringObj);
// console.log(stringObj);

var personString = '{"name": "Andrew","age": 25}';
var person = JSON.parse{personString};
console.log(typeof person);
console.log(person);
With the basics in place, let's take it just one step further, that is, by storing the string in a file. Then, we want to read the contents of that file back by using the fs module and printing some properties from it. This means that we'll need to convert the string that we get back from fs.readfilesync into an object using JSON.parse.
Let's go ahead and comment out all the code we have so far and start with a clean slate. First up, let's go ahead and load in the fs module. The const variable fs will be set equal to require, and we'll pass the fs module that we've used in the past, as shown here:
// var obj = {
//  name: 'Andrew'
// };
// var stringObj = JSON.stringify(obj);
// console.log(typeof stringObj);
// console.log(stringObj);

// var personString = '{"name": "Andrew","age": 25}';
// var person = JSON.parse(personString);
// console.log(typeof person);
// console.log(person);

const fs = require('fs');
The next thing we'll do is define the object. This object will be stored inside of our file, and then will be read back and parsed. This object will be a variable called originalNote, and we'll call it originalNote because later on, we'll load it back in and call that variable Note.
Now, originalNote will be a regular JavaScript object with two properties. We'll have the title property, which we'll set equal to Some title, and the body property, which we will set equal to Some body, as shown here:
var originalNote = {
  title: 'Some title',
  body: 'Some body'
};
The next step that you will need to do is take the original note and create a variable called originalNoteString, and set that variable equal to the JSON value of the object we defined earlier. This means that you'll need to use one of the two JSON methods we used previously in this section.
Now, once you have that originalNoteString variable, we can write a file to the filesystem. I'll write that line for you, fs.writeFileSync. The writeFileSync method, which we used before, takes two arguments. One will be the filename, and since we're using JSON, it's important to use the JSON file extension. I'll call this file notes.json. The other arguments will be text content, originalNoteString, which is not yet defined, as shown in this code block:
// originalNoteString
fs.writeFileSync('notes.json', originalNoteString);
This is the first step to the process; this is how we'll write that file into the playground folder. The next step to the process will be to read out the contents, parse it using the JSON method earlier, and print one of the properties to the screen to make sure that it's an object. In this case, we'll print the title.
The first step to print the title is to use a method we haven't used yet. We'll use the read method available on the filesystem module to read the contents. Let's make a variable called noteString. The noteString variable will be set equal to fs.readFileSync.
Now, readFileSync is similar to writeFileSync except that it doesn't take the text content, since it's getting the text content back for you. In this case, we'll just specify the first argument, which is the filename, notes.JSON:
var noteString = fs.readFileSync('notes.json');
Now that we have the string, it will be your job to take that string, use one of the preceding methods, and convert it back into an object. You can call that variable note. Next up, the only thing left to do is to test whether things are working as expected, by printing with the help of console.log(typeof note). Then, below this, we'll use console.log to print the title, note.title:
// note
console.log(typeof note);
console.log(note.title);
Now, over in Terminal, you can see (refer to the following screenshot) that I have saved the file in a broken state and it crashed, and that's expected when you're using nodemon:
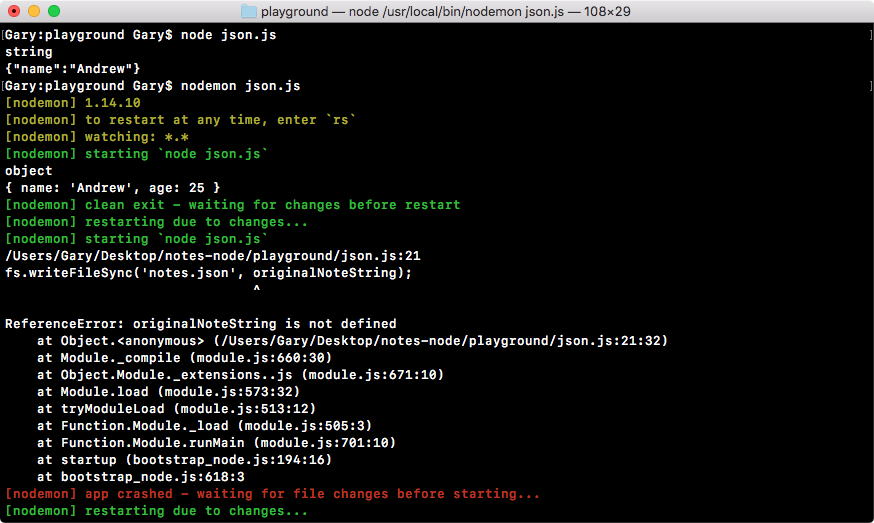
To resolve this, the first thing I'll do is fill out the originalNoteString variable, which we had commented out earlier. It will now be a variable called originalNoteString, and we'll set it equal to the return value from JSON.stringify.
Now, we know JSON.stringify takes our regular object and it converts the object into a string. In this case, we'll take the originalNote object and convert it into a string. The next line, which we already have filled out, will save that JSON value into the notes.JSON file. Then we will read that value out:
var originalNoteString = JSON.stringify(originalNote);
The next step will be to create the note variable. The note variable will be set equal to JSON.parse.
The JSON.parse method takes the string JSON and converts it back into a regular JavaScript object or array, depending on whatever you save. Here we will pass in noteString, which we'll get from the file:
var note = JSON.parse(noteString);
With this in place, we are now done. When I save this file, nodemon will automatically restart and we would expect to not see an error. Instead, we expect that we'll see the object type as well as the note title. Right inside Terminal, we have object and Some title printing to the screen:
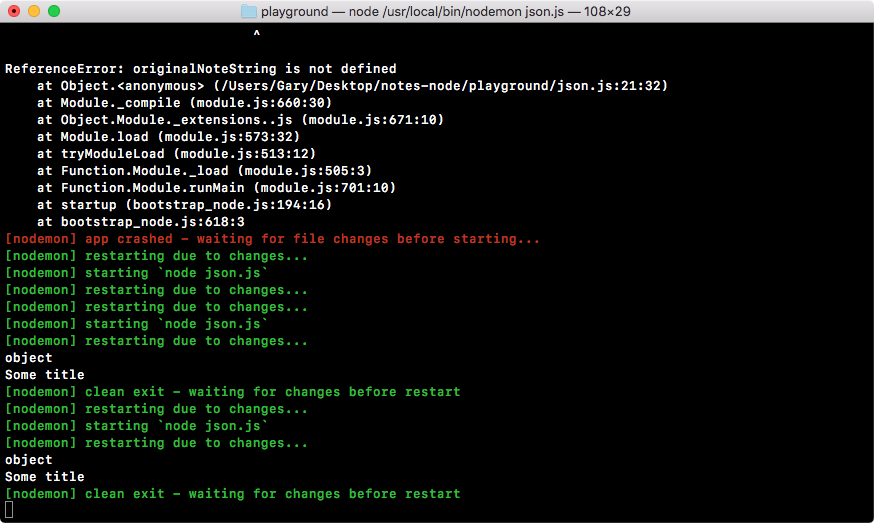
With this in place, we've successfully completed the challenge. This is exactly how we will save our notes.
When someone adds a new note, we'll use the following code to save it:
var originalNote = {
  title: 'Some title',
  body: 'Some body'
};
var originalNoteString = JSON.stringify(originalNote);
fs.writeFileSync('notes.json', originalNoteString);
When someone wants to read their note, we'll use the following code to read it:
var noteString = fs.readFileSync('notes.json');
var note = JSON.parse(noteString);
console.log(typeof note);
console.log(note.title);
Now, what if someone wants to add a note? This will require us to first read all of the notes, then modify the notes array, and then use the code (refer to the previous code block) to save the new array back into the filesystem.
If you open up that notes.JSON file, you can see right here that we have our JSON code inside the file:
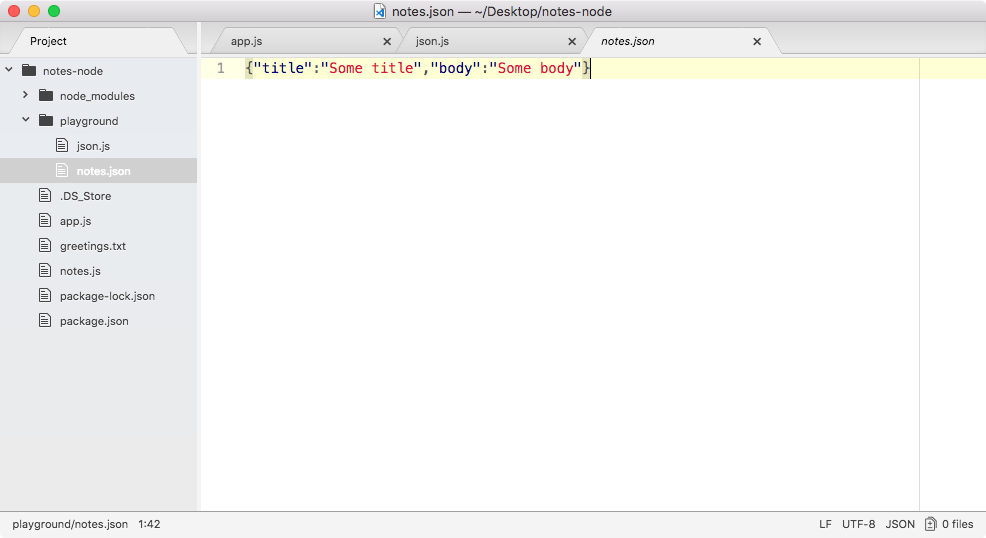
.json is actually a file format that's supported by most text editors, so I actually already have some nice syntax highlighting built in. Now, in the next section, we'll be filling out the addNote function using the exact same logic that we just used inside of this section.
In the previous section, you learned how to work with JSON inside Node.js, and this is the exact format we'll be using for the notes.js application. When you first run a command, we'll load in all the notes that might already exist. Then we'll run the command, whether it's adding, removing, or reading notes. Finally, if we've updated the array, like we will when we add and remove notes, we'll save those new notes back into the JSON file.
Now, this will all happen inside of the addNote function, which we defined in the notes.js application, and we already wired up this function. In earlier sections, we ran the app add command, and this function executed with the title and body arguments.
To get started with adding notes, the first thing we'll do is create a variable called notes, and for the moment, we'll set it equal to an empty array, just as in the following, using our square brackets:
var addNote = (title, body) => {
  var notes = [];
};
Now that we have the empty array, we can go ahead and make a variable called note, which is the individual note. This will represent the new note:
var addNote = (title, body) => {
  var notes = [];
  var note = {

  }
};
On that note, we'll have the two properties: a title and a body. Now, title can be set equal to the title variable, but, as we know, inside ES6, we can simply remove it when both values are the same; so we'll add title and body as shown here:
var addNote = (title, body) => {
  var notes = [];
  var note = {
    title,
    body
  };
};
Now we have the note and the notes array.
The next step in the process of adding notes will be to add the note to the notes array. The notes.push method will let us do just that. The push method on an array lets you pass in an item, which gets added to the end of the array, and in this case, we'll pass in the note object. So we have an empty array, and we add our one item, as shown in the following code; next, we push it in, which means that we have an array with one item:
var addNote = (title, body) => {
  var notes = [];
  var note = {
    title,
    body
  };

  notes.push(note);
};
The next step in the process will be to update the file. Now, we don't have a file in place, but we can load an fs function and start creating the file.
Up above the addNote function, let's load in the fs module. I'll create a const variable called fs and set it equal to the return result from require, and we'll require the fs module, which is a core node module, so there's no need to install it using NPM:
const fs = require('fs');
With this in place, we can take advantage of fs inside the addNote function.
Right after we push our item on to the notes array, we'll call fs.writeFileSync, which we've used before. We know we need to pass in two things: the file name and the content we want to save. For the file, I'll call, notes-data.JSON, and then we'll pass in the content to save, which in this case will be the stringify notes array, which means we can call JSON.stringify passing in notes:
notes.push(note);
fs.writeFileSync('notes-data.json', JSON.stringify(notes));
At this point, when we add a new note, it will update the notes-data.JSON file, which will be created on the machine since it does not exist, and the note will sit inside it. Now, it's important to note that currently every time you add a new note, it will wipe all existing ones because we never load in the existing ones, but we can get started testing that this note works as expected.
I'll save the file, and over inside of Terminal, we can run this file using node app.js. Since we want to add a note, we will be using that add command which we set up, then we'll specify our title and our body. The title flag can get set equal to secret, and for the body flag, I'll set it equal to the Some body here string, as shown here:
node app.js add --title=secret --body="Some body here"
Now, when we run this command from Terminal, we'll see what we'd expect:
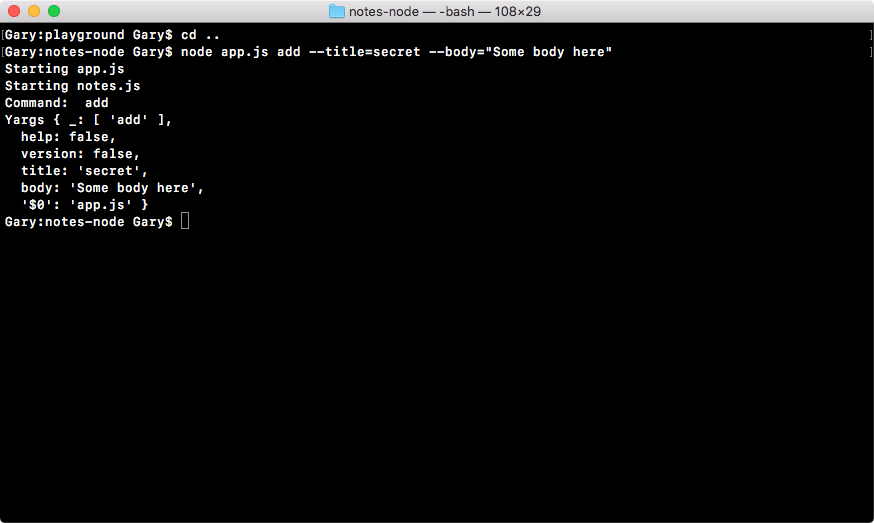
As shown in the preceding screenshot, we see a couple of the file commands we added: we see that the add command was executed, and we have our Yargs arguments. The title and body arguments also show up. Inside Atom, we also see that we have a new notes-data.json file, and in the following screenshot, we have our note, with the secret title and the Some body here body:
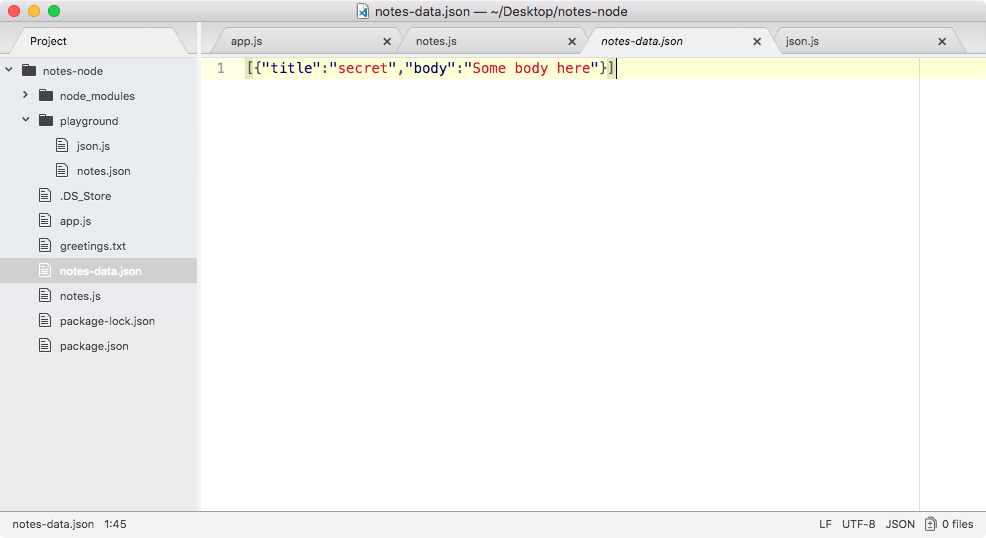
This is the first step in wiring up that addNote function. We have an existing notes file and we do want to take advantage of these notes. If notes already exist, we don't want to simply wipe them every time someone adds a new note. This means that in notes.js, earlier at the beginning of the addNote function, we'll fetch those notes.
I'll add code for fetching new notes where I define the notes and note variables. As shown in the following code, we'll use fs.readFileSync, which we've already explored. This will take the filename, in our case, notes-data.JSON. Now, we will want to store the return value from readFileSync on a variable; I'll call that variable, notesString:
var notesString = fs.readFileSync('notes-data.json');
Since this is the string version, we haven't passed it through the JSON.parse method. So, I can set notes (the variable we defined earlier in addNote function) equal to the return value from the JSON.parse method. Then JSON.parse will take the string from the file we read and it will parse it into an array; we could pass in notesString just like this:
notes = JSON.parse(notesString);
With this in place, adding a new note is no longer going to remove all of the notes that were already there.
Over in Terminal, I'll use the up arrow key to load in the last command, and I'll navigate over to the title flag and change it to secret2 and rerun the command:
node app.js add --title=secret2 --body="Some body here"
In Atom, this time you can see we now have two notes inside of our file:
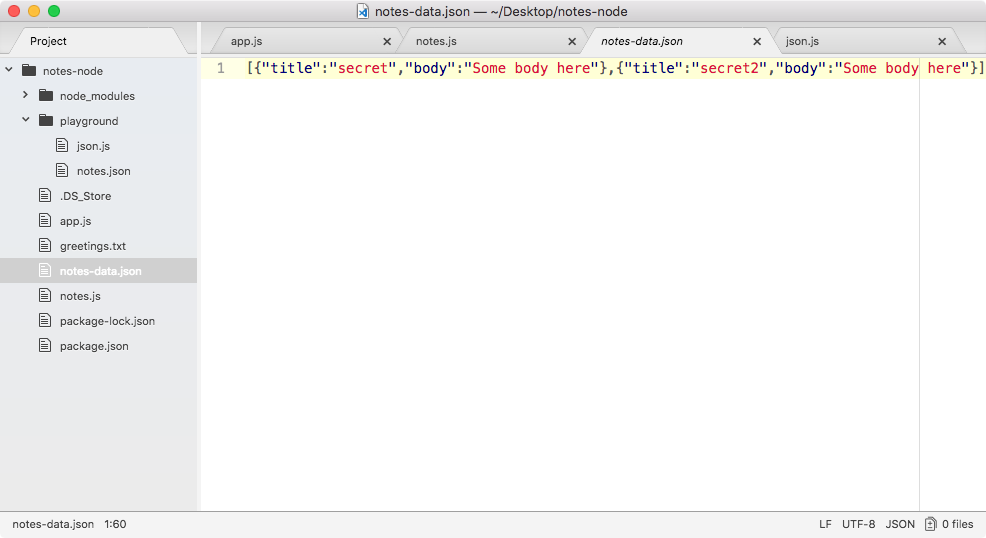
We have an array with two objects; the first one has the title of secret and the second one has the title of secret2, which is brilliant!
Now, if the notes-data.json file does not exist, which it won't when the user first runs the command, the program will crash, as shown in the following code output. We can prove this by simply rerunning the last command after deleting the note-data.JSON file:
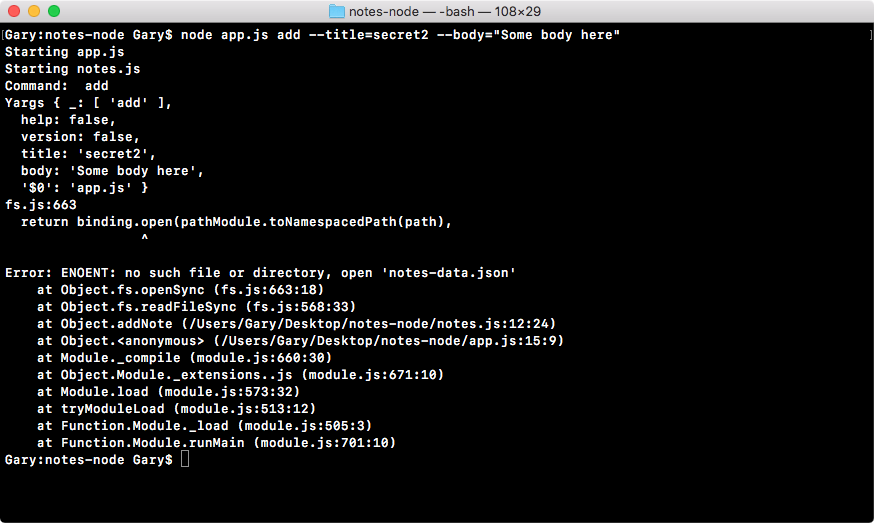
Right here, you can see we're actually getting a JavaScript error, no such file or directory; it's trying to open up the notes-data.JSON file, but without much success. To fix this, we'll use a try-catch statement from JavaScript, which hopefully you've seen in the past. To brush up this, let's go over it really quick.
To create a try-catch statement, all you do is you type try, which is a reserved keyword, and then you open and close a set of curly braces. Inside the curly braces is the code that will run. This is the code that may or may not throw an error. Next, you'll specify the catch block. Now, the catch block will take an argument, an error argument, and it also has a code block that runs:
try{

} catch (e) {

}
This code will run if and only if one of your errors in try actually occurs. So, if we load the file using readFileSync and the file exists, that's fine, catch block will never run. If it fails, catch block will run and we can do something to recover from that error. With this in place, all we'll do is move the noteString variable and the JSON.parse statements into try, as shown here:
try{
  var notesString = fs.readFileSync('notes-data.json');
  notes = JSON.parse(notesString);
} catch (e) {

}
That's it; nothing else needs to happen. We don't need to put any code in catch, although you do need to define the catch block. Now, let's take a look at what happens when we run the whole code.
The first thing that happens is that we create our static variables—nothing special there—then we try to load in the file. If the notesString function fails, that is fine because we already defined notes to be an empty array. If the file doesn't exist and it fails, then we probably want an empty array for notes anyways, because clearly there are no notes, and there's no file.
Next up, we'll parse that data into notes. There is a chance that this will fail if there's invalid data in the notes-data.JSON file, so the two lines can have problems. By putting them in try-catch, we're basically guaranteeing that the program isn't going to work unexpectedly, whether the file does or doesn't exist, but it contains corrupted data.
With this in place, we can now save notes and rerun that previous command. Note that I do not have the notes-data file in place. When I run the command, we don't see any errors, everything seems to run as expected:
When you now visit Atom, you can see that the notes-data file does indeed exist, and the data inside it looks great:

This is all we need to do to fetch the notes, update the notes with the new note, and finally save the notes to the screen.
Now, there is still a slight problem with addNote. Currently, addNote allows for duplicate titles; I could already have a note in the JSON file with the title of secret. I can come along and try to add a new note with the title of secret and it will not throw an error. What I'd like to do is to make the title unique, so that if there's already a note with that title, it will throw an error, letting you know that you need to create a note with a different title.
The first step to make the title unique will be to loop through all of the notes after we load them in and check whether there are any duplicates. If there are duplicates, we'll not call the following two lines:
notes.push(note);
fs.writeFileSync('notes-data.json', JSON.stringify(notes));
If there are no duplicates then it's fine, we will call both of the lines shown in the preceding code block, updating the notes-data file.
Now, we'll be refactoring this function down the line. Things are getting a little wonky and a little out of control, but for the moment, we can add this functionality right into the function. Let's go ahead and make a variable called duplicateNotes.
The duplicateNotes variable will eventually store an array with all of the notes that already exist inside the notes array that have the title of the note you're trying to create. Now, this means that if the duplicateNotes array has any items, that's bad. This means that the note already exists and we should not add the note. The duplicateNotes variable will get set equal to a call to notes, which is our array of notes.filter:
var duplicateNotes = notes.filter();
The filter method is an array method that takes a callback. We'll use an arrow function, and that callback will get called with the argument. In this case, it will be the singular version; if I have an array of notes, it will be called with an individual note:
var duplicateNotes = notes.filter((note) => {

});
This function gets called once for every item in the array, and you have the opportunity to return either true or false. If you return true, it will keep that item in the array, which will eventually get saved into duplicateNotes. If you return false, the new array it generates will not have that item inside duplicateNotes variable. All we want to do is to return true if the titles match, which means that we can return note.title === title, as shown here:
var duplicateNotes = notes.filter((note) => {
  return note.title === title;
});
If the titles are equal, then the preceding return statement will result as true and the item will be kept in the array, which means that there are duplicate notes. If the titles are not equal, which is most likely the case, the statement will result as false, which means that there are no duplicate notes. Now, we can simplify this a little more using arrow functions.
I'll use the arrow function, as shown here:
var duplicateNotes = notes.filter((note) => note.title === title);
Here, I have deleted everything except note.title === title and added this in front of the arrow function syntax.
This is perfectly valid using ES6 arrow functions. You have your arguments on the left, the arrow, and on the right, you have one expression. The expression doesn't take a semicolon and it's automatically returned as the function result. This means that the code we have here is identical to the code we had earlier, only it's much simpler and it only takes up one line.
Now that we have this in place, we can go ahead and check the length of the duplicateNotes variable. If the length of duplicateNotes is greater than 0, this means that we don't want to save the note because a note already exists with that title. If it is 0, we'll save the note.
if(duplicateNotes.length === 0) {

}
Here, inside the if condition, we're comparing the notes length with the number zero. If they are equal, then we do want to push the note onto the notes array and save the file. I'll cut the following two lines:
notes.push(note);
fs.writeFileSync('notes-data.json', JSON.stringify(notes));
Let's paste them right inside of the if statement, as shown here:
if(duplicateNotes.length === 0) {
  notes.push(note);
  fs.writeFileSync('notes-data.json', JSON.stringify(notes));
}
If they're not equal, that's okay too; in that case we'll do nothing.
With this in place, we can now save our file and test this functionality out. We have our notes-data.json file, and this file already has a note with a title of secret2. Let's rerun the previous command to try to add a new note with that same title:
node app.js add --title=secret2 --body="Some body here"
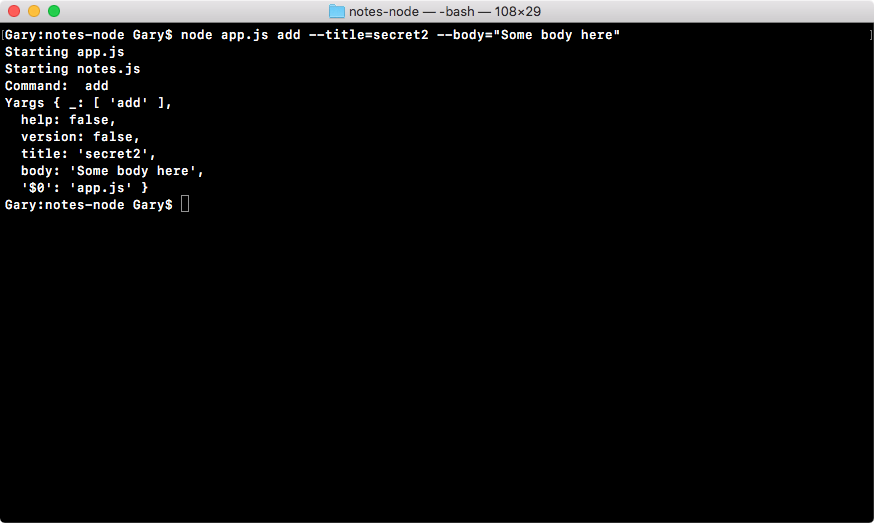
You're in Terminal, so we'll head back into our JSON file. You can see right here that we still just have one note:

Now all the titles inside of our application will be unique, so we can use these titles to fetch and delete notes.
Let's go ahead and test that other notes can still be added. I'll change the title flag from secret2 to secret, and run that command:
node app.js add --title=secret --body="Some body here"

Inside our notes-data file, you can see both notes show up:

As I mentioned earlier, next we will be doing some refactoring, since the code that loads the file, and the code that saves the file, will both be used in most of the functions we have defined and/or will define (that is, the getAll, getNote and removeNote functions).
In the previous section, you created the addNote function, which works well. It starts by creating some static variables, then we fetch any existing notes, we check for duplicates, and if there are none, we push it onto the list, and then we save the data back into the filesystem.
The only problem is that we'll be doing a lot of these steps over and over again for every method. For example, with getAll, the idea is to fetch all of the notes, and send them back to app.js so it can print them to the screen for the user. The first thing we'll to do inside of the getAll statement is have the same code; we'll have our try-catch block to fetch the existing notes.
Now, this is a problem because we'll be repeating code throughout the application. It will be best to break out the fetching of notes and the saving of notes into separate functions that we can call in multiple locations.
To resolve the problem, I'd like to get started by creating two new functions:
The first function, fetchNotes, will be an arrow function, and it will not to take any arguments since it will be fetching notes from the filesystem, as shown here:
var fetchNotes = () => {

};
The second function, saveNotes, will need to take an argument. It will need to take the notes array you want to save to the filesystem. We'll set it equal to an arrow function, and then we'll provide our argument, which I will name notes, as shown here:
var saveNotes = (notes) => {

};
Now that we have these two functions, we can go ahead and start moving some of the functionality from addNote up into the individual functions.
First up, let's do fetchNotes, which will need the following try-catch block.
I'll actually cut it out of addNote and paste it in the fetchNotes function, as shown here:
var fetchNotes = () => {
  try{
    var notesString = fs.readFileSync('notes-data.json');
    notes = JSON.parse(notesString);
  } catch (e) {

}
};
This alone is not enough, because currently we don't return anything from the function. What we want to do is to return the notes. This means that instead of saving the result from JSON.parse onto the notes variable, which we haven't defined, we'll simply return it to the calling function, as shown here:
var fetchNotes = () => {
  try{
    var notesString = fs.readFileSync('notes-data.json');
    return JSON.parse(notesString);
  } catch (e) {

}
};
So, if I call fetchNotes in the addNote function, shown as follows, I will get the notes array because of the return statement in the preceding code.
Now, if there are no notes, maybe there's no file at all; or there is a file, but the data isn't JSON, we can return an empty array. We'll add a return statement inside of catch, as shown in the following code block, because remember, catch runs if anything inside try fails:
var fetchNotes = () => {
  try{
    var notesString = fs.readFileSync('notes-data.json');
    return JSON.parse(notesString);
  } catch (e) {
    return [];
}
};
Now, this lets us simplify addNote even further. We can remove the empty space and we can take the array that we set on the notes variable and remove it and instead call fetchNotes, as shown here:
var addNote = (title, body) => {
  var notes = fetchNotes();
  var note = {
      title,
      body
};
With this in place, we now have the exact same functionality we had before, but we have a reusable function, fetchNotes, which we can use in the addNote function to handle the other commands that our app will support.
Instead of copying code and having it in multiple places in your file, we've broken it into one place. If we ever want to change how this functionality works, whether we want to change the filename or some of the logic such as the try-catch block, we can change it once instead of having to change it in every function we have.
Now, the same thing will go for saveNotes just as in the case of the fetchNotes function. The saveNotes function will take the notes variable and it will say this using fs.writeFileSync. I will cut out the line in addNote that does this (that is, fs.writeFileSync('notes-data.json', JSON.stringfy(notes));) and paste it in the saveNotes function, as shown here:
var saveNotes = (notes) => {
  fs.writeFileSync('notes-data.json', JSON.stringify(notes));
};
Now, saveNotes doesn't need to return anything. In this case, we'll copy the line in saveNotes and then call saveNotes in the if statement of the addNote function, as shown in the following code:
if (duplicateNotes.length === 0) {
  notes.push(note);
  saveNotes();
}
This might seem like overkill, we've essentially taken one line and replaced it with a different line, but it is a good idea to start getting in the habit of creating reusable functions.
Now, calling saveNotes with no data is not going to work, we want to pass in the notes variable, which is our notes array defined earlier in the saveNotes function:
if (duplicateNotes.length === 0) {
  notes.push(note);
  saveNotes(notes);
}
With this in place, the addNote function should now work as it did before we did any of our refactoring.
The next step in the process will be to test this out by creating a new note. We already have two notes, with a title of secret and a title of secret2 in notes-data.json, let's make a third one using the node app.js command in Terminal. We'll use the add command and pass in a title of to buy and a body of food, as shown here:
node app.js add --title="to buy" --body="food"
This should create a new note, and if I run the command, you can see we don't have any obvious errors:
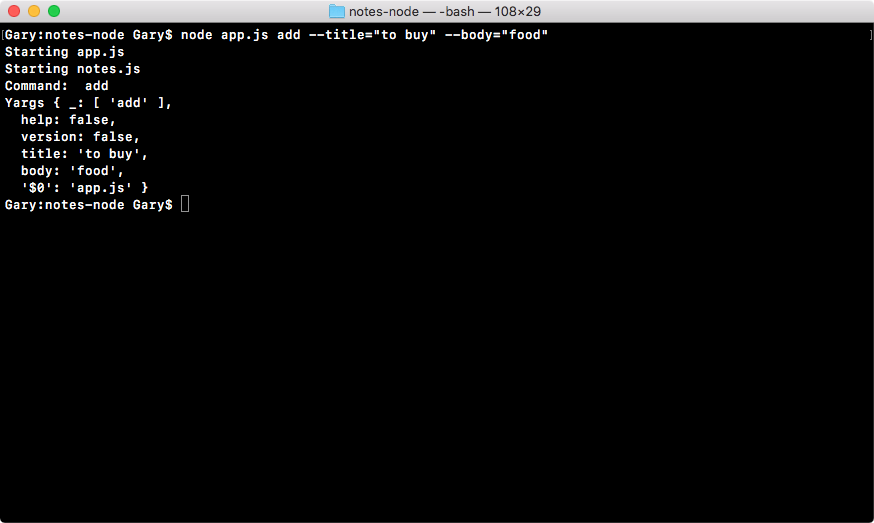
Inside of our notes-data.json file, if I scroll to the right, we have our brand new note as a title of to buy and a body of food:
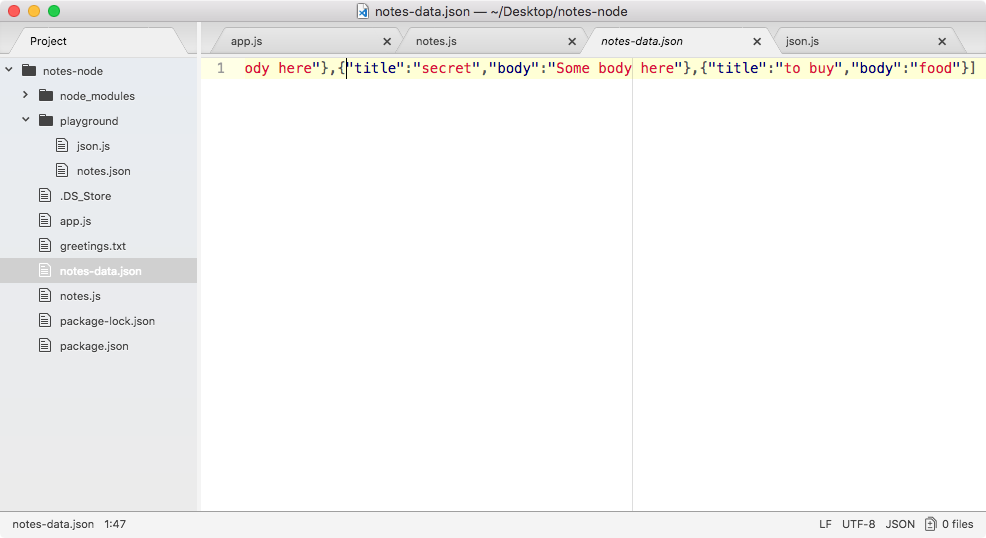
So, everything is working as expected even though we've refactored the code. Now, the next thing I want to do inside addNote is take a moment to return the note that's being added, and that will happen right after saveNotes comes back. So we'll return note:
if (duplicateNotes.length === 0) {
  notes.push(note);
  saveNotes(notes);
  return note;
}
This note object will get returned to whoever called the function, and in this case, it will get returned to app.js, where we called it in the if else block of the add command in the app.js file. We can make a variable to store this result and we can call it note:
if (command === 'add')
  var note = notes.addNote(argv.title, argv.body);
If note exists, then we know that the note was created. This means that we can go ahead and print a message, like Note created, and we can print the note title and the note body. Now, if note does not exist, if it's undefined, this means that there was a duplicate and that title already exists. If that's the case, I want you to print an error message such as Note title already in use.
Now, inside addNote, if the duplicateNotes if statement never runs, we don't have an explicit call to return. But as you know, in JavaScript, if you don't call return, then undefined automatically is returned. This means that if duplicateNotes.length is not equal to zero, undefined will be returned and we can use that as the condition for our statement.
The first thing I'll do here is to create an if statement, right next to the note variable we defined in app.js:
if (command === 'add') {
  var note = notes.addNote(argv.title, argv.body);
  if (note) {

  }
This will be an object if things went well, and it will be undefined if things went poorly. This code in here is only ever going to run if it's an object. The Undefined result will fail the condition inside of JavaScript.
Now, if the note was created successfully, what we'll do is to print a little message to the screen, using the following console.log statement:
if (note) {
  console.log('Note created');
}
If things went poorly, inside the else clause, we can call console.log, and we can print something like Note title taken, as shown here:
if (note) {
  console.log('Note created');
} else {
  console.log('Note title taken');
}
Now, the other thing that we want to do if things went well is print the notes content. I'll do this by first using console.log to print a couple of hyphens. This will create a little space above my note. Then I can use console.log twice: the first time we'll print the title, I'll add Title: as a string to show you what exactly you're seeing, then I can concatenate the title, which we have access to in note.title, as shown in this code:
if (note) {
  console.log('Note created');
  console.log('--');
  console.log('Title: ' + note.title);
Now, the preceding syntax uses an ES5 syntax; we can swap this out with an ES6 syntax using what we've already talked about: template strings. We'll add Title, a colon, and then we can use our dollar sign with our curly braces to inject the note.title variable, as shown here:
console.log(`Title: ${note.title}`);
Similarly, I'll add note.body after this to print out the body of the note. With this in place, the code should look like:
if (command === 'add') {
  var note = note.addNote(argv.title, argv.body);
  if (note) {
    console.log('Note created');
    console.log('--');
    console.log(`Title: ${note.title}`);
    console.log(`Body: ${note.body}`);
  } else {
    console.log('Note title taken');
}
Now, we should be able to run our app and see both of the title and body notes printed. In Terminal, I'll rerun the previous command. This will try to create a note with to buy, which already exists, so we should get an error message, and right here you can see Note title taken:
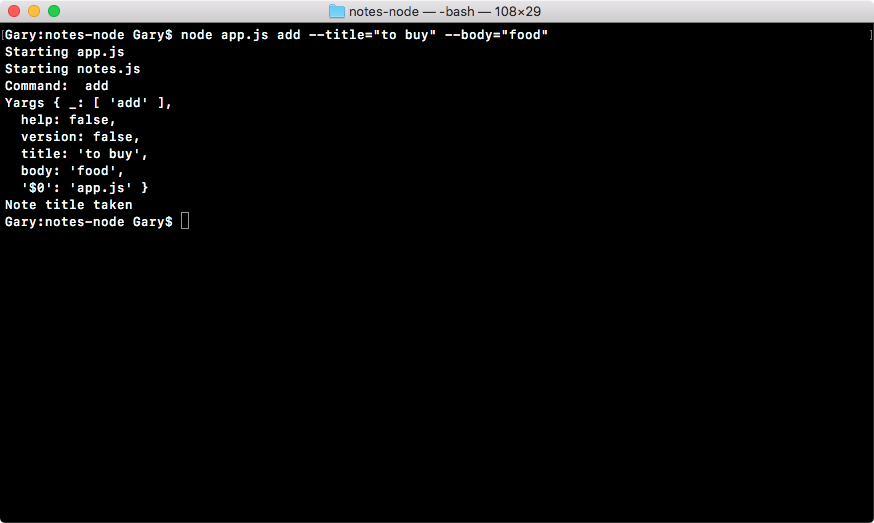
Now, we can rerun the command, changing the title to something else, such as to buy from store. This is a unique note title so the note should get created without any problems:
node app.js add --title="to buy from store" --body="food"
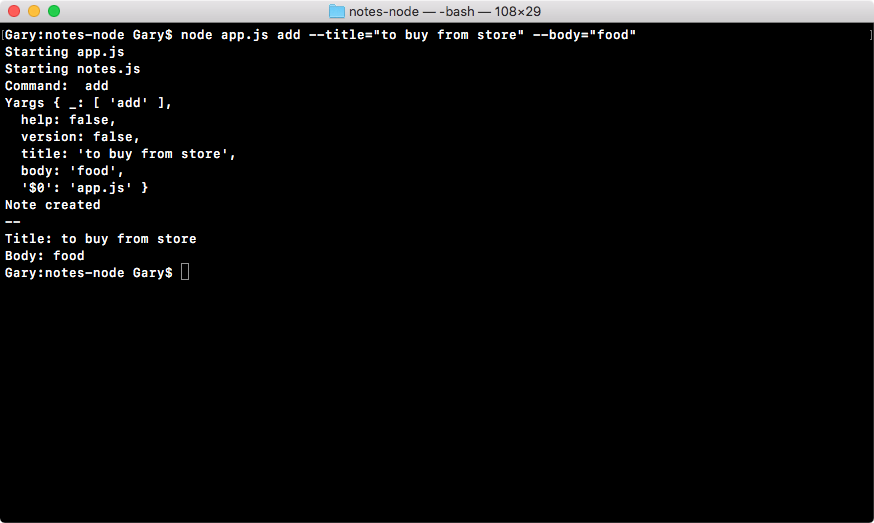
As shown in the preceding output, you can see that we get just that: we have our Note created message, our little spacer, and our title along with the body.
The addNote command is now complete. We have an output when the command actually finishes, and we have all the code that runs behind the scenes to add the note to the data that gets stored in our file.
In this chapter, you learned that parsing in process.argv can be a real pain. We would have to write a lot of manual code to parse out those hyphens, the equal signs, and the optional quotes. However, yargs can do all of that for us and it puts it on a really simple object we can access. You also learned how to work with JSON inside Node.js.
Next, we filled out the addNote function. We're able to add notes using the command line, and we're able to save those notes into a JSON file. Finally, we pulled out a lot of the code from addNote into separate functions, fetchNotes and saveNotes, which are now separate, and they're able to be reused throughout the code. When we start filling out the other methods, we can simply call fetchNotes and saveNotes instead of having to copy the contents over and over again to every new method.
In the next chapter, we'll continue our journey on node fundamentals. We'll explore some more concepts related to node, such as debugging; we'll work on the read and remove notes commands. Apart from this, we'll also learn about the advanced features of yargs and the arrow function.
We start adding support for all the other commands inside of the notes application. We'll take a look at how we can create our read command. The read command will be responsible for fetching the body of an individual note. It will fetch all the notes and print them to the screen. Now, aside from all of that, we'll be looking at debugging broken apps, and we'll look at some new ES6 features. You'll learn how to use the built-in Node debugger.
Then, you will learn a little bit more about how we can configure yargs for the command-line interface applications. We'll learn how to set up the commands, their descriptions, and the arguments. We'll be able to set various properties on the arguments, for example, whether or not they're required, and others.
In this section, you will write the code for removing a note when someone uses that remove command, and they pass in the title of the note they want to remove. In the previous chapter, we already created some utility functions that help us with fetching and saving notes, so the code should actually be pretty simple.
The first step in the process is to fill out the removeNote function, which we defined in the previous chapters, and this will be your challenge. Let's remove console.log from the removeNote function in the notes.js file. You only need to write three lines of code to get this done.
Now, the first line will fetch the notes, then the job will be to filter out the notes, removing the one with title of argument. That means we want to go through all of the notes in the notes array, and if any of them have a title that matches the title we want to remove, we want to get rid of them. And this can be done using the notes.filter function we used earlier. All we have to do is switch the equality statement in the duplicateNotes function from equals to not equals, and this code will do just that.
It will go through the notes array. Every time it finds a note that doesn't match the title it will keep it, which is what we want, and if it does find the title it will return false and remove it from the array. And then we will add the third line, which is to save the new notes array:
var removeNote = (title) => {
  // fetch notes
  // filter notes, removing the one with title of argument
  // save new notes array
};
The preceding code lines are the only three lines you need to fill out. Don't worry about returning anything from removeNote or filling out anything inside of app.js.
The first thing we will do for the fetchNotes line is to create a variable called notes, just like we did in addNote in the previous chapter, and we'll set it equal to the return result from fetchNotes:
var removeNote = (title) => {
  var notes = fetchNotes();
  // filter notes, removing the one with title of argument
  // save new notes array
};
At this point our notes variable stores an array of all of the notes. The next thing we need to do is filter our notes.
If there is a note that has this title, we want to remove it. This will be done by creating a new variable, and I'll call this one filteredNotes. Here we'll set filteredNotes equal to the result that will come back from notes.filter, which we already used up previously:
var removeNote = (title) => {
  var notes = fetchNotes();
  // filter notes, removing the one with title of argument
  var filteredNotes = notes.filter();
  // save new notes array
};
We know that notes.filter takes a function as its one and only argument, and that function gets called with the individual item in the array. In this case it would be a note. And we can do this all on one line using the ES6 arrow syntax.
That means right here we can return true if note.title does not equal the title that's passed into the function:
var removeNote = (title) => {
  var notes = fetchNotes();
  var filteredNotes = notes.filter((note) => note.title !== title);
  // save new notes array
};
This will populate filteredNotes with all of the notes whose titles do not match the one passed in. If the title does match the title passed in, it will not be added to filteredNotes because of our filter function.
The last thing to do is to call saveNotes. Right here, we'll call saveNotes passing in the new notes array which we have under the filteredNotes variable:
var removeNote = (title) => {
  var notes = fetchNotes();
  var filteredNotes = notes.filter((note) => note.title !== title);
  saveNotes(filteredNotes);
  // save new notes array
};
If we were to pass in notes, it wouldn't work as expected; we're filtering the notes out but we're not actually saving those notes, so it will not get removed from the JSON. We need to pass filteredNotes as shown in the preceding code. And we can test these by saving the file and trying to remove one of our notes.
I'll try to remove secret2 from the notes-data.json file. That means all we need to do is run the command, which we called remove, that is specified over in app.js, (refer to the following code image, and then it will call our function).
I'll run Node with app.js, and we'll pass in the remove command. The only argument we need to provide for remove is the title; there's no need to provide the body. I'll set this equal to secret2:
node app.js remove --title=secret2
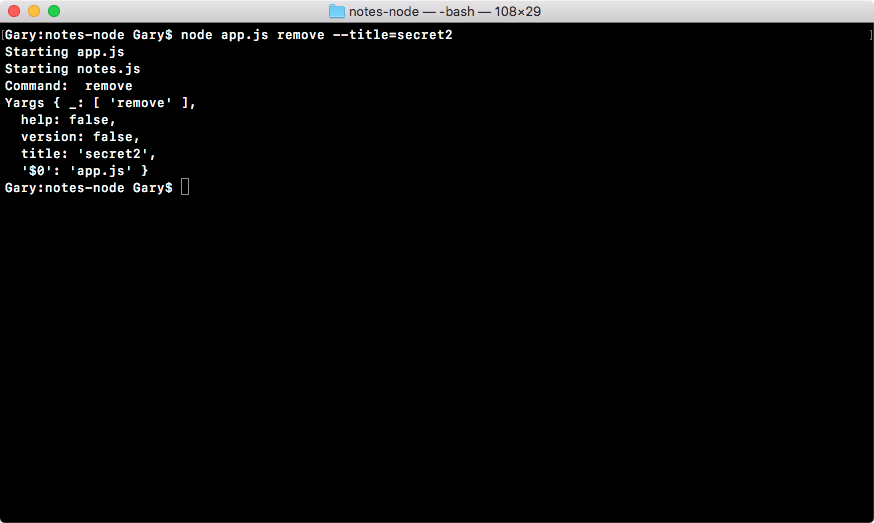
As shown in the screenshot, if I hit enter you can see we don't get any output. Although we do have the command remove printing, there is no message saying whether or not a note was removed, but we'll add that later in the section.
For now, we can check the data. And right here you can see secret2 is nowhere in sight:

This means our remove method is indeed working as expected. It removed the note whose title matched and it kept all the notes whose title was not equal to secret2, exactly what we wanted.
Now, the next thing we'll do is print a message depending on whether or not a note was actually removed. That means app.js, which calls the removeNote function, will need to know whether or not a note was removed. And how do we figure that out? How can we possibly return that given the information we have in notes.js removeNotes function?
Well, we can, because we have two really important pieces of information. We have the length of the original notes array and we have the length of the new notes array. If they're equal then we can assume that no note was removed. If they are not equal, we'll assume that a note was removed. And that is exactly what we'll do.
If the removeNote function returns true, that means a note was removed; if it returns false, that means a note was not removed. In the removeNotes function we can add return, as shown in the following code. We'll check if notes.length does not equal filteredNotes.length:
var removeNote = (title) => {
  var notes = fetchNotes();
  var filteredNotes = notes.filter((note) => note.title !== title);
  saveNotes(filteredNotes);

  return notes.length !== filteredNotes.length;
};
If they're not equal it will return true, which is what we want because a note was removed. If they're equal it will return false, which is great.
Now, inside of app.js we can add a few lines in the removeNote, else if block to make the output for this command a little nicer. The first thing to do is to store that Boolean. I'll make a variable called noteRemoved and we'll set that equal to the return, result as shown in the following code, which will either be true or false:
} else if (command == 'remove') {
  var noteRemoved = notes.removeNote(argv.title);
}
On the next line, we can create our message, and I'll do this all on one line using the ternary operator. Now, the ternary operator lets you specify a condition. In our case, we'll use a var message and it will be set equal to the condition noteRemoved, which will be true if a note was removed and false if it wasn't.
After the condition, we'll put a space with a question mark and a space; this is the statement that will run if it's true. If the noteRemoved condition passes, what we want to do is set message equal to Note was removed:
var message = noteRemoved ? 'Note was removed' :
Now, if noteRemoved is false, we can specify that condition right after the colon in the previous statement. Here, if there is no note removed we'll use the text Note not found:
var message = noteRemoved ? 'Note was removed' : 'Note not found';
Now with this in place, we can test out our message. The last thing to do is print the message to the screen using console.log passing in message:
var noteRemoved = notes.removeNote(argv.title);
var message = noteRemoved ? 'Note was removed' : 'Note not found';
console.log(message);
This lets us avoid if statements that make our else-if clause to remove unnecessarily complex.
Back inside of Atom we can rerun the last command, and in this case no note will get removed because we already deleted it. And when I run it, you can see that Note not found prints to the screen:
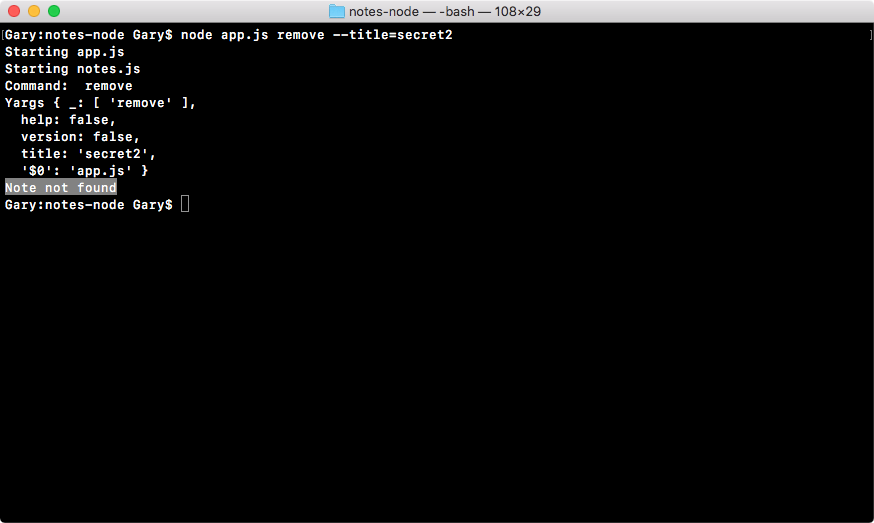
Now I'll remove a note that does exist; in notes-data.json I have a note with a title of secret as shown here:

Let's rerun the command removing the 2 from the title in Terminal. When I run this command, you can see Note was removed prints to the screen:
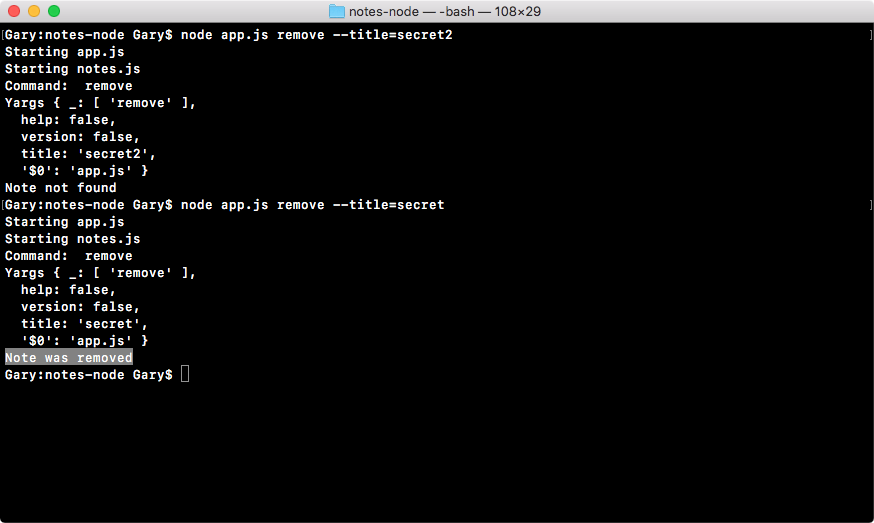
That is it for this section; we now have our remove command in place.
In this section, you will be responsible for filling out the rest of the read command. Now, the read command does have an else-if block to find in app.js where we call getNote:
} else if (command === 'read') {
  notes.getNote(argv.title);
getNote is defined over inside notes.js, even though currently it just prints out some dummy text:
var getNote = (title) => {
  console.log('Getting note', title);
};
What you'll need to do in this section is wire up both of these functions.
First up, you will need to do something with the return value from getNote. Our getNote function will return the note object if it finds it. If it doesn't, it will return undefined just like we do for addNote discussed in the section Adding and saving note, in the previous chapter.
After you store that value, you'll do some printing using console.log, similar to what we have here:
if (command === 'add') {
  var note = notes.addNote(argv.title, argv.body);
  if (note) {
    console.log('Note created');
    console.log('--');
    console.log(`Title: ${note.title}`);
    console.log(`Body: ${note.body}`);
  } else {
    console.log('Note title taken');
  }
Obviously, Note created will be something like Note read and Note title taken will be something like Note not found, but the general flow is going to be exactly the same. Now, once you have that wired up inside of app.js, you can move on to notes.js, filling out the function.
Now, the function inside of notes.js isn't going to be that complex. All you need to do is fetch the notes, like we've done in previous methods, then you're going to use notes.filter, which we explored to only return notes whose title matches the title passed in as the argument. Now, in our case this is either going to be zero notes, which means the note is not found, or it's going to be one note, which means we've found the note that the person wants to return.
Next, we do need to return that note. It's important to remember the return value from notes.filter is always going to be an array, even if that array only has one item. What you're going to need to do is return the first item in the array. If that item doesn't exist that's fine, it'll return undefined, as we want. If it does exist, great, that means we found the note. This method only requires three lines of code, one for fetching, one for filtering, and the return statement. Now, once you have all that done we'll test it out.
Let's work on this method. Now, the first thing I'll do is fill out, inside of app.js, a variable called note which is going to store the return value from getNote:
} else if (command === 'read') {
  var note = notes.getNote(argv.title);
Now, this could be an individual note object or it could be undefined. In the next line, I can use an if statement to print the message if it exists, or if it does not exist. I'll use if note, and I am going to attach an else clause:
} else if (command === 'read') {
  var note = notes.getNote(argv.title);
  if (note) {

  } else {

  }
This else clause will be responsible for printing an error if the note is not found. Let's get started with that first since it's pretty simple, console.log, Note not found, as shown here:
  if (note) {

  } else {
    console.log('Note not found');
  }
Now that we have our else clause filled out we can fill out the if statement. For this, I'll print a little message, console.log ('Note found') will get the job done. Then we can move on to printing the actual note details, and we already have that code in place. We are going to add the hyphenated spacer, then we have our note title and our note body as shown here:
if (note) {
    console.log('Note found');
    console.log('--');
    console.log(`Title: ${note.title}`);
    console.log(`Body: ${note.body}`);
  } else {
    console.log('Note not found');
  }
Now that we're done with the inside of app.js, we can move into the notes.js file and fill out the getNote method because currently it doesn't do anything with the title that gets passed in.
Inside notes, what you needed to do was fill out those three lines. The first one is going to be responsible for fetching the notes. We already have did that before with the fetchNotes function in the previous section:
var getNote = (title) => {
  var notes = fetchNotes();
};
Now that we have our notes in place we, can call notes.filter, returning all of the notes. I'll make a variable called filteredNotes, setting it equal to notes.filter. Now, we know that the filter method takes a function, I'll define an arrow function (=>) just like this:
var filteredNotes = notes.filter(() => {

});
Inside the arrow function (=>), we'll get the individual note passed in, and we'll return true when the note title, the title of the note we found in our JSON file, equals, using triple equals, title:
var filteredNotes = notes.filter(() => {
    return note.title === title;
  });
};
This will return true when the note title matches and false if it doesn't. Alternatively, we can use arrow functions, and we only have one line, as shown following, where we return something; we can cut out our condition, remove the curly braces, and simply paste that condition right here:
var filteredNotes = notes.filter((note) => note.title === title);
This has the exact same functionality, only it's a lot shorter and easier to look at.
Now that we have all of the data, all we need to do is return something, and we'll return the first item in the filteredNotes array. Next, we'll grab the first item, which is the index of zero, and then we just need to return it using the return keyword:
var getNote = (title) => {
  var notes = fetchNotes();
  var filteredNotes = notes.filter((note) => note.title === title);
  return filteredNotes[0];
};
Now, there is a chance that filteredNotes, the first item, doesn't exist, and that's fine, it's going to return undefined, in which case our else clause will run, printing Note not found. If there is a note, great, that's the note we want to print, and over in app.js we do just that.
Now that we have this in place we can test out this brand new functionality inside of Terminal by running our app using node app.js. I'll use the read command, and I'll pass in a title equal to some string that I know does not exist inside of a title in the notes-data.json file:
node app.js read --title="something here"
When I run the command, we get Note not found, as shown here, and this is exactly what we want:
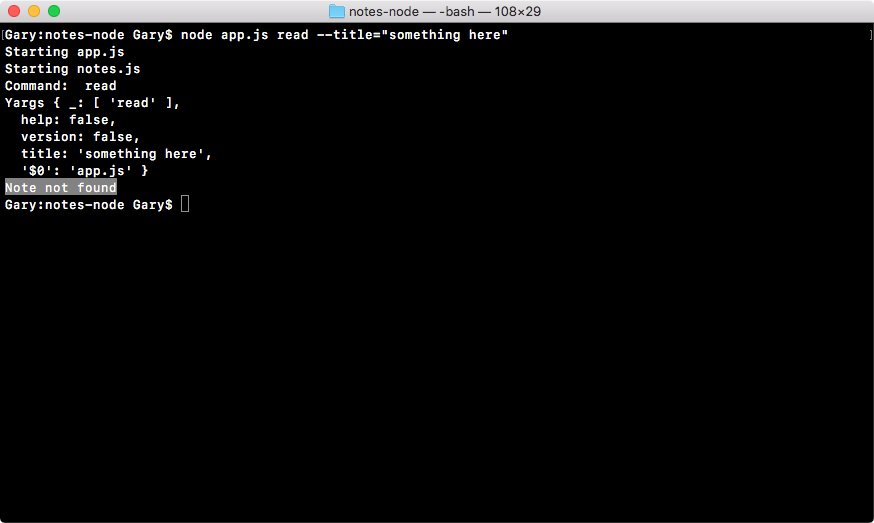
Now, if I do try to fetch a note where the title does exist, I would expect that note to come back.
In the data file I have a note with a title of to buy; let's try to fetch that one. I'll use the up arrow key to populate the previous command and replace the title with to space, buy, and hit enter:
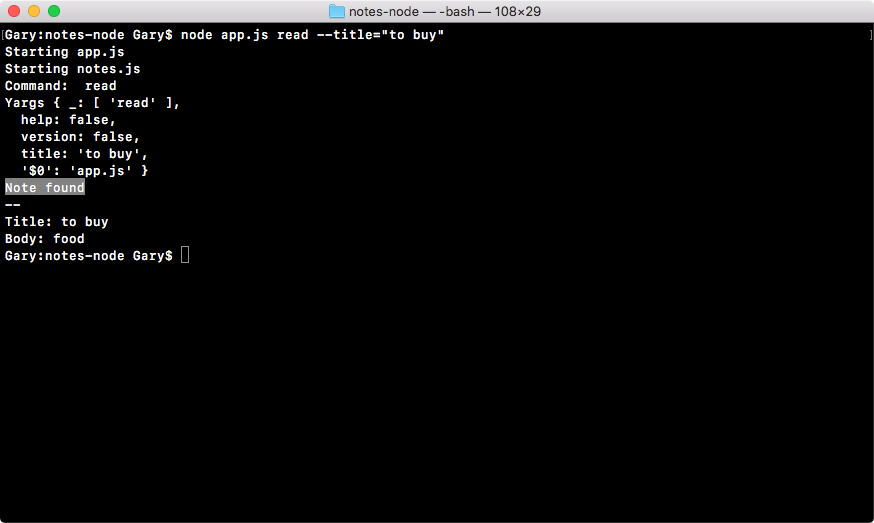
As shown in the previous code, you can see Note found prints to the screen, which is fantastic. Following Note found we have our spacers and following that we have the title, which is to buy, and the body, which is food, exactly as it appears inside of the data file. With this in place, we are done with the read command.
Now, there is one more thing I want to tackle before we wrap up this section. Inside app.js we now have the same code in two places. We have the space or title body in the add command as well as in the read command:
if (command === 'add') {
  var note = notes.addNote(argv.title, argv.body);
  if (note) {
    console.log('Note created');
    console.log('--');
    console.log(`Title: ${note.title}`);
    console.log(`Body: ${note.body}`);
  } else {
    console.log('Note title taken');
  }
 } else if (command === 'list') {
   notes.getAll();
 } else if (command === 'read') {
   var note = notes.getNote(argv.title);
   if (note) {
     console.log('Note found');
     console.log('--');
     console.log(`Title: ${note.title}`);
     console.log(`Body: ${note.body}`);
   } else {
     console.log('Note not found');
 }
When you find yourself copying and pasting code, it's probably best to break that out into a function that both locations call. This is the DRY principle, which stands for Don't Repeat Yourself.
In our case, we are repeating ourselves. It would be best to break this out into a function that we can call from both places. In order to do this, all we're going to do is make a function in notes.js called logNote.
Now, in notes.js, down following the removeNote function, we can make that brand new function a variable called logNote. This is going to be a function that takes one argument. This argument will be the note object because we want to print both the title and the body. As shown here, we'll expect the note to get passed in:
var logNote = (note) => {

};
Now, filling out the logNote function is going to be really simple, especially when you're solving a DRY issue, because you can simply take the code that's repeated, cut it out, and paste it right inside the logNote function. In this case the variable names line up already, so there is no need to change anything:
var logNote = (note) => {
  console.log('--');
  console.log(`Title: ${note.title}`);
  console.log(`Body: ${note.body}`);
};
Now that we have the logNote function in place, we can change things over in app.js. In app.js, where we have removed the console.log statements we can call notes.logNote, passing in the note object just like this:
else if (command === 'read') {
  var note = notes.getNote(argv.title);
  if (note) {
    console.log('Note found');
    notes.logNote(note);
  } else {
    console.log('Note not found');
 }
And we can do the same thing in case of the add command if block. I can remove these three console.log statements and call notes.logNote, passing in note:
if (command === 'add') {
  var note = notes.addNote(argv.title, argv.body);
  if (note) {
    console.log('Note created');
    notes.logNote(note);
 } else {
   console.log('Note title taken');
 }
And now that we have this in place, we can rerun our program and hopefully what we see is the exact same functionality.
The last thing to do before we rerun the program is export the logNote function in exports module in notes.js file. LogNote is going to get exported and we're using the ES6 syntax to do that:
module.exports = {
  addNote,
  getAll,
  getNote,
  removeNote,
  logNote
};
With this in place, I can now rerun the previous command from Terminal using up and hit enter:
node app.js read --title="to buy"

As shown, we get Note found printing to the screen, with the title and the body just like we had before. I'm also going to test out the add command to make sure that one's working, node app.js add; we will use a title of things to do and a body of go to post office:
node app.js add --title="things to do" --body="go to post office"
Now, when I hit enter, we would expect the same log to print as it did before for the add command, and that's exactly what we get:
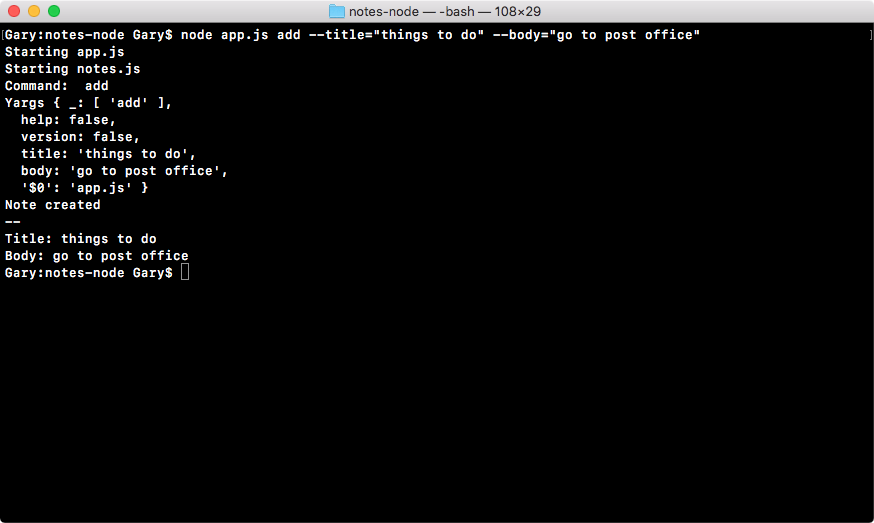
Note created prints, we get our spacer, and then we get our title and our body.
In the next section, we're going to cover one of the most important topics in the book; which is debugging. Knowing how to properly debug programs is going to save you literally hundreds of hours over your Node.js career. Debugging can be really painful if you don't have the right tools, but once you know how it's done, it really isn't that bad and it can save you a ton of time.
In this section, we're going to use the built-in debugger, which can look a little complex because it's run inside of the command line. That means that you have to use the command-line interface, which is not always the most pleasant thing to look at. In the next section, though, we are going to be installing a third-party tool that uses Chrome DevTools in order to debug your Node app. That one looks great because the Chrome DevTools are fantastic.
Before going ahead, we will learn that we do need to create a place to play around with debugging and that's going to happen in a playground file, since the code we're going to write is not going to be important to the notes app itself. Inside the notes app I'll make a new file called debugging.js:
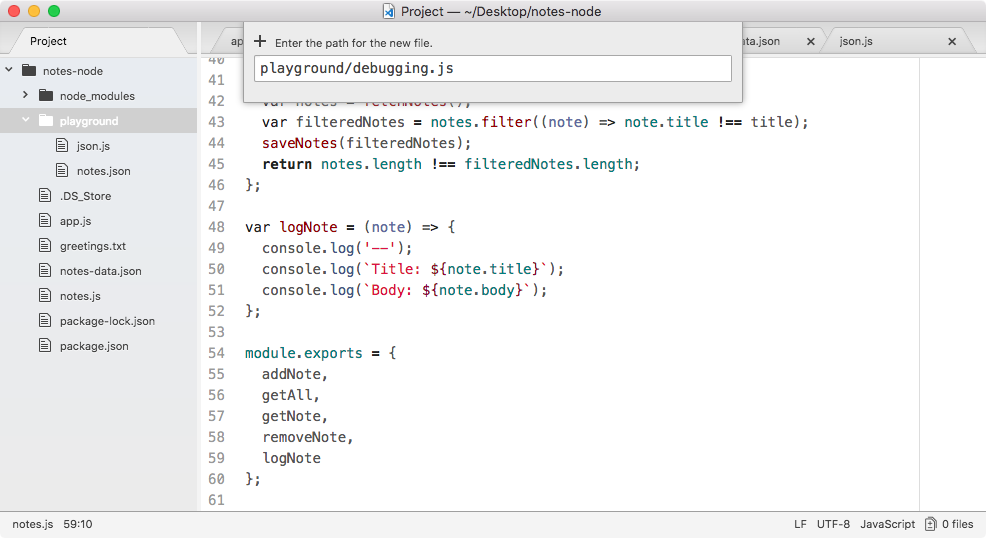
In debugging.js we're going to start off with a basic example. We're going to make an object called person, and on that object for the moment, we're going to set one property name. Set it equal to your name, I'll set mine equal to the string Andrew as shown:
var person = {
  name: 'Andrew'
};
Next up we're going to set another property, but in the next line, person.age. I'll set mine equal to my age, 25:
var person = {
  name: 'Andrew'
};

person.age = 25;
Then we're going to add another statement that changes the name, person.name equals something like Mike:
var person = {
  name: 'Andrew'
};

person.age = 25;

person.name = 'Mike';
Finally, we're going to console.log the person object, the code is going to look like this:
var person = {
  name: 'Andrew'
};

person.age = 25;

person.name = 'Mike';

console.log(person);
Now, we actually already have a form of debugging in this example, we have a console.log statement.
As you're going through the Node application development process, you may or may not have used console.log to debug your app. Maybe something's not working as expected and you want to figure out exactly what that variable has stored inside of it. For example, if you have a function that solves a math problem, maybe at one part in the function the equation is wrong and you're getting a different result.
Using console.log can be a pretty great way to do that, but it's super limited. We can view that by running it from Terminal, I'll run the following command for this:
node playground/debugging.js
When I run the file, I do get my object printed out to the screen, which is great, but, as you know, if you want to debug something besides the person object you have to add another console.log statement in order to do that.
Imagine you have something like our app.js file, you want to see what command equals, then you want to see what argv equals, it could take a lot of time to add and remove those console.log statements. There is a better way to debug. This is using the Node debugger. Now, before we make any changes to the project, we'll take a look at how the debugger works inside of Terminal, and as I warned you in the beginning of the section, the built-in Node debugger, while it is effective, is a little ugly and hard to use.
For now, though, we are going to run the app much the same way, only this time we're going to type node inspect. Node debug is going to run our app completely differently from the regular Node command. We're running the same file in the playground folder, it's called debugging.js:
node inspect playground/debugging.js
When you hit enter, you should see something like this:
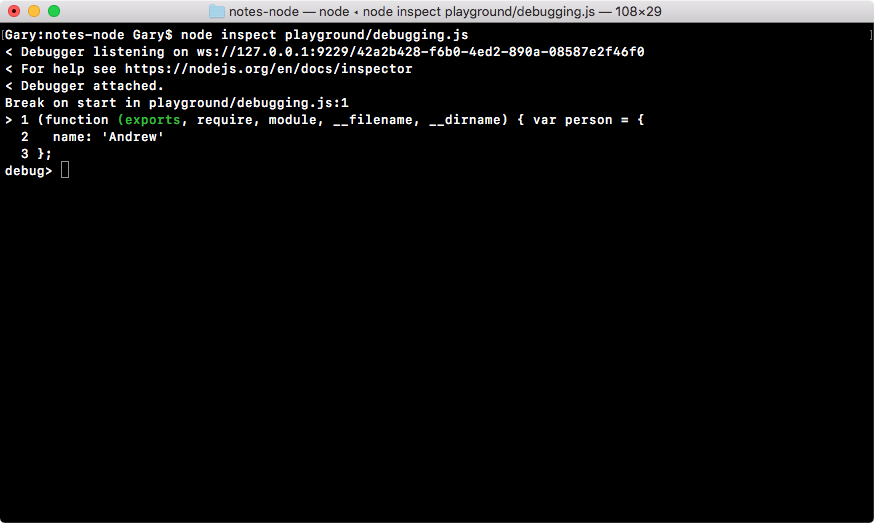
In the output, we can ignore the first two lines. This essentially means that the debugger was set up correctly and it's able to listen to the app running in the background.
Next, we have our very first line break in playground debugging on line one, and right following to it you can see line one with a little caret (>) next to it. When you first run your app in debug mode, it pauses before it executes the first statement. When we're paused on a line like line one, that means the line has not executed, so at this point in time we don't even have the person variable in place.
Now, as you can see in the preceding code, we haven't returned to the command line, Node is still waiting for input, and there are a few different commands we can run. For example, we can run n, which is short for next. You can type n, hit enter, and this moves on to the next statement.
The next statement we have, the statement on line one, was executed, so the person variable does exist. Then I can use n again to go to the next statement where we declare the person.name property, updating it from Andrew to Mike:
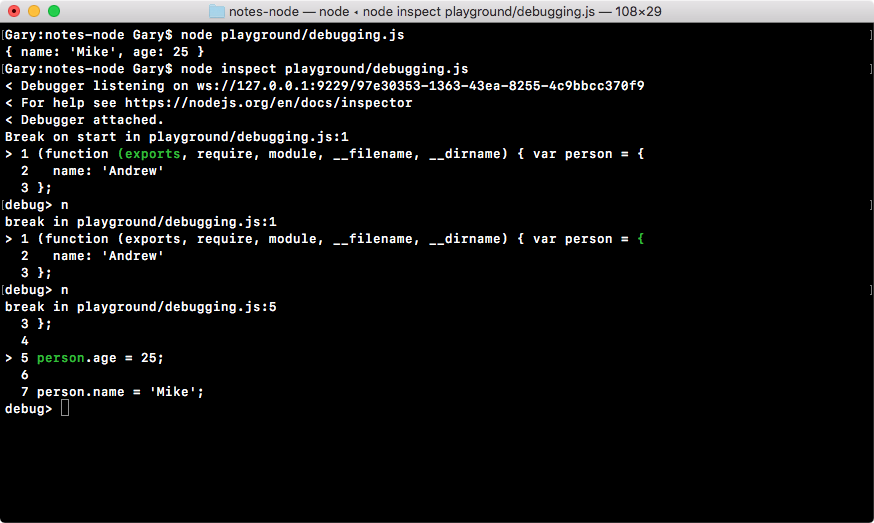
Notice, at this point, age does exist because that line has already been executed.
Now, the n command goes statement by statement through your entire program. If you realize that you don't want to do that through the whole program, which could take a lot of time, you can use c. The c command is short for Continue, and that continues to the very end of the program. In the following code, you can see our console.log statement runs the name Mike and the age 25:
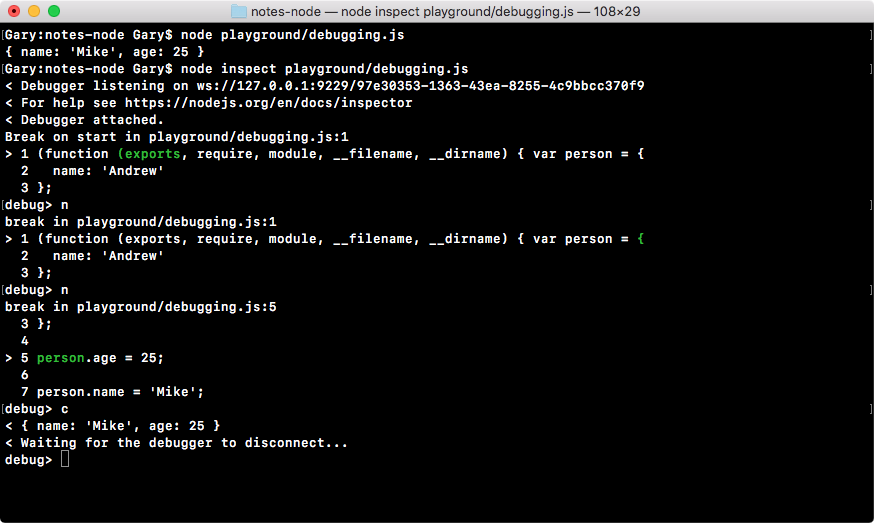
This is that's a quick example of how to use the debug keyword.
Now, we actually didn't do any debugging, we just ran through the program since it is a little foreign in terms of writing these commands, such as next and continue, I decided to do a dry run once with no debugging. You can use control + C to quit the debugger and get returned back to Terminal.
I'll use clear to clear all the output. Now that we have a basic idea about how we can execute the program in debug mode, let's take a look at how we can actually do some debugging.
I'll rerun the program using the up arrow key twice to return to the Node debug command. Then, I'll run the program, and I'll hit next twice, n and n:
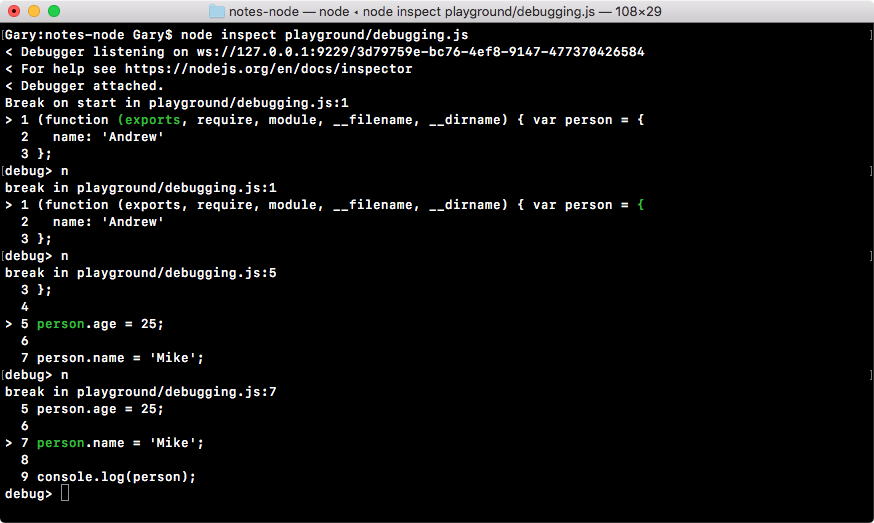
At this point in time, we are on line seven, that is where the line break currently is. From here we can do some debugging using a command called repl, which stands for Read Evaluate Print Loop. The repl command, in our case, brings you to an entirely separate area of the debugger. When you hit it you're essentially in a Node console:
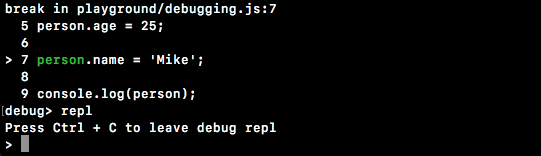
You can run any Node commands, for example, I can use console.log to print something like test, and test prints up right there.
I can make a variable a that is equal to 1 plus 3, then I can reference a and I can see it's equal to 4 as shown:
More importantly, we have access to the current program as it sits, meaning as it was before line seven was executed. We can use this to print out person, and as shown in the following code, you can see the person's name is Andrew because line seven hasn't executed and the age is 25, exactly as it appears in the program:
This is where debugging gets really useful. Being able to look at the program paused at a certain point in time is going to make it really easy to spot errors. I could do anything I want, I could print out the person name property, and that prints Andrew to the screen, as shown here:
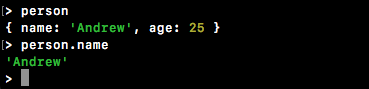
Now, once again, we still have this problem. I have to hit next through the program. When you have a really long program, there could literally be hundreds or thousands of statements that need to run before you get to the point you care about. Obviously that is not ideal, so we're going to look at a better way.
Let's quit repl using control + C; now we're back at the debugger.
From here we are going to make a quick change to our application in debugging.js.
Let's say we want to pause line seven between the person age property update and the person name property update. In order to pause, what we're going to do is run the statement debugger:
var person = {
  name: 'Andrew'
};

person.age = 25;

debugger;

person.name = 'Mike';

console.log(person);
When you have a debugger statement exactly like previous, it tells the Node debugger to stop here, which means instead of using n (next) to go statement by statement, you can use c (continue), which is going to continue until either the program exits or it sees one of the debugger keywords.
Now, over in Terminal, we're going to rerun the program exactly like we did before. This time around, instead of hitting n twice, we're going to use c to continue:
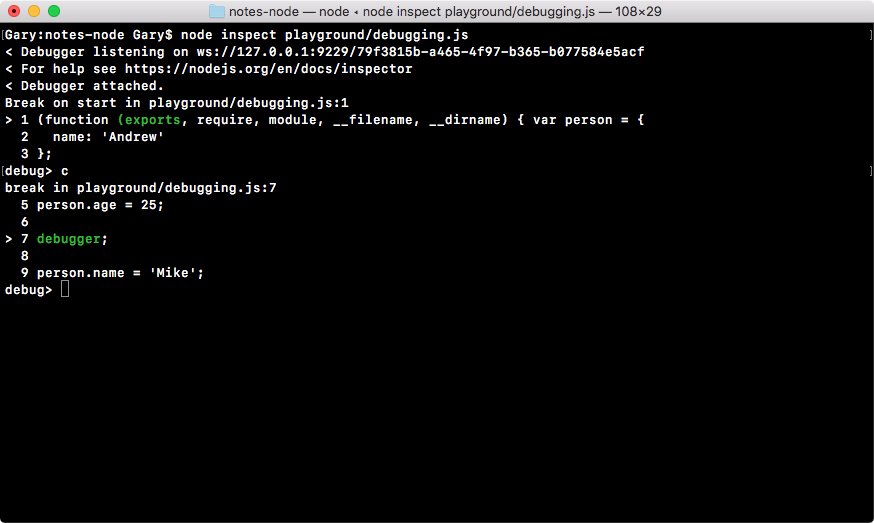
Now, when we first used c, it went to the end of the program, printing out our object. This time around it's going to continue until it finds that debugger keyword.
Now, we can use repl, access anything we like, for example, person.age, shown in this code:
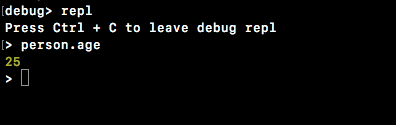
Once we're done debugging, we can quit and continue through the program. Again, we can use control + C to quit repl and the debugger.
All real debugging pretty much happens with the debugger keyword. You put it wherever you want on your program, you run the program in debug mode, eventually it gets to the debugger keyword and you do something. For example you explore some variable values, you run some functions, or you play around with a code to find the error. No one really uses n to print through the program, finding the line that causes the problem. That takes way too much time and it's just not realistic.
Now that you know a little bit about the debugger, I want you to use it inside our notes application. What we will do inside notes.js is add the debugger statement in logNote function as the first line of the function. Then I will run the program in debug mode, passing in some arguments that will cause logNote to run; for example, reading a note, after the note gets fetched, it's going to call logNote.
Now, once we have the debugger keyword in the logNote function and run it in debug mode with those arguments, the program should stop at this point. Once the program starts in debug mode, we'll use c to continue, and it'll pause. Next, we'll print out the note object and make sure it looks okay. Then, we can quit repl and quit the debugger.
Now, first we are adding the debugger statement right here:
var logNote = (note) => {
  debugger;
  console.log('--');
  console.log(`Title: ${note.title}`);
  console.log(`Body: ${note.body}`);
};
We can save the file, and now we can move into Terminal; there's no need to do anything else inside our app.
Inside Terminal we're going to run our app.js file, node debug app.js, because we want to run the program in debug mode. Then we can pass in our arguments, let's say the read command, and I'll pass in a title, "to buy" as shown here:
node debug app.js read --title="to buy"
In this case I have a note with the title "to buy", as shown here:
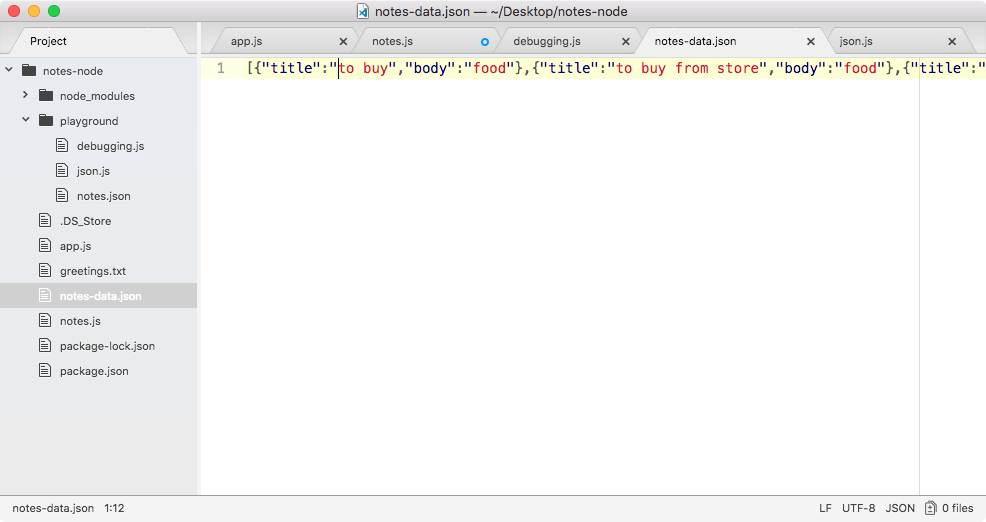
Now, when I run the preceding command, it's going to pause before that first statement runs, this is expected:

I can now use c to continue through the program. It's going to run as many statements as it takes for either the program to end or for the debugger keyword to be found, and as shown in the following code, you can see the debugger was found and our program has stopped on line 49 of notes.js:
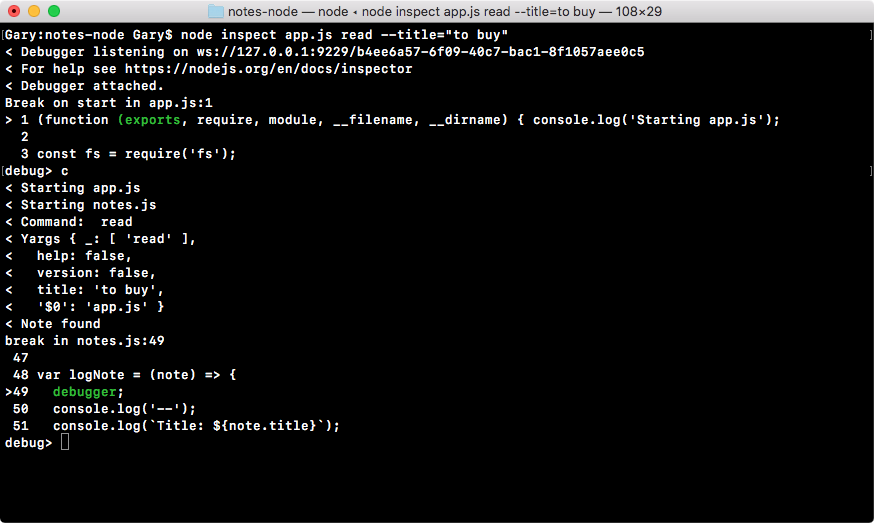
This is exactly what we wanted to do. Now, from here, I'll go into repl and print out note argument, and as shown in the following code, you can see we have the note with the title of to buy and the body food:
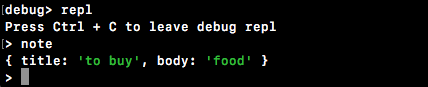
Now, if there was an error in this statement, maybe the wrong thing was printing to the screen, this would give us a pretty good idea as to why. Whatever gets passed into the note is clearly being used inside of the console.log statements, so if there was an issue with what's printing, it's most likely an issue with what gets passed into the logNote function.
Now that we've printed the note variable, we can shut down repl, and we can use control + C or quit to quit the debugger.
Now we're back at the regular Terminal and we have successfully completed the debugging inside the Node application. In the next section, we're going to look at a different way to do the same thing, a way with a much nicer graphic user interface that I find a lot easier to navigate and use.
Now that we've made some awesome progress on debugging, let's go back to the commands for our app, because there is only one more to fill out (we have covered the add, read, and remove commands in the Chapter 3, Node Fundamentals - Part 2, and this chapter, respectively). It's the list command, and it's going to be really easy, there is nothing complex going on in the case of the list command.
In order to get started, all we need to do is fill out the list notes function, which in this case we called getAll. The getAll function is responsible for returning every single note. That means it's going to return an array of objects, an array of all of our notes.
All we have to do that is to return fetchNotes, as shown here:
var getAll = () => {
  return fetchNotes();
}
There's no need to filter, there's no need to manipulate the data, we just need to pass the data from fetchNotes back through getAll. Now that we have this in place, we can fill out the functionality over inside of app.js.
We have to create a variable where we can store the notes, I was going to call it notes, but I probably shouldn't because we already have a notes variable declared. I'll create another variable, called allNotes, setting it equal to the return value from getAll, which we know because we just filled out returns all the notes:
else if (command === 'list') {
  var allNotes = notes.getAll();
}
Now I can use console.log to print a little message and I'll use template strings so I can inject the actual number of notes that are going to be printed.
Inside the template strings, I'll add Printing, then the number of notes using the $ (dollar) sign and the curly braces, allNotes.length: that's the length of the array followed by notes with the s in parenthesis to handle both singular and plural cases, as shown in the following code block:
else if (command === 'list') {
  var allNotes = notes.getAll();
  console.log(`Printing ${allNotes.length} note(s).`);
}
So, if there were six notes, it would say printing six notes.
Now that we have this in place, we have to go about the process of actually printing each note, which means we need to call logNote once for every item in the allNotes array. To do, this we'll use forEach, which is an array method similar to filter.
Filter lets you manipulate the array by returning true or false to keep items or remove items; forEach simply calls a callback function once for each item in the array. In this case we can use it using allNotes.forEach, passing in a callback function. Now, that callback function will be an arrow function (=>) in our case, and it will get called with the note variable just like filter would have. And all we'll call is notes.logNote, passing in the note argument, which is right here:
else if (command === 'list') {
  var allNotes = notes.getAll();
  console.log(`Printing ${allNotes.length} note(s).`);
  allNotes.forEach((note) => {
    notes.logNote(note);
  });
}
And now that we have this in place, we can actually simplify it by adding the logNote call, as shown in here:
else if (command === 'list') {
  var allNotes = notes.getAll();
  console.log(`Printing ${allNotes.length} note(s).`);
  allNotes.forEach((note) => notes.logNote(note));
}
This is the exact same functionality, only using the expression syntax. Now that we have our arrow function (=>) in place, we are calling notes.logNote once for each item in the all notes array. Let's save the app.js file and test this out over in Terminal.
In order to test out the list command, all I'll use is node app.js with the command list. There is no need to pass in any arguments:
node app.js list
When I run this, I do get Printing 3 note(s) and then I get my 3 notes to buy, to buy from store, and things to do, as shown in the following code output, which is fantastic:
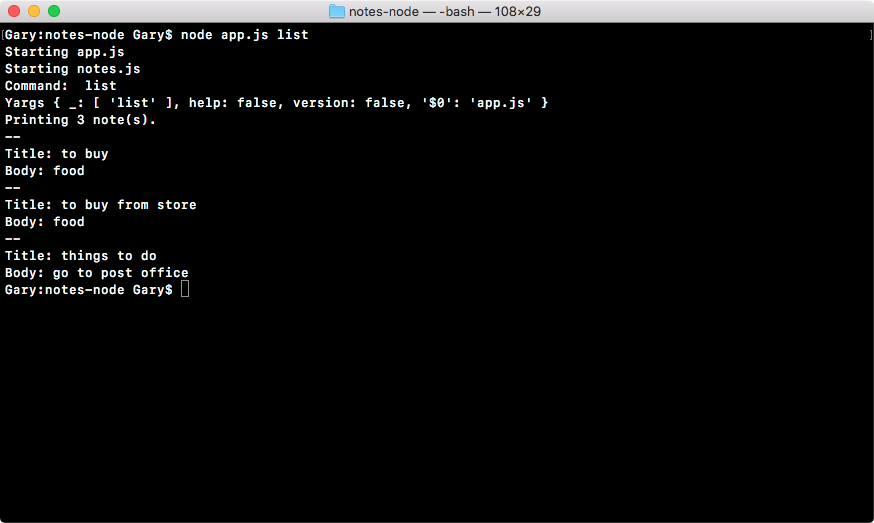
With this in place, all of our commands are now working. We can add notes, remove notes, read an individual note, and list all of the notes stored in our JSON file.
Moving on to the next section, I want to clean up some of the commands. Inside app.js and notes.js, we have some console.log statements that are printing out a few things we no longer need.
At the very top of app.js, I am going to remove the console.log('Starting app.js') statement, making the constant fs the first line.
I'll also remove the two statements: console.log('Command: ', command) and console.log('Yargs', argv) that print the command and the yargs variable value.
Inside notes.js, I will also remove the console.log('Stating notes.js') statement at the very top of that file, since it is no longer necessary, putting constant fs at the top.
It was definitely useful when we first started exploring different files, but now we have everything in place, there's no need. If I rerun the list command, this time you can see it looks a lot cleaner:
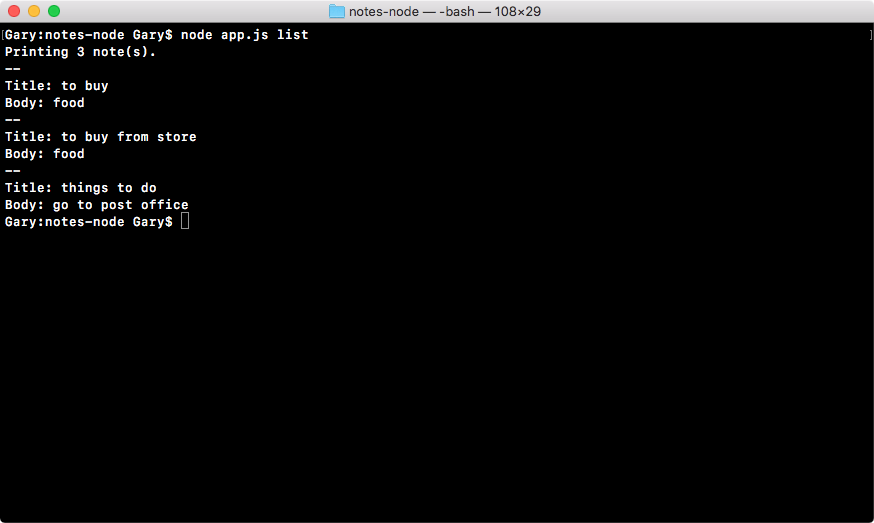
Printing three notes is the very first line showing up. With this in place, we have done our commands.
In the next section, we're going to take a slightly more in-depth look at how we can configure yargs. This is going to let us require certain arguments for our commands. So if someone tries to add a note without a title, we can warn the user and prevent the program from executing.
Before we get into the advanced discussion of yargs, first, I want to pull up the yargs docs so that you at least know where the information about yargs is coming from. You can get it by Googling npm yargs. We're going to go to the yargs package page on npm. This has the documentation for yargs, as shown here:
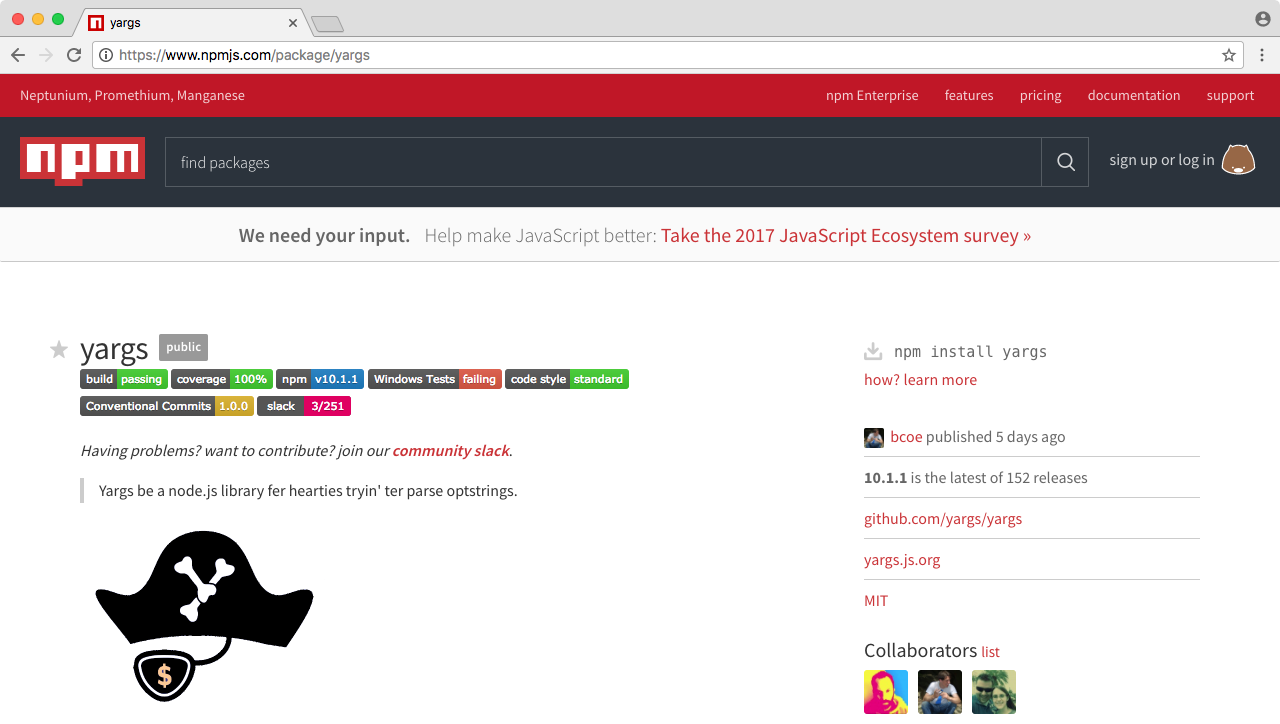
Now there is no table of contents for the yargs docs, which makes it kind of difficult to navigate. It starts off with some examples that don't go in any particular order, and then eventually it gets into a list of all the methods you have available, and that's what we're looking for.
So I'll use command + F (Ctrl + F) to search the page for methods, and as shown in the following screenshot, we get the methods header, which is the one we're looking for:
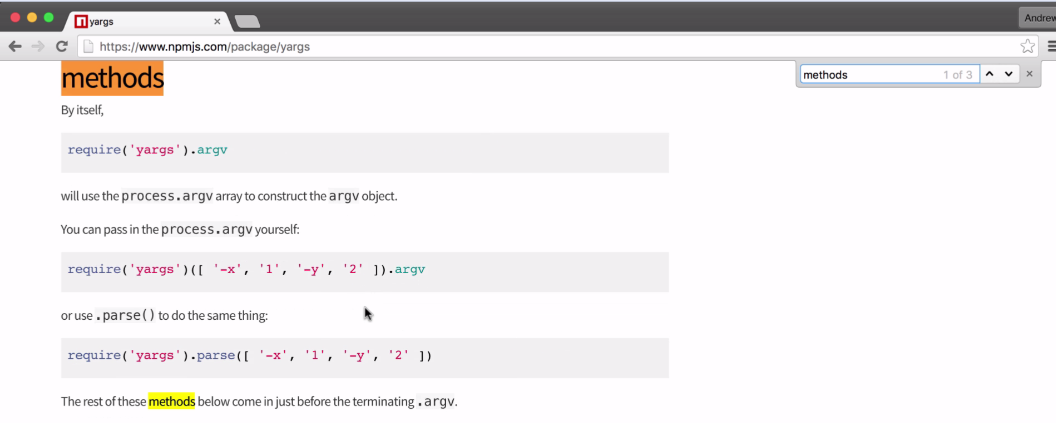
If you scroll down on the page, we start to see an alphabetical list of all the methods you have access to inside of yargs. We're specifically looking for .command; this is the method we can use to configure all four of our commands: the add, read, remove and list notes:
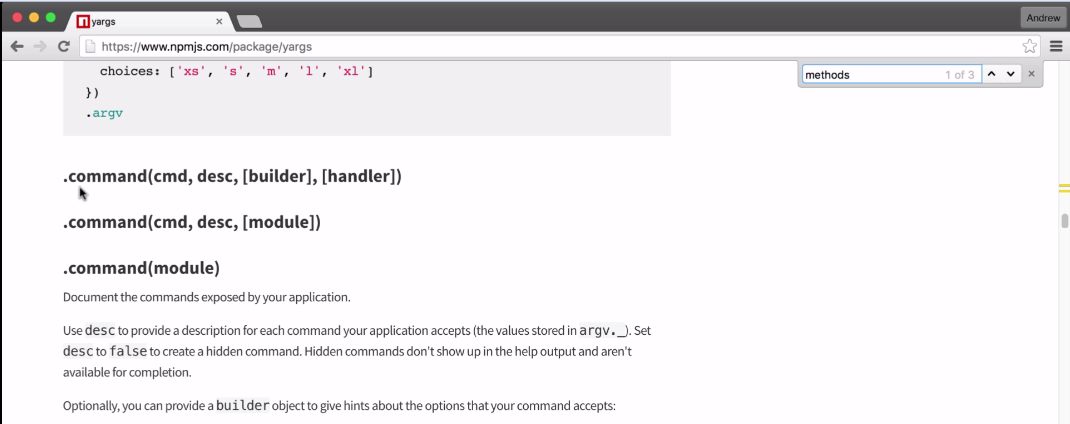
We're going to specify which options they require, if any, and we can also set up things like descriptions and help functionality.
Now in order to get started, we need to make some changes inside of app.js. We're going to start with the add command (for more information, please refer to the Adding and saving notes section in the previous chapter).
We want to add a few helpful pieces of information in argv function inside app.js, that will:
Now we are going to be chaining property calls, which means right before I access .argv I want to call .command, and then I'll call .argv on the return value from command as shown here:
const argv = yargs
  .command()
  .argv;
Now this chaining syntax probably looks familiar if you've used jQuery, a lot of different libraries are supported. Once we call .command on yargs, we're going to pass in three arguments.
The first one is the command name, exactly how the user is going to type it in Terminal, in our case it's going to be add:
const argv = yargs
  .command('add')
  .argv;
Then we're going to pass another string in, and this is going to be a description of what the command does. It is going to be some sort of English readable description that a user can read to figure out weather that's the command that they want to run:
const argv = yargs
  .command('add', 'Add a new note')
  .argv;
The next one is going to be an object. This is going to be the options object that lets us specify what arguments this command requires.
Now before we get into the options object, let's add one more call right after command. We're going to call .help, which is a method, so we're going to call it as a function, and we don't need to pass in any arguments:
const argv = yargs
  .command('add', 'Add a new note', {

  })
  .help()
  .argv;
When we add on this help call, it sets up yargs to return some really useful information when someone runs the program. For example, I can run the node app.js command with the help flag. The help flag is added because we called that help method, and when I run the program, you can see all of the options we have available:
node app.js --help

As shown in the preceding output, we have one command, add Add a new note, and a help option for the current command, help. And the same thing holds true if we run the node app.js add command with help as shown here:
node app.js add --help
In this output, we can view all of the options and arguments for add command, which in this case happens to be none because we haven't set those up:

Let's add options and arguments back inside Atom. In order to add properties, we're going to update the options object, where the key is the property name, whether it's title or body, and the value is another object that lets us specify how that property should work, as shown here:
const argv = yargs
  .command('add', 'Add a new note', {
    title: {

    }
  })
  .help()
  .argv;
In the case of title, we would add the title on the left-hand side, and we would put our options object on the right-hand side. Inside the title, we're going to configure three properties describe, demand, and alias:
The describe property will be set equal to a string, and this is going to describe what is supposed to be passed in for the title. In this case, we can just use Title of note:
const argv = yargs
  .command('add', 'Add a new note', {
    title: {
      describe: 'Title of note'
    }
  })
  .help()
  .argv;
Next we configure demand. It is going to tell yarg whether or not this argument is required. demand is false by default, we'll set it to true:
const argv = yargs
  .command('add', 'Add a new note', {
    title: {
      describe: 'Title of note',
      demand: true
    }
  })
  .help()
  .argv;
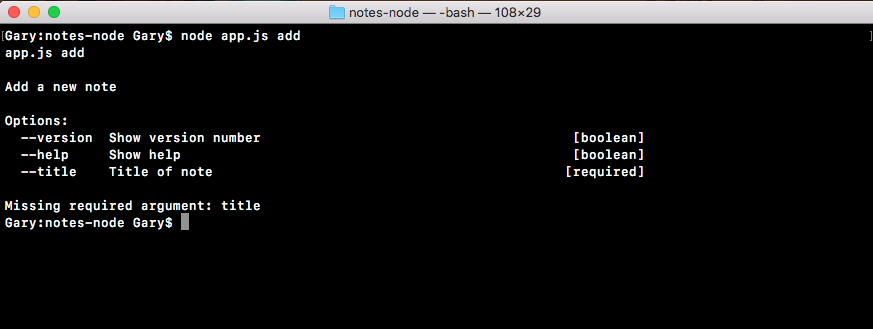
Along with describe and demand we are going to provide a third option, this is called alias. The alias lets you provide a shortcut so you don't have to type --title; you can set the alias equal to a single character like t:
const argv = yargs
  .command('add', 'Add a new note', {
    title: {
      describe: 'Title of note',
      demand: true,
      alias: 't'
    }
  })
  .help()
  .argv;
When you have done that, you can now run the command in Terminal using the new syntax.
Let's run our add command, node app.js add, instead of --title. We're going to use -t, which is the flag version, and we can set that equal to whatever we like, for example, flag title will be the title, and --body will get set equal to body , as shown in the following code. Note that we haven't set up the body argument yet so there is no alias:
node app.js add -t="flag title" --body="body"
If I run this command, everything works as expected. The flag title shows up right where it should, even though we used the alias version which is the letter t, as shown here:
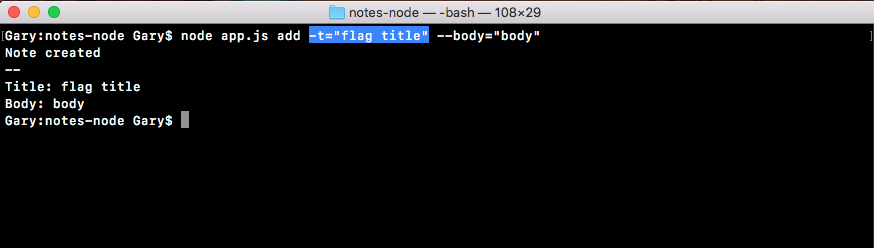
Now that we have our title configured, we can do the exact same thing for the body. We'll specify our options object and provide those three arguments: describe, demand, and alias for body:
const argv = yargs
  .command('add', 'Add a new note', {
    title: {
      describe: 'Title of note',
      demand: true,
      alias: 't'
    },
    body: {

    }
  })
  .help()
  .argv;
The first one is describe and that one's pretty easy. describe is going to get set equal to a string, and in this case Body of note will get the job done:
const argv = yargs
  .command('add', 'Add a new note', {
    title: {
      describe: 'Title of note',
      demand: true,
      alias: 't'
    },
    body: {
      describe: 'Body of note'
    }
  })
  .help()
  .argv;
The next one will be demand, and to add a note we are going to need a body. So we'll set demand equal to true, just like we do up previous for title:
const argv = yargs
  .command('add', 'Add a new note', {
    title: {
      describe: 'Title of note',
      demand: true,
      alias: 't'
    },
    body: {
      describe: 'Body of note'
      demand: true
    }
  })
  .help()
  .argv;
And last but not least is the alias. The alias is going to get set equal to a single letter, I'll use the letter b for body:
const argv = yargs
  .command('add', 'Add a new note', {
    title: {
      describe: 'Title of note',
      demand: true,
      alias: 't'
    },
    body: {
      describe: 'Body of note'
      demand: true,
      alias: 'b'
    }
  })
  .help()
  .argv;
With this in place, we can now save app.js and inside Terminal, we can take a moment to rerun node app.js add with the help flag:
node app.js add --help
When we run this command, we should now see the body argument showing up, and you can even see it shows the flag version, as shown in the following output, the alias -b (Body of note), and it is required:

Now I'll run node app.js add passing in two arguments t. I'll set that equal to t, and b setting it equal to b.
When I run the command, everything works as expected:
node app.js add -t=t -b=b
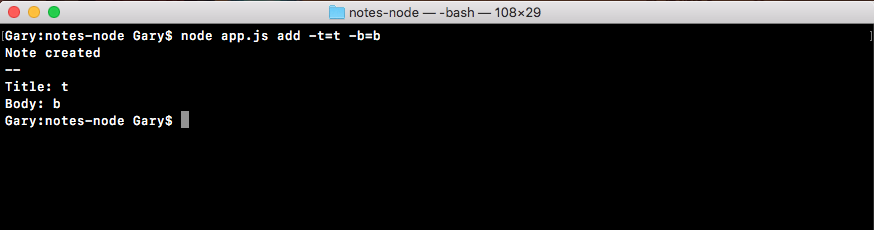
As shown in the preceding output screenshot, a new note was created with a title of t and a body of b. With this in place, we've now successfully completed the setup for the add command. We have our add command title, a description, and the block that specifies the arguments for that command. Now we do have three more commands to add support for, so let's get started doing that.
On the next line, I'll call .command again, passing in the command name. Let's do the list command first because this one is really easy, no arguments are required. Then we'll pass in the description for the list command, List all notes, as shown here:
.command('list', 'List all notes')
.help()
.argv;
Next up, we'll call command again. This time we'll do the command for read. The read command reads an individual note, so for the description for the read command, we'll use something like Read a note:
.command('list', 'List all notes')
.command('read', 'Read a note')
.help()
.argv;
Now the read command does require the title argument. That means we are going to need to provide that options object. I'll take title from add command, copy it, and paste it in the read command options object:
.command('list', 'List all notes')
.command('read', 'Read a note', {
  title: {
    describe: 'Title of note',
    demand: true,
    alias: 't'
  }
})
.help()
.argv;
As you probably just noticed, we have repeated code. The title configuration just got copied and pasted into multiple places. It would be pretty nice if this was DRY, if it was in one variable we could reference in both locations, in add and read commands.
Will call command for remove, just following where we called the command for read. Now, the remove command will have a description. We'll stick with something simple like Remove a note, and we will be providing an options object:
.command('remove', 'Remove a note', {

})
Now I can add the options object identical to the read command. However, in that options object, I'll set title equal to titleOptions, as shown here, to avoid the repetition of code:
.command('remove', 'Remove a note', {
  title: titleOptions
})
Now I don't have the titleOptions object created yet so the code would currently fail, but this is the general idea. We want to create the titleOptions object once and reference it in all the locations we use it, for add, read and remove command. I can take titleOptions, and add it for read as well as for add command, as shown here:
.command('add', 'Add a new note', {
  title: titleOptions,
  body: {
    describe: 'Body of note',
    demand: true,
    alias: 'b'
  }
})
.command('list', 'List all notes')
.command('read', 'Read a note', {
  title: titleOptions
})
.command('remove', 'Remove a note', {
title: titleOptions
})
Now, just previous the constant argv, I can create a constant called titleOptions, and I can set it equal to that object that we defined for add and read command earlier, which is describe, demand, and alias, as shown here:
const titleOptions = {
  describe: 'Title of note',
  demand: true,
  alias: 't'
};
We now have the titleOptions in place, and this will work as expected. We have the exact same functionality we did before, but we now have the titleOptions in a separate object, which follows the DRY principle we discussed in the Reading note section.
Now, we could also do the same thing for body. It might seem like overkill since we're only using it in only one location, but if we're sticking to the pattern of breaking them out into variables, I'll do it in the case of the body as well. Just following the titleOptions constant, I can create the constant bodyOptions, setting it equal to the options object we defined in the body, for add command in the previous subsection:
const bodyOptions = {
  describe: 'Body of note',
  demand: true,
  alias: 'b'
};
With this in place, we are now done. We have add, read, and remove, all with their arguments set up referencing the titleObject and bodyObject variables defined.
Let's test out the remove command in Terminal. I'll list out my notes using node app.js list, so I can see which notes I have to remove:
node app.js list
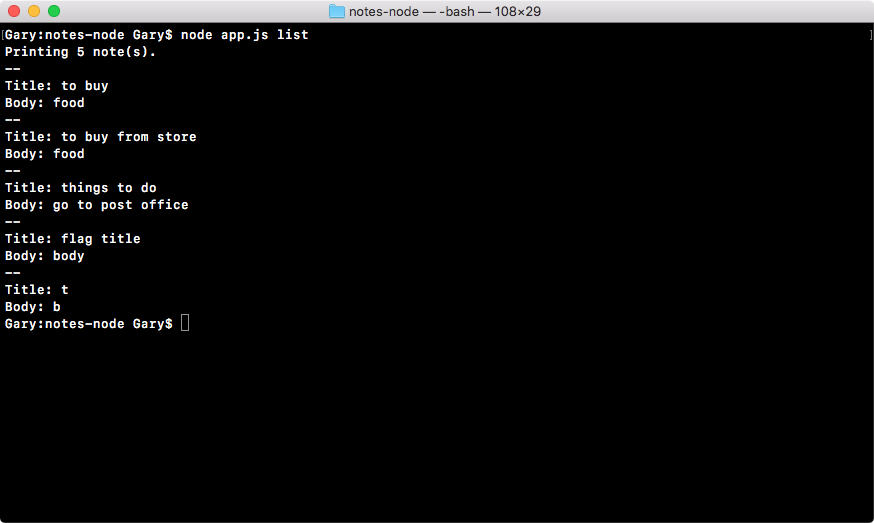
I'll remove the note with the title t, using the node app.js remove command and our flag "t":
node app.js remove -t="t"

We'll remove the note with the title t, and as shown previous, Note was removed prints to the screen. And if I use the up arrow key twice, I can list the notes out again, and you can see the note with the title t has indeed gone:
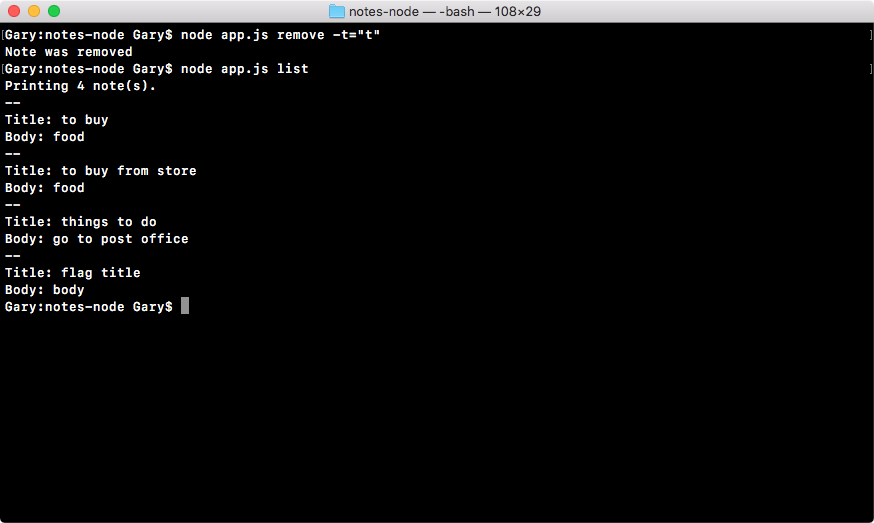
Let's remove one more note using the node app.js remove command. This time we're going to use --title, which is the argument name, and the note we're going to remove has the title flag title, as shown in this code:

When I remove it, it says Note was removed, and if I rerun the list command, I can see that we have three notes left, the note was indeed removed , as shown here:
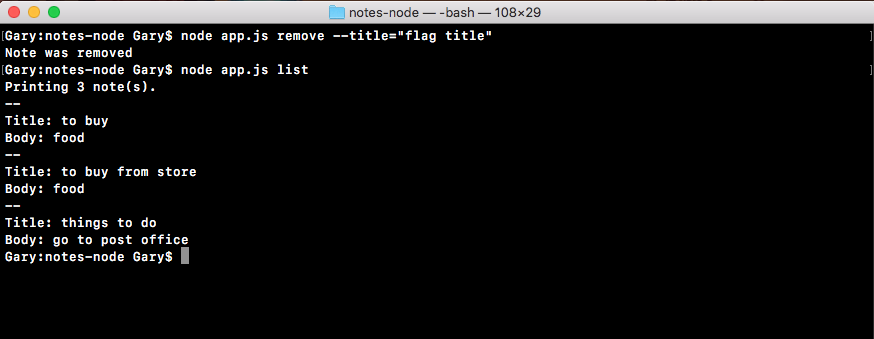
And that is it for the notes application.
In this section, you're going to learn the ins and outs of the arrow function. It's an ES6 feature, and we have taken a little look at it. Inside notes.js we used it in a few basic examples to create methods such as fetchNotes and saveNotes, and we also passed it into a few array methods like filter, and for each array, we used it as the callback function that gets called once for every item in the array.
Now if you try to swap out all of the functions in a program with arrow functions, it's most likely not going to work as expected because there are some differences between the two, and it's really important to know what those differences are, so you can make the decision to use a regular ES5 function or an ES6 arrow function.
The goal in this section is to give you the knowledge to make that choice, and we'll kick things off by creating a new file in the playground folder called arrow-function.js:
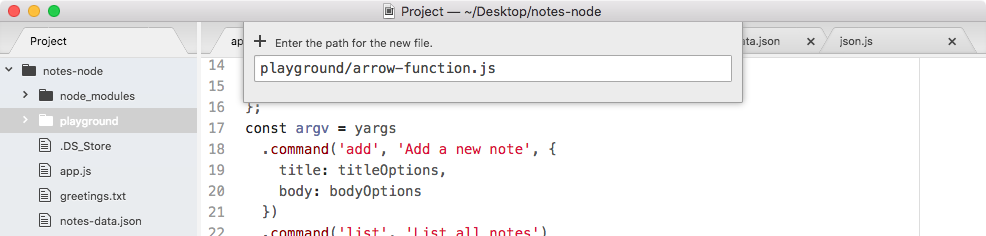
Inside this file, we're going to play around with a few examples, going over some of the subtleties to the arrow function. Before we type anything inside of the file, I'll start up this file with nodemon, so every time we make a change it automatically refreshes over in Terminal.
If you remember, nodemon is the utility we installed in Chapter 2, Node Fundamentals - Part 1. It was a global npm module. The nodemon is the command to run, and then we just pass in the file path like we would for any other Node command. As we're going into the playground folder, and the file itself is called arrow-function.js, we'll run the following command:
nodemon playground/arrow-function.js
We'll run the file, and nothing prints to the screen, as shown in the following output, besides the nodemon logs because we have nothing in the file:
To get started, in the arrowfunction.js file, we'll create a function called square, by making a variable called square and setting it equal to an arrow function.
To make our arrow function (=>), we'll first provide the arguments inside parentheses. Since we'll be squaring a number, we just need one number, and I'll refer to that number as x. If I pass in 3, I should expect 9 back, and if I pass in 9, I would expect 81 back.
After the arguments list, we have to put the arrow in arrow function (=>) by putting the equal sign and the greater than symbol together, creating our nice little arrow. From here we can provide, inside curly braces, all the statements we want to execute:
var square = (x) => {

};
Next, we might create a variable called result, setting that equal to x times x, then we might return the result variable using the return keyword, as shown here:
var square = (x) => {
  var result = x * x;
  return result;
};
Now, obviously this can be done on one line, but the goal here is to illustrate that when you use the statement arrow function (=>), you can put as many lines as you want in between those curly braces. Let's call a square, we'll do that using console.log so we can print the result to the screen. I'll call square; and we'll call square with 9, the square of 9 would be 81, so we would expect 81 to print to the screen:
var square = (x) => {
  var result = x * x;
  return result;
};
console.log(square(9));
I'll save the arrow function (=>) file, and in Terminal, 81 shows up just as we expect:
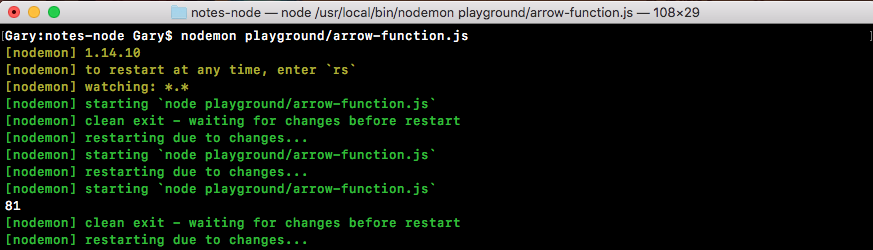
Now the syntax we used in the previous example is the statement syntax for the arrow function (=>). We've also explored the expression syntax earlier, which lets you simplify your arrow functions when you return some expressions. In this case all we need to do is specify the expression we want to return. In our case that's x times x:
var square = (x) => x * x;
console.log(square(9));
You don't need to explicitly add the return keyword. When you use an arrow function (=>) without your curly braces, it's implicitly provided for you. That means we can save the function as shown previous and the exact same result is going to print to the screen, 81 shows up.
This is one of the great advantages of arrow functions when you use them in cases like filter or for those which we did in the notes.js file. It lets you simplify your code keeping everything on one line and making your code a lot easier to maintain and scan.
If I save the file in this state, 81 still prints to the screen; and this is great we have an even simpler version of our arrow function (=>):

Now that we have a basic example down, I want to move on to a more complex example that's going to explore the nuances between regular functions and arrow functions.
To illustrate the difference, I'll make a variable called user, which will be an object. On this object we'll specify one property, name. Set name equal to the string, your name, in this case I'll set it equal to the string Andrew:
var user = {
  name: 'Andrew'
};
Then we can define a method on the user object. Right after name, with my comma at the end of the line, I'll provide the method sayHi, setting it equal to an arrow function (=>) that doesn't take any arguments. For the moment, we'll keep the arrow function really simple:
var user = {
  name: 'Andrew',
  sayHi: () => {

  }
};
All we'll do inside sayHi is use console.log to print to the screen, inside of template strings Hi:
var user = {
  name: 'Andrew',
  sayHi: () => {
    console.log(`Hi`);
  }
};
We're not using template strings yet, but we will later so I'll use them here. Down following the user object, we can test out sayHi by calling it, user.sayHi:
var user = {
  name: 'Andrew',
  sayHi: () => {
    console.log(`Hi`);
  }
};
user.sayHi();
I'll call it then save the file, and we would expect that Hi prints to the screen because all our arrow function (=>) does is use console.log to print a static string. Nothing in this case will cause any problems; you'd be able to swap out a regular function for an arrow function (=>) without issue.
Now the first issue that will arise when you use arrow functions is the fact that arrow functions do not bind a this keyword. So if you are using this inside your function, it's not going to work when you swap it out for an arrow function (=>). Now, this binding; refers to the parent binding, in our case there is no parent, function so this would refer to the global this keyword. Now we have our console.log that does not use this, I'll swap it out for a case that does.
We'll put a period after Hi, and I'll say I'm, followed by the name, which we would usually be able to access via this.name:
var user = {
  name: 'Andrew',
  sayHi: () => {
    console.log(`Hi. I'm ${this.name}`);
  }
};
user.sayHi();
If I try to run this code, it is not going to work as expected; we're going to get Hi I'm undefined printing to the screen, as shown here:

In order to fix this, we'll look at an alternative syntax to arrow functions that's great when you're defining object literals, as we are in this case.
After sayHi, I'll make a new method called sayHiAlt using a different ES6 feature. ES6 provides us a new way to make methods on objects; you provide the method name, sayHiAlt, then you go right to the parentheses skipping the colon. There's also no need for the function keyword, even though it is a regular function it's not an arrow function (=>). Then we move on to our curly braces as shown here:
var user = {
  name: 'Andrew',
  sayHi: () => {
    console.log(`Hi. I'm ${this.name}`);
  },
  sayHiAlt() {

  }
};
user.sayHi();
Inside here I can have the exact same code we have in the sayHi function, but it is going to work as expected. It's going to print Hi. I'm Andrew. I'll call sayHiAlt down following instead of the regular sayHi method:
var user = {
  name: 'Andrew',
  sayHi: () => {
    console.log(`Hi. I'm ${this.name}`);
  },
  sayHiAlt() {
    console.log(`Hi. I'm ${this.name}`);
  }
};
user.sayHiAlt();
And in Terminal, you can see Hi. I'm Andrew, prints to the screen:

The sayHiAlt syntax is a syntax that you can use to solve this problem when you create functions on object literals. Now that we know that the this keyword does not get bound, let's explore one other quirk that arrow functions have, it also does not bind the arguments array.
Regular functions, like sayHiAlt, are going to have an arguments array that's accessible inside of the function:
var user = {
  name: 'Andrew',
  sayHi: () => {
    console.log(`Hi. I'm ${this.name}`);
  },
  sayHiAlt() {
    console.log(arguments);
    console.log(`Hi. I'm ${this.name}`);
  }
};
user.sayHiAlt();
Now, it's not an actual array, it's more like an object with array; like properties, but the arguments object is indeed specified in a regular function. If I pass in one, two, and three and save the file, we'll get that back when we log out arguments:
var user = {
  name: 'Andrew',
  sayHi: () => {
    console.log(`Hi. I'm ${this.name}`);
  },
  sayHiAlt() {
    console.log(arguments);
    console.log(`Hi. I'm ${this.name}`);
  }
};
user.sayHiAlt(1, 2, 3);
Inside nodemon, it's taking a quick second to restart, and right here we have our object:

We have one, two, and three, we have the index for each as the property name, and this works because we're using a regular function. If we were to switch to the arrow function (=>) though, it is not going to work as expected.
I'll add console.log(arguments) inside of my arrow function (=>), and I'll switch from calling sayHiAlt back to the original method sayHi, as shown here:
var user = {
  name: 'Andrew',
  sayHi: () => {
    console.log(arguments);
    console.log(`Hi. I'm ${this.name}`);
  },
  sayHiAlt() {
    console.log(arguments);
    console.log(`Hi. I'm ${this.name}`);
  }
};
user.sayHi(1, 2, 3);
When I save the file in arrow-function.js, we'll get something a lot different from what we had before. What we'll actually get is the global arguments variable, which is the arguments variable for that wrapper function we explored:
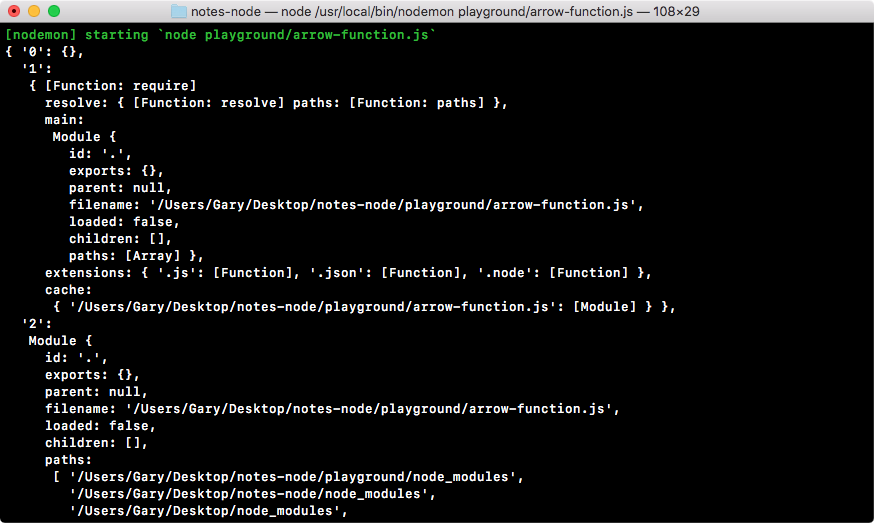
In the previous screenshot, we have things like the require function, definition, our modules object, and a couple of string paths to the file and to the current directory. These are obviously not what we're expecting, and that is another thing that you have to be aware of when you're using arrow functions; you're not going to get the arguments keyword, you're not going to get the this binding (defined in sayHi syntax) that you'd expect.
These problems mostly arise when you try to create methods on an object and use arrow functions. I would highly recommend that you switch to sayHiAlt syntax which we discussed, in those cases. You get a simplified syntax, but you also get the disk binding and you get your arguments variable as you'd expect.
In this chapter, we were able to reuse the utility functions that we already made in previous chapters, making the process of filling out a remove note that much easier. Inside app.js, we worked on how the removeNote function is executed, if it was executed successfully, we print a message; if it didn't, we print a different message.
Next, we were able to successfully fill out the read command and we also created a really cool utility function that we can take advantage of in multiple places. This keeps our code DRY and prevents us from having the same code in multiple places inside of our application.
Then we discussed a quick introduction to debugging. Essentially, debugging is a process that lets you stop the program at any point in time and play around with the program as it exists at that moment. That means you can play around with variables that exist, or functions, or anything inside of Node. We learned more about yargs, its configuration, setting up commands, their description, and arguments.
Last, you explored a little bit more about arrow functions, how they work, when to use them, and when not to use them. In general, if you don't need this keyword, or the arguments keyword you can use an arrow function without a problem, and I always prefer using arrow functions over regular functions when I can.
In the next chapter, we will explore asynchronous programming and how we can fetch data from third-party APIs. We'll use both regular functions and arrow functions a lot more, and you'll be able to see firsthand how to choose between one over the other.
If you've read any article about Node, you'd have probably come across four terms: asynchronous, non-blocking, event-based, and single-threaded. All of those are accurate terms to describe Node; the problem is it usually stops there, and it's really abstract. The topic of asynchronous programming in Node.js has been divided into three chapters. The goal in these upcoming three chapters is to make asynchronous programming super practical by putting all these terms to use in our weather application. That's the project we're going to be building in these chapters.
This chapter is all about the basics of asynchronous programming. We'll look into the basic concepts, terms, and technology related to async programming. We'll look into making requests to Geolocation APIs. We'll need to make asynchronous HTTP requests. Let's dive in, looking at the very basics of async programming in Node.
Specifically, we'll look into the following topics:
In this section, we're going to create our first asynchronous non-blocking program. This means our app will continue to run while it waits for something else to happen. In this section, we'll look at a basic example; however, in the chapter, we'll be building out a weather app that communicates with third-party APIs, such as the Google API and a weather API. We'll need to use asynchronous code to fetch data from these sources.
For this, all we need to do is make a new folder on the desktop for this chapter. I'll navigate onto my desktop and use mkdir to make a new directory, and I'll call this one weather-app. All I need to do is navigate into the weather app:
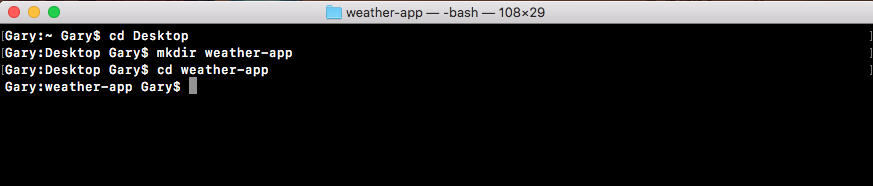
Now, I'll use the clear command to clear the Terminal output.
Now, we can open up that new weather app directory inside of Atom:
This is the directory we'll use throughout this entire chapter. In this section, we'll not be building out the weather app just yet, we'll just play around with the async features. So inside weather-app we'll make the playground folder.
This code is not going to be a part of the weather app, but it will be really useful when it comes to creating the weather app in the later sections. Now inside playground, we can make the file for this section. We'll name it async-basics.js as shown here:
To illustrate how the asynchronous programming model works, we'll get started with a simple example using console.log. Let's get started by adding a couple of console.log statements in a synchronous way. We'll create one console.log statement at the beginning of the app that will say Starting app, and we will add a second one to the end, and the second one will print Finishing up, as shown here:
console.log('Starting app');

console.log('Finishing up');
Now these are always going to run synchronously. No matter how many times you run the program, Starting app is always going to show up before Finishing up.
In order to add some asynchronous code, we'll take a look at a function that Node provides called setTimeout. The setTimeout function is a great method for illustrating the basics of non-blocking programming. It takes two arguments:
Let's call setTimeout, passing in an arrow function (=>) as our first argument. This will be callback function. It will get fired right away; that is, it will get fired after the timeout is up, after our two seconds. And then we can set up our second argument which is the delay, 2000 milliseconds, which equals those two seconds:
console.log('Starting app');

setTimeout(() => {

}, 2000);
Inside the arrow function (=>), all we'll do is use a console.log statement so that we can figure out exactly when our function fires, because the statement will print to the screen. We'll add console.log and then inside callback to get the job done, as shown here:
setTimeout(() => {
  console.log('Inside of callback');
}, 2000);
With this in place, we're actually ready to run our very first async program, and I'll not use nodemon to execute it. I'll run this file from the Terminal using the basic Node command; node playground and the file inside the playground folder which is async-basic.js:
node playground/async-basics.js
Now pay close attention to exactly what happens when we hit enter. We'll see two messages show up right away, then two seconds later our final message, Inside of callback, prints to the screen:
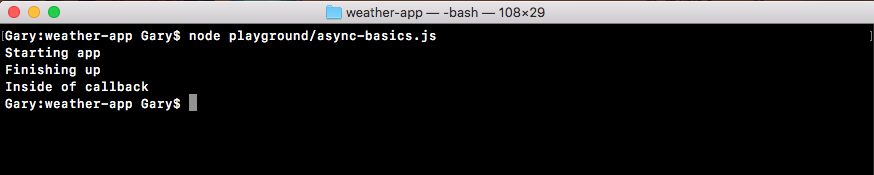
The sequence in which these messages are shown is: first we got Starting app; almost immediately after this, Finishing up prints to the screen and finally (two seconds later), Inside of callback was printed as shown in the previous code. Inside the file, this is not the order in which we wrote the code, but it is the order the code executes in.
The Starting app statement prints to the screen as we expect. Next, we call setTimeout, but we're not actually telling it to wait two seconds. We're registering a callback that will get fired in two seconds. This will be an asynchronous callback, which means that Node can do other things while these two seconds are happening. In this case, the other thing it moves down to the Finishing up message. Now since we did register this callback by using setTimeout, it will fire at some point in time, and two seconds later we do see Inside of callback printing to the screen.
By using non-blocking I/O, we're able to wait, in this case two seconds, without preventing the rest of the program from executing. If this was blocking I/O, we would have to wait two seconds for this code to fire, then the Finishing up message would print to the screen, and obviously that would not be ideal.
Now this is a pretty contrived example, we will not exactly use setTimeout in our real-world apps to create unnecessary arbitrary delays, but the principles are the same. For example, when we fetch data from the Google API we'll need to wait about 100 to 200 milliseconds for that data to come back, and we don't want the rest of the program to just be idle, it will continue. We'll register a callback, and that callback will get fired once the data comes back from the Google servers. The same principles applies even though what's actually happening is quite different.
Now, we want to write another setTimeout right here. We want to register a setTimeout function that prints a message; something like Second setTimeout works. This will be inside the callback, and we want to register a delay of 0 milliseconds, no delay at all. Let's fill out the async basics setTimeout. I'll call setTimeout with my arrow function (=>), passing in a delay of 0 milliseconds, as shown in the following code. Inside the arrow function (=>), I'll use console.log so I can see exactly when this function executes, and I'll use Second setTimeout as the text:
setTimeout(() => {
  console.log('Second setTimeout');
}, 0);
Now that we have this in place, we can run the program from the Terminal, and it's really important to pay attention to the order in which the statements print. Let's run the program:
node playground/async-basics.js
Right away we get three statements and then at the very end, two seconds later, we get our final statement:
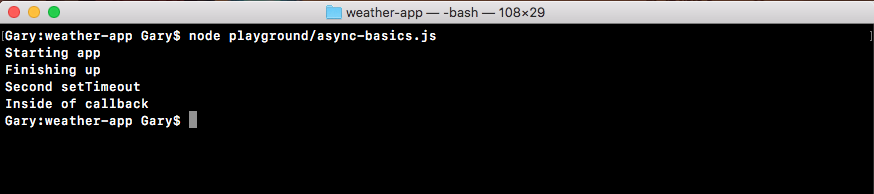
We start with Starting app, which makes sense, it's at the top. Then we get Finishing up. After Finishing up we get Second setTimeout, which seems weird, because we clearly told Node we want to run this function after 0 milliseconds, which should run it right away. But in our example, Second setTimeout printed after Finishing up.
Finally, Inside of callback printed to the screen. This behavior is completely expected. This is exactly how Node.js is supposed to operate, and it will become a lot clearer after the next section, where we'll go through this example exactly, showing you what happens behind the scenes. We'll get started with a more basic example showing you how the call stack works, we'll talk all about that in the next section, and then we'll go on to a more complex example that has some asynchronous events attached to it. We'll discuss the reason why Second setTimeout comes up after the Finishing up message after the next section.
In the last section, we ended up creating our very first asynchronous application, but unfortunately we ended up asking more questions than we got answers. We don't exactly know how async programming works even though we've used it. Our goal for this section is to understand why the program runs the way it does.
For example, why does the two-second delay in the following code not prevent the rest of the app from running, and why does a 0 second delay cause the function to be executed after Finishing up prints to the screen?
console.log('Starting app');

setTimeout(() => {
  console.log('Inside of callback');
}, 2000);

setTimeout(() => {
  console.log('Second setTimeout');
}, 0);

console.log('Finishing up');
These are all questions we'll answer in this section. This section will take you behind the scenes into what happens in V8 and Node when an async program runs. Now let's dive right into how the async program runs. We'll start with some basic synchronous examples and then move on to figuring out exactly what happens in the async program.
The following is example number one. On the left-hand side we have the code, a basic synchronous example, and on the right-hand side we have everything that happens behind the scenes, the Call Stack, our Node APIs, the Callback Queue, and the Event Loop:

Now if you've ever read an article or watched any video lesson on how Node works, you've most likely heard about one or more of these terms. In this section, we'll be exploring how they all fit together to create a real-world, working Node application. Now for our first synchronous example, all we need to worry about is the Call Stack. The Call Stack is part of a V8, and for our synchronous example it's the only thing that's going to run. We're not using any Node APIs and we're not doing any asynchronous programming.
The Call Stack is a really simple data structure that keeps track of program execution inside of a V8. It keeps track of the functions currently executing and the statements that are fired. The Call Stack is a really simple data structure that can do two things:
This means if there's an item at the bottom of the data structure and there's an item above it, you can't remove the bottom item, you have to remove the top item. If there's already two items and you want to add something on to it, it has to go on because that's how the Call Stack works.
Think about it like a can of Pringles or a thing of tennis balls: if there's already an item in there and you drop one in, the item you just dropped will not be the bottom item, it's going to be the top item. Also, you can't remove the bottom tennis ball from a can of tennis balls, you have to remove the one on top first. That's exactly how the Call Stack works.
Now when we start executing the program shown in the following screenshot, the first thing that will happen is Node will run the main function. The main function is the wrapper function we saw over in nodemon (refer to, Installing the nodemon module section in Chapter 2, Node Fundamentals Part-1) that gets wrapped around all of our files when we run them through Node. In this case, by telling V8 to run the main function we are starting the program.
As shown in the following screenshot, the first thing we do in the program is create a variable x, setting it equal to 1, and that's the first statement that's going to run:
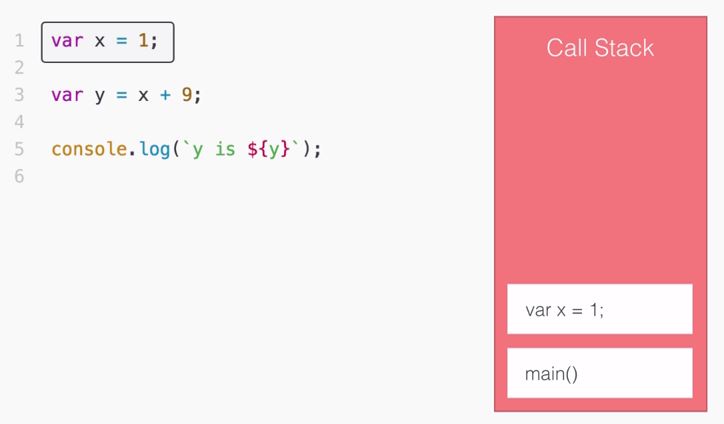
Notice it comes in on top of main. Now this statement is going to run, creating the variable. Once it's done, we can remove it from the Call Stack and move on to the next statement, where we make the variable y, which gets set equal to x, which is 1 plus 9. That means y is going to be equal to 10:
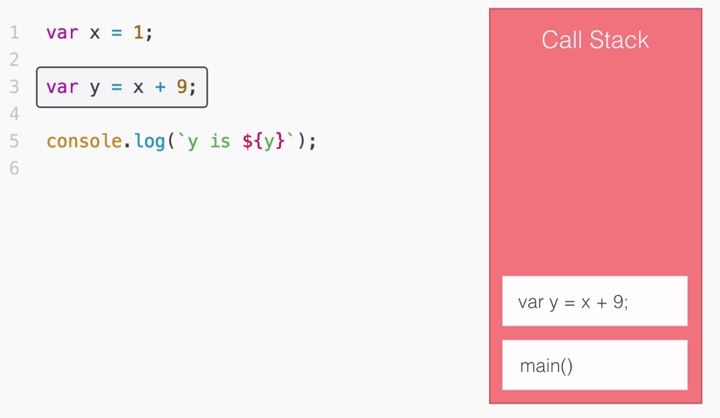
As shown in the previous screenshot, we do that and move on to the next line. The next line is our console.log statement. The console.log statement will print y is 10 to the screen. We use template strings to inject the y variable:
console.log(`y is ${y}`);
When we run this line it gets popped on to the Call Stack, as shown here:
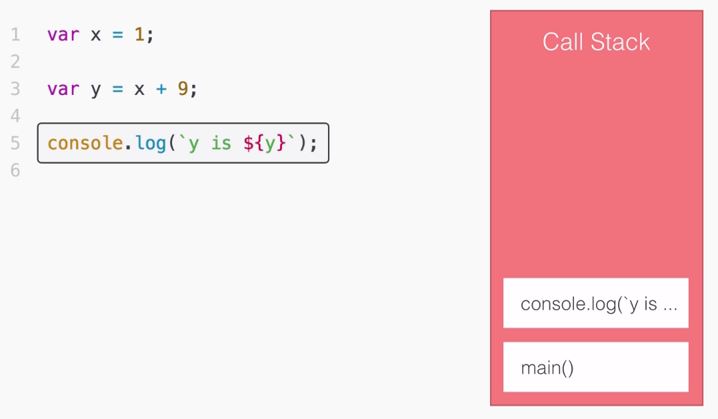
Once the statement is done, it gets removed. At this point, we've executed all the statements inside our program and the program is almost ready to be complete. The main function is still running but since the function ends, it implicitly returns, and when it returns, we remove main from the Call Stack and the program is finished. At this point, our Node process is closed. Now this is a really basic example of using the Call Stack. We went into the main function, and we moved line by line through the program.
Let's go over a slightly more complex example, our second example. As shown in the following code, we start off by defining an add function. The add function takes arguments a and b, adds them together storing that in a variable called total, and returns total. Next, we add up 3 and 8, which is 11, storing it in the res variable. Then, we print out the response using the console.log statement, as shown here:
var add = (a, b) => {
 var total = a + b;

 return total;
};

var res = add(3, 8);

console.log(res);
That's it, nothing synchronous is happening. Once again we just need the Call Stack. The first thing that happens is we execute the main function; this starts the program we have here:
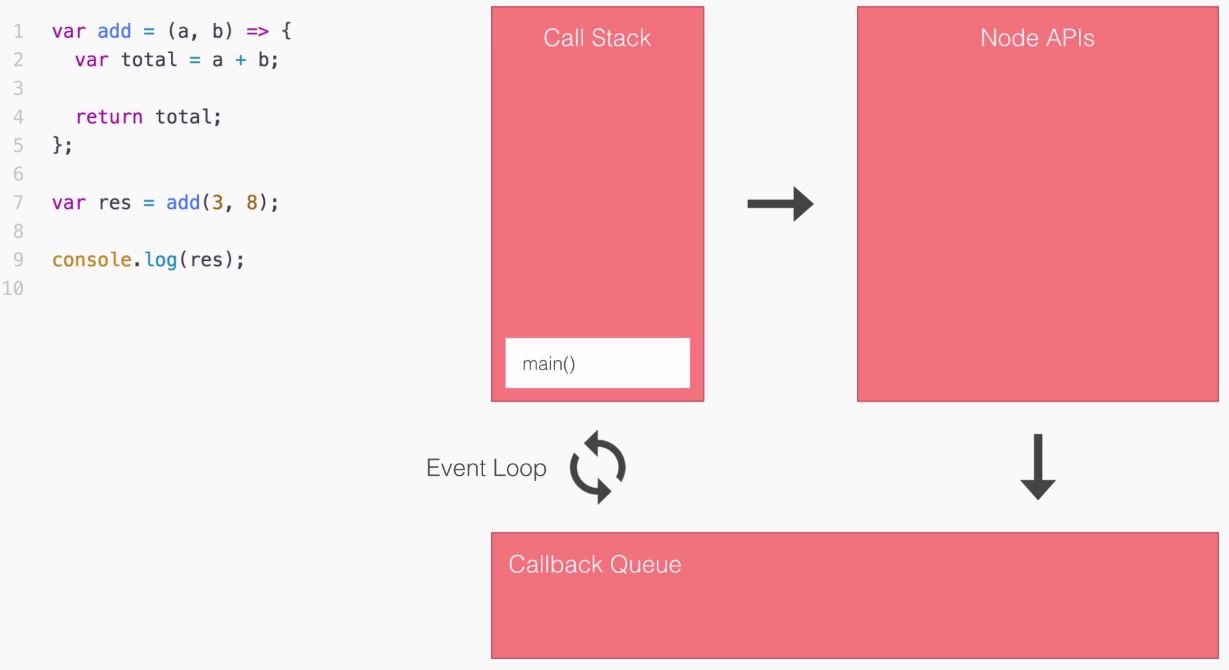
Then we run the first statement where we define the add variable. We're not actually executing the function, we're simply defining it here:
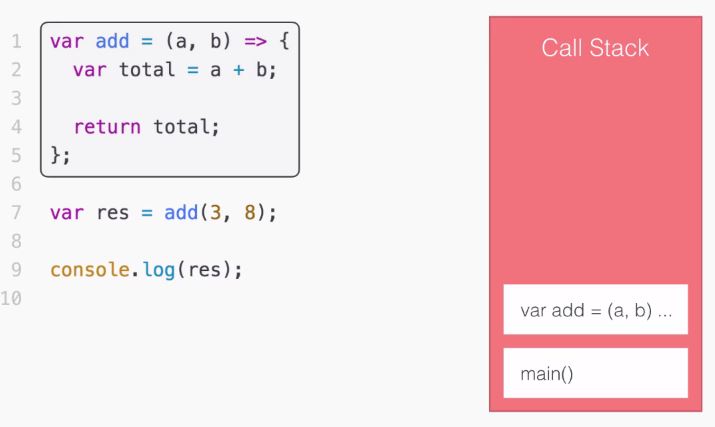
In the preceding image, the add() variable gets added on to the Call Stack, and we define add. The next line, line 7, is where we call the add variable storing the return value on the response variable:
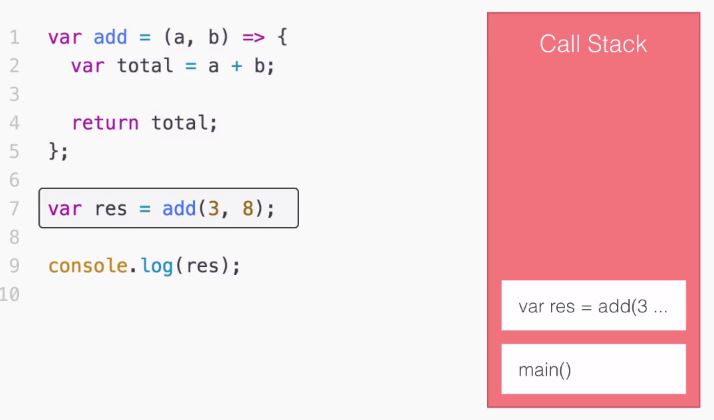
In this example, we'll call a function. So we're going to add add() on to the Call Stack, and we'll start executing that function:
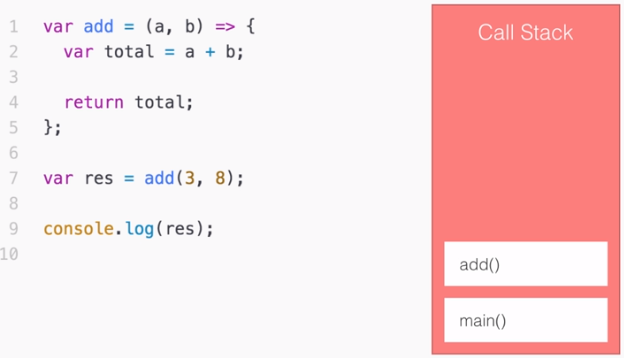
As we know, when we add main we start executing main and, when we add add() we start executing add. The first line inside add sets the total variable equal to a + b, which would be 11. We then return from the function using the return total statement. That's the next statement, and when this runs, add gets removed:

So when return total finishes, add() gets removed, then we move on to the final line in the program, our console.log statement, where we print 11 to the screen:

The console.log statement will run, print 11 to the screen and finish the execution, and now we're at the end of the main function, which gets removed from the stack when we implicitly return. This is the second example of a program running through the V8 Call Stack.
So far we haven't used Node APIs, the Callback Queue, or the Event Loop. The next example will use all four (Call Stack, the Node APIs, the Callback Queue, and the Event Loop). As shown on the left-hand side of the following screenshot, we have our async example, exactly the same as we wrote it in the last section:
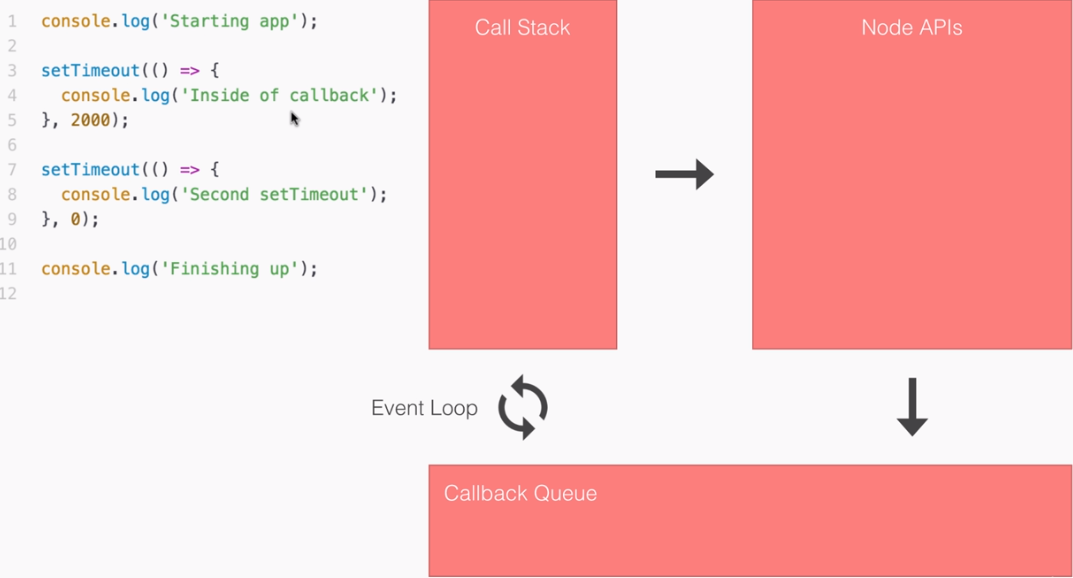
In this example, we will be using the Call Stack, the Node APIs, the Callback Queue, and the Event Loop. All four of these are going to come into play for our asynchronous program. Now things are going to start off as you might expect. The first thing that happens is we run the main function by adding it on to the Call Stack. This tells a V8 to kick off the code we have on the left side in the previous screenshot, shown here again:
console.log('Starting app');

setTimeout(() => {
  console.log('Inside of callback');
}, 2000);

setTimeout(() => {
  console.log('Second setTimeout');
}, 0);

console.log('Finishing up');
The first statement in this code is really simple, a console.log statement that prints Starting app to the screen:
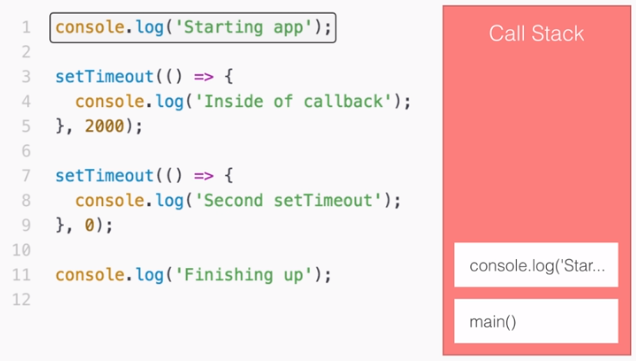
This statement runs right away and we move on to the second statement. The second statement is where things start to get interesting, this is a call to setTimeout, which is indeed a Node API. It's not available inside a V8, it's something that Node gives us access to:
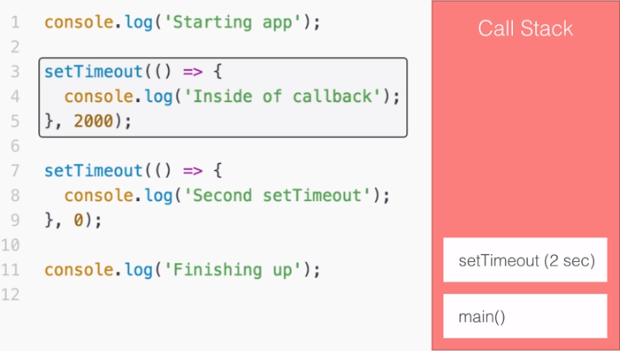
When we call the setTimeout (2 sec) function, we're actually registering the event callback pair in the Node APIs. The event is simply to wait two seconds, and the callback is the function we provided, the first argument. When we call setTimeout, it gets registered right in the Node APIs as shown here:
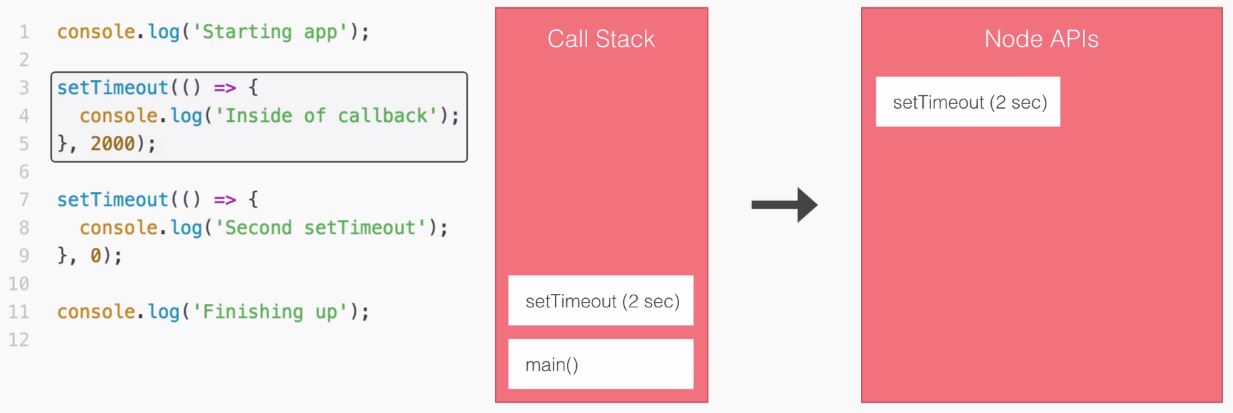
Now this statement will finish up, the Call Stack will move on, and the setTimeout will start counting down. Just because the setTimeout is counting down, it doesn't mean the Call Stack can't continue to do its job. The Call Stack can only run one thing at a time, but we can have events waiting to get processed even when the Call Stack is executing. Now the next statement that runs is the other call to setTimeout:
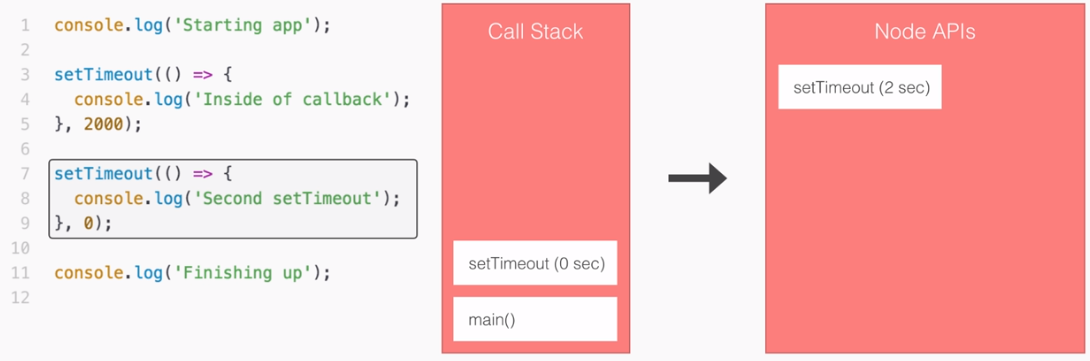
In this, we register a setTimeout callback function with a delay of 0 milliseconds, and the exact same thing happens. It's a Node API and it's going to get registered as shown in the following screenshot. This essentially says that after zero seconds, you can execute this callback:
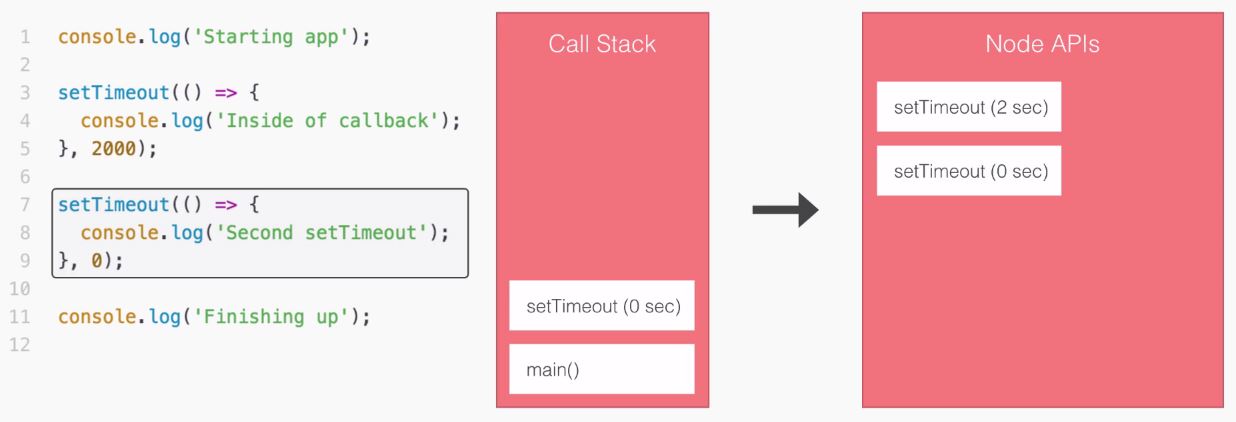
The setTimeout (0 sec) statement gets registered and the Call Stack removes that statement.
At this point let's assume that setTimeout, the one that has a zero second delay, finishes. When it finishes, it's not going to get executed right away; it's going to take that callback and move it down into the Callback Queue, as shown here:
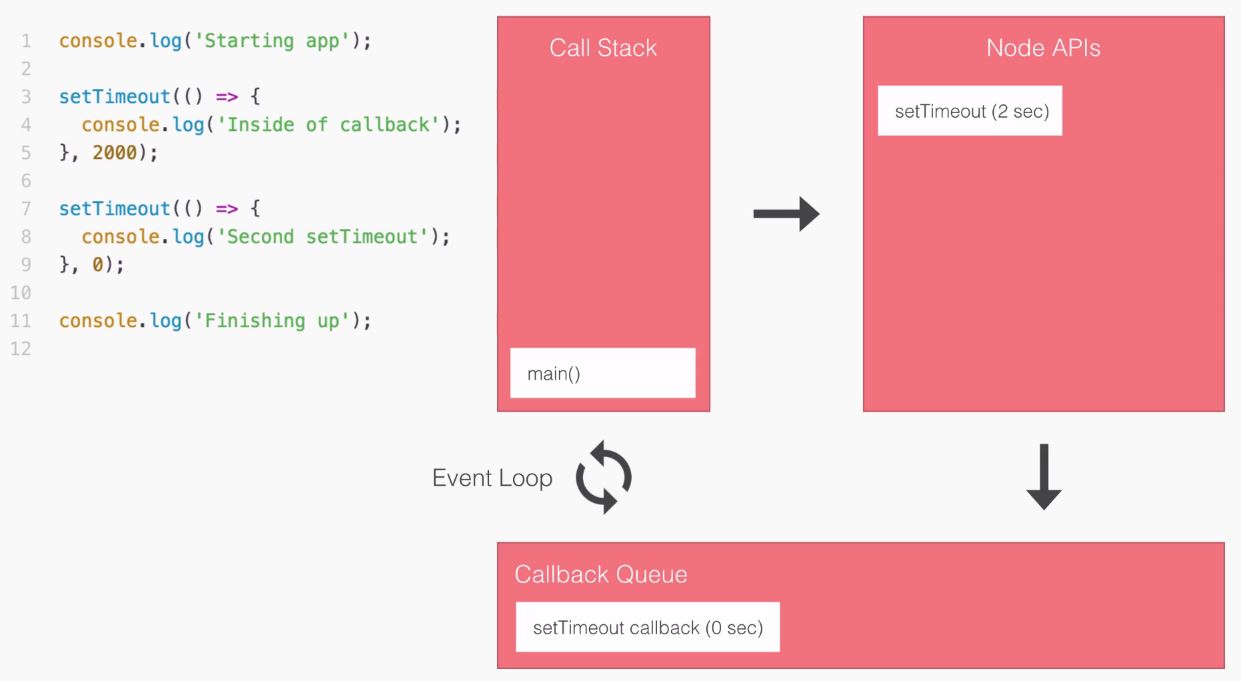
The Callback Queue is all the callback functions that are ready to get fired. In the previous screenshot, we move the function from Node API into the Callback Queue. Now the Callback Queue is where our callback functions will wait; they need to wait for the Call Stack to be empty.
When the Call Stack is empty we can run the first function. There's another function after it. We'll have to wait for that first function to run before the second one does, and this is where the Event Loop comes into play.
The Event Loop takes a look at the Call Stack. If the Call Stack is not empty, it doesn't do anything because it can't, there is nothing it can do you can only run one thing at a time. If the Call Stack is empty, the Event Loop says great let's see if there's anything to run. In our case, there is a callback function, but because we don't have an empty Call Stack, the Event Loop can't run it. So let's move on with the example.
The next thing that happens in our program is we run our console.log statement, which prints Finishing up to the screen. This is the second message that shows up in the Terminal:
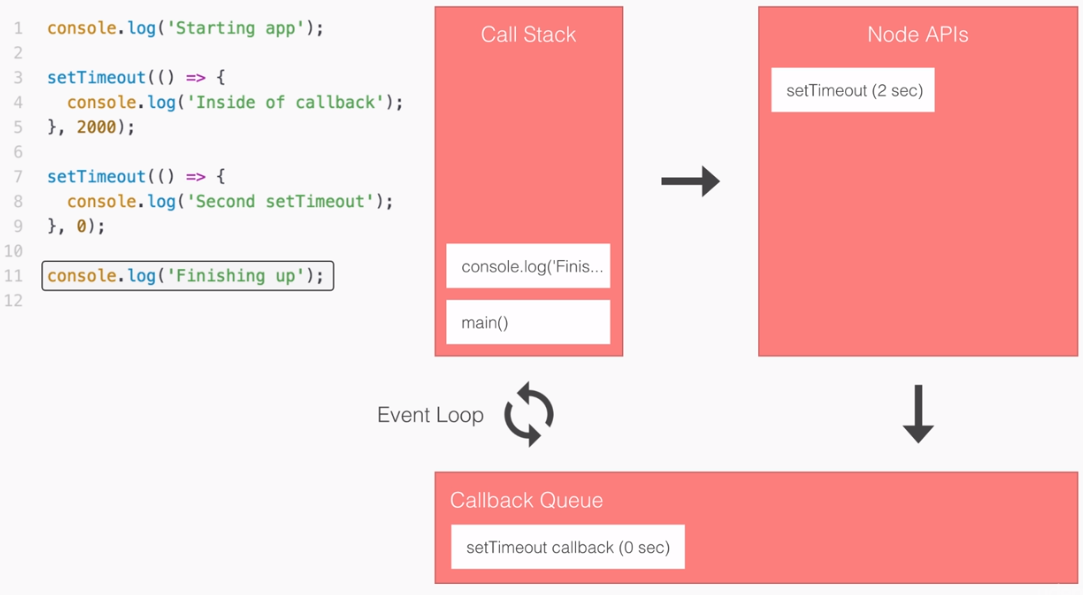
This statement runs, our main function is complete, and it gets removed from the Call Stack.
At this point, the Event Loop says hey I see that we have nothing in the call stack and we do have something in the Callback Queue, so let's run that callback function. It will take the callback and move it into the Call Stack; this means the function is executing:
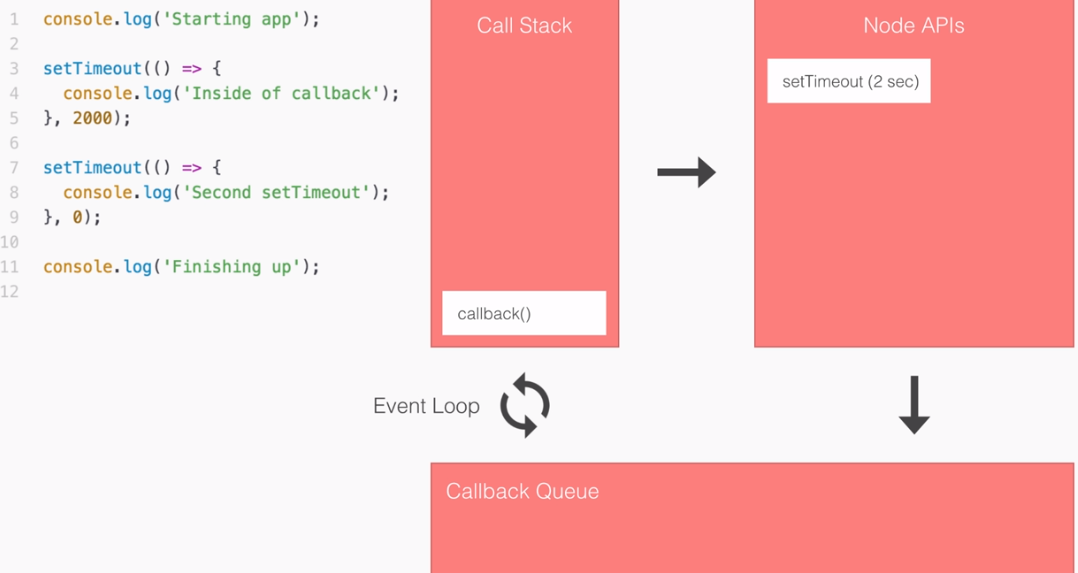
It will run the first line which is sitting on line 8, console.log, printing Second setTimeout to the screen. This is why Second setTimeout shows up after Finishing up in our previous section examples, because we can't run our callback until the Call Stack is complete. Since Finishing up is part of the main function, it will always run before Second setTimeout.
After our Second setTimeout statement finishes, the function is going to implicitly return and callback will get removed from the Call Stack:
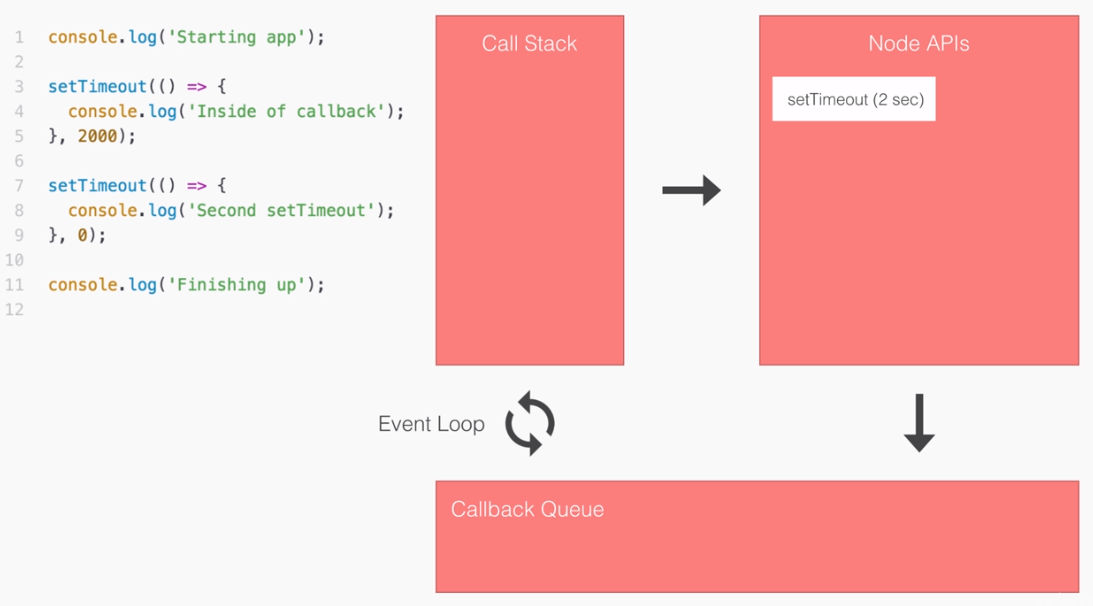
At this point, there's nothing in the Call Stack and nothing in the Callback Queue, but there is still something in our Node APIs, we still have an event listener registered. So the Node process is not yet completed. Two seconds later, the setTimeout(2 sec) event is going to fire, and it's going to take that callback function and move it into the Callback Queue. It gets removed from the Node APIs and it gets added to the Callback Queue:
At this point, the Event Loop will take a look at the Call Stack and see it's empty. Then it will take a quick look at the Callback Queue and see there is indeed something to run. What will it do? It will take that callback, add it on to the Call Stack, and start the process of executing it. This means that we'll run our one statement inside callback. After that's finished, the callback function implicitly returns and our program is complete:
This is exactly how our program ran. This illustrates how we're able to register our events using Node APIs, and why when we use a setTimeout of zero the code doesn't run right away. It needs to go through the Node APIs and through the Callback Queue before it can ever execute on the Call Stack.
Now as I mentioned in the beginning of this section, the Call Stack, the Node APIs, the Callback Queue, and the Event Loop are pretty confusing topics. A big reason why they're confusing is because we never actually directly interact with them; they're happening behind the scenes. We're not calling the Callback Queue, we're not firing an Event Loop method to make these things work. This means we're not aware they exist until someone explains them. These are topics that are really hard to grasp the first time around. By writing real asynchronous code it's going to become a lot clearer how it works.
Now that we got a little bit of an idea about how our code executes behind the scenes, we'll move on with the rest of the chapter and start creating a weather app that interacts with third-party APIs.
In this section, we'll take an in-depth look at callback functions, and use them to fetch some data from a Google Geolocation API. That's going to be the API that takes an address and returns the latitude and longitude coordinates, and this is going to be great for the weather app. This is because the weather API we use requires those coordinates and it returns the real-time weather data, such as the temperature, five-day forecast, wind speed, humidity, and other pieces of weather information.
Before we get started making the HTTPS request, let's talk about callback functions, and we have already used them. Refer to the following code (we used it in the previous section):
console.log('Starting app');

setTimeout(() => {
  console.log('Inside of callback');
}, 2000);

setTimeout(() => {
  console.log('Second setTimeout');
}, 0);

console.log('Finishing up');
Inside the setTimeout function we used a callback function. In general, a callback function is defined as a function that gets passed as an argument to another function and is executed after some event happens. Now this is a general definition, there is no strict definition in JavaScript, but it does satisfy the function in this case:
setTimeout(() => {
  console.log('Inside of callback');
}, 2000);
Here we have a function and we pass it as an argument to another function, setTimeout, and it does get executed after some event—two-second pass. Now the event could be other things, it could be a database query finishes, it could be an HTTP request comes back. In those cases, you will want a callback function, like the one in our case, to do something with that data. In the case of setTimeout, we don't get any data back because we're not requesting any; we're just creating an arbitrary delay.
Now before we actually make an HTTP request to Google, let's create a callback function example inside our playground folder. Let's make a new file called callbacks.js:
Inside the file, we'll create a contrived example of what a callback function would look like behind the scenes. We'll be making real examples throughout the book and use many functions that require callbacks. But for this chapter, we'll start with a simple example.
To get started, let's make a variable called getUser. This will be the function we'll define that will show us exactly what happens behind the scenes when we pass a callback to another function. The getUser callback will be something that simulates what it would look like to fetch a user from a database or some sort of web API. It will be a function, so we'll set it as such using arrow function (=>):
var getUser = () => {

};
The arrow function (=>) is going to take some arguments. The first argument it will take is the id, which will be some sort of a unique number that represents each user. I might have an id of 54, you might have an id of 2000; either way we're going to need the id to find a user. Next up we'll get a callback function, which is what we will call later with the data, with that user object:
var getUser = (id, callback) => {

};
This is exactly what happens when you pass a function to setTimeout.
Now we can call this function before actually filling it out. We'll call getUser, just like we did with setTimeout in the previous code example. I'll call getUser, passing in those two arguments. The first one will be some id; since we're faking it for now it doesn't really matter, and I'll go with 31. The second argument will be the function that we want to run when the user data comes back, and this is really important. As shown, we'll define that function:
getUser(31, () => {

});
Now the callback alone isn't really useful; being able to run this function after the user data comes back only works if we actually get the user data, and that's what we'll expect here:
getUser(31, (user) => {

});
We'll expect that the user objects, things like id, name, email, password, or whatever, comes back as an argument to the callback function. Then inside the arrow function (=>), we can actually do something with that data, for example, we could show it on a web app, respond to an API request, or in our case we can simply print it to the console, console.log(user):
getUser(31, (user) => {
  console.log(user);
});
Now that we have the call in place, let's fill out the getUser function to work like we have it defined.
The first thing I'll do is create a dummy object that's going to be the user object. In the future, this is going to come from database queries, but for now we'll just create a variable user setting it equal to some object:
var getUser = (id, callback) => {
  var user = {

  }
};
Let's set an id property equal to whatever id the user passes in, and we'll set a name property equal to some name. I'll use Vikram:
var getUser = (id, callback) => {
  var user = {
    id: id,
    name: 'Vikram'
  };
};
Now that we have our user object, what we want to do is call the callback, passing it as an argument. We'll then be able to actually run, getUser(31, (user) function, printing the user to the screen. In order to do this, we would call the callback function like any other function, simply referencing it by name and adding our parentheses like this:
var getUser = (id, callback) => {
  var user = {
    id: id,
    name: 'Vikram'
  };
  callback();
};
Now if we call the function like this, we're not passing any data from getUser back to the callback. In this case, we're expecting a user to get passed back, which is why we are going to specify user as shown here:
callback(user);
Now the naming isn't important, I happen to call it user, but I could easily call this userObject and userObject as shown here:
callback(user);
};

getUser(31, (userObject) => {
  console.log(userObject);
});
All that matters is the arguments, position. In this case, we call the first argument userObject and the first argument pass back is indeed that userObject. With this in place we can now run our example.
In the Terminal, we'll run the callback function using node, which is in the playground folder, and we call the file callbacks.js:
node playground/callback.js
When we run the file, right away our data prints to the screen:

We've created a callback function using synchronous programming. Now as I mentioned, this is still a contrived example because there is no need for a callback in this case. We could simply return the user object, but in that case, we wouldn't be using a callback, and the whole point here is to explore what happens behind the scenes and how we actually call the function that gets passed in as an argument.
Now, we can also simulate a delay using setTimeout, so let's do that. In our code, just before the callback (user) statement, we'll use setTimeout just like we did before in the previous section. We'll pass an arrow function (=>) in as the first argument, and set a delay of 3 seconds using 3000 milliseconds:
  setTimeout(() => {

  }, 3000);
  callback(user);
};
Now I can take my callback call, delete it from line 10, and add it inside of the callback function, as shown here:
setTimeout(() => {
    callback(user);
  }, 3000);
};
Now we'll not be responding to the getUser request until three seconds have passed. Now this will be more or less similar to what happens when we create real-world examples of callbacks, we pass in a callback, some sort of delay happens whether we're requesting from a database or from an HTTP endpoint, and then the callback gets fired.
If I save callbacks.js and rerun the code from the Terminal, you'll see we wait those three seconds, which is the simulated delay, and then the user object prints to the screen:

This is exactly the principle that we need to understand in order to start working with callbacks, and that is exactly what we'll start doing in this section.
The requests that we'll be making to that Geolocation API can actually be simulated over in the browser before we ever make the request in Node, and that's exactly what we want to do to get started. So follow along for the URL, https://maps.googleapis.com/maps/api/geocode/json.
Now this is the actual endpoint URL, but we do have to specify the address for which we want the geocode. We'll do that using query strings, which will be provided right after the question mark. Then, we can set up a set of key value pairs and we can add multiples using the ampersand in the URL, for example: https://maps.googleapis.com/maps/api/geocode/json?key=value&keytwo=valuetwo.
In our case, all we need is one query string address, https://maps.googleapis.com/maps/api/geocode/json?address, and for the address query string we'll set it equal to an address. In order to fill out that query address, I'll start typing 1301 lombard street philadelphia.
Notice that we are using spaces in the URL. This is just to illustrate a point: we can use spaces in the browser because it's going to automatically convert those spaces to something else. However, inside Node we'll have to take care of that ourselves, and we'll talk about that a little later in the section. For now if we leave the spaces in, hit enter, and we can see they automatically get converted for us:

Space characters get converted to %20, which is the encoded version of a space. In this page, we have all of the data that comes back:
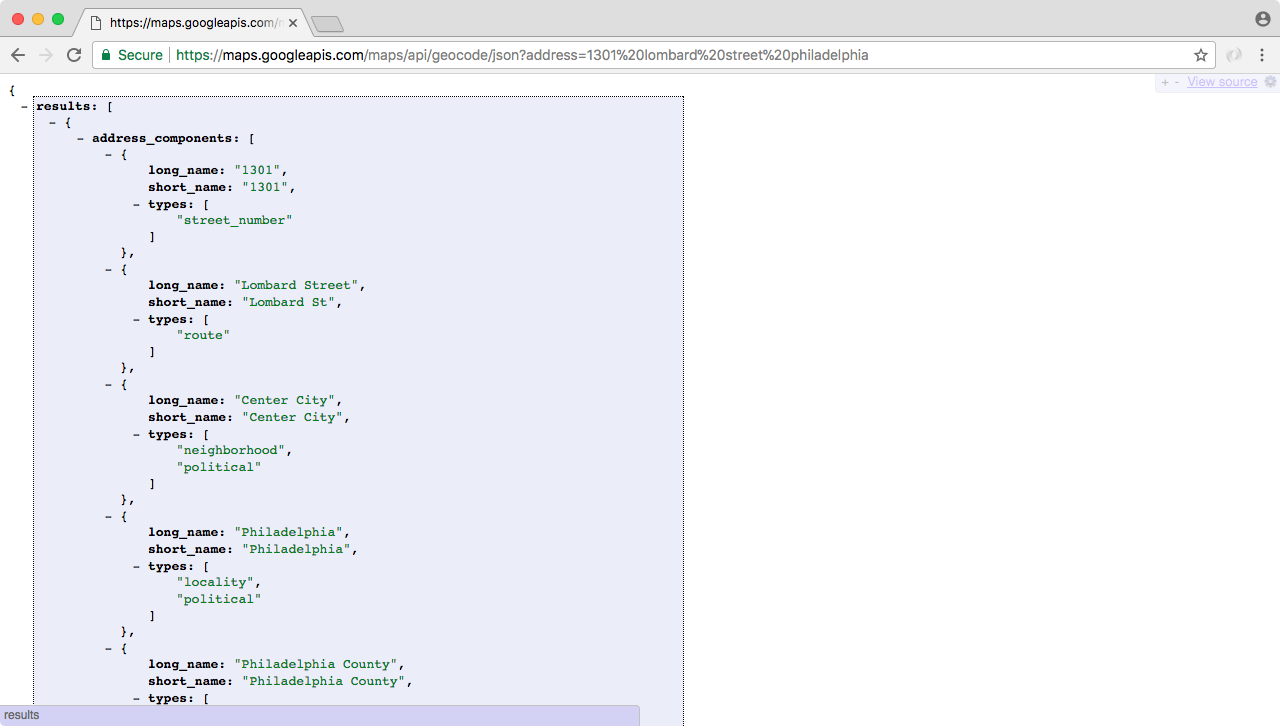
Now we'll use an extension called JSONView, which is available for Chrome and Firefox.
Now as shown in the preceding screenshot, the data on this page has exactly what we need. We have an address_components property, we don't need that. Next, we have a formatted address which is really nice, it includes the state, the zip code, and the country, which we didn't even provide in the address query.
Then, we have what we really came for: in geometry, we have location, and this includes the latitude and longitude data.
Now, what we got back from the Google Maps API request is nothing more than some JSON data, which means we can take that JSON data, convert it to a JavaScript object, and start accessing these properties in our code. To do this, we'll use a third-party module that lets us make these HTTP requests inside of our app; this one is called request.
We can visit it by going to https://www.npmjs.com/package/request. When we visit this page, we'll see all the documentation and all the different ways we can use the request package to make our HTTP requests. For now, though, we'll stick to some basic examples. On the request documentation page, on the right-hand side, we can see this is a super popular package and it has seven hundred thousand downloads in the last day:
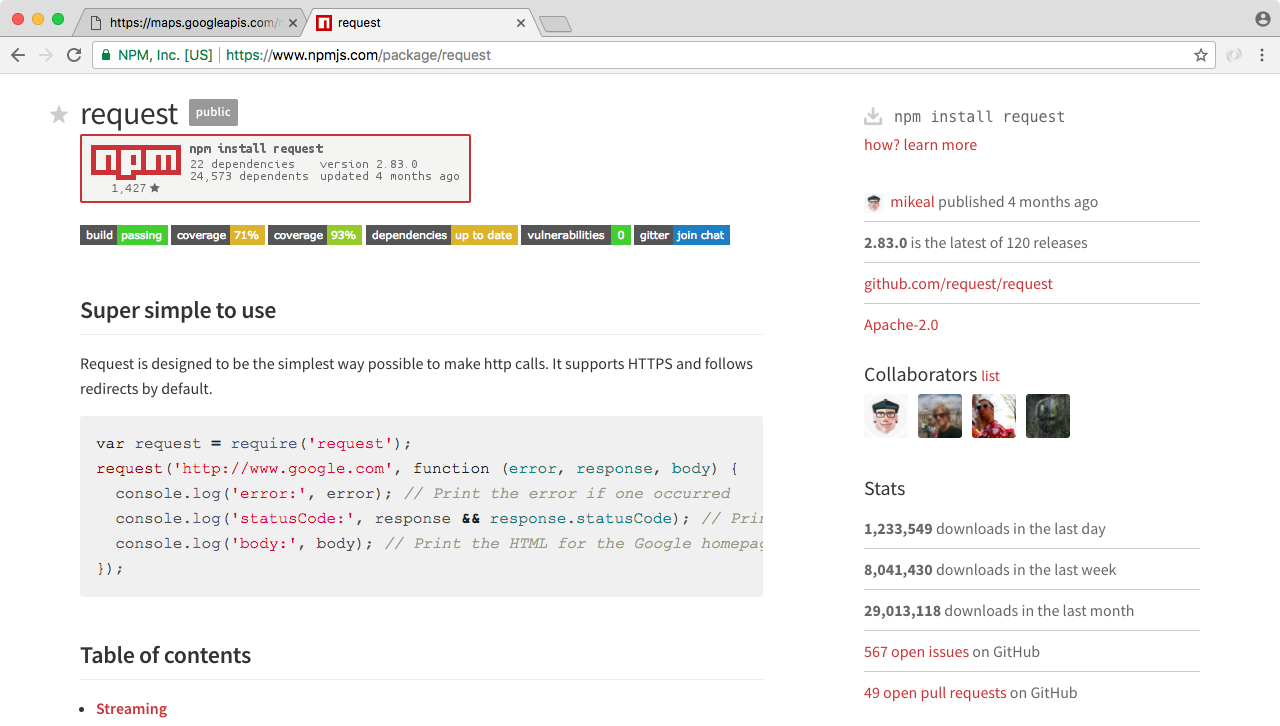
In order to get started we're going to install the package inside our project, and we'll make a request to this URL.
To install the package, we'll go to the Terminal and install the module using npm init, to create the package.json file:
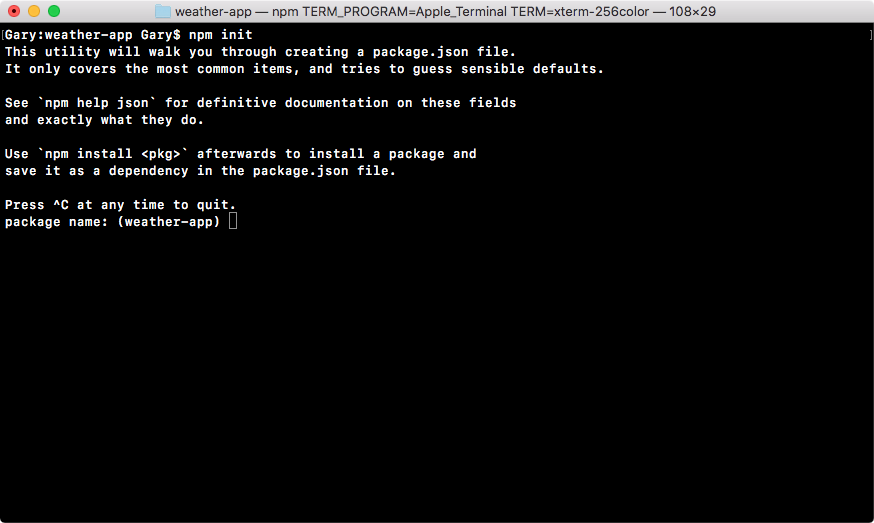
We'll run this command and use enter to use the defaults for every single option:
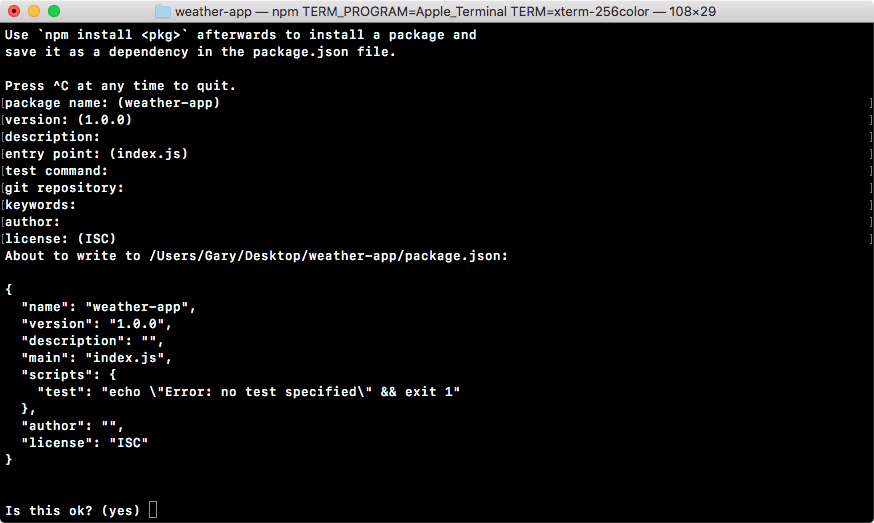
At the end, we'll type yes and hit enter again.
Now that we have our package.json file we can use npm install, followed by the module name, request, and I will specify a version. You can always find the latest version of modules on the npm page. The latest version at the time of writing is 2.73.0, so we'll add that, @2.73.0. Then we can specify the save flag because we do want to save this module in our package.json file:
npm install request@2.73.0 --save
It will be critical for running the weather application.
Now that we have the request module installed, we can start using it. Inside Atom we'll wrap up the section by making a request to that URL, in a new file in the root of the project called app.js. This will be the starting point for the weather application. The weather app will be the last command-line app we create. In the future we'll be making the backend for web apps as well as real-time apps using Socket.IO. But to illustrate asynchronous programming, a command-line app is the nicest way to go.
Now, we have our app file, and we can get started by loading in request just like we did with our other npm modules. We'll make a constant variable, call it request, and set it equal to require(request), as shown here:
const request = require('request');
Now what we need to do is make a request. In order to do this, we'll have to call the request function. Let's call it, and this function takes two arguments:
request({}, () => {
});
In our case, it's going to get called once the JSON data, the data from the Google Maps API, comes back into the Node application. We can add the arguments that are going to get passed back from request. Now, these are arguments that are outlined in the request documentation, I'm not making up the names for these:
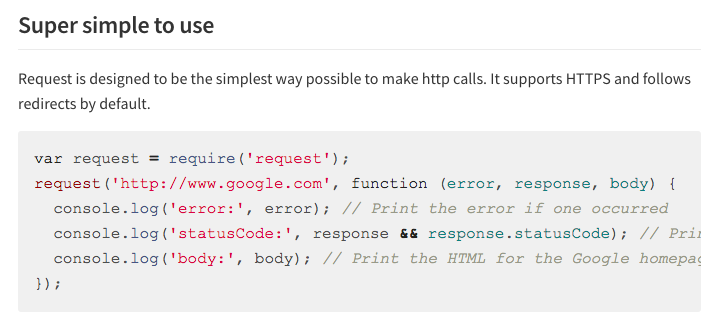
In the documentation, you can see they call it error, response, and body. That's exactly what well call ours. So, inside Atom, we can add error, response, and body, just like the docs.
Now we can fill out that options object, which is where we are going to specify the things unique to our request. In this case, one of the unique things is the URL. The URL specifies exactly what you want to request, and in our case, we have that in the browser. Let's copy the URL exactly as it appears, pasting it inside of the string for the URL property:
request({
url: 'https://maps.googleapis.com/maps/api/geocode/json?address=1301%20lombard%20street%20philadelphia',
}, (error, response, body) => {
});
Now that we have the URL property in place, we can add a comma at the very end and hit enter. Because we will specify one more property, we'll set json equal to true:
request({
url: 'https://maps.googleapis.com/maps/api/geocode/json?address=1301%20lombard%20street%20philadelphia',
json: true
}, (error, response, body) => {
});
This tells request that the data coming back is going to be JSON data, and it should go ahead, take that JSON string, and convert it to an object for us. That lets us skip a step, it's a really useful option.
With this in place, we can now do something in the callback. In the future we'll be taking this longitude and latitude and fetching weather. For now, we'll simply print the body to the screen by using console.log. We'll pass the body argument into console.log, as shown here:
request({
url: 'https://maps.googleapis.com/maps/api/geocode/json?address=1301%20lombard%20street%20philadelphia',
json: true
}, (error, response, body) => {
console.log(body);
});
Now that we have our very first HTTP request set up, and we have a callback that's going to fire when the data comes back, we can run it from the Terminal.
To run the request, we'll use node and run the app.js file:
node app.js
When we do this, the file will start executing and there will be a really short delay before the body prints to the screen:
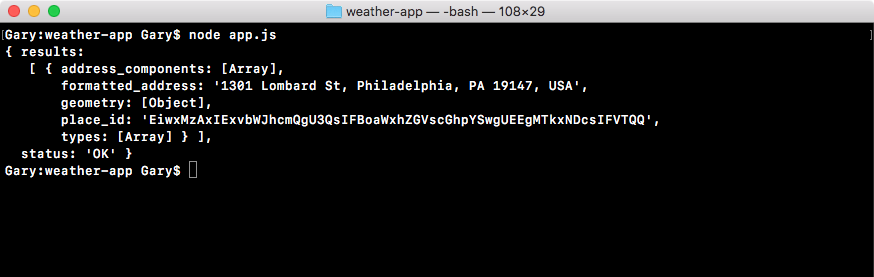
What we get back is exactly what we saw in the browser. Some of the properties, such as address_components, show object in this case because we're printing it to the screen. But those properties do indeed exist; we'll talk about how to get them later in the chapter. For now, though, we do have our formatted_address as shown in the preceding screenshot, the geometry object, the place_id, and types. This is what we'll be using to fetch the longitude and latitude, and later to fetch the weather data.
Now that we have this in place, we are done. We have the first step of the process complete. We've made a request to the Google Geolocation API, and we're getting the data back. We'll continue creating the weather app in the next section.
Before we continue learning about HTTP and what exactly is inside of error, response, and body, let's take a quick moment to talk about how we can pretty print an object to the screen. As we saw in the last subsection, when we ran our app with node app.js, the body prints to the screen.
But since there is a lot of objects nested inside of each other, JavaScript starts clipping them:
As shown in the preceding screenshot, it tells us an object is in the results, but we don't get to see exactly what the properties are. This takes place for address_components, geometry, and types. Obviously this is not useful; what we want to do is see exactly what's in the object.
To explore all of the properties, we're going to look at a way to pretty print our objects. This is going to require a really simple function call, a function we've actually already used, JSON.stringify. This is the function that takes your JavaScript objects, which body is, remember we used the json: true statement to tell request to take the JSON and convert it into an object. In the console.log, statement we'll take that object, pass body in, and provide the arguments as shown here:
const request = require('request');
request({
url: 'https://maps.googleapis.com/maps/api/geocode/json?address=1301%20lombard%20street%20philadelphia',
json: true
}, (error, response, body) => {
console.log(JSON.stringify(body));
});
Now, this is how we've usually used JSON.stringify, in the past we provided just one argument, the object we want to stringify, in this case we're going to provide a couple of other arguments. The next argument is used to filter out properties. We don't want to use that, it's usually useless, so we're going to leave it as undefined as of now:
console.log(JSON.stringify(body, undefined));
The reason we need to provide it, is because the third argument is the thing we want. The third argument will format the JSON, and we'll specify exactly how many spaces we want to use per indentation. We could go with 2 or 4 depending on your preference. In this case, we'll pick 2:
console.log(JSON.stringify(body, undefined, 2));
We'll save the file and rerun it from the Terminal. When we stringify our JSON and print it to the screen, as we'll see when we rerun the app, we get the entire object showing up. None of the properties are clipped off, we can see the entire address_components array, everything shows up no matter how complex it is:
Next, we have our geometry object, this is where our latitude and longitude are stored, and you can see them as shown here:
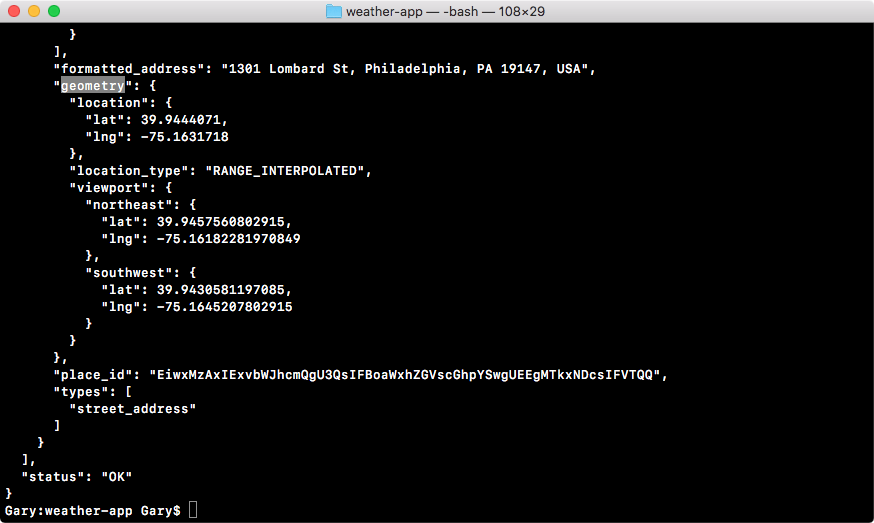
Then below that, we have our types, which was cut off before, even though it was an array with one item, which is a string:
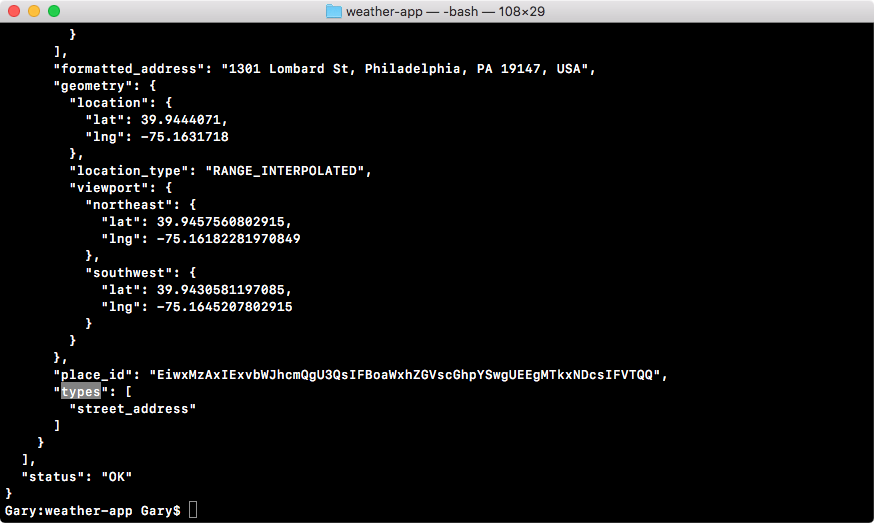
Now that we know how to pretty print our objects, it will be a lot easier to scan data inside of the console—none of our properties will get clipped, and it's formatted in a way that makes the data a lot more readable. In the next section, we'll start diving into HTTP and all of the arguments in our callback.
The goal in the previous section was not to understand how HTTP works, or what exactly the arguments, error, response, and body are the goal was to come up with a real-world example of a callback, as opposed to the contrived examples that we've been using so far with setTimeout:
const request = require('request');
request({
url: 'https://maps.googleapis.com/maps/api/geocode/json?address=1301%20lombard%20street%20philadelphia',
json: true
}, (error, response, body) => {
console.log(JSON.stringify(body, undefined, 2));
});
In the preceding case, we had a real callback that got fired once the HTTP request came back from the Google servers. We were able to print the body, and we saw exactly what we had in the website. In this section, we'll dive into these arguments, so let's kick things off by taking a look at the body argument. This is the third argument that request passes to the callback.
Now the body is not something unique to the request module (body is part of HTTP, which stands for the Hypertext Transfer Protocol). When you make a request to a website, the data that comes back is the body of the request. We've actually used the body about a million times in our life. Every single time we request a URL in the browser, what we get rendered inside the screen is the body.
In the case of https://www.npmjs.com, the body that comes back is an HTML web page that the browser knows how to render. The body could also be some JSON information, which is the case in our Google API request. Either way, the body is the core data that comes back from the server. In our case, the body stores all of the location information we need, and we'll be using that information to pull out the formatted address, the latitude, and the longitude in this section.
Before we dive into the body, let's discuss about the response object. We can look at the response object by printing it to the screen. Let's swap out body in the console.log statement for response in the code:
const request = require('request');
request({
url: 'https://maps.googleapis.com/maps/api/geocode/json?address=1301%20lombard%20street%20philadelphia',
json: true
}, (error, response, body) => {
console.log(JSON.stringify(response, undefined, 2));
});
Then save the file and rerun things inside of the Terminal by running the node app.js command. We'll get that little delay while we wait for the request to come back, and then we get a really complex object:
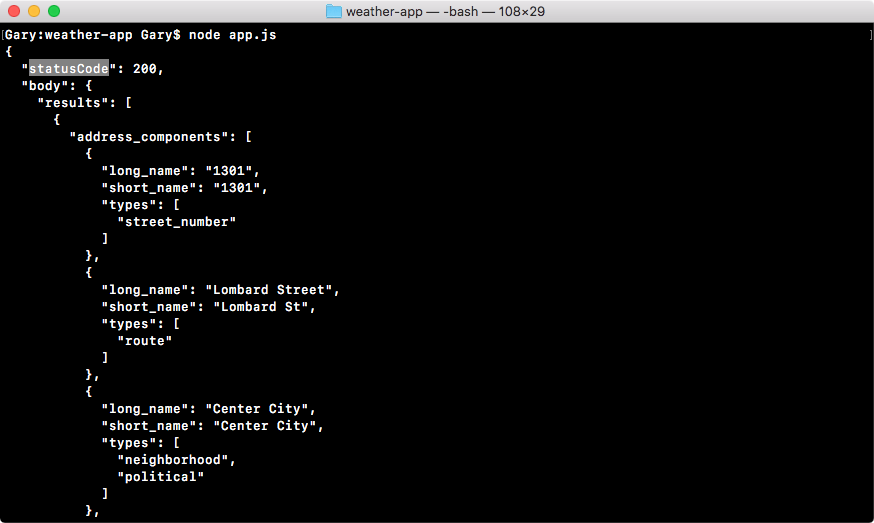
In the preceding screenshot, we can see the first thing we have in the response object is a status code. The status code is something that comes back from an HTTP request; it's a part of the response and tells you exactly how the request went.
In this case, 200 means everything went great, and you're probably familiar with some status codes, like 404 which means the page was not found, or 500 which means the server crashed. There are other body codes we'll be using throughout the book.
In this section, all we care about is that the status code is 200, which means things went well. Next up in the response object, we actually have the body repeated because it is part of the response. Since it's the most useful piece of information that comes back, the request module developers chose to make it the third argument, although you could access it using response.body as you can clearly see in this case. Here, we have all of the information we've already looked at, address components, formatted address geometry, so on.
Next to the body argument, we have something called headers, as shown here:
Now, headers are part of the HTTP protocol, they are key-value pairs as you can see in the preceding screenshot, where the key and the value are both strings. They can be sent in the request, from the Node server to the Google API server, and in the response from the Google API server back to the Node server.
Headers are great, there's a lot of built-in ones like content-type. The content-type is HTML for a website, and in our case, it's application/json. We'll talk about headers more in the later chapters. Most of these headers are not important to our application, and most we're never ever going to use. When we go on and create our own API later in the book, we'll be setting our own headers, so we'll be intimately familiar with how these headers work. For now, we can ignore them completely, all I want you to know is that these headers you see are set by Google, they're headers that come back from their servers.
Next to the headers we have the request object, which stores some information about the request that was made:
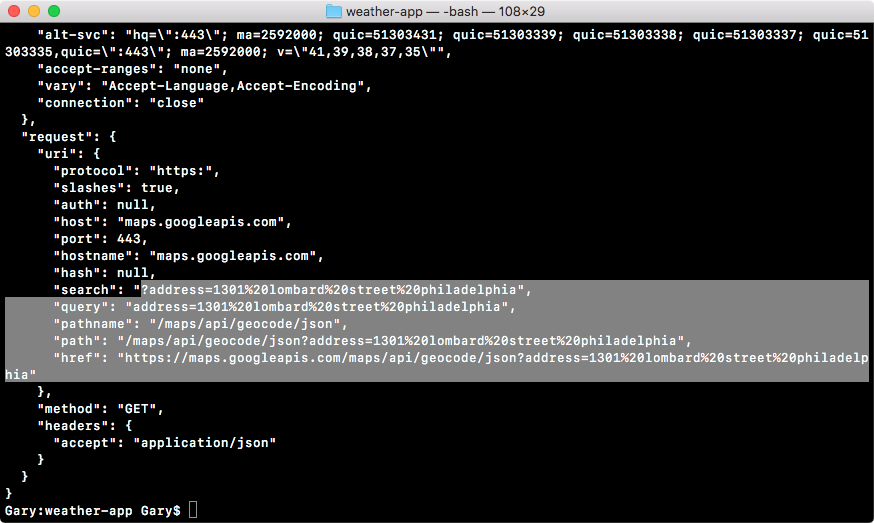
As shown in the preceding screenshot, you can see the protocol HTTPS, the host, the maps.googleapis.com website, and other things such as the address parameters, the entire URL, and everything else about the request, which is stored in this part.
Next, we also have our own headers. These are headers that were sent from Node to the Google API:
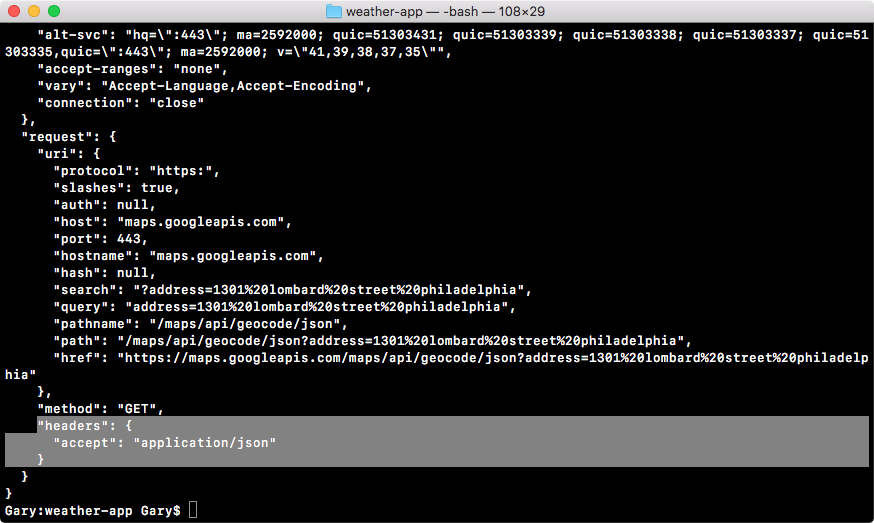
This header got set when we added json: true to options object in our code. We told request we want JSON back and request went on to tell Google, Hey, we want to accept some JSON data back, so if you can work with that format send it back! And that's exactly what Google did.
This is the response object, which stores information about the response and about the request. While we'll not be using most of the things inside the response argument, it is important to know they exist. So if you ever need to access them, you know where they live. We'll use some of this information throughout the book, but as I mentioned earlier, most of it is not necessary.
For the most part, we're going to be accessing the body argument. One thing we will use is the status. In our case it was 200. This will be important when we're making sure that the request was fulfilled successfully. If we can't fetch the location or if we get an error in the status code, we do not want to go on to try to fetch the weather because obviously we don't have the latitude and longitude information.
For now, we can move on to the final thing which is error. As I just mentioned, the status code can reveal that an error occurred, but this is going to be an error on the Google servers. Maybe the Google servers have a syntax error and their program is crashing, maybe the data that you sent is invalid, for example, you sent an address that doesn't exist. These errors are going to become evident via the status code.
What the error argument contains is errors related to the process of making that HTTP request. For example, maybe the domain is wrong: if I delete s and the dot with go in the URL, in our code, I get a URL that most likely doesn't exist:
const request = require('request');
request({
url: 'https://mapogleapis.com/maps/api/geocode/json?address=1301%20lombard%20street%20philadelphia',
In this case, I'll get an error in the error object because Node cannot make the HTTP request, it can't even connect it to the server. I could also get an error if the machine I'm making the request from does not have access to the internet. It's going to try to reach out to the Google servers, it's going to fail, and we're going to get an error.
Now, we can check out the error object by deleting those pieces of text from the URL and making a request. In this case, I'll swap out response for error, as shown here:
const request = require('request');
request({
url: 'https://mapogleapis.com/maps/api/geocode/json?address=1301%20lombard%20street%20philadelphia',
json: true
}, (error, response, body) => {
console.log(JSON.stringify(error, undefined, 2));
});
Now, inside the Terminal, let's rerun the application by running the node app.js command, and we can see exactly what we get back:
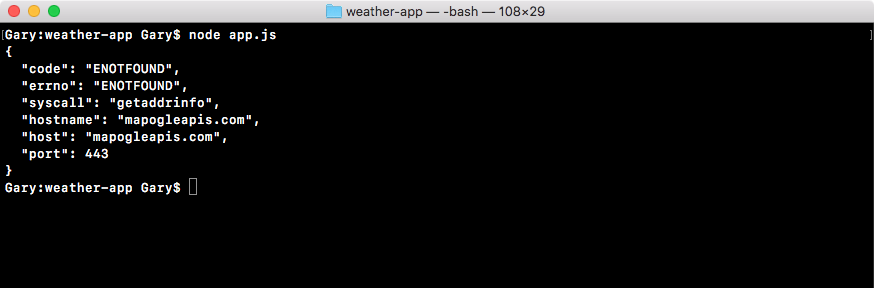
When we make the bad request, we get our error object printing to the screen, and the thing we really care about is the error code. In this case we have the ENOTFOUND error. This means that our local machine could not connect to the host provided. In this case mapogleapis.com, it doesn't exist so we'll get an error right here.
These are going to be the system errors, things such as your program not being able to connect to the internet or the domain not being found. This is also going to be really important when it comes to creating some error handling for our application there is a chance that the user's machine won't be connected to the internet. We're going to want to make sure to take the appropriate action and we'll do that depending on what is inside the error object.
If we can fix the URL, setting it back to maps.googleapis.com, and make the exact same request by using the up arrow key and the enter key, the request error object it's going to be empty, and you can see null print to the screen:

In this case, everything went great, there was no error, and it was able to successfully fetch the data, which it should be able to because we have a valid URL. That is a quick rundown of the body, the response, and the error argument. We will use them in more detail as we add error handling.
Now, we'll print some data from the body to the screen. Let's get started by printing the formatted address, and then we will be responsible for printing both the latitude and the longitude.
We'll start with figure out where the formatted address is. For this, we'll go to the browser and use JSONView. At the bottom of the browser page, you can see that little blue bar shows up when we highlight over items, and it changes as we switch items. For formatted address, for example, we access the results property, results is an array. In the case of most addresses, you'll only get one result:
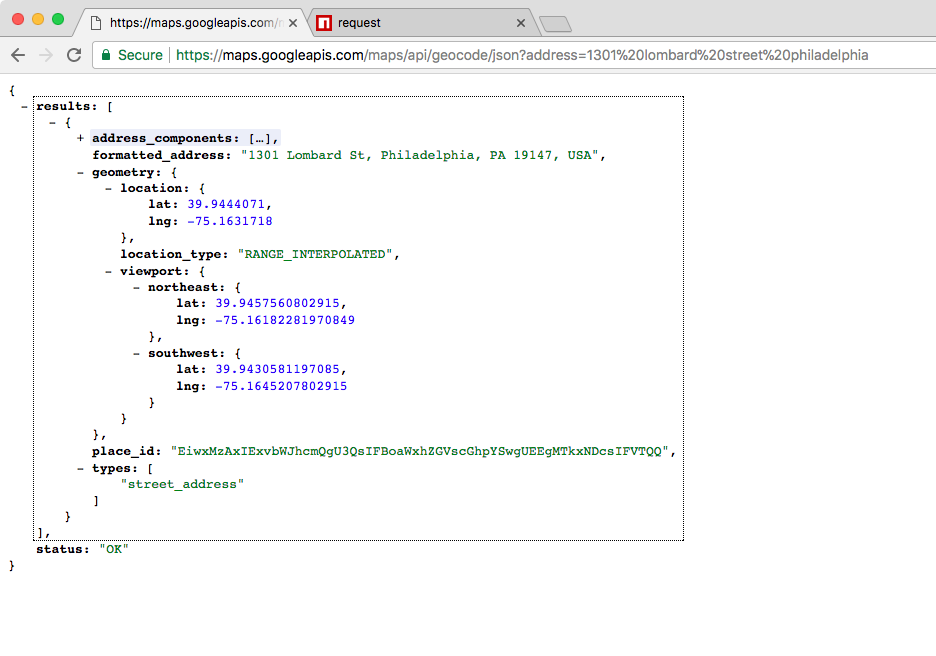
We'll use the first result every time, so we have the index of 0, then it's the .formatted_address property. This bottom line is exactly what we need to type inside of our Node code.
Inside Atom, in our code, we'll delete the console.log statement, and replace it with a new console.log statement. We'll use template strings to add some nice formatting to this. We'll add Address with a colon and a space, then I'll inject the address using the dollar sign and the curly braces. We'll access the body, results, and the first item in the results array followed by formatted address, as shown here:
const request = require('request');
request({
url: 'https://maps.googleapis.com/maps/api/geocode/json?address=1301%20lombard%20street%20philadelphia',
json: true
}, (error, response, body) => {
console.log(`Address: ${body.results[0].formatted_address}`);
});
With this in place, I can now add a semicolon at the end and save the file. Next, we'll rerun the application inside of the Terminal, and this time around we get our address printing to the screen, as shown here:

Now that we have the address printing to the screen, what we would like to print both the latitude and the longitude next.
In order to get started, inside Atom, we'll add another console.log line right next to the console.log we added for formatted address. We'll use template strings again to add some nice formatting. Let's print the latitude first.
For this, we'll add latitude followed by a colon. Then we can inject our variable using the dollar sign with the curly braces. Then, the variable we want is on the body. Just like the formatted address, it's also in the first results item; results at the index of zero. Next, we'll be going into geometry. From geometry, we'll grab the location property, the latitude, .lat, as shown here:
console.log(`Address: ${body.results[0].formatted_address}`);
console.log(`Latitude: ${body.results[0].geometry.location.lat}`);
});
Now that we have this in place, we'll do the exact same thing for longitude. We'll add another console.log statement in the next line of the code. We'll use template strings once again, typing longitude first. After that, we'll put a colon and then inject the value. In this case, the value is on the body; it's in that same results item, the first one. We'll go into geometry location again. Instead of .lat, we'll access .lng. Then we can add a semicolon at the end and save the file. This will look something like the following:
console.log(`Address: ${body.results[0].formatted_address}`);
console.log(`Latitude: ${body.results[0].geometry.location.lat}`);
console.log(`Longitude: ${body.results[0].geometry.location.lng}`);
});
Now we'll test it from the Terminal. We'll rerun the previous command, and as shown in the following screenshot, you can see we have the latitude, 39.94, and the longitude, -75.16 printing to the screen:
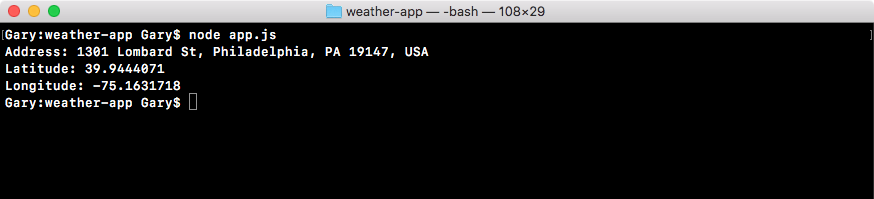
And these are the exact same values we have inside the Chrome browser, 39.94, -75.16. With this in place, we've now successfully pulled off the data we need to make that request to the weather API.
In this chapter, we have gone through a basic example of asynchronous programming. Next, we talked about what happens behind the scenes when you run asynchronous code. We got a really good idea about how your program runs and what tools and tricks are happening behind the scenes to make it run the way it does. We through a few examples that illustrate how the Call Stack, Node APIs, the Callback Queue, and the Event Loop work.
Then, we learned how to use the request module to make an HTTP request for some information, the URL we requested was a Google Maps Geocoding URL, and we passed in the address we want the latitude and the longitude for. Then we used a callback function that got fired once that data came back.
At the end of the section Callback functions and APIs, we looked into a quick tip on how we can format objects when we want to print them to the console. Last, we looked into what makes up the HTTPS request.
In the next chapter, we'll add some error handling to this callback because that's going to be really important for our HTTP requests. There's a chance that things will go wrong, and when they do, we'll want to handle that error by printing a nice error message to the screen.
This chapter is the second part of our asynchronous programming in Node.js. In this chapter, we'll look at callbacks, HTTP requests, and more. We're going to handle a lot of the errors that happen inside callbacks. There's a lot of ways our request in app.js can go wrong, and we'll want to figure out how to recover from errors inside of our callback functions when we're doing asynchronous programming.
Next, we'll be moving our request code block into a separate file and abstracting a lot of details. We'll talk about what that means and why it's important for us. We'll be using Google's Geolocation API, and we'll be using the Dark Sky API to take location information like a zip code and turn that into real-world current weather information.
Then, we'll start wiring up that forecast API, fetching real-time weather data for the address that's geocoded. We'll add our request inside of the callback for geocodeAddress. This will let us take that dynamic set of latitude and longitude coordinates, the lat/lng for the address used in the arguments list, and fetch the weather for that location.
Specifically, we'll look into the following topics:
In this section, you'll learn how to set up yargs for the weather app. You'll also learn how to include user input, which is very important for our application.
As shown in the previous chapter, HTTPS request section, the user will not type their encoded address into the Terminal; instead they will be typing in a plain text address like 1301 Lombard Street.
Now this will not work for our URL, we need to encode those special characters, like the space, replacing them with %20. Now %20 is the special character for the space, other special characters have different encoding values. We'll learn how to encode and decode strings, so we can set up our URL to be dynamic. It's going to be based off of the address provided in the Terminal. That's all we're going to discuss in this section. By the end of the section, you'll be able to type in any address you like, and you'll see the formatted address, the latitude, and the longitude.
Before we can get started doing any encoding, we have to get the address from the user, and before we can set up yargs we have to install it. In the Terminal, we'll run the npm install command, the module name is yargs, and we'll look for version 10.1.1, which is the latest version at the time of writing. We'll use the save flag to run this installation, as shown in the following screenshot:
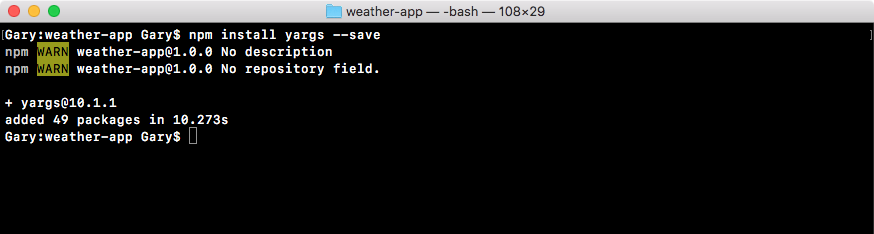
Now the save flag is great because as you remember. It updates the package.json file and that's exactly what we want. This means that we can get rid of the node modules folder which takes up a ton of space, but we can always regenerate it using npm install.
While the installation is going on, we do a bit of configuration in the app.js file. So we can get started by first loading in yargs. For this, in the app.js file, next to request constant, I'll make a constant called yargs, setting it equal to require(yargs) just like this:
const request = require('request');
const yargs = require('yargs');
Now we can go ahead and actually do that configuration. Next we'll make another constant called argv. This will be the object that stores the final parsed output. That will take the input from the process variable, pass it through yargs, and the result will be right here in the argv constant. This will get set equal to yargs, and we can start adding some calls:
const request = require('request');
const yargs = require('yargs');
const argv = yargs
Now when we created the notes app we had various commands, you could add a note and that required some arguments, list a note which required just the title, list all notes which didn't require any arguments, and we specified all of that inside of yargs.
For the weather app the configuration will be a lot simpler. There is no command, the only command would be get weather, but if we only have one why even make someone type it. In our case, when a user wants to fetch the weather all they will do is type node app.js followed by the address flag just like this:
node app.js --address
Then they can type their address inside of quotes. In my case it could be something like 1301 lombard street:
node app.js --address '1301 lombard street'
This is exactly how the command will get executed. There's no need for an actual command like fetch weather, we go right from the file name right into our arguments.
To configure yargs, things will look a little different but still pretty similar. In the Atom, I'll get started by calling .options, which will let us configure some top level options. In our case, we'll pass in an object where we configure all of the options we need. Now I'll format this like I do for all of my chained calls, where I move the call to the next line and I indent it like this:
const argv = yargs
.options({
})
Now we can set up our options and in this case we just have one, it will be that a option; a will be short for address. I could either type address in the options and I could put a in the alias, or I could put a in the options and type address in the alias. In this case I'll put a as shown here:
const argv = yargs
.options({
a: {
}
})
Next up, I can go ahead and provide that empty object, and we'll go through these same exact options we used inside of the notes app. We will demand it. If you'll fetch the weather we need an address to fetch the weather for, so I'll set demand equal to true:
const argv = yargs
.options({
a: {
demand: true,
}
})
Next up, we can set an alias, I'll set alias equal to address. Then finally we'll set describe, we can set describe to anything we think would be useful, in this case I'll go with Address to fetch weather for, as shown here:
const argv = yargs
.options({
a: {
demand: true,
alias: 'address',
describe: 'Address to fetch weather for'
}
})
Now these are the three options we provided for the notes app, but I'll add a fourth one to make our yargs configuration for the weather app even more full proof. This will be an option called string. Now string takes a Boolean either true or false. In our case we want true to be the value. This tells yargs to always parse the a or address argument as a string, as opposed to something else like a number or a Boolean:
const argv = yargs
.options({
a: {
demand: true,
alias: 'address',
describe: 'Address to fetch weather for',
string: true
}
})
In the Terminal, if I were to delete the actual string address, yargs would still accept this, it would just think I'm trying to add a Boolean flag, which could be useful in some situations. For example, do I want to fetch in Celsius or in Fahrenheit? But in our case, we don't need any sort of true or false flag, we need some data, so we'll set string to true to make sure we get that data.
Now that we have our options configuration in place, we can go ahead and add a couple other calls that we've explored. I'll add .help, calling it as shown in the following code, which adds the help flag. This is really useful especially when someone is first using a command. Then we can access .argv, which takes all of this configuration, runs it through our arguments, and restores the result in the argv variable:
const argv = yargs
.options({
a: {
demand: true,
alias: 'address',
describe: 'Address to fetch weather for',
string: true
}
})
.help()
.argv;
Now the help method adds that help argument, we can also add an alias for it right afterwards by calling .alias. Now .alias takes two arguments, the actual argument that you want to set an alias for and the alias. In our case, we already have help registered, it gets registered when we call help, and we'll set an alias which will just be the letter h, awesome:
.help()
.alias('help', 'h')
.argv;
Now we have all sorts of really great configurations set up for the weather app. For example, inside the Terminal I can now run help, and I can see all of the help information for this application:
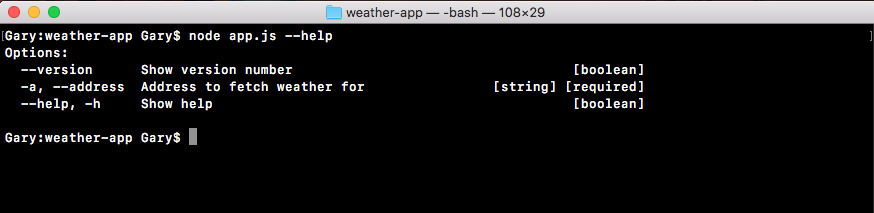
I could also use the shortcut -h, and I get the exact same data back:
Now the address is also getting passed through but we don't print it to the screen, so let's do that. Right after the configuration, let's use console.log to print the entire argv variable to the screen. This will include everything that got parsed by yargs:
.help()
.alias('help', 'h')
.argv;
console.log(argv);
Let's go ahead and rerun it in the Terminal, this time passing in an address. I'll use the a flag, and specifying something like 1301 lombard street, closing the quotes, and hitting enter:
node app.js -a '1301 lombard street'
When we do this we get our object, and as shown in the code output, we have 1301 Lombard St, Philadelphia, PA 19147, USA, the plain text address:
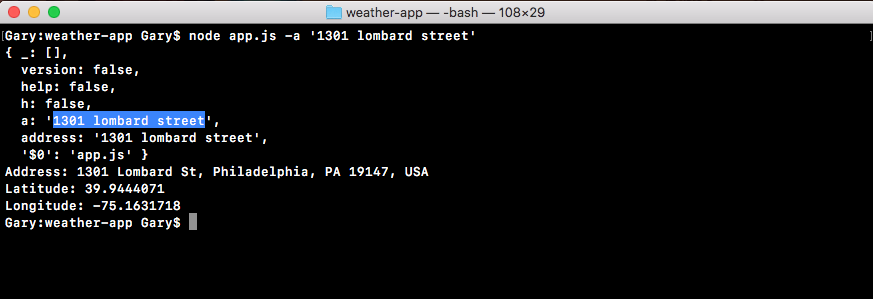
In the preceding screenshot, notice that we happen to fetch the latitude and longitude for that address, but that's just because we have it hard coded in the URL in app.js. We still need to make some changes in order to get the address, the one that got typed inside the argument, to be the address that shows up in the URL.
To explore how to encode and decode strings we'll head into the Terminal. Inside the Terminal, first we'll clear the screen using the clear command, and then we boot up a node process by typing the node command as shown:
node
Here we can run any statements we like. When we're exploring a really basic node or JavaScript feature, we'll look into some examples first, and then we go ahead and add it into our actual application. We'll look at two functions, encodeURIComponent and decodeURIComponent. We'll get started with encoding first.
Encoding, the method is called encodeURIComponent, encode URI in uppercase component, and it takes just one argument, the string you want to encode. In our case, that string will be the address, something like 1301 lombard street philadelphia. When we run this address through encodeURIComponent by hitting enter, we get the encoded version back:
encodeURIComponent('1301 lombard street philadelphia')
As shown in the following code output, we can see all the spaces, like the space between 1301 and lombard, have been replaced with their encoded character, and for the case of the space it is %20. By passing our string through encodeURIComponent, we'll create something that's ready to get injected right into the URL so we can fire off that dynamic request.

Now the alternative to encodeURIComponent is. This will take an encoded string like the one in the previous example, and take all the special characters, like %20, and convert them back into their original values, in this case space. For this, inside of decodeURIComponent once again we'll pass a string.
Let's go ahead and type our first and last name. In my case it's Andrew, and instead of a space between them I'll add %20, which we know is the encoded character for a space. Since we're trying to decode something, it's important to have some encoded characters here. Once yours looks like the following code with your first and last name, you can go ahead and hit enter, and what we get back is the decoded version:
decodeURIComponent('Andrew%20Mead')
As shown in the following code output, I have Andrew Mead with the %20 being replaced by the space, exactly what we expected. This is how we can encode and decode URI components in our app:

Now what we want to do is pull the address out of argv, we already saw that it's there, we want to encode it and we want to inject it in our URL in app.js file, replacing the address:

This will essentially create that dynamic request we've been talking about. We'll be able to type in any address we want, whether it's an address or a zip code or a city state combination, and we'll be able to fetch the formatted address, the latitude, and the longitude.
In order to get started, the first thing I'll do is get the encoded address. Let's make a variable called encodedAddress in the app.js next to the argv variable, where we can store that result. We'll set this equal to the return value from the method we just explored in the Terminal, encodeURIComponent. This will take the plain text address and return the encoded result.
Now we do need to pass in the string, and we have that available on argv.address which is the alias:
.help()
.alias('help', 'h')
.argv;
var encodedAddress = encodeURIComponent(argv.address);
Now we have that encoded result all that's left to do is inject it inside of the URL string. In the app.js, currently we're using a regular string. We'll swap this out for a template string so I can inject a variable inside of it.
Now that we have a template string, we can highlight the static address which ends at philadelphia and goes up to the = sign, and remove it, and instead of typing in a static address we can inject the dynamic variable. Inside of my curly braces, encodedAddress, as shown here:
var encodedAddress = encodeURIComponent(argv.address);
request({
url: `https://maps.googleapis.com/maps/api/geocode/json?address=${encodedAddress}`,
With this in place we are now done. We get the address from the Terminal, we encode it, and we use that inside of a geocode call. So the formatted address, latitude, and longitude should match up. Inside the Terminal, we'll shut down node by using control + C twice and use clear to clear the Terminal output.
Then we can go ahead and run our app using node app.js, passing in either the a or address flag. In this case, we'll just use a. Then we can go ahead and type in an address, for example, 1614 south broad street philadelphia as shown here:
node app.js -a '1614 south broad street philadelphia'
In this case we'll find that it's actually taking a little longer than we would expect, about three or four seconds, but we do get the address back:

Here we have the formatted address with a proper zip code state and country, and we also have the latitude and longitude showing up. We'll try a few other examples. For example for a town in Pennsylvania called Chalfont, we can type in chalfont pa which is not a complete address, but the Google Geocode API will convert it into the closest thing, as shown here:

We can see that it's essentially the address of the town, Chalfont, PA 18914 is the zip, with the state USA. Next, we have the general latitude and longitude data for that town, and this will be fine for fetching weather data. The weather isn't exactly changing when you move a few blocks over.
Now that we have our data coming in dynamically, we are able to move on to the next section where we'll handle a lot of the errors that happen inside of callbacks. There are a lot of ways this request can go wrong, and we'll want to figure out how to recover from errors inside of our callback functions when we're doing asynchronous programming.
In this section we'll learn how to handle errors inside of your callback functions, because as you might guess things don't always go as planned. For example, the current version of our app has a few really big flaws, if I try to fetch weather using node app.js with the a flag for a zip that doesn't exist, like 000000, the program crashes, which is a really big problem. It's going off. It's fetching the data, eventually that data will come back and we get an error, as shown here:
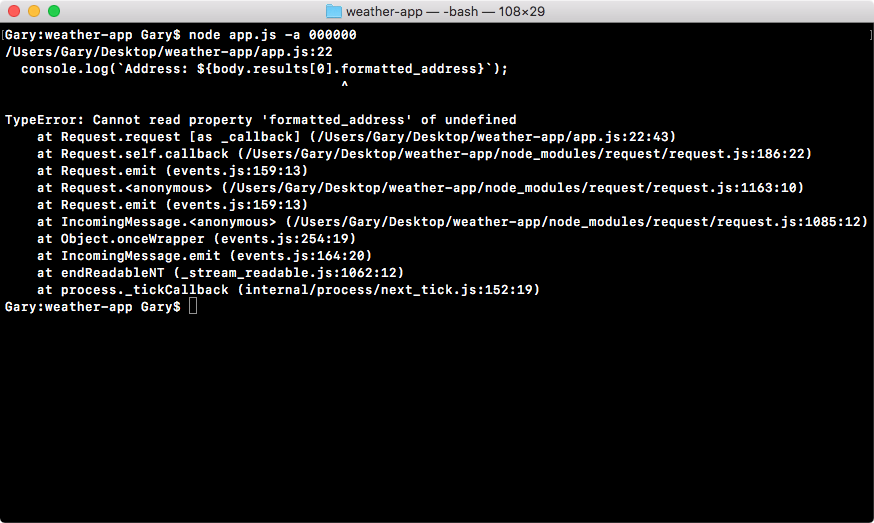
It's trying to fetch properties that don't exist, such as body.results[0].formatted_address is not a real property, and this is a big problem.
Our current callback expects everything went as planned. It doesn't care about the error object, doesn't look at response codes; it just starts printing the data that it wants. This is the happy path, but in real world node apps we have to handle errors as well otherwise the applications will become really useless, and a user can get super frustrated when things don't seem to be working as expected.
In order to do this, we'll add a set of if/else statements inside of the callback. This will let us check certain properties to determine whether or not this call, the one to our URL in the app.js, should be considered a success or a failure. For example, if the response code is a 404, we might want to consider that a failure and we'll want to do something other than trying to print the address, latitude and longitude. If everything went well though, this is a perfectly reasonable thing to do.
There are two types of errors that we'll worry about in this section. That will be:
In order to get started, let's take a look at what can happen when we pass a bad data to the Google API.
To view what actually comes back in a call like the previous example, where we have an invalid address, we'll head over to the browser and pull up the URL we used in the app.js file:
We will remove the address we used earlier from the browser history, and type in 000000, hit enter:
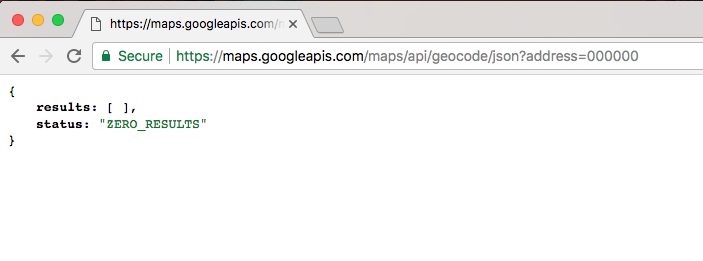
We get our results arrive but those are no results, and we have the status, the status says ZERO_RESULTS, and this is the kind of information that's really important to track down. We can use the status text value to determine whether or not the request was successful. If we pass in a real zip code like 19147, which is Philadelphia, we'll get our results back, and as shown in the following image, the status will get set equal to OK:
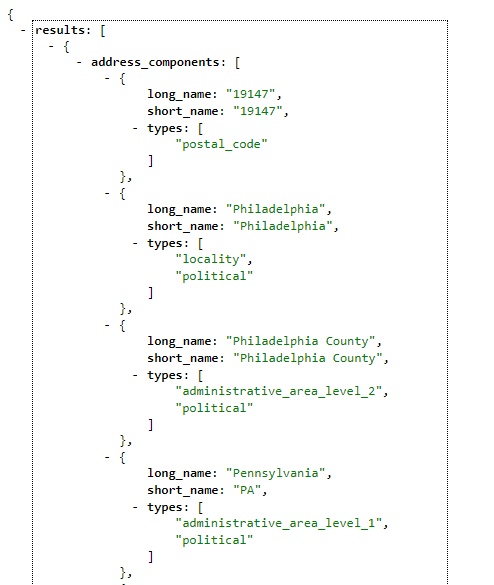
We can use this status to determine that things went well. Between these status property and the error object, which we have inside of our app, we can determine what exactly to do inside of the callback.
The first thing we'll do is add an if statement as shown below, checking if the error object exists:
request({
url: `https://maps.googleapis.com/maps/api/geocode/json?address=${encodedAddress}`,
json: true
}, (error, response, body) => {
if (error) {
}
This will run the code inside of our code block if the error object exists, if it doesn't fine, we'll move on into the next else if statement, if there is any.
If there is an error, all we'll do is add a console.log and a message to the screen, something like Unable to connect to Google servers:
if (error) {
console.log('Unable to connect Google servers.');
}
This will let the user know that we were unable to connect to the user servers, not that something went wrong with their data, like the address was invalid. This is what be inside of the error object.
Now the next thing that we'll do is add an else if statement, and inside of the condition we'll check the status property. If the status property is ZERO_RESULTS, which it was for the zip code 000000, we want to do something other than trying to print the address. Inside of our conditional in Atom, we can check that using the following statement:
if (error) {
console.log('Unable to connect Google servers.');
} else if (body.status === 'ZERO_RESULTS') {
}
If that's the case, we'll print a different message, other than Unable to connect Google servers, for this one we can use console.log to print Unable to find that address.:
if (error) {
console.log('Unable to connect Google servers.');
} else if (body.status === 'ZERO_RESULTS') {
console.log('Unable to find that address.');
}
This lets the user know that it wasn't a problem with the connection, we were just unable to find the address they provided, and they should try with something else.
Now we have error handling for those system errors, like being unable to connect to the Google servers, and for errors with the input, in this case we're unable to find a location for that address, and this is fantastic, we have both of our errors handled.
In our case, if the status is ZERO_RESULTS, we know the request failed and we can act accordingly. Inside of our app, now we'll add our last else if clause, if things went well.
Now we want to add the else if clause checking if the body.status property equals OK. If it does, we can go ahead and run these three lines inside of the code block:
console.log(`Address: ${body.results[0].formatted_address}`);
console.log(`Latitude: ${body.results[0].geometry.location.lat}`);
console.log(`Longitude: ${body.results[0].geometry.location.lng}`);
});
If it doesn't, these lines shouldn't run because the code block will not execute. Then we'll test things out inside of the Terminal, try to fetch the address of 00000, and make sure that instead of the program crashing we get our error message printing to the screen. Then we go ahead and mess up the URL in the app by removing some of the important characters, and make sure this time we get the Unable to connect to the Google servers. message. And last we'll see what happens when we enter a valid address, and make sure our three console.log statements still execute.
To get started we'll add that else if statement, and inside of the condition we'll check if body.status is OK:
if (error) {
console.log('Unable to connect Google servers.');
} else if (body.status === 'ZERO_RESULTS') {
console.log('Unable to find that address.');
} else if (body.status === 'OK') {
}
If it is OK, then we'll simply take the three console.log lines (shown in the previous code block) and move them in the else if condition. If it is OK, we'll run these three console.log statements:
if (error) {
console.log('Unable to connect Google servers.');
} else if (body.status === 'ZERO_RESULTS') {
console.log('Unable to find that address.');
} else if (body.status === 'OK') {
console.log(`Address: ${body.results[0].formatted_address}`);
console.log(`Latitude: ${body.results[0].geometry.location.lat}`);
console.log(`Longitude: ${body.results[0].geometry.location.lng}`);
}
Now we have a request that handles errors really well. If anything goes wrong we have a special message for it, and if things go right we print exactly what the user expects, the address, the latitude, and the longitude. Next we'll test this.
To test this inside of the Terminal, we'll start by rerunning the command with an address that's invalid:
node app.js -a 000000

When we run this command, we see that Unable to find address. prints to the screen. Instead of the program crashing, printing a bunch of errors, we simply have a little message printing to the screen. This is because the code we have in second else if statement, that tried to access those properties that didn't exist, no longer runs because our first else if condition gets caught and we simply print the message to the screen.
Now we also want to test that the first message (Unable to connect to the Google servers.) prints when it should. For this, we'll delete some part of the URl in our code, let's say, s and ., and save the file:
request({
url: `https://mapgoogleapis.com/maps/api/geocode/json?address=${encodedAddress}`,
json: true
}, (error, response, body) => {
if (error) {
console.log('Unable to connect Google servers.');
} else if (body.status === 'ZERO_RESULTS') {
console.log('Unable to find that address.');
} else if (body.status === 'OK') {
console.log(`Address: ${body.results[0].formatted_address}`);
console.log(`Latitude: ${body.results[0].geometry.location.lat}`);
console.log(`Longitude: ${body.results[0].geometry.location.lng}`);
}
});
Then we'll rerun the previous command in the Terminal. This time around we can see Unable to connect to Google servers. prints to the screen just like it should:

Now we can test it the final thing, by first readjusting the URL to make it correct, and then fetching a valid address from the Terminal. For example, we can use the node app.js, setting address equal to 08822, which is a zip code in New Jersey:
node app.js --address 08822
When we run this command, we do indeed get our formatted address for Flemington, NJ, with a zip code and the state, and we have our latitude and longitude as shown here:

We now have a complete error handling model. When we make a request to Google providing a address that has problems, in this case there's ZERO_RESULTS, the error object will get populated, because it's not technically an error in terms of what request thinks an error is, it's actually in the response object, which is why we have to use body.status in order to check the error.
That is it for this section, we now have error handling in place, we handle system errors, Google server errors, and we have our success case.
In this section, we'll be refactoring app.js, taking a lot of the complex logic related to geocoding and moving it into a separate file. Currently, all of the logic for making the request and determining whether or not the request succeeded, our if else statements, live inside of app.js:
request({
url: `https://maps.googleapis.com/maps/api/geocode/json?address=${encodedAddress}`,
json: true
}, (error, response, body) => {
if (error) {
console.log('Unable to connect Google servers.');
} else if (body.status === 'ZERO_RESULTS') {
console.log('Unable to find that address.');
} else if (body.status === 'OK') {
console.log(`Address: ${body.results[0].formatted_address}`);
console.log(`Latitude: ${body.results[0].geometry.location.lat}`);
console.log(`Longitude: ${body.results[0].geometry.location.lng}`);
}
});
This is not exactly reusable and it really doesn't belong here. What I'd like to do before we add even more logic related to fetching the forecast, that's the topic of the next section, is break this out into its own function. This function will live in a separate file, like we did for the notes application.
In the notes app we had a separate file that had functions for adding, listing, and removing notes from our local adjacent file. We'll be creating a separate function responsible for geocoding a given address. Although the logic will stay the same, there really is no way around it, it will be abstracted out of the app.js file and into its own location.
First up, we will need to create a new directory and a new file then we'll add a few more advanced features to the function. But before that, we'll see what the require statement will look like.
We'll load in via a constant variable called geocode the module, and we'll set it equal to require, since we're requiring a local file we'll add that relative path, ./geocode/geocode.js:
const geocode = require('./geocode/geocode.js');
That means you need to make a directory called geocode in the weather-app folder, and a file called geocode.js. Since we have a .js extension, we can actually leave it off of our require call.
Now, in the app.js file, next to .argv object, we need to call geocode.geocodeAddress. The geocodeAddress function, that will be the function responsible for all the logic we currently have in app.js. The geocodeAddress function will take the address, argv.address:
geocode.geocodeAddress(argv.address);
It will be responsible for doing everything, encoding the URL, making the request, and handling all of the error cases. This means, in that new file we need to export the geocodeAddress function, just like we exported functions from the notes application file. Next, we have all of the logic here:
var encodedAddress = encodedURIComponent(argv.address);
request({
url: `https://maps.googleapis.com/maps/api/geocode/json?address=${encodedAddress}`,
json: true
}, (error, response, body) => {
if (error) {
console.log('Unable to connect Google servers.');
} else if (body.status === 'ZERO_RESULTS') {
console.log('Unable to find that address.');
} else if (body.status === 'OK') {
console.log(`Address: ${body.results[0].formatted_address}`);
console.log(`Latitude: ${body.results[0].geometry.location.lat}`);
console.log(`Longitude: ${body.results[0].geometry.location.lng}`);
}
});
This logic needs to get moved inside of the geocodeAddress function. Now we can copy and paste the preceding shown code directly, there really is no way around some of the more complex logic, but we will need to make a few changes. We'll need to load requests into that new file, since we use it and it isn't going to be required in that file by default. Then we can go ahead and clean up the request require call in the code, since we won't be using it in this file.
Next up, the argv object is not going to exist, we'll get that passed in via the first argument, just like the argv.address in the geocode.Address statement. This means we'll need to swap this out for whatever we call that first argument for example, address. Once this is done, the program should work exactly as it works without any changes in app.js, there should be no change in functionality.
To get started, let's make a brand new directory in the weather-app folder, that's the first thing we need to do. The directory is called geocode, which aligns with the require statement we have in the geocode variable. In geocode folder, we'll make our file geocode.js:
Now inside of geocode.js, we can get started by loading in request, let's make a constant called request, and we'll set it equal to require('request'):
const request = require('request');
Now we can go ahead and define the function responsible for geocoding, this one will be called geocodeAddress. We'll make a variable called geocodeAddress, setting it equal to an arrow function, and this arrow function will get an address argument past in:
var geocodeAddress = (address) => {
};
This is the plain text unencoded address. Now before we copy the code from app.js into this function body, we want to export our geocodeAddress function using module.exports, which we know as an object. Anything we put on module.exports object will be available to any files that require this file. In our case, we want to make a geocodeAddress property available, setting it equal to the geocodeAddress function that we defined in the preceding statement:
var geocodeAddress = (address) => {
};
module.exports.geocodeAddress = geocodeAddress;
Now it's time to actually copy all of the code from app.js in to geocode.js. We'll cut the request function code, move in to geocode.js, and paste it inside of the body of our function:
var geocodeAddress = (address) => {
var encodedAddress = encodedURIComponent(argv.address);
request({
url: `https://maps.googleapis.com/maps/api/geocode/json?address=${encodedAddress}`,
json: true
}, (error, response, body) => {
if (error) {
console.log('Unable to connect Google servers.');
} else if (body.status === 'ZERO_RESULTS') {
console.log('Unable to find that address.');
} else if (body.status === 'OK') {
console.log(`Address: ${body.results[0].formatted_address}`);
console.log(`Latitude: ${body.results[0].geometry.location.lat}`);
console.log(`Longitude: ${body.results[0].geometry.location.lng}`);
}
});
};
module.exports.geocodeAddress = geocodeAddress;
The only thing we need to change inside of this code, is how we get the plaintext address. We no longer have that argv object, instead we get address passed in as an argument. The final code will look like the following code block:
const request = require('request');
var geocodeAddress = (address) => {
var encodedAddress = encodedURIComponent(argv.address);
request({
url: `https://maps.googleapis.com/maps/api/geocode/json?address=${encodedAddress}`,
json: true
}, (error, response, body) => {
if (error) {
console.log('Unable to connect Google servers.');
} else if (body.status === 'ZERO_RESULTS') {
console.log('Unable to find that address.');
} else if (body.status === 'OK') {
console.log(`Address: ${body.results[0].formatted_address}`);
console.log(`Latitude: ${body.results[0].geometry.location.lat}`);
console.log(`Longitude: ${body.results[0].geometry.location.lng}`);
}
});
};
module.exports.geocodeAddress = geocodeAddress;
With this in place, we're now done with the geocode file. It contains all of the complex logic for making and finishing the request. Over at app.js, we can clean things up by removing some extra spaces, and removing the request module which is no longer used in this file. The final app.js file will look like the following code block:
const yargs = require('yargs');
const geocode = require('./geocode/geocode');
const argv = yargs
.options({
a: {
demand: true,
alias: 'address',
describe: 'Address to fetch weather for',
string: true
}
})
.help()
.alias('help', 'h')
.argv;
geocode.geocodeAddress(argv.address);
Now at this point the functionality should be exactly the same. Inside of the Terminal, I'll go ahead and run a few to confirm the changes worked. We'll use the a flag to search for a zip code that does exist, something like 19147, and as shown, we can see the address, the latitude, and the longitude:

Now we'll swap out that zip code to one that does not exist, like 000000, when we run this through the geocoder, you can see Unable to find address prints to screen:

It means all of the logic inside of geocode.js is still working. Now the next step in the process is the process of adding a callback function to geocodeAddress.
The goal of refactoring the code and app.js was not to get rid of the callback, the goal was to abstract all the complex logic related to encoding the data, making that request, and checking for errors. app.js should not care about any of that, it doesn't even need to know that an HTTP request was ever made. All the app.js should care about is passing an address to the function, and doing something with the result. The result being either an error message or the data, the formatted address, the latitude, and the longitude.
Before we go ahead and make any changes in geocode.js, we want to take a look at how we'll structure things inside of app.js. We'll pass an arrow function to geocodeAddress, and this will get called after the request comes back:
geocode.geocodeAddress(argv.address, () => {
});
In the parentheses, we'll expect two arguments, errorMessage, which will be a string, and results, which will contain the address, the latitude, and the longitude:
geocode.geocodeAddress(argv.address, (errorMessage, results) => {
});
Out of these two only one will be available at a time. If we have an error message we'll not have results, and if we have results we'll not have an error message. This will make the logic in the arrow function, of determining whether or not the call succeeded, much simpler. We'll be able to use an if statement, if (errorMessage), and if there is an error message, we can simply print it to the screen using console.log statement:
geocode.geocodeAddress(argv.address, (errorMessage, results) => {
if (errorMessage) {
console.log(errorMessage);
}
});
There's no need to dig into any sort of object and figure out exactly what's going on, all of that logic is abstracted in geocode.js. Now if there is no error message inside of the else clause, we can go ahead and print the results. We'll use that pretty print method we talked about in the previous chapter, we'll add the console.log(JSON.stringify) statement, and we'll pretty print the results object which will be an object containing an address property, a latitude property, and a longitude property.
Then, we'll pass the undefined argument as our second argument. This skips over the filtering function which we don't need, and then we can specify the spacing, which will format this in a really nice way, we'll use two spaces as shown here:
geocode.geocodeAddress(argv.address, (errorMessage, results) => {
if (errorMessage) {
console.log(errorMessage);
} else {
console.log(JSON.stringify(results, undefined, 2));
}
});
Now that we have our function set up inside of geocodeAddress function in app.js, and we have a good idea about how it will look, we can go ahead and implement it inside of geocode.js.
In our arguments definition, instead of just expecting an address argument we'll also expect a callback argument, and we can call this callback argument whenever we like. We'll call it in three places. We'll call it once inside of the if (error) block, instead of calling console.log we'll simply call the callback with the Unable to connect to Google servers. string. This string will be the error message we defined in geocodeAddress function in app.js.
In order to do this, all we need to do is change our console.log call to a callback call. We'll pass it as the first argument our error message. We can take the string exactly as it appeared in console.log, and move it into the arguments for callback. Then I can remove the console.log call and save the file. The resultant code will look like following:
request({
url: `https://maps.googleapis.com/maps/api/geocode/json?address=${encodedAddress}`,
json: true
}, (error, response, body) => {
if (error) {
callback('Unable to connect to Google servers.');
}
Now we can do the exact same thing in the next else if block for our other console.log statement, when there is zero results, we'll replace console.log with callback:
if (error) {
callback('Unable to connect Google servers.');
} else if (body.status === 'ZERO_RESULTS') {
callback('Unable to find that address.');
}
Now the last else if block will be a little trickier. It's a little trickier because we don't exactly have our object. We also need to create an undefined variable for the first argument, since an error message will not be provided when things go well. All we have to do to create that undefined error message is call callback, passing an undefined variable as the first argument. Then we can go ahead and specify our object as the second argument, and this object, this will be exactly what's in the geocodeAddress function, results:
} else if (body.status === 'OK') {
callback(undefined, {
})
console.log(`Address: ${body.results[0].formatted_address}`);
console.log(`Latitude: ${body.results[0].geometry.location.lat}`);
console.log(`Longitude: ${body.results[0].geometry.location.lng}`);
}
Now as I mentioned the results have three properties: the first one will be formatted address, so let's go ahead and knock that out first. We'll set address equal to body.results, just like we have in the Address variable of console.log statement:
} else if (body.status === 'OK') {
callback(undefined, {
address: body.results[0].formatted_address
})
console.log(`Address: ${body.results[0].formatted_address}`);
console.log(`Latitude: ${body.results[0].geometry.location.lat}`);
console.log(`Longitude: ${body.results[0].geometry.location.lng}`);
}
Here we're making things even easier, instead of having complex properties that are nested deep inside of an object inside of app.js, we'll be able to access a simple address property, and we'll do the same thing for Latitude and Longitude of console.log statements.
Next, we'll grab the code that let us fetch the latitude, and I'll add my second property, latitude, setting it equal to the code we grab from the console.log statement. Then we can go ahead and add the last property, which will be longitude, setting that equal to the latitude code, replacing lat with lng. Now that we have this in place we can add a semicolon at the end, and remove the console.log statements since they're no longer necessary, and with this we are done:
if (error) {
callback('Unable to connect Google servers.');
} else if (body.status === 'ZERO_RESULTS') {
callback('Unable to find that address.');
} else if (body.status === 'OK') {
callback(undefined, {
address: body.results[0].formatted_address,
latitude: body.results[0].geometry.location.lat,
longitude: body.results[0].geometry.location.lng
});
}
We can now rerun the file, and when we do we'll pass an address to geocodeAddress, this will go off and make the request, and when the request comes back, we'll be able to handle that response in a really simple way.
Inside of the Terminal, we'll go back to run two node app.js commands; the command where we used the zip code of 19147, everything works as expected and a bad zip code 000000, to show the error message.
As shown in the following code output, we can see our results object with an address property, a latitude property, and a longitude property:
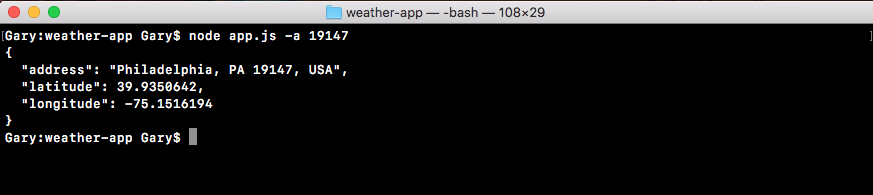
In case of a bad zip code, we just want to make sure the error message still shows up, and it does, Unable to find that address. prints to the screen, as shown here:

This is happening because of the if statement in the geocodeAddress function in app.js.
After abstracting all of that logic to the geocode file, the app.js file is now a lot simpler and a lot easier to maintain. We can also call geocodeAddress in multiple locations. If we want to reuse the code we don't have to copy and paste the code, which would not follow the DRY principle, which stands for Don't Repeat Yourself, instead we can do the DRY thing and simply call geocodeAddress like we have in the app.js file. With this in place we are now done fetching the geocode data.
In this section, you'll make your very first request to the weather API, and we'll do this in a static way at first, meaning that it will not use the actual latitude and longitude for the address we passed in, we'll simply have a static URL. We'll make the request and we'll explore what data we get back in the body.
Now before we can add anything to Atom, we want to go ahead and explore this API so we can see how it works in the browser. This will give us a better idea about what weather data we get back, when we pass a latitude and longitude to the API. To do this we'll head over to the browser, and we'll visit a couple of URLs.
First up let's go to forecast.io. It is a regular weather website, you type in your location and you get all the weather information you'd expect:
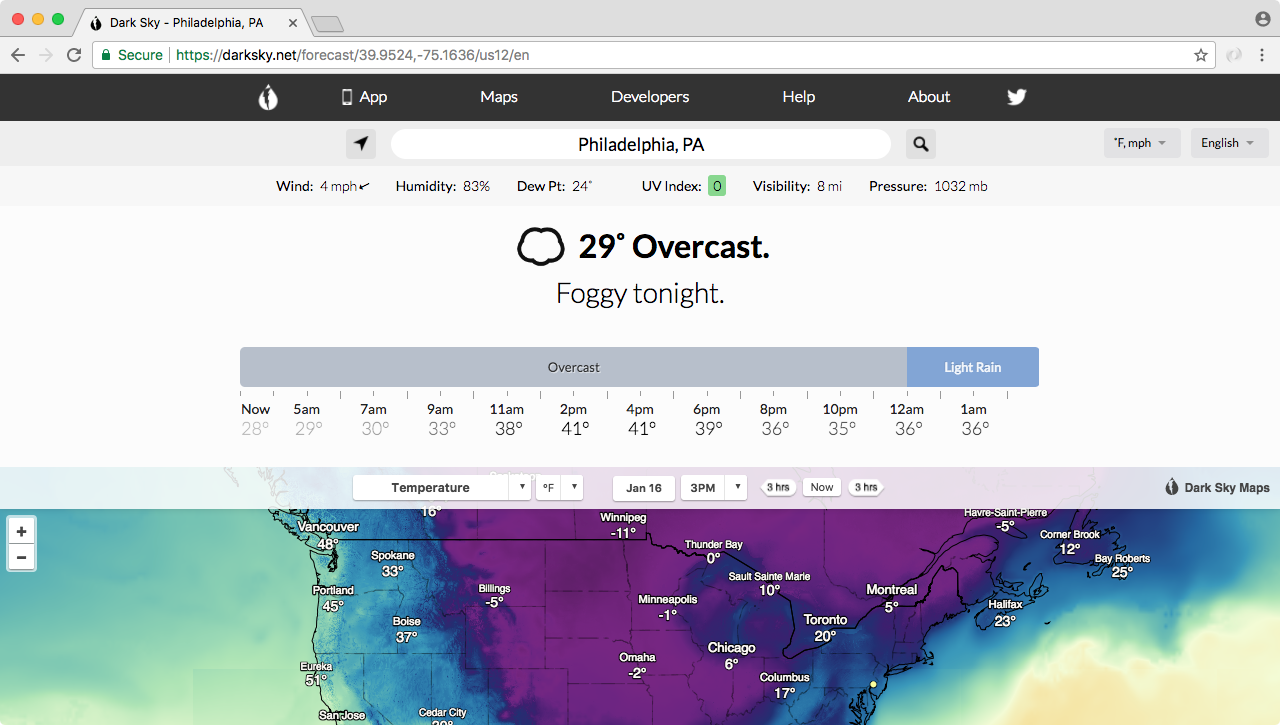
As shown in the preceding image, there's warnings, there's radar, there's the current weather, and we also have the weekly forecast in the website as shown in the following image:
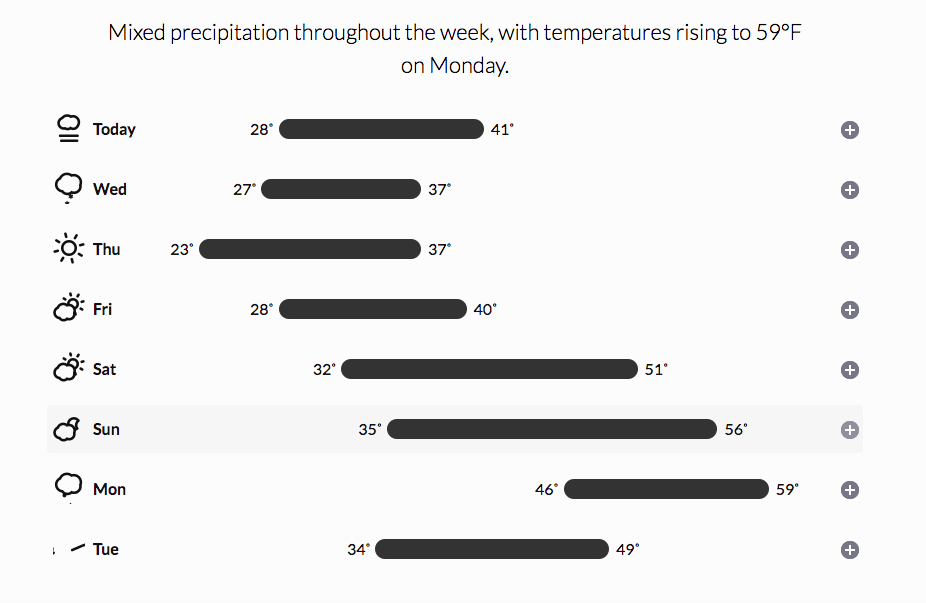
This is similar to weather.com, but the one cool thing about forecast.io is that the API that powers this website, it's actually available to you as a developer. You can make a request to our URL, and you can fetch the exact same weather information.
That is exactly what we'll do when we can explore the API by going to the website developer.forecast.io. Here we can sign up for a free developer account, in order to get started making those weather requests:
The Dark Sky Forecast API gives you 1,000 free requests a day, and I do not see us going over that limit. After the 1,000 requests, each costs a one thousandth of a penny, so you get a thousand requests for every penny you spend. We'll never go over that limit so don't even worry about it. There is no credit card required to get started, you'll simply get cut off after you make a thousand requests.
To get started you'll need to register for a free account, it's really simple, we just need an email and a password. Once we've created an account and we can see the dashboard as shown here:
The only piece of information we need from this page is our API key. The API key is like a password, it will be part of the URL we request and it will help forecast.io keep track of how many requests we make a day. Now I'll take this API key and paste it in the app.js, so we have it accessible later when we need it.
The next thing we'll do is explore the documentation, the actual URL structure we need to provide in order to fetch the weather for a given latitude and longitude. We can get that by clicking the API Docs link button, which is present in the top-right side of The Dark Sky Forecast API page. This'll lead us to following page:
In the API Docs link, we have a Forecast Request URL. As shown in the preceding image, this URL is exactly what we need to make a request to in order to fetch the data.
Before we add this URL into our app and use the request library, we need to find the actual URL which we can use to make the request. For this, we'll copy it and paste it into a new tab:
Now, we do need to swap out some of the URL information. For example, we have our API key that needs to get replaced, we also have latitude and longitude. Both of those need to get replaced with the real data. Let's get started with that API key first since we already copy and pasted it inside of app.js. We'll copy the API key, and replace the letters [key] with the actual value:
Next up, we can grab a set of longitude and latitude coordinates. For this, go inside the Terminal and run our app, node app.js, and for the address we can use any zip let's say, 19146 to fetch the latitude and longitude coordinates.
Next up, we'll copy these and place into the URL where they belong. The latitude goes between the forward slash and the comma, and the longitude will go after the comma, as shown here:
Once we have a real URL with all of those three pieces of info swapped out for actual info, we can make the request, and what we'll get back is the forecast information:
Now the data we get back, it is overwhelming. We have a forecast by the minute, we have forecasts by the hour, by the week, by the day, all sorts of information, it's really useful but it's also super overwhelming. In this chapter, we'll be using the first object that is currently. This stores all of the current weather information, things like the current summary which is clear, the temperature, the precipitation probability, the humidity, a lot of really useful information is sitting in it.
In our case, what we really care about is the temperature. The current temperature in Philadelphia is shown 84.95 degrees. This is the kind of information we want to use inside of our application, when someone searches for the weather in a given location.
Now in order to play around with the weather API, we'll take the exact same URL we have defined in the previous section, and we'll make a request in app.js. First, we want to do a little setup work.
Inside of app.js, we'll comment out everything we have so far, and next to our API key we'll make a call to request, requesting this exact URL, just like we did for the geocode API in the previous section/chapter, before we made it dynamic. Then we'll print out the body.currently.temperature property to the screen, so when we run the app we'll see the current temperature for whatever latitude and longitude we used. In our case it's a static latitude and longitude representing Philadelphia.
In order to get started we'll load in request. Now we had it in the app.js file before and then we removed it in the previous section, but we'll add it back once again. We'll add it next to the commented out code, by creating a constant called request, and loading it in, const request equals to require('request'):
const request = require('request');
Now we can go ahead and make the actual request, just like we did for the geocode API by calling request, it's a function just like this:
const request = require('request');
request();
We have to pass in our two arguments, the options object is the first one, and the second one is the arrow function:
request({}, () => {
});
This is our callback function that gets fired once the HTTP request finishes. Before we fill out the actual function, we want to set up our options. There're two options, URL and JSON. We'll set url equal to the static string, the exact URL we have in the browser:
request({
url: 'https://api.forecast.io/forecast/4a04d1c42fd9d32c97a2c291a32d5e2d/39.9396284,-75.18663959999999',
}, () => {
Then in the next line after comma, we can set json equal to true, telling the request library to go ahead and parse that body as JSON, which it is:
request({
url: 'https://api.forecast.io/forecast/4a04d1c42fd9d32c97a2c291a32d5e2d/39.9396284,-75.18663959999999',
json: true
}, () => {
From here, we can go ahead and add our callback arguments; error, response, and body. These are the exact same three arguments we have in the if block of geocode.js file for the geocoding request:
request({
url: 'https://api.forecast.io/forecast/4a04d1c42fd9d32c97a2c291a32d5e2d/39.9396284,-75.18663959999999',
json: true
}, (error, response, body) => {
});
Now that we have this in place, the last thing we need to do is print the current temperature, which is available on the body using console.log statement. We'll use console.log to print body.currently.temperature, as shown here:
request({
url: 'https://api.forecast.io/forecast/4a04d1c42fd9d32c97a2c291a32d5e2d/39.9396284,-75.18663959999999',
json: true
}, (error, response, body) => {
console.log(body.currently.temperature);
});
Now that we have the temperature printing, we need to test it by running it from the Terminal. In the Terminal, we'll rerun the previous command. The address is not actually being used here since we commented out that code, and what we get is 28.65, as shown in this code output:

With this we have our weather API call working inside of the application.
Now we do want to add a little error handling inside of our callback function. We'll handle errors on the error object, and we'll also handle errors that come back from the forecast.io servers. First up, just like we did for the geocoding API, we'll check if error exists. If it does, that means that we were unable to connect to the servers, so we can print a message that relays that message to the user, console.log something like Unable to connect to forecast.io server.:
request({
url: 'https://api.forecast.io/forecast/4a04d1c42fd9d32c97a2c291a32d5e2d/39.9396284,-75.18663959999999',
json: true
}, (error, response, body) => {
if (error){
console.log('Unable to connect to Forecast.io server.');
}
console.log(body.currently.temperature);
});
Now that we've handled general errors, we can move on to a specific error that the forecast.io API throws. This happens when the format of the URL, the latitude and longitude, is not correct.
For example, if we delete some numbers including the comma in the URL, and hit enter we'll get a 400 Bad Request:
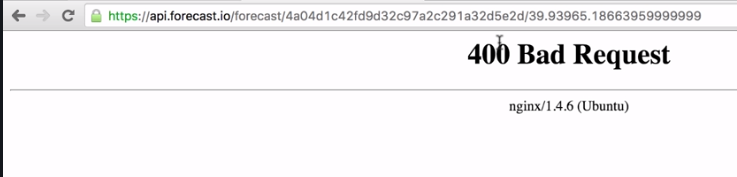
This is the actual HTTP status code. If you remember from the geolocation API we had a body.status property that was either OK or ZERO_RESULTS. This is similar to that property, only this uses the HTTP mechanisms instead of some sort of custom solution that Google used. In our case, we'll want to check if the status code is 400. Now if we have a bad API key, I'll add a couple e's in the URL, we'll also get a 400 Bad Request:
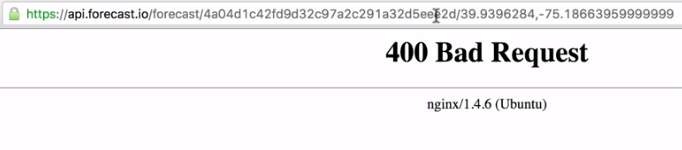
So both of these errors can be handled using the same code.
Inside of Atom, we can handle this by checking the status code property. After our if statement closing curly brace, we'll add else if block, else if (response.statusCode), this is the property we looked at when we looked at the response argument in detail. response.statusCode will be equal to 400 if something went wrong, and that's exactly what we'll check for here:
if (error){
console.log('Unable to connect to Forecast.io server.');
} else if (response.statusCode === 400) {
}
If the status code is 400 we'll print a message, console.log('Unable to fetch weather'):
if (error){
console.log('Unable to connect to Forecast.io server.');
} else if (response.statusCode === 400) {
console.log('Unable to fetch weather.');
}
Now we've handled those two errors, and we can move on to the success case. For this we'll add another else if block with response.statusCode equals 200. The status code will equal 200 if everything went well, in that case we'll print the current temperature to the screen.
I'll cut the console.log(body.currently.temperature) line out and paste it inside of the else if code block:
if (error){
console.log('Unable to connect to Forecast.io server.');
} else if (response.statusCode === 400) {
console.log('Unable to fetch weather.');
} else if (response.statusCode === 200) {
console.log(body.currently.temparature);
}
});
There's is another way to represent our entire if block code. The following is an updated code snippet, and we can actually replace everything we have in the current callback function with this code:
if (!error && response.statusCode === 200) {
console.log(body.currently.temperature);
} else {
console.log('Unable to fetch weather.');
}
This condition checks if there is no error and the response status code is a 200, if that's the case what do we do? We simply print the temperature like we were doing last time, that was in the else if clause at the very bottom. Now we have an else case in the updated code snippet, so if there is an error or the status code is not a 200, we'll go ahead and print this message to the screen. This will handle things like the server not having a network connection, or 404s from an invalid or broken URL. All right, use this code instead and everything should be working as expected with the latest version of the weather API.
Now we have some error handling in place and we can go ahead and test that our app still works. From the Terminal we'll rerun the previous command, and we still get a temperature 28.71:

Back inside of Atom, we'll trash some of the data by removing the comma, saving the file:
request({
url: 'https://api.forecast.io/forecast/4a04d1c42fd9d32c97a2c291a32d5e2d/39.9396284-75.18663959999999',
json: true
}, (error, response, body) => {
if (error){
console.log('Unable to connect to Forecast.io server.');
} else if (response.statusCode === 400) {
console.log('Unable to fetch weather.');
} else if (response.statusCode === 200) {
console.log(body.currently.temparature);
}
});
When we rerun it from the Terminal, this time, we would expect Unable to fetch weather. to print to the screen, and when I rerun the app that is exactly what we get, as shown here:

Now, let's add the comma back in and test our last part of the code. To test the if error, we can test that by removing something like the dot from forecast.io:
request({
url: 'https://api.forecastio/forecast/4a04d1c42fd9d32c97a2c291a32d5e2d/39.9396284,-75.18663959999999',
json: true
}, (error, response, body) => {
We can rerun the app, and we see Unable to connect to Forecast.io server.:

All of our error handling works great, and if there is no errors the proper temperature prints to the screen, which is fantastic.
In this section, we'll take the code that we created in the last section, and break it out into its own file. Similar to what we did with the Geocoding API request where we called geocodeAddress instead of actually having the request call in app.js. That means we'll make a new folder, a new file, and we'll create a function in there that gets exported.
After that we'll go ahead and learn how to chain callbacks together. So when we get that address from the Terminal we can convert that into coordinates. And we can take those coordinates and convert them into temperature information, or whatever weather data we want to pull off of the return result from the Forecast API.
Now before we can dive into the refactoring, we'll create a brand new file, and we'll worry about getting the code we created in the previous section into that function. Then we'll go for creating that callback.
First, let's make the directory. The directory will be called weather. And in the weather directory we'll make a new file called weather.js.
Now in this file we can take all of our code from app.js, and paste it in weather.js:
const request = require('request');
request({
url: 'https://api.forecast.io/forecast/4a04d1c42fd9d32c97a2c291a32d5e2d/39.9396284,-75.18663959999999',
json: true
}, (error, response, body) => {
if (error) {
console.log('Unable to connect to Forecast.io server.');
} else if (response.statusCode === 400) {
console.log('Unable to fetch weather.');
} else if (response.statusCode === 200) {
console.log(body.currently.temperature);
}
});
The only thing we need to do in order to take this code and convert it to create that function, which will get exported. And then we can move our call to the request inside of it. We'll make a brand new function called getWeather next to the request variable:
const request = require('request');
var getWeather = () => {
};
getWeather will take some arguments, but that'll be added later. For now we'll leave the arguments list empty. Next, we'll take our call to request and move it inside the getWeather function:
const request = require('request');
var getWeather = () => {
request({
url: 'https://api.forecast.io/forecast/4a04d1c42fd9d32c97a2c291a32d5e2d/39.9396284,-75.18663959999999',
json: true
}, (error, response, body) => {
if (error) {
console.log('Unable to connect to Forecast.io server.');
} else if (response.statusCode === 400) {
console.log('Unable to fetch weather.');
} else if (response.statusCode === 200) {
console.log(body.currently.temperature);
}
});
};
Then, we can go ahead and export this getWeather function. We'll add module.exports.getWeather and set it equal to the getWeather function that we defined up:
module.exports.getWeather = getWeather;
Now that we have this in place, we can go ahead and move into app.js to add some code. The first thing we need do is remove the API key. We no longer need that. And we'll highlight all of the commented code and uncomment it using the command /.
Now we'll import the weather.js file. We'll create a const variable called weather, and setting it equal to the require, return result:
const yargs = require('yargs');
const geocode = require('./geocode/geocode');
const weather = require('');
In this case we're requiring our brand new file we just created. We'll provide a relative path ./ because we're loading in a file that we wrote. Then we'll provide the directory named weather followed by the file named weather.js. And we can leave off that js extension, as we already know:
const weather = require('./weather/weather');
Now that we have the Weather API loaded in, we can go ahead and call it. We'll comment out our call to geocodeAddress and, we'll run weather.getWeather():
// geocode.geocodeAddress(argv.address, (errorMessage, results) => {
// if (errorMessage) {
// console.log(errorMessage);
// } else {
// console.log(JSON.stringify(results, undefined, 2));
// }
//});
weather.getWeather();
Now as I mentioned before, there will be arguments later in the section. For now we'll leave them empty. And we can run our file from the Terminal. This means we should see the weather printing for the coordinates, we hard-coded in the previous section. So, we'll run node app.js. We'll need to provide an address since we haven't commented out the yargs code. So we'll add a dummy address. I'll use a zip code in New Jersey:
node app.js -a 08822

Now, the geolocation code is never running, because that is commented out. But we are running the weather code that got moved to the new file. And we are indeed seeing a temperature 31.82 degrees, which means that the code is properly getting executed in the new file.
Now we'll need to pass in some arguments, including a callback function and inside getWeather variable in weather file. We'll need to use those arguments instead of a static lat/lng pair. And we'll also need to call the callback instead of using console.log. The first thing we'll do before we actually change the weather.js code is change the app.js code. There are three arguments to be added. These are lat, lng and callback.
First up we'll want to pass in the latitude. We'll take the static data, like the latitude part from the URL in weather.js, copy it, and paste it right inside of the arguments list in app.js as first argument. The next one will be the longitude. We'll grab that from the URL, copy it, and paste it inside of app.js as the second argument:
// lat, lng, callback
weather.getWeather(39.9396284, -75.18663959999999);
Then we can go ahead and provide the third one, which will be the callback function. This function will get fired once the weather data comes back from the API. I'll use an arrow function that will get those two arguments we discussed earlier in the previous section: errorMessage and weatherResults:
weather.getWeather(39.9396284, -75.18663959999999, (errorMessage, weatherResults) => {
});
The weatherResults object containing any sort of temperature information we want. In this case it could be the temperature and the actual temperature. Now, we have used weatherResults in place of results, and this is because, we want to differentiate weatherResults from the results variable in geocodeAddress.
Inside of the getWeather function in app.js, we now need to use if-else statements in order to print the appropriate thing to the screen, depending on whether or not the error message exists. If there is errorMessage we do want to go ahead and print it using console.log. In this case we'll pass in the errorMessage variable:
weather.getWeather(39.9396284, -75.18663959999999, (errorMessage, weatherResults) => {
if (errorMessage) {
console.log(errorMessage);
}
});
Now if there is no error message we'll use the weatherResults object. We'll be printing a nice formatted message later. For now we can simply print the weatherResults object using the pretty printing technique we talked about in the previous chapter, where we call JSON.stringify inside of console.log:
weather.getWeather(39.9396284, -75.18663959999999, (errorMessage, weatherResults) => {
if (errorMessage) {
console.log(errorMessage);
} else {
console.log(JSON.stringify());
}
});
Inside the JSON.stringify parentheses, we'll provide those three arguments, the actual object; weatherResults, undefined for our filtering function, and a number for our indentation. In this case we'll go with 2 once again:
weather.getWeather(39.9396284, -75.18663959999999, (errorMessage, weatherResults) => {
if (errorMessage) {
console.log(errorMessage);
} else {
console.log(JSON.stringify(weatherResults, undefined, 2));
}
});
And now that we have our getWeather call getting called with all three arguments, we can go ahead and actually implement this call inside of weather.js.
To get started we'll make the URL in the weather.js file dynamic, which means we need to replace the url strings with template strings. Once we have template strings in place, we can inject the arguments, latitude and longitude, right into the URL.
Let's go ahead and define all the arguments that are getting passed in. We add lat, lng, and our callback:
var getWeather = (lat, lng, callback) => {
First off let's inject that latitude. We'll take the static latitude, remove it, and between the forward slash and the comma we'll inject it using dollar with our curly braces. This lets us inject a value into our template string; in this case lat. And we can do the exact same thing right after the comma with the longitude. We'll remove the static longitude, use the dollar sign with our curly braces to inject the variable into the string:
var getWeather = (lat, lng, callback) => {
request({
url: `https://api.forecast.io/forecast/4a04d1c42fd9d32c97a2c291a32d5e2d/${lat},${lng}`,
Now that the URL is dynamic, the last thing we need to do inside of getWeather is change our console.log calls to callback calls.
To change our console.log into callback calls, for the first two console.log calls we can replace console.log with callback. And this will line up with the arguments that we specified in app.js, where the first one is the errorMessage and the second one is the weatherResults. In this case we'll pass the errorMessage back and the second argument is undefined, which it should be. We can do the same thing for Unable to fetch weather:
if (error) {
callback('Unable to connect to Forecast.io server.');
} else if (response.statusCode === 400) {
callback('Unable to fetch weather.');
}
Now the third console.log call will be a little more complex. We'll have to actually create an object instead of just passing the temperature back. We'll call the callback with the first argument being undefined, because in this case there is no errorMessage. Instead we'll provide that weatherResults object:
if (error) {
callback('Unable to connect to Forecast.io server.');
} else if (response.statusCode === 400) {
callback('Unable to fetch weather.');
} else if (response.statusCode === 200) {
callback(undefined, {
})
console.log(body.currently.temperature);
}
Inside the parentheses, we can define all the temperature properties we like. In this case we'll define temperature, setting it equal to body.currently, which stores all of the currently weather data, .temperature:
else if (response.statusCode === 200) {
callback(undefined, {
temperature: body.currently.temperature
})
console.log(body.currently.temperature);
}
Now that we have the temperature variable we can go ahead and provide that second property to the object, which is actual temperature. Actual temperature will account for things like humidity, wind speed, and other weather conditions. The actual temperature data is available under a property on currently called apparentTemperature. We'll provide that. And as the value we'll use the same thing. This gets us to the currently object, just like we do for temperature. This will be body.currently.apparentTemperature:
else if (response.statusCode === 200) {
callback(undefined, {
temperature: body.currently.temperature,
apparentTemperature: body.currently.apparentTemperature
})
console.log(body.currently.temperature);
}
Now we have our two properties, so we can go ahead and remove that console.log statement. Add a semicolon. The final code will look like:
const request = require('request');
var getWeather = (lat, lng, callback) => {
request({
url: `https://api.forecast.io/forecast/4a04d1c42fd9d32c97a2c291a32d5e2d/${lat},${lng}`,
json: true
}, (error, response, body) => {
if (error) {
callback('Unable to connect to Forecast.io server.');
} else if (response.statusCode === 400) {
callback('Unable to fetch weather.');
} else if (response.statusCode === 200) {
callback(undefined, {
temperature: body.currently.temperature,
apparentTemperature: body.currently.apparentTemperature
});
}
});
};
module.exports.getWeather = getWeather;
Now we can go ahead and run the app. We have our getWeather function wired up both inside of the weather.js file and inside of app.js. Now once again we are still using static coordinates, but this will be the last time we run the file with that static data. From the Terminal we'll rerun the application:

And as shown we get our temperature object printing to the screen. We have our temperature property 48.82 and we have the apparentTemperature, which is already at 47.42 degrees.
With this in place we're now ready to learn how to chain our callbacks together. That means in app.js we'll take the results that come back from geocodeAddress, pass them in to getWeather, and use that to print dynamic weather for the address you provide over here in the Terminal. In this case we would get the address for the town in New Jersey. As opposed to the static address which we're using in the app.js file that latitude/longitude pair is for Philadelphia.
To get started we have to take our getWeather call and actually move it inside of the callback function for geocodeAddress. Because inside this callback function is the only place we have access to the latitude and longitude pairs.
Now if we open the geocode.js file, we can see that we get formatted_address back as the address property, we get the latitude back as latitude, and we get longitude back as longitude. We'll start wiring this up.
First, we do need to remove the comments of geocodeAddress in the app.js.
Next, we'll go ahead and take the console.log statement in the success case and replace it with a console.log call that will print the formatted address:
geocode.geocodeAddress(argv.address, (errorMessage, results) => {
if (errorMessage) {
console.log(errorMessage);
} else {
console.log(results.address);
}
});
This will print the address to the screen, so we know exactly what address we're getting weather data for.
Now that we have our console.log printing the address, we can take the getWeather call, and move it right below the console.log line:
geocode.geocodeAddress(argv.address, (errorMessage, results) => {
if (errorMessage) {
console.log(errorMessage);
} else {
console.log(results.address);
weather.getWeather(39.9396284, -75.18663959999999,
(errorMessage, weatherResults) => {
if (errorMessage) {
console.log(errorMessage);
} else {
console.log(JSON.stringify(weatherResults, undefined, 2));
}
});
}
});
And with this in place we're now really close to actually chaining the two callbacks together. All that's left to do is take these static coordinates and replace them with the dynamic ones, which will be available in the results object.
The first argument will be results.latitude, which we defined in app.js on the object. And the second one will be results.longitude:
geocode.geocodeAddress(argv.address, (errorMessage, results) => {
if (errorMessage) {
console.log(errorMessage);
} else {
console.log(results.address);
weather.getWeather(results.latitude, results.longitude,
(errorMessage, weatherResults) => {
if (errorMessage) {
console.log(errorMessage);
} else {
console.log(JSON.stringify(weatherResults, undefined, 2));
}
});
}
});
This is all we need to do to take the data from geocodeAddress and pass it in to getWeather. This will create an application that prints our dynamic weather, the weather for the address in the Terminal.
Now before we go ahead and run this, we'll replace the object call with a more formatted one. We'll take both of the pieces of information-the temperature variable and the apparentTemperature variable from weather.js file, and use them in that string in app.js. This means that we can remove the console.log in the else block of getWeather call, replacing it with a different console.log statement:
if (errorMessage) {
console.log(errorMessage);
} else {
console.log();
}
We'll use template strings, since we plan to inject a few variables in; these're currently, followed by the temperature. We'll inject that using weatherResults.temperature. And then we can go ahead and put a period, and add something along the lines of: It feels like, followed by the apparentTemperature property, which I'll inject using weatherResults.apparentTemperature. I'll put a period after that:
if (errorMessage) {
console.log(errorMessage);
} else {
console.log(`It's currently ${weatherResults.temperature}. It feels like
${weatherResults.apparentTemperature}`);
}
We now have a console.log statement that prints the weather to the screen. We also have one that prints the address to the screen, and we have error handlers for both geocodeAddress and getWeather.
Let's go ahead and test this by rerunning the node app.js command in the Terminal. We'll use the same zip code, 08822:
node app.js -a 08822

When we run it we get Flemington, NJ as the formatted address and It's currently is 31.01. It feels like 24.9. Now to test that this is working we'll type in something else inside of quotes, something like Key West fl:
node app.js -a 'Key West fl'

And when we run this command we do get Key West, FL as shown as the formatted address, and It's currently 64.51. It feels like 64.52.
With this in place, the weather application is now wired up. We take the address we get the latitude/longitude pair using the Google Geocoding API. Then we use our forecast API to take that latitude/longitude pair and convert it into temperature information.
In this chapter, we learned about how to set up yargs for the weather-app file and how to include user input in it. Next, we looked into how to handle errors inside of our callback functions and how to recover from those errors. We simply added else/if statements inside of the callback function. Callbacks are just one function, so in order to figure out if things went well or if things didn't go well, we have to use else/if statements, this lets us do different things, such as print different messages, depending on whether or not we perceive the request to have gone well. Then, we made our first request to the weather API, and we looked into a way to fetch the weather based off of the latitude-longitude combination.
Last, we looked in chaining the geocodeAddress and getWeather call functions. We took that request call that was originally in app.js, and we moved it into weather.js, defining it there. We used a callback to pass the data from weather.js into app.js where we imported the weather.js file. Then, inside of the callback for geocodeAddress we call getWeather and inside of that callback we printed the weather specific information to the screen. This was all done using callback functions.
In the next chapter, we'll talk about a different way we can synchronize our asynchronous code using ES6 promises.
In the previous two chapters, we looked at many important concepts of asynchronous programming in Node. This chapter is about promises. Promises are available in JavaScript since ES6. Although they have been around in third-party libraries for quite some time, they finally made their way into the core JavaScript language, which is great because they're a really fantastic feature.
In this chapter, we'll learn about how promises work, we'll start to understand exactly why they're useful, and why they've even come to exist inside JavaScript. We'll take a look at a library called axios that supports promises. This will let us simplify our code, creating our promise calls easily. We'll actually rebuild an entire weather app in the last section.
Specifically, we'll look into following topics:
Promises aim to solve a lot of the problems that come up when we have a lot of asynchronous code in our application. They make it a lot easier to manage our asynchronous computations—things such as requesting data from a database. Alternatively, in the case of a weather app, things such as fetching data from a URL.
In the app.js file we do a similar thing using callbacks:
const yargs = require('yargs');
const geocode = require('./geocode/geocode');
const weather = require('./weather/weather');
const argv = yargs
.options({
a: {
demand: true,
alias: 'address',
describe: 'Address to fetch weather for',
string: true
}
})
.help()
.alias('help', 'h')
.argv;
geocode.geocodeAddress(argv.address, (errorMessage, results) => {
if (errorMessage) {
console.log(errorMessage);
} else {
console.log(results.address);
weather.getWeather(results.latitude, results.longitude, (errorMessage, weatherResults) => {
if (errorMessage) {
console.log(errorMessage);
} else {
console.log(`It's currently ${weatherResults.temperature}. It feels like ${weatherResults.apparentTemperature}.`);
}
});
}
});
In this code, we have two callbacks:
We use this to manage our asynchronous actions. In our case, it's things such as fetching data from an API, using an HTTP request. We can use promises in this example to make the code a lot nicer. This is exactly the aim later in the chapter.
In this section, we'll explore the basics concept of promises. We'll compare and contrast callbacks with promises just yet, because there's a lot more subtleties than can be described without knowing exactly how promises work. So, before we talk about why they're better, we will simply create some.
In the Atom, inside the playground folder, we'll create a new file and call it promise.js. Before we define promises and talk about exactly how they work, we will run through a simple example because that is the best way to learn just about anything—going through an example and seeing how it works.
To get started, we'll work through a very basic example. We'll stick to the core promise features.
To get started with this very simple example, we'll make a variable called somePromise. This will eventually store the promise object. We'll be calling various methods on this variable to do something with the promise. We'll set the somePromise variable equal to the return result from the constructor function for promises. We'll use the new keyword to create a new instance of a promise. Then, we'll provide the thing we want to create a new instance of, Promise, as shown here:
var somePromise = new Promise
Now this Promise function, which is indeed a function—we have to call it like one; that is, it takes one argument. This argument will be a function. We'll use an anonymous arrow function (=>), and inside it, we'll do all of the asynchronous stuff we want to do:
var somePromise = new Promise(() => {
});
It will all be abstracted, kind of like we abstract the HTTP request inside the geocodeAddress function in the geocode.js file:
const request = require('request');
var geocodeAddress = (address, callback) => {
var encodedAddress = encodeURIComponent(address);
request({
url: `https://maps.googleapis.com/maps/api/geocode/json?address=${encodedAddress}`,
json: true
}, (error, response, body) => {
if (error) {
callback('Unable to connect to Google servers.');
} else if (body.status === 'ZERO_RESULTS') {
callback('Unable to find that address.');
} else if (body.status === 'OK') {
callback(undefined, {
address: body.results[0].formatted_address,
latitude: body.results[0].geometry.location.lat,
longitude: body.results[0].geometry.location.lng
});
}
});
};
module.exports.geocodeAddress = geocodeAddress;
All of the complex logic in the geocodeAddress function does indeed need to happen, but the app.js file doesn't need to worry about it. The geocode.geocodeAddress function in the app.js file has a very simple if statement that checks whether there's an error. If there is an error, we will print a message, and if there's not, we move on. The same thing will be true with promises.
The new Promise callback function will get called with two arguments, resolve and reject:
var somePromise = new Promise((resolve, reject) => {
});
This is how we'll manage the state of our promise. When we make a promise, we're making a promise; we're saying, "Hey, I'll go off and I'll fetch that website data for you." Now this could go well, in which case, you will resolve the promise, setting its state to fulfilled. When a promise is fulfilled, it's gone out and it's done the thing you've expected it to do. This could be a database request, an HTTP request, or something else completely.
Now when you call reject, you're saying, "Hey, we tried to get that thing done man, but we just could not." So the promise has been considered rejected. These are the two states that you can set a promise to—fulfilled or rejected. Just like inside geocode.js, we either provide one argument for an error, or we provide the second argument if things went well. Instead of doing that though, promises give us two functions we can call.
Now, in order to illustrate exactly how we can use these, we'll call resolve. Once again, this is not asynchronous. We're not doing anything quite yet. So all of this will happen essentially in real time, as far as you see in Terminal. We'll call resolve with some data. In this case, I'll pass in a string, Hey. It worked!, as shown here:
var somePromise = new Promise((resolve, reject) => {
resolve('Hey. It worked!');
});
Now this string is the value the promise was fulfilled with. This is exactly what someone will get back. In case of the geocode.geocodeAddress function in app file, it could be the data, whether it's the results or the error message. In our case though, we're using resolve, so this will be the actual data the user wanted. When things go well, Hey. It worked! is what they expect.
Now in order to actually do something when the promise gets either resolved or rejected, we need to call a promise method called then; somePromise.then. The then method lets us provide callback functions for both success and error cases. This is one of the areas where callbacks differ from promises. In a callback, we had one function that fired no matter what, and the arguments let us know whether or not things went well. With promises we'll have two functions, and this will be what determines whether or not things went as planned.
Now before we dive into adding two functions, let's start with just one. Right here, I'll call then, passing in one function. This function will only get called if the promise gets fulfilled. This means that it works as expected. When it does, it will get called with the value passed to resolve. In our case, it's a simple message, but it can be something like a user object in the case of a database request. For now though, we'll stick with message:
somePromise.then((message) => {
})
This will print message to the screen. Inside the callback, when the promise gets fulfilled we'll call console.log, printing Success, and then as a second argument, we'll print the actual message variable:
somePromise.then((message) => {
console.log('Success: ', message);
})
Now that we have a very basic promise example in place, let's run it from the Terminal using nodemon, which we installed in the previous chapter. We'll add nodemon, and then we'll go into the playground folder, /promise.js:

When we do this right away, our app runs and we get success. Hey. It worked! This happens instantaneously. There was no delay because we haven't done anything asynchronously. Now when we first explored callbacks (refer to Chapter 5, Basics of Asynchronous Programming in Node.js ), we used setTimeout to simulate a delay, and this is exactly what we'll do in this case.
Inside our somePromise function, we'll call setTimeout, passing in the two arguments: the function to call after the delay and the delay in milliseconds. I'll go with 2500, which is 2.5 seconds:
var somePromise = new Promise((resolve, reject) => {
setTimeout(() => {
}, 2500);
Now after those 2.5 seconds are up, then, and only then, do we want to resolve the promise. This means that our function, the one we pass into then will not get called for 2.5 seconds. Because, as we know, this will not get called until the promise resolves. I'll save the file, which will restart nodemon:

In Terminal, you can see we have our delay, and then success: Hey it worked! prints to the screen. This 2.5 second delay was caused by this setTimeout. After the delay was up (in this case it's an artificial delay, but later it'll be a real delay), we're able to resolve with the data.
Now there's a chance that things didn't go well. We have to handle errors inside our Node applications. In that case, we wouldn't call resolve, we would call reject. Let's comment out the resolve line, and create a second one, where we call reject. We'll call reject much the same way we called resolve. We have to pass in one argument, and in this case, a simple error message like Unable to fulfill promise will do:
var somePromise = new Promise((resolve, reject) => {
setTimeout(() => {
// resolve('Hey. It worked!');
reject('Unable to fulfill promise');
}, 2500);
});
Now when we call reject, we're telling the promise that it has been rejected. This means that the thing we tried to do did not go well. Currently, we don't have an argument that handles this. As we mentioned, this function only gets called when things go as expected, not when we have errors. If I save the file and rerun it in Terminal, what we'll get is a promise that rejects:

However, we don't have a handler for it, so nothing will print to the screen. This will be a pretty big problem. We need to do something with that error message. Maybe we will alert the user, or we will try some other code.
As shown in the previous code output, we can see that nothing printed between the restarting and exiting. In order to do something with the error, we'll add a second argument to the then method. This second argument is what lets us handle errors in our promises. This argument will get executed and called with that value. In this case, it's our message. We'll create an argument called errorMessage, as shown here:
somePromise.then((message) => {
console.log('Success: ', message);
}, (errorMessage) => {
});
Inside the argument, we can do something with that. In this case, we'll print it to the screen using console.log, printing Error with a colon and a space to add some nice formatting, followed by the actual value that was rejected:
}, (errorMessage) => {
console.log('Error: ', errorMessage);
});
Now that we have this in place, we can refresh things by saving the file. We will now see our error message in Terminal, because we now have a place for it to do something:

Here, we have a place for it to print the message to the screen; Unable to fulfill promise prints to the screen, which works exactly as expected.
We now have a promise that can either get resolved or rejected. If it gets resolved, meaning the promise was fulfilled, we have a function that handles that. If it gets rejected, we have a function that handles that as well. This is one of the reasons why promises are awesome. You get to provide different functions, depending on whether or not the promise got resolved or rejected. This lets you avoid a lot of complex if statements inside of our code, which we needed to do in app.js to manage whether or not the actual callback succeeded or failed.
Now inside a promise, it's important to understand that you can only either resolve or reject a promise once. If you resolve a promise you can't reject it later, and if you resolve it with one value you can't change your mind at a later point in time. Consider this example, where I have a code like the following code; here I resolve first and then I reject:
var somePromise = new Promise((resolve, reject) => {
setTimeout(() => {
resolve('Hey. It worked!');
reject('Unable to fulfill promise');
}, 2500);
});
somePromise.then((message) => {
console.log('Success: ', message);
}, (errorMessage) => {
console.log('Error: ', errorMessage);
});
In this case, we'll get our success message printing to the screen. We'll never see errorMessage, because, as I just said, you can only do one of these actions once. You can either resolve once or you can reject once. You can't do both; you can't do either twice.
This is another great advantage over callbacks. There's nothing preventing us from accidentally calling the callback function twice. Let's consider the geocode.js file for example. Let's add another line in the if block of geocode request call, as shown here:
const request = require('request');
var geocodeAddress = (address, callback) => {
var encodedAddress = encodeURIComponent(address);
request({
url: `https://maps.googleapis.com/maps/api/geocode/json?address=${encodedAddress}`,
json: true
}, (error, response, body) => {
if (error) {
callback('Unable to connect to Google servers.');
callback();
This is a more obvious example, but it could easily be hidden inside of complex if-else statements. In this case, our callback function in app.js will indeed get called twice, which can cause really big problems for our program. Inside the promise example this callback will never get called twice, no matter how many times you try to call resolve or reject, this function will only get fired once.
We can prove that right now by calling resolve again. In the promise example case, let's save the file with the following changes:
var somePromise = new Promise((resolve, reject) => {
setTimeout(() => {
resolve('Hey. It worked!');
resolve();
reject('Unable to fulfill promise');
}, 2500);
});
Now, let's refresh things; we'll resolve with our message, Hey. It worked! and we'll never ever have the function fired a second time with no message. Because, as we said, the promise is already resolved. Once you set a promise's state to either fulfilled or rejected, you can't set it again.
Now before a promise's resolve or reject function gets called, a promise is in a state known as pending. This means that you're waiting for information to come back, or you're waiting for your async computation to finish. In our case, while we're waiting for the weather data to come back, the promise would be considered pending. A promise is considered settled when it has been either fulfilled or rejected.
No matter which one you chose, you could say the promise has settled, meaning that it's no longer pending. In our case, this would be a settled promise that was indeed fulfilled because resolve is called right here. So these are just a couple of the benefits of promises. You don't have to worry about having callbacks called twice, you can provide multiple functions—one for success handling and one for error handling. It really is a fantastic utility!
Now that we've gone through a quick example of how promises work, going over just the very fundamentals, we'll to move on to something slightly more complex.
In this section, we'll explore two more ways to use promises. We'll create functions that take input and return a promise. Also, we'll explore promise chaining, which will let us combine multiple promises.
Now the problem with the example we discussed in the previous section is that we have a promise function, but it doesn't take any input. This most likely is never going to be the case when we're using real-world promises. We'll want to provide some input, such as the ID of a user to fetch from the database, a URL to request, or a partial URL, for example, just the address component.
In order to do this, we'll have to create a function. For this example, we'll make a variable, which will be a function called asyncAdd:
var asyncAdd = () => {
}
This will be a function that simulates the async functionality using setTimeout. In reality, it's just going to add two numbers together. However, it will illustrate exactly what we need to do, later in this chapter, to get our weather app using promises.
Now in the function, we will take two arguments, a and b, and we'll return a promise:
var asyncAdd = (a, b) => {
};
So, whoever calls this asyncAdd method, they can pass in input, but they can also get the promise back so that they can use then to sync up and wait for it to complete. Inside the asyncAdd function, we'll use return to do this. We'll return the new Promise object using the exact same new Promise syntax we did when we created the somePromise variable. Now this is the same function, so we do need to provide the constructor function that gets called with both resolve and reject, just like this:
var asyncAdd = (a, b) => {
return new Promise((resolve, reject) => {
});
Now we have an asyncAdd function, which takes two numbers and returns a promise. The only thing left to do is to actually simulate the delay, and make the call to resolve. To do this, we'll simulate the delay using setTimeout. Then we'll pass in my callback function, setting the delay to 1.5 seconds, or 1500 milliseconds:
return new Promise((resolve, reject) => {
setTimeout(() => {
}, 1500)
});
In the callback function, we'll write a simple if-else statement that will check if the type of both a and b is a number. If it is, great! We'll resolve the value of the two numbers added. If they're not numbers (one or more), then we'll reject. To do this, we'll use the if statement with the typeof operator:
setTimeout(() => {
if (typeof a === 'number')
}, 1500);
Here, we're using the typeof object to get the string type before the variable. Also, we're checking whether it's equal to a number, which is what will come back from typeof when we have a number. Now similar to a, we'll add typeof b, which is also a number:
if (typeof a === 'number' && typeof b === 'number') {}
We can add the two numbers up, resolving the value. Inside the code block of the if statement, we'll call resolve, passing in a + b:
return new Promise((resolve, reject) => {
setTimeout(() => {
if (typeof a === 'number' && typeof b === 'number') {
resolve(a + b);
}
}, 1500);
This will add the two numbers up, passing in one argument to resolve. Now this is the happy path when both a and b are indeed numbers. If things don't go well, we'll want to add reject. We'll use the else block to do this. If the previous condition fails, we'll reject by calling reject('Arguments must be numbers'):
if (typeof a === 'number' && typeof b === 'number') {
resolve(a + b);
} else {
reject('Argumets must be numbers');
}
Now we have an asyncAdd function that takes two variables, a and b, returns a promise, and anyone who happens to call asyncAdd can add a then call onto the return result to get that value.
Now what exactly will this look like? To show this, first we'll comment out all of the code we have in the newPromise variable of promise.js. Following this, we'll call the asyncAdd variable where we make asyncAdd. We'll call it like we would any other function, by passing in two values. Remember, this could be a database ID or anything else for an async function. In our case, it's just two numbers. Let's say, 5 and 7. Now the return value from this function is a promise. We can make a variable and call then on that variable, but we can also just tack the then method, as shown here:
asyncAdd(5, 7).then
This is exactly what we'll do when we use promises; we'll tack on then, passing in our callbacks. The first callback being the success case, and the second one being the error case:
ouldasyncAdd(5, 7).then(() => {
}, () => {
});
In the second callback, we'll get our errorMessage, which we can log to the screen using the console.log(errorMessage); statement, as shown here:
asyncAdd(5, 7).then(() => {
}, (errorMessage) => {
console.log(errorMessage);
});
If one or more of the numbers are not actually numbers, the error function will fire because we called reject. If both are numbers, all we'll do will get the result and print it to the screen, using console.log. We'll add res and inside the arrow function (=>), we'll add the console.log statement and print the string Result with a colon. Then, as the second argument in console.log, we'll pass in the actual number, which will print it to the screen as well:
asyncAdd(5, 7).then(() => {
console.log('Result:', res);
}, (errorMessage) => {
console.log(errorMessage);
});
Now that we have our promise asyncAdd function in place, let's test this out inside Terminal. To do this, we'll run nodemon to start up nodemon playground/promise.js:
Right away, we'll get the delay and the result, 12 prints to the screen. This is fantastic! We are able to create the function that takes the dynamic input, but still returns a promise.
Now notice that we've taken an async function that usually requires callbacks and we've wrapped it to use promises. This is a good handy feature. As you start using promises in Node, you'll come to realize that some things do not support promises and you'd like them to. For example, the request library that we used to make our HTTP requests does not support promises natively. However, we can wrap our request call inside of a promise, which is what we'll to do later in the section. For now though, we have a basic example illustrating how this works. Next, we'd like to talk about promise chaining.
Promise chaining is the idea of having multiple promises run in a sequence. For example, I want to take an address and convert that into coordinates, and take those coordinates and convert them into weather information; this is an example of needing to synchronize two things. Also, we can do that really easily using promise chaining.
In order to chain our promises, inside our success call we'll return a new promise. In our example, we can return a new promise by calling asyncAdd again. I'll call asyncAdd next to the res and console.log statements, passing in two arguments: the result, whatever the previous promise has returned, and some sort of new number; let's use 33:
asyncAdd(5, 7).then((res) => {
console.log('Result:', res);
return asyncAdd(res, 33);
Now we're returning a promise so we can add my chaining onto it by calling the then method again. The then method will to get called after we close the closing parenthesis for our previous then method. This will also take one or more arguments. We can pass in a success handler, which will be a function and an error handler, which will also be a function:
asyncAdd(5, 7).then((res) => {
console.log('Result:', res);
return asyncAdd(res, 33);
}, (errorMessage) => {
console.log(errorMessage);
}).then(() => {
}, () => {
})
Now that we have our then callbacks set up, we can actually fill them out. Once again we will get a result; this will be the result of 5 plus 7, which is 12, plus 33, which will be 45. Then, we can print console.log ('Should be 45'). Next, we'll print the actual value from results variable:
}).then((res) => {
console.log('Should be 45', res);
}, () => {
});
Now our error handler will also be the same. We'll have errorMessage and we'll print it to the screen using the console.log, printing errorMessage:
}).then((res) => {
console.log('Should be 45', res);
}, (errorMessage) => {
console.log(errorMessage);
});
Now what we have is some chaining. Our first then callback functions will fire based on the result of our first asyncAdd call. If it goes well, the first one will fire. If it goes poorly, the second function will fire. Our second then call will be based on the asyncAdd call, where we add 33. This will let us chain the two results together, and we should get 45 printing to the screen. We'll save this file, which will restart things inside nodemon. Eventually, we'll get our two results: 12 and our Should be 45. As shown in the following code image, we get just that, Result: 12 and Should be 45, printing to the screen:

Now when it comes to error handling, there are a few quirks; so, we'll simulate some errors. First up, let's simulate an error in our second asyncAdd call. We know we can do that by passing in a value that's not a number. In this case, let's wrap 33 inside quotes:
asyncAdd(5, 7).then((res) => {
console.log('Result:', res);
return asyncAdd(res, '33');
}, (errorMessage) => {
console.log(errorMessage);
}).then((res) => {
console.log('Should be 45', res);
}, (errorMessage) => {
concole.log(errorMessage);
})
This will be a string and our call should reject. Now we can save the file and see what happens:

We get Result: 12, then we get our error, Arguments must be numbers. Exactly as we expect, this is printing on the screen. Instead of getting Should be 45, we get our error message.
But things get a little trickier when something earlier on in the promise chain gets rejected. Let's swap '33' with the number 33. Then let's replace 7 with the string '7', as shown here:
asyncAdd(5, '7').then((res) => {
console.log('Result:', res);
return asyncAdd(res, 33);
}, (errorMessage) => {
console.log(errorMessage);
}).then((res) => {
console.log('Should be 45', res);
}, (errorMessage) => {
concole.log(errorMessage);
})
This will cause our first promise to fail, which means we'll never see the result. We should see the error message printing to the screen, but that's not what will happen:

When we restart, we do indeed get the error message printing to the screen, but then we also get Should be 45 undefined. The second then console.log is running because we provided an error handler in the second asyncAdd function. It's running the error handler. Then it says, Okay, things must be good now we ran the error handler. Let's move on to the next then call calling the success case.
To fix the error, we can remove both of our error handlers from both the then calls, and replace them with a call at the very bottom, to a different method, which we'll call .catch:
asyncAdd(5, '7').then((res) => {
console.log('Result:', res);
return asyncAdd(res, 33);
}).then((res) => {
console.log('Should be 45', res);
}).catch;
The catch promise method is similar to then, but it just takes one function. This is the error handler. As shown in the following code, we can specify one error handler if any of our promise calls fail. We'll take errorMessage and print it to the screen using console.log(errorMessage):
asyncAdd(5, '7').then((res) => {
console.log('Result:', res);
return asyncAdd(res, 33);
}).then((res) => {
console.log('Should be 45', res);
}).catch((errorMessage) => {
console.log(errorMessage)
});
For now though, if things are a little blurry that is okay, as long as you're starting to see exactly what we're doing. We're taking the result from one promise and passing it to a different one. In this case, the result works exactly as expected. The first promise fails, we get, Arguments must be numbers printing to the screen. Also, we don't get that broken statement where we try to print 45, but we get undefined instead. Using catch, we can specify an error handler that will fire for all of our previous failures. This is exactly what we want.
Now as I mentioned earlier, some libraries support promises while others don't. The request library does not support promises. We will make a function that wraps request, returning a promise. We'll use some functionalities from the geocode.js file from the previous chapter.
First, let's discuss a quick setup, and then we'll actually fill it out. In the playground folder, we can make a new file to store this, called promise-2.js:
We'll make a function called geocodeAddress. The geocodeAddress function will take the plain text address, and it will return a promise:
var geocodeAddress = (address) => {
};
The geocodeAddress function will return a promise. So if I pass in a ZIP code, such as 19146, I would expect a promise to come back, which I can attach a then call to. This will let me wait for that request to finish. Right here, I'll tack on a call to then, passing in my two functions: the success handler for when the promise is fulfilled and the error handler for when the promise is rejected:
geocodeAddress('19146').then(() => {
}, () => {
})
Now when things go well, I'll expect the location object with the address, the latitude, and the longitude, and when things go poorly, I'll expect the error message:
geocodeAddress('19146').then((location) => {
}, (errorMessage) => {
})
When the error message happens, we'll just print it to the screen using console.log (errorMessage). For now, when things go well and the success case runs, we'll just print that entire object using our pretty printing technique, console.log. Then, we'll call JSON.stringify, like we've done many times before, passing in the three arguments—the object, undefined for the filter method—which we'll never use in the book, and the number 2 for the number of spaces we'd like to use as our indentation:
geocodeAddress('19146').then((location) => {
console.log(JSON.stringify(location, undefined, 2));
}, (errorMessage) => {
console.log(errorMessage);
});
This is what we want to create, the function that lets this functionality work as expected. This then call should work as shown in the previous code.
To get started I'll return the promise by calling: return new Promise, passing in my constructor function:
var geocodeAddress = (address) => {
return new Promise(() => {
});
};
Inside the function, we'll add that call to request. Let's provide the resolve and reject arguments:
return new Promise((resolve, reject) => {
});
};
Now that we have our Promise set up, we can load in the request module on top of the code, creating a constant called request and setting that equal to the return result from require('request'):
const request = require('request');
var geocodeAddress = (address) => {
Next, we'll move into the geocode.js file, grab code inside the geocodeAddress function, and move it over into promise-2 file, inside of the constructor function:
const request = require('request');
var geocodeAddress = (address) => {
return new Promise((resolve, reject) => {
var encodedAddress = encodeURIComponent(address);
request({
url: `https://maps.googleapis.com/maps/api/geocode/json?address=${encodedAddress}`,
json: true
}, (error, response, body) => {
if (error) {
callback('Unable to connect to Google servers.');
} else if (body.status === 'ZERO_RESULTS') {
callback('Unable to find that address.');
} else if (body.status === 'OK') {
callback(undefined, {
address: body.results[0].formatted_address,
latitude: body.results[0].geometry.location.lat,
longitude: body.results[0].geometry.location.lng
});
}
});
});
};
Now we are mostly good to go; we only need to change a few things. The first thing we need to do is to replace our error handlers. In the if block of the code, we have called our callback handler with one argument; instead, we'll call reject, because if this code runs, we want to reject the promise. We have the same thing in the next else block. We'll call reject if we get ZERO_RESULTS. This is indeed a failure, and we do not want to pretend we succeeded:
if (error) {
reject('Unable to connect to Google servers.');
} else if (body.status === 'ZERO_RESULTS') {
reject('Unable to find that address.');
Now in the next else block, this is where things did go well; here we can call resolve. Also, we can remove the first argument, as we know resolve and reject only take one argument:
if (error) {
reject('Unable to connect to Google servers.');
} else if (body.status === 'ZERO_RESULTS') {
reject('Unable to find that address.');
} else if (body.status === 'OK') {
resolve(
We are able to specify multiple values though, because we resolve an object with properties on it. Now that we have this in place, we are done. We can actually save our file, rerun it inside Terminal, and test things out.
To test, we'll save the file, move into Terminal, and shut down nodemon for the promise.js file. We'll run node for the promise.js file. It's in the playground folder, and it's called promise-2.js:
node playground/promise-2.js
Now, when we run this program, we're actually making that HTTP request. As shown in the following code output, we can see the data comes back exactly as we expected:

We get our address, latitude, and longitude variables. This is fantastic! Now let's test to see what happens when we pass in an invalid address, something like 5 zeroes, which we've used before to simulate an error:
const request = require('request');
var geocodeAddress = (address) => {
return new Promise((resolve, reject) => {
var encodedAddress = encodeURIComponent(address);
request({
url: `https://maps.googleapis.com/maps/api/geocode/json?address=${encodedAddress}`,
json: true
}, (error, response, body) => {
if (error) {
reject('Unable to connect to Google servers.');
} else if (body.status === 'ZERO_RESULTS') {
reject('Unable to find that address.');
} else if (body.status === 'OK') {
resolve({
address: body.results[0].formatted_address,
latitude: body.results[0].geometry.location.lat,
longitude: body.results[0].geometry.location.lng
});
}
});
});
};
We'll save the file, rerun the program, and Unable to find that address. prints to the screen:

This happens only because we call reject. We will call reject inside of the Promise constructor function. We have our error handler, which prints the message to the screen. This is an example of how to take a library that does not support promises and wrap it in a promise, creating a promise ready function. In our case, that function is geocodeAddress.
In this section, we'll learn how to use a library that has promises built in. We'll explore the axios library, which is really similar to request. Although, instead of using callbacks as request does, it uses promises. So we don't have to wrap our calls in promises to get that promise functionality. We'll actually be recreating the entire weather app in this section. We'll only have to write about 25 lines of code. We'll go through the entire process: taking the address, getting the coordinates, and then fetching the weather.
To fetch weather app code from the app.js file, we'll duplicate app.js, because we configure yargs in the original app.js file and we'll want to carry the code over to the new project. There's no need to rewrite it. In the weather directory, we'll duplicate app.js, giving it a new name, app-promise.js.
Inside app-promise.js, before we add anything, let's rip some stuff out. We'll be ripping out the geocode and weather variable declarations. We'll not be requiring any files:
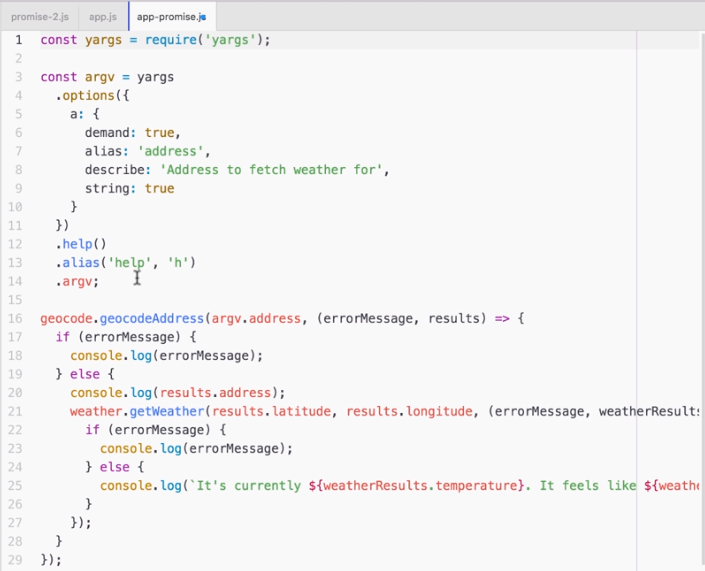
Then I'll remove everything after our yargs configuration, which in this case is just our call to geocodeAddress. The resultant code will look like the following:
const yargs = require('yargs');
const argv = yargs
.options({
a: {
demand: true,
alias: 'address',
describe: 'Address to fetch weather for',
string: true
}
})
.help()
.alias('help', 'h')
.argv;
Now that we have a clean slate, we can get started by installing the new library. Before we run the npm install command, we'll see where we can find the documentation. We can get it by visiting: https://www.npmjs.com/package/axios. As shown in the following screenshot, we have the axios npm library page, where we can view all sorts of information about it, including the documentation:
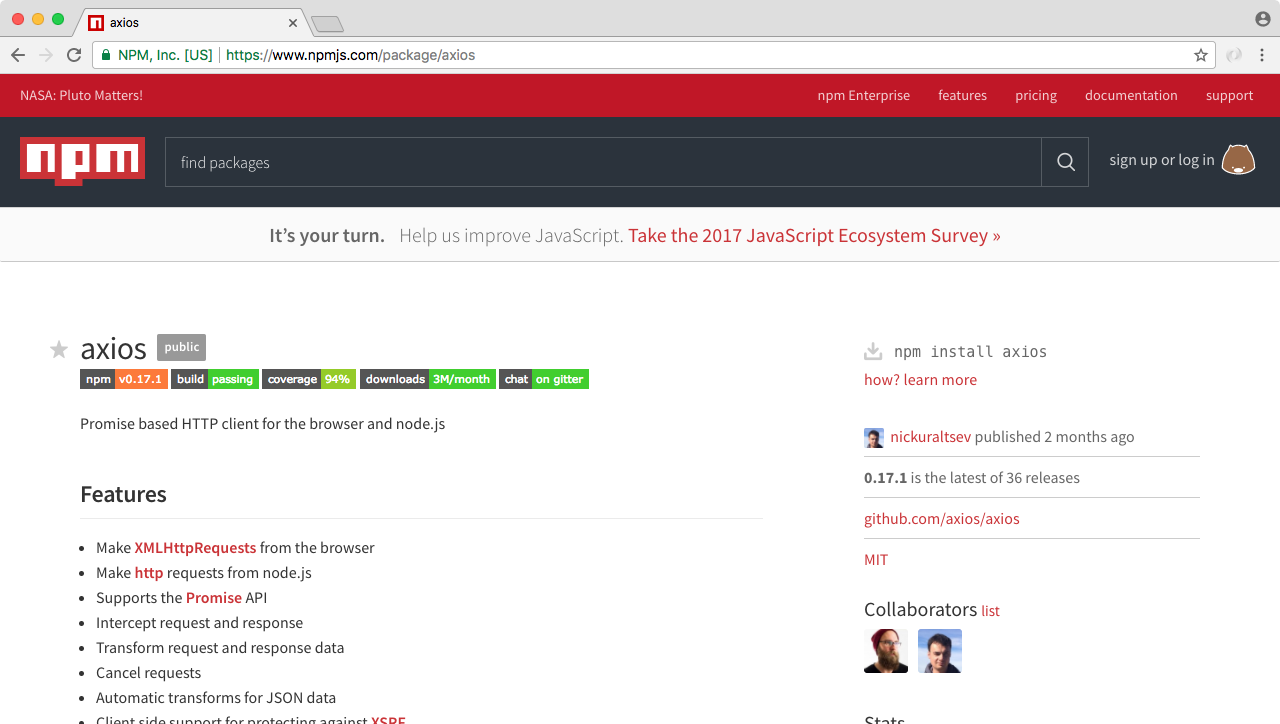
Here we can see some things that look familiar. We have calls to then and catch, just like we do when we use promises outside of axios:
Inside the stats column of this page, you can see that this is a super popular library. The most recent version is 0.13.1. This is the exact version we'll be using. Feel free to go to this page when you use axios in your projects. There are a lot of really good examples and documentation. For now though, we can install it.
To install axios, inside Terminal, we'll be running npm install; the library name is axios, and we'll specify the version 0.17.1 with the save flag updating the package.json file. Now I can run the install command, to install axios:
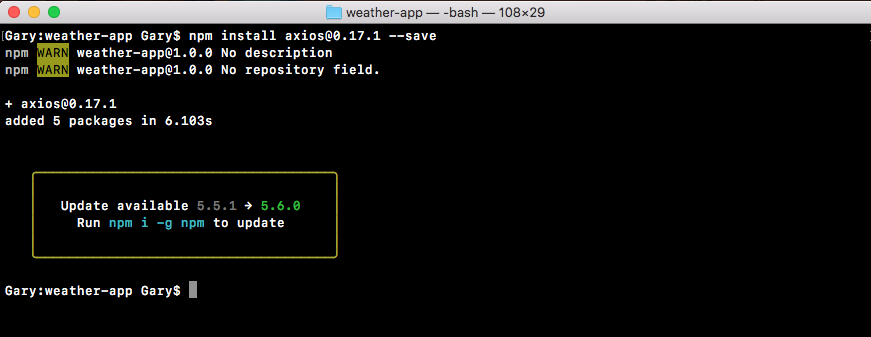
Inside our app-promise file, we can get started by loading in axios at the top. We'll make a constant called axios, setting it equal to require('axios'), as shown here:
const yargs = require('yargs');
const axios = require('axios');
Now that we have this in place, we can actually start making the calls in the code. This will involve us pulling out some of the functionality from the geocode and weather files. So we'll open up the geocode.js and weather.js files. Because we will be pulling some of the code from these files, things such as the URL and some of the error handling techniques. Although we'll talk about the differences as they come up.
The first thing we need to do is to encode the address and get the geocode URL. Now this stuff happens inside geocode.js. So we'll actually copy the encodedAddress variable line, where we create the encoded address, and paste it in the app-promise file, following the argv variable:
.argv;
var encodedAddress = encodeURIComponent(argv.address);
Now we do need to tweak this a little bit. The address variable doesn't exist; but we have argv.address. So, we'll switch address with argv.address:
var encodeAddress = encodeURIComponent(argv.address);
Now we have the encoded address; the next thing we need to get before we can start using axios is the URL that we want to make the request to. We'll grab that from the geocode.js file as well. In app-promise.js, we will make a new variable called geocodeURI. Then, we'll take the URL present in geocode.js, from the opening tick to the closing tick, copy it, and paste it in app-promise.js, equal to geocodeURI:
var encodedAddress = encodeURIComponent(argv.address);
var geocodeUrl = `https://maps.googleapis.com/maps/api/geocode/json?address=${encodedAddress}`;
Now we use the encoded address variable inside the URL; this is fine because it does exist in our code. So at this point, we have our geocodeUrl variable and we can get started in making our very first axios request.
In our case, we'll be taking the address and getting the latitude and longitude. To make our request, we'll call a method available on axios, axios.get:
var geocodeUrl = `https://maps.googleapis.com/maps/api/geocode/json?address=${encodedAddress}`;
axios.get
The get is the method that lets us make our HTTP get request, which is exactly what we want to do in this case. Also, it's really simple to set up. When you're expecting JSON data, all you have to do is to pass in the URL that we have in the geocodeUrl variable. There's no need to provide any other options, such as an option letting it know it's JSON. axios knows how to automatically parse our JSON data. What get returns is actually a promise, which means we can use .then in order to run some code when the promise gets fulfilled or rejected, whether things go well or poorly:
axios.get(geocodeUrl).then()
Inside then, we'll provide one function. This will be the success case. The success case will get called with one argument, which the axios library recommends that you call response:
axios.get(geocodeUrl).then((response) => {
});
Technically, we could call anything you like. Now inside the function, we'll get access to all of the same information we got inside of the request library; things such as our headers, response, and request headers, as well as the body information; all sorts of useful info. What we really need though is the response.data property. We'll print that using console.log:
axios.get(geocodeUrl).then((response) => {
console.log(response.data);
});
Now that we have this in place, we can run our app-promise file, passing in a valid address. Also, we can see what happens when we make that request.
Inside command line (Terminal), we'll use the clear command first to clear the Terminal output. Then we can run node app-promise.js, passing in an address. Let's use a valid address, for example, 1301 lombard street, philadelphia:
node app-promise.js -a '1301 lombard street philadelphia
The request goes out. And what do we get back? We get back the results object exactly as we saw it when we used the other modules in the previous chapters:
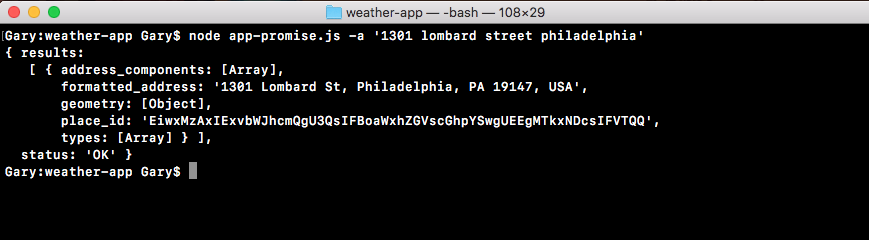
The only difference in this case is that we're using promises built in, instead of having to wrap it in promises or using callbacks.
Now aside from the success handler we used in the previous example, we can also add a call to catch, to let us catch all of the errors that might occur. We'll to get the error object as the one-and-only argument; then we can do something with that error object:
axios.get(geocodeUrl).then((response) => {
console.log(response.data);
});catch((e) => {
});
Inside the function, we'll kick things off, using console.log to print the error argument:
}).catch((e) => {
console.log(e)
});
Now let's simulate an error by removing the dot in the URL:
var encodedAddress = encodeURIComponent(argv.address);
var geocodeUrl = `https://mapsgoogleapis.com/maps/api/geocode/json?address=${encodedAddress}`;
axios.get(geocodeUrl).then((response) => {
console.log(response.data);
}).catch((e) => {
console.log(e)
});
We can see what happens when we rerun the program. Now I'm doing this to explore the axios library. I know exactly what will happen. This is not why I'm doing it. I'm doing it to show you how you should approach new libraries. When you get a new library, you want to play around with all the different ways it works. What exactly comes back in that error argument when we have a request that fails? This is important information to know; so when you write a real-world app, you can add the appropriate error handling code.
In this case, if we rerun the exact same command, we'll get an error:
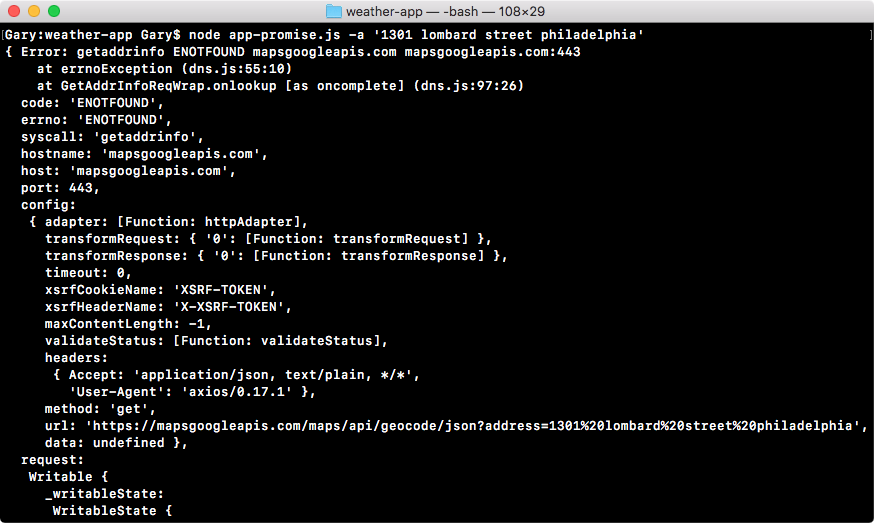
As you can see, there really is nothing to print on the screen. We have a lot of very cryptic error codes and even the errorMessage property, which usually contains something good or does not. Then we have an error code followed by the URL. What we want instead is print a plain text English message.
To do this, we'll use an if-else statement, checking what the code property is. This is the error code and in this case ENOTFOUND; we know it means that it could not connect to the server. In app-promise.js, inside the error handler, we can add this by having if and checking the condition:
}).catch((e) => {
if (e.code === 'ENOTFOUND') {
}
If that is the case, we'll print some sort of custom message to the screen using console.log:
}).catch((e) => {
if (e.code === 'ENOTFOUND') {
console.log('Unable to connect to API servers.');
}
console.log(e);
});
Now we have an error handler that handles this specific case. So we can remove our call to console.log:
axios.get(geocodeUrl).then((response) => {
console.log(response.data);
}).catch((e) => {
if (e.code === 'ENOTFOUND') {
console.log('Unable to connect to API servers.');
}
});
Now if we save the file, and rerun things from Terminal, we should get a much nicer error message printing to the screen:

This is exactly what we get: Unable to connect to API servers. Now I'll add that dot back in, so things start working. We can worry about the response that comes back.
As you remember, inside the geocode file, there were some things we needed to do. We've already handled the error related to server connection, but there is still another error pending, that is, if the body.status property equals ZERO_RESULTS. We want to print an error message in that case.
To do this, we'll inside app-promise, create our very own error. We'll throw an error inside the axios.get function. This error will cause all of the code after it, not to run. It will move right into the error handler.
Now we only want to throw an error if the status property is set to ZERO_RESULTS. We'll add an if statement at the very top of the get function to check if (response.data.status) equals ZERO_RESULTS:
axios.get(geocodeUrl).then((response) => {
if (response.data.status === 'ZERO_RESULTS') {
}
If that is the case, then things went bad and we do not want to move on to make the weather request. We want to run our catch code we have. To throw a new error that our promise can catch, we'll use a syntax called throw new Error. This creates and throws an error letting Node know that something went wrong. We can provide our own error message, something that's readable to a user: Unable to find that address:
axios.get(geocodeUrl).then((response) => {
if (response.data.status === 'ZERO_RESULTS') {
throw new Error('Unable to find that address.');
}
This is a message that'll let that user know exactly what went wrong. Now when this error gets thrown, the same catch code will run. Currently, we only have one if condition that checks whether the code property is ENOTFOUND. So we'll add an else clause:
axios.get(geocodeUrl).then((response) => {
if (response.data.status === 'ZERO_RESULTS') {
throw new Error('Unable to find that address.');
}
console.log(response.data);
}).catch((e) => {
if (e.code === 'ENOTFOUND') {
console.log('Unable to connect to API servers.');
} else {
}
});
Inside the else block, we can print the error message, which is the string we typed in the throw new Error syntax using the e. message property, as shown here:
axios.get(geocodeUrl).then((response) => {
if (response.data.status === 'ZERO_RESULTS') {
throw new Error('Unable to find that address.');
}
console.log(response.data);
}).catch((e) => {
if (e.code === 'ENOTFOUND') {
console.log('Unable to connect to API servers.');
} else {
console.log(e.message);
}
});
If the error code is not ENOTFOUND, we'll simply print the message to the screen. This will happen if we get zero results. So let's simulate that to make sure the code works. Inside Terminal, we'll rerun the previous command passing in a zip code. At first, we'll use a valid zip code, 08822 and we should get our data back. Then we'll use an invalid one: 00000.
When we run the request with a valid address, we get this:
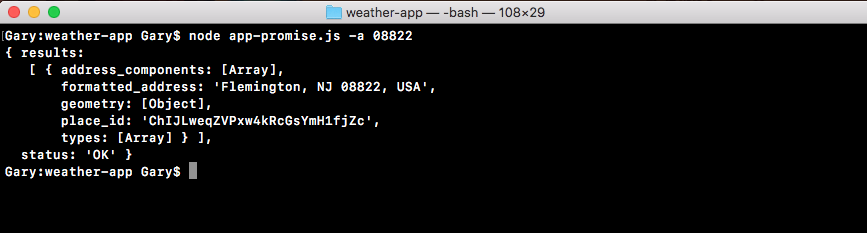
When we run the request with the invalid address, we get the error:
By calling throw new Error, we're immediately stopping the execution of this function. So console.log with e.message never prints, which is exactly what we want. Now that we have our error handler in place, we can start generating that weather URL.
In order to generate the weather URL, we'll copy the URL from the weather file, taking it with the ticks in place, and moving it into the app-promise file. We'll make a new variable called weatherUrl, setting it equal to the copied URL:
url: `https://api.forecast.io/forecast/4a04d1c42fd9d32c97a2c291a32d5e2d/${lat},${lng}`,
Now weatherUrl does need a few pieces of information. We need the latitude and longitude. We have two variables lat and lng, so let's create them, getting the appropriate value from that response object, var lat and var lng:
var lat;
var lng;
url: `https://api.forecast.io/forecast/4a04d1c42fd9d32c97a2c291a32d5e2d/${lat},${lng}`,
Now in order to pull them off, we have to go through that process of digging into the object. We've done it before. We'll be looking in the response object at the data property, which is similar to the body in the request library. Then we'll go into results, grabbing the first item and accessing the geometry property, then we'll access location.lat:
var lat = response.data.results[0].geometry.location.lat;
Now similarly, we can add things for the longitude variable:
var lat = response.data.results[0].geometry.location.lat;
var lng = response.data.results[0].geometry.location.lng;
Now before we make that weather request, we want to print the formatted address because that's something the previous app did as well. In our console.log(response.data) statement, and instead of printing response.data, we'll dive into the data object getting the formatted address. This is also on the results array's first item. We'll be accessing the formatted_address property:
var lat = response.data.results[0].geometry.location.lat;
var lng = response.data.results[0].geometry.location.lng;
var weatherUrl = `https://api.forecast.io/forecast/4a04d1c42fd9d32c97a2c291a32d5e2d/${lat},${lng}`;
console.log(response.data.results[0].formatted_address);
Now that we have our formatted address printing to the screen, we can make our second call by returning a new promise. This is going to let us chain these calls together.
To get started, we'll return a call to axios.get, passing in the URL. We just defined that, it is weatherUrl:
var lat = response.data.results[0].geometry.location.lat;
var lng = response.data.results[0].geometry.location.lng;
var weatherUrl = `https://api.forecast.io/forecast/4a04d1c42fd9d32c97a2c291a32d5e2d/${lat},${lng}`;
console.log(response.data.results[0].formatted_address);
return axios.get(weatherUrl);
Now that we have this call returning, we can attach another then call right between our previous then call and catch call, by calling then, passing in one function, just like this:
return axios.get(weatherUrl);
}).then(() => {
}).catch((e) => {
if (e.code === 'ENOTFOUND') {
This function will get called when the weather data comes back. We'll get that same response argument, because we're using the same method, axios.get:
}).then((response) => {
Inside the then call, we don't have to worry about throwing any errors, since we never needed to access a body property in order to check if something went wrong. With the weather request if this callback runs, then things went right. We can print the weather information. In order to get that done, we'll make two variables:
The temperature variable will get set equal to response.data. Then we'll access that currently property. Then we'll access temperature. We'll pull out the second variable, the actual temperature or apparentTemperature, which is the property name, var apparentTemperature. We'll be setting this equal to response.data.currently.apparentTemperature:
}).then((response) => {
var temperature = response.data.currently.temperature;
var apparentTemperature = response.data.currently.apparentTemperature;
Now that we have our two things pulled out into variables, we can add those things inside of a call, console.log. We chose to define two variables, so that we don't have to add the two really long property statements to console.log. We can simply reference the variables. We'll add console.log and we'll use template strings in the console.log statement, so that we can inject the previous mentioned two values inside of quotes: It's currently, followed by temperature. Then we can add a period, It feels like, followed by apparentTemperature:
}).then((response) => {
var temperature = response.data.currently.temperature;
var apparentTemperature = response.data.currently.apparentTemperature;
console.log(`It's currently ${temperature}. It feels like ${apparentTemperature}.`);
Now that we have our string printing to the screen, we can test that our app works as expected. We'll save the file and inside Terminal, we'll rerun the command from two commands ago where we had a valid zip code:
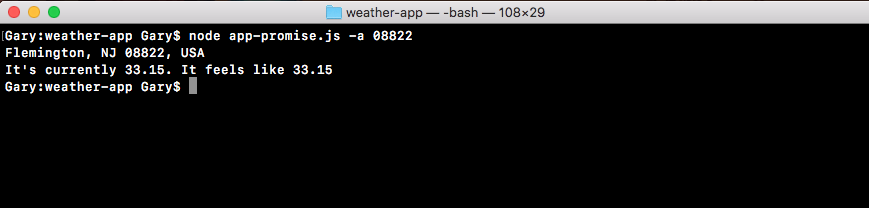
When we run this, we get the weather info for Flemington, New Jersey. It's currently 84 degrees, but it feels like 90. If we run something that has a bad address, we do get the error message:

So everything looks great! Using the axios library, we're able to chain promises like the app-promise without needing to do anything too crazy. The axios get method returns a promise, so we can access it directly using then.
In the code, we use then once to do something with that geolocation data. We print the address to the screen. Then we return another promise, where we make the request for the weather. Inside of our second then call, we print the weather to the screen. We also added a catch call, which will handle any errors. If anything goes wrong with either of our promises, or if we throw an error, catch will get fired printing the messages to the screen.
This is all it takes to use axios and set up promises for your HTTP requests. Now one reason people love promises over traditional callbacks is that instead of nesting we can simply chain. So our code doesn't get indented to crazy levels. As we saw in app.js in the previous chapter, we went a few indentation levels deep just to add two calls together. If we needed to add a third it would have gotten even worse. With promises, we can keep everything at the same level, keeping our code a lot easier to maintain.
In this chapter, we've gone through a quick example of how promises work, by going over just the very fundamentals. Async is a critical part to Node.js. We went through the very basics of callbacks and promises. We looked a few examples, creating a pretty cool weather app.
This brings us to the end of our asynchronous Node.js programming, but this does not mean that you have to stop building out the weather app. There are a couple ideas as to what you could do to continue on with this project. First up, you can load in more information. The response we get back from the weather API contains a ton of stuff besides just the current temperature, which is what we used. It'd great if you can incorporate some of that stuff in there, whether it's high/low temperatures, or chances of precipitation.
Next up, it'd be really cool to have a default location ability. There would be a command that lets me set a default location, and then I could run the weather app with no location argument to use that default. We could always specify a location argument to search for weather somewhere else. This would be an awesome feature, and it would work kind of similar to the Notes app, where we save data to the filesystem.
In the next chapter, we'll start creating web servers, which will be async. We'll make APIs, which will be async. Also, we'll create real-time Socket.IO apps, which will be async. We'll move on to creating Node apps that we deploy to servers, making those servers accessible to anybody with a web connection.
We'll cover a ton of exciting stuff in this chapter. We'll learn how to make a web server and how to integrate version control into Node applications. Now to get all this done, we will look at a framework called Express. It's one of the most popular npm libraries, and for good reason. It makes it really easy to do stuff such as creating a web server or an HTTP API. It's kind of similar to the Dark Sky API we used in the last chapter.
Now most courses start with Express, and that can be confusing because it blurs the line between what is Node and what is Express. We'll kick things off by adding Express to a brand new Node app.
Specifically, we'll cover the following topics:
In this section, you'll make your very first Node.js web server, which means you'll have a whole new way for users to access your app. Instead of having them run it from the Terminal passing in arguments, you'll be able to give them a URL they can visit to view your web app or a URL they can make an HTTP request to to fetch some data.
This will be similar to what we did when we used the geocode API in the previous chapters. Instead of using an API though, we'll be able to create our own. We'll also be able to set up a static website for something like a portfolio site. Both are really valid use cases. Now all of this will be done using a library called Express, which is the most popular npm library. It's actually one of the reasons that Node got so popular because it was so easy to make REST APIs and static web servers.
Express is a no-nonsense library. Now there are a lot of different ways to configure it. So it can get pretty complex. That's why we'll be using it throughout the next couple of chapters. To get started, let's make a directory where we can store all of the code for this app. This app will be our web server.
On the desktop let's us make a directory called node-web-server, by running the mkdir node-web-server command in the Terminal:

Once this directory is created, we'll navigate into it using cd:

And we'll also open it up inside Atom. In Atom, we'll open it up from the desktop:
Now before going further, we'll run the npm init command so we can generate the package.json file. As shown in the following code, we'll run npm init:
Then, we'll use the default value just by pressing enter through all of the options shown in the following screenshot. There's no need to customize any of these as of now:
Then we'll type yes in the last statement Is this ok? (yes) and the package.json file goes in place:

As mentioned earlier, Express is a really big library. There's an entire website dedicated to the Express docs. Instead of a simple README.md file, you can go to www.expressjs.com to view everything the website have to offer:

We'll find Getting started, help articles, and many more. The website has the Guide option to help you do things such as Routing, Debugging, Error handling, and an API reference, so we can look into exactly what methods we have access to and what they do. It's a very handy website.
Now that we have our node-web-server directory, we'll install Express so we can get started making our web server. In the Terminal we'll run the clear command first to clear the output. Then we'll run the npm install command. The module name is express and we'll be using the latest version, @4.16.0. We'll also provide the save flag to update the dependencies inside of our package.json file as shown here:
npm install express@4.16.0 --save
Once again we'll use the clear command to clear the Terminal output.
Now that we have Express installed, we can actually create our web server inside Atom. In order to run the server, we will need a file. I'll call this file server.js. It will sit right in the root of our application:
This is where we'll configure the various routes, things like the root of the website, pages like /about, and so on. It's also where we'll start the server, binding it to a port on our machine. Now we'll be deploying to a real server. Later we'll talk about how that works. For now, most of our server examples will happen on our localhost.
Inside server.js, the first thing we'll do is load in Express by making a constant called express and setting it equal to require('express'):
const express = require('express');
Next up, what we'll do is make a new Express app. To do this we'll make a variable called app and we'll set it equal to the return result from calling express as a function:
const express = require('express');
var app = express();
Now there are no arguments we need to pass into express. We will do a ton of configuration, but that will happen in a different way.
In order to create an app, all we have to do is call the method. Next to the variable app we can start setting up all of our HTTP route handlers. For example, if someone visits the root of the website we're going to want to send something back. Maybe it's some JSON data, maybe it's an HTML page.
We can register a handler using app.get function. This will let us set up a handler for an HTTP get request. There are two arguments we have to pass into app.get:
In our case we're looking for the root of the app. So we can just use forward slash (/) for the first argument. In the second argument, we'll use a simple arrow function (=>) as shown here:
const express = require('express');
var app = express();
app.get('/', (req, res) => {
};
Now the arrow function (=>) will get called with two arguments. These are really important to how Express works:
We'll explore both of these in detail. For now though, we'll use one method, res.send. This will let us respond to the request, sending some data back. In app.get function, let's call res.send, passing in a string. In the parenthesis we'll add Hello Express!:
app.get('/', (req, res) => {
res.send('Hello Express!');
});
This is the response for the HTTP request. So when someone views the website they will see this string. If they make a request from an application, they will get back Hello Express! as the body data.
Now at this point we're not quite done. We have one of our routes set up, but the app is never going to actually start listening. What we need to do is call app.listen. The app.listen function will bind the application to a port on our machine. In this case for our local host app, we will use port 3000, a really common port for developing locally. Later in the chapter, we'll talk about how to customize this depending on whatever server you use to deploy your app to production. For now though, a number like 3000 works:
app.get('/', (req, res) => {
res.send('Hello Express!');
});
app.listen(3000);
With this in place we are now done. We have our very first Express server. We can actually run things from the Terminal, and view it in the browser. Inside the Terminal, we'll use nodemon server.js to start up our app:
nodemon server.js
This will start up the app and you'll see that the app never really finishes as shown here:

Right now it's hanging. It's waiting for requests to start coming in. The apps that use app.listen, they will never stop. You'll have to shut them down manually with control + C, like we've done before. It might crash if you have an error in your code. But it'll never stop normally, since we have that binding set up here. It will listen to requests until you tell it to stop.
Now that the server is up, we can move into the browser and open up a new tab visiting the website, localhost: followed by the port 3000:
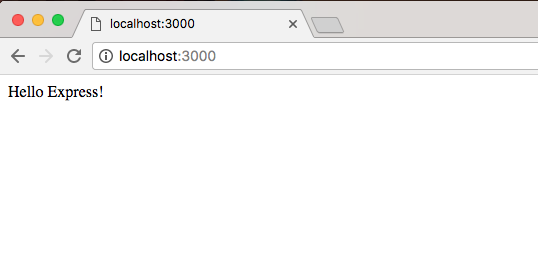
This will load up the root of the website, and we specify the handler for that route. Hello Express! shows up, which is exactly what we expected. Now there's no thrills. There's no formatting. We're just sending a string from the server back to the client that made the request.
What we'd like to do next is open up the developer tools, so we can explore exactly what happened when that request was made. Inside Chrome you can get to the Developer Tools using Settings| More Tools| Developer Tools:
Or you can use the keyboard shortcut shown along with Developer Tools for the operating system.
We'll now open up the Developer Tools, which should look similar to the ones we used when we ran the Node Inspector debugger. They're a little different, but the idea is the same:
We have a bunch of tabs up top, and then we have our tab specific information down following on the page. In our case, we want to go to the Network tab, and currently we have nothing. So we'll refresh the page with the tab open, and what we see right here is our localhost request:
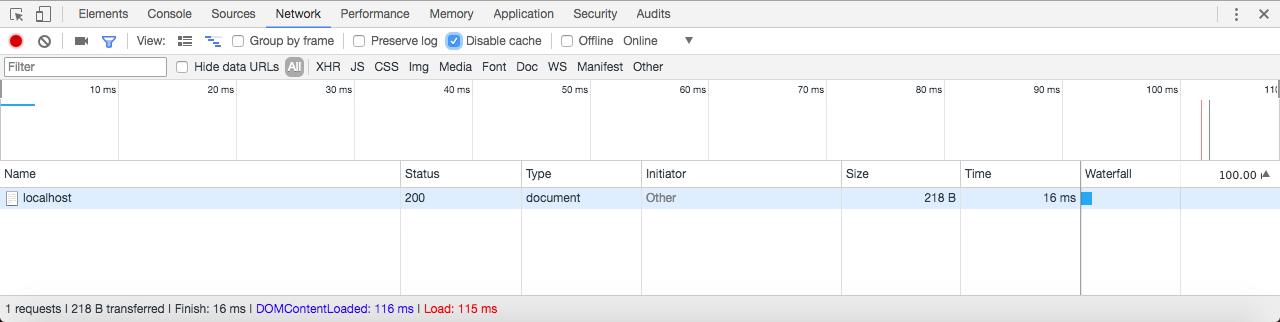
This is the request that's responsible for showing Hello Express! to the screen. We can actually click the request to view its details:
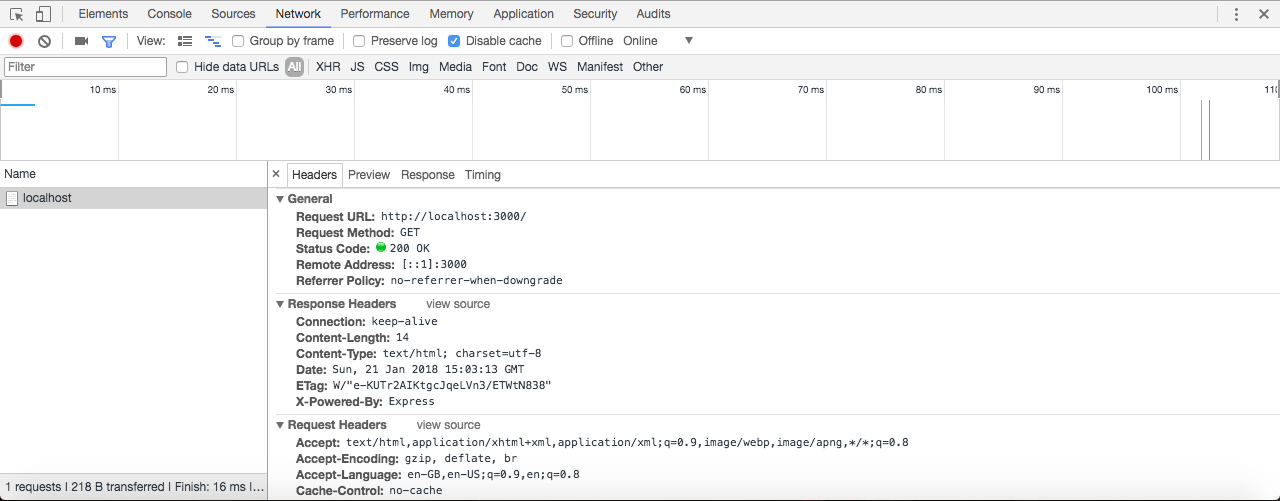
This page can be a little overwhelming at first. There is a a lot of information. Up on top we have some general info, such as the URL that was requested, the method that the client wanted; in this case, we made a GET request, and the status code that came back. The default status code being 200, meaning that everything went great. We'd like to point the attention to is one response header.
Under Response Headers we have a header called Content-Type. This header tells the client what type of data came back. Now this could be something like an HTML website, some text, or some JSON data and the client could be a web browser, an iPhone, an Android device, or any other computer with network capabilities. In our case, we're telling the browser that what came back is some HTML, so why don't you render it as such. We use the text/html Content-Type. And this automatically got set by Express, which is one of the reasons it's so popular. It handles a lot of that mundane stuff for us.
Now that we have a very basic example, we want to step things up a notch. Inside Atom, we can actually provide some HTML right inside of send by wrapping our Hello Express! message in an h1 tag. Later in this section, we'll be setting up a static website that has HTML files that get served up. We'll also look at templating to create dynamic web pages. But for now, we can actually just pass in some HTML to res.send:
app.get('/', (req, res) => {
res.send('<h1>Hello Express!</h1>');
});
app.listen(3000);
We'll save the server file, which should restart things in the browser. When we give the browser a refresh, we get Hello Express! printing to the screen:
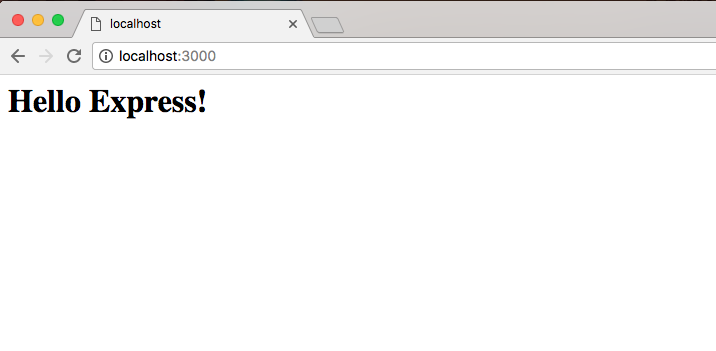
This time though, we have it in an h1 tag, which means it's formatted by the default browser styles. In this case it looks nice and big. With this in place we can now open up the request inside the Network tab, and what we get is the exact same thing we had before. We're still telling the browser that it's HTML. Only one difference this time: we actually have an HTML tag, so it gets rendered using the browser's default styles.
The next thing we'd look into is how we can send some JSON data back. Sending JSON is really easy with Express. To illustrate how we can do it we'll comment out our current call to res.send and add a new one. We'll call res.send passing in an object:
app.get('/', (req, res) => {
// res.send('<h1>Hello Express!</h1>');
res.send({
})
});
On this object we can provide whatever we like. We can create a name property, setting it equal to the string version of any name, say Andrew. We can make a property called likes, setting it equal to an array, and we can specify some things we may like. Let's add Biking as one of them, and then add Cities as another:
res.send({
name: 'Andrew',
likes: [
'Biking',
'Cities'
]
});
When we call res.send passing in an object, Express notices that. Express takes it, converts it into JSON, and sends it back to the browser. When we save server.js and nodemon refreshes, we can refresh the browser, and what we get is my data formatted using JSON view:

This means we can collapse the properties and quickly navigate the JSON data.
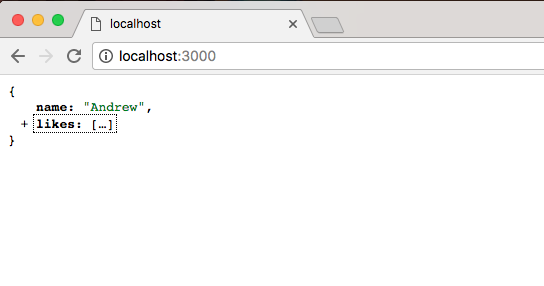
Now the only reason JSON view picked up on this is because that Content-Type header that we explored in our last request it actually changed. If I open up localhost, a lot of things look the same. But now Content-Type has an application/json Content-Type:
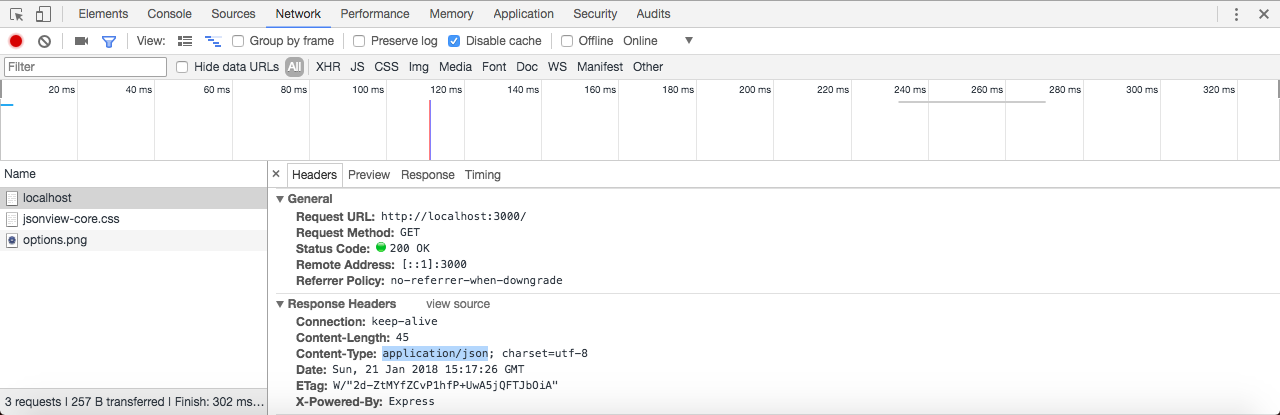
This Content-Type tells the requester whether it's an Android phone, an iOS device, or the browser that JSON data is coming back, and it should parse it as such. That's exactly what the browser does in this case.
Express also makes it really easy to set up other routes aside from the root route. We can explore that inside Atom by calling app.get a second time. We'll call app.get. We'll create a second route. We'll call this one about:
app.get('/about')
app.listen(3000);
Notice that we just used /about as the route. It's important to keep that forward slash in place, but after that you can type whatever you like. In this case we'll have a /about page that someone can visit. Then I'll provide the handler. The handler will take the req and the res object:
app.get('/about', (req, res) => {
});
app.listen(3000);
This will let us figure out what kind of request came in, and it will let us respond to that request. For now just to illustrate we can create more pages, we'll keep the response simple, res.send. Inside the string we're going to print About Page:
app.get('/about', (req, res) => {
res.send('About Page');
});
Now when we save the server.js file, the server is going to restart. In the browser we can visit localhost:3000/about. At /about we should now see our new data, and that's exactly what we get back, About Page shows up as shown here:
Using app.get we're able to specify as many routes as we like. For now we just have an about route and a / route, which is also referred to as the root route. The root route returns some data, which happens to be JSON, and the about route returns a little bit of HTML. Now that we have this in place and we have a very basic understanding about how we can set up routes in Express, we'd like you to create a new route /bad. This is going to simulate what happens when a request fails.
To show the error handling request with JSON, we're going to call app.get. This app.get is going to let us register another handler for a get HTTP request. In our case the route we're looking for inside of quotes is going to be /bad. When someone makes a request for this page, what we want to do is going to be specified in the callback. The callback will take our two arguments, req and res. We'll use an arrow function (=>), which I've used for all of the handlers so far:
app.get('/bad', (req, res) => {
});
app.listen(3000);
Inside the arrow function (=>), we'll send back some JSON by calling res.send. But instead of passing in a string, or some string HTML, we'll pass in an object:
app.get('/bad', (req, res) => {
res.send({
});
});
Now that we have our object in place we can specify the properties we want to send back. In this case we'll set one errorMessage. We'll set my error message property equal to a string, Unable to handle request:
app.get('/bad', (req, res) => {
res.send({
errorMessage: 'Unable to handle request'
});
});
Next up we'll save the file, restarting it in nodemon, and visit it in the browser. Make sure our error message showed up correctly. In the browser, we'll visit /bad, hit enter, and this is what we get:
We get our JSON showing up using JSON view. We have our error message, and we have the message showing up: Unable to handle request. Now if you are using JSON view and you want to view the raw JSON data, you can actually click on View source, and it will show it in a new tab. Here, we're looking at the raw JSON data, where everything is wrapped in those double quotes:

I'll stick to the JSON view data because it's a lot easier to navigate and view. We now have a very basic Express application up and running. It listens on port 3000 and it currently has handlers for 3 URLs: when we get the root of the page, when we get /about, and when we make a get request for /bad.
In this section, we'll learn how to set up a static directory. So if we have a website with HTML, CSS, JavaScript, and images, we can serve that up without needing to provide a custom route for every single file, which would be a real burden. Now setting this up is really simple. But before we make any updates to server.js, we'd create some static assets inside of our project that we can actually serve up.
In this case we'll make one HTML page that we'll be able to view in the browser. Before we get started, we do need to create a new directory, and everything inside this directory will be accessible via the web server, so it's important to not put anything in here that you don't want prying eyes to see.
Everything in the directory should be intended to be view able by anybody. We'll create a public folder to store all of our static assets, and inside here we'll make an HTML page. We'll create a help page for our example project by creating a file called help.html:

Now in help.html we will make a quick basic HTML file, although we'll not touch on all of the subtleties of HTML, since this is not really an HTML book. Instead, we'll just set up a basic page.
The first thing we need to do is create a DOCTYPE which lets the browser know what version of HTML we're using. That will look something like this:
<!DOCTYPE html>
After the opening tag, and the exclamation mark, we'd type DOCTYPE in uppercase. Then, we provide the actual DOCTYPE for HTML5, the latest version. Then we can use the greater than sign to close things up. In the next line, we'll open up our html tag so we can define our entire HTML file:
<!DOCTYPE html>
<html>
</html>
Inside html, there are two tags we'll use: the head tag which lets us configure our doc, and the body tag which contains everything we want to render to the screen.
We'll create the head tag first:
<!DOCTYPE html>
<html>
<head>
</head>
</html>
Inside head, we'll provide two pieces of info, charset and title tag:
As shown in the following code snippet, we'll set meta. And on meta, we'll set the charset property using equals, and provide the value utf-8:
<head>
<meta charset="utf-8">
</head>
For the title tag, we can set it to whatever we like; Help Page seems appropriate:
<head>
<meta charset="utf-8">
<title>Help Page</title>
</head>
Now that our head is configured, we can add something to the body of our website. This is the stuff that's actually going to be viewable inside the viewport. Next to the head, we'll open and close the body tag:
<body>
</body>
Inside body again, we'll provide two things: an h1 title and a p paragraph tag.
The title is going to match the title tag we used in the head, Help Page, and the paragraph will just have some filler text—Some text here:
<!DOCTYPE html>
<html>
<head>
<meta charset="utf-8">
<title>Help Page</title>
</head>
<body>
<h1>Help Page</h1>
<p>Some text here</p>
</body>
</html>
Now we have an HTML page and the goal is to be able to serve this page up in our Express app without having to manually configure it.
We'll serve our HTML page in the Express app using a piece of Express middleware. Middleware lets us configure how our Express application works, and it's something we'll use extensively throughout the book. For now, we can think of it kind of like a third-party add-on.
In order to add some middleware, we'll call app.use. The app.use takes the middleware function we want to use. In our case, we'll use a built-in piece of middleware. So inside server.js, next to the variable app statement, we'll provide the function off of the express object:
const express = require('express');
var app = express();
app.use();
We will be making our own middleware in the next chapter, so it'll become clear exactly what's getting passed into use in a little bit. For now, we'll pass in express.static and to call it as a function:
var app = express();
app.use(express.static());
Now express.static takes the absolute path to the folder you want to serve up. If we want to be able to serve up /help, we'll need to provide the path to the public folder. This means we need to specify the path from the root of our hard drive, which can be tricky because your projects move around. Luckily we have the __dirname variable:
app.use(express.static(__dirname));
This is the variable that gets passed into our file by the wrapper function we explored. The __dirname variable stores the path to your projects directory. In this case, it stores the path to node-web-server. All we have to do is concatenate /public to tell it to use this directory for our server. We'll concatenate using the plus sign and the string, /public:
app.use(express.static(__dirname + '/public'));
With this in place, we are now done. We have our server set up and there's nothing else to do. Now we should be able to restart our server and access /help.html. We should now see the HTML page we have. In the Terminal we can now start the app using nodemon server.js:
Once the app is up and running we can visit it in the browser. We'll start by going to localhost:3000:
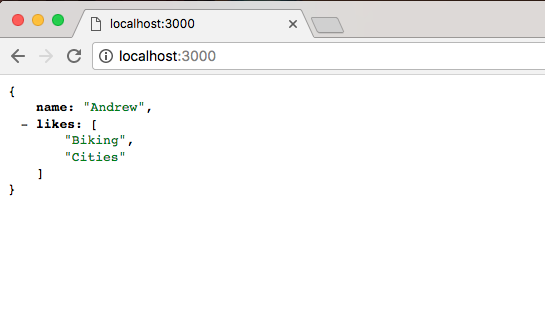
Here we get our JSON data, which is exactly what we expect. And if we change that URL to /help.html we should get our Help Page rendering:
And that is exactly what we get, we have our Help Page showing to the screen. We have the Help Page title as the head, and the Some text here paragraph following as body. Being able to set up a static directory that easily has made Node the go-to choice for simple projects that don't really require a backend. If you want to create a Node app for the sole purpose of serving up a directory you can do it in about four lines of code: the first three lines and the last line in the server.js file.
Now one more thing we'd discuss is the call to app.listen(3000). The app.listen does take a second argument. It's optional. It's a function. This will let us do something once the server is up because it can take a little bit of time to get started. In our case we'll assign console.log a message: Server is up on port 3000:
app.listen(3000, () => {
console.log('Server is up on port 3000');
});
Now it's really clear to the person who started the app that the server is actually ready to go because the message will print to the screen. If we save server.js, and go back into the Terminal we can see Server is up on port 3000 prints:

Back inside the browser we can refresh and we get the exact same results:
That's it for this section. We now have a static directory where we can include JavaScript, CSS, images, or any other file types we like.
In the last couple sections, we looked at multiple ways that we can render HTML using Express. We passed some HTML into response.send, but obviously that was not ideal. It's a real pain to write the markup in a string. We also created a public directory where we can have our static HTML files, such as our help file, and we can serve these up to the browser. Both of those work great but there is a third solution, and that will be the topic in this section. The solution is a templating engine.
A templating engine will let you render HTML but do it in a dynamic way, where we can inject values, such as a username or the current date, inside the template, kind of like we would in Ruby or PHP. Using this templating engine, we'll also be able to create reusable markup for things such as a header or a footer, which is going to be the same on a lot of your pages. This templating engine, handlebars, will be the topic of this section and the next, so let's get started.
The first thing we'll do is install the hbs module. This is a handlebars view engine for Express. Now there are a ton of other view engines for Express, for example EJS or Pug. We'll go with handlebars because its syntax is great. It's a great way to get started.
Now we'll see a few things inside of the browser. First up we will visit handlebarsjs.com. This is the documentation for handlebars. It shows you exactly how to use all of its features, so if we want to use anything, we can always go here to learn how to use it.
Now we'll install a module that's a wrapper around handlebars. It will let us use it as an Express view engine. To view this, we'll go to npmjs.com/package/hbs.
This module is pretty popular. It's a really great view engine. They have a lot of documentation. I just want to let you know this exists as well. Now we can install and integrate it into our application. In the Terminal, we'll install hbs using npm install, the module name is hbs, and the most recent version is @4.0.1. I will use the save flag to update package.json:
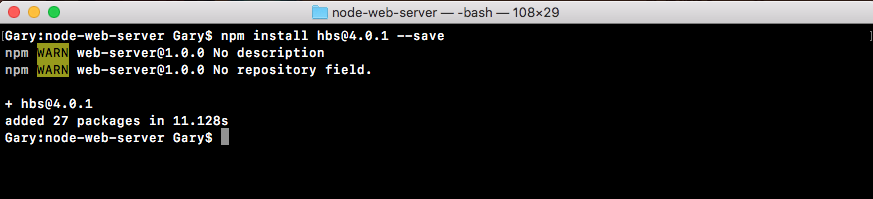
Now actually configuring Express to use this handlebars view engine is super simple. All we have to do is import it and add one statement to our Express configuration. We'll do just that inside Atom.
Inside Atom, let's get started by loading in handlebars const hbs = require hbs, as shown and from here we can add that one line:
const express = require('express');
const hbs = require('hbs');
Next, let's call app.set where we call app.use for Express static:
app.set
app.use(express.static(__dirname + '/public'));
This lets us set some various Express-related configurations. There's a lot of built-in ones. We'll be talking about more of them later. For now, about what we'll do is pass in a key-value pair, where the key is the thing you want to set and the value is the value you want to use. In this case, the key we're setting is view engine. This will tell Express what view engine we'd like to use and we'll pass in inside of quotes hbs:
app.set('view engine', 'hbs');
app.use(express.static(__dirname + '/public'));
This is all we need to do to get started.
Now in order to create our very first template, what we'd like to do is make a directory in the project called views. The views is the default directory that Express uses for your templates. So what we'll do is add the views directory and then we'll add a template inside it. We'll make a template for our About Page.
Inside views, we'll add a new file and the file name will be about.hbs. The hbs handlebars extension is important. Make sure to include it.
Now Atom already knows how to parse hbs files. At the bottom of the about.hbs file, where it shows the current language it's using, HTML in parentheses mustache.
What we'll do to get started though is take the contents of help.html and copy it directly. Let's copy this file so we don't have to rewrite that boilerplate, and we'll paste it right in the about.hbs:
<!DOCTYPE html>
<html>
<head>
<meta charset="utf-8">
<title>Help Page</title>
</head>
<body>
<h1>Help Page</h1>
<p>Some text here</p>
</body>
</html>
Now we can try to render this page. We'll change the h1 tag from help page to about page:
<body>
<h1>About Page</h1>
<p>Some text here</p>
</body>
We'll talk about how to dynamically render stuff inside this page later. Before that we'd like to just get this rendering.
Inside server.js, we already have a root for /about, which means we can render our hbs template instead of sending back this about page string. We will remove our call to res.send and we'll replace it with res.render:
app.get('/about', (req, res) => {
res.render
});
Render will let us render any of the templates we have set up with our current view engine about.hbs file. We do indeed have the about template and we can pass that name, about.hbs, in as the first and only argument. We'll render about.hbs:
app.get('/about', (req, res) => {
res.render('about.hbs');
});
This will be enough to get that static page rendering. We'll save server.js and in the Terminal, we'll clear the output and we'll run our server using nodemon server.js:

Once the server is up and running, it is showing on port 3000. We can open up this /about URL and see what we get. We'll head into Chrome and open up localhost:3000 /about, and when we do that, we get the following:
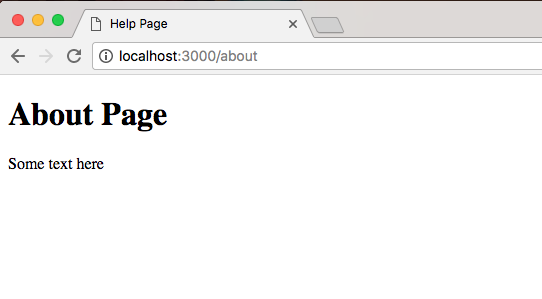
We get my about page rendered just like we'd expect it. We've got an h1 tag, which shows up nice and big, and we have our paragraph tag, which shows up the following. So far we have used hbs but we haven't actually used any of its features. Right now, we're rendering a dynamic page, so we might as well have not even included it. What I want to do is talk about how we can inject data inside of our templates.
Let's come up with some things that we want to make dynamic inside our handlebars file. First up, we'll make this h1 tag dynamic so the page name gets passed into the template in about.hbs page, and we'll also add a footer. For now, we'll just make that a simple footer tag:
<footer>
</footer>
</body>
</html>
Inside of the footer, we'll add a paragraph and that paragraph will have the copyright for our website. We'll just say something like copyright followed by the year, which is 2018:
<footer>
<p>Copyright 2018</p>
</footer>
Now year should also be dynamic, so that as the years change, we don't have to manually update our markup. We'll look at how to make both the 2018 and the about page dynamic, which means they're getting passed in instead of being typed in the handlebars file.
In order to do this, we'll have to do two things:
Passing in data is pretty simple. All we have to do is specify a second argument to res.render in server.js. This will take an object, and on this object we can specify whatever we like. We might have a pageTitle that gets set equal to About Page:
app.get('/about', (req, res) => {
res.render('about.hbs', {
pageTitle: 'About Page'
});
});
We have one piece of data getting injected in the template. It's not used yet but it is indeed getting injected. We could also add another one like currentYear. We'll put currentYear next to the pageTitle and we'll set currentYear equal to the actual year off of the date JavaScript constructor. This will look something like this:
app.get('/about', (req, res) => {
res.render('about.hbs', {
pageTitle: 'About Page',
currentYear: new Date().getFullYear()
});
});
We'll create a new date which makes a new instance of the date object. Then, we'll use a method called getFullYear, which returns the year. In this case, it would return 2018, just like this .getFullYear. Now we have a pageTitle and a currentYear. These are both getting passed in, and we can use them.
In order to use these pieces of data, what we have to do inside of our template is use that handlebars syntax which looks a little bit like shown in the following code. We start by opening up two curly braces in the h1 tag, then we close two curly braces. Inside the curly braces, we can reference any of the props we passed in. In this case, let's use pageTitle, and inside our copyright paragraph, we'll use, inside of double curly braces, currentYear:
<body>
<h1>{{pageTitle}}</h1>
<p>Some text here</p>
<footer>
<p>Copyright 2018</p>
</footer>
</body>
</html>
With this in place, we now have two pieces of dynamic data getting injected inside our application. Now nodemon should have restarted in the background, so there's no need to manually do anything there. When we refresh the page, we do still get About Page, which is great:
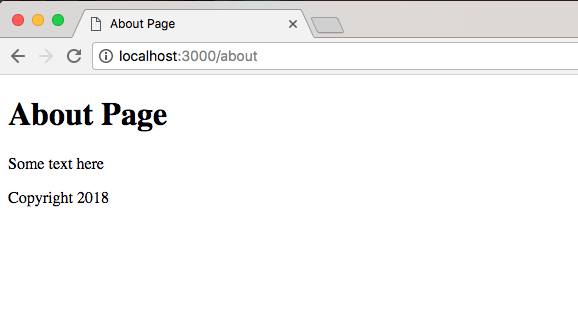
This comes from the data we defined in server.js, and we get Copyright 2018 showing up. Well this web page is pretty simple and doesn't look that interesting. At least you know how to create those servers and inject that data inside your web page. All you have to do from here is add some custom styles to get things looking nice.
Before we go ahead, let's move into the about file and swap out the title. Currently, it says Help Page. That's left over from the public folder. Let's change it to Some Website:
<!DOCTYPE html>
<html>
<head>
<meta charset="utf-8">
<title>Some Website</title>
</head>
<body>
<h1>{{pageTitle}}</h1>
<p>Some text here</p>
<footer>
<p>Copyright 2018</p>
</footer>
</body>
</html>
Now that we have this in place. Next, we'll create a brand new template and that template is going to get rendered when someone visits the root of our website, the / route. Now currently, we render some JSON data:
app.get('/', (req, res) => {
// res.send('<h1>Hello Express!</h1>');
res.send({
name: 'Andrew',
likes: [
'Biking',
'Cities'
]
});
What we want to do is replace this with a call to response.render, rendering a brand new view.
To get started, we'll duplicate the about.hbs file so we can start customizing it for our needs. We'll duplicate it, and call this one home.hbs:
<!DOCTYPE html>
<html>
<head>
<meta charset="utf-8">
<title>Some Website</title>
</head>
<body>
<h1>{{pageTitle}}</h1>
<p>Some text here</p>
<footer>
<p>Copyright 2018</p>
</footer>
</body>
</html>
Now from here most things are going to stay the same. We'll keep the pageTitle in place. We'll also keep the Copyright and footer following. What we want to change though is this paragraph. It was fine that the About Page as a static one, but for the home page, we'll set it equal to, inside curly braces, the welcomeMessage property:
<body>
<h1>{{pageTitle}}</h1>
<p>{{welcomeMessage}}</p>
<footer>
<p>Copyright {{currentYear}}</p>
</footer>
</body>
Now welcomeMessage is only going to be available on home.hbs, which is why we have specifying it in home.hbs but not in about.hbs.
Next up, we needed to call response render inside of the callback. This will let us actually render the page. We'll add response.render, passing in the template name we want to render. This one is called home.hbs. Then we'll pass in our data:
app.get('/', (req, res) => {
res.render('home.hbs', {
})
});
Now to get started, we can pass in the page title. We'll set this equal to Home Page and we'll pass in some sort of generic welcome message - Welcome to my website. Then we'll pass in the currentYear, and we already know how to fetch the currentYear: new Date(), and on the date object, we'll call the getFullYear method:
res.render('home.hbs', {
pageTitle: 'Home Page',
welcomeMessage: 'Welcome to my website',
currentYear: new Date().getFullYear()
})
With this in place, all we needed to do is save the file, which is automatically going to restart the server using nodemon and refresh the browser. When we do that, we get the following:

We get our Home Page title, our Welcome to my website message, and my copyright with the year 2018. And if we go to /about, everything still looks great. We have our dynamic page title and copyright and we have our static some text here text:
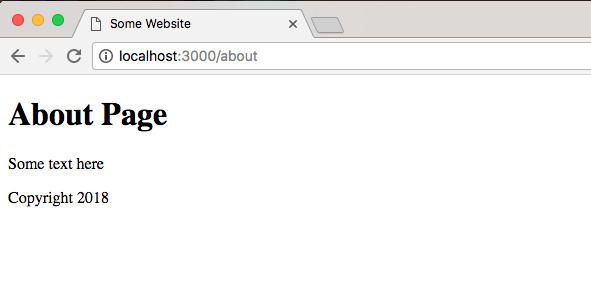
With this in place, we are now done with the very basics of handlebars. We see how this can be useful inside of a real-world web app. Aside from a realistic example such as the copyright, other reasons you might use this is to inject some sort of dynamic user data - things such as a username and email or anything else.
Now that we have a basic understanding about how to use handlebars to create static pages, we'll look at some more advanced features of hbs inside the next section.
In this section, we'll learn a few more advanced features that handlebars has to offer. This will make it easier to render our markup, especially markup that's used in multiple places, and it will make it easier to inject dynamic data into your web pages.
In order to illustrate the first thing we'll talk about, I want to open up both about.hbs and home.hbs, and you'll notice down at the bottom that they both have the exact same footer code as follows:
<footer>
<p>Copyright {{currentYear}}</p>
</footer>
We have a little copyright message for both and they both have the same header area, which is the h1 tag.
Now this really isn't a problem because we have two pages, but as you add more and more pages it's going to become a real pain to update your header and your footer. You'll have to go into every file and manage the code there, but what we'll talk about instead is something called a partial.
A partial is a partial piece of your website. It's something you can reuse throughout your templates. For example, we might have a footer partial that renders the footer code. You can include that partial on any page you need a footer. You could do the same thing for header. In order to get started, the first thing we need to do is set up our server.js file just a little bit to let handlebars know that we want to add support for partials.
In order to do this, we'll add one line of code in the server.js file where we declared our view engine previously, and it will look something like this (hbs.registerPartials):
hbs.registerPartials
app.set('view engine', 'hbs');
app.use(express.static(__dirname + '/public'));
Now registerPartials is going to take the directory you want to use for all of your handlebar partial files, and we'll be specifying that directory as the first and only argument. Once again, this does need to be the absolute directory, so I'll use the __dirname variable:
hbs.registerPartials(__dirname)
Then we can concatenate the rest of the path, which will be /views. In this case, I want you to use /partials.
hbs.registerPartials(__dirname + '/views/partials')
We'll store our partial files right inside a directory in the views folder. Now we can create that folder right in views called partials.
Inside partials, we can put any of the handlebars partials we like. To illustrate how they work, we'll create a file called footer.hbs:
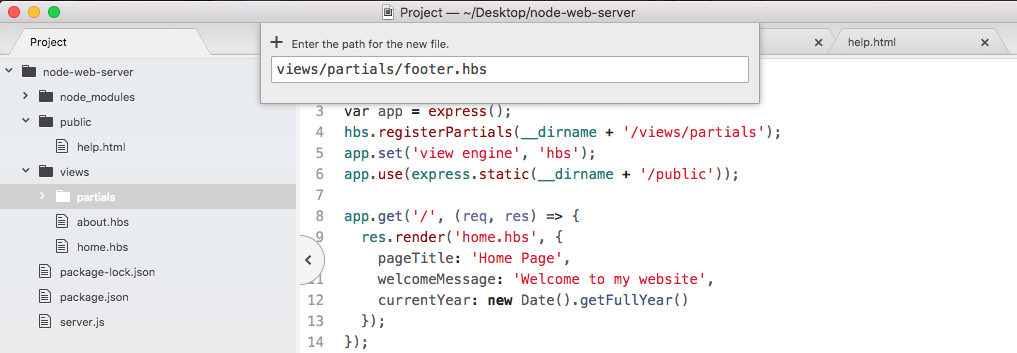
Inside footer.hbs, we'll have access to the same handlebars features, which means we can write some markup, we can inject variables, we can do whatever we like. For now, what we'll do is copy the footer tag exactly, pasting it inside footer.hbs:
<footer>
<p>Copyright {{getCurrentYear}}</p>
</footer>
Now we have our footer.hbs file, this is the partial and we can include it in both about.hbs and home.hbs. In order to do that, we'll delete the code that we already have in the partial and we'll replace it with opening and closing two curly braces. Now instead of injecting data, we want to inject a template and the syntax for that is to add a greater than symbol with a space, followed by the partial name. In our case that partial is called footer, so we can add this right here:
{{> footer}}
</body>
</html>
Then I can save about and do the same thing over in home.hbs. We now have our footer partial. It's rendering on both pages.
To illustrate how this works, I'll fire up my server and by default nodemon; it's not going to watch your handlebars files. So if you make a change, the website's not going to render as you might expect. We can fix this by running nodemon, passing in server.js and providing the -e flag. This lets us specify all of the extensions we want to watch. In our case, we'll watch the JS extension for the server file, and after the comma, the hds extension:
Now our app is up and running, we can refresh things over in the browser, and they should look the same. We have our about page with our footer:
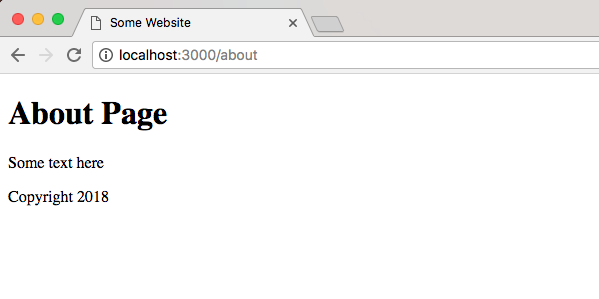
We have our home page with the exact same footer:
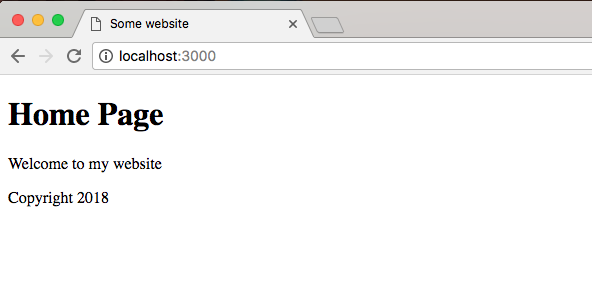
The advantage now is if we want to change that footer, we just do it in one place, in the footer.hbs file.
We can add something to our footer paragraph tag. Let's add a little message created by Andrew Mead with a -:
<footer>
<p>Created By Andrew Mead - Copyright {{CurrentYear}}</p>
</footer>
Now, save the file and when we refresh the browser, we have our brand new footer for Home Page:
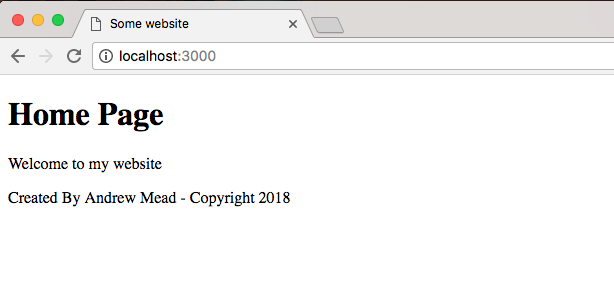
We have our brand new footer for About Page:
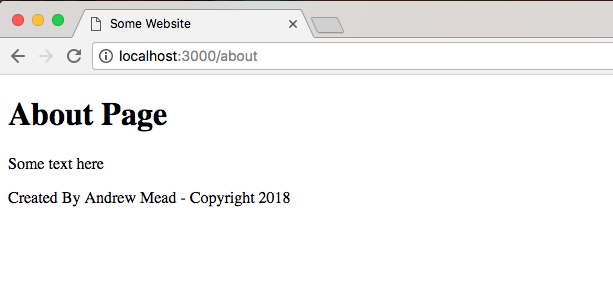
It will show up for both the home page and the about page. There's no need to do you anything manual in either of these pages, and this is the real power of partials. You have some code, you want to reuse it inside your website, so you simply create a partial and you inject it wherever you like.
Now that we have the footer partial in place, let's create the header partial. That means we'll need to create a brand new file header.hbs. We'll want to add the h1 tag inside that file and then we'll render the partial in both about.hbs and home.hbs. Both pages should still look the same.
We'll get started by creating a new file in the partials folder called header.hbs.
Inside header.hbs, we'll take the h1 tag from our website, paste it right inside and save it:
<h1>{{pageTitle}}</h1>
Now we can use this header partial in both about and home files. Inside of about, we need to do this using the syntax, the double curly braces with the greater than sign, followed by the partial name header. We'll do the exact same thing for the home page. In the home page, we'll delete our h1 tag, inject the header and save the file:
Now we'd create something slightly different just so we can test that it actually is using the partial. We'll type 123 right after the h1 tag in header.hbs:
<h1>{{pageTitle}}</h1>123
Now that all the files are saved, we should be able to refresh the browser, and we see about page with 123 printing, which is fantastic:
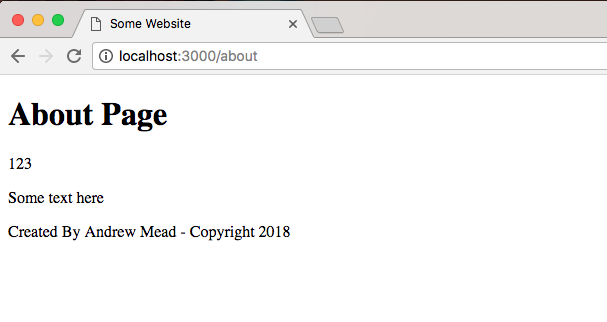
This means the header partial is indeed working, and if I go back to the home page, everything still looks great:
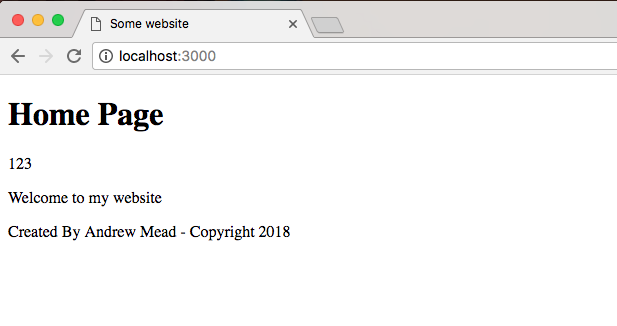
Now that we have the header broken out into its own file, we can do all sorts of things. We can take our h1 tag and put it inside of a header tag, which is the appropriate way to declare your header inside of HTML. As shown, we add an opening and closing header tag. We can take the h1 and we can move it right inside:
<header>
<h1>{{pageTitle}}</h1>
</header>
We could also add some links to the other pages on our website. We could add an anchor tag for the homepage by adding an a tag:
<header>
<h1>{{pageTitle}}</h1>
<p><a></a></p>
</header>
Inside the a tag, we'll specify the link text we'd like to show up. I'll go with Home, then inside the href attribute, we can specify the path the link should take you to, which would just be /:
<header>
<h1>{{pageTitle}}</h1>
<p><a href="/">Home</a></p>
</header>
Then we can take the same paragraph tag, copy it and paste it in the next line and make a link for the about page. I'll change the page text to About, the link text, and the URL instead of going to / will go to /about:
<header>
<h1>{{pageTitle}}</h1>
<p><a href="/">Home</a></p>
<p><a href="/about">About</a></p>
</header>
Now we've made a change to our header file and it will be available on all of the pages of our website. I'm on the home page. If I refresh it, I get Home and About page links:
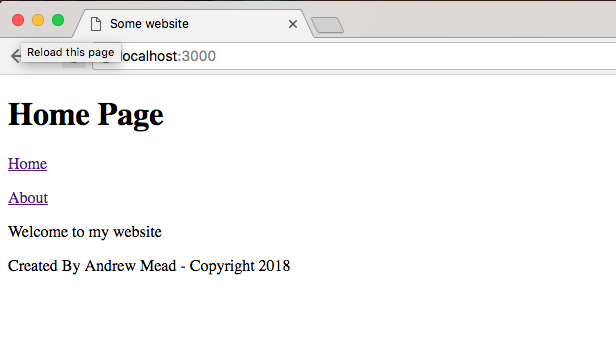
I can click on the About to go to the About Page:
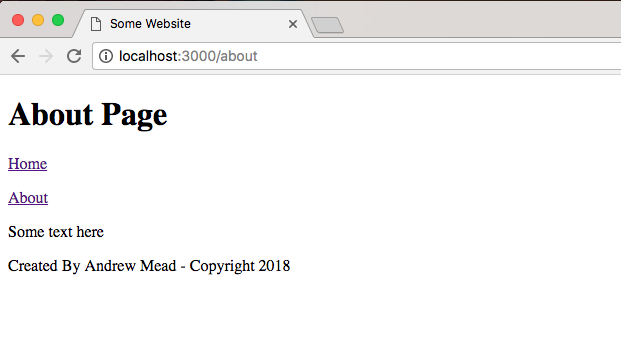
Similarly, I can click on Home to come right back. All of this is much easier to manage now that we have partials inside of our website.
Now before we go further, there is one more thing I want to talk about, that is, a handlebars helper. Handlebars helpers are going to be ways for us to register functions to run to dynamically create some output. For example, inside server.js, we currently inject the current year inside of both of our app.get templates and that's not really necessary.
There is a better way to pass this data in, and this data shouldn't need to be provided because we'll always use the exact same function. We'll always take the new date getfullYear return value passing it in. Instead, we'll use a partial, and we'll set ours up right now. Now a partial is nothing more than a function you can run from inside of your handlebars templates.
All we need to do is register it and I'll do that in the server.js, following on from where we set up our Express middleware. As shown in the following code, we'll call hbs.register and we'll be registering a helper, so we'll call a registerHelper:
hbs.registerPartials(__dirname + '/views/partials')
app.set('view engine', 'hbs');
app.use(express.static(__dirname + '/public'));
hbs.registerHelper();
Now registerHelper takes two arguments:
The first argument right here will be getCurrentYear in our case. We'll create a helper that returns that current year:
hbs.registerHelper('getCurrentYear',);
The second argument will be our function. I'll use an arrow function (=>):
hbs.registerHelper('getCurrentYear', () => {
});
Anything we return from this function will get rendered in place of the getCurrentYear call. That means if we call getCurrentYear inside the footer, it will return the year from the function, and that data is what will get rendered.
In the server.js, we can return the year by using return and having the exact same code we have app.get object:
hbs.registerHelper('getCurrentYear'), () => {
return new Date().getFullYear()
});
We'll make a new date and we'll call its getFullYear method. Now that we have a helper, we can remove this data from every single one of our rendering calls:
hbs.registerHelper('getCurrentYear, () => {
return new Date().getFullYear()
});
app.get('/', (req, res) => {
res.render('home.hbs', {
pageTitle: 'Home Page',
welcomeMessage: 'Welcome to my website'
});
});
app.get('/about', (req, res) => {
res.render('about.hbs', {
pageTitle: 'About Page'
});
});
This is going to be really fantastic because there really is no need to compute it for every page since it's always the same. Now that we've removed that data from the individual calls to render, we will have to use getCurrentYear inside the footer.hbs file:
<footer>
<p>Created By Andrew Mead - Copyright {{getCurrentYear}}</p>
</footer>
Instead referencing the current year, we will use the helper getCurrentYear, and there's no need for any special syntax. When you use something inside curly braces that clearly isn't a partial, handlebars is first going to look for a helper with that name. If there is no helper, it'll look for a piece of data with that getCurrentYear name.
In this case, it will find the helper, so everything will work as expected. We can now save footer.hbs, move into the browser, and give things a refresh. When I refresh the page, we still get Copyright 2018 in Home Page:
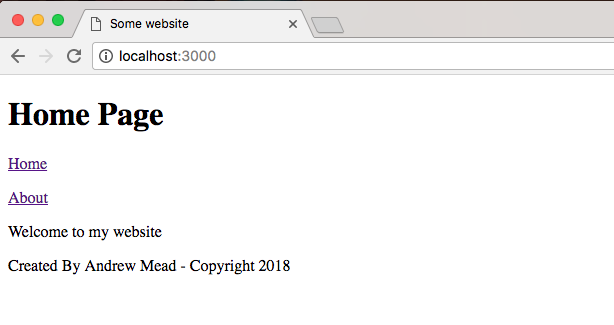
If I go to the About Page, everything looks great:
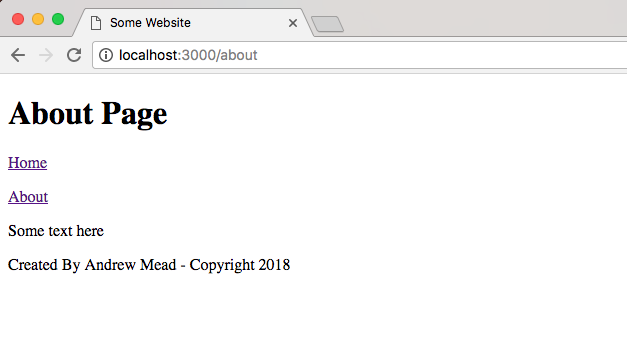
We can prove that data is coming back from our helper by simply returning something else. Let's comment out our helper code in server.js and before the comment, we can use return test, just like this:
hbs.registerHelper('getCurrentYear', () => {
return 'test';//return new Date().getFullYear()
});
We can now save server.js, refresh the browser, and we get tests showing up as shown here:
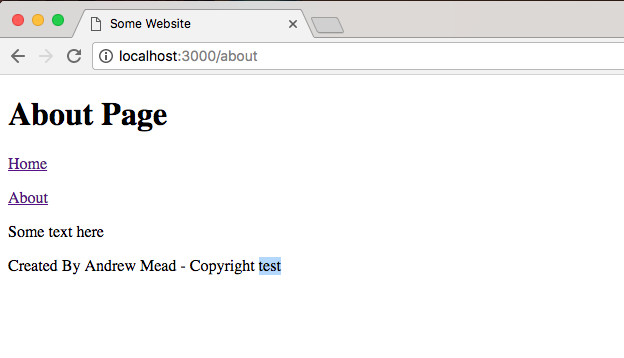
So the data that renders right after the Copyright word is indeed coming from that helper. Now we can remove the code so we return the proper year.
Helpers can also take arguments, and this is really useful. Let's create a second helper that's going to be a capitalization helper. We'll call the helper screamIt and its job will be to take some text and it will return that text in uppercase.
In order to do this, we will be calling hbs.registerHelper again. This helper will be called screamIt, and it will take a function because we do need to run some code in order to do anything useful:
hbs.registerHelper('getCurrentYear', () => {
return new Date().getFullYear()
});
hbs.registerHelper('screamIt', () => {
});
Now screamIt is going to take text to scream and all it will do is call on that string the toUpperCase method. We'll return text.toUpperCase, just like this:
hbs.registerHelper('screamIt', (text) => {
return text.toUpperCase();
});
Now we can actually use screamIt in one of our files. Let's move into home.hbs. Here, we have our welcome message in the p tag. We'll remove it and we'll scream the welcome message. In order to pass data into one of our helpers, we first have to reference the helper by name, screamIt, then after a space we can specify whatever data we want to pass in as arguments.
In this case, we'll pass in the welcome message, but we could also pass in two arguments by typing a space and passing in some other variable which we don't have access to:
<!DOCTYPE html>
<html>
<head>
<meta charset="utf-8">
<title>Some Website</title>
</head>
<body>
{{> header}}
<p>{{screamIt welcomeMessage}}</p>
{{> footer}}
</body>
</html>
For now, we'll use it like this, which means we'll call the screamIt helper, passing in one argument welcomeMessage. Now we can save home.hbs, move back into the browser, go to the Home Page and as shown following, we get WELCOME TO MY WEBSITE in all uppercase:

Using handlebars helpers, we can create both functions that don't take arguments and functions that do take arguments. So when you need to do something to the data inside of your web page, you can do that with JavaScript. Now that we have this in place, we are done.
In this section, you'll learn how to use Express middleware. Express middleware is a fantastic tool. It allows you to add on to the existing functionality that Express has. So if Express doesn't do something you'd like it to do, you can add some middleware and teach it how to do that thing. Now we've already used a little bit of middleware. In server.js file, we used some middleware and we teach Express how to read from a static directory, which is shown here:
app.use(express.static(__dirname + '/public'));
We called app.use, which is how you register middleware, and then we provided the middleware function we want to use.
Now middleware can do anything. You could just execute some code such as logging something to the screen. You could make a change to the request or the response object. We'll do just that in the next chapter when we add API authentication. We'll want to make sure the right header is sent. That header will be expected to have an API token. We can use middleware to determine whether or not someone's logged in. Basically, it will determine whether or not they should be able to access a specific route, and we can also use middleware to respond to a request. We could send something back from the middleware, just like we would anywhere else, using response.render or response.send.
In order to explore middleware, we'll create some basic middleware. Just following where we call app.use registering our Express static middleware, we'll call app.use again:
app.use(express.static(__dirname + '/public'));
app.use();
Now app.use is how you register middleware, and it takes a function. So, we'll pass in an arrow function (=>):
app.use(() => {
});
The use function takes just one function. There is no need to add any other arguments. This function will get called with the request (req) object, the response (res) object and a third argument, next:
app.use((req, res, next) => {
});
Now request and response objects, these should seem familiar by now. They're the exact same arguments we get whenever we register a handler. The next argument is where things get a little trickier. The next argument exists so you can tell Express when your middleware function is done, and this is useful because you can have as much middleware as you like registered to a single Express app. For example, I have some middleware that serves up a directory. We'll write some more that logs some request data to the screen, and we could have a third piece that helps with application performance, keeping track of response times, all of that is possible.
Now inside app.use function, we can do anything we like. We might log something to the screen. We might make a database request to make sure a user is authenticated. All of that is perfectly valid and we use the next argument to tell Express when we're done. So if we do something asynchronous, the middleware is not going to move on. Only when we call next, will the application continue to run, like this:
app.use((req, res, next) => {
next();
});
Now this means if your middleware doesn't call next, your handlers for each request, they're never going to fire. We can prove this. Let's call app.use, passing in an empty function:
app.use((req, res, next) => {
});
Let's save the file and in the Terminal, we'll run our app using nodemon with server.js:
nodemon server.js
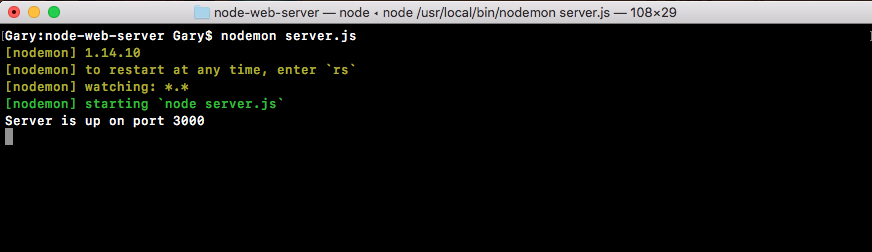
I'll move into the browser and I'll make a request for the home page. I'll refresh the page and you can see that up top, it is trying to load but it's never going to finish:
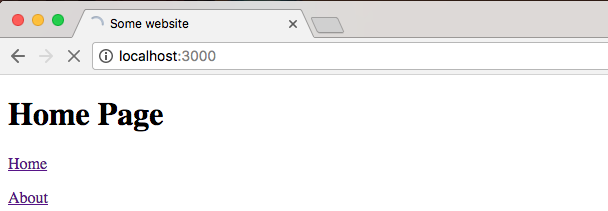
Now it's not that it can't connect to the server. It connects to the server just fine. The real problem is that inside our app, we have middleware that doesn't call next. To fix this, all we'll do is call next like this:
app.use((req, res, next) => {
next();
});
Now when things refresh over inside the browser, we get our Home Page exactly as we expect it:

The only difference is now we have a place where we can add on some functionality.
Inside app.use, we're going to get started by creating a logger that will log out all of the requests that come in to the server. We'll store a timestamp so we can see exactly when someone made a request for a specific URL.
To get started inside the middleware, let's get the current time. I'll make a variable called now, setting it equal to newDate, creating a new instance of our date object, and I'll call it toString method:
app.use((req, res, next) => {
var now = new Date().toString();
next();
});
The toString method creates a nice formatted date, a human-readable timestamp. Now that we have our now variable in place, we can start creating the actual logger by calling console.log.
Let's call console.log, passing in whatever I like. Let's pass in inside of ticks the now variable with a colon after:
app.use((req, res, next) => {
var now = new Date().toString();
console.log(`${now};`)
next();
});
Now if I save my file, things are going to restart in the Terminal because nodemon is running. When we make a request for the site again and we go into the Terminal, we should see the log:

Currently it's just a timestamp, but we are on the right track. Now everything is working because we called next, so after this console.log call prints to the screen, our application continues and it serves up the page.
Inside middleware, we can add on more functionality by exploring the request object. On the request object, we have access to everything about the request—the HTTP method, the path, query parameters, and anything that comes from the client. Whether the client is an app, a browser, or an iPhone, it is all going to be available in that request object. Two things we'll pull off now are the HTTP method and the path.
If you want to look at a full list of the things you have access to, you can go to expressjs.com, and go to API reference:
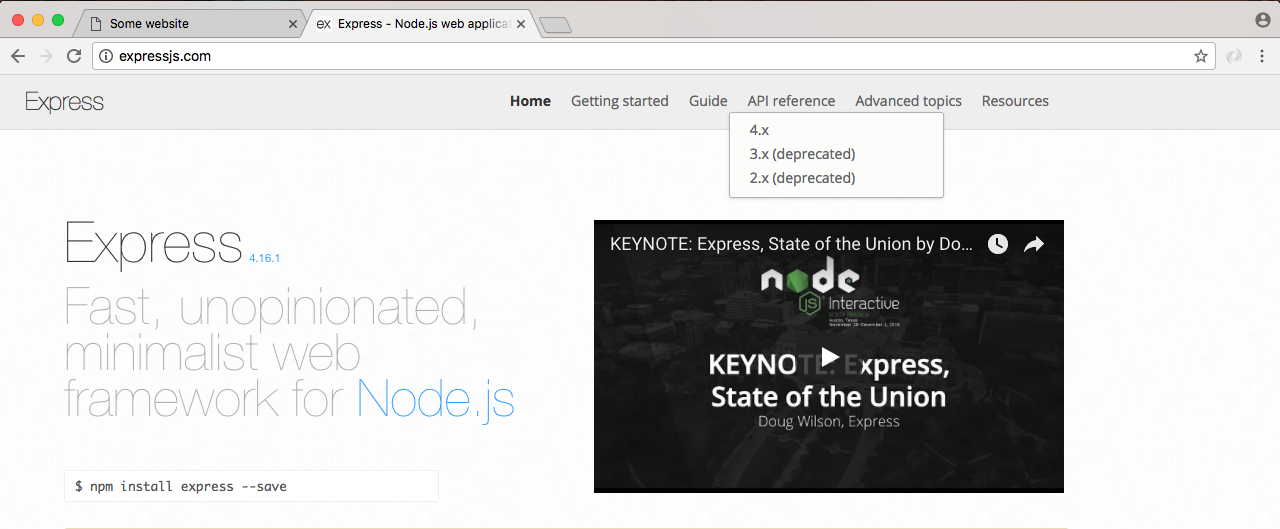
We happen to be using a 4.x version of Express, so we'll click that link:
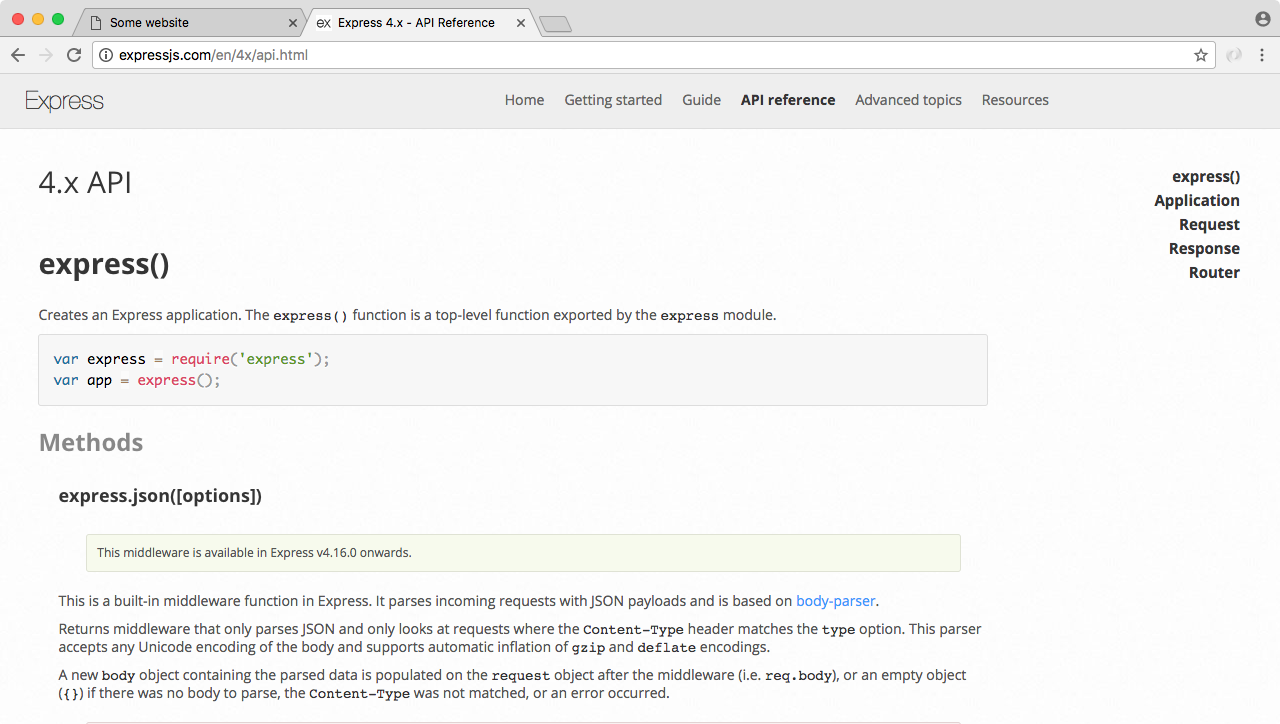
On the right-hand side of this link, we have both Request and Response. We'll look for the request objects, so we'll click that. This'll lead us to the following:
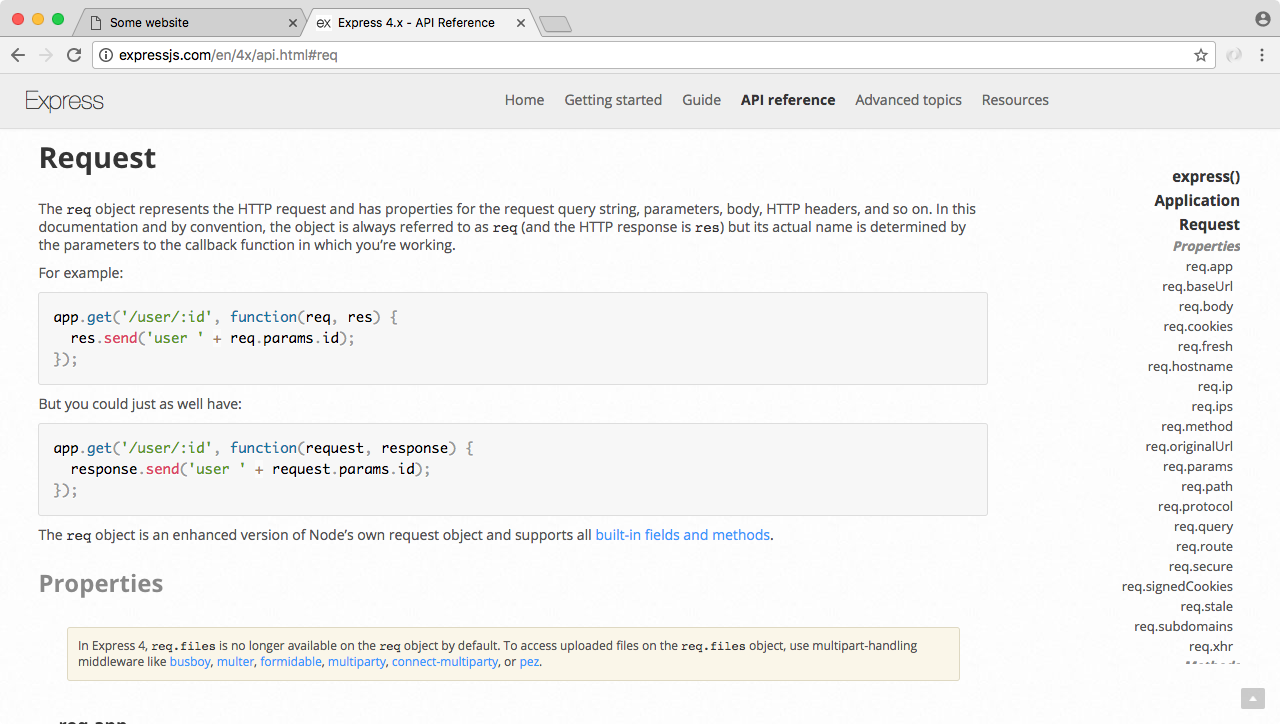
We'll be using two request properties: req.url and req.method. Inside Atom, we can start implementing those, adding them into console.log. Right after the timestamp, we'll print the HTTP method. We'll be using other methods later. For now we've only used the get method. Right inside the console.log, I'll inject request.method printing it to the console:
app.use((req, res, next) => {
var now = new Date().toString();
console.log(`${now}: ${req.method}`)
next();
});
Next up we can print the path so we know exactly what page the person requested. I'll do that by injecting another variable, req.url:
console.log(`${now}: ${req.method} ${req.url}`);
With this in place, we now have a pretty useful piece of middleware. It takes the request object, it spits out some information and then it moves on, letting the server process that request which was added. If we save the file and rerun the app from the browser, we should be able to move into the Terminal and see this new logger printing to the screen, and as shown following we get just that:

We have our timestamp, the HTTP method which is GET, and the path. If we change the path to something more complicated, such as /about, and we move back into the Terminal, we'll see the /about where we accessed req.url:

Now this is a pretty basic example of some middleware. We can take it a step further. Aside from just logging a message to the screen, we'll also print the message to a file.
To print the message to a file, let's load in fs up in the server.js file. We'll create a constant. Call that const fs and set that equal to the return result from requiring the module:
const express = require('express');
const hbs = require('hbs');
const fs = require('fs');
Now we can implement this down following in the app.use. We'll take our template string, which is currently defined inside console.log. We'll cut it out and instead store in a variable. We'll make a variable called log, setting it equal to that template string as shown here:
app.use((req, res, next) => {
var now = new Date().toString();
var log = `${now}: ${req.method} ${req.url}`;
console.log();
next();
});
Now we can pass that log variable into both console.log and into an fs method to write to our file system. For console.log, we will call log like this:
console.log(log);
For fs, I'll call fs.appendFile. Now as you remember, appendFile lets you add on to a file. It takes two arguments: the file name and the thing we want to add. The file name we'll use is server.log. We'll create a nice log file and the actual contents will just be the log message. We will need to add one more thing: we also want to move on to the next line after every single request gets logged, so I'll concatenate the new line character, which will be \n:
fs.appendFile('server.log', log + '\n');
Now that we have this in place, we can test things out. I save the file, which should be restarting things inside of nodemon. Inside Chrome, we can give the page a refresh. If we head back into the Terminal, we do still get my log, which is great:

Notice we also have a request for a favicon.ico. This is usually the icon that's shown in the browser tab. I have one cached from a previous project. There actually is no icon file defined, which is totally fine. The browser still makes the request anyway, which is why that shows up as shown in the previous code snippet.
Inside Atom, we now have our server.log file, and if we open it up, we have a log of all the requests that were made:
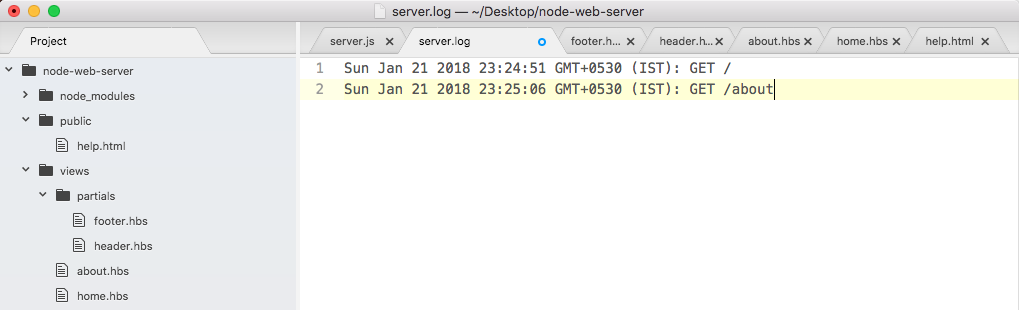
We have timestamps, HTTP methods, and paths. Using app.use, we were able to create some middleware that helps us keep track of how our server is working.
Now there are times where you might not want to call next. We learned that we could call next after we do something asynchronous, such as a read from a database, but imagine something goes wrong. You can avoid calling next to never move on to the next piece of middleware. We would like to create a new view inside the views folder. We'll call this one maintenance.hbs. This will be a handlebars template that will render when the site is in maintenance mode.
We'll start with making the maintenance.hbs file by duplicating home.hbs. Inside maintenance.hbs, all we'll do is wipe the body and add a few tags:
<!DOCTYPE html>
<html>
<head>
<meta charset="utf-8">
<title>Some Website</title>
</head>
<body>
</body>
</html>
As shown in the following code, we'll add an h1 tag to print a little message to the user:
<body>
<h1></h1>
</body>
We're going to use something like We'll be right back:
<body>
<h1>We'll be right back</h1>
</body>
Next, I can add a paragraph tag:
<body>
<h1>We'll be right back</h1>
<p>
</p>
</body>
Inside the paragraph, I'll leave a little message: The site is currently being updated:
<p>
The site is currently being updated.
</p>
Now that we have our template file in place, we can define our maintenance middleware. This is going to bypass all of our other handlers, where we render other files and print JSON, and instead it'll just render this template to the screen. We'll save the file, move into server.js, and define that middleware.
Right next to the previously-defined middleware, we can call app.use passing in our function. The function will take those three arguments: request (req), response (res), and next:
app.use((req, res, next) => {
})
Inside the middleware, all we'll need to do is call res.render. We'll add res.render passing in the name of the file we want to render; in this case, it's maintenance.hbs:
app.use((req, res, next) => {
res.render('maintenance.hbs');
});
That is all you needed to do to set up our main middleware. This middleware will stop everything after it from executing. We don't call next, so the actual handlers in the app.get function, they will never get executed and we can test this.
Inside the browser, we'll refresh the page, and we will get the following output:
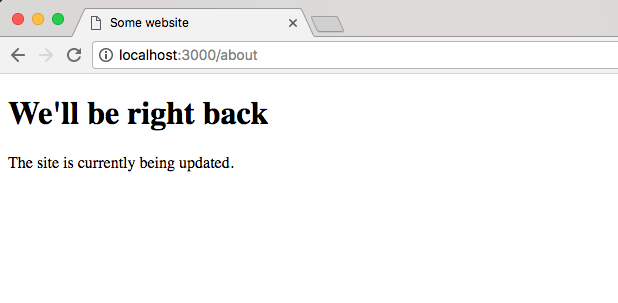
We get the maintenance page. We can go to the home page and we get the exact same thing:
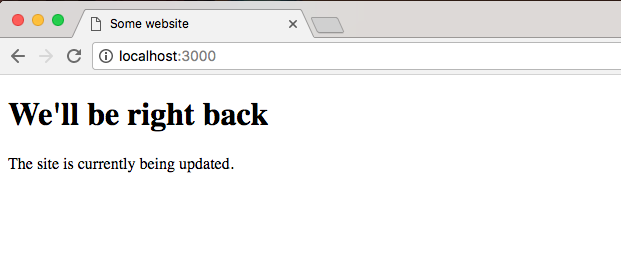
Now there's one more really important piece to middleware we haven't discussed yet. Remember inside the public folder, we have a help.html file as shown here:
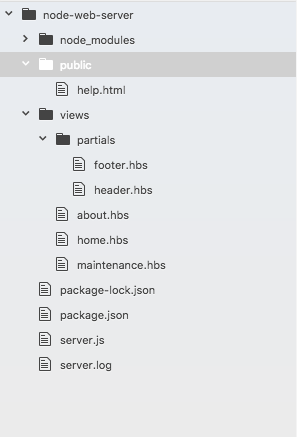
If we visit this in the browser by going to localhost:3000/help.html, we'll still get the help page. We'll not get the maintenance page:
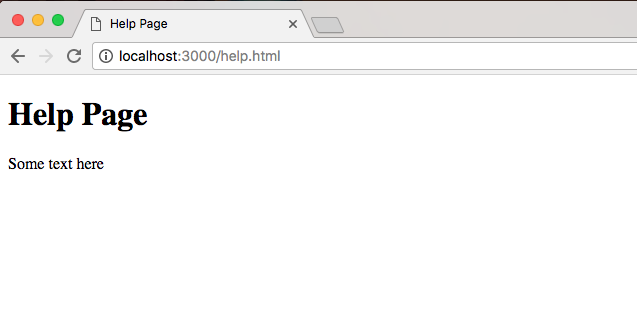
That is because middleware is executed in the order you call app.use. This means the first thing we do is we set up our Express static directory, then we set up our logger, and finally we set up our maintenance.hbs logger:
app.use(express.static(__dirname + '/public'));
app.use((req, res, next) => {
var now = new Date().toString();
var log = `${now}: ${req.method} ${req.url}`;
console.log(log);
fs.appendFile('server.log', log + '\n');
next();
});
app.use((req, res, next) => {
res.render('maintenance.hbs');
});
This is a pretty big problem. If we also want to make the public directory files such as help.html private, we'll have to reorder our calls to app.use because currently the Express server is responding inside of the Express static middleware, so our maintenance middleware doesn't get a chance to execute.
To resolve this, we'll take the app.use Express static call, remove it from the file, and add it after we render the maintenance file to the screen. The resultant code is going to look like this:
app.use((req, res, next) => {
var now = new Date().toString();
var log = `${now}: ${req.method} ${req.url}`;
console.log(log);
fs.appendFile('server.log', log + '\n');
next();
});
app.use((req, res, next) => {
res.render('maintenance.hbs');
});
app.use(express.static(__dirname + '/public'));
Now, everything will work as expected, no matter what we're going to log the request. Then we'll check if we're in maintenance mode if the maintenance middleware function is in place. If it is, we'll render the maintenance file. If it's not, we'll ignore it because it'll be commented out or something like that, and finally we'll be using Express static. This is going to fix all those problems. If I re-render the app now, I get the maintenance page on help.html:
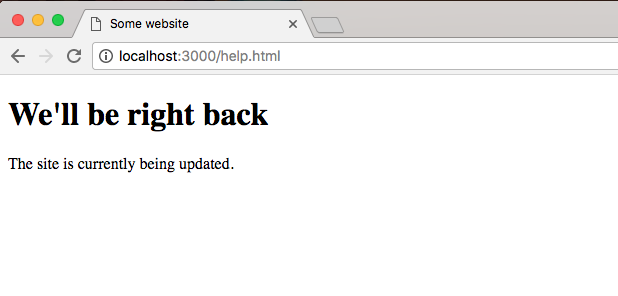
If I go back to the root of the website, I still get the maintenance page:

Now once we're done with the maintenance middleware, we can always comment it out. This will remove it from being executed, and the website will work as expected.
This has been a quick dive into Express middleware. We'll be using it a lot more throughout the book. We'll be using middleware to check if our API requests are actually authenticated. Inside the middleware, we'll be making a database request, checking if the user is indeed who they say they are.
In this chapter you learned about Express and how it can be used to easily create websites. We looked at how we can set up a static web server, so when we have an entire directory of JavaScript, images, CSS, and HTML. We can serve that up easily without needing to provide routes for everything. This will let us create all sorts of applications, which we'll be doing throughout the rest of the book.
Next, we continued on learning how to use Express. We took a look at how we can render dynamic templates, kind of like we would with a PHP or Ruby on Rails file. We have some variables and we rendered a template injecting those variables. Then we learned a little bit about handlebars partials, which let us create reusable chunks of code like headers and footers. We also learned about Handlebars helpers, which is a way to run some JavaScript code from inside of your handlebars templates. Lastly, we moved back to talking about Express and how it can customize our requests, responses, our server.
In the next chapter, we'll look into deploying applications to the web.
In this chapter, we'll worry about adding version control and deploying our applications because when it comes to creating real-world Node apps, deploying your app to the Web is obviously a pretty big part of that. Now in the real world, every single company uses some form of version control. It is essential to the software development process, and most of them aren't using Git. Git has become really popular, dominating the market share for version control. Git is also free and open source, and there is a ton of great educational material. They have a book on how to learn Git. It's free and Stack Overflow is filled with Git-specific questions and answers.
We'll be using Git to save our project. We'll also be using it to back up our work to a service called GitHub, and finally we'll be using Git to deploy our project live to the Web. So we'll be able to take our web server and deploy it for anybody to visit. It won't just be available on localhost.
Specifically, we'll look into the following topics:
In this section, we'll learn how to set up and use Git, which is a version control system. Git will let us keep track of the changes to our project over time. This is really useful when something goes wrong and we need to revert to a previous state in the project where things were working. It's also super useful for backing up our work.
To get started, we will need to install Git on the computer, but luckily for us it is a really simple installation process. It's one of those installers where we just click on the Next button through a few steps. So let's go ahead and do that.
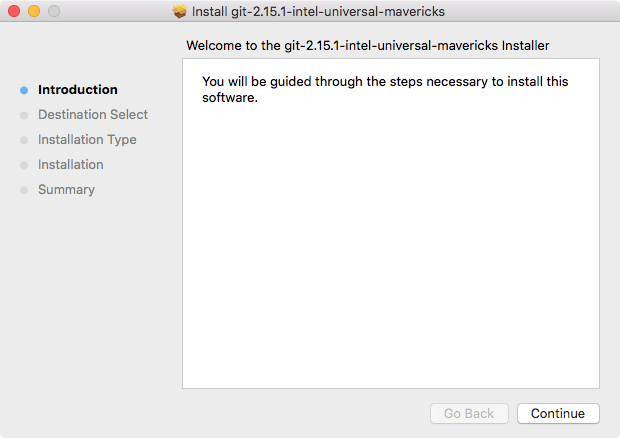
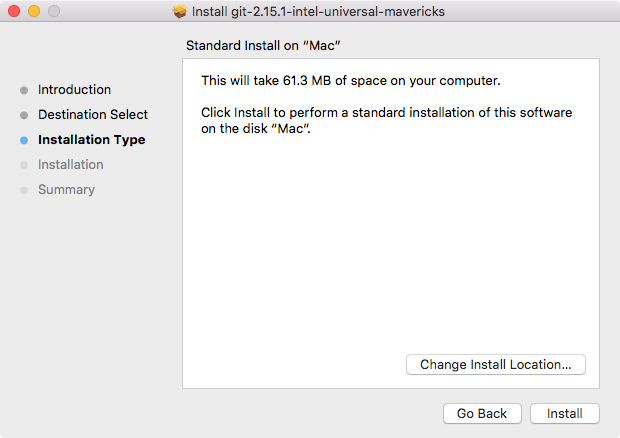
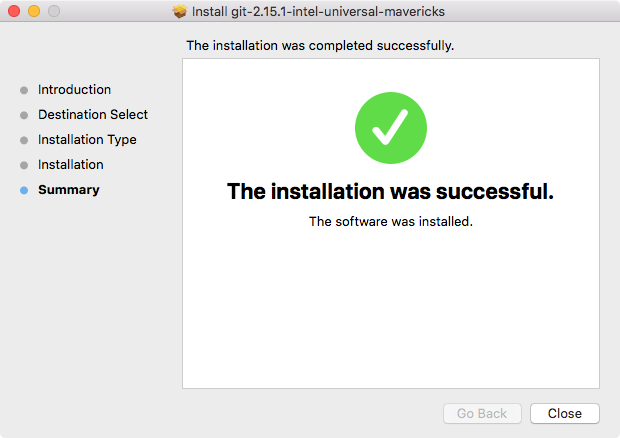
If you're on macOS, you'll need to launch the package installer and you might get the following message box saying that it's from an unidentified developer:
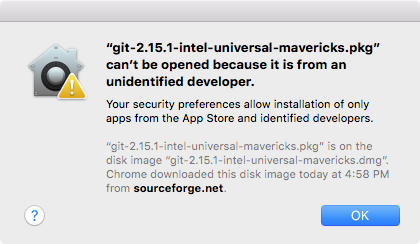
This is because it is distributed via a third party as opposed to being in the macOS App Store. We can go ahead and right-click on the package, then click on the Open button and confirm that we do indeed want to open it.
Once you're at the installer, the process is going to be pretty simple. You can essentially click on Continue and Next throughout every step.
If you're on Windows though, there is an important distinction. Inside the installer you're going to see a screen just like this:
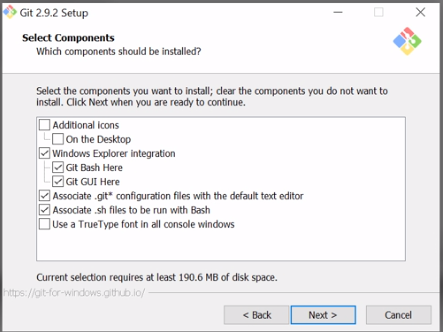
It is really important that you also install Git Bash as shown in the screenshot. Git Bash is a program that simulates a Linux-type Terminal, and it's going to be really essential when we create our SSH keys in the next section to uniquely identify our machine.
Now, let's move in to the Terminal to test the installation. From the Terminal we can go ahead and run git --version. This is going to print a new version of Git we have installed:
git --version
As shown in the following screenshot, we can see we have git version 2.14.3:

With successful installation of Git, we are now ready to turn our node-web-server directory into a Git repository. In order to do this, we'll the following command:
git init
The git init command needs to get executed from the root of our project, the folder that has everything that we want to keep track of. In our case, node-web-server is that folder. It has our server.js file, our package.json file, and all of our directories. So, from the server folder, we'll run git init:

This creates a .git directory inside that folder. We can prove that by running the ls -a command:
ls -a
As shown in the following screenshot, we get all of the directories including the hidden ones and right here I do indeed have .git:

Now this directory is not something we should be manually updating. We'll be using commands from the Terminal in order to make changes to the Git folder.
Let's use the clear command to clear the Terminal output, and now we can start looking at exactly how Git works.
As mentioned earlier, Git is responsible for keeping track of the changes to our project, but by default it doesn't actually track any of our files. We have to tell Git exactly which files we want it to keep track of and there's a good reason for this. There are files in every project that we're most likely not going to want to add to our Git repo, and we'll talk about which ones and why later. For now let's go ahead and run the following command:
git status
Now all these commands need to get executed from inside of the root of the project. If you try to run this outside a repository, you'll get an error like git repository not found. What that means is that Git cannot find that .git directory in order to actually get the status of your repository.
When we run this command, we'll get some output that looks like this:
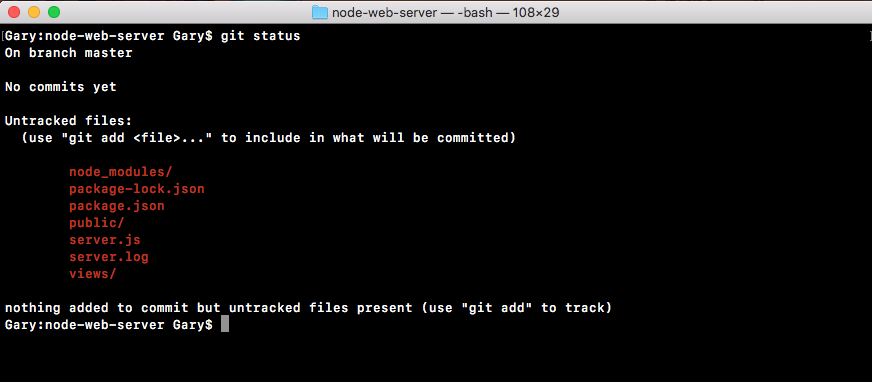
The important pieces for now is the Untracked files header and all of the files underneath it. These are all of the files and folders that Git seized, but it's currently not tracking. Git doesn't know if you want to keep track of the changes to these files or if you want to ignore them from your repository.
Now the views folder, for example, is something we definitely want to keep track of. This is going to be essential to the project and we want to make sure that whenever someone downloads the repository, they get the views folder. The log file on the other hand doesn't really need to be included in Git. In general our log files are not going to be committed, since they usually contain information specific to a point in time when the server was running.
As shown in the preceding code output, we have server.js, our public folder, and package.json. These are all essential to the process of executing the app. These are definitely going to be added to our Git repository, and the first one above we have is the node_modules folder. The node_modules folder is what's called a generated folder.
Generated folders are easily generated by running a command. In our case, we can regenerate this entire directory using npm install. We're not going to want to add Node modules to our Git repository because its contents differ depending on the version of npm you have installed and depending on the operating system you're using. It's best to leave off Node modules and let every person who uses your repository manually install the modules on the machine they're actually going to be running the app.
Now we have these six folders and files listed, so let's go ahead and add the four folders and files we want to keep. To get started, we'll use any git add command. The git add command lets us tell the Git we want to keep track of a certain file. Let's type the following command:
git add package.json
After we do this, we can run it git status again, and this time we get something very different:
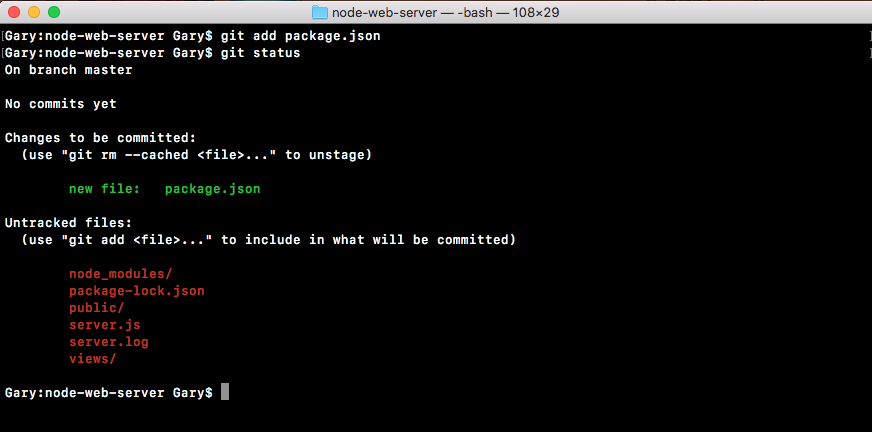
Now we have an Initial commit header. This is new, and we have our old Untracked files header. Notice under Untracked files, we don't have package.json anymore. That is moved up to the Initial commit header. These are all of the files that are going to be saved, also known as committed, when we make our first commit. Now we can move on adding the 3 others. We'll use a git add command again to tell Git we want to track the public directory. We can run a git status command to confirm it was added as expected:

As shown in the preceding screenshot, we can see the public/help.html file is now going to be committed to Git once we run a commit.
Next up we can add server.js with git add server.js, and we can add the views directory using git add views, just like this:
git add server.js
git add views/
We'll run a git status command to confirm:
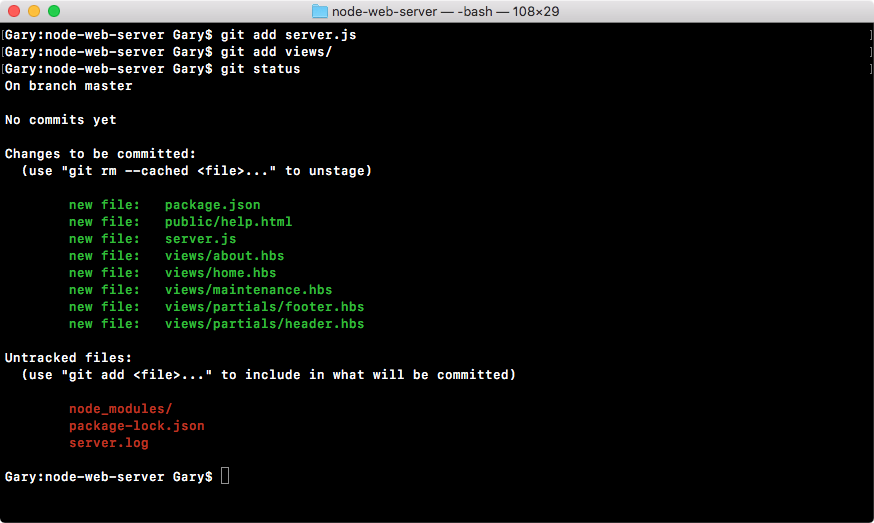
Everything looks good. Now the Untracked files are going to sit around here until we do one of two things—we either add them to the Git repository or ignore them using a custom file that we're going to create inside Atom.
Inside Atom, we'd like to make a new file called .gitignore, in our root of our project. The gitignore file is going to be part of our Git repository and it tells get which folders and files you want to ignore. In this case we can go ahead and ignore node_modules, just like this:
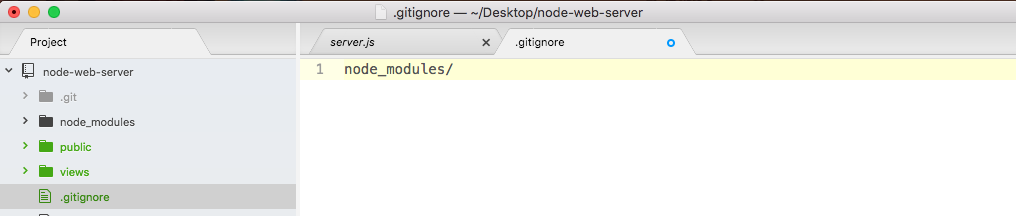
When we save the gitignore file and rerun git status from the Terminal, we'll now get a really different result:
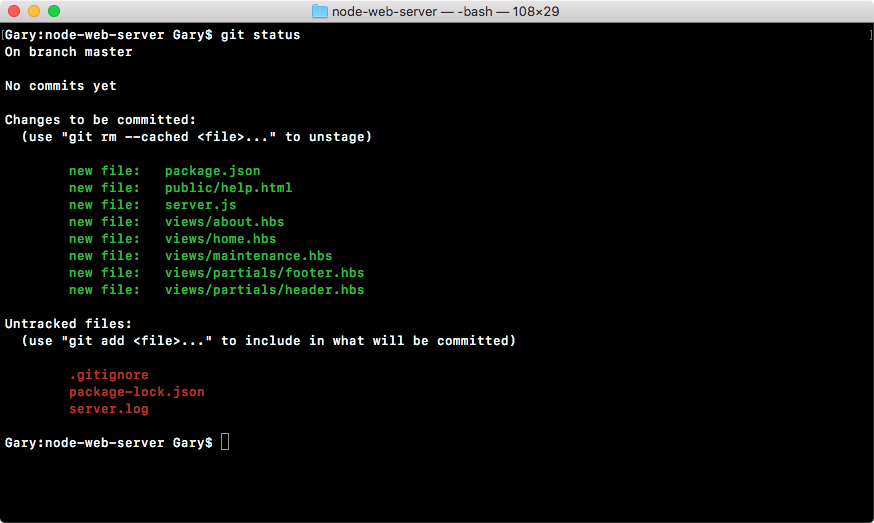
As shown, we can see we have a new untracked file—.gitignore—but the node_modules directory is nowhere in sight, and that's exactly what we want. We want to remove this completely, making sure that it never ever gets added to the Git repo. Next up, we can go ahead and ignore that server.log file by typing its name, server.log:
node modules/
server.log
We'll save gitignore, run git status from the Terminal one more time, and make sure everything looks great:
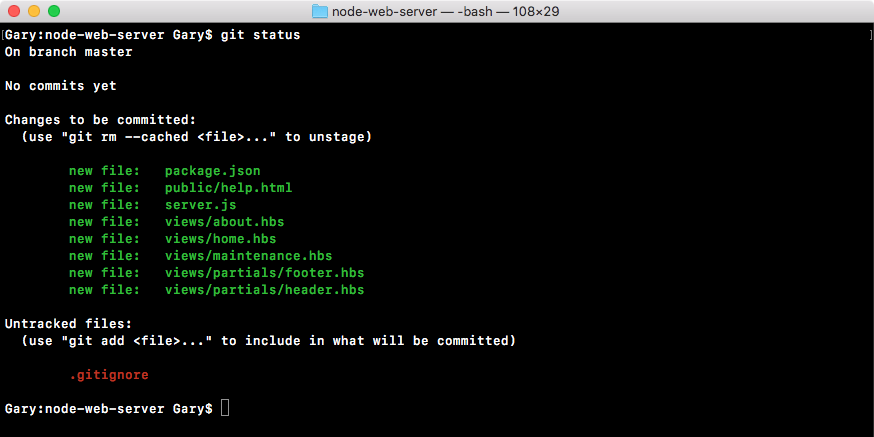
As shown, we have a gitignore file as our only untracked file. The server.log file and node_modules are nowhere in sight.
Now that we have gitignore, we are going to be adding it to Git using git add .gitignore and when we run git status, we should be able to see that all the files that show up are under the initial commit:
git add .gitignore
git status
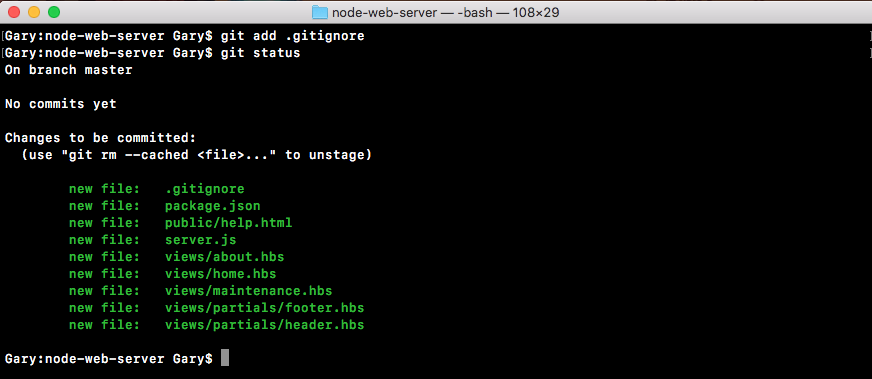
So now it's time to make a commit. A commit really only requires two things. It requires some change in the repository. In this case, we're teaching Git how to track a ton of new files, so we are indeed changing something, and it requires a message. We've already handled the file part of things. We've told Git what we want to save, we just haven't actually saved it yet.
In order to make our first commit and save our first thing into the Git repository, we'll run git commit and provide one flag, the m flag, which is short message. After that inside quotes, we can specify the message that we want to use for this commit. It's really important to use these messages so when someone's digging through the commit history, the list of all the changes to the project can be seen, which are actually useful. In this case, Initial commit is always a good message for your first commit:
git commit -m 'Initial commit'
I'll go ahead and hit enter and as shown in the following screenshot, we see all of the changes that happened to the repo:
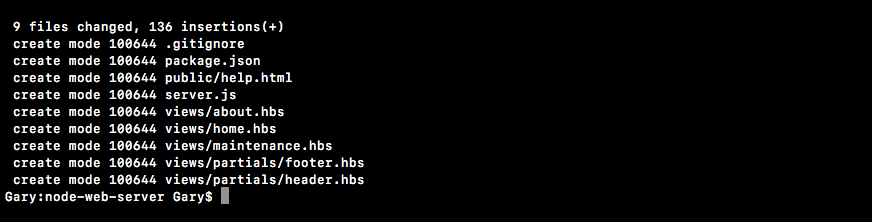
We have created a bunch of new files inside of the Git repository. These are all of the files that we told Git we want to keep track of and this is fantastic.
We now have our very first commit, which essentially means that we've saved the project at its current state. If we make a big change to server.js, messing stuff up to not be able figure out how to get it back to the way it was, we can always get it back because we made a Git commit. Now we'll explore some more fancy Git things in the later sections. We'll be talking about how to do most of the things you want to do with Git, including deploying to Heroku and pushing to GitHub.
Now that you have a local Git repository, we'll look at how we can take that code and push it up to a third-party service called GitHub. GitHub is going to let us host our Git repositories remotely, so if our machine ever crashes we can get our code back, and it also has great collaboration tools, so we can open-source a project, letting others use our code, or we can keep it private so only people we choose to collaborate with can see the source code.
Now in order to actually communicate between our machine and GitHub, we'll have to create something called an SSH key. SSH keys were designed to securely communicate between two computers. In this case, it will be our machine and the GitHub server. This will let us confirm that GitHub is who they say they are and it will let GitHub confirm that we indeed have access to the code we're trying to alter. This will all be done with SSH keys and we'll create them first, then we'll configure them, and finally we'll push our code up to GitHub.
The process of setting up SSH keys can be a real burden. This is one of those topics where there's really small room for error. If you type any of the commands wrong, things are just not going to work as expected.
Now if you're on Windows, you'll need to do everything in this section from a Git Bash as opposed to the regular Command Prompt because we'll be using some commands that just are not available on Windows. They are, however, available on Linux and macOS. So if you're using either of those operating systems, you can continue using the Terminal you've been using throughout the book.
Before we dive into the commands, I want to show you a quick guide that exists online in case you get stuck or you have any questions. You can Google GitHub SSH keys, and this is going to link you to an article called generating an SSH key: https://help.github.com/articles/connecting-to-github-with-ssh/. Once you're here, you'll be able to click on the SSH breadcrumb, and this is going to bring you back to all of their articles on SSH keys:
Out of these articles, the nested four are the ones we'll be focusing on checking if we have a key, generating a new key, adding the key to GitHub, and finally testing that everything worked as expected. If you run into any problems along any of these steps, you can always click on the guide for that step and you can pick the operating system you're using so you can see the appropriate commands for that OS. Now that you know this exists, let's go ahead and do it together.
The first command we'll run from the Terminal is going to check if we have an existing SSH key. Now if you don't, that's fine. We'll go ahead and create one. If you do or you're not sure you do, you can run the following command to confirm whether or not you have one: ls with the al flag. This is going to print all the files in a given directory, and the directory where SSH keys are stored by default on your machine is going to be at the user directory, which you can use (~) as a shortcut for /.ssh:
ls -al ~/.ssh
When you run the command, you'll see all of the contents inside of that SSH directory:

In this case I've deleted all of my SSH keys so I have nothing inside my directory. I just have paths for the current directory and the previous one. Now that we have this in place and we've confirmed we don't have a key, we can go ahead and generate one. If you do already have a key, a file like id_rsa, you can go ahead and skip the process of generating the key.
To make a key we'll use the ssh-keygen command. Now the ssh-keygen takes three arguments. We'll pass in t setting it equal to rsa. We'll pass in b which is for bytes, setting that equal to 4096. Make sure to match these arguments exactly, and we'll be setting a capital C flag which will get set equal to your email:
ssh-keygen -t rsa -b 4096 -C 'garyngreig@gmail.com'
Now we can go ahead and hit enter, which will generate two new files in our .ssh folder. When you run this command, you'll get greeted with a few steps. I want you to use the default for all of them:

Here they want to ask you if you want to customize the file name. I do not recommend doing that. You can just hit enter:

Next up they ask you for a passphrase, which we'll not use. I'll hit enter for no passphrase, then I need to confirm the passphrase, so I'll just hit enter again:
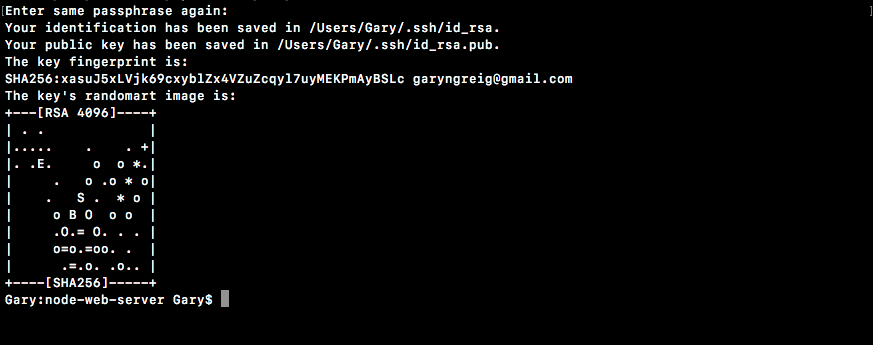
As shown, we get a little message that our SSH key was properly created and that it was indeed saved in our folder.
With this in place, I can now cycle back through my previous commands running the ls command, and what do I get?

We get id_rsa and I get the id_rsa.pub file. The id_rsa file contains the private key. This is the key you should never give to anyone. It lives on your machine and your machine only. The .pub file, which is the public file. This one is the one you'll give to third-party services such as GitHub or Heroku, which we'll be doing in the next several sections.
Now that our keys are generated, the last thing we need to do is start up the SSH agent and add this key so it knows that it exists. We'll do this by running two commands. These are:
First up we'll run eval, and then we'll open some quotes and inside the quotes, we'll use the dollar sign and open and close some parentheses just like this:
eval "$()"
Inside our parentheses we'll type ssh-agent with the s flag:
eval "$(ssh-agent -s)"
This will start up the SSH agent program and it will also print the process ID to confirm it is indeed running, and as shown, we get Agent pid 1116:

The process ID is obviously going to be different for everyone. As long as you get something back like this you are good to go.
Next up we have to tell the SSH agent where this file lives. We'll do that using ssh-add. This takes the path to our private key file which we have in the user directory /.ssh/id_rsa:
ssh-add ~/.ssh/id_rsa
When I run this, I should get a message like identity added:

This means that the local machine now knows about this public/private key pair and it'll try to use these credentials when it communicates with a third-party service such as GitHub. Now that we have this in place, we are ready to configure GitHub. We'll make an account, set it up, and then we'll come back and test that things are working as expected.
To configure GitHub, follow these steps:
Here, you need to do two things: give it a name, and add the key.
First add the name. The name can be anything you like. For example, I usually use one that uniquely identifies my computer since I have a couple. I'll use MacBook Pro, just like this.

Next up, add the key.
To add the key, we need to grab the contents of the id_rsa.pub file, we generated in the previous sub-section. That file contains the information that GitHub needs in order to securely communicate between our machine and their machines. There are different methods to grab the key. In the browser, we have the Adding a new SSH key to your GitHub account article for our reference.
Then, move into the Terminal and run it.
pbcopy < ~/.ssh/id_rsa.pub
This copies the contents of the file to the clipboard. You can also open the command up with a regular text editor and copy the contents of the file. We can use any method to copy the file. It doesn't matter how you do it. All that matters is you do.

The contents of id_rsa.pub should start with ssh-rsa and it should end with that email you used.
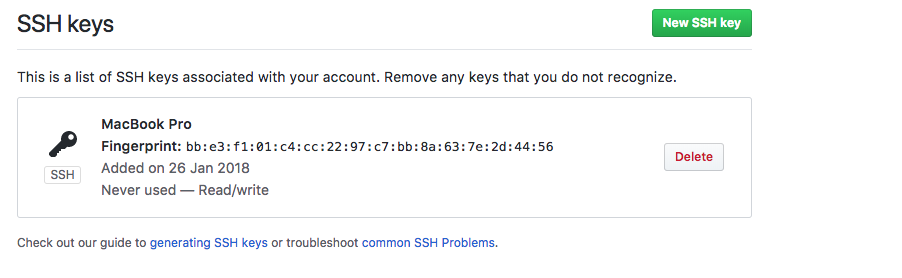
Now we can go ahead and test that things are working by running one command from the Terminal. Once again this command can be executed from anywhere on your machine. You don't need to be in your project folder to do this.
To test the working of our GitHub configuration, we'll use ssh, which tries to make a connection. We'll use the T flag, followed by the URL we want to connect to you get at git@github.com:
ssh -T git@github.com
This is going to test our connection. It will make sure that the SSH keys are properly set up and we can securely communicate with GitHub. When I run the command I get a message saying that The authenticity of host 'github.com (192.30.253.113)' can't be established.

We know that we want to communicate with github.com. We're expecting that communication to happen, so we can go ahead and enter yes:

From here, we get a message from the GitHub servers as shown in the preceding screenshot. If you are seeing this message with your username then you are done. You're ready to create your first repository and push your code up.
Next, we'll move into GitHub, go back to the home page, and create a new repository.
To create a new repository, follow these steps:
This will lead us to the new repository page:
Once you have a name, you could give it an optional description and you can pick whether you want to go with a public or private repository.

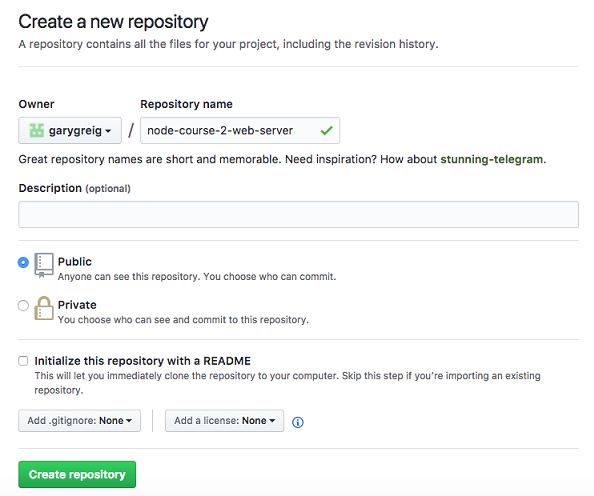
This is going to get brought to your repository page:
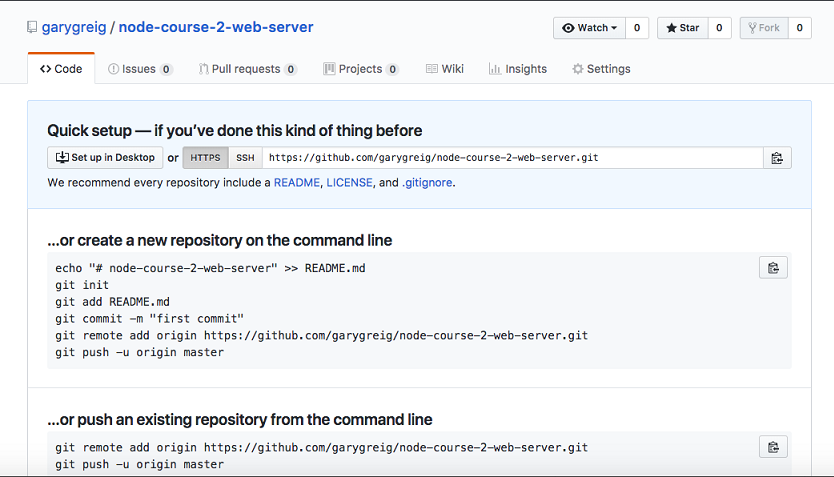
It will give you a little setup because currently there is no code to view, so it will give you a few instructions depending on which situation you're in.
Now, out of the preceding three setup instructions, we don't need the one for creating a new repository. We are not going to use the one for importing our code from some other URL. What we have is an existing repository and we want to push it from the command line.

We'll run these two commands from inside our project:
Remotes let Git know which third-party URLs you want to sync up with. Maybe I want to push my code to GitHub to communicate with my co-workers. Maybe I also want to be able to push up to Heroku to deploy my app. That means you would want two remotes. In our case, we'll just add one, so I'll copy this URL, move into the Terminal, paste it, and hit enter:
git remote add origin https://github.com/garygreig/node-course-2-web-server.git
Now that we have our git remote added, we can go ahead and run that second command. We'll use the second command extensively throughout the book. In the Terminal, we can copy and paste the code for second command, and run it:
git push -u origin master
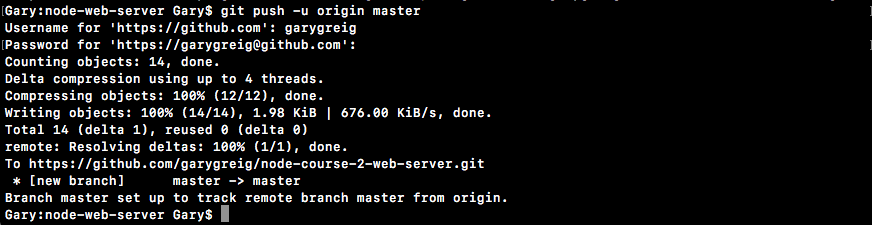
As shown in the preceding screenshot, we can see everything went great. We were able to successfully write all of our data up to GitHub, and if we go back into the browser and refresh the page, we're no longer going to see those setup instructions. Instead, we're going to see our repository, kind of like a tree view:
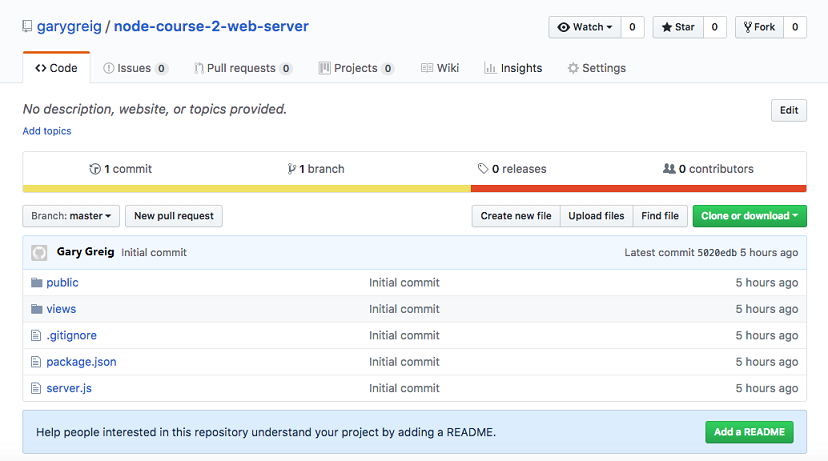
Here we can see we have our server.js file, which is great. We don't see the log file or node_module file, which is good, because we ignored that. I have my public directory. Everything works really really well. We also have issues tracking, Pull requests. You can create a Wiki page which lets you set up instructions for your repository. There's a lot of really great features that GitHub has to offer. We'll be using just the very basic features.
On our repository, we can see we have one commit and if we click on that one commit button, you can actually go to the commits page and here we see the initial commit message that we typed. We made that commit in the previous section:
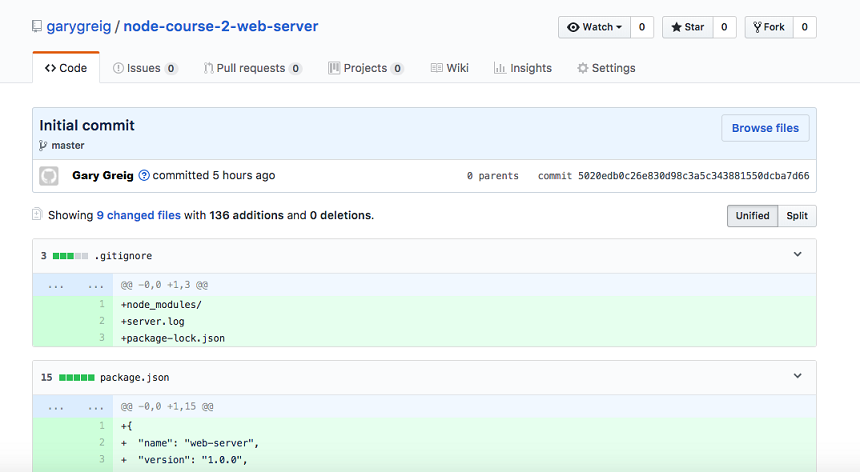
This is going to let us keep track of all our code, revert if we make unwanted changes, and manage our repository. Now that we have our code pushed up, we are done.
In this section, you'll deploy your Node app live to the Web using Heroku. By the end of the section, you'll have the URL you can give anybody and they'll be able to go to that URL in their browser to view the application. We'll do this via Heroku.
Heroku is a website. It's a web app for managing web applications that are hosted in the cloud. It's a really great service. They make it almost effortless to create new apps, deploy your apps, update apps, and add cool add-on-things such as logging and error tracking, all of that is built in. Now Heroku, like GitHub, does not require a credit card to sign up and there is a free tier, which we'll use. They have paid plans for just about everything, but we can get away with the free tier for everything we'll do in this section.
To kick things off, we'll open up the browser and go to heroku.com. Here we can go ahead and sign up for a new account. Take a quick moment to either log in to your existing one or sign up for a new one. Once log in, it'll show you the dashboard. Now your dashboard will look something like this:
Although there might be a greeting telling you to create a new application, which you can ignore. I have a bunch of apps. You might not have these. That is perfectly fine.
The next thing we'll do is install the Heroku command-line tools. This will let us create apps, deploy apps, open apps, and do all sorts of really cool stuff from the Terminal, without having to come into the web app. That will save us time and make development a lot easier. We can grab the download by going to toolbelt.heroku.com.

Here we're able to grab the installer for whatever operating system, you happen to be running on. So, let's start the download. It's a really small download so it should happen pretty quickly.
Once it's done, we can go ahead and run through the process:
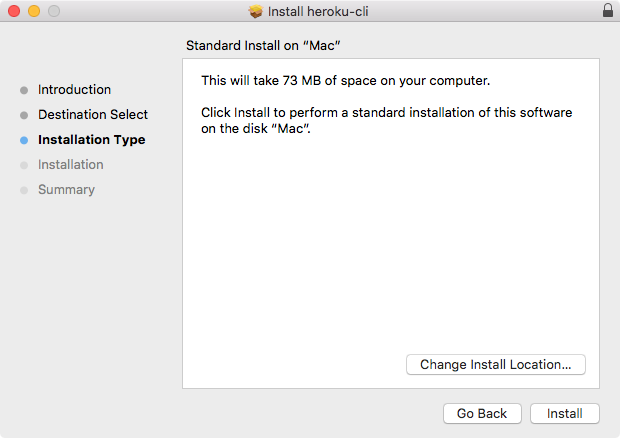
This is a simple installer where you just click on Install. There is no need to customize anything. You don't have to enter any specific information about your Heroku account. Let's go ahead and complete the installer.
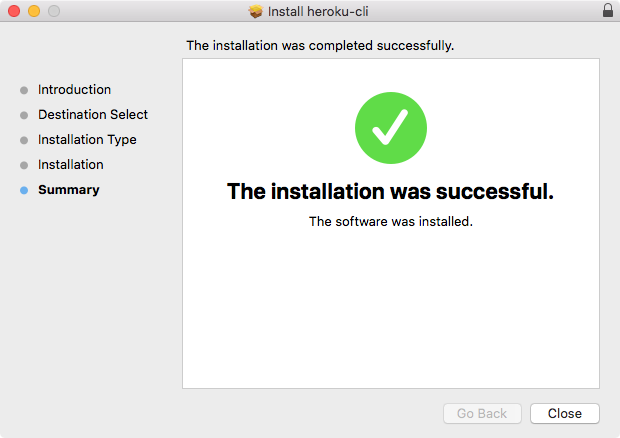
This will give us a new command from the Terminal that we can execute. Before we can do that, we do have to log in locally in the Terminal and that's exactly what we'll do next.
Now we will start off the Terminal. If you already have it running, you might need to restart it in order for your operating system to recognize the new command. You can test that it got installed properly by running the following command:
heroku --help
When you run this command, you'll see that it's installing the CLI for the first time and then we'll get all the help information. This will tell us what commands we have access to and exactly how they work:
Now we will need to log in to the Heroku account locally. This process is pretty simple. In the preceding code output, we have all of the commands available and one of them happens to be login. We can run heroku login just like this to start the process:
heroku login
I'll run the login command and now we just use the email and password that we had set up before:

I'll type in my email and password. Typing for Password is hidden because it's secure. And when I do that you see Logged in as garyngreig@gmail.com shows up and this is fantastic:

Now we're logged in and we're able to successfully communicate between our machine's command line and the Heroku servers. This means we can get started creating and deploying applications.
Now before going ahead, we'll use the clear command to clear the Terminal output and get our SSH key on Heroku, kind of like what we did with GitHub, only this time we can do it via the command line. So it's going to be a lot easier. In order to add our local keys to Heroku, we'll run the heroku keys:add command. This will scan our SSH directory and add the key up:
heroku keys:add
Here you can see it found a key the id_rsa.pub file: Would you like to upload it to Heroku?.

Type Yes and hit enter:

Now we have our key uploaded. That is all it took. Much easier than it was to configure with GitHub. From here, we can use the heroku keys command to print all the keys currently on our account:
heroku keys

We could always remove them using heroku keys:remove command followed by the email related to that key. In this case, we'll keep the Heroku key that we have. Next up, we can test our connection using SSH with the v flag and git@heroku.com:
ssh -v git@heroku.com
This will communicate with the Heroku servers:
As shown, we can see it's asking that same question: The authenticity of the host 'heroku.com' can't be established, Are you sure you want to continue connecting? Type Yes.
You will see the following output:
Now when you run that command, you'll get a lot of cryptic output. What you're looking for is authentication succeeded and then public key in parentheses. If things did not go well, you'll see the permission denied message with public key in parentheses. In this case, the authentication was successful, which means we are good to go. I'll run clear again, clearing the Terminal output.
Now we can turn our attention towards the application code because before we can deploy to Heroku, we will need to make two changes to the code. These are things that Heroku expects your app to have in place in order to run properly because Heroku does a lot of things automatically, which means you have to have some basic stuff set up for Heroku to work. It's not too complex—some really simple changes, a couple one-liners.
First up in the server.js file down at the very bottom of the file, we have the port and our app.listen statically coded inside server.js:
app.listen(3000, () => {
console.log('Server is up on port 3000');
});
We need to make this port dynamic, which means we want to use a variable. We'll be using an environment variable that Heroku is going to set. Heroku will tell your app which port to use because that port will change as you deploy your app, which means that we'll be using that environment variable so we don't have to swap out our code every time we want to deploy.
With environment variables, Heroku can set a variable on the operating system. Your Node app can read that variable and it can use it as the port. Now all machines have environment variables. You can actually view the ones on your machine by running the env command on Linux or macOS or the set command on Windows.
What you'll get when you do that is a really long list of key-value pairs, and this is all environment variables are:
Here, we have a LOGNAME environment variable set to Andrew. I have a HOME environment variable set to my home directory, all sorts of environment variables throughout my operating system.
One of these that Heroku is going to set is called PORT, which means we need to go ahead and grab that port variable and use it in server.js instead of 3000. Up at the very top of the server.js file, we'd to make a constant called port, and this will store the port that we'll use for the app:
const express = require('express');.
const hbs = require('hbs');
const fs = require('fs');
const port
Now the first thing we'll do is grab a port from process.env. The process.env is an object that stores all our environment variables as key-value pairs. We're looking for one that Heroku is going to set called PORT:
const port = process.env.PORT;
This is going to work great for Heroku, but when we run the app locally, the PORT environment variable is not going to exist, so we'll set a default using the OR (||) operator in this statement. If process.env.port does not exist, we'll set port equal to 3000 instead:
const port = process.env.PORT || 3000;
Now we have an app that's configured to work with Heroku and to still run locally, just like it did before. All we have to do is take the PORT variable and use that in app.listen instead of 3000. As shown, I'm going to reference port and inside our message, I'll swap it out for template strings and now I can replace 3000 with the injected port variable, which will change over time:
app.listen(port, () => {
console.log(`Server is up on port ${port}`);
});
With this in place, we have now fixed the first problem with our app. I'll now run node server.js from the Terminal, like we did in the previous chapter:
node server.js
We still get the exact same message: Server is up on port 3000, so your app will still works locally as expected:

Next up, we have to specify a script in package.json. Inside package.json, you might have noticed we have a scripts object, and in there we have a test script.
This gets set by default for npm:
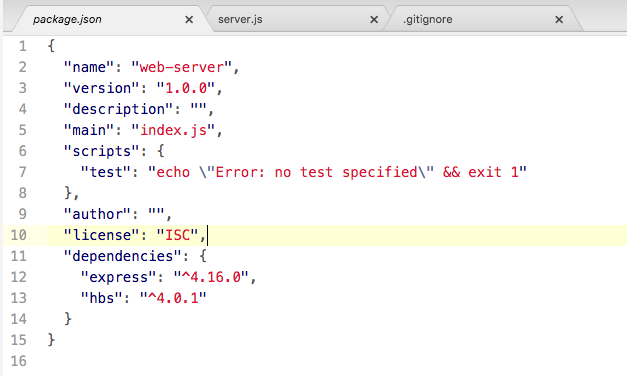
We can create all sorts of scripts inside the scripts object that do whatever we like. A script is nothing more than a command that we run from the Terminal, so we could take this command, node server.js, and turn it into a script instead, and that's exactly what we're going to do.
Inside the scripts object, we'll add a new script. The script needs to be called start:

This is a very specific, built-in script and we'll set it equal to the command that starts our app. In this case, it will be node server.js:
"start": "node server.js"
This is necessary because when Heroku tries to start our app, it will not run Node with your file name because it doesn't know what your file name is called. Instead, it will run the start script and the start script will be responsible for doing the proper thing; in this case, booting up that server file.
Now we can run our app using that start script from the Terminal by using the following command:
npm start
When I do that, we get a little output related to npm and then we get Server is up on port 3000, and if we visit the app in the browser, everything works exactly as it did in the previous chapter:

The big difference is that we are now ready for Heroku. We could also run the test script using from the Terminal npm test:
npm test
Now, we have no tests specified and that is expected:

The next step in the process will be to make the commit and then we can finally start getting it up on the Web. From the Terminal, we'll use some of the Git commands we explored earlier in this chapter. First up, git status. When we run git status, we have something a little new:
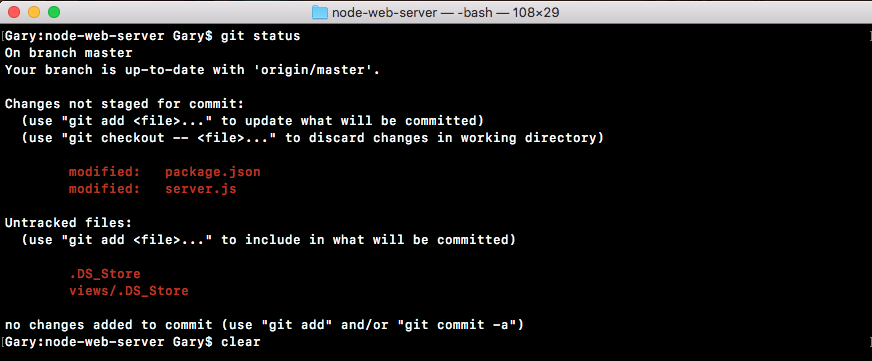
Instead of new files, we have modified files here as shown in the code output here. We have a modified package.json file and we have a modified server.js file. These are not going to be committed if we were to run a git commit just yet; we still have to use git add. What we'll do is run git add with the dot as the next argument. Dot is going to add every single thing showing up and get status to the next commit.
Now I only recommend using the syntax of everything you have listed in the Changes not staged for commit header. These are the things you actually want to commit, and in our case, that is indeed what we want. If I run git add and then a rerun git status, we can now see what is going to be committed next, under the Changes to be committed header:
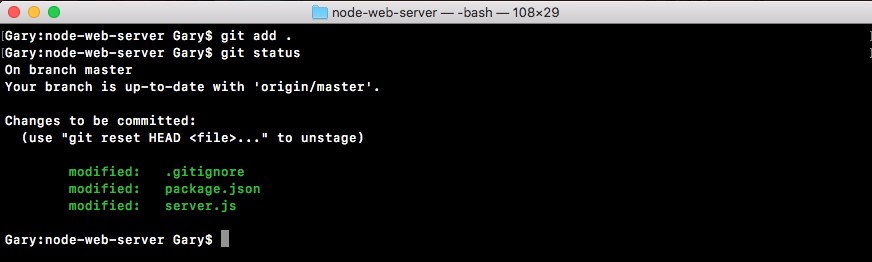
Here we have our package.json file and the server.js file. Now we can go ahead and make that commit.
I'll run a git commit command with the m flag so we can specify our message, and a good message for this commit would be something like Setup start script and heroku port:
git commit -m 'Setup start script and heroku port'
Now we can go ahead and run that command, which will make the commit.
Now we can go ahead and push that up to GitHub using the git push command, and we can leave off the origin remote because the origin is the default remote. I'll go ahead and run the following command:
git push
This will push it up to GitHub, and now we are ready to actually create the app, push our code up, and view it over in the browser:
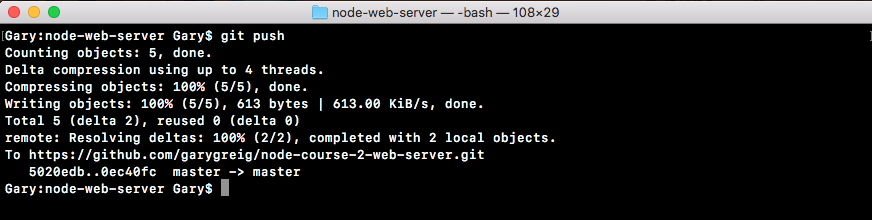
The next step in the process will be to run a command called heroku create from the Terminal. heroku create needs to get executed from inside your application:
heroku create
Just like we run our Git commands, when I run heroku create, a couple things are going to happen:
Now remember we have an origin remote, which points to our GitHub repository. We'll have a Heroku remote, which points to our Heroku Git repository. When we deploy to the Heroku Git repository, Heroku is going to see that. It will take the changes and it will deploy them to the Web. When we run Heroku create, all of that happens:

Now we do still have to push up to this URL in order to actually do the deploying process, and we can do that using git push followed by heroku:
git push heroku
The brand new remote was just added because we ran heroku create. Now pushing it this time around will go through the normal process. You'll then start seeing some logs.
These are logs coming back from Heroku letting you know how your app is deploying. It's going through the entire process, showing you what happens along the way. This will take about 10 seconds and at the very end we have a success message—Verifying deploy... done:
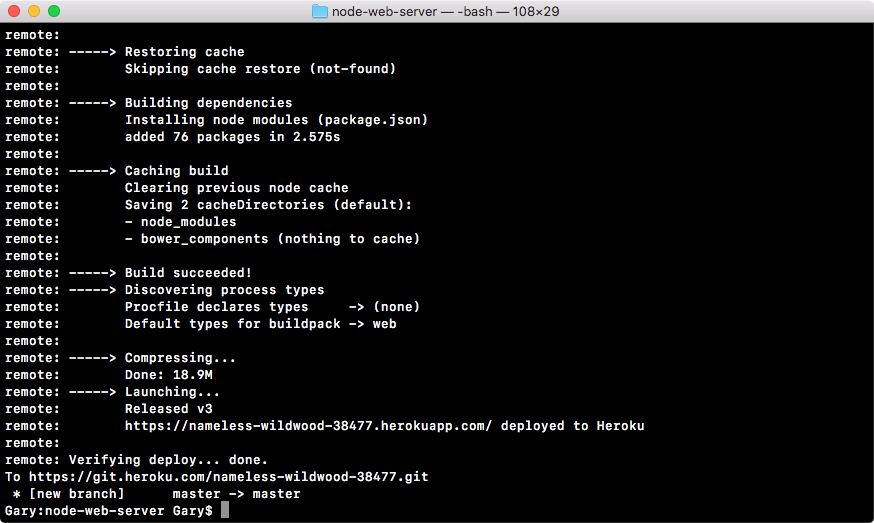
It also verified that the app was deployed successfully and that did indeed pass. From here we actually have a URL we can visit (https://sleepy-retreat-32096.herokuapp.com/). We can take it, copy it, and paste it in the browser. What I'll do instead is use the following command:
heroku open
The heroku open will open up the Heroku app in the default browser. When I run this, it will switch over to Chrome and we get our application showing up just as expected:
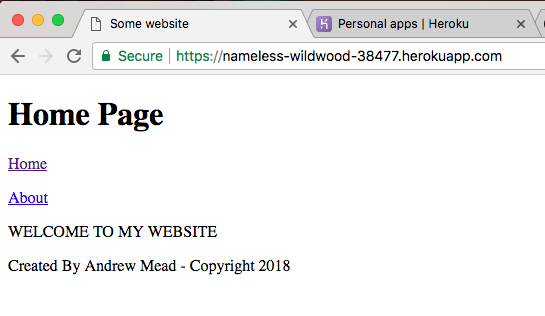
We can switch between pages and everything works just like it did locally. Now we have a URL and this URL was given to us by Heroku. This is the default way Heroku generates app URLs. If you have your own domain registration company, you can go ahead and configure its DNS to point to this application. This will let you use a custom URL for your Heroku app. You'll have to refer to the specific instructions for your domain registrar in order to do that, but it can indeed be done.
Now that we have this in place, we have successfully deployed our Node applications live to Heroku, and this is just fantastic. In order to do this, all we had to do is make a commit to change our code and push it up to a new Git remote. It could not be easier to deploy our code.
You can also manage your application by going back over to the Heroku dashboard. If you give it a refresh, you should see that brand new URL somewhere on the dashboard. Remember mine was sleepy retreat. Yours is going to be something else. If I click on the sleepy retreat, I can view the app page:
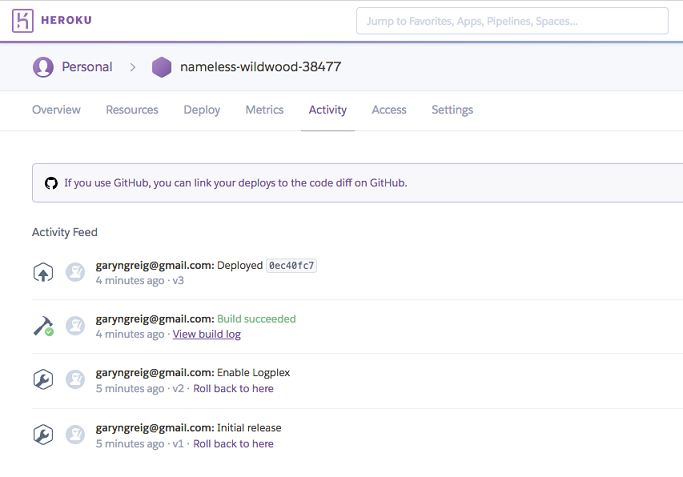
Here we can do a lot of configuration. We can manage Activity and Access so we can collaborate with others. We have metrics, we have Resources, all sorts of really cool stuff. With this in place, we are now done with our basic deploying section.
In the next section, your challenge will be to go through that process again. You'll add some changes to the Node app. You'll commit them, deploy them, and view them live in the Web. We'll get started by creating the local changes. That means I'll register a new URL right here using app.get.
We'll create a new page/projects, which is why I have that as the route for my HTTP get handler. Inside the second argument, we can specify our callback function, which will get called with request and response, and like we do for the other routes above, the root route and our about route, we'll be calling response.render to render our template. Inside the render arguments list, we'll provide two.
The first one will be the file name. The file doesn't exist, but we can still go ahead and call render. I'll call it projects.hbs, then we can specify the options we want to pass to the template. In this case, we'll set page title, setting it equal to Projects with a capital P. Excellent! Now with this in place, the server file is all done. There are no more changes there.
What I'll do is go ahead and go to the views directory, creating a new file called projects.hbs. In here, we'll be able to configure our template. To kick things off, I'm going to copy the template from the about page. Since it's really similar, I'll copy it. Close about, paste it into projects, and I'm just going to change this text to project page text would go here. Then we can save the file and make our last change.
The last thing we want to do is update the header. We now have a brand new projects page that lives at /projects. So we'll want to go ahead and add that to the header links list. Right here, I'll create a new paragraph tag and then I'll make an anchor tag. The text for the link will be Projects with a capital P and the href, which is the URL to visit when that link is clicked. We'll set that equal to /projects, just like we did for about, where we set it equal to /about.
Now that we have this in place, all our changes are done and we are ready to test things out locally. I'll fire up the app locally using Node with server.js as the file. To start, we're up on localhost 3000. So over in the browser, I can move to the localhost tab, as opposed to the Heroku app tab, and click on Refresh. Right here we have Home, which goes to home, we have About which goes to about, and we have Projects which does indeed go to /projects, rendering the projects page. Project page text would go here. With this in place we're now done locally.
We have the changes, we've tested them, now it's time to go ahead and make that commit. That will happen over inside the Terminal. I'll shut down the server and run Git status. This will show me all the changes to my repository as of the last commit. I have two modified files: the server file and the header file, and I have my brand new projects file. All of this looks great. I want to add all of this to the next commit, so I can use a Git add with the . to do just that.
Now before I actually make the commit, I do like to test that the proper things got added by running Git status. Right here I can see my changes to be committed are showing up in green. Everything looks great. Next up, we'll run a Git commit to actually make the commit. This is going to save all of the changes into the Git repository. A message for this one would be something like adding a project page.
With a commit made, the next thing you needed to do was push it up to GitHub. This will back our code up and let others collaborate on it. I'll use Git push to do just that. Remember we can leave off the origin remote as origin is the default remote, so if you leave off a remote it'll just use that anyway.
With our GitHub repository updated, the last thing to do is deploy to Heroku and we do that by pushing up the Git repository, using Git push, to the Heroku remote. When we do this, we get our long list of logs as the Heroku server goes through the process of installing our npm modules, building the app, and actually deploying it. Once it's done, we'll get brought back to the Terminal like we are here, and then we can open up the URL in the browser. Now I can copy it from here or run Heroku open. Since I already have a tab open with the URL in place, I'll simply give it a refresh. Now you might have a little delay as you refresh your app. Sometimes starting up the app right after a new app was deployed can take about 10 to 15 seconds. That will only happen as you first visit it. Other times where you click on the Refresh button, it should reload instantly.
Now we have the projects page and if I visit it, everything looks awesome. The navbar is working great and the projects page is indeed rendering at /projects. With this in place, we are now done. We've gone through the process of adding a new feature, testing it locally, making a Git commit, pushing it up to GitHub, and deploying it to Heroku. We now have a workflow for building real-world web applications using Node.js. This also brings a close to this section.
You also learned about Git, GitHub, and Heroku. These are the tools I prefer to use when I'm creating applications. I like to use Git because it's super popular. It's basically the only choice these days. I like to use GitHub because it has a great user interface. It has a ton of awesome features and pretty much everyone else is using it too. There's a great community. And I like to use Heroku because it is just dead simple to deploy new versions of your application. You can swap out any of these tools with any other tools. You can use services such Amazon Web Services to host. You could use Bitbucket as your GitHub alternative. These are perfectly fine solutions. All that really matters is you have some tools that are working for you, you have a Git repository backed up somewhere, whether it's GitHub or Bitbucket, and you have an easy way to deploy so you can make changes quickly and get them out to your users fast.
In different sections, we looked at how to add files to Git and how to make that first commit. Next, we set up both GitHub and Heroku, then we looked at how to push our code and deploy it. Then, we looked at how we can communicate with Heroku to deploy our code. Then after that, we looked at some real-world workflows for creating new commits, pushing to GitHub, and deploying to Heroku.
In the next chapter, we'll look into testing our applications.
In this chapter, we'll look at how we can test our code to make sure it's working as expected. Now, if you've ever set up test cases for other languages, then you know how hard it can be to get started. You have to set up the actual test infrastructure. Then you have to write your individual test cases. Every time I didn't test an application, it was because the setup process and the tools available to me were such a burden. Then you dig around for information online and you get really simple examples, but not examples for testing real-world things like asynchronous code. We'll be doing all of that in this chapter. I'll give you a very simple setup for testing and writing your test cases.
We'll look at the best tools available so you'll actually be excited to write those test cases and see all of those green checkmarks. We'll be testing from here on out as well, so let's dive in looking at how we can test some code.
In this section, you'll create your very first test case so that you can test whether your code is working as expected. By adding automatic testing to our project, we'll be able to verify that a function does what it says it'll do. If we make a function that's supposed to add two numbers together, we can automatically verify it's doing that. And if we have a function that's supposed to fetch a user from the database, we can make sure it's doing that as well.
Now to get started in this section, we'll look at the very basics of setting up a testing suite inside a Node.js project. We'll be testing a real-world function.
In order to get started, we will make a directory to store our code for this chapter. We'll make one on the desktop using mkdir and we'll call this directory node-tests:
mkdir node-tests
Then we'll change directory inside it using cd, so we can go ahead and run npm init. We'll be installing modules and this will require a package.json file:
cd node-tests
npm init
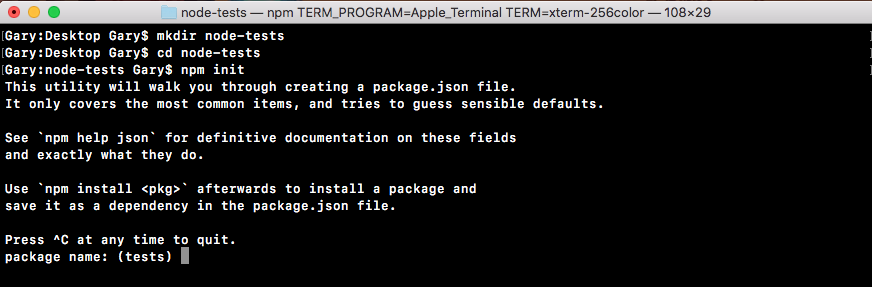
We'll run npm init using the default values for everything, simply hitting enter throughout every single step:
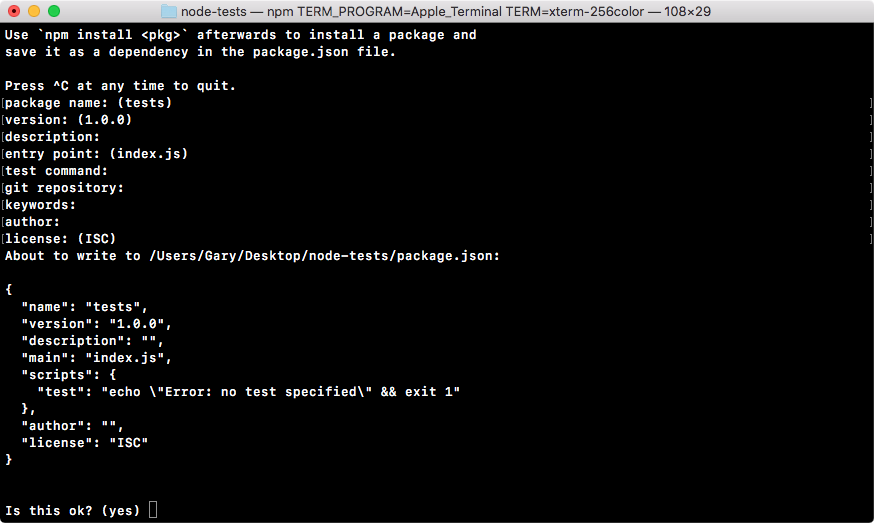
Now once that package.json file is generated, we can open up the directory inside Atom. It's on the desktop and it's called node-tests.
From here, we're ready to actually define a function we want to test. The goal in this section is to learn how to set up testing for a Node project, so the actual functions we'll be testing are going to be pretty trivial, but it will help illustrate exactly how to set up our tests.
To get started, let's make a fake module. This module will have some functions and we'll test those functions. In the root of the project, we'll create a brand new directory and I'll call this directory utils:

We can assume this will store some utility functions, such as adding a number to another number, or stripping out whitespaces from a string, anything kind of hodge-podge that doesn't really belong to any specific location. We'll make a new file in the utils folder called utils.js, and this is a similar pattern to what we did when we created the weather and location directories in our weather app in the previous chapter:
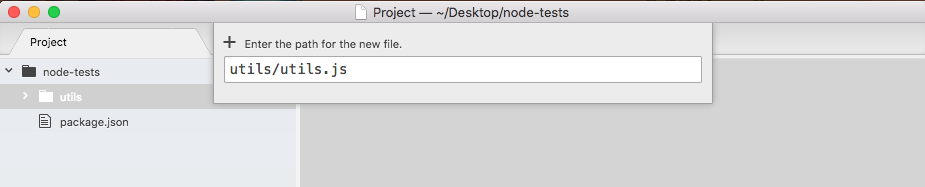
You're probably wondering why we have a folder and a file with the same name. This will be clear when we start testing.
Now before we can write our first test case to make sure something works, we need something to test. I'll make a very basic function that takes two numbers and adds them together. We'll create an adder function as shown in the following code block:
module.exports.add = () => {
}
This arrow function (=>) will take two arguments, a and b, and inside the function, we'll return the value a + b. Nothing too complex here:
module.exports.add = () => {
return a + b;
};
Now since we just have one expression inside our arrow function (=>) and we want to return it, we can actually use the arrow function (=>) expression syntax, which lets us add our expression as shown in the following code, a + b, and it'll be implicitly returned:
module.exports.add = (a, b) => a + b;
There's no need to explicitly add a return keyword on to the function. Now that we have utils.js ready to go, let's explore testing.
We'll be using a framework called Mocha in order to set up our test suite. This will let us configure our individual test cases and also run all of our test files. This will be really important for creating and running tests. The goal here is to make testing simple and we'll use Mocha to do just that. Now that we have a file and a function we actually want to test, let's explore how to create and run a test suite.
We'll be doing the testing using the super popular testing framework Mocha, which you can find at mochajs.org. This is a fantastic framework for creating and running test suites. It's super popular and their page has all the information you'd ever want to know about setting it up, configuring it, and all the cool bells and whistles it has included:
If you scroll down on this page, you'll be able to see a table of contents:
Here you can explore everything Mocha has to offer. We'll be covering most of it in this chapter, but for anything we don't cover, I do want to make you aware you can always learn about it on this page.
Now that we've explored the Mocha documentation page, let's install it and start using it. Inside the Terminal, we'll install Mocha. First up, let's clear the Terminal output. Then we'll install it using the npm install command. When you use npm install, you can also use the shortcut npm i. This has the exact same effect. I'll use npm i with mocha, specifying the version @3.0.0. This is the most recent version of the library as of this filming:
npm i mocha@3.0.0
Now we do want to save this into the package.json file. Previously, we've used the save flag, but we'll talk about a new flag, called save-dev. The save-dev flag is will save this package for development purposes only—and that's exactly what Mocha will be for. We don't actually need Mocha to run our app on a service like Heroku. We just need Mocha locally on our machine to test our code.
When you use the save-dev flag, it installs the module much the same way:
npm i mocha@5.0.0 --save-dev
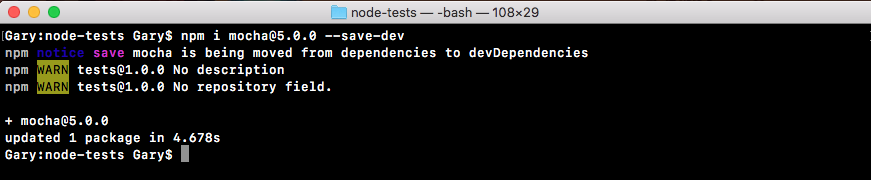
But if you explore package.json, you'll see things are a little different. Inside our package.json file, instead of a dependencies attribute, we have a devDependencies attribute:
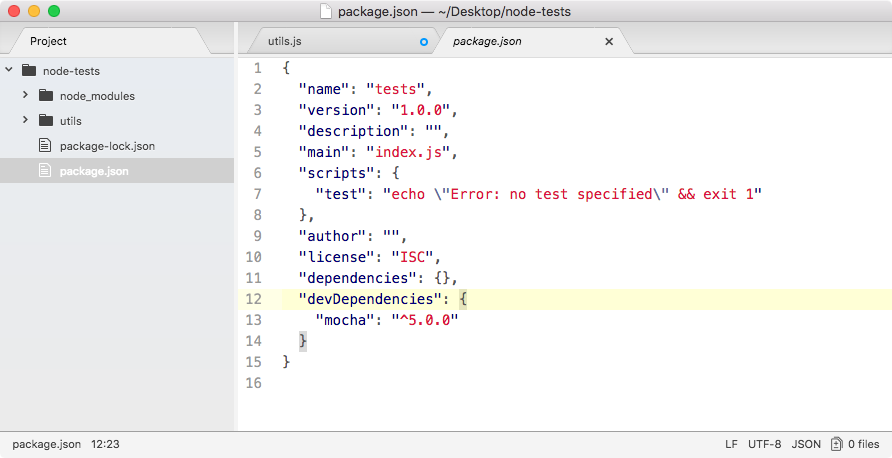
In there we have Mocha, with the version number as the value. The devDependencies are fantastic because they're not going to be installed on Heroku, but they will be installed locally. This will keep the Heroku boot times really, really quick. It won't need to install modules that it's not going to actually need. We'll be installing both devDependencies and dependencies in most of our projects from here on out.
Now that we have Mocha installed, we can go ahead and create a test file. In the utils folder, we'll make a new file called utils.test.js:
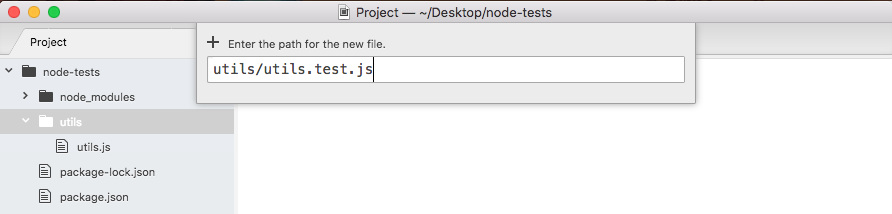
This file will store our test cases. We'll not store our test cases in utils.js. This will be our application code. Instead, we'll make a file called utils.test.js. When we use this test.js extension, we're basically telling our app that this will store our test cases. When Mocha goes through our app looking for tests to run, it should run any file with this extension.
Now we have a test file, the only thing left to do is create a test case. A test case is a function that runs some code, and if things go well, great, the test is considered to have passed. And if things do not go well, the test is considered to have failed. We can create a new test case, using it. It is a function provided by Mocha. We'll be running our project test files through Mocha, so there's no reason to import it or do anything like that. We simply call it just like this:
it();
Now it lets us define a new test case and it takes two arguments. These are:
First up, we'll have a string description of what exactly the test is doing. If we're testing that the adder function works, we might have something like:
it('should add two numbers');
Notice here that it plays into the sentence. It should read like this, it should add two numbers; describes exactly what the test will verify. This is called behavior-driven development, or BDD, and that's the principles that Mocha was built on.
Now that we've set up the test string, the next thing to do is add a function as the second argument:
it('should add two numbers', () => {
});
Inside this function, we'll add the code that tests that the add function works as expected. This means it will probably call add and check that the value that comes back is the appropriate value given the two numbers passed in. That means we do need to import the util.js file up at the top. We'll create a constant, call utils, setting it equal to the return result from requiring utils. We're using ./ since we will be requiring a local file. It's in the same directory so I can simply type utils without the js extension as shown here:
const utils = require('./utils');
it('should add two numbers', () => {
});
Now that we have the utils library loaded in, inside the callback we can call it. Let's make a variable to store the return results. We'll call this one results. And we'll set it equal to utils.add passing in two numbers. Let's use something like 33 and 11:
const utils = require('./utils');
it('should add two numbers', () => {
var res = utils.add(33, 11);
});
We would expect it to get 44 back. Now at this point, we do have some code inside of our test suites so we run it. We'll do that by configuring that test script we looked at in the previous chapter inside a package.json.
Currently, the test script simply prints a message to the screen saying that no tests exist. What we'll do instead is call Mocha. As shown in the following code, we'll be calling Mocha, passing in as the one and only argument the actual files we want to test. We can use a globbing pattern to specify multiple files. In this case, we'll be using ** to look in every single directory. We're looking for a file called utils.test.js:
"scripts": {
"test": "mocha **/utils.test.js"
},
Now this is a very specific pattern. It's not going to be particularly useful. Instead, we can swap out the file name with a star as well. Now we're looking for any file on the project that has a file name ending in .test.js:
"scripts": {
"test": "mocha **/*.test.js"
},
And this is exactly what we want. From here, we can run our test suite by saving package.json and moving to the Terminal. We'll use the clear command to clear the Terminal output and then we can run our test script using command shown as follows:
npm test
When we run this, we'll execute that Mocha command:
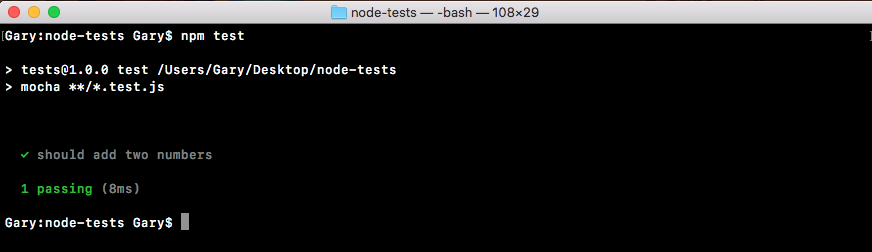
It'll go off. It'll fetch all of our test files. It'll run all of them and print the results on the screen inside Terminal as shown in the preceding screenshot. Here we can see we have a green checkmark next to our test, should add two numbers. Next, we have a little summary, one passing test, and it happened in 8 milliseconds.
Now in our case, we don't actually assert anything about the number that comes back. It could be 700 and we wouldn't care. The test will always pass. To make a test fail what we have to do is throw an error. That means we can throw a new error and we pass into the constructor function whatever message we want to use as the error as shown in the following code block. In this case, I could say something like Value not correct:
const utils = require('./utils');
it('should add two numbers', () => {
var res = utils.add(33, 11);
throw new Error('Value not correct')
});
Now with this in place, I can save the test file and rerun things from the Terminal by rerunning npm test, and when we do that now we have 0 tests passing and we have 1 test failing:
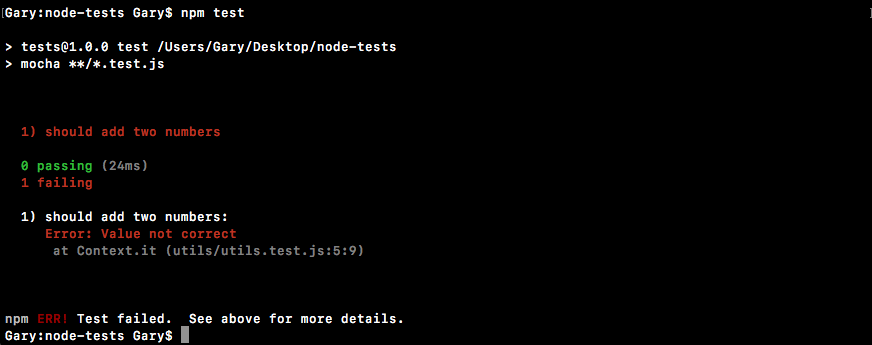
Next we can see the one test is should add two numbers, and we get our error message, Value not correct. When we throw a new error, the test fails and that's exactly what we want to do for add.
Now, we'll create an if statement for the test. If the response value is not equal to 44, that means we have a problem on our hands and we'll throw an error:
const utils = require('./utils');
it('should add two numbers', () => {
var res = utils.add(33, 11);
if (res != 44){
}
});
Inside the if condition, we can throw a new error and we'll use a template string as our message string because I do want to use the value that comes back in the error message. I'll say Expected 44, but got, then I'll inject the actual value, whatever happens to come back:
const utils = require('./utils');
it('should add two numbers', () => {
var res = utils.add(33, 11);
if (res != 44){
throw new Error(`Expected 44, but got ${res}.`);
}
});
Now in our case, everything will line up great. But what if the add method wasn't working correctly? Let's simulate this by simply tacking on another addition, adding on something like 22 in utils.js:
module.exports.add = (a, b) => a + b + 22;
I'll save the file, rerun the test suite:
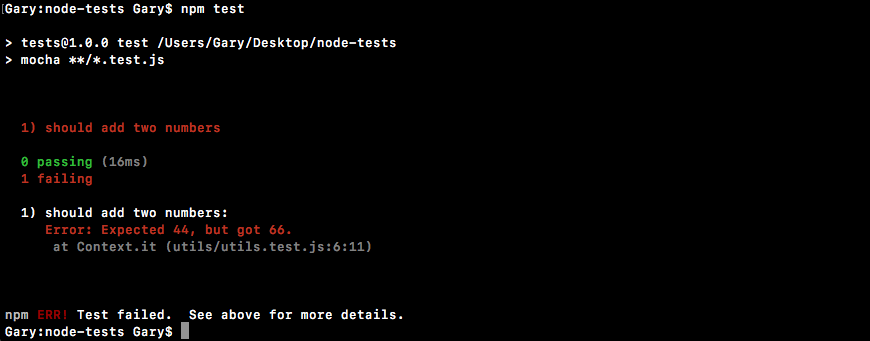
Now we get an error message: Expected 44, but got 66. This error message is fantastic. It lets us know that something is going wrong with the test and it even tells us exactly what we got back and what we expected. This will let us go into the add function, look for errors, and hopefully fix them.
Creating test cases doesn't need to be something super complex. In this case, we have a simple test case that tests a simple function.
Now, we'll create a new function that squares a number and returns the result. We'll define that in the utils.js file using module.exports.square. We'll set that equal to an arrow function (=>) that takes in one number, x, and we'll return x times x, x * x, just like this:
module.exports.add = (a, b) => a + b;
module.exports.square = (x) => x * x;
Now we have this brand new function square and we'll create a new test case that makes sure square works as expected. In utils.test.js, next to the if condition for add function, we'll call the it function again:
const utils = require('./utils');
it('should add two numbers', () => {
var res = utils.add(33, 11);
if (res != 44){
throw new Error(`Expected 44, but got ${res}.`);
}
});
it();
Inside the it function, we'll add our two arguments, the string, and the callback function. Inside the string, we'll create our message, should square a number:
it('should square a number', () => {
});
And inside the callback function, we can actually go ahead and call square. Now we do want to create a variable to store the result so we can check that the result is what we expect it to be. Then we can call utils.square passing in a number. I'll go with 3 in this case, which means I should expect 9 to come back:
it('should square a number', () => {
var res = utils.square(3);
});
In the next line, we can have an if statement, if the result does not equal 9, then we'll throw a message because things went wrong:
it('should square a number', () => {
var res = utils.square(3);
if (res !== 9) {
}
});
We can throw an error using throw new Error, passing in whatever message we like. We can use a regular string, but I always prefer using a template string so we can inject values easily. I'll say something like Expected 9, but got, followed by the value that's not correct; in this case, that's stored in the response variable:
it('should square a number', () => {
var res = utils.square(3);
if (res !== 9) {
throw new Error(`Expected 9, but got ${res}`);
}
});
Now I can save this test case and run the test suite from the Terminal. Using the up arrow key and the enter key, we can rerun the last command:
npm test
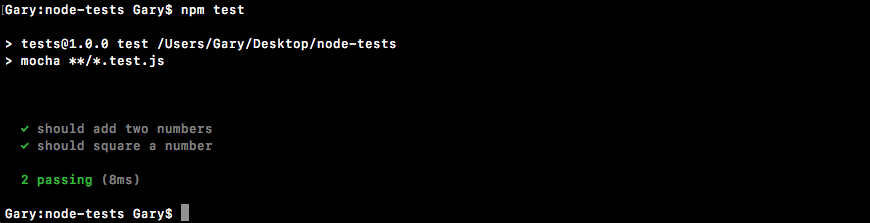
We get two tests passing, should add two numbers and should square a number both have checkmarks next to them. And we ran both tests in just 14 milliseconds, which is fantastic.
Now the next thing, we want to do is mess up the square function to make sure our test fails when the number is not correct. I'll add 1 on to the result in utils.js, which will cause the test to fail:
module.exports.add = (a, b) => a + b;
module.exports.square = (x) => x * x + 1;
Then we can rerun things from the Terminal and we should see the error message:
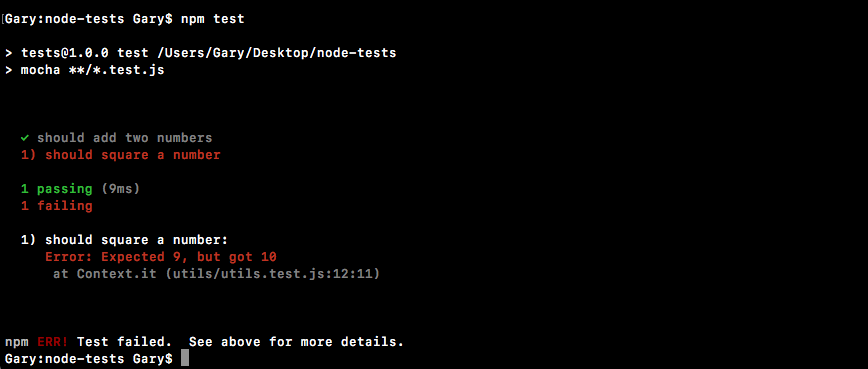
We get Expected 9, but got 10. This is fantastic. We now have a test suite capable of testing both the add function and the square function. I'll remove that + 1, and we are done.
We now have a very, very basic test suite that we can execute with Mocha. Currently, we have two tests and to create those tests we used the it method provided by Mocha. In the upcoming sections, we'll be exploring more methods that Mocha gives us and we'll also be looking at better ways to do our assertions. Instead of manually creating them, we'll be using an assertion library to help with the heavy lifting.
Before we write more test cases, let's see an automatic way to rerun our test suite when we change either our test code or our application code. We'll be doing that with nodemon. Now, previously we used nodemon like this:
nodemon app.js
We would type nodemon and we would pass in a file like app.js. Whenever any code in our app changed, it would rerun the app.js file as a Node application. What we can actually do is specify any command in the world we want to run when our files change. This means we can rerun npm test when the files change.
To do this, we'll use the exec flag. This flag tells nodemon that we'll specify a command to run, and it might not necessarily be a Node file. As shown in the following command, we can specify that command. It'll be 'npm test':
nodemon --exec 'npm test'
With this in place, we can now run the nodemon command. It'll kick off for the first time running our test suite:
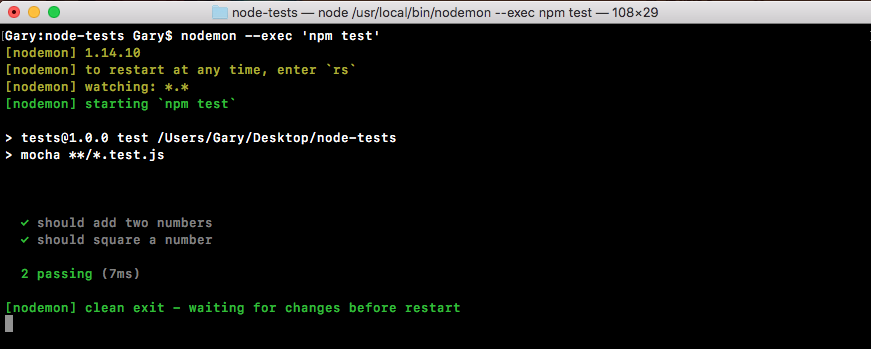
Here we see we have two tests passing. Let's go ahead into the app utils.js and make a change to one of the functions, so it fails. We'll add 3 or 4 onto the result for add:
module.exports.add = (a, b) => a + b + 4;
module.exports.square = (x) => x * x;
It automatically restarts over here:
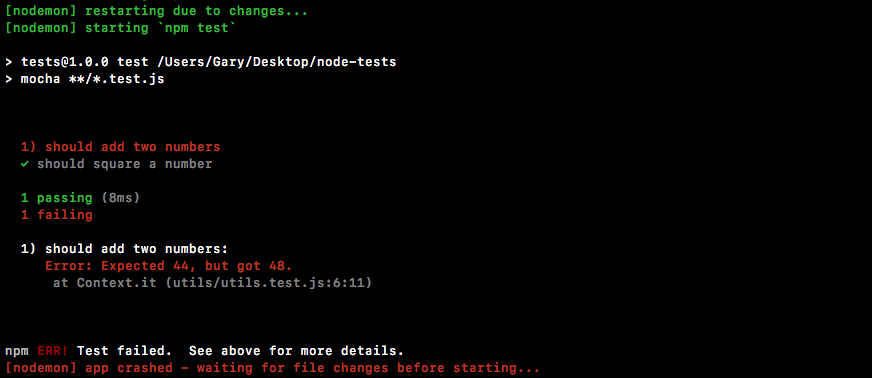
And now we see that we have a test suite where one test passes and one tests fails. I can always go ahead and undo that error we added, save the file, and the test suite will automatically rerun.
This will make testing your application that much easier. You won't have to switch to the Terminal and rerun the npm test command every time we make a change to our application. Now we have a command that we can run, we'll shut down nodemon and use the up arrow key to show it again.
And we can actually move this into a script inside of package.json.
Inside package.json we'll make a new script right after the test script. Now we've used the start script and the test script—these are built-in—we'll create a custom one called test-watch, and we can run the test-watch script to kick things off. Inside of test-watch, we'll have the exact same command we ran from Terminal. That means we'll be rounding nodemon. We'll be using the exec flag and inside of quotes, we'll be running npm test:
"scripts": {
"test": "mocha **/*.test.js",
"test-watch": "nodemon --exec 'npm test'"
},
Now that we have this in place, we can run the script from the Terminal as opposed to having to type out this command every single time we want to start up the autotest suite.
To run a script with a custom name, such as test-watch, in the Terminal all we need to do is run npm run followed by the script name, test-watch, as shown in the following command:
npm run test-watch
If I do this, it will start things off. We'll get our test suite and it's still waiting for changes, as shown here:
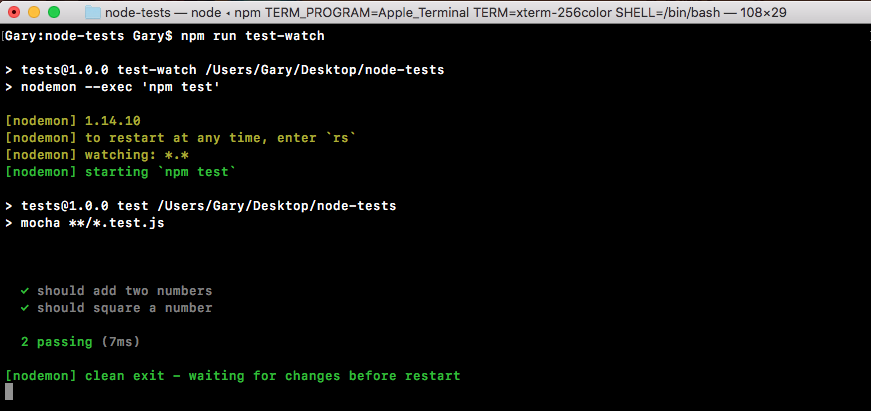
Now, every time you start the test suite you can simply use npm run test-watch. That'll start up the test-watch script, which starts up nodemon. Every time a change happens in your project, it'll rerun npm test, showing the results of the test suite to the screen.
Now that we have a way to automatically restart our test suite, let's go ahead and get back into the specifics of testing in Node.
In the previous sections, we made two test cases to verify that utils.add and our utils.square method work as expected. We did that using an if condition, that is, if the value was not 44 that means something went wrong and we threw an error. In this section, we'll learn how to use an assertion library, which will take care of all of the if condition in utils.test.js code for us:
if (res !== 44)
throw new Error(`Expected 44, but got ${res}.`)
}
Because when we add more and more tests, the code will end up looking pretty similar and there's no reason to keep rewriting it. Assertion libraries let us make assertions about values, whether it's about their type, the value itself, whether an array contains an element, all sorts of things like that. They really are fantastic.
The one we'll be using is called expect. You can find it by going to Google and googling mjackson expect. And this is the result we're looking for:
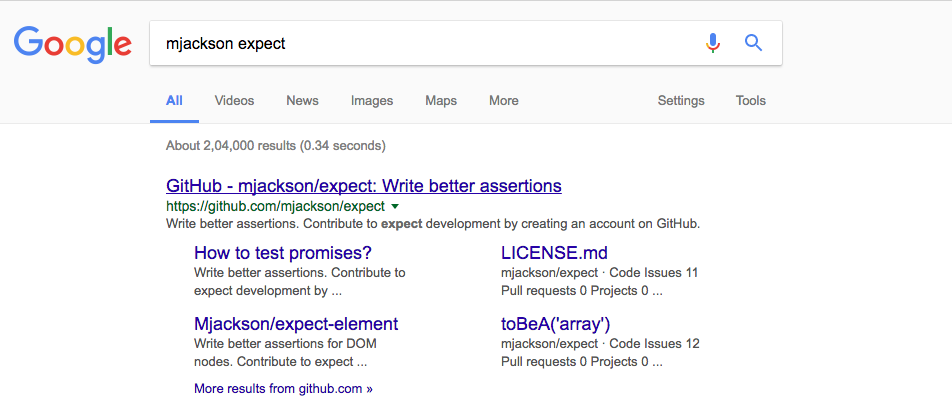
It's mjackson's repository, expect. It is a fantastic and super popular assertion library. This library will let us pass in a value and make some assertions about it. On this page, we scroll down past the introduction and the installation we can get down to an example:
As shown in the preceding screenshot, we have our Assertions header and we have our first assertion, toExist. This will verify that a value exists. In the next line, we have an example, we pass in a string to expect:
This is the value we want to make some assertions about. In the context of our application, that would be the response variable in the utils.test.js, shown here:
const utils = require('./utils');
it('should add two numbers', () => {
var res = utils.add(33, 11);
if (res !== 44) {
throw new Error(`Expected 44, but got ${res}.`)
}
});
We want to assert that it is equal to 44. After we call expect, we can start chaining on some assertion calls. In the assertion example, next we check if it does exist:
expect('something truthy').toExist()
This would not throw an error because a string is indeed truthy inside JavaScript. If we passed in something like undefined, which is not truthy, toExist would fail. It would throw an error and the test case would not pass. Using these assertions, we can make it really, really easy to check the values in our tests without having to write all of that code ourselves.
Let's go ahead and start exploring the assertion libraries. First up, let's install the module inside the Terminal by running npm install. The module name itself is called expect and we'll grab the most recent version, @1.20.2. Once again, we'll be using the save-dev flag like we did with Mocha. Because we do indeed want to save this dependency in package.json, but it's a dev dependency, it's not required for the application to run whether it's on Heroku or some other service:
npm install expect@1.20.2 --save-dev
Let's go ahead and install this dependency.

Then we can move to the application, and check out the package.json file, as shown in the following screenshot, it looks great:
We have both expect and Mocha. Now, inside our utils.test file, we can kick things off by loading in the library and making our first assertions using expect. Up at the very top of the file, we'll load in the library, creating a constant called expect and require('expect'), just like this:
const expect = require('expect');
Now, we can get started by swapping out the if condition in the utils.test.js code with a call to expect instead:
const expect = require('expect');
const utils = require('./utils');
it('should add two numbers', () => {
var res = utils.add(33, 11);
// if(res !== 44) {
// throw new Error(`Expected 44, but got ${res}.`)
//}
});
As you saw in the example on assertion/expect page, we'll start all our assertions by calling expect as a function passing in the value we want to make assertions about. In this case, that is the res variable:
const expect = require('expect');
const utils = require('./utils');
it('should add two numbers', () => {
var res = utils.add(33, 11);
expect(res)
// if(res !== 44) {
// throw new Error(`Expected 44, but got ${res}.`)
//}
});
Now, we can assert all sorts of things. In this case, we want to assert that the value is equal to 44. We'll make our assertion toBe. On the documentation page, it looks like this:
This asserts that a value equals another value and that's exactly what we want. We assert that our value passed into expect equals another value using toBe, passing that value in as the first argument. Back inside Atom, we can go ahead and use this assertion, .toBe, and we're expecting the result variable to be the number 44, just like this:
const expect = require('expect');
const utils = require('./utils');
it('should add two numbers', () => {
var res = utils.add(33, 11);
expect(res).toBe(44);
// if(res !== 44) {
// throw new Error(`Expected 44, but got ${res}.`)
//}
});
Now we have our test case and it should work exactly as it did with the if condition.
To prove it does work, let's move into the Terminal and use the clear command to clear the Terminal output. Now we can run that test-watch script as shown in the following command line:
npm run test-watch
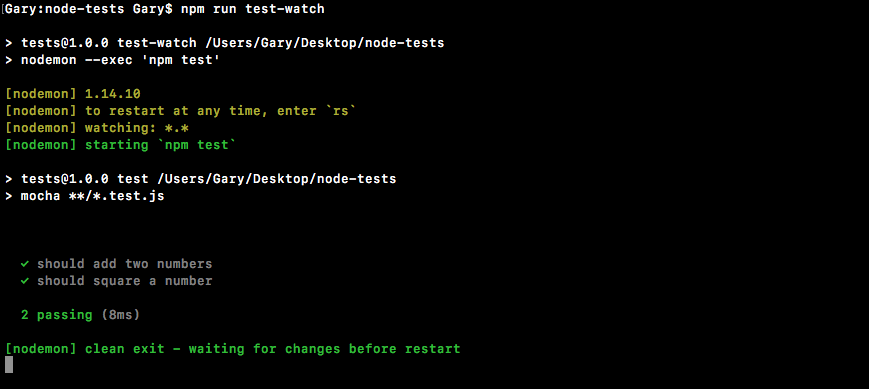
As shown in the preceding code output, we get our two tests passing just like they did before. Now we were to change 44 to some other value that would throw an error like 40:
const expect = require('expect');
const utils = require('./utils');
it('should add two numbers', () => {
var res = utils.add(33, 11);
expect(res).toBe(40);
// if(res !== 44) {
// throw new Error(`Expected 44, but got ${res}.`)
//}
});
We save the file, and we'll get an error and the expect library will generate useful error messages for us:
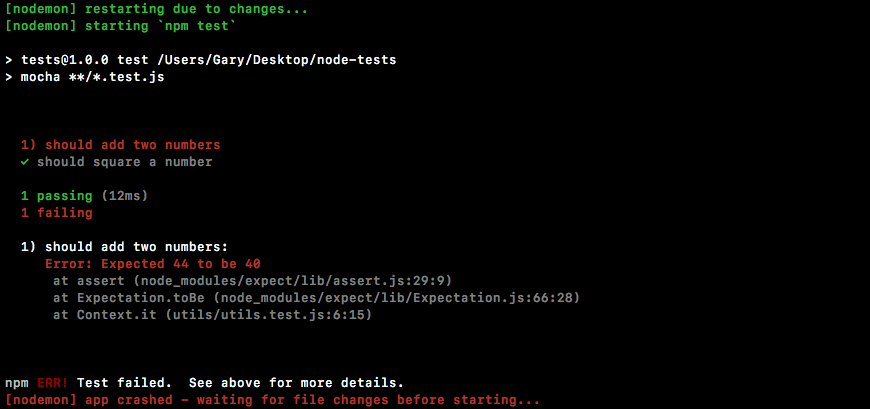
It's saying that we Expected 44 to be 40. Clearly that's not the case, so an error gets thrown. I'll change this back to 44, save the file, and all of our tests will pass.
Now we can also chain together multiple assertions. For example, we could assert that the value that comes back from add is a number. This can be done using another assertion. So let's head into the docs and take a look. Inside Chrome, we'll scroll down through the assertion docs list. There are a lot of methods. We'll be exploring some of them. In this case, we're looking for toBeA, the method that takes a string:
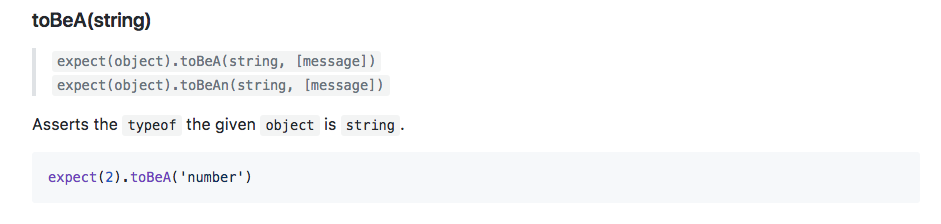
This takes the string type and it uses the typeof operator to assert that the value is of a certain type. Here we're expecting 2 to be a number. We can do that exact same thing over in our code. Inside Atom, right after toBe, we can chain on another call, toBeA, followed by the type. This could be something like a string, it could be something like an object, or in our case, it could be a number, just like this:
const expect = require('expect');
const utils = require('./utils');
it('should add two numbers', () => {
var res = utils.add(33, 11);
expect(res).toBe(44).toBeA('number');
// if(res !== 44) {
// throw new Error(`Expected 44, but got ${res}.`)
//}
});
We'll open up the Terminal so we can see the results. It's currently hidden. Save the file. Our tests will rerun and we can see they're both passing:
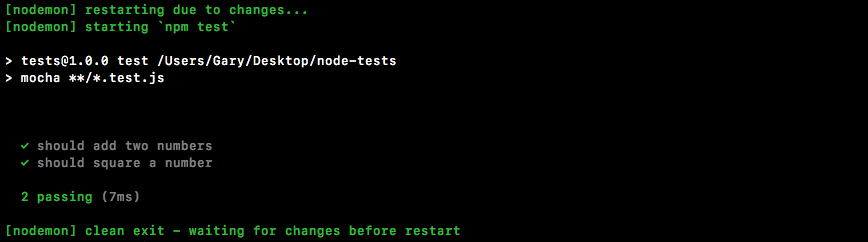
Let's use a different type, something that was going to cause the test to fail for example string:
expect(res).toBe(44).toBeA('string');
We would then get an error message, Expected 44 to be a string:
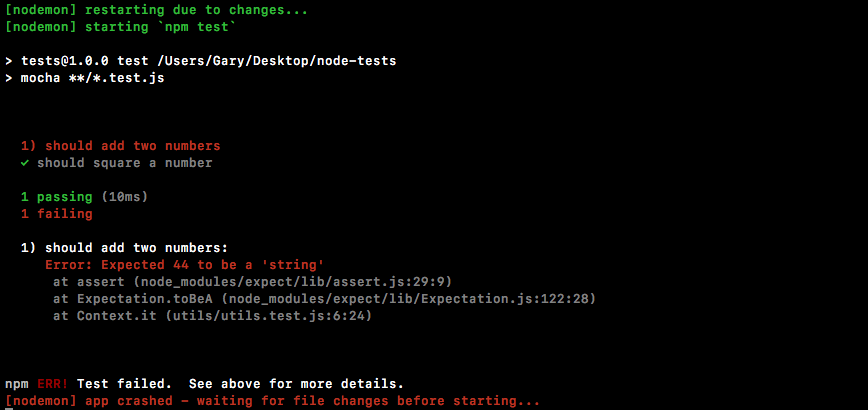
This is really useful. It'll help us clean up our errors really quickly. Let's change the code back to number and we are good to go.
Now we'd like to do the same thing for our tests for square a number function. We'll use expect to assert that the response is indeed the number 9 and that the type is a number. We'll use these same two assertions we do with the add function. First, we need to do to delete the current square if condition code, since we will not be using that anymore. As shown in the following code, we'll make some expectations about the res variable. We'll expect it to be the number 9, just like this:
it('should square a number', () => {
var res = utils.square(3);
expect(res).toBe(9);
});
We'll save the file and make sure the test passes, and it does indeed pass:

Now, we'll assert the type using toBeA. Here, we're checking that the type of the return value from the square method is a number:
it('should square a number', () => {
var res = utils.square(3);
expect(res).toBe(9).toBeA('number');
});
When we save the file, we get both of our tests still passing, which is fantastic:

Now this is just a small test as to what expect can do. Let's create a bogus test case that will explore a few more ways we can use expect. We'll not be testing an actual function. We'll just play around with some assertions inside of the it callback.
To create the bogus test, we'll make a new test using the it callback function:
it('should expect some values');
We can put whatever we want in here, it's not too important. And we'll pass in an arrow function (=>) as our callback function:
it('should expect some values', () => {
});
Now as we've seen already, one of the most fundamental assertions you'll make is you're just going to check for equality. We want to check if something like the response variable equals something else, like the number 44. Inside expect, we can also do the opposite. We can expect that a value like 12 does not equal, using toNotBe. And then we can assert that it doesn't equal some other value, like 11:
it('should expect some values', () => {
expect(12).toNotBe(11);
});
The two aren't equal, so when we save the file over in the Terminal, all three tests should be passing:

If I set that equal to the same value, it'll not work as expected:
it('should expect some values', () => {
expect(12).toNotBe(12);
});
We'll get an error, Expected 12 to not be 12:
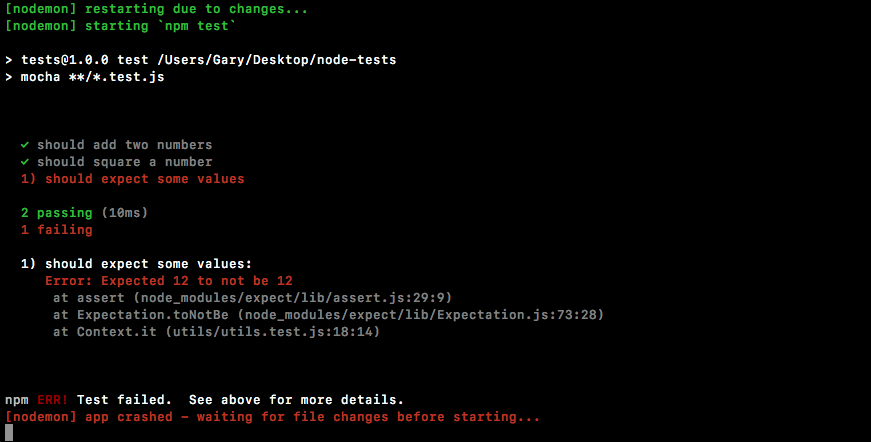
Now toBe and toNotBe work great for numbers, strings, and Booleans, but if you're trying to compare arrays or objects, they will not work as expected and we can prove this.
We'll start with removing the current code by commenting it out. We'll leave it around so we use it later:
it('should expect some values', () => {
// expect(12).toNotBe(12);
});
We'll expect an object with the name property set to Andrew, toBe, and we'll assert that it is another object where the name property is equal to Andrew, just like this:
it('should expect some values', () => {
// expect(12).toNotBe(12);
expect({name: 'Andrew'})
});
We'll use toBe, just like we did with number, checking if it is the same as another object where name equals Andrew:
it('should expect some values', () => {
// expect(12).toNotBe(12);
expect({name: 'Andrew'}).toBe({name: 'Andrew'});
});
Now when we save this, you might think the test will pass, but it doesn't:
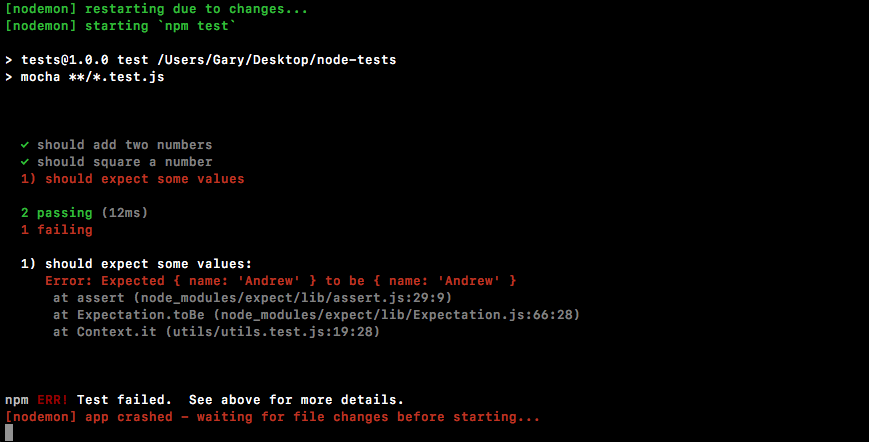
As shown in the preceding output, we see that we expected the two names to be equal. When objects are compared for equality using the triple equals, which is what toBe uses, they'll not be the same because it's trying to see if they're the exact same object, and they're not. We've created two separate objects with the same properties.
To check if the two names are equal, we'll have to use something different. It's called toEqual as shown here:
it('should expect some values', () => {
// expect(12).toNotBe(12);
expect({name: 'Andrew'}).toEqual({name: 'Andrew'});
});
If we save the file now, this will work. It'll rip into the object properties, making sure they have the same ones:

The same thing goes for toNotEqual. This checks if two objects are not equal. To check this, we'll go ahead and change the first object to have a lowercase a in andrew:
it('should expect some values', () => {
// expect(12).toNotBe(12);
expect({name: 'andrew'}).toNotEqual({name: 'Andrew'});
});
Now, the test passes. They are not equal:

This is how we do equality with our objects and arrays. Now another really useful thing we have is toInclude.
The toInclude assertion checks if an array or an object includes some things. Now if it's an array, we can check if it includes a certain item in the array. If it's an object, we can check if it includes certain properties. Let's run through an example of that.
We'll expect that an array with the numbers 2, 3, and 4 inside the it callback has the number 5 inside and we can do that using toInclude:
it('should expect some values', () => {
// expect(12).toNotBe(12);
// expect({name: 'andrew'}).toNotEqual({name: 'Andrew'});
expect([2,3,4]).toInclude(5);
});
The toInclude assertion takes the item. In this case, we'll check if the array has 5 inside. Now clearly it doesn't, so this test will fail:
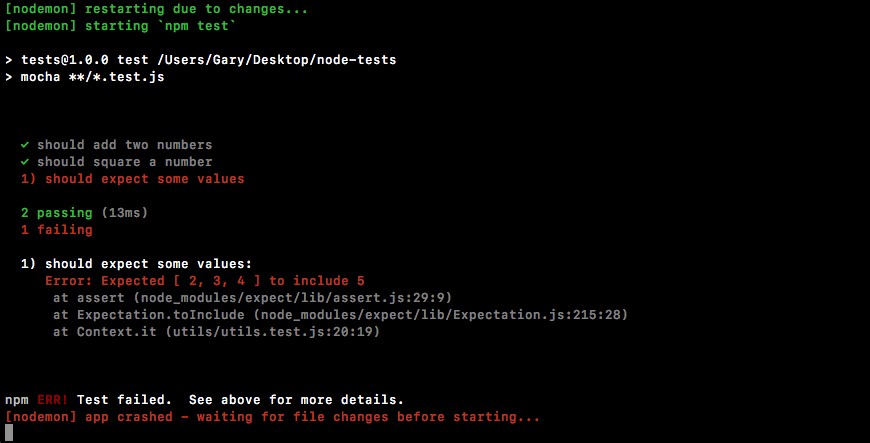
We get the message, Expected [ 2, 3, 4] to include 5. That does not exist. Now we change this to a number that does exist, for example 2:
it('should expect some values', () => {
// expect(12).toNotBe(12);
// expect({name: 'andrew'}).toNotEqual({name: 'Andrew'});
expect([2,3,4]).toInclude(2);
});
We'll rerun the test suite and everything will work as expected:

Now, along with toInclude, we have toExclude like this:
it('should expect some values', () => {
// expect(12).toNotBe(12);
// expect({name: 'andrew'}).toNotEqual({name: 'Andrew'});
expect([2,3,4]).toExclude(1);
});
This will check if something does not exist, for example the number 1, which is not in the array. If we run this assertion, the test passes:
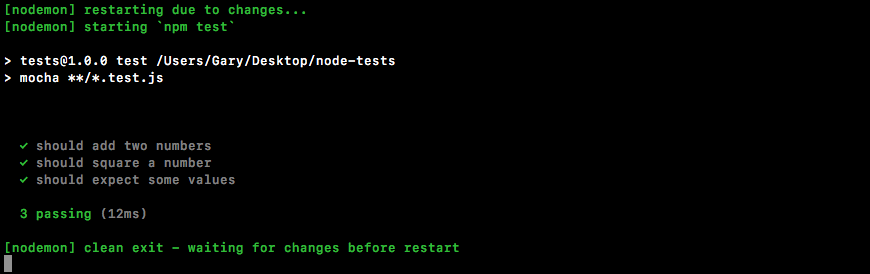
The same two methods, toInclude and toExclude, work with objects as well. We can play with that right on the next line. I'll expect that the following object has something on it:
it('should expect some values', () => {
// expect(12).toNotBe(12);
// expect({name: 'andrew'}).toNotEqual({name: 'Andrew'});
// expect([2,3,4]).toExclude(1);
expect({
})
});
Let's go ahead and create an object that has a few properties. These are:
This will look like the following code block:
it('should expect some values', () => {
// expect(12).toNotBe(12);
// expect({name: 'andrew'}).toNotEqual({name: 'Andrew'});
// expect([2,3,4]).toExclude(1);
expect({
name: 'Andrew',
age: 25,
location: 'Philadelphia'
})
});
Now let's say we want to make some assertions about particular properties, not necessarily the entire object. We can use toInclude to assert that the object has some properties and that those property values equals the value we pass in:
it('should expect some values', () => {
// expect(12).toNotBe(12);
// expect({name: 'andrew'}).toNotEqual({name: 'Andrew'});
// expect([2,3,4]).toExclude(1);
expect({
name: 'Andrew',
age: 25,
location: 'Philadelphia'
}).toInclude({
})
});
For example, the age property. Let's say we only care about the age. We can assert that the object has an age property equal to 25 by typing the following code:
it('should expect some values', () => {
// expect(12).toNotBe(12);
// expect({name: 'andrew'}).toNotEqual({name: 'Andrew'});
// expect([2,3,4]).toExclude(1);
expect({
name: 'Andrew',
age: 25,
location: 'Philadelphia'
}).toInclude({
age: 25
})
});
It doesn't matter that there's a name property. The name property could be any value. That is irrelevant in this assertion. Now let's use the value, 23:
.toInclude({
age: 23
})
This test will fail as shown here since the value is not correct:
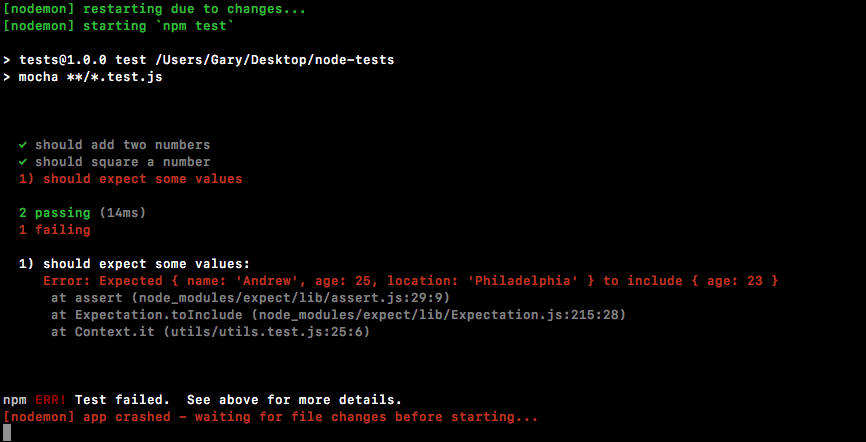
We expected the age property to be 23, but it was indeed 25, so the test fails. The same thing goes with the toExclude assertion.
Here we can save our test files. This checks if the object does not have a property age equal to 23. It does indeed not have that, so the test passes:
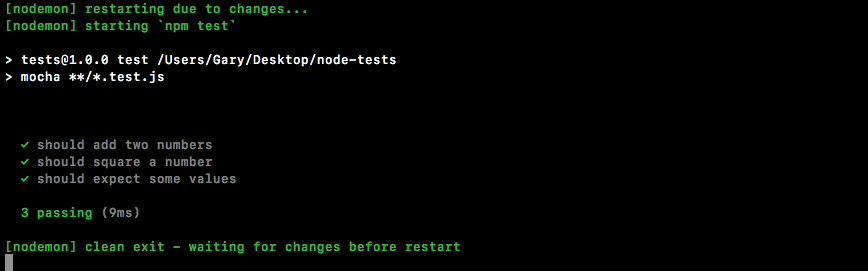
This is just a quick taste as to what expect can do. For a full list of features, I recommend diving through the documentation. There's a ton of other assertions you can use, things like checking if a number is greater than another number, if a number is less than or equal to another number, all sorts of math-related operations are included as well.
Now let's wrap up this section with some more testing. Over in utils.js, we can make a new function, one that we'll be testing, module.exports.setName. The setName function is will take two arguments. It'll take a user object, some fictitious user object with some generic properties, and it'll take fullName as a string:
module.exports.add = (a, b) => a + b;
module.exports.square = (x) => x * x;
module.exports.setName (user, fullName)
The job of setName will be to rip apart fullName into two parts—the first name and the last name—by splitting it on the space. We'll set the two properties, first name and last name, and return the user object. We'll fill out the function then we'll write the test case.
The first thing we'll do is split the name into a names array, var names will be that array:
module.exports.add = (a, b) => a + b;
module.exports.square = (x) => x * x;
module.exports.setName (user, fullName) => {
var names
};
It'll have two values, assuming there's only one space inside of the name. We're assuming someone types their first name, hits a space, and types their last name. We'll set this equal to fullName.split and we'll split on the space. So I'll pass in an empty string with a space inside it as the value to split:
module.exports.add = (a, b) => a + b;
module.exports.square = (x) => x * x;
module.exports.setName (user, fullName) => {
var names = fullName.split(' ');
};
Now we have a names array where the first item is the firstName and the last item is the lastName. So we can start updating the user object. user.firstName will equal the first item in the names array and we'll grab the index of 0, which is the first item. We'll do something similar for last name, user.lastName equals the second item from the names array:
module.exports.add = (a, b) => a + b;
module.exports.square = (x) => x * x;
module.exports.setName (user, fullName) => {
var names = fullName.split(' ');
user.firstName = names[0];
user.lastName = names[1];
};
Now we're all done, we have the names set, and we can return the user object using return user, just like this:
module.exports.add = (a, b) => a + b;
module.exports.square = (x) => x * x;
module.exports.setName (user, fullName) => {
var names = fullName.split(' ');
user.firstName = names[0];
user.lastName = names[1];
return user;
};
Inside the utils.test file, we can now kick things off. First, we'll comment out our it('should expect some values') handler:
const expect = require('expect');
const utils = require('./utils');
it('should add two numbers', () => {
var res = utils.add(33, 11);
expect(res).toBe(44).toBeA('number');
});
it('should square a number', () => {
var res = utils.square(3);
expect(res).toBe(9).toBeA('number');
});
// it('should expect some values', () => {
// // expect(12).toNotBe(12);
// // expect({name: 'andrew'}).toNotEqual({name: 'Andrew'});
// // expect([2,3,4]).toExclude(1);
// expect({
// name: 'Andrew',
// age: 25,
// location: 'Philadelphia'
// }).toExclude({
// age: 23
// })
// });
This is pretty great for documentation. You can always explore it later if you forget how things work. We'll create a new test that should verify first and last names are set.
We'll create a user object. On that user object, we want to set some properties such as age and location. Then we'll pass the variable user into the setName method. That'll be the first argument defined in the utils.js file. We'll pass in a string. The string with firstName followed by a space followed by lastName. Then we'll get the result back and we'll make some assertions about it. We want to assert the returning object includes using the toInclude assertion.
As shown in the following code, we'll call it to make the new test case. We'll be testing:
it('should set firstName and lastName')
Inside it, we can now provide our second argument, which will be our callback function. Let's set that to an arrow function (=>) and now we can make the user object:
it('should set firstName and lastName', () => {
});
The user object will have a few properties. Let's add something like location, setting that equal to Philadelphia, and then set an age property, setting that equal to 25:
it('should set firstName and lastName', () => {
var user = {location: 'Philadelphia', age: 25};
});
Now we'll call the method we defined over in utils.js, the setName method. We'll do that on the next line, creating a variable called res to store the response. Then we'll set that equal to utils.setName passing in the two arguments, the user object and fullName, Andrew Mead:
it('should set firstName and lastName', () => {
var user = {location: 'Philadelphia', age: 25};
var res = utils.setName(user, 'Andrew Mead');
});
Now at this point, the result should be what we expect. We should have the firstName and lastName properties. We should have the location property and the age property.
Now if you know a lot about JavaScript, you might know that objects are passed by reference, so the user variable has actually been updated as well. That is expected. Both user and res will have the exact same value. We can actually go ahead and prove that using an assertion. We'll expect that user equals using toEqual the res:
it('should set firstName and lastName', () => {
var user = {location: 'Philadelphia', age: 25};
var res = utils.setName(user, 'Andrew Mead');
expect(user).toEqual(res);
});
Inside Terminal, we can see the test does indeed pass:
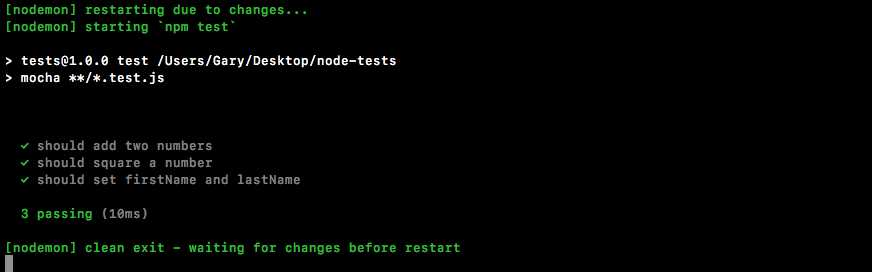
Let's delete expect(user).toEqual(res);. Now, we want check if the user object or the res object includes certain properties. We'll check using expect that the res variable has some properties using toInclude:
it('should set firstName and lastName', () => {
var user = {location: 'Philadelphia', age: 25};
var res = utils.setName(user, 'Andrew Mead');
expect(res).toInclude({
})
});
The properties we're looking for are firstName equal to what we would expect that to be, Andrew, and lastName equal to Mead:
it('should set firstName and lastName', () => {
var user = {location: 'Philadelphia', age: 25};
var res = utils.setName(user, 'Andrew Mead');
expect(res).toInclude({
firstName: 'Andrew',
lastName: 'Mead'
})
});
These are the assertions that should be made in order to verify that setName is working as expected. If I save the file, the test suite reruns and we do indeed get the passing tests as shown here:
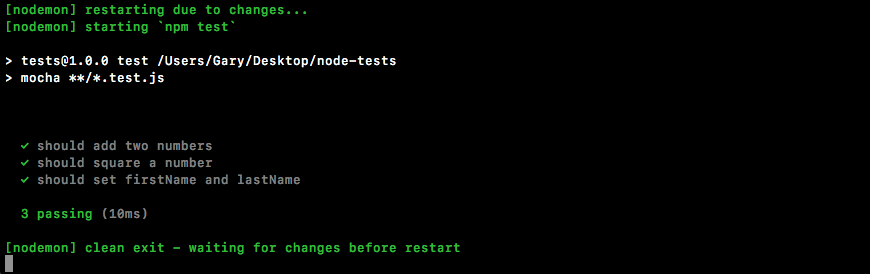
We have three of them and it took just 10 milliseconds to run.
And with this in place, we now have an assertion library for our test suite. That's fantastic because writing test cases just got way easier, and the whole goal of the chapter is to make testing approachable and easy.
In the next section, we'll start looking at how we can test more complex asynchronous functions.
In this section, you'll learn how to test asynchronous functions. The process of testing asynchronous functions isn't that different from synchronous ones, like what we've done already, but it is a little different so it justifies its own section.
To kick things off, we'll make a fake async function using setTimeout to simulate a delay inside utils.js. Just below where we make our add function, let's make one called asyncAdd. It'll essentially have the same features, but it'll use setTimeout and it'll have a callback to simulate a delay. Now in the real world, this delay might be a database request or an HTTP request. We'll be dealing with that in the following chapters. For now though, let's add module.exports.asyncAdd:
module.exports.add = (a, b) => a + b;
module.exports.asyncAdd = ()
This will take three arguments, as opposed to the two the add function took, a, b, and callback:
module.exports.add = (a, b) => a + b;
module.exports.asyncAdd = (a, b, callback)
This is what's going to make the function asynchronous. Eventually, once the setTimeout is up, we'll call the callback with the sum, whether it's one plus three being four, or five plus nine being fourteen. Next up, we can put the arrow in arrow function (=>) and open and close our curly braces:
module.exports.asyncAdd = (a, b, callback) => {
};
Inside the arrow function (=>), as mentioned, we'll be using setTimeout to create the delay. We'll pass in a callback and we'll pass in our setTimeout. Let's go with 1 second in this case:
module.exports.asyncAdd = (a, b, callback) => {
setTimeout(() => {
}, 1000);
};
Now, by default, if our tests take longer than 2 seconds, Mocha will assume that is not what we wanted and it'll fail. That's why we're using 1 second in this case. Inside our callback, we can call the actual callback argument with the sum a + b, just like this:
module.exports.asyncAdd = (a, b, callback) => {
setTimeout(() => {
callback(a + b);
}, 1000);
};
We now have an asyncAdd function and we can start writing a test for it.
Inside of the utils.test file, just under our previous test for utils.add, we'll add a new one for asyncAdd. The test setup will look really similar. We will be calling it and passing in a string as the first argument and a callback as the second argument. Then we'll add our callback, just like this:
it('should async add two numbers', () => {
});
Inside the callback, we can get started calling utils.asyncAdd. We'll call it using utils.asyncAdd and we'll pass in those three arguments. We'll use 4 and 3, which should result in 7. And we'll provide the callback function, which should get called with that value, the value being 7:
it('should async add two numbers', () => {
utils.asyncAdd(4, 3, () => {
});
});
Inside the callback arguments, we would expect something like sum to come back:
it('should async add two numbers', () => {
utils.asyncAdd(4, 3, (sum) => {
});
});
Now we can start making some assertions about that sum variable using the expect object. We can pass it into expect to make our assertions, and these assertions aren't going to be new. It's stuff we've already done. We'll expect that the sum variable equals, using toBe, the number 7. Then we'll check that it's a number, using toBeA, inside quotes, number:
it('should async add two numbers', () => {
utils.asyncAdd(4, 3, (sum) => {
expect(sum).toBe(7).toBeA('number');
});
});
Now obviously if it is equal to 7 that means it is a number, but we're using both just to simulate exactly how chaining will work inside of our expect calls.
Now that we have our assertions in place, let's save the file and run our test and see what happens. We'll run it from Terminal, npm run test-watch to start up our nodemon watching script:
npm run test-watch
Now our tests will run and the test does indeed pass:
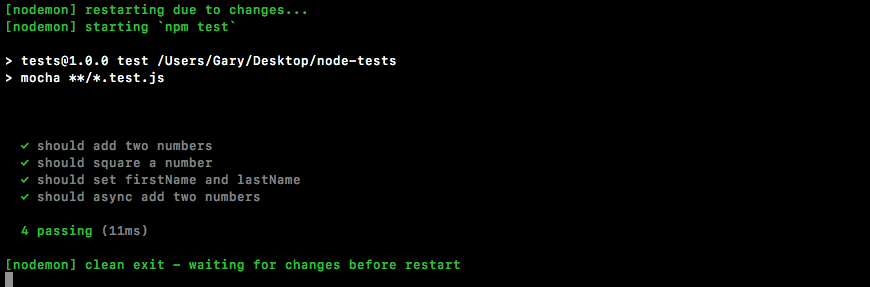
The only problem is that it's passing for the wrong reasons. If we change 7 to 10 and save the file:
it('should async add two numbers', () => {
utils.asyncAdd(4, 3, (sum) => {
expect(sum).toBe(10).toBeA('number');
});
});
In this case, the test is still going to pass. Right here, you see we have four tests passing:
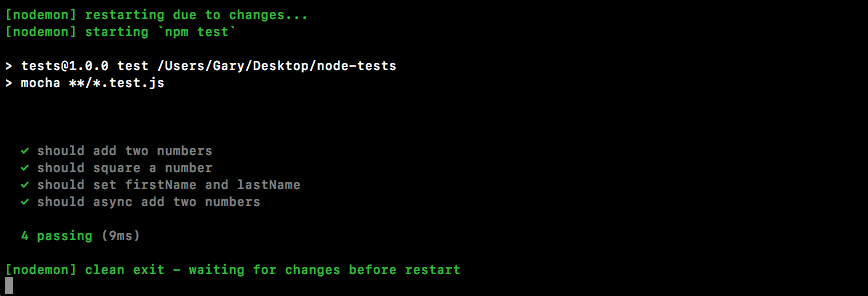
Now the reason this test is passing is not because the assertion in utils.test.js is valid. It's passing because we have an asynchronous action that takes 1 second. This function will return before the async callback gets fired. When I say function returning, I'm referring to the callback function, the second argument to it.
This is when Mocha thinks your test is done. This means that these assertions never run. The Mocha output has already said our test passes before this callback ever gets fired. What we need to do is tell Mocha this will be an asynchronous test that'll take time. To do this, all we do is we provide an argument inside the callback function we pass to it. We'll call this one done:
it('should async add two numbers', (done) => {
When we have the done argument specified, Mocha knows that means we have an asynchronous test and it'll not finish processing this test until done gets called. This means we can call done after our assertions:
it('should async add two numbers', (done) => {
utils.asyncAdd(4, 3, (sum) => {
expect(sum).toBe(10).toBeA('number');
done();
});
});
With this in place, our test will now run. The function will return right after it calls async.Add, but that's OK because we have done specified. About a second later, our callback function will fire. Inside the asyncAdd callback function, we'll make our assertions. This time the assertions will matter because we have done and we haven't called it yet. After the assertions we call done, this tells Mocha that we're all done with the test. It can go ahead and process the result, letting us know whether it passed or failed. This will fix that error.
If I save the file in this state, it'll rerun the tests and we'll see that our test should async.Add two numbers will indeed fail. Inside Terminal, let's open up the error message, we have Expected 7 to be 10:
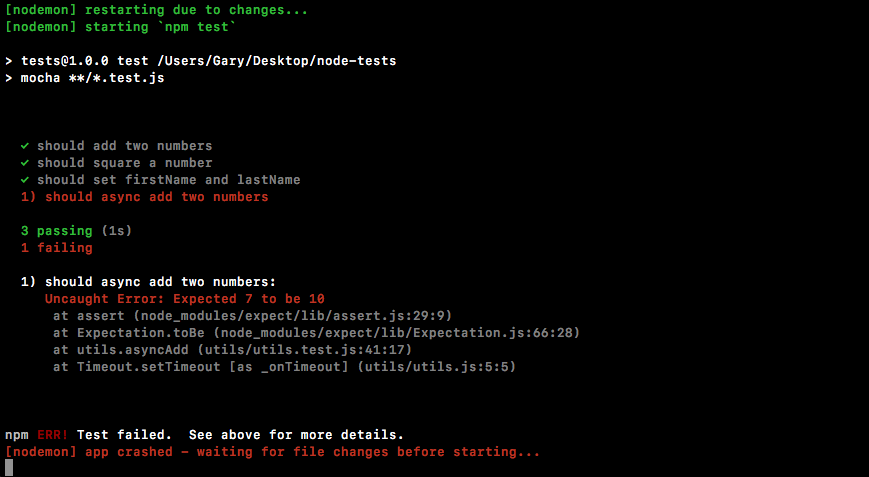
This is exactly what we thought would happen the first time around when we didn't use done, but as we can see, we do need to use done when we're doing something asynchronous inside of our tests.
Now we can change this expectation back to 7, save the file:
it('should async add two numbers', (done) => {
utils.asyncAdd(4, 3, (sum) => {
expect(sum).toBe(7).toBeA('number');
done();
});
});
This time around things should work as expected after 1 second delay as it runs this test:
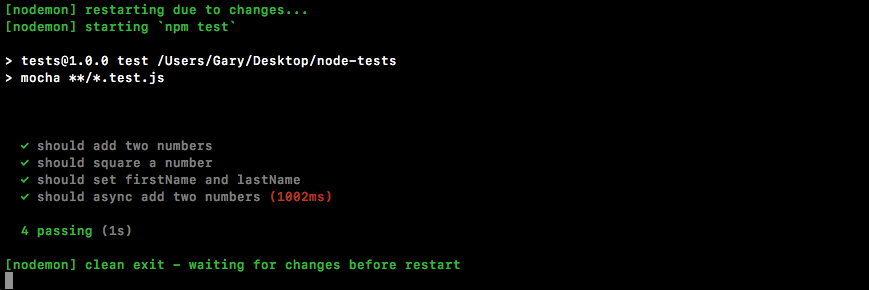
It can't report right away because it has to wait for done to get called. Notice that our total test time is now about a second. We can see that we have four tests passing. Mocha also warns us when a test takes a long time because it assumes that's not expected. Nothing inside Node, even a database or HTTP request, should take even close to a second, so it's essentially letting us know that there's probably an error somewhere inside of your function—it's taking a really, really long time to process. In our case though, the one second delay was clearly set up inside of utils so there's no need to worry about that warning.
With this in place, we now have a test for our very first asynchronous method. All we had to do is add a done as an argument and call it once we were done making our assertions.
Now let's create an asynchronous version of the square method as we did with the synchronous one. In order to get started, we'll define the function first and then we'll worry about writing that test.
Inside the utils file, we can get started next to the square method creating a new one called asyncSquare:
module.exports.square = (x) => x * x;
module.exports.asyncSquare
It'll take two arguments: the original argument which we called x, and the callback function that'll get called after our 1-second delay:
module.exports.square = (x) => x * x;
module.exports.asyncSquare = (x, callback) => {
};
Then we can finish up the arrow function (=>) and we can start working on the body of asyncSquare. It'll look pretty similar to the asyncAdd one. We'll call setTimeout passing in a callback and a delay. In this case, the delay will be the same; we'll go with 1 second:
module.exports.square = (x) => x * x;
module.exports.asyncSquare = (x, callback) => {
setTimeout(() => {
}, 1000);
};
Now we can actually call the callback. This will trigger the callback function that got passed in and we'll pass in the value x times x, which will properly square the number passed in place of x:
module.exports.square = (x) => x * x;
module.exports.asyncSquare = (x, callback) => {
setTimeout(() => {
callback(x * x);
}, 1000);
};
Now inside the test file, things are indeed passing, but we haven't added a test for the asyncSquare function so let's do that. Inside the utils.test file, the next thing you needed to do was call it. Next to it for testing the asyncAdd function, let's call it to make a new test for this asyncSquare function:
it('should square a number', () => {
var res = utils.square(3);
expect(res).toBe(9).toBeA('number');
});
it('should async square a number')
Next up, we'll provide the callback function that'll get called when the test actually executes. And since we are testing an async function, we'll put done in the callback function as shown here:
it('should async square a number', (done) => {
});
This will tell Mocha to wait until done is called to decide whether or not the test passed. Next, we can now call utils.asyncSquare passing in a number of our choice. We'll use 5. Next up, we can pass in a callback:
it('should async square a number', (done) => {
utils.asyncSquare(5, () => {
})
});
This will get the final result. In the arrow function (=>), we'll create a variable to store that result:
utils.asyncSquare(5, (res) => {
});
Now that we have this in place, we can start making our assertions.
The assertions will be done using the expect library. We'll make some assertions about the res variable. We'll assert that it equals, using toBe, the number 25, which is 5 times 5. We'll also use toBeA to assert something about the type of the value:
it('should async square a number', (done) => {
utils.asyncSquare(5, (res) => {
expect(res).toBe(25).toBeA('number');
});
});
In this case, we want to make sure that the square is indeed a number, as opposed to a Boolean, string, or object. With this in place, we do need to call done and then save the file:
it('should async square a number', (done) => {
utils.asyncSquare(5, (res) => {
expect(res).toBe(25).toBeA('number');
done();
});
});
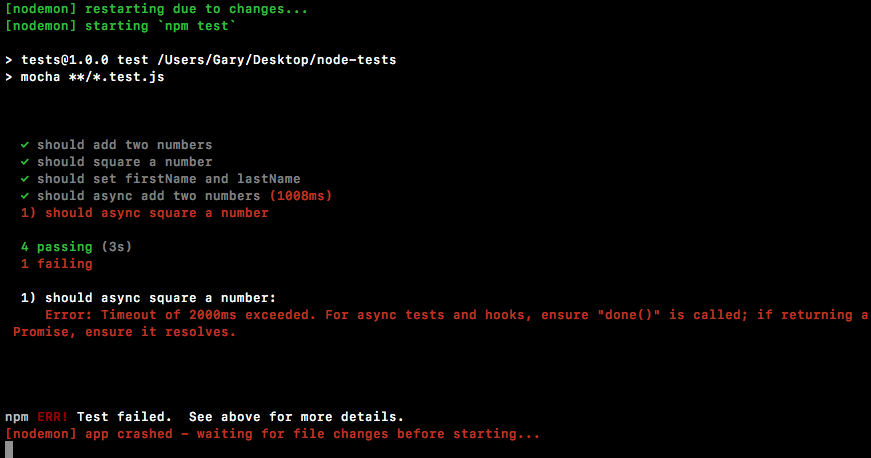
You're getting an error timeout, the 2,000 milliseconds has exceeded. This is when Mocha cuts off your test. If you see this, this usually means two things:
In our case, we have 5 tests passing and it took 2 seconds to do that. This is fantastic:
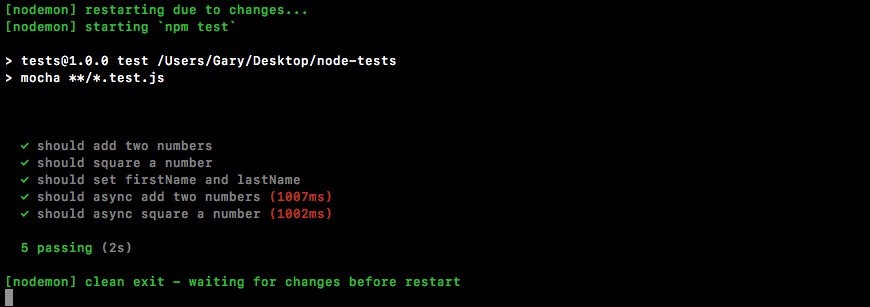
We now have a way to test synchronous functions and asynchronous functions. This will make testing a lot more flexible. It'll let us test essentially everything inside of our applications.
In this chapter, we looked into testing the synchronous and asynchronous functions. We looked into basic testing. We explored the testing framework, Mocha. Then, we look into using assertion libraries in testing Node modules.
In the next chapter, we'll look at how we can test our Express apps.
In this chapter, we'll continue our journey of testing the Node applications. In the previous chapter, we looked at the basic testing framework and worked on synchronous as well as asynchronous Node application. In this chapter we'll move on to testing the Express applications, then we'll look into a method to organize our test better in the result output, and last but not least we'll get into some advanced methods of testing Node application.
Specifically, we'll look into the following topics:
In this section, we'll be setting up an Express app and then, we'll look at how we can test it to verify that the data that comes back from our routes is what the user should be getting. Now before we do any of that, we will need to create an Express server and that's the goal of this section.
We'll start with installing Express. We'll use npm i, which is short for install, to install Express. Remember, you could always replace install with i. We'll grab the most recent version, @4.16.2. Now, we'll be using the save flag as opposed to the save dev flag that we've used for testing in the previous chapter:
npm i express@4.16.2 --save
This command is going to install Express as a regular dependency, which is exactly what we want:
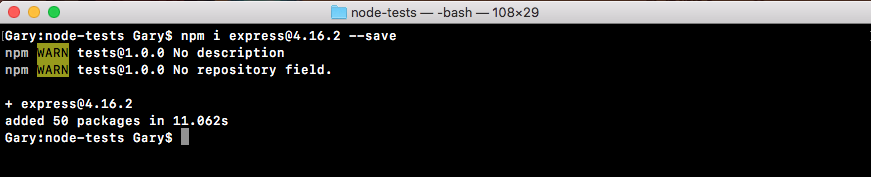
We need Express when we deploy to production, whether it's Heroku or some other service.
Back inside the app, if we open up package.json, we can see we have dependencies which we've seen before, and devDependencies which is new to us:
"devDependencies": {
"expect": "^1.20.2",
"mocha": "^3.0.0"
},
"dependencies": {
"express": "^4.14.0"
}
}
This is how we can break up the different dependencies. From here, we'll make a server folder inside the root of the project where we can store the server example as well as the test file. We'll make a directory called server. Then inside server, we'll make a file called server.js.
The server.js file will contain the actual code that starts up our server. We'll define our routes, we'll listen to a port, all that stuff is going to happen in here. This is what we had before for the previous server chapter. In server.js, we'll add const express, and this will get equal to the require ('express') return result:
const express = require('express');
Next up, we can make our application by creating a variable called app and setting it equal to a call to express:
const express = require('express');
var app = express();
Then we can start configuring our routes. Let's set up just one for this section, app.get:
const express = require('express');
var app = express();
app.get
This will set up an HTTP GET handler. The URL will be just / (forward slash), the root of the website. And when someone requests that, for the moment we'll specify a really simple string as the return result. We get the request and the response object like we do for all of our express routes. Yo respond, we'll call res.send, sending back the string Hello World!:
app.get('/', (req, res) => {
res.send('Hello world!');
});
The last step in the process will be to listen on a port using app.listen. We'll bind to port 3000 by passing it in as the first and only argument:
app.get('/', (req, res) => {
res.send('Hello world!');
});
app.listen(3000);
With this in place, we are now done. We have a basic Express server. Before we move on to explore how to test these routes, let's start it up. We'll do that by using the following command:
node server/server.js
When we run this, we don't get any logs because we haven't added a callback function for when the server starts, but it should indeed be up.
If we go over to Chrome and visit localhost:3000, we get Hello world! printing to the screen:

Now, we are ready to move on to start testing our Express application.
Now, we'll learn an easy, no-nonsense way to test our Express applications. That means we can verify that when we make an HTTP GET request to the / URL, we get the Hello world! response back.
Now traditionally, testing HTTP apps has been one of the more difficult things to test. We would have to fire up a server, like we did in the previous section. Then we would need some code to actually make the request to the appropriate URL. And then we have to dig through the response, getting what we want, and making assertions about it, whether it's headers, the status code, the body, or anything else. It is a real burden. That is not the goal for this section. Our goal here is to make testing easy and approachable, so we'll use a library called SuperTest to test our Express applications.
SuperTest was created by the developers who originally created Express. It has built-in support for Express and it makes testing your Express apps dead simple.
In order to get started, let's pull up the docs page so you know where it lives if you ever want to look at any other features that it has to offer. If you Google supertest, it should be the first result:
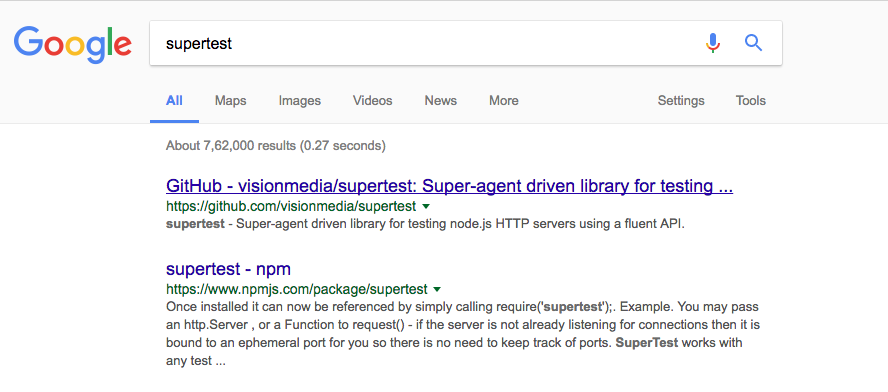
It's the VisionMedia repository and the repository itself is called SuperTest. Let's switch over to the repository page and we can take a quick look at what it has to offer. On this page, we can find installation instructions and introduction stuff. We don't really need that. Let's take a quick look at an example:
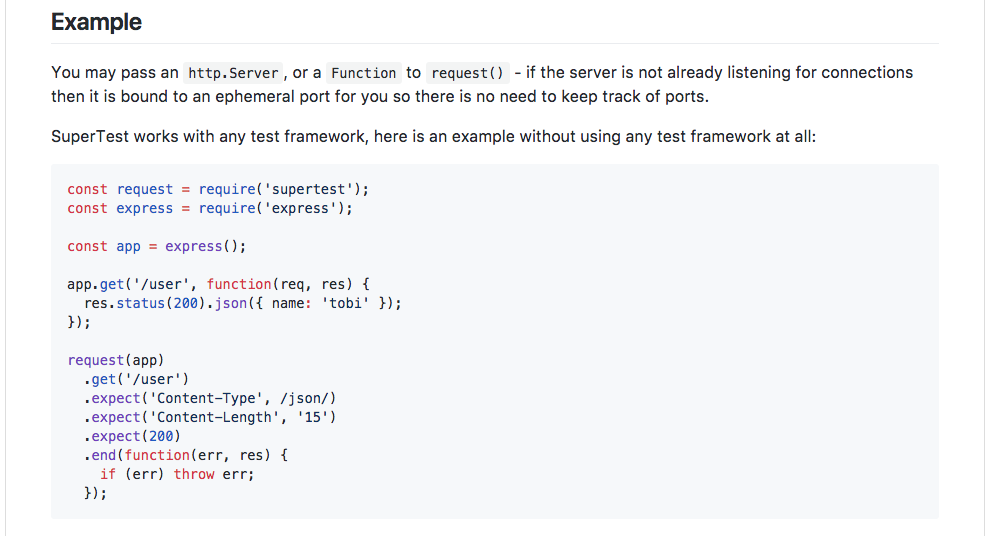
As shown in the previous screenshot, we can see an example of how SuperTest works. We create an Express application, just like we normally would, and we define a route. Then we make a call to the request method, which is provided by SuperTest, passing in our Express application. We say we want to make a get request to the / URL. Then we start making assertions. There's no need to manually check either the headers, the status code, or the body. It has built-in assertions for all of that.
To get started, we'll install SuperTest in our application by running npm install from the Terminal. We have the Node server still running. Let's shut that down and then install the module.
We can use npm i, the module name is supertest and we'll be grabbing the most recent version, @2.0.0. This is a test-specific module so we'll be installing it with save. We'll use save-dev to add it to the devDependencies in package.json:
npm i supertest@3.0.0 --save-dev

With SuperTest installed, we are now ready to work on the server.test.js file. As it doesn't yet exist inside the server folder, so we can create it. It's going to sit just alongside server.js:

Now that we have server.test.js in place, we can start setting up our very first test. First, we'll be creating a constant called request and setting that equal to the return result from requiring supertest:
const request = require('supertest');
This is the main method we'll be using to test our Express apps. From here, we can load in the Express application. Now inside server.js, we don't have an export that exports the app, so we'll have to add that. I'll add it next to the app.listen statement by creating module.exports.app and setting that equal to the app variable:
app.listen(3000);
module.exports.app = app;
Now we have an export called app that we can access from other files. The server.js is still going to run as expected when we start it from the Terminal, not in test mode. We just added an export so if anyone happens to require it, they can get access to that app. Inside server.test.js, we'll make a variable to import this. We'll call the variable app. Then we'll require using require('./server.js'), or just server. Then we'll access the .app property:
const request = require('supertest');
var app = require('./server').app;
With this in place, we now have everything we need to write our very first test.
The first test we'll write is a test that verifies when we make an HTTP GET request to the / URL, we get Hello world! back. To do this, we will be calling it just like we did for our other tests in the previous chapter. We're still using mocha as the actual test framework. We're using SuperTest to fill in the gaps:
var app = require('./server').app;
it('should return hello world response')
Now we'll set up the function as follows:
it('should return hello world response', (done) => {
});
This is going to be an asynchronous call so I are providing done as the argument to let mocha know to wait before determining whether or not the test passed or failed. From here, we can now make our very first call to request. To use SuperTest, we call request passing in the actual Express application. In this case, we pass in the app variable:
it('should return hello world response', (done) => {
request(app)
});
Then we can start chaining together all the methods we need to make the request, make our assertions, and finally wrap things up. First up, you'll be using a method to actually make that request, whether it's a get, put, delete, or a post.
For now, we'll be making a get request, so we will use .get. The .get request takes the URL. So, we'll provide / (forward slash), just as we did in server.js:
it('should return hello world response', (done) => {
request(app)
.get('/')
});
Next up, we can make some assertions. To make assertions, we'll use .expect. Now .expect is one of those methods that does different things depending on what you pass to it. In our case, we'll be passing in a string. Let's pass in a string which will be the response body that we assert, Hello world!:
it('should return hello world response', (done) => {
request(app)
.get('/')
.expect('Hello world!')
});
Now that we're done and we've made our assertions, we can wrap things up. To wrap up a request in SuperTest, all we do is we call .end passing in done as the callback:
it('should return hello world response', (done) => {
request(app)
.get('/')
.expect('Hello world!')
.end(done);
});
This handles everything behind the scenes so you don't need to manually call done at a later point in time. All of it is handled by SuperTest. With these four lines (in the previous code), we have successfully tested our very first API request.
We'll kick things off in the Terminal by running our test-watch script:
npm run test-watch
The test script is going to start and as shown here, we have some tests:
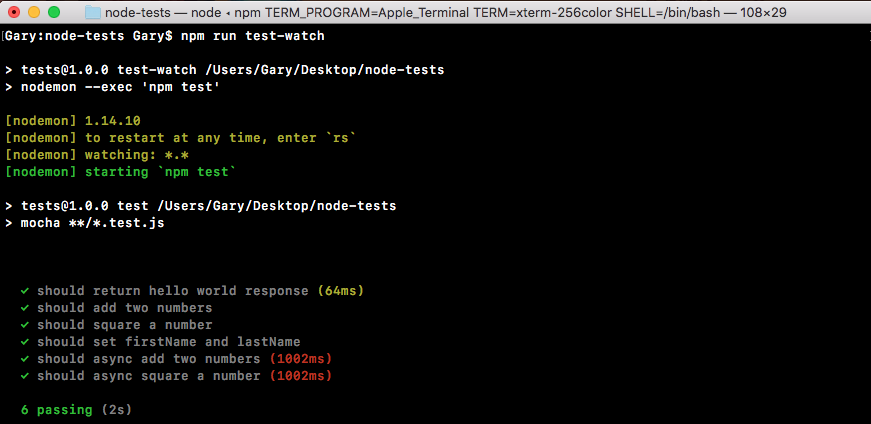
We have our test, should return hello world response, showing up in the previous screenshot.
Now we can take things a step further making other assertions about the data that comes back. For example, we can use expect after the .get request in server.test.js to make an assertion about the status code. By default, all of our Express calls are going to return a 200 status code, which means that things went OK:
it('should return hello world response', (done) => {
request(app)
.get('/')
.expect(200)
.expect('Hello world!')
.end(done);
});
If we save the file, the test still passes:

Now let's make some changes to the request to make these tests fail. First up, in server.js we'll just add a few characters (ww) to the string, and save the file:
app.get('/', (req, res) => {
res.send('Hello wwworld!');
});
app.listen(3000);
module.exports.app = app;
This should cause the SuperTest test to fail and it does indeed do that:
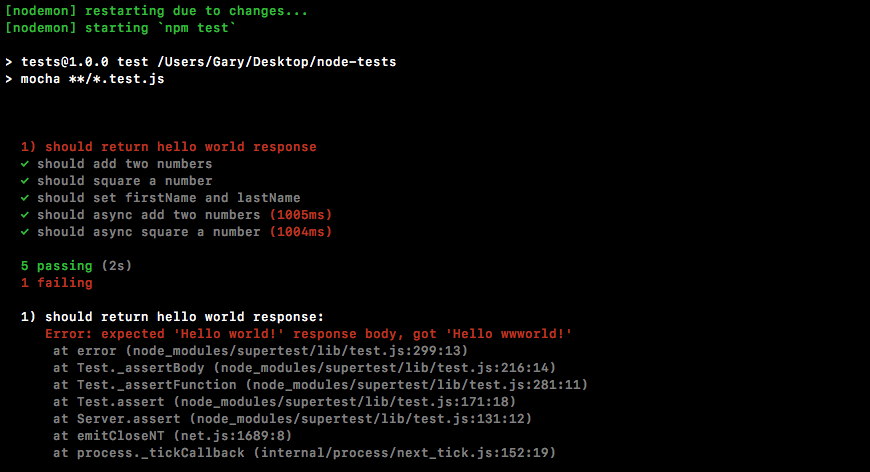
As shown in the previous screenshot, we get a message, expected 'Hello world!' response body, but we got 'Hello wwworld!'. This is letting us know exactly what happened. Back inside server.js, we can remove those extra characters (ww) and try something else.
Now we haven't talked about how to set a custom status for our response, but we can do that with one method, .status. Let's add .status in server.js, chaining it on, before, send('Hello world!'), just like this:
app.get('/', (req, res) => {
res.status().send('Hello world!');
});
Then, we can pass in the numerical status code. For example, we could use a 404 for page not found:
app.get('/', (req, res) => {
res.status(404).send('Hello world!');
});
If we save the file this time around, the body is going to match up, but inside the Terminal we can see we now have a different error:
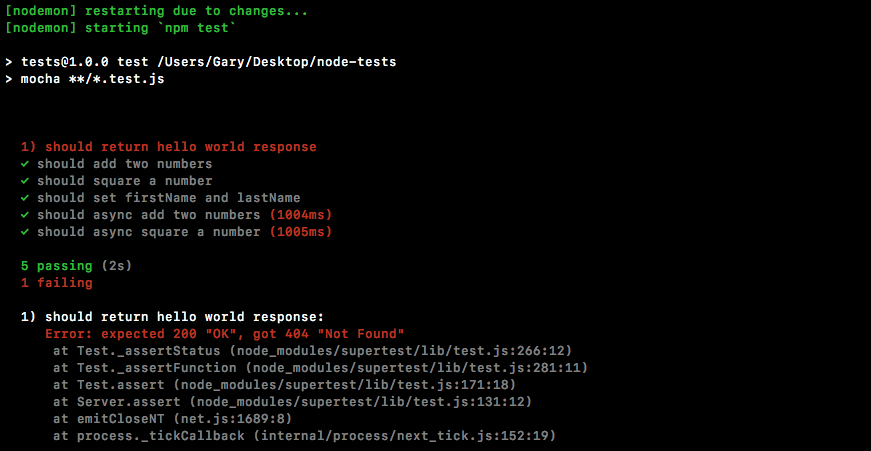
We expected a 200, but we got a 404. Using SuperTest, we can make all sorts of assertions about our application. Now the same thing is true for different types of responses. For example, we can create an object as the response. Let's make a simple object and we'll create a property called error. Then we'll set error equal to a generic error message for a 404, something like Page not found:
app.get('/', (req, res) => {
res.status(404).send({
error: 'Page not found.'
});
});
Now, we're sending back a JSON body, but currently we're not making any assertions about that body so the test is going to fail:
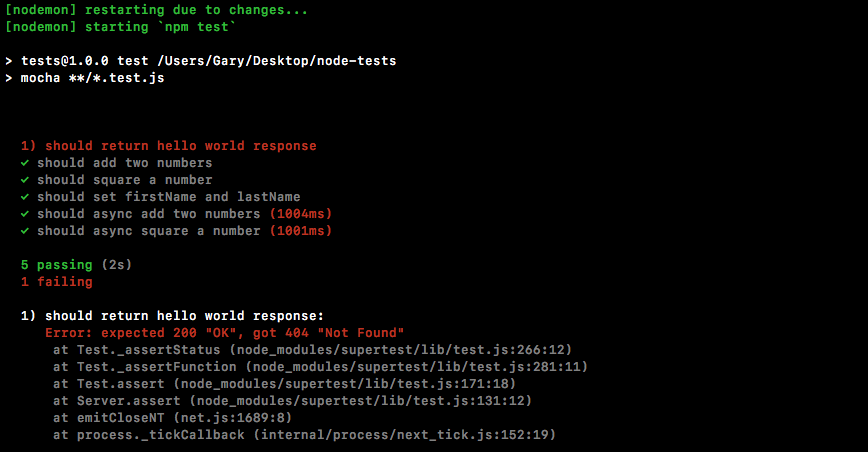
We can update our tests to expect JSON to come back. In order to get that done, all we have to do inside server.test is change what we pass to expect. Instead of passing in a string, we'll pass in an object:
it('should return hello world response', (done) => {
request(app)
.get('/')
.expect(200)
.expect({
})
.end(done);
});
Now we can match up that object exactly. Inside the object, we'll expect that the error property exists and that it equals exactly what we have in server.js:
.expect({
error: 'Page not found.'
})
Then, we'll change the .expect call to a 404 from 200:
.expect(404)
.expect({
error: 'Page not found.'
})
With this in place, our assertions now match up with the actual endpoint we've defined inside the Express application. Let's save the file and see if all the tests pass:

As shown in the previous screenshot, we can see it is indeed passing. The Should return hello world response is passing. It took about 41ms (milliseconds) to complete, and that is perfectly fine.
A lot of the built-in assertions do get the job done for the majority of cases. There are times where you want a little more flexibility. For example, in the previous chapter, we learned about all those cool assertions expect can make. We can use toInclude, toExclude, all of that stuff is really handy and it's a shame to lose it. Luckily, there's a lot of flexibility with SuperTest. What we can do instead of taking an object and passing it into expect, or a number for the status code, we can provide a function. This function will get called by SuperTest and it will get passed the response:
.expect((res) => {
})
This means we can access headers, body, anything we want to access from the HTTP response—it's going to be available in the function. We can pipe it through the regular expect assertion library like we've done in the previous chapter.
Let's load it in, creating a constant called expect and setting it equal to require expect:
const express = require('supertest');
const express = require('express');
Now before we look at how it's going to work, we'll make a change in server.js. Here, we'll add a second property on to the .status object. We'll add an error and then add something else. Let's use name, setting it equal to the application name, Todo App v1.0:
app.get('/', (req, res) => {
res.status(404).send({
error: 'Page not found.',
name: 'Todo App v1.0'
});
});
Now that we have this in place, we can take a look at how we can use those custom assertions inside our test file. In the .expect object, we'll have access to the response and in the response there is a body property. This will be a JavaScript object with key-value pairs, which means we would expect to have an error property and a name property, which we set in server.js.
Back inside our test file, we can make a custom assertion using expect. I'll expect something about the body, res.body. Now we can use any assertion we like, not just the equals assertion, which is the only one SuperTest supports. Let's use the toInclude assertion:
.expect((res) => {
expect(res.body).toInclude({
});
})
Remember, toInclude lets you specify a subset of the properties on the object. As long as it has those ones that's fine. It doesn't matter that it has extra ones. In our case, inside toInclude, we can just specify the error message, leaving off the fact that name exists at all. We want to check that error: Page not found, formatted exactly like we have it inside of server.js:
.expect((res) => {
expect(res.body).toInclude({
error: 'Page not found.'
});
})
Now when we save the file back inside the Terminal, things restart and all of my tests are passing:
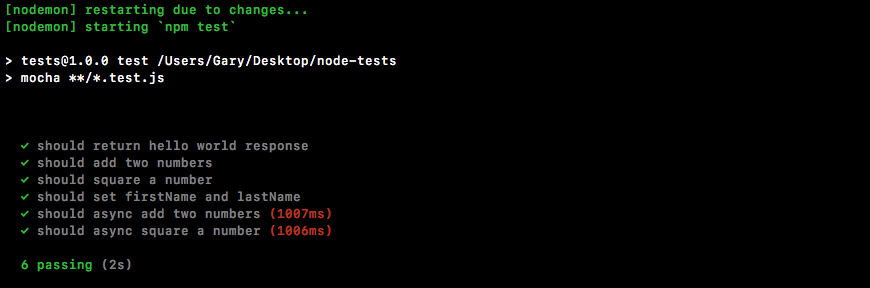
Using a combination of SuperTest and expect we can have super flexible test suites for our HTTP endpoints. With this in place, we'll create another express route and we'll define a test that makes sure it works as expected.
There will be two sides to this express route, the actual setup in server.js and the test. We can start inside server.js. In here, we'll make a new route. First, let's add a few comments to specify exactly what we'll do. It's going to be an HTTP GET route. The route itself will be /users and we can just assume this returns an array of users:
app.get('/', (req, res) => {
res.status(404).send({
error: 'Page not found.',
name: 'Todo App v1.0'
});
});
// GET /users
We can pass an array back through the send method, just like we do an object in the previous code. Now this array is going to be an array of objects where each object is a user. For now, we want to give users a name property and an age prop:
// GET /users
// Give users a name prop and age prop
Then we'll create two or three users for this example. Now once we have this done, we'll be responsible for writing a test that asserts it works as expected. That's going to happen in server.test.js. Inside server.test.js, we'll make a new test:
it('should return hello world response', (done) => {
request(app)
.get('/')
.expect(404)
.expect((res) => {
expect(res.body).toInclude({
error: 'Page not found.'
});
})
.end(done);
});
// Make a new test
And this test is going to assert a couple of things. First up, we assert that the status code that comes back is a 200 and we want to make an assertion that inside of that array and we'll do that using toInclude:
// Make a new test
// assert 200
// Assert that you exist in users array
Let's start with defining the endpoint first. Inside server.js, just following the comments, we'll call app.get so we can register the brand new HTTP endpoint for our application. This one is going to be at /users:
app.get('/users')
// GET /users
// Give users a name prop and age prop
Next up, we'll specify the callback that takes both request and response:
app.get('/users', (req, res) => {
});
// GET /users
// Give users a name prop and age prop
This will let us actually respond to the request, and the goal here is just to respond with an array. In this case, I'll call response.send passing in an array of objects:
app.get('/users', (req, res) => {
res.send([{
}])
});
The first object will be name. We'll set the name equal to Mike and we'll set his age equal to 27:
app.get('/users', (req, res) => {
res.send([{
name: 'Mike',
age: 27
}])
});
Then I can add another object. Let's add the second object to the array with a name equal to Andrew and an age equal to 25:
app.get('/users', (req, res) => {
res.send([{
name: 'Mike',
age: 27
}, {
name: 'Andrew',
age: 25
}])
});
In the last one, we'll set the name equal to Jen and the age equal to 26:
app.get('/users', (req, res) => {
res.send([{
name: 'Mike',
age: 27
}, {
name: 'Andrew',
age: 25
}, {
name: 'Jen',
age: 26
}])
});
Now that we have our endpoint done, we can save server.js, move into server.test.js, and start worrying about actually creating our test case.
In server.test.js, just following the comments, we need to start things out by calling it. it is the only way to make a new test:
// Make a new test
// assert 200
// Assert that you exist in users array
it('should return my user object')
Then we'll specify the callback function. It will get past the done argument because this one is going to be asynchronous:
// Make a new test
// assert 200
// Assert that you exist in users array
it('should return my user object', (done) => {
});
To kick things off inside the test case, we'll be calling requests just like we did in hello world response, passing in the Express application:
it('should return my user object', (done) => {
request(app)
});
Now we can set up the actual call. In this case, we're just making a call, a get request, to the following URL, inside of quotes, /users:
it('should return my user object', (done) => {
request(app)
.get('/users')
});
Next up, we can start making our assertions and the first thing we're supposed to assert that the status code is at 200, which is the default status code used by Express. We can assert that by calling .expect and passing in the status code as a number. In this case, we'll pass in 200:
it('should return my user object', (done) => {
request(app)
.get('/users')
.expect(200)
});
After this, we'll use a custom expect assertion. This means that we'll call expect passing in a function and use toInclude inside it to make the assertion that you exist in that users array. We'll call expect the method passing in the function, and that function will get called with the response:
it('should return my user object', (done) => {
request(app)
.get('/users')
.expect(200)
.expect((res) => {
})
});
This will let us make some assertions about the response. What we're actually going to do is make an assertion using expect. We'll expect something about the response body. In this case, we'll be checking that it includes using toInclude, our user object:
it('should return my user object', (done) => {
request(app)
.get('/users')
.expect(200)
.expect((res) => {
expect(res.body).toInclude()
})
});
Now remember you can call toInclude on both arrays and objects. All we do is pass in the item we want to confirm is in the array. In our case, it's an object where the name property equals Andrew and the age property equals 25, which is what we used inside server.js:
expect(res.body).toInclude({
name: 'Andrew',
age: 25
})
Now that we have our custom expect call in place, at the very bottom we can call .end. This is going to wrap up the request and we can pass in done as the callback so it can properly fire off those errors if any actually occurred:
expect(res.body).toInclude({
name: 'Andrew',
age: 25
})
})
.end(done);
With this in place, we are ready to get going. We can save the file.
Inside the Terminal, we can see the tests are indeed rerunning:
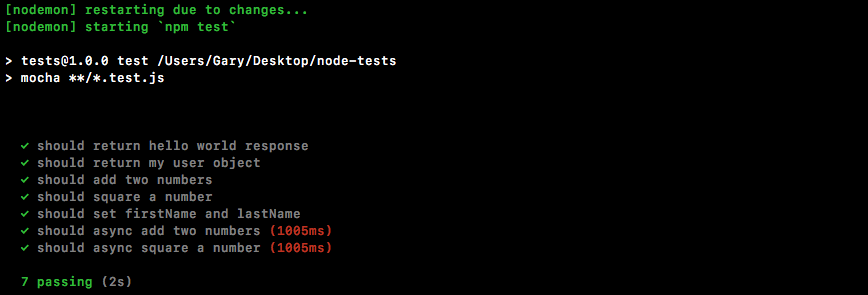
We have a test as shown in the previous screenshot, should return my user object. It is passing.
Now we can confirm that we'll not go crazy and test the wrong thing by just messing up the data. We will now add a lowercase a after the uppercase one in Andrew in server.js, as shown here:
app.get('/users', (req, res) => {
res.send([{
name: 'Mike',
age: 27
}, {
name: 'Aandrew',
age: 25
}, {
name: 'Jen',
age: 26
}])
});
The test is going to fail. We can see that in the Terminal:
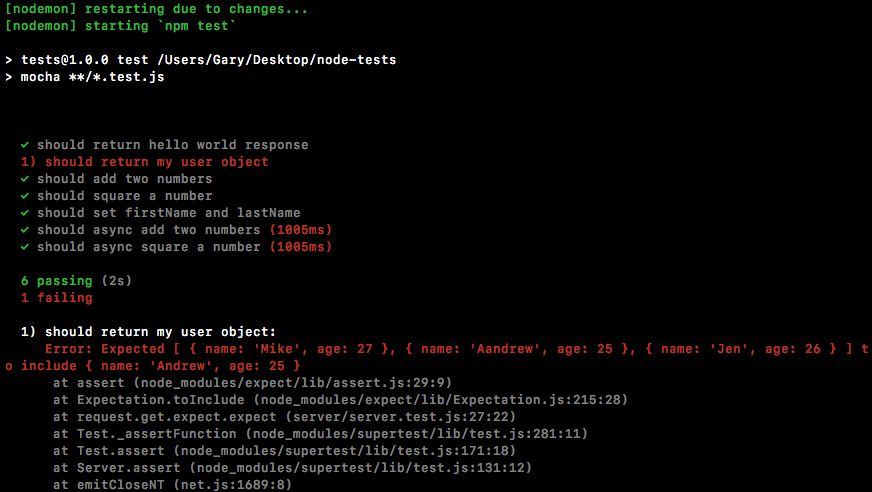
We have done testing for our Express apps. We'll now talk about one more way we can test our Node code.
In this section, we will learn how to use describe(). describe is a function injected into our test files, just like the it function is. It comes from mocha and it's really fantastic. Essentially, it lets us group tests together. That makes it a lot easier to scan the test output. If we run our npm test command in the Terminal, we get our tests:
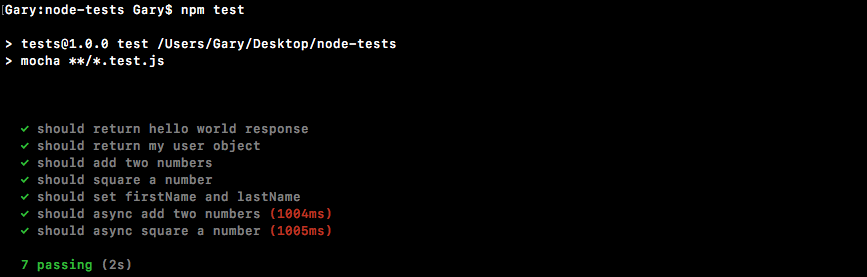
We have seven tests and currently they're all grouped together. It's really hard to look for the tests in the utils file and it's impossible to find the tests for asyncAdd without scanning all of the text. What we'll do is call describe(). This will let us make groups of tests. We can give that group a name. It will make our test output much more readable.
In the utils.test.js file, right after the utils constant, we'll call describe():
const expect = require('expect');
const utils = require('./utils');
describe()
The describe object takes two arguments, just like it. The first one is the name and the other is the callback function. We'll use Utils. This will be the describe block that contains all of the tests in the utils.test file. Then we'll provide the function. This is the callback function:
describe('Utils', () => {
});
Inside the callback function, we'll be defining tests. Any test defined in the callback function will be a part of the utils block. That means we can take our existing tests, cut them out of the file, paste them in there, and we'll have a describe block called utils with all of the tests for this file. So, let's do just that.
We'll grab all the tests, excluding the ones that are just playground tests where we play around with various expect functionality. We'll then paste them right into the callback function. The resultant code is going to look like this:
describe('Utils', () => {
it('should add two numbers', () => {
var res = utils.add(33, 11);
expect(res).toBe(44).toBeA('number');
});
it('should async add two numbers', (done) => {
utils.asyncAdd(4, 3, (sum) => {
expect(sum).toBe(7).toBeA('number');
done();
});
});
it('should square a number', () => {
var res = utils.square(3);
expect(res).toBe(9).toBeA('number');
});
it('should async square a number', (done) => {
utils.asyncSquare(5, (res) => {
expect(res).toBe(25).toBeA('number');
done();
});
});
});
These are four tests for add, asyncAdd, square, and asyncSquare respectively. Now we'll save the file and we can start up the test-watch script from the Terminal and check the output:
npm run test-watch
The script will start and run through our tests, and as shown in the following screenshot, we'll have different outputs:
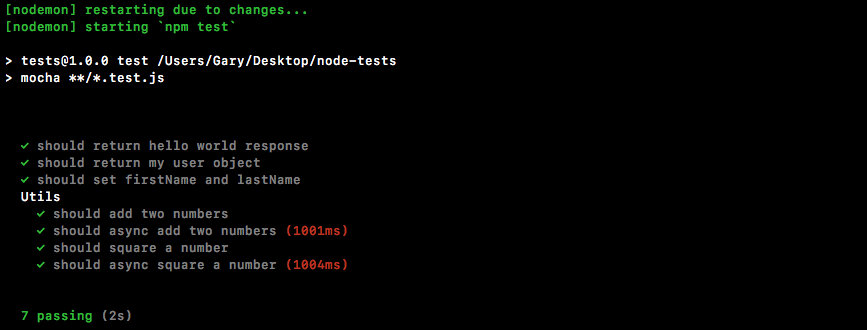
We have a Utils section and under Utils, we have all of the tests in that describe block. This makes reading and scanning your tests much, much easier. We can do the same thing for the individual methods.
Now, in the case of utils.test.js (refer to the previous screenshot), we have one test per method, but if you have a lot of tests that are targeting a complex method, it's best to wrap that in its own describe block. We can nest describe blocks and tests in any way we like. For example, right inside utils just after the describe statement, we can call describe again. We can pass a new description. Let's use # (pound sign) followed by add:
describe('Utils', () => {
describe('#add')
The # (pound sign) followed by the method name is the common syntax for adding a describe block for a specific method. Then we can provide that callback function:
describe('Utils', () => {
describe('#add', () => {
})
Then, we can take any tests we want to add into that group, cut them out, and paste them in:
describe('Utils', () => {
describe('#add', () => {
it('should add two numbers', () => {
var res = utils.add(33, 11);
expect(res).toBe(44).toBeA('number');
});
});
Then I can save the file. This will rerun the test suite and now we have test output that's even more scannable:
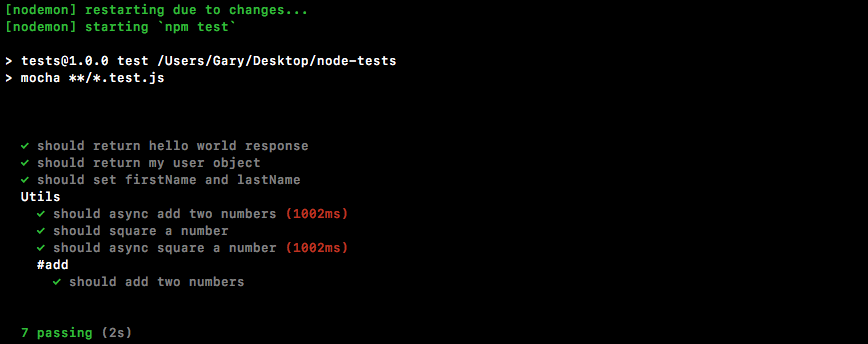
It's super easy to find the utils add method tests because they're clearly labelled. Now you could go as crazy or as uncrazy with this as you want. There really is no hard-and-fast rule for how often to use describe to structure your tests. It's really up to you to figure out what makes sense given the amount of tests you have for a method or a file.
In this case, we have quite a few tests in the file so it definitely makes sense to add that utils block. And I just wanted to show you you could nest them, so I added it for add as well. If I was writing this code, I probably wouldn't add a second layer of tests, but if I had more than one test per method, I definitely would add a second describe block.
Now, let's create some describe blocks in the server.test file. We'll create a route describe block called Server. Then we'll create describe blocks for both the route URL and for /users. We'll have GET/. That will have the test case in there, some test case. Then alongside //, we'll have GET /users, and that will have its own test case, some test case as explained in the comments next:
const request = require('supertest');
const expect = require('expect');
var app = require('./server').app;
// Server
// GET /
// some test case
// GET / user
// some test case
Now the test cases are obviously already defined. All we need to do is call describe three times to generate the previously explained structure.
We'll start with calling describe() once following the comments part, and this description will be for the route, so we'll call this one Server:
// Server
// GET /
// some test case
// GET / user
// some test case
describe('Server')
This is going to contain all the tests in our server file. We can add the callback function next and we can move on:
describe('Server', () => {
})
Next up, we'll call describe again. This time we're creating a describe block for tests that test the GET / route and add the callback function:
describe('Server', () => {
describe('GET /', () => {
})
})
Now we can simply take our test, cut it out, and paste it right inside the describe callback. The resultant code is going to look like this:
describe('Server', () => {
describe('GET /', () => {
it('should return hello world response', (done) => {
request(app)
.get('/')
.expect(404)
.expect((res) => {
expect(res.body).toInclude({
error: 'Page not found.'
});
})
.end(done);
});
});
})
Next up, we'll call describe the third time. We'll be calling describe passing in as the description GET /users:
describe('GET /users')
We'll have our callback function as always and then we can copy and paste our test right inside:
describe('GET /users'), () => {
it('should return my user object', (done) => {
request(app)
.get('/users')
.expect(200)
.expect((res) => {
expect(res.body).toInclude({
name: 'Andrew',
age: 25
});
})
.end(done);
});
});
With this in place, we are now done. We have a much better structure for our tests and when we rerun the test suite by saving the file, we'll be able to see that in the Terminal:
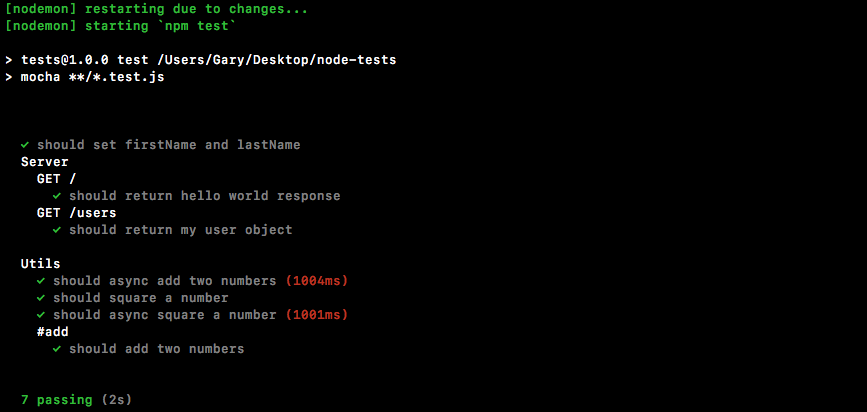
As shown in the previous code, we have a much more scannable test suite. We can see our server tests right away. We can create groups of tests for each feature. Since we have static data right now, we really don't need more than one test per feature. But down the line, we will have multiple tests for each of our HTTP requests, so it's a good idea to get into that habit of creating describe blocks early. And that's it for this one!
In this section, which is the final section for the testing chapter, we'll learn some pretty advanced testing techniques. We'll be using these techniques as we build real-world apps, but for now let's start off with an example. We'll worry about the vocabulary for what we're about to do in just a second.
For the moment, we'll close all our current files and create a new directory in the root of the project. We'll make a new folder called spies. We'll talk about what exactly spies are and how they relate to testing in just a moment. Inside spies, we'll make two files: app.js (this is the file that we'll be testing) and a second one, called db.js. In our example, we can just assume that db.js is a file that has all sorts of methods for saving and reading data from the database.
Inside db.js, we'll create one function using module.exports. Let's create a function called saveUser. The saveUser function will be a really simple function, and it will take a user object like this:
module.exports.saveUser = (user) => {
}
Now, we'll just print it to the screen using the console.log statement. We'll print it a little message, Saving the user, and we'll also print out the object as shown here:
module.exports.saveUser = (user) => {
console.log('Saving the user', user);
}
Now obviously, this is not a real saveUser function. We do not interact with any sort of database, but it will illustrate exactly how we will be using spies to test our code.
Next up, we will fill our app.js, and this is the file we'll actually be testing. Inside app.js, we'll create a new function: module.exports.handleSignup. In the context of an application with authentication, handleSignup might take an email and a password; maybe it goes ahead and checks if the email already exists. If it doesn't, great; it saves the user and then it sends some sort of a welcome email. We can simulate that by creating an arrow function (=>) that takes in email and a password:
module.exports.handleSignup = (email, password) => {
};
Inside the arrow function (=>), we'll leave three comments. These will be things that the function is supposed to do. It will check if the email already exists; it will save the user to the database; and finally, we'll send that welcome email:
module.exports.handleSignup = (email, password) => {
// Check if email already exists
// Save the user to the database
// Send the welcome email
};
Now, these three things are just an example of what a handleSignup method might actually do. When we go through the real process, you'll see how it pans out. Now, we already have one of these in place. We just created saveUser, so we'll do is call saveUser instead of having this second comment:
// Check if email already exists
db.saveUser()
// Send the welcome email
It's not imported just yet, but that's not going to stop us from calling it; we'll add the import in just a second, and we'll pass in what it expects, the user object. Now, we don't have a user object; we have an email and a password. We can create that user object by setting email equal to the email argument and setting password equal to the password argument:
db.saveUser({
email: email,
password: password
});
Now one important thing to note: inside ES6, if the property name in an object you're setting is the same as the variable name, you can actually define it like this:
db.saveUser({
email,
password
});
In this example, since we're setting a password property equal to whatever on the password variable, there's no need to have both. This ES6 syntax also allows us to create a much simpler-looking call. There's no need to have it on multiple lines since it's pretty reasonable in length.
Now, at the top, we can load in db by creating a variable, calling it db, and setting it equal to require('db.js'). That is a local file, so we'll start it with a ./ to grab it from the current directory:
var db = require('./db.js');
Now, this is an example of something that we'll want to test inside our code. We have a handleSignup method. It takes an email and a password, and we need to make sure that db.saveUser works as well. That is a big problem, and this means that we're not just testing handleSignup, we are also testing the following:
This is a real pain. What we'll do instead is fake the saveUser function. It's never actually going to execute the code inside it db, but it will let us verify that when we run handleSignup, saveUser gets called. We're going to do this with something called spies.
The spies function let you swap out a real function such as saveUser for a testing utility. When that test function gets called we can create various assertions about it, making sure it was called with certain arguments. Let's start exploring that.
We'll start it with creating a new file. Inside the spies directory, we'll make a new file called app.test.js, and we can start playing around with spies. Now, spies comes built-in with expect, so all we have to do is load it in:
const expect = require('expect');
From here we can create our very first test. We'll put this in a describe block so it's easier to find over in our test output:
const expect = require('expect');
describe('')
We'll call this describe block App and we'll add my callback function:
describe('App', () => {
});
Now we can add individual test cases. First up, we'll call it and make a new test where we can just play around with spies:
describe('App', () => {
it('')
});
We won't be calling the function in our app.js file just yet. We'll add in the it object a string say, Should call the spy correctly:
describe('App', () => {
it('should call the spy correctly', () => {
});
});
In order to visualize how spies work, we'll go through the most basic example we can. First up, creating a spy.
To create a spy, we'll call a function expect.createSpy inside the it callback function:
it('should call the spy correctly', () => {
expect.createSpy();
});
The createSpy is going to return a function, and that is the function that we'll swap out for the real one, which means we do want to store that in a variable. I'll create a variable called spy, setting it equal to the returned result:
it('should call the spy correctly', () => {
var spy = expect.createSpy();
});
And now we would inject spy into our code, whether it's app.js or some other function, and we would wait for it to get called. We can call it directly just like this:
it('should call the spy correctly', () => {
var spy = expect.createSpy();
spy();
});
Next up, we can set up a series of assertions using expect's spies assertions by heading over to the browser and going to the expect documentation, mjackson expect (https://github.com/mjackson/expect).
On this page, we can scroll down to the spies section, where they talk about all the assertions we have access to. We should start seeing spies in the method names, and that's when we know we've gotten there:
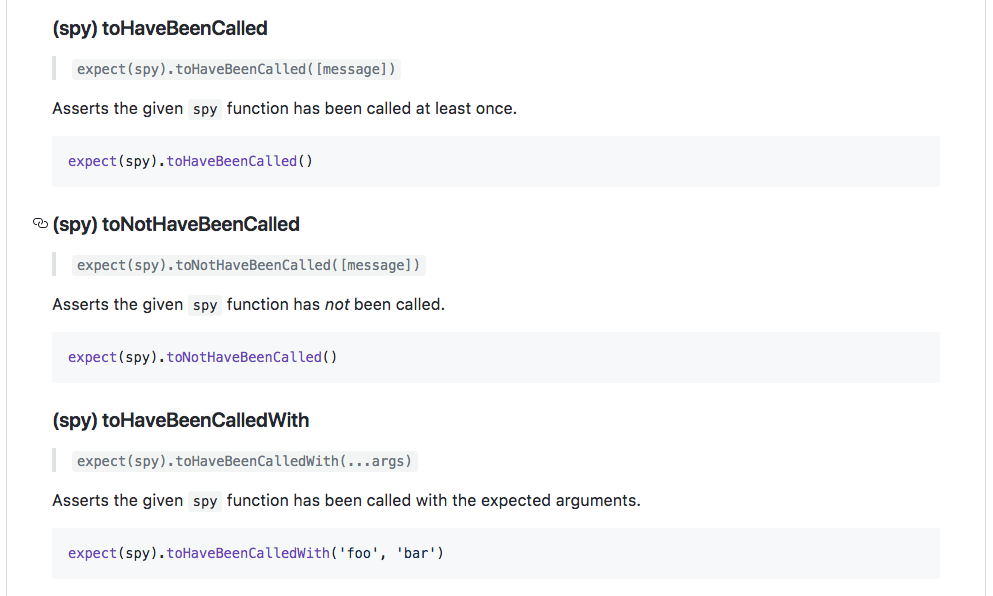
As shown in the previous code, we have the toHaveBeenCalled function and this is our first assertion with spies. We can assert that our spy was indeed called. Inside Atom, we'll do that by calling expect and passing in the spy, just like this:
it('should call the spy correctly', () => {
var spy = expect.createSpy();
spy();
expect(spy)
});
Then, we'll add the assertion, toHaveBeenCalled:
expect(spy).toHaveBeenCalled();
This will cause the test to pass if spy was called, which it was, and it'll cause the test to fail if the spy was never called. We can run the test suite inside the Terminal using the npm run test-watch command, and this is going to kick off the tests using nodemon:
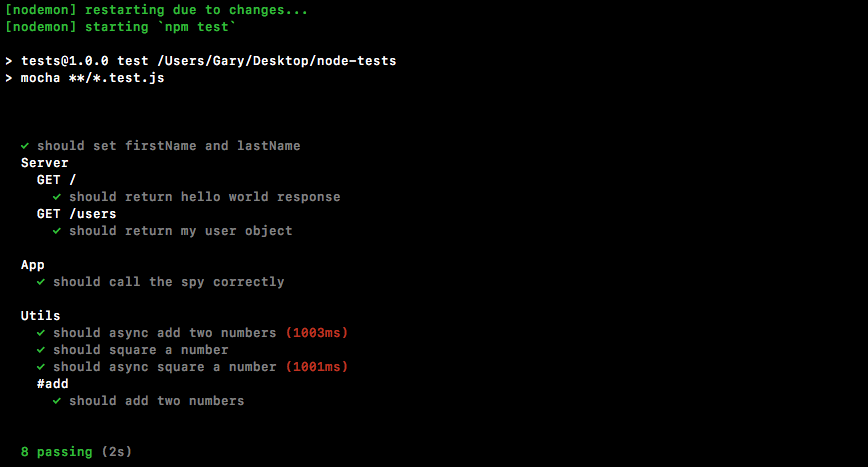
As shown in the previous screenshot, we have all our test cases, and under the App one, we have should call the spy correctly. It did indeed pass, which is fantastic.
Now let's comment out the line where I call spy:
it('should call the spy correctly', () => {
var spy = expect.createSpy();
// spy();
expect(spy).toHaveBeenCalled();
});
And this time around, the test should fail because spy was never actually called, and as shown in the following screenshot, we see spy was not called:
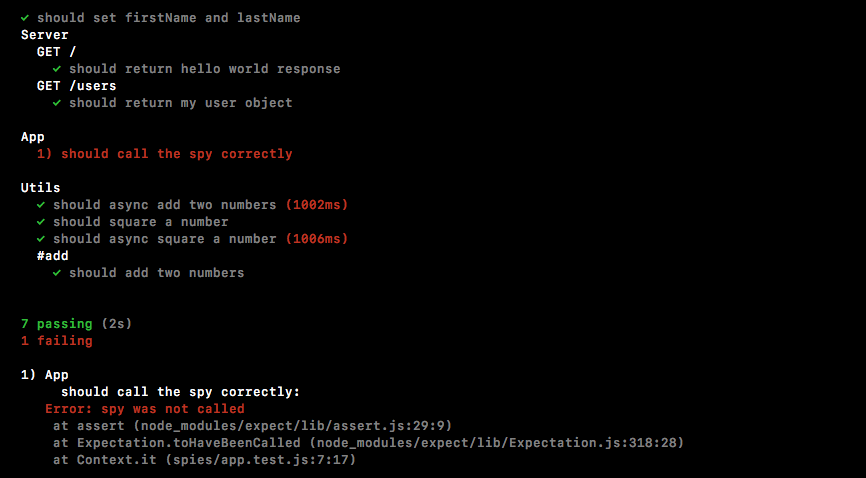
Now, checking if a spy was called or not called is great, but we can get even more detail out of our assertions. For example, what if I call the spy with the name Andrew and the age 25:
it('should call the spy correctly', () => {
var spy = expect.createSpy();
spy('Andrew', 25);
expect(spy).toHaveBeenCalled();
});
Now, we want to verify if the spy was not just called but was called with these arguments? Well, luckily, we have an assertion for that too. Instead of toHaveBeenCalled, we can call toHaveBeenCalledWith, and this lets us pass in some arguments and verify the spy was indeed called with those arguments.
As shown in the following code, we'll assert that my spy was called with Andrew and the number 25:
expect(spy).toHaveBeenCalledWith('Andrew', 25);
When we save the file and the test cases restart, we should see all the tests passing, and that's exactly what we get:
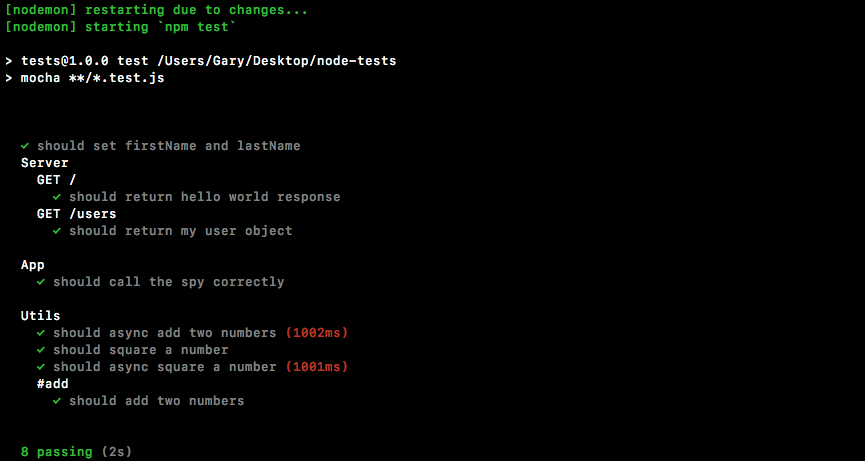
Now, if the spy was not called with the mentioned data, I'll remove 25:
it('should call the spy correctly', () => {
var spy = expect.createSpy();
spy('Andrew');
expect(spy).toHaveBeenCalledWith('Andrew', 25);
});
Now if we rerun the test suite, the test will fail. It will give you an error message letting you know that spy was never called with [ 'Andrew', 25 ]. This is causing the test to fail, which is fantastic.
For our purposes, we need a spy so we can simulate that function inside of app.js (saveUser). We need a way to replace saveUser function with a spy. Then we can verify that when handleSignup gets called, it does indeed call saveUser. It doesn't need to actually go through the process over in db.js; this is not important to our tests. The only thing that is important is that the function was called with the correct arguments.
To do that, we'll look at an npm module called rewire, which lets us swap out variables for our tests. In our case, in our test file, we'll be able to replace the db object with something else completely. Then, when the code runs, instead of calling db.saveUser as defined in app.js, it will be calling db.saveUser, which will be a spy.
To get started, we do need to install rewire in the Terminal. It's a fantastic test utility. It's pretty essential for testing functions with side effects, like the one we have seen in this section. Let's run npm install. The module name itself is called rewire, and we'll be grabbing the most recent version as of this filming, version @3.0.2. This is a test-specific module. We'll not need it for our application to run regularly, so we will be using the --save-dev flag to add it to our package.json dependencies list:
npm install rewire@3.0.2 --save-dev

Once the module is installed we can get started using it, and it's pretty simple to set up. Inside app.test.js we can start by loading it in. Up at the very top, we'll create a new constant. This one will be called rewire, and we'll set it equal to the returned result from requiring rewire:
const expect = require('expect');
const rewire = require('rewire');
Now, the way that rewire works is it requires you to use rewire instead of require when you're loading in the file that you want to mock out. For this example, we want to replace db with something else, so when we load an app we have to load it in in a special way. We'll make a variable called app, and we'll set it equal to rewire followed by what we would usually put inside of require. In this case it's a relative file, a file that we created ./app will get the job done:
const expect = require('expect');
const rewire = require('rewire');
var app = rewire('./app');
Now rewire loads your file through require, but it also adds two methods onto app. These methods are:
We can use these to mock out various data inside of app.js. That means we'll make a simulation of the db object, the one that comes back from db.js, but we'll swap out the function with a spy.
Inside our describe block, we can kick things off by making a variable. This variable is going to be called db, and we'll set it equal to an object:
describe('App', () => {
var db = {
}
The only thing we need to mock out in our case is saveUser. Inside the object, we'll define saveUser and then I'll set it equal to a spy by creating one using expect.createSpy, just like this:
describe('App', () => {
var db = {
saveUser: expect.createSpy()
};
Now we have this db variable, and the only thing left to do is replace it. We do that using app.__set__, and this is going to take two arguments:
describe('App', () => {
var db = {
saveUser: expect.createSpy()
};
app.__set__();
The first one is the thing you want to replace. We're trying to replace db, and we're trying to replace it with the db variable, which is our object that has the saveUser function:
describe('App', () => {
var db = {
saveUser: expect.createSpy()
};
app.__set__('db', db);
With that in place, we can now write a test that verifies that handleSignup does indeed call saveUser.
To verify if handleSignup calls saveUser, inside app.test.js, we'll call it:
describe('App', () => {
var db = {
saveUser: expect.createSpy()
};
app.__set__('db', db);
it('should call the spy correctly', () => {
var spy = expect.createSpy();
spy('Andrew', 25);
expect(spy).toHaveBeenCalledWith('Andrew', 25);
});
it('should call saveUser with user object')
Then we can pass in our function, and this is what will actually run when the test gets executed, and there's no need to use any asynchronous done arguments. This will be a synchronous test for now:
it('should call saveUser with user object', () => {
});
Inside the callback function, we can come up with an email and a password that we'll pass in to handleSignup in db.js. We'll make a variable called email setting it equal to some email andrew@example.com, and we can do the same thing with the password, var password; we'll set that equal to 123abc:
it('should call saveUser with user object', () => {
var email = 'andrew@example.com';
var password = '123abc';
});
Next up, we will call handleSignup. This is the function we want to test. We'll call app.handleSignup, passing in our two arguments, email and password:
it('should call saveUser with user object', () => {
var email = 'andrew@example.com';
var password = '123abc';
app.handleSignup(email, password);
});
Now at this point, handleSignup will get executed. This means that the code over here will run and it will fire db.saveUser, but db.saveUser is not the method in db.js; it's a spy instead, which means we can now use those assertions we just learned about.
Inside of the test case, we'll use expect to expect something about db; the variable .saveUser, which we set equal to a spy:
app.handleSignup(email, password);
expect(db.saveUser)
We'll call .toHaveBeenCalledWith with an object because that is what db.js should have been called with. We'll use that same ES6 shortcut: email, password:
app.handleSignup(email, password);
expect(db.saveUser).toHaveBeenCalledWith({email, password});
});
This creates an email attribute set to the email variable, and a password attribute set to the password variable. With this in place, we can now save our test file, and in the Terminal we can restart the test-watch script by using the up arrow key twice to rerun our npm run test-watch command. This is going to kick off our test suite, starting up all of our tests:
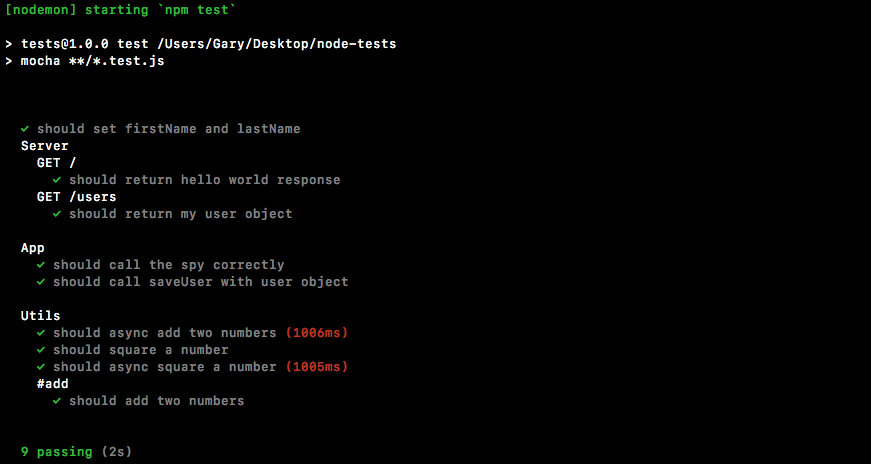
As shown in the previous screenshot, we see should call the spy correctly passes. Also, the test case we just created also passes. We can see should call saveUser with the user object, and this is fantastic. We now have a way to test pretty much anything inside Node. We can even test functions that call other functions, verifying that the communication happens as expected. All of this can be done using spies.
In this chapter, we looked into testing the Express applications as we did with the synchronous and async Node applications in the previous chapter. Then, we worked on organizing our tests with the describe() object so that we can see our different test methods right away.
In the last section we explored one more way we can test our Node applications, that is, spies. We created test files for spies, looked into the spy assertions and swapping of a function with spy.
That's the end of the book! Through the course of is book, you learned the fundamentals of Node.js so that you test and deploy Node.js applications on the web. We hope that you liked the journey this book has taken you through. We wish you all the success and hope that you continue to better your Node.js applications.
If you enjoyed this book, you may be interested in another book by Packt:

Node Cookbook - Third Edition
David Mark Clements, Mathias Buus, Matteo Collina, Peter Elger
ISBN: 978-1-78588-008-7
Please share your thoughts on this book with others by leaving a review on the site that you bought it from. If you purchased the book from Amazon, please leave us an honest review on this book's Amazon page. This is vital so that other potential readers can see and use your unbiased opinion to make purchasing decisions, we can understand what our customers think about our products, and our authors can see your feedback on the title that they have worked with Packt to create. It will only take a few minutes of your time, but is valuable to other potential customers, our authors, and Packt. Thank you!
![]()
Copyright © 2018 Packt Publishing
All rights reserved. No part of this book may be reproduced, stored in a retrieval system, or transmitted in any form or by any means, without the prior written permission of the publisher, except in the case of brief quotations embedded in critical articles or reviews.
Every effort has been made in the preparation of this book to ensure the accuracy of the information presented. However, the information contained in this book is sold without warranty, either express or implied. Neither the author, nor Packt Publishing or its dealers and distributors, will be held liable for any damages caused or alleged to have been caused directly or indirectly by this book.
Packt Publishing has endeavored to provide trademark information about all of the companies and products mentioned in this book by the appropriate use of capitals. However, Packt Publishing cannot guarantee the accuracy of this information.
Acquisition Editor: Ben Renow-Clarke
Content Development Editor: Monika Sangwan
Technical Editors: Anupam Tiwari, Gaurav Gavas
Copy Editors: Safis Editing, Tom Jacob
Project Editor: Suzanne Coutinho
Proofreader: Safis Editing
Indexer: Pratik Shirodkar
Production Coordinator: Nilesh Mohite
First published: January 2018
Production reference: 1300118
Published by Packt Publishing Ltd.
Livery Place
35 Livery Street
Birmingham
B3 2PB, UK.
ISBN 978-1-78839-554-0
Mapt is an online digital library that gives you full access to over 5,000 books and videos, as well as industry leading tools to help you plan your personal development and advance your career. For more information, please visit our website.
Spend less time learning and more time coding with practical eBooks and Videos from over 4,000 industry professionals
Improve your learning with Skill Plans built especially for you
Get a free eBook or video every month
Mapt is fully searchable
Copy and paste, print, and bookmark content
Did you know that Packt offers eBook versions of every book published, with PDF and ePub files available? You can upgrade to the eBook version at www.PacktPub.com and as a print book customer, you are entitled to a discount on the eBook copy. Get in touch with us at service@packtpub.com for more details.
At www.PacktPub.com, you can also read a collection of free technical articles, sign up for a range of free newsletters, and receive exclusive discounts and offers on Packt books and eBooks.
Andrew Mead is a full-stack developer living in beautiful Philadelphia! He launched his first Udemy course in 2014 and had a blast teaching and helping others. Since then, he has launched 3 courses with over 21,000 students and over 1,900 5-star reviews.
Andrew currently teaches Node, Gulp, and React. Before he started teaching, he created a web app development company. He has helped companies of all sizes launch production web applications to their customers. He has had the honor of working with awesome companies such as Siemens, Mixergy, and Parkloco. He has a Computer Science degree from Temple University, and he has been programming for just over a decade. He loves creating, programming, launching, learning, teaching, and biking.
If you're interested in becoming an author for Packt, please visit authors.packtpub.com and apply today. We have worked with thousands of developers and tech professionals, just like you, to help them share their insight with the global tech community. You can make a general application, apply for a specific hot topic that we are recruiting an author for, or submit your own idea.
Welcome to Learning Node.js Development. This book is packed with a ton of content, projects, challenges and real-world examples, all designed to teach you Node by doing. This means you'll be getting your hands dirty early on in the upcoming chapters writing some code, and you'll be writing code for every project. You will be writing every line of code that powers our applications. Now, we would require a text editor for this book. We have various text editor options that you can use. I always recommend using Atom, which you can find at atom.io. It's free, open-source, and it's available for all operating systems, namely Linux, macOS, and Windows. It's created by the folks behind GitHub.
All the projects in the book are fun to build and they were designed to teach you everything required to launch your own Node app, from planning to development and testing to deploying. Now, as you launch these different Node applications and move through the book, you will run into errors, which is bound to happen. Maybe something doesn't get installed as expected, or maybe you try to run an app and instead of getting the expected output, you get a really long obscure error message. Don't worry, I am there to help. I'll show you tips and tricks to get pass through those errors in the chapters. Let's go ahead and get to it.
This book targets anyone looking to launch their own Node applications, switch careers, or freelance as a Node developer. You should have a basic understanding of JavaScript in order to follow this book.
Chapter 1, Getting Set Up, talks about what Node is and why you want to use it. In this chapter, you'll learn Node installation and by the end of the chapter, you'll be able to run your first Node application.
Chapter 2, Node Fundamentals - Part 1, talks about building Node applications. The Node Fundamentals topic has been divided into 3 parts. Part 1 of this topic includes module basics, requiring own files, and third-party NPM modules.
Chapter 3, Node Fundamentals - Part 2, continues our discussion on some more Node fundamentals. This chapter explores yargs, JSON, the addNote function, and refactor, moving functionality into individual functions and testing the functionality.
Chapter 4, Node Fundamentals - Part 3, includes things such as read and write from the file system. We'll look into advanced yargs configuration, debugging broken apps, and some new ES6 functions.
Chapter 5, Basics of Asynchronous Programming in Node.js, covers basic concepts, terms, and technologies related to the async programming, making it super-practical and using it in our weather application.
Chapter 6, Callbacks in Asynchronous Programming, is the second part of async programming in Node. We'll look into callbacks, HTTPS requests, and error handling inside of our callback functions. We'll also look into the forecast API and fetching real-time weather data for our address.
Chapter 7, Promises in Asynchronous Programming, is the third and last part of async programming in Node. This chapter focuses on Promises, how it works, why they are useful, and so on. At the end of this chapter, we'll use Promises in our weather app.
Chapter 8, Web Servers in Node, talks about Node web servers and integrating version control into Node applications. We'll also introduce a framework called Express, one of the most important NPM libraries.
Chapter 9, Deploying Applications to Web, talks about deploying the applications to the Web. We'll be using Git, GitHub, and deploy our live app to the Web using these two services.
Chapter 10, Testing the Node Applications- Part 1, talks about how we can test our code to make sure it is working as expected. We'll work on setting up for testing and then writing our test cases. We'll look into the basic testing framework and asynchronous testing.
Chapter 11, Testing the Node Application - Part 2, continues our journey of testing Node applications. In this chapter, we'll work on testing the Express applications and look into some advanced methods of testing.
A web browser, we'll be using Chrome throughout the course book but any browser will do, and Terminal, sometimes known as the command line on Linux or the Command Prompt on Windows. Atom as the text editor. The following list of modules will be used throughout the course of this book:
You can download the example code files for this book from your account at www.packtpub.com. If you purchased this book elsewhere, you can visit www.packtpub.com/support and register to have the files emailed directly to you.
You can download the code files by following these steps:
Once the file is downloaded, please make sure that you unzip or extract the folder using the latest version of:
The code bundle for the book is also hosted on GitHub at https://github.com/PacktPublishing/Learning-Node.js-Development. We also have other code bundles from our rich catalog of books and videos available at https://github.com/PacktPublishing/. Check them out!
There are a number of text conventions used throughout this book.
CodeInText: Indicates code words in text, database table names, folder names, filenames, file extensions, pathnames, dummy URLs, user input, and Twitter handles. Here is an example: "Mount the downloaded WebStorm-10*.dmg disk image file as another disk in your system."
A block of code is set as follows:
console.log('Starting app.js');
const fs = require('fs');
const _ = require('lodash');
const yargs = require('yargs');
When we wish to draw your attention to a particular part of a code block, the relevant lines or items are set in bold:
const argv = yargs.argv;
var command = process.argv[2];
console.log('Command:', command);
console.log('Process', process.argv);
console.log('Yargs', argv);
Any command-line input or output is written as follows:
cd hello-world
node app.js
Bold: Indicates a new term, an important word, or words that you see onscreen. For example, words in menus or dialog boxes appear in the text like this. Here is an example: "Select System info from the Administration panel."
Feedback from our readers is always welcome.
General feedback: Email feedback@packtpub.com and mention the book title in the subject of your message. If you have questions about any aspect of this book, please email us at questions@packtpub.com.
Errata: Although we have taken every care to ensure the accuracy of our content, mistakes do happen. If you have found a mistake in this book, we would be grateful if you would report this to us. Please visit www.packtpub.com/submit-errata, selecting your book, clicking on the Errata Submission Form link, and entering the details.
Piracy: If you come across any illegal copies of our works in any form on the Internet, we would be grateful if you would provide us with the location address or website name. Please contact us at copyright@packtpub.com with a link to the material.
If you are interested in becoming an author: If there is a topic that you have expertise in and you are interested in either writing or contributing to a book, please visit authors.packtpub.com.
Please leave a review. Once you have read and used this book, why not leave a review on the site that you purchased it from? Potential readers can then see and use your unbiased opinion to make purchase decisions, we at Packt can understand what you think about our products, and our authors can see your feedback on their book. Thank you!
For more information about Packt, please visit packtpub.com.
In this chapter, you'll get your local environment set up for the rest of the book. Whether you're on macOS, Linux, or Windows, we'll install Node and look at exactly how we can run Node applications.
We'll talk about what Node is, why you would ever want to use it, and why you would want to use Node as opposed to something like Rails, C++, Java, or any other language that can accomplish similar tasks. By the end of this chapter, you will be running your very first Node application. It's going to be simple, but it is going to get us to the path to creating real-world production Node apps, which is the goal of this book.
More specifically, we'll cover the following topics:
Before we start talking about what Node is and why it's useful, you need to first install Node on your machine, because in the next couple of sections, we'll want to run a little bit of Node code.
Now, to get started, we just need two programs—a browser, I'll be using Chrome throughout the book, but any browser will do, and Terminal. I'll use Spotlight to open up Terminal, which is what it's known as on my operating system.
If you're on Windows, look for the Command Prompt, you can search using the Windows key and then by typing command prompt, and on Linux, you're looking for the command line, although depending on your distribution it might be called Terminal or Command Prompt.
Now, once you have that program open, you'll see a screen, as shown in the following screenshot:
Essentially, it's waiting for you to run a command. We'll run quite a few commands from Terminal throughout the book. I'll discuss it in a few sections later, so if you've never used this before, you can start navigating comfortably.
In the browser, we can head over to nodejs.org to grab the installer for the latest version of Node(as shown here). In this book, we'll use the most recent version, version 9.3.0:
ES6 is the next version of JavaScript and it comes with a lot of great enhancements we'll be using throughout the book. If you look at the following image, Node.js Long Term Support Release Schedule (https://github.com/nodejs/LTS), you can see that the current Node version is V8, out in April 2017:
Before going further, I would like to talk about the Node release cycle. What I have in the preceding image is the official release cycle, this is released by Node. You'll notice that only next to the even Node numbers do you find the active LTS, the blue bar, and the maintenance bar. Now, LTS stands for long-term support, and this is the version that's recommended for most users. I'd recommend that you stick with the currently offered LTS option (Node v 8.9.4 LTS), though anything on the left-hand side will do, this is shown as the two green buttons on nodejs.org.
Now, as you can see, the major version numbers, bump every six months. Regardless of any sort of big overarching change, this happens like clockwork even if nothing drastic has changed. It's not like Angular where jumping from 1.0 to 2.0 was almost like using a completely different library. This is just not the case with Node, what you're getting from this book is the latest and greatest Node has to offer.
Once the version is confirmed and selected, all we have to do is to click the required version button on the Node website (nodejs.org) and download the installer. The installer is one of those basic click Next a few times and you're done type of installers, there's no need to run any fancy commands. I'll start the installer. As shown in the following screenshot, it'll just ask a few questions, then let's click on Next or Continue through all of them:
You might want to specify a custom destination, but if you don't know what that means, and you don't usually do it when installing programs, skip that step too. Here, in the next screenshot, you can see that I'm using just 58.6 MB, no problem.
I'll run the installer by entering my password. And once I enter my password, it should really only take a couple of seconds to get Node installed:
As shown in the following screenshot, we have a message that says The installation was completed successfully, which means we are good to go:
Now that Node has been installed successfully, we can go ahead and verify that by running Node from Terminal. Inside Terminal, I'll shut it down by going to Quit Terminal and open it up again:
In our case, we restarted things and we can run our brand new command so, we'll type it:
node -v
What we're doing in this command is we're running the Node command, and we're passing in what's called a flag, a hyphen sign followed by a letter. It could be a, it could be j, or in our case it's v. This command will print the version of Node currently installed.
We might get an error like this:
If you try to run a command that doesn't exist, such as nodeasdf, you'll see command not found. If you see this, it usually means the Node installer didn't work correctly, or you haven't run it in the first place.
In our case though, running Node with the v flag should result in a number. In our case, it's version 9.3.0. If you do have Node installed, and you see something like the following screenshot, then you are done. In the next section, we'll start exploring exactly what Node is.
Node came about when the original developers took JavaScript, something you could usually only run inside the browser, and they let it run on your machine as a standalone process. This means that we could create applications using JavaScript outside the context of the browser.
Now, JavaScript previously had a limited feature set. When I used it in the browser, I could do things such as update the URL and remove the Node logo, adding click events or anything else, but I couldn't really do much more.
With Node, we now have a feature set that looks much more similar to other languages, such as Java, Python, or PHP. Some of these are as follows:
These were things that were not possible in the past, and they are because of Node.
Now, both Node and the JavaScript that gets executed inside of your browser, they're both running on the exact same engine. It's called the V8 JavaScript runtime engine. It's an open source engine that takes JavaScript code and compiles it into much faster machine code. And that's a big part of what makes Node.js so fast.
Machine code is low-level code that your computer can run directly without needing to interpret it. Your machine only knows how to run certain types of code, for example, your machine can't run JavaScript code or PHP code directly without first converting it into low-level code.
Using this V8 engine, we can take our JavaScript code, compile it to much quicker machine code, and execute that. This is where all those new features come in. The V8 engine is written in a language called C++. So if you want to extend the Node language, you don't write Node code, you write C++ code that builds off of what V8 already has in place.
Speaking of JavaScript code, let's start writing some inside Terminal. Now, throughout the book, we'll be creating files and executing those files, but we can actually create a brand new Node process by running the node command.
Referring to the following screenshot, I have a little right caret, which is waiting for JavaScript Node code, not a new command-prompt command:
This means that I can run something like console.log, which, as you probably already know, logs a message to the screen. log is a function, so I'll call it as such, opening and closing my parentheses, and passing in a string inside two single quotes, a message Hello world!, as shown in the following command line:
console.log('Hello world!');
This will print Hello world to the screen. If I hit enter, Hello world! prints just like you'd expect, as shown in the following code output:
Now, what actually happened behind the scenes? Well, this is what Node does. It takes your JavaScript code, it compiles it into machine code, and executes it. In the preceding code, you can see it executed our code, printing out Hello world!. Now, the V8 engine is running behind the scenes when we execute this command, and it's also running inside the Chrome browser.
If I open up the developer tools in Chrome by going to Settings | More Tools | Developer Tools:
I can ignore most of the things. I'm just looking for the Console tab, as shown in the following screenshot:
The preceding screenshot showing the console is a place where we can run some JavaScript code. I can type the exact same command, console.log('Hello world!'); and run it:
As you can see in the preceding screenshot, Hello world! prints to the screen, which is the exact same result we got when we ran it up earlier using Terminal. In both cases, we're running it through the V8 engine, and in both cases the output is the same.
Now, we already know that the two are different. Node has features such as filesystem manipulation, and the browser has features such as manipulating what's shown inside the window. Let's take a quick moment to explore their differences.
Inside the browser, you've probably used window if you've done any JavaScript development:
Window is the global object, it stores basically everything you have access to. In the following screenshot, you can see things such as array, we have all sorts of CSS manipulation and Google Analytics keywords; essentially every variable you create lives inside Window:
We have something similar inside Node called global, as shown here:
It's not called window because there is no browser window in Node, thus it is called global. The global object stores a lot of the same things as window. In the following screenshot, you can see methods that might be familiar, such as setTimeout and setInterval:
If we look at this code screenshot, we have most of the things that are defined inside the window, with some exceptions, as shown in the following screenshot:
Now, inside the Chrome browser, I also have access to document:
The document object stores a reference to the Document Object Model (DOM) in the Node website. The document object shows exactly what I have inside the browser's viewport, as shown in the following screenshot:
I can make changes to the document to update what gets shown up on the browser's viewport. Now, obviously we don't have this HTML document inside Node, but we do have something similar, which is called process. You can view it by running process from Node, and in the following screenshot, we have a lot of information about the specific Node process that's being executed:
There's also methods available here to shut down the current Node process. What I'd like you to do is run the process.exit command, passing in as an argument the number zero, to say that things exited without error:
process.exit(0);
When I run this command, you can see I'm now back at the command prompt, as shown in the following screenshot:
I've left Node, and I'm at a place where I can run any regular command prompt command, such as checking my Node version. I can always get back into Node by running node, and I can leave it without using the process.exit command by using control + C twice.
Now, I'm back at my regular command prompt. So, these are the notable differences, obviously inside the browser you have the viewable area, window gets changed to global, and a document basically becomes process. Now, obviously that's a generalization, but those are some of the big picture changes. We'll be exploring all the minutiae throughout the book.
Now, when someone asks you what is Node? You can say Node's a JavaScript runtime that uses the V8 engine. When they ask you what the V8 engine is, you can say the V8 engine is an open source JavaScript engine written in C++ that takes JavaScript code and compiles it to machine code. It's used inside Node.js and it's used in the Chrome browser.
In this section, we'll cover the why behind Node.js. Why is it so good at creating backend apps? And why is it becoming so popular with companies such as Netflix, Uber and Walmart, who are all using Node.js in production?
As you might have noticed since you're taking this course, when people want to learn a new backend language, more and more they're turning to Node as the language they want to learn. The Node skillset is in hot demand, for both frontend developers who need to use Node day to day to do things such as compile their applications, to engineers who are creating applications and utilities using Node.js. All of this has made Node the backend language of choice.
Now, if we look at the homepage of Node, we have three sentences, as shown in the following screenshot:
In the previous section, we addressed the first sentence. We took a look at what Node.js is. There's only three sentences in the image, so in this section, we'll take a look at the second two sentences. We'll read them now, then we'll break it down, learning exactly why Node is so great.
The first sentence, Node.js uses an event-driven, non-blocking I/O model that makes it lightweight and efficient; we'll explore all of this now. The second sentence we'll explore at the end of the section—Node.js' packaged ecosystem, npm, is the largest ecosystem of open source libraries in the world. Now, these two sentences have a ton of information packed into them.
We'll go over a few code examples, we'll dive into some charts and graphs, and we'll explore what makes Node different and what makes it so great.
Node is an event-driven, non-blocking language. Now, what is I/O? I/O is something that your application does all of the time. When you're reading or writing to a database, that is I/O, which is short form for input/output.
This is the communication from your Node application to other things inside of the Internet of Things. This could be a database read and write request, you may be changing some files on your filesystem, or you may be making an HTTP request to a separate web server, such as a Google API for fetching a map for the user's current location. All of these use I/O, and I/O takes time.
Now, the non-blocking I/O is great. That means while one user is requesting a URL from Google, other users can be requesting a database file read and write access, they can be requesting all sorts of things without preventing anyone else from getting some work done.
Let's go ahead and take a look at the differences between blocking and non blocking software development:
In the preceding screenshot, I have two files that we'll be executing. But before going to that, first let's explore how each of these files operates, the steps that are required in order to finish the program.
This will help us understand the big differences between blocking, which I have on the left side of the image, which is not what Node uses, and non-blocking is on the right side, which is exactly how all of our Node applications in the book are going to operate.
You don't have to understand the individual details, such as what require is, in order to understand what's going on in this code example. We'll be breaking things down in a very general sense. The first line on each code is responsible for fetching a function that gets called. This function will be our simulated I/O function that is going to a database, fetching some user data and printing it to the screen.
Refer to the preceding code image. After we load in the function, both files try to fetch a user with an ID of 123. When it gets that user, it prints it to the screen with the user1 string first, and then it goes on and it fetches the user with 321 as the ID. And it prints that to the screen. And finally both files add up 1 + 2, storing the result, which is 3, in the sum variable and print it to the screen.
Now, while they all do the same thing, they do it in very different ways. Let's break down the individual steps. In the following code image, we'll go over what Node executes and how long it takes:
You can consider the seconds shown in the preceding screenshot; it doesn't really matter, it's just to show the relative operating speed between the two files.
The blocking example can be illustrated as follows:
The first thing that happens inside our blocking example, as shown in the preceding screenshot, is that we fetch the user on line 3 in the code:
var user1 = getUserSync('123');
Now, this request requires us to go to a database, which is an I/O operation to fetch that user by ID. This takes a little bit of time. In our case, we'll say it takes three seconds.
Next, on line 4 in the code, we print the user to the screen, which is not an I/O operation and it runs right away, printing user1 to the screen, as shown in the following code:
console.log('user1', user1);
As you can see in the following screenshot, it takes almost no time at all:
Next up, we wait on the fetching of user2:
var user2 = getUserSync('321');
When user2 comes back, as you might expect, we print it to the screen, which is exactly what happens on line 7:
console.log('user2', user2);
Finally, we add up our numbers and we print it to the screen:
var sum = 1 + 2;
console.log('The sum is ' + sum);
None of this is I/O, so right here we have our sum printing to the screen in barely any time.
This is how blocking works. It's called blocking because while we're fetching from the database, which is an I/O operation, our application cannot do anything else. This means our machine sits around idle waiting for the database to respond, and can't even do something simple like adding two numbers and printing them to the screen. It's just not possible in a blocking system.
In our non-blocking example, this is how we'll be building our Node applications.
Let's break this code example down line by line. First up, things start much the same way as we discussed in the blocking example. We'll start the getUser function for user1, which is exactly what we did earlier:
But we're not waiting, we're simply kicking off that event. This is all part of the event loop inside Node.js, which is something we'll be exploring in detail.
Notice it takes a little bit of time; we're just starting the request, we're not waiting for that data. The next thing we do might surprise you. We're not printing user1 to the screen because we're still waiting for that request to come back, instead we start the process of fetching our user2 with the ID of 321:
In this part of the code, we're kicking off another event, which takes just a little bit of time to do-it is not an I/O operation. Now, behind the scenes, the fetching of the database is I/O, but starting the event, calling this function is not, so it happens really quickly.
Next up, we print the sum. The sum doesn't care about either of the two user objects. They're basically unrelated, so there's no need to wait for the users to come back before I print that sum variable, as shown in the following screenshot:
What happens after we print the sum? Well, we have the dotted box, as shown in the following screenshot:
This box signifies the simulated time it takes for our event to get responded to. Now, this box is the exact same width as the box in the first part of the blocking example (waiting on user1), as shown here:
Using non-blocking doesn't make our I/O operations any faster, but what it does do is it lets us run more than one operation at the same time.
In the non-blocking example, we start two I/O operations before the half second mark, and in between three and a half seconds, both come back, as shown in the following screenshot:
Now, the result here is that the entire application finishes much quicker. If you compare the time taken in executing both the files, the non-blocking version finishes in just over three seconds, while the blocking version takes just over six seconds. A difference of 50%. This 50% comes from the fact that in blocking, we have two requests each taking three seconds, and in non-blocking, we have two requests each taking three seconds, but they run at the same time.
Using the non-blocking model, we can still do stuff like printing the sum without having to wait for our database to respond. Now, this is the big difference between the two; blocking, everything happens in order, and in non-blocking we start events, attaching callbacks, and these callbacks get fired later. We're still printing out user1 and user2, we're just doing it when the data comes back, because the data doesn't come back right away.
Inside Node.js, the event loop attaches a listener for the event to finish, in this case for that database to respond back. When it does, it calls the callback you pass in the non-blocking case, and then we print it to the screen.
In a blocking context, we could handle two requests on two separate threads, but that doesn't really scale well, because for each request we have to beef up the amount of CPU and RAM resources that we're using for the application, and this sucks because those threads, are still sitting idle. Just because we can spin up other threads doesn't mean we should, we're wasting resources that are doing nothing.
In the non-blocking case, instead of wasting resources by creating multiple threads, we're doing everything on one thread. When a request comes in, the I/O is non-blocking so we're not taking up any more resources than we would be if it never happened at all.
Let's run these examples in real time and see what we get. And we have the two files (blocking and non-blocking files) that we saw in the previous section.
We'll run both of these files, and I'm using the Atom editor to edit my text files. These are things we'll be setting up later in the section, this is just for your viewing purpose, you don't need to run these files.
Now, the blocking and non-blocking files, will both get run and they'll do similar things to those we did in the previous section, just in a different way. Both use I/O operations, getUserSync and getUser, that take five seconds apiece. The time is no different, it's just the order they execute in that makes the non-blocking version much quicker.
Now, to simulate and show how things work, I'll add a few console.log statements as shown in the following code example, console.log('starting user1'), console.log('starting user2').
This will let us visualize how things work inside Terminal. By running node blocking.js, this is how we run files. We type node and we specify the filename, as shown in the following code:
node blocking.js
When I run the file, we get some output. starting user1 prints to the screen and then it sits there:
Now, we have the user1 object printing to the screen with the name Andrew, and starting user2 prints to the screen, as shown in the following code output:
After that, the user2 object comes back around five seconds later with the name of Jen.
As shown in the preceding screenshot, our two users have printed to the screen, and at the very end our sum, which is 3, prints to the screen; everything works great.
Notice that starting user1 was immediately followed by the finishing of user1, and starting user2 was immediately followed by the finishing of user2 because this is a blocking application.
Now, we'll run the non-blocking file, which I've called non-blocking.js. When I run this file, starting user1 prints, starting user2 prints, then the sum prints all back to back:
Around 5 seconds later, at basically the same time, user1 and user2 both print to the screen.
This is how non-blocking works. Just because we started an I/O operation doesn't mean we can't do other things, such as starting another one and printing some data to the screen, in this case just a number. This is the big difference, and this is what makes non-blocking apps so fantastic. They can do so many things at the exact same time without having to worry about the confusion of multi-threading applications.
Let's move back into the browser and take a look at those sentences again in the Node website:
Node.js uses an event-driven, non-blocking I/O model that makes it lightweight and efficient, and we saw that in action.
Because Node is non-blocking, we were able to cut down the time our application took by half. This non-blocking I/O makes our apps super quick, this is where the lightweight and efficient comes into play.
Now, let's go to the last sentence on the Node website, as shown in the following screenshot:
Node.js' package ecosystem, npm, is the largest ecosystem of open-source libraries in the world. This is what really makes Node fantastic. This is the cherry on top-the community, the people every day developing new libraries that solve common problems in your Node.js applications.
Things such as validating objects, creating servers, and serving up content live using sockets. There's libraries already built for all of those so you don't have to worry about this. This means that you can focus on the specific things related to your application without having to create all this infrastructure before you can even write real code, code that does something specific to your apps use case.
Now, npm, which is available on npmjs.org, is the site we'll be turning to for a lot of third-party modules:
If you're trying to solve a problem in Node that sounds generic, chances are that someone's already solved it. For example, if I want to validate some objects, let's say I want to validate that a name property exists and that there's an ID with a length of three. I could go into Google or go into npm; I usually choose Google, and I could Google search npm validate object.
When I google that, I'll just look for results from npmjs.com, and you can find the first three or so are from that:
I can click the first one, and this will let me explore the documentation and see if it's right for me:
This one looks great, so I can add it to my app without any effort.
Now, we'll go through this process. Don't worry, I'm not going to leave you high and dry on how to add third-party modules. We'll be using a ton of them in the book because this is what real Node developers do. They take advantage of the fantastic community of developers, and that's the last thing that makes Node so great.
This is why Node has come to the position of power that it currently sits at, because it's non-blocking, meaning it's great for I/O applications, and it has a fantastic community of developers. So, if you ever want to get anything done, there's a chance someone already wrote the code to do it.
This is not to say you should never use Rails or Python or any other blocking language again, that is not what I'm getting at. What I'm really trying to show you is the power of Node.js and how you can make your applications even better. Languages like Python have things such as the library Twisted, which aims to add non-blocking features to Python. Though the big problem is all of the third-party libraries, as they are still written in a blocking fashion, so you're really limited as to which libraries you can use.
Since Node was built non-blocking from the ground up, every single library on npmjs.com is non-blocking. So you don't have to worry about finding one that's non blocking versus blocking; you can install a module knowing it was built from the ground up using a non blocking ideology.
In the next couple of sections, you'll be writing your very first app and running it from Terminal.
In this section, I want to give you a tour of the various text editors you can use for this book. If you already have one you love using, you can keep using the one you have. There's no need to switch editors to get anything done in this book.
Now, if you don't have one and you're looking for a few options, I always recommend using Atom, which you can find at atom.io. It's free, open source, and it's available on all operating systems, Linux, macOS, and Windows. It's created by the folks behind GitHub and it's the editor that I'll be using inside of this book. There's an awesome community of theme and plug-in developers so you really can customize it to your liking.
Now, aside from Atom there are a few other options. I've heard a lot of people talking about Visual Studio Code. It is also open source, free, and available on all operating systems. If you don't like Atom, I highly recommend you check this out, because I've heard so many good things by word of mouth.
Next up, we always have Sublime Text, which you can find at sublimetext.com. Now, Sublime Text is not free and it's not open source, but it's a text editor that a lot of folks do enjoy using. I prefer Atom because it's very similar to Sublime Text, though I find it snappier and easier to use, plus it's free and open source.
Now, if you are looking for a more premium editor with all of the bells and whistles in IDE as opposed to a text editor, I always recommend JetBrains. None of their products are free, though they do come with a 30-day free trial, but they really are the best tools of the trade. If you find yourself in a corporate setting or you're at a job where the company is willing to pay for an editor, I always recommend that you go with JetBrains. All of their editors come with all of the tools you'd expect, such as version control integration, debugging tools, and deploying tools built in.
So, take a moment, download the one you want to use, play around with it, make sure it fits your needs, and if not, try another one.
In this section, you will be creating and running your very first Node app. Well, it will be a simple one. It'll demonstrate the entire process, from creating files to running them from Terminal.
The first step will be to create a folder. Every project we create will go live inside of its own folder. I'll open up the Finder on macOS and navigate to my desktop. What I'd like you to do is open up the desktop on your OS, whether you're on Linux, Windows, or macOS, and create a brand new folder called hello-world.
Now I'll use command + O (Ctrl + O for Windows users) to open up, and I'll navigate to the desktop and double-click my hello-world folder, as shown here:
On the left I have my files, which are none. So, let's create a new one. I'll make a new file in the root of the project, and we'll call this one app.js, as shown here:
This will be the only file we have inside our Node application, and in this file we can write some code that will get executed when we start the app.
In the future, we'll be doing crazy stuff like initializing databases and starting web servers, but for now we'll simply use console.log, which means we're accessing the log property on the console object. It's a function, so we can call it with parentheses, and we'll pass in one argument as string, Hello world!. I'll toss a semicolon on the end and save the file, as shown in the following code:
console.log('Hello world!');
This will be the first app we run.
Now that we have our app.js file, the only thing left to do is to run it, and we'll do that over in Terminal. Now, to run this program, we have to navigate into our project folder. If you're not familiar with Terminal, I'll give you a quick refresher.
You can always figure out where you are using pwd on Linux or macOS, or the dir command on Windows. When you run it, you'll see something similar to the following screenshot:
I'm in the Users folder, and then I'm in my user folder, and my user name happens to be Gary.
We can use cd to navigate into the desktop, and here we are:
Now we're sitting in the desktop. The other command you can run from anywhere on your computer is cd /users/Gary/desktop. And this will navigate to your desktop, no matter what folder you're located in. The command cd desktop, requires you to be in the user directory to work correctly.
Now we can start by cd-ing into our project directory, which we called hello-world, as shown in the following command:
cd hello-world
With the following screenshot:
Once we're in this directory, we can run at the ls command on Linux or Mac (which is the dir command on Windows) to see all of our files, and in this case we just have one, we have app.js:
This is the file we'll run.
Now, before you do anything else, make sure you are in the hello-world folder and you should have the app.js file inside. If you do, all we'll do is run the node command followed by a space so we can pass in an argument, and that argument will be the filename, app.js as shown here:
node app.js
Once you have this in place, hit enter and there we go, Hello world! prints to the screen, as shown here:
And that is all it takes to create and run a very basic Node application. While our app doesn't do anything cool, we'll be using this process of creating folders/files and running them from Terminal throughout the book, so it's a great start on our way to making real-world Node apps.
In this chapter, we touched base with the concept of Node.js. We took a look at what Node is and we learned that it's built on top of the V8 JavaScript engine. Then we explored why Node has become so popular, its advantages and its disadvantages. We took a look at the different text editors we can choose from and, at the end, you created your very first Node application.
In the next chapter, we'll dive in and create our first app. I am really excited to start writing real-world applications.
In this chapter, you'll learn a ton about building Node applications, and you'll actually build your first Node application. This is where all the really fun stuff is going to start.
We'll kick things off by learning about all of the modules that come built in to Node. These are objects and functions that let you do stuff with JavaScript you've never been able to do before. We'll learn how to do things, such as reading and writing from the filesystem, which we'll use in the Node's application to persist our data.
We'll also be looking at third-party npm modules; this is a big part of the reason that Node became so popular. The npm modules give you a great collection of third-party libraries you can use, and they also have really common problems. So you don't have to rewrite that boilerplate code over and over again. We'll be using a third-party module in this chapter to help with fetching input from the user.
The chapter will specifically cover the following topics:
In this section, you will finally learn some Node.js code, and we'll kick things off by talking about modules inside Node. Modules are units of functionality, so imagine I create a few functions that do something similar, such as a few functions that help with math problems, for example, add, subtract, and divide. I could bundle those up as a module, call it Andrew-math, and other people could take advantage of it.
Now, we'll not be looking at how to make our own module; in fact, we will be looking at how we can use modules, and that will be done using a function in Node, called require(). The require() function will let us do three things:
If you have all of your code in one file, it will be really hard to test, maintain, and update. Now, require() isn't that bad. In this section, we'll explore the first use case for require().
We'll take a look at two built-in modules; we'll figure out how to require them and how to use them, and then we'll move on to starting the process of building that Node application.
The first step we'll take inside of the Terminal is that we'll make a directory to store all of these files. We'll navigate from our home directory to the desktop using the cd Desktop command:
cd Desktop
Then, we'll make a folder to store all of the lesson files for this project.
Now, we'll make that folder using the mkdir command, which is the short form for make directory. Let's call the folder notes-node, as shown in the following code:
mkdir notes-node
We'll make a note app in Node so that notes-node seems appropriate. Then we'll cd into notes-node, and we can get started playing around with some of the built-in modules:
cd notes-node
These modules are built in, so there's no need to install anything in Terminal. We can simply require them right inside of our Node files.
The next step in the process is to open up that directory inside the Atom text editor. So open up the directory we just created on the Desktop, and you will find it there, as shown in the following screenshot:
Now, we will need to make a file, and we'll put that file in the root of the project:
We'll call this file app.js, and this is where our application will start:
We will be writing other files that get used throughout the app, but this is the only file we'll ever be running from Terminal. This is the initialization file for our application.
Now, to kick things off, the first thing I will do is to use console.log to print Starting app, as shown in the following code:
console.log('Starting app');
After we call the console.log starting app, we'll load in a built-in module using require().
To view Node.js API docs, go to nodejs.org/api. When you go to this URL, you'll be greeted with a long list of built-in modules. Using the File System module we'll create a new file and the OS module. The OS module will let us fetch things such as the username for the currently logged-in user.
To kick things off though, we will start with the File System module. We'll go through the process of creating a file and appending to it:
When you view a docs page for a built-in module, whether it's File System or a different module, you'll see a long list of all the different functions and properties that you have available to you. The one we'll use in this section is fs.appendFile.
If you click on it, it will take you to the specific documentation, and this is where we can figure out how to use appendFile, as shown in the following screenshot:
Now, appendFile is pretty simple. We'll pass to it two string arguments (shown in the preceding screenshot):
This is all we need to provide in order to call fs.appendFile. Before we can call fs.appendFile, we need to require it. The whole point of requiring is to let us load in other modules. In this case, we'll load in the fs module from app.js.
Let's create a variable that will be a constant, using const.
Then we'll give it a name, fs and set it equal to require(), as shown in the following code:
const fs = require()
Here, require() is a function that's available to you inside any of your Node.js files. You don't have to do anything special to call it, you simply call it as shown in the preceding code. Inside the argument list, we'll just pass one string.
In our case, we'll pass in the module name, which is fs and toss in a semicolon at the end, as shown in the following code:
const fs = require('fs');
This will tell Node that you want to fetch all of the contents of the fs module and store them in the fs variable. At this point, we have access to all of the functions available on the fs module, which we explored over in the docs, including fs.appendFile.
Back in Atom, we can call the appendFile by calling fs.appendFile, passing in the two arguments that we'll use; the first one will be the filename, so we add greetings.txt, and the second one will be the text you want to append to the file. In our case, we'll append Hello world!, as shown in the following code:
fs.appendFile('greetings.txt', 'Hello world!');
Let's save the file, as shown in the preceding command, and run it from Terminal to see what happens.
// Orignal line
fs.appendFile('greetings.txt', 'Hello world!');
// Option one
fs.appendFile('greetings.txt', 'Hello world!', function (err){
if (err) {
console.log('Unable to write to file');
}
});
// Option two
fs.appendFileSync('greetings.txt', 'Hello world!');
In the preceding code, we have the original line that we have inside our program.
In Option one here is to add a callback as the third argument to the append file. This callback will get executed when either an error occurs or the file successfully gets written too. Inside option one, we have an if statement; if there is an error, we simply print a message to the screen, Unable to write to file.
Now, our second option in the preceding code, Option two, is to call appendFileSync, which is a synchronous method (we'll talk more about that later); this function does not take the third argument. You can type it as shown in the preceding code and you won't get the warning.
So, pick one of these two options if you see the warning; both will work much the same.
If you are on v6, you can stick with the the original line, shown at the top of the preceding code, although you might as well use one of the two options below that line to make your code a little more future proof.
Fear not, we'll be talking about asynchronous and synchronous functions, as well as callback functions, extensively throughout the book. What I'm giving you here in the code is just a template, something you can write in your file to get that error removed. In a few chapters, you will understand exactly what these two methods are and how they work.
If we do the appending over in Terminal, node app.js, we'll see something pretty cool:
As shown in the preceding code, we get our one console.log statement, Starting app.. So we know the app started correctly. Also, if we head over into Atom, we'll actually see that there's a brand new greetings.txt file, as shown in the following code. This is the text file that was created by fs.appendFile:
console.log('Starting app.');
const fs = require('fs');
fs.appendFile('greetings.txt', 'Hello world!');
Here, fs.appendFile tries to append greetings.txt to a file; if the file doesn't exist, it simply creates it:
You can see that we have our message, Hello world! in the greetings.txt file, printing to the screen. In just a few minutes, we were able to load in a built-in Node module and call a function that lets us create a brand new file.
If we call it again by rerunning the command using the up arrow key and the enter key, and we head back into the contents of greetings.txt, you can see this time around that we have Hello world! twice, as shown here:
It appended Hello world! one time for each time we ran the program. We have an application that creates a brand new file on our filesystem, and if the file already exists, it simply adds to it.
Once we have created and appended the greetings.txt file, we'll customize this greeting.txt file. To do this, we'll explore one more built-in module. We'll be using more than just appendFile in the future. We'll be exploring other methods. For this section, the real goal is to understand require(). The require() function lets us load in the module's functionality so that we can call it.
The second module that we'll be using is OS, and we can view it in the documentation. In the OS module, we'll use the method defined at the very bottom, os.userInfo([options]):
The os.userInfo([options]) method gets called and returns various information about the currently logged-in user, such as the username, and this is what we'll pull off:
Using the username that comes from the OS, we can customize the greeting.txt file so that instead of Hello world! it can say Hello Gary!.
To get started, we have to require OS. This means that we'll go back inside Atom. Now, just below where I created my fs constant, I'll create a new constant called os, setting it equal to require(); this gets called as a function and passes one argument, the module name, os, as shown here:
console.log('Starting app.');
const fs = require('fs');
const os = require('os');
fs.appendFile('greetings.txt', 'Hello world!');
From here, we can start calling methods available on the OS module, such as os.userInfo([optional]).
Let's make a new variable called user to store the result. The variable user will get set equal to os.userInfo, and we can call userInfo without any arguments:
console.log('Starting app.');
const fs = require('fs');
const os = require('os');
var user = os.userInfo();
fs.appendFile('greetings.txt', 'Hello world!');
Now, before we do anything with the fs.appendFile line, I'll comment it out and print the contents of the user variable using console.log:
console.log('Starting app.');
const fs = require('fs');
const os = require('os');
var user = os.userInfo();
console.log(user);
// fs.appendFile('greetings.txt', 'Hello world!');
This will let us explore exactly what we get back. Over in Terminal, we can rerun our program using the up arrow key and enter key, and right here in the following code, you see that we have an object with a few properties:
We have uid, gid, username, homedir, and shell. Depending on your OS, you'll not have all of these, but you should always have the username property. This is the one we care about.
This means that back inside Atom, we can use user.username inside of appendFile. I'll remove the console.log statement and uncomment our call to fs.appendFile:
console.log('Starting app.');
const fs = require('fs');
const os = require('os');
var user = os.userInfo();
fs.appendFile('greetings.txt', 'Hello world!');
Now, where we have world in the fs.appendFile, we'll swap it with user.username. There are two ways we can do this.
The first way is to remove world! and concatenate user.username. Then we can concatenate another string using the + (plus) operator, as shown in the following code:
console.log('Starting app.');
const fs = require('fs');
const os = require('os');
var user = os.userInfo();
fs.appendFile('greetings.txt', 'Hello' + user.username + '!');
Now if we run this, everything is going to work as expected. Over in Terminal, we can rerun our app. It prints Starting app:
Over in the greetings.txt file, you should see something like Hello Gary! printing to the screen, as shown here:
Using the fs module and the os module, we were able to grab the user's username, create a new file, and store it.
The second way to swap world with user.username in the fs.appendFile is, using an ES6 feature known as template strings. Template strings start and end with the ` (tick) operator, which is available to the left of the 1 key on your keyboard. Then you type things as you normally would.
This means that we'll first type hello, then we'll add a space with the ! (exclamation) mark, and just before !, we will put the name:
console.log('Starting app.');
const fs = require('fs');
const os = require('os');
var user = os.userInfo();
fs.appendFile('greetings.txt', `Hello !`);
To insert a JavaScript variable inside your template string, you use the $ (dollar) sign followed by opening and closing curly braces. Then we will just reference a variable such as user.username:
console.log('Starting app.');
const fs = require('fs');
const os = require('os');
var user = os.userInfo();
fs.appendFile('greetings.txt', `Hello ${user.username}!`);
This is all it takes to use template strings; it's an ES6 feature available because you're using Node v6. This syntax is much easier to understand and update than the string/concatenation version we saw earlier.
If you run the code, it will produce the exact same output. We can run it, view the text file, and this time around, we have Hello Gary! twice, which is what we want here:
With this in place, we are now done with our very basic example and we're ready to start creating our own files for our notes application and requiring them inside app.js in the next section.
First up, you learned that we can use require to load in modules. This lets us take existing functionality written by either the Node developers, a third-party library, or ourselves, and load it into a file so that it can be reusable. Creating reusable code is essential for building large apps. If you have to build everything in an app every time, no one would ever get anything done because they would get stuck at building the basics, things such as HTTP servers and web servers. There are already modules for such stuff, and we'll be taking advantage of the great npm community. In this case, we used two built-in modules, fs and os. We loaded them in using require and we stored the module results inside two variables. These variables store everything available to us from the module; in the case of fs, we use the appendFile method, and in the case of OS, we use the userInfo method. Together, we were able to grab the username and save it into a file, which is fantastic.
In this section, you will learn how to use require() to load in other files that you created inside your project. This will let you move functions outside app.js into more specific files; this will make your application easier to scale, test, and update. To get started, the first thing we'll do is to make a new file.
In the context of our notes app, the new file will store various functions for writing and reading notes. As of now, you don't need to worry about that functionality, as we'll get into the detail later in the section, but we will create the file where it will eventually live. This file will be notes.js, and we'll save it inside the root of our application, right alongside app.js and greetings.txt, as shown here:
For the moment, all we'll do inside notes is to use console.log to print a little log showing the file has been executed using the following code:
console.log('Starting notes.js');
Now, we have console.log on the top of notes and one on the top of app.js. I'll change console.log in the app.js from Starting app. to Starting app.js. With this in place, we can now require the notes file. It doesn't export any functionality, but that's fine.
We'll look at how to export stuff later in the section. For now though, we'll load our module in much the same way we loaded in the built-in Node modules.
Let's make const; I'll call this one notes and set it equal to the return result from require():
console.log('Starting app.js');
const fs = require('fs');
const os = require('os');
const notes = require('');
var user = os.userInfo();
fs.appendFile('greetings.txt', `Hello ${user.username}!`);
Inside the parentheses, we will pass in one argument that will be a string, but it will be a little different. In the previous section, we typed in the module name, but what we have in this case is not a module, but a file, notes.js. What we need to do is to tell Node where that file lives using a relative path.
Now, relative paths start with ./ (a dot forward slash), which points to the current directory that the file is in. In this case, this points us to the app.js directory, which is the root of our project notes-node. From here, we don't have to go into any other folders to access notes.js, it's in the root of our project, so we can type its name, as shown in the following code:
console.log('Starting app.js');
const fs = require('fs');
const os = require('os');
const notes = require('./notes.js');
var user = os.userInfo();
fs.appendFile('greetings.txt', `Hello ${user.username}!`);
With this in place, we can now save app.js and see what happens when we run our application. I'll run the app using the node app.js command:
As shown in the preceding code output, we get our two logs. First, we get Starting app.js and then we get Starting notes.js. Now, Starting notes.js comes from the note.js file, and it only runs because we required the file inside of app.js.
Comment out this command line from the app.js file, as shown here:
console.log('Starting app.js');
const fs = require('fs');
const os = require('os');
// const notes = require('./notes.js');
var user = os.userInfo();
fs.appendFile('greetings.txt', `Hello ${user.username}!`);
Save the file, and rerun it from Terminal; you can see the notes.js file never executes because we never explicitly touch it.
We never call it inside Terminal as we do in the preceding example, and we never require.
For now though, we will be requiring it, so I'll uncomment that line.
For now though, the focus will be to export something from notes.js which we can use in app.js. Inside notes.js (actually, inside all of our Node files), we have access to a variable called module. I'll use console.log to print module to the screen so that we can explore it over in Terminal, as shown here:
console.log('Starting notes.js');
console.log(module);
Let's rerun the file to explore it. As shown in the following screenshot, we get a pretty big object, that is, different properties related to the notes.js file:
Now, to tell the truth, we'll not be using most of these properties. We have things such as id, exports, parent, and filename. The only one property we'll ever use in this book is exports.
The exports object on the module property and everything on this object gets exported. This object gets set as the const variable, notes. This means that we can set properties on it, they will get set on notes, and we can use them inside app.js.
Let's take a quick look at how that works. What we'll do is to define an age property using module.exports, the object we just explored over in Terminal. Also, we know that it's an object because we can see it in the preceding screenshot (exports: {}); this means that I can add a property, age, and set it equal to my age, which is 25, as shown here:
console.log('Starting notes.js');
module.exports.age = 25;
Then I can save this file and move into app.js to take advantage of this new age property. The const variable notes will be storing all of my exports, in the present case, just age.
In fs.appendFile, after the greeting.txt file, I'll add You are followed by the age. Inside template strings, we will use $ with curly braces, notes.age, and a period at the end, as shown here:
console.log('Starting app.js');
const fs = require('fs');
const os = require('os');
const notes = require('./notes.js');
var user = os.userInfo();
fs.appendFile('greetings.txt', `Hello ${user.username}! You are ${notes.age}.`);
Now our greeting should say Hello Gary! You are 25. It's getting the 25 value from our separate file (that is, note.js), which is fantastic.
Let's take a quick moment to rerun the program over in Terminal using the up arrow key and enter keys:
Back inside the app, we can open greetings.txt, and as shown in the following screenshot, we have Hello Gary! You are 25:
Using require(), we were able to require a file that we created, and this file stored some properties that were advantageous to the rest of the project.
Now, obviously, the preceding example is pretty contrived. We'll not be exporting static numbers; the real goal of exports is to be able to export functions that get used inside app.js. Let's take a quick moment to export two functions. In the notes.js file, I'll set module.exports.addnote equal to a function; the function keyword followed by opening and closing parentheses, which is followed by the curly braces:
console.log('Starting notes.js');
module.exports.addNote = function () {
}
Now, throughout the course, I'll be using arrow functions where I can, as shown in the preceding code. To convert a regular ES5 function into an arrow function, all you do is remove the function keyword and replace it with an => sign right between the parentheses and the opening curly braces, as shown here:
console.log('Starting notes.js');
module.exports.addNote = () => {
}
For now though, we'll keep things really simple, using console.log to print addNote. This will let us know that the addNote function was called. We'll return a string, 'New note', as shown here:
console.log('Starting notes.js');
module.exports.addNote = () => {
console.log('addNote');
return 'New note';
};
Now, the addNote function is being defined in notes.js, but we can take advantage of it over in app.js.
Let's take a quick second to comment out both the appendFile and user line in app.js:
console.log('Starting app.js');
const fs = require('fs');
const os = require('os');
const notes = require('./notes.js');
// var user = os.userInfo();
//
// fs.appendFile('greetings.txt', `Hello ${user.username}! You are ${notes.age}.`);
I'll add a variable, call the result, (res for short), and set it equal to the return result from notes.addNote:
console.log('Starting app.js');
const fs = require('fs');
const os = require('os');
const notes = require('./notes.js');
var res = notes.addNote();
// var user = os.userInfo();
//
// fs.appendFile('greetings.txt', `Hello ${user.username}! You are ${notes.age}.`);
Now, the addNote function is a dummy function for the moment. It doesn't take any arguments and it doesn't actually do anything, so we can call it without any arguments.
Then we'll print the result variable, as shown in the following code, and we would expect the result variable to be equal to the New note string:
console.log('Starting app.js');
const fs = require('fs');
const os = require('os');
const notes = require('./notes.js');
var res = notes.addNote();
console.log(res);
// var user = os.userInfo();
//
// fs.appendFile('greetings.txt', `Hello ${user.username}! You are ${notes.age}.`);
If I save both of my files (app.js and notes.js) and rerun things from Terminal, you can see that New note prints to the screen at the very end and just before addNote prints:
This means that we successfully required the notes file we called addNote, and its return result was successfully returned to app.js.
Using this exact pattern, we'll be able to define our functions for adding and removing notes over in our notes.js file, but we'll be able to call them anywhere inside of our app, including in app.js.
Now it's time for a quick challenge. What I'd like you to do is make a new function in notes.js called add. This add function will get set on the exports object.
This add function will take two arguments, a and b; it'll add them together and return the result. Then over in app.js, I'd like you to call that add function, passing in two numbers, whatever you like, such as 9 and -2, then print the result to the screen and make sure it works correctly.
So, take a moment, create that add function inside notes.js, call it inside app.js, and make sure the proper result prints to the screen. How'd it go? Hopefully, you were able to make that function and call it from app.js.
The first step in the process will be to define the new function. In notes.js, I'll set module.exports.add equal to that function, as shown here:
console.log('Starting notes.js');
module.exports.addNote = () => {
console.log('addNote');
return 'New note';
};
module.exports.add =
Let's set it equal to an arrow function. If you used a regular function, that is perfectly fine, I just prefer using the arrow function when I can. Also, inside parentheses, we will be getting two arguments, we'll be getting a and b, as shown here:
console.log('Starting notes.js');
module.exports.addNote = () => {
console.log('addNote');
return 'New note';
};
module.exports.add = (a, b) => {
};
All we need to do is return the result, which is really simple. So we'll enter return a + b:
console.log('Starting notes.js');
module.exports.addNote = () => {
console.log('addNote');
return 'New note';
};
module.exports.add = (a, b) => {
return a + b;
};
Now, this was the first part of your challenge, defining a utility function in notes.js; the second part was to actually use it over in app.js.
In app.js, we can use our function by printing the console.log result with a colon : (this is just for formatting). As the second argument, we'll print the actual results, notes.add. Then, we'll add up two numbers; we'll add 9 and -2, as shown in this code:
console.log('Starting app.js');
const fs = require('fs');
const os = require('os');
const notes = require('./notes.js');
console.log('Result:', notes.add(9, -2));
// var user = os.userInfo();
//
// fs.appendFile('greetings.txt', `Hello ${user.username}! You are ${notes.age}.`);
The result in this case should be 7. If we run the program you can see that we get just that, 7 prints to the screen:
If you were able to get this, congratulations, you successfully completed one of your first challenges. These challenges will be sprinkled throughout the book and they'll get progressively more complex. But don't worry, we'll keep the challenges pretty explicit; I'll tell you exactly what I want and exactly how I want it done. Now, you can play around with different ways to do it, the real goal is to just get you writing code independent of following someone else's lead. That is where the real learning happens.
In the next section, we will explore how to use third-party modules. From there, we'll start building the notes application.
You now know two out of the three ways to use require(), and in this section, we'll explore the last way, which is to require a package you've installed from npm. As I mentioned in the first chapter, npm is a big part of what makes Node so fantastic. There is a huge community of developers that have created thousands of packages that already solve some of the most common problems in Node applications. We will be taking advantage of quite a few packages throughout the book.
Now, in the npm packages, there's nothing magical, it's regular Node code that aims to solve a specific problem. The reason you'd want to use it is so you don't have to spend all your time writing these utility functions that already exist; not only do they exist, they've been tested, they've been proven to work, and others have used them and documented them.
Now, with all that said, how do we get started? Well, to get started, we actually have to run a command from the Terminal to tell our application we want to use npm modules. This command will be run over in the Terminal. Make sure you've navigated inside your project folder and inside the notes-node directory. Now, when you installed Node, you also installed something called npm.
We will be running some npm commands and you can test that you have it installed by running npm, a space, and -v (we're running npm with the v flag). This should print the version, as shown in the following code:
It's okay if your version is slightly different, that's not important; what is important is that you have npm installed.
Now, we'll run a command called npm init in Terminal. This command will prompt us to fill out a few questions about our npm project. We can run the command and we can cycle through the questions, as shown in the following screenshot:
In the preceding screenshot, at the top is a quick description of what's happening, and down below it'll start asking you a few questions, as shown in the following screenshot:
The questions include the following:
After answering these questions, if we hit enter, we'll get the following on our screen and a final question:
Now, I want to dispel the myth that this command is doing anything magical. All this command is doing is creating a single file inside your project. It'll be in the root of the project and it's called package.json, and the file will look exactly like the preceding screenshot.
To the final question, as shown down below in the preceding image, you can hit enter or type yes to confirm that this is what you want to do:
Now that we have created the file, we can actually view it inside our project. As shown in the following code, we have the package.json file:
{
"name": "notes-node",
"version": "1.0.0",
"description": "",
"main": "app.js",
"scripts": {
"test": "echo \"Error: no test specified\" && exit 1"
},
"author": "",
"license": "ISC"
}
And this is all it is, it's a simple description of your application. Now, as I mentioned, we'll not be publishing our app to npm, so a lot of this information really isn't important to us. What is important, though, is that package.json is where we define the third-party modules we want to install in our application.
To install a module in the app, we will run a command over in the Terminal. In this chapter, we'll be installing a module called lodash. The lodash module comes with a ton of utility methods and functions that make developing inside Node or JavaScript a heck of a lot easier. To take a look at what exactly we're getting into, let's move into the browser.
We'll to go to https://www.npmjs.com. Then we'll search for the package, lodash, and you can see it comes up, as shown in the following screenshot:
When you click on it, you should be taken to the package page, and the package page will show you a lot of statistics about the module and the documentation, as shown here:
Now, I use the lodash package page when I'm looking for new modules; I like to see how many downloads it has and when it was last updated. On the package page, you can see it was updated recently, which is great it means the package is most likely compatible with the latest versions of Node, and if you go further down the page, you can see this is actually one of the most popular npm packages, with over a million downloads a day. We will be using this module to explore how to install npm modules and how to actually use them in a project.
To install lodash, the first thing you need to grab is just a module name, which is lodash. Once you have that information, you're ready to install it.
Coming to Terminal, we'll run the npm install command. After installing, we'll specify the module, lodash. Now, this command alone would work; what we'll also do, though, is provide the save flag.
The npm install lodash command will install the module, and the save flag, -- (two) hyphens followed by the word save, will update the contents of the package.json file. Let's run this command:
npm install loadsh --save
The preceding command will go off to the npm servers and fetch the code and install it inside your project, and any time you install an npm module, it'll live in your project in a node_modules folder.
Now, if you open that node_modules folder, you'll see the lodash folder as shown in the following code. This is the module that we just installed:
{
"name": "notes-node",
"version": "1.0.0",
"description": "",
"main": "app.js",
"scripts": {
"test": "echo \"Error: no test specified\" && exit 1"
},
"author": "",
"license": "ISC",
"dependencies": {
"lodash": "^4.17.4"
}
}
As you can see over in package.json in the preceding figure, we've also had some updates automatically take place. There's a new dependencies attribute that has an object with key value pairs, where the key is the module we want to use in our project and the value is the version number, in this case, the most recent version, version 4.17.4. With this in place, we can now require our module inside the project.
Over inside app.js, we can take advantage of everything that comes in lodash by going through the same process of requiring it. We'll make a const, we'll name that const _, (which is a common name for the lodash utility library), and we'll set it equal to require(). Inside the require parentheses, we'll pass in the module name exactly as it appears in the package.json file. This is the same module name you used when you ran npm install. Then, we'll type lodash, as shown here:
console.log('Starting app.js');
const fs = require('fs');
const os = require('os');
const _ = require('lodash');
const notes = require('./notes.js');
console.log('Result:', notes.add(9, -2));
// var user = os.userInfo();
//
// fs.appendFile('greetings.txt', `Hello ${user.username}! You are ${notes.age}.`);
Now, the order of operations is pretty important here. Node will first look for a core module with the name lodash. It'll not find one because there is no core module, so the next place it will look is the node_modules folder. As shown in the following code, it will find lodash and load that module, returning any of the exports it provides:
console.log('Starting app.js');
const fs = require('fs');
const os = require('os');
const _ = require('lodash');
const notes = require('./notes.js');
console.log('Result:', notes.add(9, -2));
// var user = os.userInfo();
//
// fs.appendFile('greetings.txt', `Hello ${user.username}! You are ${notes.age}.`);
With the exports in place, we can now take advantage of some of the utilities that come with Lodash. We'll quickly explore two in this section, and we'll be exploring more throughout the book since Lodash is basically just a set of really handy utilities. Before we do, we should take a look at the documentation so we know exactly what we're getting into.
On the npm page, click the lodash link given there, or go to lodash.com and click the API Documentation page, as shown here:
You can view all of the various methods you have available to you, as shown in the following screenshot:
In our case, we'll be using command + F (Ctrl + F for Windows users) to search for _.isString. Then in the docs, we can click on it, opening it up in the main page, as shown in the following screenshot:
The _.isString is a utility that comes with lodash, and it returns true if the variable you pass in is a string, and it returns false if the value you pass in is not a string. And we can prove that by using it over in Atom. Let's use this.
To use the _.isString utility, we'll add console.log in app.js to show the result to the screen and we'll use _.isString, passing in a couple of values. Let's pass in true first, then we can duplicate this line and we'll pass in a string such as Gary, as shown here:
console.log('Starting app.js');
const fs = require('fs');
const os = require('os');
const _ = require('lodash');
const notes = require('./notes.js');
console.log(_.isString(true));
console.log(_.isString('Gary'));
// console.log('Result:', notes.add(9, -2));
// var user = os.userInfo();
//
// fs.appendFile('greetings.txt', `Hello ${user.username}! You are ${notes.age}.`);
We can run our project over in the Terminal using the same command we've used previously, node app.js, to run our file:
When we run the file, we get our two prompts that we've started both files, and we get false and then true. false comes because the Boolean is not a string, and true comes up because Gary is indeed a string, so it passes the test of _.isString. This is one of the many utility functions that comes bundled with lodash.
Now, lodash can do a lot more than simple type checking. It comes with a bunch of other utility methods we can take advantage of. Let's explore one more utility.
Back inside the browser, we can use command + F again to search for a new utility, which is _.uniq:
This unique method, simply takes an array and it returns that array with all duplicates removed. That means if I have the same number a few times or the same string, it'll remove any duplicates. Let's run this.
Back inside Atom, we can add this utility into our project, we'll comment out our _.isString calls and we will make a variable called filteredArray. This will be the array without the duplicates, and what we'll do is call, after the equal sign, _.uniq.
Now, as we know, this takes an array. And since we're trying to use the unique function, we'll pass in an array with some duplicates. Use your name twice as a string; I'll use my name once, followed by the number 1, followed by my name again. Then I can use 1, 2, 3, and 4 as shown here:
console.log('Starting app.js');
const fs = require('fs');
const os = require('os');
const _ = require('lodash');
const notes = require('./notes.js');
// console.log(_.isString(true));
// console.log(_.isString('Gary'));
var filteredArray = _.uniq(['Gary', 1, 'Gary', 1, 2, 3, 4]);
console.log();
// console.log('Result:', notes.add(9, -2));
// var user = os.userInfo();
//
// fs.appendFile('greetings.txt', `Hello ${user.username}! You are ${notes.age}.`);
Now, if things go as planned, we should get an array with all the duplicates removed, which means we'll have one instance of Gary, one instance of 1, and then 2, 3, and 4, which don't have duplicates.
The last thing to do is to print that using console.log so we can view it inside the Terminal. I'll pass in this filteredArray variable to our console.log statement as shown in the following code:
console.log('Starting app.js');
const fs = require('fs');
const os = require('os');
const _ = require('lodash');
const notes = require('./notes.js');
// console.log(_.isString(true));
// console.log(_.isString('Gary'));
var filteredArray = _.uniq(['Gary', 1, 'Gary', 1, 2, 3, 4]);
console.log(filteredArray);
// console.log('Result:', notes.add(9, -2));
// var user = os.userInfo();
//
// fs.appendFile('greetings.txt', `Hello ${user.username}! You are ${notes.age}.`);
From here, we can run our project inside Node. I'll use the last command, then I can press the enter key, and you can see we get our array with all duplicates removed, as shown in the following code output:
We have one instance of the string Gary, one instance of the number 1, and then we have 2, 3, 4, exactly what we expected.
The lodash utility really is endless. There are so many functions that it can be kind of overwhelming to explore at first, but as you start creating more JavaScript and Node projects, you'll find yourself solving a lot of the same problems over and over again when it comes to sorting, filtering, or type checking, and in that case, it's best to use a utility such as lodash to get that lifting done. The lodash utility is great for the following reasons:
If there were any issues, they've been sorted out by now.
Now that you know how to use a third-party module, there is one more thing I want to discuss. That is the node_modules folder in general. When you take your Node project and you put it on GitHub, or you're copying it around or sending it to a friend, the node_modules folder really shouldn't be taken with you.
The node_modules folder contains generated code. This is not code you've written and you should never make any updates to the files inside Node modules because there's a pretty good chance they'll get overwritten next time you install some modules.
In our case, we've already defined the modules and the versions inside package.json as shown in the following code because we used that handy save flag:
{
"name": "notes-node",
"version": "1.0.0",
"description": "",
"main": "app.js",
"scripts": {
"test": "echo \"Error: no test specified\" && exit 1"
},
"author": "",
"license": "ISC",
"dependencies": {
"lodash": "^4.17.4"
}
}
This actually means we can delete the node_modules folder completely. Now, we can copy the folder and give it to a friend, we can put it on GitHub, or whatever we want to do. When we want to get that node_modules folder back, all we have to do inside the Terminal is run the npm install command without any module names or any flags.
This command, when run without any names or flags, is going to load in your package.json file, grab all of the dependencies and install them. After running this command, the node_modules folder is going to look exactly as it looked before we deleted it. Now, when you are using Git and GitHub, instead of deleting the node_modules folder, you'll just ignore it from your repository.
Now, what we have explored so far is a process we'll be going through a lot more throughout the book. So if npm still seems foreign or you're not quite sure why it's even useful, it will become clear as we do more with our third-party modules, rather than just type checking or looking for unique items in an array. There's a ton of power behind the npm community and we'll be harnessing that to our fullest as we make real-world apps.
One of the major complaints I get is the fact that students have to restart the app from the Terminal every time they want to see the changes they just made inside their text editor. So, in this section, we'll take a look at how we can automatically restart our app as we make changes to the file. That means if I change from Gary to Mike and save it, it will automatically restart over in the Terminal.
Now, to automatically restart our app as we make changes to a file, we have to install a command-line utility, and we'll do this using npm. To get started, we'll go to Google Chrome (or the browser you are using) and head over to https://www.npmjs.com, as we did previously in the Installing the lodash module in our app section, and the module we're looking for is called nodemon.
The nodemon will be responsible for watching our app for changes and restarting the app when those changes occur. Right here, as we see in the following screenshot, we can view the docs for nodemon as well as various other things such as current version numbers and so on:
You will also notice that it's a really popular module, with over 30,000 downloads a day. Now, this module is a little different from the one we used in the last section, that is, lodash. The lodash got installed and added into our project's package.json file as shown in the following code block:
{
"name": "notes-node",
"version": "1.0.0",
"description": "",
"main": "app.js",
"scripts": {
"test": "echo \"Error: no test specified\" && exit 1"
},
"author": "",
"license": "ISC",
"dependencies": {
"lodash": "^4.17.4"
}
}
That means it went into our node_modules folder and we were able to require it in our app.js file (refer to the previous section for more detail). Nodemon, however, works a little differently. It's a command-line utility that gets executed from the Terminal. It will be a completely new way of starting our application, and to install modules to be run from the command line, we have to tweak the install command that we used in the last section.
For now, we can start off much the same way, though. We'll use npm install and type the name just like we did in the Installing the lodash module in our app section, but instead of using the save flag, we'll use the g flag, which is short for global, as shown here:
npm install nodemon -g
This command installs nodemon as a global utility on your machine, which means it'll not get added to your specific project and you'll never require nodemon. Instead, you'll be running the nodemon command from Terminal, as shown here:
When we install nodemon using the preceding command, it'll go off to npm and fetch all of the code that comes with nodemon.
And it'll add it into the installation where Node and npm live on your machine, outside the project you're working on.
The npm install nodemon -g command could be executed from anywhere in your machine; it does not need to be executed from the project folder since it doesn't actually update the project at all. With this in place, though, we now have a brand new command on our machine, nodemon.
Nodemon will get executed as Node did, where we type the command and then we type the file we want to start. In our case, app.js is the root of our project. When you run it, you'll see a few things, as shown here:
We'll see a combination of our app's output, along with nodemon logs that show you what's happening. As shown in the preceding code, you can see the version nodemon is using, the files it's watching, and the command it actually ran. Now, at this point, it's waiting for more changes; it already ran through the entire app and it'll keep running until another change happens or until you shut it down.
Inside Atom, we'll make a few changes to our app. Let's get started by changing Gary to Mike in app.js, and then we'll change the filteredArray variable to var filteredArray = _.uniq(['Mike']), as shown in the following code:
console.log('Starting app.js');
const fs = require('fs');
const os = require('os');
const _ = require('lodash');
const notes = require('./notes.js');
// console.log(_.isString(true));
// console.log(_.isString('Gary'));
var filteredArray = _.uniq(['Mike']);
console.log(filteredArray);
Now, I'll be saving the file. In the Terminal window, you can see the app automatically restarted, and within a split second, the new output is shown on the screen:
As shown in the preceding screenshot, we now have our array with one item of string, Mike. And this is the real power of nodemon.
You can create your applications and they will automatically restart over in the Terminal, which is super useful. It'll save you a ton of time and a ton of headaches. You won't have to switch back and forth every time you make a small tweak. This also prevents a ton of errors where you are running a web server, you make a change, and you forget to restart the web server. You might think your change didn't work as expected because the app is not working as expected, but in reality, you just never restarted the app.
For the most part, we will be using nodemon throughout the book since it's super useful. It's only used for development purposes, which is exactly what we're doing on our local machine. Now, we'll move forward and start exploring how we can get input from the user to create our notes application. That will the topic of the next few sections.
Before we get started, we should clean up a lot of the code we've already written in this section. I'll remove all of the commented-out code in app.js. Then, I'll simply remove os, where we have fs, os and lodash, since we'll not be using it throughout the project. I'll also be adding a space between the third-party and Node modules and the files I've written, which are as follows:
console.log('Starting app.js');
const fs = require('fs');
const _ = require('lodash');
const notes = require('./notes.js');
I find this to be a good syntax that makes it a lot easier to quickly scan for either third-party or Node modules, or the modules that I've created and required.
Next up, over in notes.js, we'll remove the add function; this was only added for demonstration purposes, as shown in the following figure. Then we can save both the notes.js and app.js files, and nodemon will automatically restart:
console.log('Starting notes.js');
module.exports.addNote = () => {
console.log('addNote');
return 'New note';
};
module.exports.add = (a, b) => {
return a + b;
};
Now we can remove the greetings.txt file. That was used to demonstrate how the fs module works, and since we already know how it works, we can wipe that file. And last but not least, we can always shut down nodemon using Ctrl + C. Now we're back at the regular Terminal.
And with this in place, now we should move on, figuring out how we can get input from the user, because that's how users can create notes, remove notes, and fetch their notes.
If a user wants to add a note, we need to know the note's title as well as the body of the note. If they want to fetch a note, we need to know the title of the note they want to fetch, and all this information needs to come into our app. And note apps, don't really do anything cool until they get this dynamic user input. This is what makes your scripts useful and awesome.
Now, throughout the book, we'll be creating note apps that get input from the user in a lot of different ways. We'll be using socket I/O to get real-time info from a web app, we'll be creating our own API so other websites and servers can make Ajax requests to our app, but in this section, we'll start things off with a very basic example of how to get user input.
We'll be getting input from the user inside the command line. That means when you run the app in the command line, you'll be able to pass in some arguments. These arguments will be available inside Node, and then we can do other things with them, such as create a note, delete a note, or return a note.
To start things off, let's run our app from the Terminal. We'll run it pretty similarly to how we ran it in the earlier sections: we'll start with node (I'm not using nodemon since we'll be changing the input), then we'll use app.js, which is the file we want to run, but then we can still type other variables.
If we want to add a note, that might look as a command shown in the following code:
node app.js add
This command will add a note; we can remove a note using the remove command, as shown here:
node app.js remove
And we could list all of our notes using the list command:
node app.js list
Now, when we run this command, the app is still going to work as expected. Just because we passed in a new argument doesn't mean our app is going to crash:
And we actually have access to the list argument already, we're just not using it inside the application.
To access the command-line arguments your app was initialized with, you'll want to use that process object that we explored in the first chapter.
We can log out all of the arguments using console.log to print them to the screen; it's on the process object, and the property we're looking for is argv.
Now save app.js and it'll look like the following:
console.log('Starting app.js');
const fs = require('fs');
const _ = require('lodash');
const notes = require('./notes.js');
console.log(process.argv);
Then we'll rerun this file:
Now, as shown in the preceding command output, we have three items which are as follows:
That means we can access that third item in the array, and that will be the command for our notes application.
Let's access the command-line argument in the array now. We'll make a variable called command, and set it equal to process.argv, and we'll grab the item in the third position (which is list, as shown in the preceding command output), which is the index of two as shown here:
var command = process.argv[2];
Then we can log that out to the screen by logging out command the string. Then, as the second argument, I'll pass in the actual command that was used:
console.log('Command: ' , command);
And this is just a simple log to keep track of how the app is getting executed. The cool stuff is going to come when we add if statements that do different things depending on that command.
Let's create an if/else block below the console.log('Command: ', command);. We'll add if (command === 'add'), as shown here:
console.log('Starting app.js');
const fs = require('fs');
const _ = require('lodash');
const notes = require('./notes.js');
var command = process.argv[2];
console.log('Command: ', command);
if (command === 'add')
In this case, we'll go through the process of adding a new note. Now, we're not specifying the other arguments here, such as the title or the body (we'll discuss that in later sections). For now, if the command does equal add, we'll use console.log to print Adding new note, as shown in the following code:
console.log('Starting app.js');
const fs = require('fs');
const _ = require('lodash');
const notes = require('./notes.js');
var command = process.argv[2];
console.log('Command: ', command);
if (command === 'add') {
console.log('Adding new note');
}
And we can do the exact same thing with a command such as list. We'll add else if (command === 'list'), as shown here:
console.log('Starting app.js');
const fs = require('fs');
const _ = require('lodash');
const notes = require('./notes.js');
var command = process.argv[2];
console.log('Command: ', command);
if (command === 'add') {
console.log('Adding new note');
} else if (command === 'list')
If the command does equal the string list, we'll run the following block of code using console.log to print Listing all notes. We can also add an else clause if there is no command, which is console.log ('Command not recognized'), as shown here:
console.log('Starting app.js');
const fs = require('fs');
const _ = require('lodash');
const notes = require('./notes.js');
var command = process.argv[2];
console.log('Command: ', command);
if (command === 'add') {
console.log('Adding new note');
} else if (command === 'list') {
console.log('Listing all notes');
} else {
console.log('Command not recognized');
}
With this in place, we can now rerun our app for a third time, and this time around, you'll see we have the command equal to list, and listing all notes shows up, as shown in the following code:
if (command === 'add') {
console.log('Adding new note');
} else if (command === 'list') {
console.log('Listing all notes');
} else {
console.log('Command not recognized');
}
This means we were able to use our argument to run different code. Notice that we didn't run Adding new note and we didn't run Command not recognized. We could, however, switch the node app.js command from list to add, and in that case, we'll get Adding new note printing, as shown in the following screenshot:
And if we run a command that doesn't exist, for example read, you can see Command not recognized prints as shown in the following screenshot:
Now, what I'd like you to do is add two more else if clauses to our if block, which will be as follows:
All you have to do is add the else if statement for both of them, and then just put a quick console.log printing something like Fetching note or Removing note.
Take a moment to knock that out as your challenge for this section. Once you add those two else if clauses, run both of them from the Terminal and make sure your log shows up. If it does show up, you are done, you can move ahead with this section.
For the solution, the first thing I'll do is to add an else if for read. I'll open and close my curly braces and hit enter right in the middle so everything gets formatted correctly.
In the else if statement, I'll check whether the command variable equals the string read, as shown here:
console.log('Starting app.js');
const fs = require('fs');
const _ = require('lodash');
const notes = require('./notes.js');
var command = process.argv[2];
console.log('Command: ', command);
if (command === 'add') {
console.log('Adding new note');
} else if (command === 'list') {
console.log('Listing all notes');
} else if () {
} else {
console.log('Command not recognized');
}
For now, we'll use console.log to print Reading note:
console.log('Starting app.js');
const fs = require('fs');
const _ = require('lodash');
const notes = require('./notes.js');
var command = process.argv[2];
console.log('Command: ', command);
if (command === 'add') {
console.log('Adding new note');
} else if (command === 'list') {
console.log('Listing all notes');
} else if (command === 'read') {
} else {
console.log('Command not recognized');
}
The next thing you need to do is add an else if clause that checks whether the command equals remove. In the else if, I'll open and close my condition and hit enter just as I did in the previous else if clause; this time, I'll add if the command equals remove, we want to remove the note. And in that case, all we'll do is to use console.log to print Reading note, as shown in the following code:
console.log('Starting app.js');
const fs = require('fs');
const _ = require('lodash');
const notes = require('./notes.js');
var command = process.argv[2];
console.log('Command: ', command);
if (command === 'add') {
console.log('Adding new note');
} else if (command === 'list') {
console.log('Listing all notes');
} else if (command === 'read') {
console.log('Reading note');
} else {
console.log('Command not recognized');
}
And with this in place, we are done. If we refer to the code block, we've added two new commands we can run over in the Terminal, and we can test those:
if (command === 'add') {
console.log('Adding new note');
} else if (command === 'list') {
console.log('Listing all notes');
} else if (command === 'read') {
console.log('Reading note');
} else {
console.log('Command not recognized');
}
First up, I'll run node app.js with the read command, and Reading note shows up:
console.log('Starting app.js');
const fs = require('fs');
const _ = require('lodash');
const notes = require('./notes.js');
var command = process.argv[2];
console.log('Command: ', command);
if (command === 'add') {
console.log('Adding new note');
} else if (command === 'list') {
console.log('Listing all notes');
} else if (command === 'read') {
console.log('Reading note');
} else if (command == 'remove') {
console.log('Removing note');
} else {
console.log('Command not recognized');
}
Then I'll rerun the command; this time, I'll be using remove. And when I do that, Removing note prints to the screen, as shown in this screenshot:
I'll wrap up my testing using a command that doesn't exist, and when I run that, you can see Command not recognized shows up.
Now, what we did in the previous subsection is step 1. We now have support for various commands. The next thing we need to figure out is how we'll get more specific information. For example, which note do you want to remove? Which note do you want to read? And what do you want the note text to be in the case of adding a note? This is all information we need to get from the Terminal.
Now, getting it is going to be pretty similar to what we did earlier, and to show you what it looks like, we'll print the entire argv object once again, using the following command:
console.log(process.argv);
Over in the Terminal, we can now run a more complex command. Let's say we want to remove a note using the node app.js remove command, and we'll do that by its title. We might use the title argument, which looks like the following code:
node app.js remove --title
In this title argument, we have -- (two) hyphens followed by the argument name, which is title, followed by the = (equals) sign. Then we can type our note title. Maybe the note title is secrets. This will pass the title argument into our application.
Now, there are a couple of different ways you could format the title argument, which are as follows:
node app.js remove --title=secrets
node app.js remove --title="secrets 2"
No matter how you choose to format your argument, these are all valid ways to pass in the title.
For the moment, I'll keep the = (equals) sign and the quotes and rerun the command:
node app.js remove --title="secrets 2"
When I run the command, you can see in the following code output that we have our two arguments:
These are the arguments that we don't need, then we have our remove command, which is the third one, and we now have a new fourth string, the title that is equal to secrets 2. And our argument was successfully passed into the application. The problem is that it's not very easy to use. In the fourth string, we have to parse out the key, which is title, and the value, which is secrets 2.
When we used the command, which was the third argument in the previous section, it was a lot easier to use inside our app. We simply pulled it out of the arguments array and we referenced it by using the command variable and checking whether it equaled add, list, read, or remove.
Things get a lot more complex as we use different styles for passing in the arguments. If we rerun the last command with a space instead of an = (equals) sign, as shown in the following code, which is perfectly valid, our arguments array now looks completely different:
In the preceding code output, you can see that we have the title as the fourth item, and we have the value, which is secrets 2, as the fifth, which means we have to add other conditions for parsing. And this turns into a pain really quickly, which is why we will not do it.
We'll use a third-party module called yargs in the next chapter to make parsing the command-line arguments effortless. Instead of having strings, as shown in this one or the one we discussed earlier, we'll get an object where the title property equals the secrets 2 string. That will make it super easy to implement the rest of the notes application.
Now, parsing certain types of command-line arguments, such as key value pairs, becomes a lot more complex, which is why, in the next chapter, we'll be using yargs to do just that.
In this chapter, we learned how to use require to load in modules that come with Node.js. We created our files for our notes application and required them inside app.js. We explored how to use built-in modules and we explored how to use modules we defined. We found out how to require other files that we created, and how to export things such as properties and functions from those files.
We explored npm a little bit, how we can use npm init to generate a package.json file, and how we can install and use third-party modules. Next, we explored the nodemon module, using it to automatically restart our app as we make changes to a file. Last, we learned how to get input from the user, which is needed to create the notes application. We learned that we can use command-line arguments to pass data into our app.
In the next chapter, we'll explore some more interesting Node fundamental concepts, including yargs, JSON, and Refactor.
In this chapter, we'll continue our discussion on some more node fundamentals. We'll explore yargs, and we'll see how to parse command-line arguments using process.argv and yargs. After that, we'll explore JSON. JSON is nothing more than a string that looks kind of like a JavaScript object, with the notable differences being that it uses double quotes instead of single quotes and all of your property names—like name and age, in this case—require quotes around them. We'll look into how to convert an object into a string, then define that string, use it, and convert it back to an object.
After we've done that, we'll fill out the addNote function. Finally, we'll look into refactor, moving the functionality into individual functions and testing the functionality.
More specifically, we'll go through following topics:
In this section, we will use yargs, a third-party npm module, to make the process of parsing much easier. It will let us access things such as title and body information without needing to write a manual parser. This is a great example of when you should look for an npm module. If we don't use a module, it would be more productive for our Node application to use a third-party module that has been tested and thoroughly vetted.
To get started, we'll install the module, then we'll add it into the project, parsing for things such as a title of the body, and we'll call all the functions that will get defined over in notes.js. If the command is add, we'll call add note, so on.
Now, let's view the documents page for yargs. It's always a good idea to know what you're getting yourself into. If you search for yargs on Google, you should find the GitHub page as your first search result. As shown in the following screenshot, we have the GitHub page for the yargs library:
Now, yargs is a very complex library. It has a ton of features for validating all sorts of input, and it has different ways in which you can format that input. We will start with a very basic example, although we will be introducing more complex examples throughout this chapter.
We'll now move into Terminal to install this module inside of our application. To do this, we'll use npm install followed by the module name, yargs, and in this case, I'll use the @ sign to specify the specific version of the module I want to use, 11.0.0, which is the most recent version at the time of writing. Next, I'll add the save flag, which, as we know, updates the package.json file:
npm install yargs@11.0.0 --save
Now that we've installed yargs, we can move over into Atom, inside of app.js, and get started with using it. The basics of yargs, the very core of its feature set, is really simple to take advantage of. The first thing we'll do is to require it up, as we did with fs and lodash in the previous chapter. Let's make a constant and call it yargs, setting it equal to require('yargs'), as shown here:
console.log('Starting app.js');
const fs = require('fs');
const _ = require('lodash');
const yargs = require('yargs');
const notes = require('./notes.js');
var command = process.argv[2];
console.log('Command:', command);
console.log(process.argv);
if (command === 'add') {
console.log('Adding new note');
} else if (command === 'list') {
console.log('Listing all notes');
} else if (command === 'read') {
console.log('Reading note');
} else if (command === 'remove') {
console.log('Removing note');
} else {
console.log('Command not recognized');
}
From here, we can fetch the arguments as yargs parses them. It will take the same process.argv array that we discussed in the previous chapter, but it goes behind the scenes and parses it, giving us something that's much more useful than what Node gives us. Just above the command variable, we can make a const variable called argv, setting it equal to yargs.argv, as shown here:
console.log('Starting app.js');
const fs = require('fs');
const _ = require('lodash');
const yargs = require('yargs');
const notes = require('./notes.js');
const argv = yargs.argv;
var command = process.argv[2];
console.log('Command:', command);
console.log(process.argv);
if (command === 'add') {
console.log('Adding new note');
} else if (command === 'list') {
console.log('Listing all notes');
} else if (command === 'read') {
console.log('Reading note');
} else if (command === 'remove') {
console.log('Removing note');
} else {
console.log('Command not recognized');
}
The yargs.argv module is where the yargs library stores its version of the arguments that your app ran with. Now we can print it using console.log, and this will let us take a look at the process.argv and yargs.argv variables; we can also compare them and see how yargs differs. For the command where we use console.log to print process.argv, I'll make the first argument a string called Process so that we can differentiate it in Terminal. We'll call console.log again. The first argument will be the Yargs string, and the second one will be the actual argv variable, which comes from yargs:
console.log('Starting app.js');
const fs = require('fs');
const _ = require('lodash');
const yargs = require('yargs');
const notes = require('./notes.js');
const argv = yargs.argv;
var command = process.argv[2];
console.log('Command:', command);
console.log('Process', process.argv);
console.log('Yargs', argv);
if (command === 'add') {
console.log('Adding new note');
} else if (command === 'list') {
console.log('Listing all notes');
} else if (command === 'read') {
console.log('Reading note');
} else if (command === 'remove') {
console.log('Removing note');
} else {
console.log('Command not recognized');
}
Now we can run our app (refer to the preceding code block) a few different ways and see how these two console.log statements differ.
First up, we'll run at node app.js with the add command, and we can run this very basic example:
node app.js add
We already know what the process.argv array looks like from the previous chapter. The useful information is the third string inside of the array, which is 'add'. In the fourth string, Yargs gives us an object that looks very different:
As shown in the preceding code output, first we have the underscore property, then commands such as add are stored.
If I were to add another command, say add, and then I were to add a modifier, say encrypted, you would see that add would be the first argument and encrypted the second, as shown here:
node app.js add encrypted
So far, yargs really isn't shining. This isn't much more useful than what we have in the previous example. Where it really shines is when we start passing in key-value pairs, such as the title example we used in the Getting input section of Node Fundamentals - Part 1 in chapter 2. I can set my title flag equal to secrets, press enter, and this time around, we get something much more useful:
node app.js add --title=secrets
In the following code output, we have the third string that we would need to parse in order to fetch the value and the key, and in the fourth string, we actually have a title property with a value of secrets:
Also, yargs has built-in parsing for all the different ways you could specify this.
We can insert a space after title, and it will still work just as it did before; we can add quotes around secrets, or add other words, like secrets from Andrew, and it will still parses it correctly, setting the title property to the secrets from Andrew string, as shown here:
node app.js add --title "secrets from Andrew"
This is where yargs really shines! It makes the process of parsing your arguments a lot easier. This means that inside our app, we can take advantage of that parsing and call the proper functions.
Let's work with the add command, for example, for parsing your arguments and calling the functions. Once the add command gets called, we want to call a function defined in notes, which will be responsible for actually adding the note. The notes.addNote function will get the job done. Now, what do we want to pass to the addNote function? We want to pass in two things: the title, which is accessible on argv.title, as we saw in the preceding example; and the body, argv.body:
console.log('Starting app.js');
const fs = require('fs');
const _ = require('lodash');
const yargs = require('yargs');
const notes = require('./notes.js');
const argv = yargs.argv;
var command = process.argv[2];
console.log('Command:', command);
console.log('Process', process.argv);
console.log('Yargs', argv);
if (command === 'add') {
console.log('Adding new note');
notes.addNote(argv.title, argv.body);
} else if (command === 'list') {
console.log('Listing all notes');
} else if (command === 'read') {
console.log('Reading note');
} else if (command === 'remove') {
console.log('Removing note');
} else {
console.log('Command not recognized');
}
Now that we have notes.addNote in place, we can remove our console.log statement, which was just a placeholder, and we can move into the notes application notes.js.
Inside notes.js, we'll get started by making a variable with the same name as the method we used over app.js and addNote, and we will set it equal to an anonymous arrow function, as shown here:
var addNote = () => {
};
Now, this alone isn't too useful, because we're not exporting the addNote function. Below the variable, we can define module.exports in a slightly different way. In previous sections, we added properties onto exports to export them. We can actually define an entire object that gets set to exports, and in this case, we can set addNote equal to the addNote function defined in preceding code block:
module.exports = {
addNote: addNote
};
In the preceding code, we're setting an object equal to module.exports, and that object has a property, addNote, which points to the addNote function we defined as a variable in the preceding code block.
Once again, addNote: and addNote are identical inside of ES6. We will be using the ES6 syntax for everything throughout this book.
Now I can take my two arguments, title and body, and actually do something with them. In this case, we'll call console.log and Adding note, passing in the two arguments as the second and third argument to console.log, title and body, as shown here:
var addNote = (title, body) => {
console.log('Adding note', title, body);
};
Now we're in a pretty good position to run the add command with title and body and see if we get exactly what we'd expect, which is the console.log statement shown in the preceding code to print.
Over in Terminal, we can start by running the app with node app.js, and then specify the filename. We'll use the add command; which will run the appropriate function. Then, we'll pass in title, setting it equal to secret, and then we can pass in body, which will be our second command-line argument, setting that equal to the string, This is my secret:
node app.js add --title=secret --body="This is my secret"
In this command, we specified three things: the add command the title argument, which gets set to secret; and the body argument, which gets set to "This is my secret". If all goes well, we'll get the appropriate log. Let's run the command.
In the following command output, you can see Adding note secret, which is the title; and This is my secret, which is the body:
With this in place, we now have one of our methods set up and ready to go. The next thing that we'll do is convert the other commands we have—the list, read, and remove commands. Let's look into one more command, and then you'll do the other two by yourself as exercises.
Now, with the list command, I'll remove the console.log statement and call notes.getAll, as shown here:
console.log('Starting app.js');
const fs = require('fs');
const _ = require('lodash');
const yargs = require('yargs');
const notes = require('./notes.js');
const argv = yargs.argv;
var command = process.argv[2];
console.log('Command:', command);
console.log('Process', process.argv);
console.log('Yargs', argv);
if (command === 'add') {
notes.addNote(argv.title, argv.body);
} else if (command === 'list') {
notes.getAll();
} else if (command === 'read') {
console.log('Reading note');
} else if (command === 'remove') {
console.log('Removing note');
} else {
console.log('Command not recognized');
}
At some point, notes.getAll will return all of the notes. Now, getAll doesn't take any arguments since it will return all of the notes regardless of the title. The read command will require a title, and remove will also require the title of the note you want to remove.
For now, we can create the getAll function. Inside notes.js, we'll go through that process again. We'll start by making a variable, calling it getAll, and setting it equal to an arrow function, which we've used before. We start with our arguments list, then we set up the arrow (=>), which is the equal sign and the greater than sign. Next, we specify the statements we want to run. Inside our code block, we'll run console.log(Getting all notes), as shown here:
var getAll = () => {
console.log('Getting all notes');
};
The last step to the process after adding that semicolon will be to add getAll to the exports, as shown in the following code block:
module.exports = {
addNote,
getAll
};
Now that we have getAll in notes.js in place, and we've wired it up in app.js, we can run things over in Terminal. In this case, we'll run the list command:
node app.js list
In the preceding code output, you can see at the bottom that Getting all notes prints to the screen. Now that we have this in place, we can remove console.log('Process', process.argv) from the command variable in app.js. The resultant code will look like the following code block:
console.log('Starting app.js');
const fs = require('fs');
const _ = require('lodash');
const yargs = require('yargs');
const notes = require('./notes.js');
const argv = yargs.argv;
var command = process.argv[2];
console.log('Command:', command);
console.log('Yargs', argv);
if (command === 'add') {
notes.addNote(argv.title, argv.body);
} else if (command === 'list') {
notes.getAll();
} else if (command === 'read') {
console.log('Reading note');
} else if (command === 'remove') {
console.log('Removing note');
} else {
console.log('Command not recognized');
}
We will keep the yargs log around since we'll be exploring the other ways and methods to use yargs throughout the chapter.
Now that we have the list command in place, next, I'd like you to create a method for the read and remove commands.
When the read command is used, we want to call notes.getNote, passing in title. Now, title will get passed in and parsed using yargs, which means that we can use argv.title to fetch it. And that's all we have to do when it comes to calling the function:
console.log('Starting app.js');
const fs = require('fs');
const _ = require('lodash');
const yargs = require('yargs');
const notes = require('./notes.js');
const argv = yargs.argv;
var command = process.argv[2];
console.log('Command:', command);
console.log('Yargs', argv);
if (command === 'add') {
notes.addNote(argv.title, argv.body);
} else if (command === 'list') {
notes.getAll();
} else if (command === 'read') {
notes.getNote(argv.title);
} else if (command === 'remove') {
console.log('Removing note');
} else {
console.log('Command not recognized');
}
The next step is to define getNote, because currently it doesn't exist. Over in notes.js, right below the getAll variable, we can make a variable called getNote, which will be a function. We'll use the arrow function, and it will take an argument; it will take the note title. The getNote function takes the title, then it returns the body for that note:
var getNote = (title) => {
};
Inside getNote, we can use console.log to print something like Getting note, followed by the title of the note you will fetch, which will be the second argument to console.log:
var getNote = (title) => {
console.log('Getting note', title);
};
This is the first command, and we can now test it before we go on to the second one, which is remove.
Over in Terminal, we can use node app.js to run the file. We'll be using the new read command, passing in a title flag. I'll use a different syntax, where title gets set equal to the value outside of quotes. I'll use something like accounts:
node app.js read --title accounts
This accounts value will read the accounts note in the future, and it will print it to the screen, as shown here:
As you can see in the preceding code output, we get an error, which we'll debug now.
Getting an error is not the end of the world. Getting an error usually means that you have a small typo or you forgot one step in the process. So, we'll first figure out how to parse through these error messages, because the error messages you get in the code output can be pretty daunting. Let's refer to the code output error here:
As you can see, the first line shows you where the error occurred. It's inside of our app.js file, and the number 19 after the colon is the line number. It shows you exactly where things went bad. The TypeError: notes.getNote is not a function line is telling you pretty clearly that the getNote function you tried to run doesn't exist. Now we can take this information and debug our app.
In app.js, we see that we call notes.getNote. Everything looks great, but when we move into notes.js, we realize that we never actually exported getNote. This is why when we try to call the function, we get getNote is not a function. All we have to do to fix that error message is export getNote, as shown here:
module.exports = {
addNote,
getAll,
getNote
};
Now when we save the file and rerun the app from Terminal, we'll get what we expect—Getting note followed by the title, which is accounts, as shown here:
This is how we can debug our error messages. Error messages contain really useful information. For the most part, the first couple of lines are code that you've written, and the other ones are internal Node code or third-party modules. In our case, the first line of the stack trace is important, as it shows exactly where the error occurred.
Now, since the read command is working, we can move on to the last one, which is the remove command. Here, I'll call notes.removeNote, passing in the title, which as we know is available in argv.title:
console.log('Starting app.js');
const fs = require('fs');
const _ = require('lodash');
const yargs = require('yargs');
const notes = require('./notes.js');
const argv = yargs.argv;
var command = process.argv[2];
console.log('Command:', command);
console.log('Yargs', argv);
if (command === 'add') {
notes.addNote(argv.title, argv.body);
} else if (command === 'list') {
notes.getAll();
} else if (command === 'read') {
notes.getNote(argv.title);
} else if (command === 'remove') {
notes.removeNote(argv.title);
} else {
console.log('Command not recognized');
}
Next up, we'll define the removeNote function over inside of our notes API file, right below the getNote variable:
var removeNote = (title) => {
console.log('Removing note', title);
};
Now, removeNote will work much the same way as getNote. All it needs is the title; it can use this information to find the note and remove it from the database. This will be an arrow function that takes the title argument.
In this case, we'll print the console.log statement, Removing note; then, as the second argument, we'll simply print title back to the screen to make sure that it's going through the process successfully. This time around, we'll export our removeNote function; we'll define it using the ES6 syntax:
module.exports = {
addNote,
getAll,
getNote,
removeNote
};
The last thing to do is test it and make sure it works. We can reload the last command using the up arrow key. We change read to remove, and that is all we need to do. We're still passing in the title argument, which is great, because that is what remove needs:
node app.js remove --title accounts
When I run this command, we get exactly what we expected. Removing note prints to the screen, as shown in the following code output, and then we get the title of the note that we're supposed to be removing, which is accounts:
This looks great! That is all it takes to use yargs to parse your arguments.
With this, we now have a place to define all of that functionality, for saving, reading, listing, and removing notes.
The last thing I want to discuss before we wrap up this section is—how we fetch command.
As we know, command is available in the _ property as the first and only item. This means that in the app.js, var command statement, we can set command equal to argv, then ._, and then we'll use [] to grab the first item in the array, as shown in the following code:
console.log('Starting app.js');
const fs = require('fs');
const _ = require('lodash');
const yargs = require('yargs');
const notes = require('./notes.js');
const argv = yargs.argv;
var command = argv._[0];
console.log('Command:', command);
console.log('Yargs', argv);
if (command === 'add') {
notes.addNote(argv.title, argv.body);
} else if (command === 'list') {
notes.getAll();
} else if (command === 'read') {
notes.getNote(argv.title);
} else if (command === 'remove') {
notes.removeNote(argv.title);
} else {
console.log('Command not recognized');
}
With this in place, we now have the same functionality, but we'll use yargs everywhere. If I rerun the last command, we can test that the functionality still works. And it does! As shown in the following command output, we can see that Command: remove shows up:
Next, we'll look into filling out the individual functions. We'll take a look first at how we can use JSON to store our notes inside our file system.
Now that you know how to parse command-line arguments using process.argv and yargs, you've solved the first piece to the puzzle for the notes application. Now, how do we get that unique input from the user? The second piece to the puzzle is to solve how we store this information.
When someone adds a new note, we want to save it somewhere, preferably on the filesystem. So the next time they try to fetch, remove, or read that note, they actually get the note back. To do this, we'll need to introduce something called JSON. If you're already familiar with JSON, you probably know it is super popular. It stands for JavaScript Object Notation, and it's a way to represent JavaScript arrays and objects using a string. Now, why would you ever want to do that?
Well, you might want to do that because strings are just text, and that's pretty much supported anywhere. I can save JSON to a text file, and then I can read it later, parse it back into a JavaScript array or object, and do something with it. This is exactly what we'll take a look at in this section.
To explore JSON and how it works, let's go ahead and make a new folder inside our project called playground.
In the playground folder, we'll make a file called json.js, this is where we can explore how JSON works. To get started, let's make a very simple object.
Let's first make a variable called obj, setting it equal to an object. On this object, we'll just define one property, name, and set it equal to your first name; I'll set this one equal to Andrew, as shown here:
var obj = {
name: 'Andrew'
};
Now, let's assume that we want to take this object and work on it. Let's say we want to, for example, send it between servers as a string and save it to a text file. To do this, we'll need to call one JSON method.
Let's take a moment to define a variable to store the result, stringObj, and we'll set it equal to JSON.stringify, as shown here:
var stringObj = JSON.stringify(obj);
The JSON.stringify method takes your object, in this case, the obj variable, and returns the JSON-stringified version. This means that the result stored in stringObj is actually a string. It's no longer an object, and we can take a look at that using console.log. I'll use console.log twice. First up, we'll use the typeof operator to print the type of the string object to make sure that it actually is a string. Since typeof is an operator, it gets typed in lowercase, there is no camel casing. Then, you pass in the variable whose type you want to check. Next up, we can use console.log to print the contents of the string itself, printing out the stringObj variable, as shown here:
console.log(typeof stringObj);
console.log(stringObj);
What we've done here is we've taken an object, converted it into a JSON string, and printed it onto the screen. Over in Terminal, I'll navigate into the playground folder using the following command:
cd playground
We can now use node to run our json.js file. When we run the file, we see two things:
As shown in the preceding code output, first, we will get our type, which is a string, and this is great, because remember, JSON is a string. Next, we will get our object, which looks pretty similar to a JavaScript object, but there are a few differences. These differences are as follows:
Now, JSON doesn't just support string values, you can use an array, a Boolean, a number, or anything else. All of those types are perfectly valid inside of your JSON. In this case, we have a very simple example where we have a name property and it's set to "Andrew".
This is the process of taking an object and converting it into a string. Next up, we'll define a string and convert that into an object we can actually use in our app.
Let's get started by making a variable called personString, and we'll to set it equal to a string using single quotes since JSON uses double quotes inside of itself, as shown here:
var personString = '';
Then we'll define our JSON in the quotes. We'll start by opening and closing some curly braces. We'll use double quotes to create our first attribute, which we'll call name, and we'll set that attribute equal to Andrew. This means that after the closing quote, we'll add :; then we'll open and close double quotes again and type the value Andrew, as shown here:
var personString = '{"name": "Andrew"}';
Next up, we can add another property. After the value, Andrew, I'll create another property after the comma, called age, which will be set equal to a number. I can use my colon and then define the number without the quotes, in this case, 25:
var personString = '{"name": "Andrew","age": 25}';
You can go ahead and use your name and your age, obviously, but make sure the rest looks identical to what you see here.
Now, let's say we get the earlier-defined JSON from a server or we grab it from a text file. Currently, it's useless; if we want to get the name value, there is no good way to do that because we're using a string, so personString.name doesn't exist. What we need to do is take the string and convert it back into an object.
To convert the string back to object, we'll use the opposite of JSON.stringify, which is JSON.parse. Let's make a variable to store the result. I'll create a person variable and it will be set equal to JSON.parse, passing in as the one and only argument the string you want to parse, in this case, the person string, which we defined earlier:
var person = JSON.parse(personString);
Now, this variable takes your JSON and converts it from a string back into its original form, which could be an array or an object. In our case, it converts it back into an object, and we have the person variable as an object, as shown in the preceding code. Also, we can prove that it's an object using the typeof operator. I'll use console.log twice, just like we did previously.
First up, we'll print typeof person, and then we'll print the actual person variable, console.log(person):
console.log(typeof person);
console.log(person);
With this in place, we can now rerun the command in Terminal; I'll actually start nodemon and pass in json.js:
nodemon json.js
As shown in the following code output, you can now see that we're working with an object, which is great, and we have our regular object:
We know that Andrew is an object because it's not wrapped in double quotes; the values don't have any quotes, and we use single quotes for Andrew, which is valid in JavaScript, but it's not valid in JSON.
This is the entire process of taking an object, converting it to a string, and then taking the string and converting it back into the object, and this is exactly what we'll do in the notes app. The only difference is that we'll be taking the following string and storing it in a file, then later on, we'll be reading that string from the file using JSON.parse to convert it back to an object, as shown in the following code block:
// var obj = {
// name: 'Andrew'
// };
// var stringObj = JSON.stringify(obj);
// console.log(typeof stringObj);
// console.log(stringObj);
var personString = '{"name": "Andrew","age": 25}';
var person = JSON.parse{personString};
console.log(typeof person);
console.log(person);
With the basics in place, let's take it just one step further, that is, by storing the string in a file. Then, we want to read the contents of that file back by using the fs module and printing some properties from it. This means that we'll need to convert the string that we get back from fs.readfilesync into an object using JSON.parse.
Let's go ahead and comment out all the code we have so far and start with a clean slate. First up, let's go ahead and load in the fs module. The const variable fs will be set equal to require, and we'll pass the fs module that we've used in the past, as shown here:
// var obj = {
// name: 'Andrew'
// };
// var stringObj = JSON.stringify(obj);
// console.log(typeof stringObj);
// console.log(stringObj);
// var personString = '{"name": "Andrew","age": 25}';
// var person = JSON.parse(personString);
// console.log(typeof person);
// console.log(person);
const fs = require('fs');
The next thing we'll do is define the object. This object will be stored inside of our file, and then will be read back and parsed. This object will be a variable called originalNote, and we'll call it originalNote because later on, we'll load it back in and call that variable Note.
Now, originalNote will be a regular JavaScript object with two properties. We'll have the title property, which we'll set equal to Some title, and the body property, which we will set equal to Some body, as shown here:
var originalNote = {
title: 'Some title',
body: 'Some body'
};
The next step that you will need to do is take the original note and create a variable called originalNoteString, and set that variable equal to the JSON value of the object we defined earlier. This means that you'll need to use one of the two JSON methods we used previously in this section.
Now, once you have that originalNoteString variable, we can write a file to the filesystem. I'll write that line for you, fs.writeFileSync. The writeFileSync method, which we used before, takes two arguments. One will be the filename, and since we're using JSON, it's important to use the JSON file extension. I'll call this file notes.json. The other arguments will be text content, originalNoteString, which is not yet defined, as shown in this code block:
// originalNoteString
fs.writeFileSync('notes.json', originalNoteString);
This is the first step to the process; this is how we'll write that file into the playground folder. The next step to the process will be to read out the contents, parse it using the JSON method earlier, and print one of the properties to the screen to make sure that it's an object. In this case, we'll print the title.
The first step to print the title is to use a method we haven't used yet. We'll use the read method available on the filesystem module to read the contents. Let's make a variable called noteString. The noteString variable will be set equal to fs.readFileSync.
Now, readFileSync is similar to writeFileSync except that it doesn't take the text content, since it's getting the text content back for you. In this case, we'll just specify the first argument, which is the filename, notes.JSON:
var noteString = fs.readFileSync('notes.json');
Now that we have the string, it will be your job to take that string, use one of the preceding methods, and convert it back into an object. You can call that variable note. Next up, the only thing left to do is to test whether things are working as expected, by printing with the help of console.log(typeof note). Then, below this, we'll use console.log to print the title, note.title:
// note
console.log(typeof note);
console.log(note.title);
Now, over in Terminal, you can see (refer to the following screenshot) that I have saved the file in a broken state and it crashed, and that's expected when you're using nodemon:
To resolve this, the first thing I'll do is fill out the originalNoteString variable, which we had commented out earlier. It will now be a variable called originalNoteString, and we'll set it equal to the return value from JSON.stringify.
Now, we know JSON.stringify takes our regular object and it converts the object into a string. In this case, we'll take the originalNote object and convert it into a string. The next line, which we already have filled out, will save that JSON value into the notes.JSON file. Then we will read that value out:
var originalNoteString = JSON.stringify(originalNote);
The next step will be to create the note variable. The note variable will be set equal to JSON.parse.
The JSON.parse method takes the string JSON and converts it back into a regular JavaScript object or array, depending on whatever you save. Here we will pass in noteString, which we'll get from the file:
var note = JSON.parse(noteString);
With this in place, we are now done. When I save this file, nodemon will automatically restart and we would expect to not see an error. Instead, we expect that we'll see the object type as well as the note title. Right inside Terminal, we have object and Some title printing to the screen:
With this in place, we've successfully completed the challenge. This is exactly how we will save our notes.
When someone adds a new note, we'll use the following code to save it:
var originalNote = {
title: 'Some title',
body: 'Some body'
};
var originalNoteString = JSON.stringify(originalNote);
fs.writeFileSync('notes.json', originalNoteString);
When someone wants to read their note, we'll use the following code to read it:
var noteString = fs.readFileSync('notes.json');
var note = JSON.parse(noteString);
console.log(typeof note);
console.log(note.title);
Now, what if someone wants to add a note? This will require us to first read all of the notes, then modify the notes array, and then use the code (refer to the previous code block) to save the new array back into the filesystem.
If you open up that notes.JSON file, you can see right here that we have our JSON code inside the file:
.json is actually a file format that's supported by most text editors, so I actually already have some nice syntax highlighting built in. Now, in the next section, we'll be filling out the addNote function using the exact same logic that we just used inside of this section.
In the previous section, you learned how to work with JSON inside Node.js, and this is the exact format we'll be using for the notes.js application. When you first run a command, we'll load in all the notes that might already exist. Then we'll run the command, whether it's adding, removing, or reading notes. Finally, if we've updated the array, like we will when we add and remove notes, we'll save those new notes back into the JSON file.
Now, this will all happen inside of the addNote function, which we defined in the notes.js application, and we already wired up this function. In earlier sections, we ran the app add command, and this function executed with the title and body arguments.
To get started with adding notes, the first thing we'll do is create a variable called notes, and for the moment, we'll set it equal to an empty array, just as in the following, using our square brackets:
var addNote = (title, body) => {
var notes = [];
};
Now that we have the empty array, we can go ahead and make a variable called note, which is the individual note. This will represent the new note:
var addNote = (title, body) => {
var notes = [];
var note = {
}
};
On that note, we'll have the two properties: a title and a body. Now, title can be set equal to the title variable, but, as we know, inside ES6, we can simply remove it when both values are the same; so we'll add title and body as shown here:
var addNote = (title, body) => {
var notes = [];
var note = {
title,
body
};
};
Now we have the note and the notes array.
The next step in the process of adding notes will be to add the note to the notes array. The notes.push method will let us do just that. The push method on an array lets you pass in an item, which gets added to the end of the array, and in this case, we'll pass in the note object. So we have an empty array, and we add our one item, as shown in the following code; next, we push it in, which means that we have an array with one item:
var addNote = (title, body) => {
var notes = [];
var note = {
title,
body
};
notes.push(note);
};
The next step in the process will be to update the file. Now, we don't have a file in place, but we can load an fs function and start creating the file.
Up above the addNote function, let's load in the fs module. I'll create a const variable called fs and set it equal to the return result from require, and we'll require the fs module, which is a core node module, so there's no need to install it using NPM:
const fs = require('fs');
With this in place, we can take advantage of fs inside the addNote function.
Right after we push our item on to the notes array, we'll call fs.writeFileSync, which we've used before. We know we need to pass in two things: the file name and the content we want to save. For the file, I'll call, notes-data.JSON, and then we'll pass in the content to save, which in this case will be the stringify notes array, which means we can call JSON.stringify passing in notes:
notes.push(note);
fs.writeFileSync('notes-data.json', JSON.stringify(notes));
At this point, when we add a new note, it will update the notes-data.JSON file, which will be created on the machine since it does not exist, and the note will sit inside it. Now, it's important to note that currently every time you add a new note, it will wipe all existing ones because we never load in the existing ones, but we can get started testing that this note works as expected.
I'll save the file, and over inside of Terminal, we can run this file using node app.js. Since we want to add a note, we will be using that add command which we set up, then we'll specify our title and our body. The title flag can get set equal to secret, and for the body flag, I'll set it equal to the Some body here string, as shown here:
node app.js add --title=secret --body="Some body here"
Now, when we run this command from Terminal, we'll see what we'd expect:
As shown in the preceding screenshot, we see a couple of the file commands we added: we see that the add command was executed, and we have our Yargs arguments. The title and body arguments also show up. Inside Atom, we also see that we have a new notes-data.json file, and in the following screenshot, we have our note, with the secret title and the Some body here body:
This is the first step in wiring up that addNote function. We have an existing notes file and we do want to take advantage of these notes. If notes already exist, we don't want to simply wipe them every time someone adds a new note. This means that in notes.js, earlier at the beginning of the addNote function, we'll fetch those notes.
I'll add code for fetching new notes where I define the notes and note variables. As shown in the following code, we'll use fs.readFileSync, which we've already explored. This will take the filename, in our case, notes-data.JSON. Now, we will want to store the return value from readFileSync on a variable; I'll call that variable, notesString:
var notesString = fs.readFileSync('notes-data.json');
Since this is the string version, we haven't passed it through the JSON.parse method. So, I can set notes (the variable we defined earlier in addNote function) equal to the return value from the JSON.parse method. Then JSON.parse will take the string from the file we read and it will parse it into an array; we could pass in notesString just like this:
notes = JSON.parse(notesString);
With this in place, adding a new note is no longer going to remove all of the notes that were already there.
Over in Terminal, I'll use the up arrow key to load in the last command, and I'll navigate over to the title flag and change it to secret2 and rerun the command:
node app.js add --title=secret2 --body="Some body here"
In Atom, this time you can see we now have two notes inside of our file:
We have an array with two objects; the first one has the title of secret and the second one has the title of secret2, which is brilliant!
Now, if the notes-data.json file does not exist, which it won't when the user first runs the command, the program will crash, as shown in the following code output. We can prove this by simply rerunning the last command after deleting the note-data.JSON file:
Right here, you can see we're actually getting a JavaScript error, no such file or directory; it's trying to open up the notes-data.JSON file, but without much success. To fix this, we'll use a try-catch statement from JavaScript, which hopefully you've seen in the past. To brush up this, let's go over it really quick.
To create a try-catch statement, all you do is you type try, which is a reserved keyword, and then you open and close a set of curly braces. Inside the curly braces is the code that will run. This is the code that may or may not throw an error. Next, you'll specify the catch block. Now, the catch block will take an argument, an error argument, and it also has a code block that runs:
try{
} catch (e) {
}
This code will run if and only if one of your errors in try actually occurs. So, if we load the file using readFileSync and the file exists, that's fine, catch block will never run. If it fails, catch block will run and we can do something to recover from that error. With this in place, all we'll do is move the noteString variable and the JSON.parse statements into try, as shown here:
try{
var notesString = fs.readFileSync('notes-data.json');
notes = JSON.parse(notesString);
} catch (e) {
}
That's it; nothing else needs to happen. We don't need to put any code in catch, although you do need to define the catch block. Now, let's take a look at what happens when we run the whole code.
The first thing that happens is that we create our static variables—nothing special there—then we try to load in the file. If the notesString function fails, that is fine because we already defined notes to be an empty array. If the file doesn't exist and it fails, then we probably want an empty array for notes anyways, because clearly there are no notes, and there's no file.
Next up, we'll parse that data into notes. There is a chance that this will fail if there's invalid data in the notes-data.JSON file, so the two lines can have problems. By putting them in try-catch, we're basically guaranteeing that the program isn't going to work unexpectedly, whether the file does or doesn't exist, but it contains corrupted data.
With this in place, we can now save notes and rerun that previous command. Note that I do not have the notes-data file in place. When I run the command, we don't see any errors, everything seems to run as expected:
When you now visit Atom, you can see that the notes-data file does indeed exist, and the data inside it looks great:
This is all we need to do to fetch the notes, update the notes with the new note, and finally save the notes to the screen.
Now, there is still a slight problem with addNote. Currently, addNote allows for duplicate titles; I could already have a note in the JSON file with the title of secret. I can come along and try to add a new note with the title of secret and it will not throw an error. What I'd like to do is to make the title unique, so that if there's already a note with that title, it will throw an error, letting you know that you need to create a note with a different title.
The first step to make the title unique will be to loop through all of the notes after we load them in and check whether there are any duplicates. If there are duplicates, we'll not call the following two lines:
notes.push(note);
fs.writeFileSync('notes-data.json', JSON.stringify(notes));
If there are no duplicates then it's fine, we will call both of the lines shown in the preceding code block, updating the notes-data file.
Now, we'll be refactoring this function down the line. Things are getting a little wonky and a little out of control, but for the moment, we can add this functionality right into the function. Let's go ahead and make a variable called duplicateNotes.
The duplicateNotes variable will eventually store an array with all of the notes that already exist inside the notes array that have the title of the note you're trying to create. Now, this means that if the duplicateNotes array has any items, that's bad. This means that the note already exists and we should not add the note. The duplicateNotes variable will get set equal to a call to notes, which is our array of notes.filter:
var duplicateNotes = notes.filter();
The filter method is an array method that takes a callback. We'll use an arrow function, and that callback will get called with the argument. In this case, it will be the singular version; if I have an array of notes, it will be called with an individual note:
var duplicateNotes = notes.filter((note) => {
});
This function gets called once for every item in the array, and you have the opportunity to return either true or false. If you return true, it will keep that item in the array, which will eventually get saved into duplicateNotes. If you return false, the new array it generates will not have that item inside duplicateNotes variable. All we want to do is to return true if the titles match, which means that we can return note.title === title, as shown here:
var duplicateNotes = notes.filter((note) => {
return note.title === title;
});
If the titles are equal, then the preceding return statement will result as true and the item will be kept in the array, which means that there are duplicate notes. If the titles are not equal, which is most likely the case, the statement will result as false, which means that there are no duplicate notes. Now, we can simplify this a little more using arrow functions.
I'll use the arrow function, as shown here:
var duplicateNotes = notes.filter((note) => note.title === title);
Here, I have deleted everything except note.title === title and added this in front of the arrow function syntax.
This is perfectly valid using ES6 arrow functions. You have your arguments on the left, the arrow, and on the right, you have one expression. The expression doesn't take a semicolon and it's automatically returned as the function result. This means that the code we have here is identical to the code we had earlier, only it's much simpler and it only takes up one line.
Now that we have this in place, we can go ahead and check the length of the duplicateNotes variable. If the length of duplicateNotes is greater than 0, this means that we don't want to save the note because a note already exists with that title. If it is 0, we'll save the note.
if(duplicateNotes.length === 0) {
}
Here, inside the if condition, we're comparing the notes length with the number zero. If they are equal, then we do want to push the note onto the notes array and save the file. I'll cut the following two lines:
notes.push(note);
fs.writeFileSync('notes-data.json', JSON.stringify(notes));
Let's paste them right inside of the if statement, as shown here:
if(duplicateNotes.length === 0) {
notes.push(note);
fs.writeFileSync('notes-data.json', JSON.stringify(notes));
}
If they're not equal, that's okay too; in that case we'll do nothing.
With this in place, we can now save our file and test this functionality out. We have our notes-data.json file, and this file already has a note with a title of secret2. Let's rerun the previous command to try to add a new note with that same title:
node app.js add --title=secret2 --body="Some body here"
You're in Terminal, so we'll head back into our JSON file. You can see right here that we still just have one note:
Now all the titles inside of our application will be unique, so we can use these titles to fetch and delete notes.
Let's go ahead and test that other notes can still be added. I'll change the title flag from secret2 to secret, and run that command:
node app.js add --title=secret --body="Some body here"
Inside our notes-data file, you can see both notes show up:
As I mentioned earlier, next we will be doing some refactoring, since the code that loads the file, and the code that saves the file, will both be used in most of the functions we have defined and/or will define (that is, the getAll, getNote and removeNote functions).
In the previous section, you created the addNote function, which works well. It starts by creating some static variables, then we fetch any existing notes, we check for duplicates, and if there are none, we push it onto the list, and then we save the data back into the filesystem.
The only problem is that we'll be doing a lot of these steps over and over again for every method. For example, with getAll, the idea is to fetch all of the notes, and send them back to app.js so it can print them to the screen for the user. The first thing we'll to do inside of the getAll statement is have the same code; we'll have our try-catch block to fetch the existing notes.
Now, this is a problem because we'll be repeating code throughout the application. It will be best to break out the fetching of notes and the saving of notes into separate functions that we can call in multiple locations.
To resolve the problem, I'd like to get started by creating two new functions:
The first function, fetchNotes, will be an arrow function, and it will not to take any arguments since it will be fetching notes from the filesystem, as shown here:
var fetchNotes = () => {
};
The second function, saveNotes, will need to take an argument. It will need to take the notes array you want to save to the filesystem. We'll set it equal to an arrow function, and then we'll provide our argument, which I will name notes, as shown here:
var saveNotes = (notes) => {
};
Now that we have these two functions, we can go ahead and start moving some of the functionality from addNote up into the individual functions.
First up, let's do fetchNotes, which will need the following try-catch block.
I'll actually cut it out of addNote and paste it in the fetchNotes function, as shown here:
var fetchNotes = () => {
try{
var notesString = fs.readFileSync('notes-data.json');
notes = JSON.parse(notesString);
} catch (e) {
}
};
This alone is not enough, because currently we don't return anything from the function. What we want to do is to return the notes. This means that instead of saving the result from JSON.parse onto the notes variable, which we haven't defined, we'll simply return it to the calling function, as shown here:
var fetchNotes = () => {
try{
var notesString = fs.readFileSync('notes-data.json');
return JSON.parse(notesString);
} catch (e) {
}
};
So, if I call fetchNotes in the addNote function, shown as follows, I will get the notes array because of the return statement in the preceding code.
Now, if there are no notes, maybe there's no file at all; or there is a file, but the data isn't JSON, we can return an empty array. We'll add a return statement inside of catch, as shown in the following code block, because remember, catch runs if anything inside try fails:
var fetchNotes = () => {
try{
var notesString = fs.readFileSync('notes-data.json');
return JSON.parse(notesString);
} catch (e) {
return [];
}
};
Now, this lets us simplify addNote even further. We can remove the empty space and we can take the array that we set on the notes variable and remove it and instead call fetchNotes, as shown here:
var addNote = (title, body) => {
var notes = fetchNotes();
var note = {
title,
body
};
With this in place, we now have the exact same functionality we had before, but we have a reusable function, fetchNotes, which we can use in the addNote function to handle the other commands that our app will support.
Instead of copying code and having it in multiple places in your file, we've broken it into one place. If we ever want to change how this functionality works, whether we want to change the filename or some of the logic such as the try-catch block, we can change it once instead of having to change it in every function we have.
Now, the same thing will go for saveNotes just as in the case of the fetchNotes function. The saveNotes function will take the notes variable and it will say this using fs.writeFileSync. I will cut out the line in addNote that does this (that is, fs.writeFileSync('notes-data.json', JSON.stringfy(notes));) and paste it in the saveNotes function, as shown here:
var saveNotes = (notes) => {
fs.writeFileSync('notes-data.json', JSON.stringify(notes));
};
Now, saveNotes doesn't need to return anything. In this case, we'll copy the line in saveNotes and then call saveNotes in the if statement of the addNote function, as shown in the following code:
if (duplicateNotes.length === 0) {
notes.push(note);
saveNotes();
}
This might seem like overkill, we've essentially taken one line and replaced it with a different line, but it is a good idea to start getting in the habit of creating reusable functions.
Now, calling saveNotes with no data is not going to work, we want to pass in the notes variable, which is our notes array defined earlier in the saveNotes function:
if (duplicateNotes.length === 0) {
notes.push(note);
saveNotes(notes);
}
With this in place, the addNote function should now work as it did before we did any of our refactoring.
The next step in the process will be to test this out by creating a new note. We already have two notes, with a title of secret and a title of secret2 in notes-data.json, let's make a third one using the node app.js command in Terminal. We'll use the add command and pass in a title of to buy and a body of food, as shown here:
node app.js add --title="to buy" --body="food"
This should create a new note, and if I run the command, you can see we don't have any obvious errors:
Inside of our notes-data.json file, if I scroll to the right, we have our brand new note as a title of to buy and a body of food:
So, everything is working as expected even though we've refactored the code. Now, the next thing I want to do inside addNote is take a moment to return the note that's being added, and that will happen right after saveNotes comes back. So we'll return note:
if (duplicateNotes.length === 0) {
notes.push(note);
saveNotes(notes);
return note;
}
This note object will get returned to whoever called the function, and in this case, it will get returned to app.js, where we called it in the if else block of the add command in the app.js file. We can make a variable to store this result and we can call it note:
if (command === 'add')
var note = notes.addNote(argv.title, argv.body);
If note exists, then we know that the note was created. This means that we can go ahead and print a message, like Note created, and we can print the note title and the note body. Now, if note does not exist, if it's undefined, this means that there was a duplicate and that title already exists. If that's the case, I want you to print an error message such as Note title already in use.
Now, inside addNote, if the duplicateNotes if statement never runs, we don't have an explicit call to return. But as you know, in JavaScript, if you don't call return, then undefined automatically is returned. This means that if duplicateNotes.length is not equal to zero, undefined will be returned and we can use that as the condition for our statement.
The first thing I'll do here is to create an if statement, right next to the note variable we defined in app.js:
if (command === 'add') {
var note = notes.addNote(argv.title, argv.body);
if (note) {
}
This will be an object if things went well, and it will be undefined if things went poorly. This code in here is only ever going to run if it's an object. The Undefined result will fail the condition inside of JavaScript.
Now, if the note was created successfully, what we'll do is to print a little message to the screen, using the following console.log statement:
if (note) {
console.log('Note created');
}
If things went poorly, inside the else clause, we can call console.log, and we can print something like Note title taken, as shown here:
if (note) {
console.log('Note created');
} else {
console.log('Note title taken');
}
Now, the other thing that we want to do if things went well is print the notes content. I'll do this by first using console.log to print a couple of hyphens. This will create a little space above my note. Then I can use console.log twice: the first time we'll print the title, I'll add Title: as a string to show you what exactly you're seeing, then I can concatenate the title, which we have access to in note.title, as shown in this code:
if (note) {
console.log('Note created');
console.log('--');
console.log('Title: ' + note.title);
Now, the preceding syntax uses an ES5 syntax; we can swap this out with an ES6 syntax using what we've already talked about: template strings. We'll add Title, a colon, and then we can use our dollar sign with our curly braces to inject the note.title variable, as shown here:
console.log(`Title: ${note.title}`);
Similarly, I'll add note.body after this to print out the body of the note. With this in place, the code should look like:
if (command === 'add') {
var note = note.addNote(argv.title, argv.body);
if (note) {
console.log('Note created');
console.log('--');
console.log(`Title: ${note.title}`);
console.log(`Body: ${note.body}`);
} else {
console.log('Note title taken');
}
Now, we should be able to run our app and see both of the title and body notes printed. In Terminal, I'll rerun the previous command. This will try to create a note with to buy, which already exists, so we should get an error message, and right here you can see Note title taken:
Now, we can rerun the command, changing the title to something else, such as to buy from store. This is a unique note title so the note should get created without any problems:
node app.js add --title="to buy from store" --body="food"
As shown in the preceding output, you can see that we get just that: we have our Note created message, our little spacer, and our title along with the body.
The addNote command is now complete. We have an output when the command actually finishes, and we have all the code that runs behind the scenes to add the note to the data that gets stored in our file.
In this chapter, you learned that parsing in process.argv can be a real pain. We would have to write a lot of manual code to parse out those hyphens, the equal signs, and the optional quotes. However, yargs can do all of that for us and it puts it on a really simple object we can access. You also learned how to work with JSON inside Node.js.
Next, we filled out the addNote function. We're able to add notes using the command line, and we're able to save those notes into a JSON file. Finally, we pulled out a lot of the code from addNote into separate functions, fetchNotes and saveNotes, which are now separate, and they're able to be reused throughout the code. When we start filling out the other methods, we can simply call fetchNotes and saveNotes instead of having to copy the contents over and over again to every new method.
In the next chapter, we'll continue our journey on node fundamentals. We'll explore some more concepts related to node, such as debugging; we'll work on the read and remove notes commands. Apart from this, we'll also learn about the advanced features of yargs and the arrow function.
We start adding support for all the other commands inside of the notes application. We'll take a look at how we can create our read command. The read command will be responsible for fetching the body of an individual note. It will fetch all the notes and print them to the screen. Now, aside from all of that, we'll be looking at debugging broken apps, and we'll look at some new ES6 features. You'll learn how to use the built-in Node debugger.
Then, you will learn a little bit more about how we can configure yargs for the command-line interface applications. We'll learn how to set up the commands, their descriptions, and the arguments. We'll be able to set various properties on the arguments, for example, whether or not they're required, and others.
In this section, you will write the code for removing a note when someone uses that remove command, and they pass in the title of the note they want to remove. In the previous chapter, we already created some utility functions that help us with fetching and saving notes, so the code should actually be pretty simple.
The first step in the process is to fill out the removeNote function, which we defined in the previous chapters, and this will be your challenge. Let's remove console.log from the removeNote function in the notes.js file. You only need to write three lines of code to get this done.
Now, the first line will fetch the notes, then the job will be to filter out the notes, removing the one with title of argument. That means we want to go through all of the notes in the notes array, and if any of them have a title that matches the title we want to remove, we want to get rid of them. And this can be done using the notes.filter function we used earlier. All we have to do is switch the equality statement in the duplicateNotes function from equals to not equals, and this code will do just that.
It will go through the notes array. Every time it finds a note that doesn't match the title it will keep it, which is what we want, and if it does find the title it will return false and remove it from the array. And then we will add the third line, which is to save the new notes array:
var removeNote = (title) => {
// fetch notes
// filter notes, removing the one with title of argument
// save new notes array
};
The preceding code lines are the only three lines you need to fill out. Don't worry about returning anything from removeNote or filling out anything inside of app.js.
The first thing we will do for the fetchNotes line is to create a variable called notes, just like we did in addNote in the previous chapter, and we'll set it equal to the return result from fetchNotes:
var removeNote = (title) => {
var notes = fetchNotes();
// filter notes, removing the one with title of argument
// save new notes array
};
At this point our notes variable stores an array of all of the notes. The next thing we need to do is filter our notes.
If there is a note that has this title, we want to remove it. This will be done by creating a new variable, and I'll call this one filteredNotes. Here we'll set filteredNotes equal to the result that will come back from notes.filter, which we already used up previously:
var removeNote = (title) => {
var notes = fetchNotes();
// filter notes, removing the one with title of argument
var filteredNotes = notes.filter();
// save new notes array
};
We know that notes.filter takes a function as its one and only argument, and that function gets called with the individual item in the array. In this case it would be a note. And we can do this all on one line using the ES6 arrow syntax.
That means right here we can return true if note.title does not equal the title that's passed into the function:
var removeNote = (title) => {
var notes = fetchNotes();
var filteredNotes = notes.filter((note) => note.title !== title);
// save new notes array
};
This will populate filteredNotes with all of the notes whose titles do not match the one passed in. If the title does match the title passed in, it will not be added to filteredNotes because of our filter function.
The last thing to do is to call saveNotes. Right here, we'll call saveNotes passing in the new notes array which we have under the filteredNotes variable:
var removeNote = (title) => {
var notes = fetchNotes();
var filteredNotes = notes.filter((note) => note.title !== title);
saveNotes(filteredNotes);
// save new notes array
};
If we were to pass in notes, it wouldn't work as expected; we're filtering the notes out but we're not actually saving those notes, so it will not get removed from the JSON. We need to pass filteredNotes as shown in the preceding code. And we can test these by saving the file and trying to remove one of our notes.
I'll try to remove secret2 from the notes-data.json file. That means all we need to do is run the command, which we called remove, that is specified over in app.js, (refer to the following code image, and then it will call our function).
I'll run Node with app.js, and we'll pass in the remove command. The only argument we need to provide for remove is the title; there's no need to provide the body. I'll set this equal to secret2:
node app.js remove --title=secret2
As shown in the screenshot, if I hit enter you can see we don't get any output. Although we do have the command remove printing, there is no message saying whether or not a note was removed, but we'll add that later in the section.
For now, we can check the data. And right here you can see secret2 is nowhere in sight:
This means our remove method is indeed working as expected. It removed the note whose title matched and it kept all the notes whose title was not equal to secret2, exactly what we wanted.
Now, the next thing we'll do is print a message depending on whether or not a note was actually removed. That means app.js, which calls the removeNote function, will need to know whether or not a note was removed. And how do we figure that out? How can we possibly return that given the information we have in notes.js removeNotes function?
Well, we can, because we have two really important pieces of information. We have the length of the original notes array and we have the length of the new notes array. If they're equal then we can assume that no note was removed. If they are not equal, we'll assume that a note was removed. And that is exactly what we'll do.
If the removeNote function returns true, that means a note was removed; if it returns false, that means a note was not removed. In the removeNotes function we can add return, as shown in the following code. We'll check if notes.length does not equal filteredNotes.length:
var removeNote = (title) => {
var notes = fetchNotes();
var filteredNotes = notes.filter((note) => note.title !== title);
saveNotes(filteredNotes);
return notes.length !== filteredNotes.length;
};
If they're not equal it will return true, which is what we want because a note was removed. If they're equal it will return false, which is great.
Now, inside of app.js we can add a few lines in the removeNote, else if block to make the output for this command a little nicer. The first thing to do is to store that Boolean. I'll make a variable called noteRemoved and we'll set that equal to the return, result as shown in the following code, which will either be true or false:
} else if (command == 'remove') {
var noteRemoved = notes.removeNote(argv.title);
}
On the next line, we can create our message, and I'll do this all on one line using the ternary operator. Now, the ternary operator lets you specify a condition. In our case, we'll use a var message and it will be set equal to the condition noteRemoved, which will be true if a note was removed and false if it wasn't.
After the condition, we'll put a space with a question mark and a space; this is the statement that will run if it's true. If the noteRemoved condition passes, what we want to do is set message equal to Note was removed:
var message = noteRemoved ? 'Note was removed' :
Now, if noteRemoved is false, we can specify that condition right after the colon in the previous statement. Here, if there is no note removed we'll use the text Note not found:
var message = noteRemoved ? 'Note was removed' : 'Note not found';
Now with this in place, we can test out our message. The last thing to do is print the message to the screen using console.log passing in message:
var noteRemoved = notes.removeNote(argv.title);
var message = noteRemoved ? 'Note was removed' : 'Note not found';
console.log(message);
This lets us avoid if statements that make our else-if clause to remove unnecessarily complex.
Back inside of Atom we can rerun the last command, and in this case no note will get removed because we already deleted it. And when I run it, you can see that Note not found prints to the screen:
Now I'll remove a note that does exist; in notes-data.json I have a note with a title of secret as shown here:
Let's rerun the command removing the 2 from the title in Terminal. When I run this command, you can see Note was removed prints to the screen:
That is it for this section; we now have our remove command in place.
In this section, you will be responsible for filling out the rest of the read command. Now, the read command does have an else-if block to find in app.js where we call getNote:
} else if (command === 'read') {
notes.getNote(argv.title);
getNote is defined over inside notes.js, even though currently it just prints out some dummy text:
var getNote = (title) => {
console.log('Getting note', title);
};
What you'll need to do in this section is wire up both of these functions.
First up, you will need to do something with the return value from getNote. Our getNote function will return the note object if it finds it. If it doesn't, it will return undefined just like we do for addNote discussed in the section Adding and saving note, in the previous chapter.
After you store that value, you'll do some printing using console.log, similar to what we have here:
if (command === 'add') {
var note = notes.addNote(argv.title, argv.body);
if (note) {
console.log('Note created');
console.log('--');
console.log(`Title: ${note.title}`);
console.log(`Body: ${note.body}`);
} else {
console.log('Note title taken');
}
Obviously, Note created will be something like Note read and Note title taken will be something like Note not found, but the general flow is going to be exactly the same. Now, once you have that wired up inside of app.js, you can move on to notes.js, filling out the function.
Now, the function inside of notes.js isn't going to be that complex. All you need to do is fetch the notes, like we've done in previous methods, then you're going to use notes.filter, which we explored to only return notes whose title matches the title passed in as the argument. Now, in our case this is either going to be zero notes, which means the note is not found, or it's going to be one note, which means we've found the note that the person wants to return.
Next, we do need to return that note. It's important to remember the return value from notes.filter is always going to be an array, even if that array only has one item. What you're going to need to do is return the first item in the array. If that item doesn't exist that's fine, it'll return undefined, as we want. If it does exist, great, that means we found the note. This method only requires three lines of code, one for fetching, one for filtering, and the return statement. Now, once you have all that done we'll test it out.
Let's work on this method. Now, the first thing I'll do is fill out, inside of app.js, a variable called note which is going to store the return value from getNote:
} else if (command === 'read') {
var note = notes.getNote(argv.title);
Now, this could be an individual note object or it could be undefined. In the next line, I can use an if statement to print the message if it exists, or if it does not exist. I'll use if note, and I am going to attach an else clause:
} else if (command === 'read') {
var note = notes.getNote(argv.title);
if (note) {
} else {
}
This else clause will be responsible for printing an error if the note is not found. Let's get started with that first since it's pretty simple, console.log, Note not found, as shown here:
if (note) {
} else {
console.log('Note not found');
}
Now that we have our else clause filled out we can fill out the if statement. For this, I'll print a little message, console.log ('Note found') will get the job done. Then we can move on to printing the actual note details, and we already have that code in place. We are going to add the hyphenated spacer, then we have our note title and our note body as shown here:
if (note) {
console.log('Note found');
console.log('--');
console.log(`Title: ${note.title}`);
console.log(`Body: ${note.body}`);
} else {
console.log('Note not found');
}
Now that we're done with the inside of app.js, we can move into the notes.js file and fill out the getNote method because currently it doesn't do anything with the title that gets passed in.
Inside notes, what you needed to do was fill out those three lines. The first one is going to be responsible for fetching the notes. We already have did that before with the fetchNotes function in the previous section:
var getNote = (title) => {
var notes = fetchNotes();
};
Now that we have our notes in place we, can call notes.filter, returning all of the notes. I'll make a variable called filteredNotes, setting it equal to notes.filter. Now, we know that the filter method takes a function, I'll define an arrow function (=>) just like this:
var filteredNotes = notes.filter(() => {
});
Inside the arrow function (=>), we'll get the individual note passed in, and we'll return true when the note title, the title of the note we found in our JSON file, equals, using triple equals, title:
var filteredNotes = notes.filter(() => {
return note.title === title;
});
};
This will return true when the note title matches and false if it doesn't. Alternatively, we can use arrow functions, and we only have one line, as shown following, where we return something; we can cut out our condition, remove the curly braces, and simply paste that condition right here:
var filteredNotes = notes.filter((note) => note.title === title);
This has the exact same functionality, only it's a lot shorter and easier to look at.
Now that we have all of the data, all we need to do is return something, and we'll return the first item in the filteredNotes array. Next, we'll grab the first item, which is the index of zero, and then we just need to return it using the return keyword:
var getNote = (title) => {
var notes = fetchNotes();
var filteredNotes = notes.filter((note) => note.title === title);
return filteredNotes[0];
};
Now, there is a chance that filteredNotes, the first item, doesn't exist, and that's fine, it's going to return undefined, in which case our else clause will run, printing Note not found. If there is a note, great, that's the note we want to print, and over in app.js we do just that.
Now that we have this in place we can test out this brand new functionality inside of Terminal by running our app using node app.js. I'll use the read command, and I'll pass in a title equal to some string that I know does not exist inside of a title in the notes-data.json file:
node app.js read --title="something here"
When I run the command, we get Note not found, as shown here, and this is exactly what we want:
Now, if I do try to fetch a note where the title does exist, I would expect that note to come back.
In the data file I have a note with a title of to buy; let's try to fetch that one. I'll use the up arrow key to populate the previous command and replace the title with to space, buy, and hit enter:
As shown in the previous code, you can see Note found prints to the screen, which is fantastic. Following Note found we have our spacers and following that we have the title, which is to buy, and the body, which is food, exactly as it appears inside of the data file. With this in place, we are done with the read command.
Now, there is one more thing I want to tackle before we wrap up this section. Inside app.js we now have the same code in two places. We have the space or title body in the add command as well as in the read command:
if (command === 'add') {
var note = notes.addNote(argv.title, argv.body);
if (note) {
console.log('Note created');
console.log('--');
console.log(`Title: ${note.title}`);
console.log(`Body: ${note.body}`);
} else {
console.log('Note title taken');
}
} else if (command === 'list') {
notes.getAll();
} else if (command === 'read') {
var note = notes.getNote(argv.title);
if (note) {
console.log('Note found');
console.log('--');
console.log(`Title: ${note.title}`);
console.log(`Body: ${note.body}`);
} else {
console.log('Note not found');
}
When you find yourself copying and pasting code, it's probably best to break that out into a function that both locations call. This is the DRY principle, which stands for Don't Repeat Yourself.
In our case, we are repeating ourselves. It would be best to break this out into a function that we can call from both places. In order to do this, all we're going to do is make a function in notes.js called logNote.
Now, in notes.js, down following the removeNote function, we can make that brand new function a variable called logNote. This is going to be a function that takes one argument. This argument will be the note object because we want to print both the title and the body. As shown here, we'll expect the note to get passed in:
var logNote = (note) => {
};
Now, filling out the logNote function is going to be really simple, especially when you're solving a DRY issue, because you can simply take the code that's repeated, cut it out, and paste it right inside the logNote function. In this case the variable names line up already, so there is no need to change anything:
var logNote = (note) => {
console.log('--');
console.log(`Title: ${note.title}`);
console.log(`Body: ${note.body}`);
};
Now that we have the logNote function in place, we can change things over in app.js. In app.js, where we have removed the console.log statements we can call notes.logNote, passing in the note object just like this:
else if (command === 'read') {
var note = notes.getNote(argv.title);
if (note) {
console.log('Note found');
notes.logNote(note);
} else {
console.log('Note not found');
}
And we can do the same thing in case of the add command if block. I can remove these three console.log statements and call notes.logNote, passing in note:
if (command === 'add') {
var note = notes.addNote(argv.title, argv.body);
if (note) {
console.log('Note created');
notes.logNote(note);
} else {
console.log('Note title taken');
}
And now that we have this in place, we can rerun our program and hopefully what we see is the exact same functionality.
The last thing to do before we rerun the program is export the logNote function in exports module in notes.js file. LogNote is going to get exported and we're using the ES6 syntax to do that:
module.exports = {
addNote,
getAll,
getNote,
removeNote,
logNote
};
With this in place, I can now rerun the previous command from Terminal using up and hit enter:
node app.js read --title="to buy"
As shown, we get Note found printing to the screen, with the title and the body just like we had before. I'm also going to test out the add command to make sure that one's working, node app.js add; we will use a title of things to do and a body of go to post office:
node app.js add --title="things to do" --body="go to post office"
Now, when I hit enter, we would expect the same log to print as it did before for the add command, and that's exactly what we get:
Note created prints, we get our spacer, and then we get our title and our body.
In the next section, we're going to cover one of the most important topics in the book; which is debugging. Knowing how to properly debug programs is going to save you literally hundreds of hours over your Node.js career. Debugging can be really painful if you don't have the right tools, but once you know how it's done, it really isn't that bad and it can save you a ton of time.
In this section, we're going to use the built-in debugger, which can look a little complex because it's run inside of the command line. That means that you have to use the command-line interface, which is not always the most pleasant thing to look at. In the next section, though, we are going to be installing a third-party tool that uses Chrome DevTools in order to debug your Node app. That one looks great because the Chrome DevTools are fantastic.
Before going ahead, we will learn that we do need to create a place to play around with debugging and that's going to happen in a playground file, since the code we're going to write is not going to be important to the notes app itself. Inside the notes app I'll make a new file called debugging.js:
In debugging.js we're going to start off with a basic example. We're going to make an object called person, and on that object for the moment, we're going to set one property name. Set it equal to your name, I'll set mine equal to the string Andrew as shown:
var person = {
name: 'Andrew'
};
Next up we're going to set another property, but in the next line, person.age. I'll set mine equal to my age, 25:
var person = {
name: 'Andrew'
};
person.age = 25;
Then we're going to add another statement that changes the name, person.name equals something like Mike:
var person = {
name: 'Andrew'
};
person.age = 25;
person.name = 'Mike';
Finally, we're going to console.log the person object, the code is going to look like this:
var person = {
name: 'Andrew'
};
person.age = 25;
person.name = 'Mike';
console.log(person);
Now, we actually already have a form of debugging in this example, we have a console.log statement.
As you're going through the Node application development process, you may or may not have used console.log to debug your app. Maybe something's not working as expected and you want to figure out exactly what that variable has stored inside of it. For example, if you have a function that solves a math problem, maybe at one part in the function the equation is wrong and you're getting a different result.
Using console.log can be a pretty great way to do that, but it's super limited. We can view that by running it from Terminal, I'll run the following command for this:
node playground/debugging.js
When I run the file, I do get my object printed out to the screen, which is great, but, as you know, if you want to debug something besides the person object you have to add another console.log statement in order to do that.
Imagine you have something like our app.js file, you want to see what command equals, then you want to see what argv equals, it could take a lot of time to add and remove those console.log statements. There is a better way to debug. This is using the Node debugger. Now, before we make any changes to the project, we'll take a look at how the debugger works inside of Terminal, and as I warned you in the beginning of the section, the built-in Node debugger, while it is effective, is a little ugly and hard to use.
For now, though, we are going to run the app much the same way, only this time we're going to type node inspect. Node debug is going to run our app completely differently from the regular Node command. We're running the same file in the playground folder, it's called debugging.js:
node inspect playground/debugging.js
When you hit enter, you should see something like this:
In the output, we can ignore the first two lines. This essentially means that the debugger was set up correctly and it's able to listen to the app running in the background.
Next, we have our very first line break in playground debugging on line one, and right following to it you can see line one with a little caret (>) next to it. When you first run your app in debug mode, it pauses before it executes the first statement. When we're paused on a line like line one, that means the line has not executed, so at this point in time we don't even have the person variable in place.
Now, as you can see in the preceding code, we haven't returned to the command line, Node is still waiting for input, and there are a few different commands we can run. For example, we can run n, which is short for next. You can type n, hit enter, and this moves on to the next statement.
The next statement we have, the statement on line one, was executed, so the person variable does exist. Then I can use n again to go to the next statement where we declare the person.name property, updating it from Andrew to Mike:
Notice, at this point, age does exist because that line has already been executed.
Now, the n command goes statement by statement through your entire program. If you realize that you don't want to do that through the whole program, which could take a lot of time, you can use c. The c command is short for Continue, and that continues to the very end of the program. In the following code, you can see our console.log statement runs the name Mike and the age 25:
This is that's a quick example of how to use the debug keyword.
Now, we actually didn't do any debugging, we just ran through the program since it is a little foreign in terms of writing these commands, such as next and continue, I decided to do a dry run once with no debugging. You can use control + C to quit the debugger and get returned back to Terminal.
I'll use clear to clear all the output. Now that we have a basic idea about how we can execute the program in debug mode, let's take a look at how we can actually do some debugging.
I'll rerun the program using the up arrow key twice to return to the Node debug command. Then, I'll run the program, and I'll hit next twice, n and n:
At this point in time, we are on line seven, that is where the line break currently is. From here we can do some debugging using a command called repl, which stands for Read Evaluate Print Loop. The repl command, in our case, brings you to an entirely separate area of the debugger. When you hit it you're essentially in a Node console:
You can run any Node commands, for example, I can use console.log to print something like test, and test prints up right there.
I can make a variable a that is equal to 1 plus 3, then I can reference a and I can see it's equal to 4 as shown:
More importantly, we have access to the current program as it sits, meaning as it was before line seven was executed. We can use this to print out person, and as shown in the following code, you can see the person's name is Andrew because line seven hasn't executed and the age is 25, exactly as it appears in the program:
This is where debugging gets really useful. Being able to look at the program paused at a certain point in time is going to make it really easy to spot errors. I could do anything I want, I could print out the person name property, and that prints Andrew to the screen, as shown here:
Now, once again, we still have this problem. I have to hit next through the program. When you have a really long program, there could literally be hundreds or thousands of statements that need to run before you get to the point you care about. Obviously that is not ideal, so we're going to look at a better way.
Let's quit repl using control + C; now we're back at the debugger.
From here we are going to make a quick change to our application in debugging.js.
Let's say we want to pause line seven between the person age property update and the person name property update. In order to pause, what we're going to do is run the statement debugger:
var person = {
name: 'Andrew'
};
person.age = 25;
debugger;
person.name = 'Mike';
console.log(person);
When you have a debugger statement exactly like previous, it tells the Node debugger to stop here, which means instead of using n (next) to go statement by statement, you can use c (continue), which is going to continue until either the program exits or it sees one of the debugger keywords.
Now, over in Terminal, we're going to rerun the program exactly like we did before. This time around, instead of hitting n twice, we're going to use c to continue:
Now, when we first used c, it went to the end of the program, printing out our object. This time around it's going to continue until it finds that debugger keyword.
Now, we can use repl, access anything we like, for example, person.age, shown in this code:
Once we're done debugging, we can quit and continue through the program. Again, we can use control + C to quit repl and the debugger.
All real debugging pretty much happens with the debugger keyword. You put it wherever you want on your program, you run the program in debug mode, eventually it gets to the debugger keyword and you do something. For example you explore some variable values, you run some functions, or you play around with a code to find the error. No one really uses n to print through the program, finding the line that causes the problem. That takes way too much time and it's just not realistic.
Now that you know a little bit about the debugger, I want you to use it inside our notes application. What we will do inside notes.js is add the debugger statement in logNote function as the first line of the function. Then I will run the program in debug mode, passing in some arguments that will cause logNote to run; for example, reading a note, after the note gets fetched, it's going to call logNote.
Now, once we have the debugger keyword in the logNote function and run it in debug mode with those arguments, the program should stop at this point. Once the program starts in debug mode, we'll use c to continue, and it'll pause. Next, we'll print out the note object and make sure it looks okay. Then, we can quit repl and quit the debugger.
Now, first we are adding the debugger statement right here:
var logNote = (note) => {
debugger;
console.log('--');
console.log(`Title: ${note.title}`);
console.log(`Body: ${note.body}`);
};
We can save the file, and now we can move into Terminal; there's no need to do anything else inside our app.
Inside Terminal we're going to run our app.js file, node debug app.js, because we want to run the program in debug mode. Then we can pass in our arguments, let's say the read command, and I'll pass in a title, "to buy" as shown here:
node debug app.js read --title="to buy"
In this case I have a note with the title "to buy", as shown here:
Now, when I run the preceding command, it's going to pause before that first statement runs, this is expected:
I can now use c to continue through the program. It's going to run as many statements as it takes for either the program to end or for the debugger keyword to be found, and as shown in the following code, you can see the debugger was found and our program has stopped on line 49 of notes.js:
This is exactly what we wanted to do. Now, from here, I'll go into repl and print out note argument, and as shown in the following code, you can see we have the note with the title of to buy and the body food:
Now, if there was an error in this statement, maybe the wrong thing was printing to the screen, this would give us a pretty good idea as to why. Whatever gets passed into the note is clearly being used inside of the console.log statements, so if there was an issue with what's printing, it's most likely an issue with what gets passed into the logNote function.
Now that we've printed the note variable, we can shut down repl, and we can use control + C or quit to quit the debugger.
Now we're back at the regular Terminal and we have successfully completed the debugging inside the Node application. In the next section, we're going to look at a different way to do the same thing, a way with a much nicer graphic user interface that I find a lot easier to navigate and use.
Now that we've made some awesome progress on debugging, let's go back to the commands for our app, because there is only one more to fill out (we have covered the add, read, and remove commands in the Chapter 3, Node Fundamentals - Part 2, and this chapter, respectively). It's the list command, and it's going to be really easy, there is nothing complex going on in the case of the list command.
In order to get started, all we need to do is fill out the list notes function, which in this case we called getAll. The getAll function is responsible for returning every single note. That means it's going to return an array of objects, an array of all of our notes.
All we have to do that is to return fetchNotes, as shown here:
var getAll = () => {
return fetchNotes();
}
There's no need to filter, there's no need to manipulate the data, we just need to pass the data from fetchNotes back through getAll. Now that we have this in place, we can fill out the functionality over inside of app.js.
We have to create a variable where we can store the notes, I was going to call it notes, but I probably shouldn't because we already have a notes variable declared. I'll create another variable, called allNotes, setting it equal to the return value from getAll, which we know because we just filled out returns all the notes:
else if (command === 'list') {
var allNotes = notes.getAll();
}
Now I can use console.log to print a little message and I'll use template strings so I can inject the actual number of notes that are going to be printed.
Inside the template strings, I'll add Printing, then the number of notes using the $ (dollar) sign and the curly braces, allNotes.length: that's the length of the array followed by notes with the s in parenthesis to handle both singular and plural cases, as shown in the following code block:
else if (command === 'list') {
var allNotes = notes.getAll();
console.log(`Printing ${allNotes.length} note(s).`);
}
So, if there were six notes, it would say printing six notes.
Now that we have this in place, we have to go about the process of actually printing each note, which means we need to call logNote once for every item in the allNotes array. To do, this we'll use forEach, which is an array method similar to filter.
Filter lets you manipulate the array by returning true or false to keep items or remove items; forEach simply calls a callback function once for each item in the array. In this case we can use it using allNotes.forEach, passing in a callback function. Now, that callback function will be an arrow function (=>) in our case, and it will get called with the note variable just like filter would have. And all we'll call is notes.logNote, passing in the note argument, which is right here:
else if (command === 'list') {
var allNotes = notes.getAll();
console.log(`Printing ${allNotes.length} note(s).`);
allNotes.forEach((note) => {
notes.logNote(note);
});
}
And now that we have this in place, we can actually simplify it by adding the logNote call, as shown in here:
else if (command === 'list') {
var allNotes = notes.getAll();
console.log(`Printing ${allNotes.length} note(s).`);
allNotes.forEach((note) => notes.logNote(note));
}
This is the exact same functionality, only using the expression syntax. Now that we have our arrow function (=>) in place, we are calling notes.logNote once for each item in the all notes array. Let's save the app.js file and test this out over in Terminal.
In order to test out the list command, all I'll use is node app.js with the command list. There is no need to pass in any arguments:
node app.js list
When I run this, I do get Printing 3 note(s) and then I get my 3 notes to buy, to buy from store, and things to do, as shown in the following code output, which is fantastic:
With this in place, all of our commands are now working. We can add notes, remove notes, read an individual note, and list all of the notes stored in our JSON file.
Moving on to the next section, I want to clean up some of the commands. Inside app.js and notes.js, we have some console.log statements that are printing out a few things we no longer need.
At the very top of app.js, I am going to remove the console.log('Starting app.js') statement, making the constant fs the first line.
I'll also remove the two statements: console.log('Command: ', command) and console.log('Yargs', argv) that print the command and the yargs variable value.
Inside notes.js, I will also remove the console.log('Stating notes.js') statement at the very top of that file, since it is no longer necessary, putting constant fs at the top.
It was definitely useful when we first started exploring different files, but now we have everything in place, there's no need. If I rerun the list command, this time you can see it looks a lot cleaner:
Printing three notes is the very first line showing up. With this in place, we have done our commands.
In the next section, we're going to take a slightly more in-depth look at how we can configure yargs. This is going to let us require certain arguments for our commands. So if someone tries to add a note without a title, we can warn the user and prevent the program from executing.
Before we get into the advanced discussion of yargs, first, I want to pull up the yargs docs so that you at least know where the information about yargs is coming from. You can get it by Googling npm yargs. We're going to go to the yargs package page on npm. This has the documentation for yargs, as shown here:
Now there is no table of contents for the yargs docs, which makes it kind of difficult to navigate. It starts off with some examples that don't go in any particular order, and then eventually it gets into a list of all the methods you have available, and that's what we're looking for.
So I'll use command + F (Ctrl + F) to search the page for methods, and as shown in the following screenshot, we get the methods header, which is the one we're looking for:
If you scroll down on the page, we start to see an alphabetical list of all the methods you have access to inside of yargs. We're specifically looking for .command; this is the method we can use to configure all four of our commands: the add, read, remove and list notes:
We're going to specify which options they require, if any, and we can also set up things like descriptions and help functionality.
Now in order to get started, we need to make some changes inside of app.js. We're going to start with the add command (for more information, please refer to the Adding and saving notes section in the previous chapter).
We want to add a few helpful pieces of information in argv function inside app.js, that will:
Now we are going to be chaining property calls, which means right before I access .argv I want to call .command, and then I'll call .argv on the return value from command as shown here:
const argv = yargs
.command()
.argv;
Now this chaining syntax probably looks familiar if you've used jQuery, a lot of different libraries are supported. Once we call .command on yargs, we're going to pass in three arguments.
The first one is the command name, exactly how the user is going to type it in Terminal, in our case it's going to be add:
const argv = yargs
.command('add')
.argv;
Then we're going to pass another string in, and this is going to be a description of what the command does. It is going to be some sort of English readable description that a user can read to figure out weather that's the command that they want to run:
const argv = yargs
.command('add', 'Add a new note')
.argv;
The next one is going to be an object. This is going to be the options object that lets us specify what arguments this command requires.
Now before we get into the options object, let's add one more call right after command. We're going to call .help, which is a method, so we're going to call it as a function, and we don't need to pass in any arguments:
const argv = yargs
.command('add', 'Add a new note', {
})
.help()
.argv;
When we add on this help call, it sets up yargs to return some really useful information when someone runs the program. For example, I can run the node app.js command with the help flag. The help flag is added because we called that help method, and when I run the program, you can see all of the options we have available:
node app.js --help
As shown in the preceding output, we have one command, add Add a new note, and a help option for the current command, help. And the same thing holds true if we run the node app.js add command with help as shown here:
node app.js add --help
In this output, we can view all of the options and arguments for add command, which in this case happens to be none because we haven't set those up:
Let's add options and arguments back inside Atom. In order to add properties, we're going to update the options object, where the key is the property name, whether it's title or body, and the value is another object that lets us specify how that property should work, as shown here:
const argv = yargs
.command('add', 'Add a new note', {
title: {
}
})
.help()
.argv;
In the case of title, we would add the title on the left-hand side, and we would put our options object on the right-hand side. Inside the title, we're going to configure three properties describe, demand, and alias:
The describe property will be set equal to a string, and this is going to describe what is supposed to be passed in for the title. In this case, we can just use Title of note:
const argv = yargs
.command('add', 'Add a new note', {
title: {
describe: 'Title of note'
}
})
.help()
.argv;
Next we configure demand. It is going to tell yarg whether or not this argument is required. demand is false by default, we'll set it to true:
const argv = yargs
.command('add', 'Add a new note', {
title: {
describe: 'Title of note',
demand: true
}
})
.help()
.argv;
Along with describe and demand we are going to provide a third option, this is called alias. The alias lets you provide a shortcut so you don't have to type --title; you can set the alias equal to a single character like t:
const argv = yargs
.command('add', 'Add a new note', {
title: {
describe: 'Title of note',
demand: true,
alias: 't'
}
})
.help()
.argv;
When you have done that, you can now run the command in Terminal using the new syntax.
Let's run our add command, node app.js add, instead of --title. We're going to use -t, which is the flag version, and we can set that equal to whatever we like, for example, flag title will be the title, and --body will get set equal to body , as shown in the following code. Note that we haven't set up the body argument yet so there is no alias:
node app.js add -t="flag title" --body="body"
If I run this command, everything works as expected. The flag title shows up right where it should, even though we used the alias version which is the letter t, as shown here:
Now that we have our title configured, we can do the exact same thing for the body. We'll specify our options object and provide those three arguments: describe, demand, and alias for body:
const argv = yargs
.command('add', 'Add a new note', {
title: {
describe: 'Title of note',
demand: true,
alias: 't'
},
body: {
}
})
.help()
.argv;
The first one is describe and that one's pretty easy. describe is going to get set equal to a string, and in this case Body of note will get the job done:
const argv = yargs
.command('add', 'Add a new note', {
title: {
describe: 'Title of note',
demand: true,
alias: 't'
},
body: {
describe: 'Body of note'
}
})
.help()
.argv;
The next one will be demand, and to add a note we are going to need a body. So we'll set demand equal to true, just like we do up previous for title:
const argv = yargs
.command('add', 'Add a new note', {
title: {
describe: 'Title of note',
demand: true,
alias: 't'
},
body: {
describe: 'Body of note'
demand: true
}
})
.help()
.argv;
And last but not least is the alias. The alias is going to get set equal to a single letter, I'll use the letter b for body:
const argv = yargs
.command('add', 'Add a new note', {
title: {
describe: 'Title of note',
demand: true,
alias: 't'
},
body: {
describe: 'Body of note'
demand: true,
alias: 'b'
}
})
.help()
.argv;
With this in place, we can now save app.js and inside Terminal, we can take a moment to rerun node app.js add with the help flag:
node app.js add --help
When we run this command, we should now see the body argument showing up, and you can even see it shows the flag version, as shown in the following output, the alias -b (Body of note), and it is required:
Now I'll run node app.js add passing in two arguments t. I'll set that equal to t, and b setting it equal to b.
When I run the command, everything works as expected:
node app.js add -t=t -b=b
As shown in the preceding output screenshot, a new note was created with a title of t and a body of b. With this in place, we've now successfully completed the setup for the add command. We have our add command title, a description, and the block that specifies the arguments for that command. Now we do have three more commands to add support for, so let's get started doing that.
On the next line, I'll call .command again, passing in the command name. Let's do the list command first because this one is really easy, no arguments are required. Then we'll pass in the description for the list command, List all notes, as shown here:
.command('list', 'List all notes')
.help()
.argv;
Next up, we'll call command again. This time we'll do the command for read. The read command reads an individual note, so for the description for the read command, we'll use something like Read a note:
.command('list', 'List all notes')
.command('read', 'Read a note')
.help()
.argv;
Now the read command does require the title argument. That means we are going to need to provide that options object. I'll take title from add command, copy it, and paste it in the read command options object:
.command('list', 'List all notes')
.command('read', 'Read a note', {
title: {
describe: 'Title of note',
demand: true,
alias: 't'
}
})
.help()
.argv;
As you probably just noticed, we have repeated code. The title configuration just got copied and pasted into multiple places. It would be pretty nice if this was DRY, if it was in one variable we could reference in both locations, in add and read commands.
Will call command for remove, just following where we called the command for read. Now, the remove command will have a description. We'll stick with something simple like Remove a note, and we will be providing an options object:
.command('remove', 'Remove a note', {
})
Now I can add the options object identical to the read command. However, in that options object, I'll set title equal to titleOptions, as shown here, to avoid the repetition of code:
.command('remove', 'Remove a note', {
title: titleOptions
})
Now I don't have the titleOptions object created yet so the code would currently fail, but this is the general idea. We want to create the titleOptions object once and reference it in all the locations we use it, for add, read and remove command. I can take titleOptions, and add it for read as well as for add command, as shown here:
.command('add', 'Add a new note', {
title: titleOptions,
body: {
describe: 'Body of note',
demand: true,
alias: 'b'
}
})
.command('list', 'List all notes')
.command('read', 'Read a note', {
title: titleOptions
})
.command('remove', 'Remove a note', {
title: titleOptions
})
Now, just previous the constant argv, I can create a constant called titleOptions, and I can set it equal to that object that we defined for add and read command earlier, which is describe, demand, and alias, as shown here:
const titleOptions = {
describe: 'Title of note',
demand: true,
alias: 't'
};
We now have the titleOptions in place, and this will work as expected. We have the exact same functionality we did before, but we now have the titleOptions in a separate object, which follows the DRY principle we discussed in the Reading note section.
Now, we could also do the same thing for body. It might seem like overkill since we're only using it in only one location, but if we're sticking to the pattern of breaking them out into variables, I'll do it in the case of the body as well. Just following the titleOptions constant, I can create the constant bodyOptions, setting it equal to the options object we defined in the body, for add command in the previous subsection:
const bodyOptions = {
describe: 'Body of note',
demand: true,
alias: 'b'
};
With this in place, we are now done. We have add, read, and remove, all with their arguments set up referencing the titleObject and bodyObject variables defined.
Let's test out the remove command in Terminal. I'll list out my notes using node app.js list, so I can see which notes I have to remove:
node app.js list
I'll remove the note with the title t, using the node app.js remove command and our flag "t":
node app.js remove -t="t"
We'll remove the note with the title t, and as shown previous, Note was removed prints to the screen. And if I use the up arrow key twice, I can list the notes out again, and you can see the note with the title t has indeed gone:
Let's remove one more note using the node app.js remove command. This time we're going to use --title, which is the argument name, and the note we're going to remove has the title flag title, as shown in this code:
When I remove it, it says Note was removed, and if I rerun the list command, I can see that we have three notes left, the note was indeed removed , as shown here:
And that is it for the notes application.
In this section, you're going to learn the ins and outs of the arrow function. It's an ES6 feature, and we have taken a little look at it. Inside notes.js we used it in a few basic examples to create methods such as fetchNotes and saveNotes, and we also passed it into a few array methods like filter, and for each array, we used it as the callback function that gets called once for every item in the array.
Now if you try to swap out all of the functions in a program with arrow functions, it's most likely not going to work as expected because there are some differences between the two, and it's really important to know what those differences are, so you can make the decision to use a regular ES5 function or an ES6 arrow function.
The goal in this section is to give you the knowledge to make that choice, and we'll kick things off by creating a new file in the playground folder called arrow-function.js:
Inside this file, we're going to play around with a few examples, going over some of the subtleties to the arrow function. Before we type anything inside of the file, I'll start up this file with nodemon, so every time we make a change it automatically refreshes over in Terminal.
If you remember, nodemon is the utility we installed in Chapter 2, Node Fundamentals - Part 1. It was a global npm module. The nodemon is the command to run, and then we just pass in the file path like we would for any other Node command. As we're going into the playground folder, and the file itself is called arrow-function.js, we'll run the following command:
nodemon playground/arrow-function.js
We'll run the file, and nothing prints to the screen, as shown in the following output, besides the nodemon logs because we have nothing in the file:
To get started, in the arrowfunction.js file, we'll create a function called square, by making a variable called square and setting it equal to an arrow function.
To make our arrow function (=>), we'll first provide the arguments inside parentheses. Since we'll be squaring a number, we just need one number, and I'll refer to that number as x. If I pass in 3, I should expect 9 back, and if I pass in 9, I would expect 81 back.
After the arguments list, we have to put the arrow in arrow function (=>) by putting the equal sign and the greater than symbol together, creating our nice little arrow. From here we can provide, inside curly braces, all the statements we want to execute:
var square = (x) => {
};
Next, we might create a variable called result, setting that equal to x times x, then we might return the result variable using the return keyword, as shown here:
var square = (x) => {
var result = x * x;
return result;
};
Now, obviously this can be done on one line, but the goal here is to illustrate that when you use the statement arrow function (=>), you can put as many lines as you want in between those curly braces. Let's call a square, we'll do that using console.log so we can print the result to the screen. I'll call square; and we'll call square with 9, the square of 9 would be 81, so we would expect 81 to print to the screen:
var square = (x) => {
var result = x * x;
return result;
};
console.log(square(9));
I'll save the arrow function (=>) file, and in Terminal, 81 shows up just as we expect:
Now the syntax we used in the previous example is the statement syntax for the arrow function (=>). We've also explored the expression syntax earlier, which lets you simplify your arrow functions when you return some expressions. In this case all we need to do is specify the expression we want to return. In our case that's x times x:
var square = (x) => x * x;
console.log(square(9));
You don't need to explicitly add the return keyword. When you use an arrow function (=>) without your curly braces, it's implicitly provided for you. That means we can save the function as shown previous and the exact same result is going to print to the screen, 81 shows up.
This is one of the great advantages of arrow functions when you use them in cases like filter or for those which we did in the notes.js file. It lets you simplify your code keeping everything on one line and making your code a lot easier to maintain and scan.
If I save the file in this state, 81 still prints to the screen; and this is great we have an even simpler version of our arrow function (=>):
Now that we have a basic example down, I want to move on to a more complex example that's going to explore the nuances between regular functions and arrow functions.
To illustrate the difference, I'll make a variable called user, which will be an object. On this object we'll specify one property, name. Set name equal to the string, your name, in this case I'll set it equal to the string Andrew:
var user = {
name: 'Andrew'
};
Then we can define a method on the user object. Right after name, with my comma at the end of the line, I'll provide the method sayHi, setting it equal to an arrow function (=>) that doesn't take any arguments. For the moment, we'll keep the arrow function really simple:
var user = {
name: 'Andrew',
sayHi: () => {
}
};
All we'll do inside sayHi is use console.log to print to the screen, inside of template strings Hi:
var user = {
name: 'Andrew',
sayHi: () => {
console.log(`Hi`);
}
};
We're not using template strings yet, but we will later so I'll use them here. Down following the user object, we can test out sayHi by calling it, user.sayHi:
var user = {
name: 'Andrew',
sayHi: () => {
console.log(`Hi`);
}
};
user.sayHi();
I'll call it then save the file, and we would expect that Hi prints to the screen because all our arrow function (=>) does is use console.log to print a static string. Nothing in this case will cause any problems; you'd be able to swap out a regular function for an arrow function (=>) without issue.
Now the first issue that will arise when you use arrow functions is the fact that arrow functions do not bind a this keyword. So if you are using this inside your function, it's not going to work when you swap it out for an arrow function (=>). Now, this binding; refers to the parent binding, in our case there is no parent, function so this would refer to the global this keyword. Now we have our console.log that does not use this, I'll swap it out for a case that does.
We'll put a period after Hi, and I'll say I'm, followed by the name, which we would usually be able to access via this.name:
var user = {
name: 'Andrew',
sayHi: () => {
console.log(`Hi. I'm ${this.name}`);
}
};
user.sayHi();
If I try to run this code, it is not going to work as expected; we're going to get Hi I'm undefined printing to the screen, as shown here:
In order to fix this, we'll look at an alternative syntax to arrow functions that's great when you're defining object literals, as we are in this case.
After sayHi, I'll make a new method called sayHiAlt using a different ES6 feature. ES6 provides us a new way to make methods on objects; you provide the method name, sayHiAlt, then you go right to the parentheses skipping the colon. There's also no need for the function keyword, even though it is a regular function it's not an arrow function (=>). Then we move on to our curly braces as shown here:
var user = {
name: 'Andrew',
sayHi: () => {
console.log(`Hi. I'm ${this.name}`);
},
sayHiAlt() {
}
};
user.sayHi();
Inside here I can have the exact same code we have in the sayHi function, but it is going to work as expected. It's going to print Hi. I'm Andrew. I'll call sayHiAlt down following instead of the regular sayHi method:
var user = {
name: 'Andrew',
sayHi: () => {
console.log(`Hi. I'm ${this.name}`);
},
sayHiAlt() {
console.log(`Hi. I'm ${this.name}`);
}
};
user.sayHiAlt();
And in Terminal, you can see Hi. I'm Andrew, prints to the screen:
The sayHiAlt syntax is a syntax that you can use to solve this problem when you create functions on object literals. Now that we know that the this keyword does not get bound, let's explore one other quirk that arrow functions have, it also does not bind the arguments array.
Regular functions, like sayHiAlt, are going to have an arguments array that's accessible inside of the function:
var user = {
name: 'Andrew',
sayHi: () => {
console.log(`Hi. I'm ${this.name}`);
},
sayHiAlt() {
console.log(arguments);
console.log(`Hi. I'm ${this.name}`);
}
};
user.sayHiAlt();
Now, it's not an actual array, it's more like an object with array; like properties, but the arguments object is indeed specified in a regular function. If I pass in one, two, and three and save the file, we'll get that back when we log out arguments:
var user = {
name: 'Andrew',
sayHi: () => {
console.log(`Hi. I'm ${this.name}`);
},
sayHiAlt() {
console.log(arguments);
console.log(`Hi. I'm ${this.name}`);
}
};
user.sayHiAlt(1, 2, 3);
Inside nodemon, it's taking a quick second to restart, and right here we have our object:
We have one, two, and three, we have the index for each as the property name, and this works because we're using a regular function. If we were to switch to the arrow function (=>) though, it is not going to work as expected.
I'll add console.log(arguments) inside of my arrow function (=>), and I'll switch from calling sayHiAlt back to the original method sayHi, as shown here:
var user = {
name: 'Andrew',
sayHi: () => {
console.log(arguments);
console.log(`Hi. I'm ${this.name}`);
},
sayHiAlt() {
console.log(arguments);
console.log(`Hi. I'm ${this.name}`);
}
};
user.sayHi(1, 2, 3);
When I save the file in arrow-function.js, we'll get something a lot different from what we had before. What we'll actually get is the global arguments variable, which is the arguments variable for that wrapper function we explored:
In the previous screenshot, we have things like the require function, definition, our modules object, and a couple of string paths to the file and to the current directory. These are obviously not what we're expecting, and that is another thing that you have to be aware of when you're using arrow functions; you're not going to get the arguments keyword, you're not going to get the this binding (defined in sayHi syntax) that you'd expect.
These problems mostly arise when you try to create methods on an object and use arrow functions. I would highly recommend that you switch to sayHiAlt syntax which we discussed, in those cases. You get a simplified syntax, but you also get the disk binding and you get your arguments variable as you'd expect.
In this chapter, we were able to reuse the utility functions that we already made in previous chapters, making the process of filling out a remove note that much easier. Inside app.js, we worked on how the removeNote function is executed, if it was executed successfully, we print a message; if it didn't, we print a different message.
Next, we were able to successfully fill out the read command and we also created a really cool utility function that we can take advantage of in multiple places. This keeps our code DRY and prevents us from having the same code in multiple places inside of our application.
Then we discussed a quick introduction to debugging. Essentially, debugging is a process that lets you stop the program at any point in time and play around with the program as it exists at that moment. That means you can play around with variables that exist, or functions, or anything inside of Node. We learned more about yargs, its configuration, setting up commands, their description, and arguments.
Last, you explored a little bit more about arrow functions, how they work, when to use them, and when not to use them. In general, if you don't need this keyword, or the arguments keyword you can use an arrow function without a problem, and I always prefer using arrow functions over regular functions when I can.
In the next chapter, we will explore asynchronous programming and how we can fetch data from third-party APIs. We'll use both regular functions and arrow functions a lot more, and you'll be able to see firsthand how to choose between one over the other.
If you've read any article about Node, you'd have probably come across four terms: asynchronous, non-blocking, event-based, and single-threaded. All of those are accurate terms to describe Node; the problem is it usually stops there, and it's really abstract. The topic of asynchronous programming in Node.js has been divided into three chapters. The goal in these upcoming three chapters is to make asynchronous programming super practical by putting all these terms to use in our weather application. That's the project we're going to be building in these chapters.
This chapter is all about the basics of asynchronous programming. We'll look into the basic concepts, terms, and technology related to async programming. We'll look into making requests to Geolocation APIs. We'll need to make asynchronous HTTP requests. Let's dive in, looking at the very basics of async programming in Node.
Specifically, we'll look into the following topics:
In this section, we're going to create our first asynchronous non-blocking program. This means our app will continue to run while it waits for something else to happen. In this section, we'll look at a basic example; however, in the chapter, we'll be building out a weather app that communicates with third-party APIs, such as the Google API and a weather API. We'll need to use asynchronous code to fetch data from these sources.
For this, all we need to do is make a new folder on the desktop for this chapter. I'll navigate onto my desktop and use mkdir to make a new directory, and I'll call this one weather-app. All I need to do is navigate into the weather app:
Now, I'll use the clear command to clear the Terminal output.
Now, we can open up that new weather app directory inside of Atom:
This is the directory we'll use throughout this entire chapter. In this section, we'll not be building out the weather app just yet, we'll just play around with the async features. So inside weather-app we'll make the playground folder.
This code is not going to be a part of the weather app, but it will be really useful when it comes to creating the weather app in the later sections. Now inside playground, we can make the file for this section. We'll name it async-basics.js as shown here:
To illustrate how the asynchronous programming model works, we'll get started with a simple example using console.log. Let's get started by adding a couple of console.log statements in a synchronous way. We'll create one console.log statement at the beginning of the app that will say Starting app, and we will add a second one to the end, and the second one will print Finishing up, as shown here:
console.log('Starting app');
console.log('Finishing up');
Now these are always going to run synchronously. No matter how many times you run the program, Starting app is always going to show up before Finishing up.
In order to add some asynchronous code, we'll take a look at a function that Node provides called setTimeout. The setTimeout function is a great method for illustrating the basics of non-blocking programming. It takes two arguments:
Let's call setTimeout, passing in an arrow function (=>) as our first argument. This will be callback function. It will get fired right away; that is, it will get fired after the timeout is up, after our two seconds. And then we can set up our second argument which is the delay, 2000 milliseconds, which equals those two seconds:
console.log('Starting app');
setTimeout(() => {
}, 2000);
Inside the arrow function (=>), all we'll do is use a console.log statement so that we can figure out exactly when our function fires, because the statement will print to the screen. We'll add console.log and then inside callback to get the job done, as shown here:
setTimeout(() => {
console.log('Inside of callback');
}, 2000);
With this in place, we're actually ready to run our very first async program, and I'll not use nodemon to execute it. I'll run this file from the Terminal using the basic Node command; node playground and the file inside the playground folder which is async-basic.js:
node playground/async-basics.js
Now pay close attention to exactly what happens when we hit enter. We'll see two messages show up right away, then two seconds later our final message, Inside of callback, prints to the screen:
The sequence in which these messages are shown is: first we got Starting app; almost immediately after this, Finishing up prints to the screen and finally (two seconds later), Inside of callback was printed as shown in the previous code. Inside the file, this is not the order in which we wrote the code, but it is the order the code executes in.
The Starting app statement prints to the screen as we expect. Next, we call setTimeout, but we're not actually telling it to wait two seconds. We're registering a callback that will get fired in two seconds. This will be an asynchronous callback, which means that Node can do other things while these two seconds are happening. In this case, the other thing it moves down to the Finishing up message. Now since we did register this callback by using setTimeout, it will fire at some point in time, and two seconds later we do see Inside of callback printing to the screen.
By using non-blocking I/O, we're able to wait, in this case two seconds, without preventing the rest of the program from executing. If this was blocking I/O, we would have to wait two seconds for this code to fire, then the Finishing up message would print to the screen, and obviously that would not be ideal.
Now this is a pretty contrived example, we will not exactly use setTimeout in our real-world apps to create unnecessary arbitrary delays, but the principles are the same. For example, when we fetch data from the Google API we'll need to wait about 100 to 200 milliseconds for that data to come back, and we don't want the rest of the program to just be idle, it will continue. We'll register a callback, and that callback will get fired once the data comes back from the Google servers. The same principles applies even though what's actually happening is quite different.
Now, we want to write another setTimeout right here. We want to register a setTimeout function that prints a message; something like Second setTimeout works. This will be inside the callback, and we want to register a delay of 0 milliseconds, no delay at all. Let's fill out the async basics setTimeout. I'll call setTimeout with my arrow function (=>), passing in a delay of 0 milliseconds, as shown in the following code. Inside the arrow function (=>), I'll use console.log so I can see exactly when this function executes, and I'll use Second setTimeout as the text:
setTimeout(() => {
console.log('Second setTimeout');
}, 0);
Now that we have this in place, we can run the program from the Terminal, and it's really important to pay attention to the order in which the statements print. Let's run the program:
node playground/async-basics.js
Right away we get three statements and then at the very end, two seconds later, we get our final statement:
We start with Starting app, which makes sense, it's at the top. Then we get Finishing up. After Finishing up we get Second setTimeout, which seems weird, because we clearly told Node we want to run this function after 0 milliseconds, which should run it right away. But in our example, Second setTimeout printed after Finishing up.
Finally, Inside of callback printed to the screen. This behavior is completely expected. This is exactly how Node.js is supposed to operate, and it will become a lot clearer after the next section, where we'll go through this example exactly, showing you what happens behind the scenes. We'll get started with a more basic example showing you how the call stack works, we'll talk all about that in the next section, and then we'll go on to a more complex example that has some asynchronous events attached to it. We'll discuss the reason why Second setTimeout comes up after the Finishing up message after the next section.
In the last section, we ended up creating our very first asynchronous application, but unfortunately we ended up asking more questions than we got answers. We don't exactly know how async programming works even though we've used it. Our goal for this section is to understand why the program runs the way it does.
For example, why does the two-second delay in the following code not prevent the rest of the app from running, and why does a 0 second delay cause the function to be executed after Finishing up prints to the screen?
console.log('Starting app');
setTimeout(() => {
console.log('Inside of callback');
}, 2000);
setTimeout(() => {
console.log('Second setTimeout');
}, 0);
console.log('Finishing up');
These are all questions we'll answer in this section. This section will take you behind the scenes into what happens in V8 and Node when an async program runs. Now let's dive right into how the async program runs. We'll start with some basic synchronous examples and then move on to figuring out exactly what happens in the async program.
The following is example number one. On the left-hand side we have the code, a basic synchronous example, and on the right-hand side we have everything that happens behind the scenes, the Call Stack, our Node APIs, the Callback Queue, and the Event Loop:
Now if you've ever read an article or watched any video lesson on how Node works, you've most likely heard about one or more of these terms. In this section, we'll be exploring how they all fit together to create a real-world, working Node application. Now for our first synchronous example, all we need to worry about is the Call Stack. The Call Stack is part of a V8, and for our synchronous example it's the only thing that's going to run. We're not using any Node APIs and we're not doing any asynchronous programming.
The Call Stack is a really simple data structure that keeps track of program execution inside of a V8. It keeps track of the functions currently executing and the statements that are fired. The Call Stack is a really simple data structure that can do two things:
This means if there's an item at the bottom of the data structure and there's an item above it, you can't remove the bottom item, you have to remove the top item. If there's already two items and you want to add something on to it, it has to go on because that's how the Call Stack works.
Think about it like a can of Pringles or a thing of tennis balls: if there's already an item in there and you drop one in, the item you just dropped will not be the bottom item, it's going to be the top item. Also, you can't remove the bottom tennis ball from a can of tennis balls, you have to remove the one on top first. That's exactly how the Call Stack works.
Now when we start executing the program shown in the following screenshot, the first thing that will happen is Node will run the main function. The main function is the wrapper function we saw over in nodemon (refer to, Installing the nodemon module section in Chapter 2, Node Fundamentals Part-1) that gets wrapped around all of our files when we run them through Node. In this case, by telling V8 to run the main function we are starting the program.
As shown in the following screenshot, the first thing we do in the program is create a variable x, setting it equal to 1, and that's the first statement that's going to run:
Notice it comes in on top of main. Now this statement is going to run, creating the variable. Once it's done, we can remove it from the Call Stack and move on to the next statement, where we make the variable y, which gets set equal to x, which is 1 plus 9. That means y is going to be equal to 10:
As shown in the previous screenshot, we do that and move on to the next line. The next line is our console.log statement. The console.log statement will print y is 10 to the screen. We use template strings to inject the y variable:
console.log(`y is ${y}`);
When we run this line it gets popped on to the Call Stack, as shown here:
Once the statement is done, it gets removed. At this point, we've executed all the statements inside our program and the program is almost ready to be complete. The main function is still running but since the function ends, it implicitly returns, and when it returns, we remove main from the Call Stack and the program is finished. At this point, our Node process is closed. Now this is a really basic example of using the Call Stack. We went into the main function, and we moved line by line through the program.
Let's go over a slightly more complex example, our second example. As shown in the following code, we start off by defining an add function. The add function takes arguments a and b, adds them together storing that in a variable called total, and returns total. Next, we add up 3 and 8, which is 11, storing it in the res variable. Then, we print out the response using the console.log statement, as shown here:
var add = (a, b) => {
var total = a + b;
return total;
};
var res = add(3, 8);
console.log(res);
That's it, nothing synchronous is happening. Once again we just need the Call Stack. The first thing that happens is we execute the main function; this starts the program we have here:
Then we run the first statement where we define the add variable. We're not actually executing the function, we're simply defining it here:
In the preceding image, the add() variable gets added on to the Call Stack, and we define add. The next line, line 7, is where we call the add variable storing the return value on the response variable:
In this example, we'll call a function. So we're going to add add() on to the Call Stack, and we'll start executing that function:
As we know, when we add main we start executing main and, when we add add() we start executing add. The first line inside add sets the total variable equal to a + b, which would be 11. We then return from the function using the return total statement. That's the next statement, and when this runs, add gets removed:
So when return total finishes, add() gets removed, then we move on to the final line in the program, our console.log statement, where we print 11 to the screen:
The console.log statement will run, print 11 to the screen and finish the execution, and now we're at the end of the main function, which gets removed from the stack when we implicitly return. This is the second example of a program running through the V8 Call Stack.
So far we haven't used Node APIs, the Callback Queue, or the Event Loop. The next example will use all four (Call Stack, the Node APIs, the Callback Queue, and the Event Loop). As shown on the left-hand side of the following screenshot, we have our async example, exactly the same as we wrote it in the last section:
In this example, we will be using the Call Stack, the Node APIs, the Callback Queue, and the Event Loop. All four of these are going to come into play for our asynchronous program. Now things are going to start off as you might expect. The first thing that happens is we run the main function by adding it on to the Call Stack. This tells a V8 to kick off the code we have on the left side in the previous screenshot, shown here again:
console.log('Starting app');
setTimeout(() => {
console.log('Inside of callback');
}, 2000);
setTimeout(() => {
console.log('Second setTimeout');
}, 0);
console.log('Finishing up');
The first statement in this code is really simple, a console.log statement that prints Starting app to the screen:
This statement runs right away and we move on to the second statement. The second statement is where things start to get interesting, this is a call to setTimeout, which is indeed a Node API. It's not available inside a V8, it's something that Node gives us access to:
When we call the setTimeout (2 sec) function, we're actually registering the event callback pair in the Node APIs. The event is simply to wait two seconds, and the callback is the function we provided, the first argument. When we call setTimeout, it gets registered right in the Node APIs as shown here:
Now this statement will finish up, the Call Stack will move on, and the setTimeout will start counting down. Just because the setTimeout is counting down, it doesn't mean the Call Stack can't continue to do its job. The Call Stack can only run one thing at a time, but we can have events waiting to get processed even when the Call Stack is executing. Now the next statement that runs is the other call to setTimeout:
In this, we register a setTimeout callback function with a delay of 0 milliseconds, and the exact same thing happens. It's a Node API and it's going to get registered as shown in the following screenshot. This essentially says that after zero seconds, you can execute this callback:
The setTimeout (0 sec) statement gets registered and the Call Stack removes that statement.
At this point let's assume that setTimeout, the one that has a zero second delay, finishes. When it finishes, it's not going to get executed right away; it's going to take that callback and move it down into the Callback Queue, as shown here:
The Callback Queue is all the callback functions that are ready to get fired. In the previous screenshot, we move the function from Node API into the Callback Queue. Now the Callback Queue is where our callback functions will wait; they need to wait for the Call Stack to be empty.
When the Call Stack is empty we can run the first function. There's another function after it. We'll have to wait for that first function to run before the second one does, and this is where the Event Loop comes into play.
The Event Loop takes a look at the Call Stack. If the Call Stack is not empty, it doesn't do anything because it can't, there is nothing it can do you can only run one thing at a time. If the Call Stack is empty, the Event Loop says great let's see if there's anything to run. In our case, there is a callback function, but because we don't have an empty Call Stack, the Event Loop can't run it. So let's move on with the example.
The next thing that happens in our program is we run our console.log statement, which prints Finishing up to the screen. This is the second message that shows up in the Terminal:
This statement runs, our main function is complete, and it gets removed from the Call Stack.
At this point, the Event Loop says hey I see that we have nothing in the call stack and we do have something in the Callback Queue, so let's run that callback function. It will take the callback and move it into the Call Stack; this means the function is executing:
It will run the first line which is sitting on line 8, console.log, printing Second setTimeout to the screen. This is why Second setTimeout shows up after Finishing up in our previous section examples, because we can't run our callback until the Call Stack is complete. Since Finishing up is part of the main function, it will always run before Second setTimeout.
After our Second setTimeout statement finishes, the function is going to implicitly return and callback will get removed from the Call Stack:
At this point, there's nothing in the Call Stack and nothing in the Callback Queue, but there is still something in our Node APIs, we still have an event listener registered. So the Node process is not yet completed. Two seconds later, the setTimeout(2 sec) event is going to fire, and it's going to take that callback function and move it into the Callback Queue. It gets removed from the Node APIs and it gets added to the Callback Queue:
At this point, the Event Loop will take a look at the Call Stack and see it's empty. Then it will take a quick look at the Callback Queue and see there is indeed something to run. What will it do? It will take that callback, add it on to the Call Stack, and start the process of executing it. This means that we'll run our one statement inside callback. After that's finished, the callback function implicitly returns and our program is complete:
This is exactly how our program ran. This illustrates how we're able to register our events using Node APIs, and why when we use a setTimeout of zero the code doesn't run right away. It needs to go through the Node APIs and through the Callback Queue before it can ever execute on the Call Stack.
Now as I mentioned in the beginning of this section, the Call Stack, the Node APIs, the Callback Queue, and the Event Loop are pretty confusing topics. A big reason why they're confusing is because we never actually directly interact with them; they're happening behind the scenes. We're not calling the Callback Queue, we're not firing an Event Loop method to make these things work. This means we're not aware they exist until someone explains them. These are topics that are really hard to grasp the first time around. By writing real asynchronous code it's going to become a lot clearer how it works.
Now that we got a little bit of an idea about how our code executes behind the scenes, we'll move on with the rest of the chapter and start creating a weather app that interacts with third-party APIs.
In this section, we'll take an in-depth look at callback functions, and use them to fetch some data from a Google Geolocation API. That's going to be the API that takes an address and returns the latitude and longitude coordinates, and this is going to be great for the weather app. This is because the weather API we use requires those coordinates and it returns the real-time weather data, such as the temperature, five-day forecast, wind speed, humidity, and other pieces of weather information.
Before we get started making the HTTPS request, let's talk about callback functions, and we have already used them. Refer to the following code (we used it in the previous section):
console.log('Starting app');
setTimeout(() => {
console.log('Inside of callback');
}, 2000);
setTimeout(() => {
console.log('Second setTimeout');
}, 0);
console.log('Finishing up');
Inside the setTimeout function we used a callback function. In general, a callback function is defined as a function that gets passed as an argument to another function and is executed after some event happens. Now this is a general definition, there is no strict definition in JavaScript, but it does satisfy the function in this case:
setTimeout(() => {
console.log('Inside of callback');
}, 2000);
Here we have a function and we pass it as an argument to another function, setTimeout, and it does get executed after some event—two-second pass. Now the event could be other things, it could be a database query finishes, it could be an HTTP request comes back. In those cases, you will want a callback function, like the one in our case, to do something with that data. In the case of setTimeout, we don't get any data back because we're not requesting any; we're just creating an arbitrary delay.
Now before we actually make an HTTP request to Google, let's create a callback function example inside our playground folder. Let's make a new file called callbacks.js:
Inside the file, we'll create a contrived example of what a callback function would look like behind the scenes. We'll be making real examples throughout the book and use many functions that require callbacks. But for this chapter, we'll start with a simple example.
To get started, let's make a variable called getUser. This will be the function we'll define that will show us exactly what happens behind the scenes when we pass a callback to another function. The getUser callback will be something that simulates what it would look like to fetch a user from a database or some sort of web API. It will be a function, so we'll set it as such using arrow function (=>):
var getUser = () => {
};
The arrow function (=>) is going to take some arguments. The first argument it will take is the id, which will be some sort of a unique number that represents each user. I might have an id of 54, you might have an id of 2000; either way we're going to need the id to find a user. Next up we'll get a callback function, which is what we will call later with the data, with that user object:
var getUser = (id, callback) => {
};
This is exactly what happens when you pass a function to setTimeout.
Now we can call this function before actually filling it out. We'll call getUser, just like we did with setTimeout in the previous code example. I'll call getUser, passing in those two arguments. The first one will be some id; since we're faking it for now it doesn't really matter, and I'll go with 31. The second argument will be the function that we want to run when the user data comes back, and this is really important. As shown, we'll define that function:
getUser(31, () => {
});
Now the callback alone isn't really useful; being able to run this function after the user data comes back only works if we actually get the user data, and that's what we'll expect here:
getUser(31, (user) => {
});
We'll expect that the user objects, things like id, name, email, password, or whatever, comes back as an argument to the callback function. Then inside the arrow function (=>), we can actually do something with that data, for example, we could show it on a web app, respond to an API request, or in our case we can simply print it to the console, console.log(user):
getUser(31, (user) => {
console.log(user);
});
Now that we have the call in place, let's fill out the getUser function to work like we have it defined.
The first thing I'll do is create a dummy object that's going to be the user object. In the future, this is going to come from database queries, but for now we'll just create a variable user setting it equal to some object:
var getUser = (id, callback) => {
var user = {
}
};
Let's set an id property equal to whatever id the user passes in, and we'll set a name property equal to some name. I'll use Vikram:
var getUser = (id, callback) => {
var user = {
id: id,
name: 'Vikram'
};
};
Now that we have our user object, what we want to do is call the callback, passing it as an argument. We'll then be able to actually run, getUser(31, (user) function, printing the user to the screen. In order to do this, we would call the callback function like any other function, simply referencing it by name and adding our parentheses like this:
var getUser = (id, callback) => {
var user = {
id: id,
name: 'Vikram'
};
callback();
};
Now if we call the function like this, we're not passing any data from getUser back to the callback. In this case, we're expecting a user to get passed back, which is why we are going to specify user as shown here:
callback(user);
Now the naming isn't important, I happen to call it user, but I could easily call this userObject and userObject as shown here:
callback(user);
};
getUser(31, (userObject) => {
console.log(userObject);
});
All that matters is the arguments, position. In this case, we call the first argument userObject and the first argument pass back is indeed that userObject. With this in place we can now run our example.
In the Terminal, we'll run the callback function using node, which is in the playground folder, and we call the file callbacks.js:
node playground/callback.js
When we run the file, right away our data prints to the screen:
We've created a callback function using synchronous programming. Now as I mentioned, this is still a contrived example because there is no need for a callback in this case. We could simply return the user object, but in that case, we wouldn't be using a callback, and the whole point here is to explore what happens behind the scenes and how we actually call the function that gets passed in as an argument.
Now, we can also simulate a delay using setTimeout, so let's do that. In our code, just before the callback (user) statement, we'll use setTimeout just like we did before in the previous section. We'll pass an arrow function (=>) in as the first argument, and set a delay of 3 seconds using 3000 milliseconds:
setTimeout(() => {
}, 3000);
callback(user);
};
Now I can take my callback call, delete it from line 10, and add it inside of the callback function, as shown here:
setTimeout(() => {
callback(user);
}, 3000);
};
Now we'll not be responding to the getUser request until three seconds have passed. Now this will be more or less similar to what happens when we create real-world examples of callbacks, we pass in a callback, some sort of delay happens whether we're requesting from a database or from an HTTP endpoint, and then the callback gets fired.
If I save callbacks.js and rerun the code from the Terminal, you'll see we wait those three seconds, which is the simulated delay, and then the user object prints to the screen:
This is exactly the principle that we need to understand in order to start working with callbacks, and that is exactly what we'll start doing in this section.
The requests that we'll be making to that Geolocation API can actually be simulated over in the browser before we ever make the request in Node, and that's exactly what we want to do to get started. So follow along for the URL, https://maps.googleapis.com/maps/api/geocode/json.
Now this is the actual endpoint URL, but we do have to specify the address for which we want the geocode. We'll do that using query strings, which will be provided right after the question mark. Then, we can set up a set of key value pairs and we can add multiples using the ampersand in the URL, for example: https://maps.googleapis.com/maps/api/geocode/json?key=value&keytwo=valuetwo.
In our case, all we need is one query string address, https://maps.googleapis.com/maps/api/geocode/json?address, and for the address query string we'll set it equal to an address. In order to fill out that query address, I'll start typing 1301 lombard street philadelphia.
Notice that we are using spaces in the URL. This is just to illustrate a point: we can use spaces in the browser because it's going to automatically convert those spaces to something else. However, inside Node we'll have to take care of that ourselves, and we'll talk about that a little later in the section. For now if we leave the spaces in, hit enter, and we can see they automatically get converted for us:
Space characters get converted to %20, which is the encoded version of a space. In this page, we have all of the data that comes back:
Now we'll use an extension called JSONView, which is available for Chrome and Firefox.
Now as shown in the preceding screenshot, the data on this page has exactly what we need. We have an address_components property, we don't need that. Next, we have a formatted address which is really nice, it includes the state, the zip code, and the country, which we didn't even provide in the address query.
Then, we have what we really came for: in geometry, we have location, and this includes the latitude and longitude data.
Now, what we got back from the Google Maps API request is nothing more than some JSON data, which means we can take that JSON data, convert it to a JavaScript object, and start accessing these properties in our code. To do this, we'll use a third-party module that lets us make these HTTP requests inside of our app; this one is called request.
We can visit it by going to https://www.npmjs.com/package/request. When we visit this page, we'll see all the documentation and all the different ways we can use the request package to make our HTTP requests. For now, though, we'll stick to some basic examples. On the request documentation page, on the right-hand side, we can see this is a super popular package and it has seven hundred thousand downloads in the last day:
In order to get started we're going to install the package inside our project, and we'll make a request to this URL.
To install the package, we'll go to the Terminal and install the module using npm init, to create the package.json file:
We'll run this command and use enter to use the defaults for every single option:
At the end, we'll type yes and hit enter again.
Now that we have our package.json file we can use npm install, followed by the module name, request, and I will specify a version. You can always find the latest version of modules on the npm page. The latest version at the time of writing is 2.73.0, so we'll add that, @2.73.0. Then we can specify the save flag because we do want to save this module in our package.json file:
npm install request@2.73.0 --save
It will be critical for running the weather application.
Now that we have the request module installed, we can start using it. Inside Atom we'll wrap up the section by making a request to that URL, in a new file in the root of the project called app.js. This will be the starting point for the weather application. The weather app will be the last command-line app we create. In the future we'll be making the backend for web apps as well as real-time apps using Socket.IO. But to illustrate asynchronous programming, a command-line app is the nicest way to go.
Now, we have our app file, and we can get started by loading in request just like we did with our other npm modules. We'll make a constant variable, call it request, and set it equal to require(request), as shown here:
const request = require('request');
Now what we need to do is make a request. In order to do this, we'll have to call the request function. Let's call it, and this function takes two arguments:
request({}, () => {
});
In our case, it's going to get called once the JSON data, the data from the Google Maps API, comes back into the Node application. We can add the arguments that are going to get passed back from request. Now, these are arguments that are outlined in the request documentation, I'm not making up the names for these:
In the documentation, you can see they call it error, response, and body. That's exactly what well call ours. So, inside Atom, we can add error, response, and body, just like the docs.
Now we can fill out that options object, which is where we are going to specify the things unique to our request. In this case, one of the unique things is the URL. The URL specifies exactly what you want to request, and in our case, we have that in the browser. Let's copy the URL exactly as it appears, pasting it inside of the string for the URL property:
request({
url: 'https://maps.googleapis.com/maps/api/geocode/json?address=1301%20lombard%20street%20philadelphia',
}, (error, response, body) => {
});
Now that we have the URL property in place, we can add a comma at the very end and hit enter. Because we will specify one more property, we'll set json equal to true:
request({
url: 'https://maps.googleapis.com/maps/api/geocode/json?address=1301%20lombard%20street%20philadelphia',
json: true
}, (error, response, body) => {
});
This tells request that the data coming back is going to be JSON data, and it should go ahead, take that JSON string, and convert it to an object for us. That lets us skip a step, it's a really useful option.
With this in place, we can now do something in the callback. In the future we'll be taking this longitude and latitude and fetching weather. For now, we'll simply print the body to the screen by using console.log. We'll pass the body argument into console.log, as shown here:
request({
url: 'https://maps.googleapis.com/maps/api/geocode/json?address=1301%20lombard%20street%20philadelphia',
json: true
}, (error, response, body) => {
console.log(body);
});
Now that we have our very first HTTP request set up, and we have a callback that's going to fire when the data comes back, we can run it from the Terminal.
To run the request, we'll use node and run the app.js file:
node app.js
When we do this, the file will start executing and there will be a really short delay before the body prints to the screen:
What we get back is exactly what we saw in the browser. Some of the properties, such as address_components, show object in this case because we're printing it to the screen. But those properties do indeed exist; we'll talk about how to get them later in the chapter. For now, though, we do have our formatted_address as shown in the preceding screenshot, the geometry object, the place_id, and types. This is what we'll be using to fetch the longitude and latitude, and later to fetch the weather data.
Now that we have this in place, we are done. We have the first step of the process complete. We've made a request to the Google Geolocation API, and we're getting the data back. We'll continue creating the weather app in the next section.
Before we continue learning about HTTP and what exactly is inside of error, response, and body, let's take a quick moment to talk about how we can pretty print an object to the screen. As we saw in the last subsection, when we ran our app with node app.js, the body prints to the screen.
But since there is a lot of objects nested inside of each other, JavaScript starts clipping them:
As shown in the preceding screenshot, it tells us an object is in the results, but we don't get to see exactly what the properties are. This takes place for address_components, geometry, and types. Obviously this is not useful; what we want to do is see exactly what's in the object.
To explore all of the properties, we're going to look at a way to pretty print our objects. This is going to require a really simple function call, a function we've actually already used, JSON.stringify. This is the function that takes your JavaScript objects, which body is, remember we used the json: true statement to tell request to take the JSON and convert it into an object. In the console.log, statement we'll take that object, pass body in, and provide the arguments as shown here:
const request = require('request');
request({
url: 'https://maps.googleapis.com/maps/api/geocode/json?address=1301%20lombard%20street%20philadelphia',
json: true
}, (error, response, body) => {
console.log(JSON.stringify(body));
});
Now, this is how we've usually used JSON.stringify, in the past we provided just one argument, the object we want to stringify, in this case we're going to provide a couple of other arguments. The next argument is used to filter out properties. We don't want to use that, it's usually useless, so we're going to leave it as undefined as of now:
console.log(JSON.stringify(body, undefined));
The reason we need to provide it, is because the third argument is the thing we want. The third argument will format the JSON, and we'll specify exactly how many spaces we want to use per indentation. We could go with 2 or 4 depending on your preference. In this case, we'll pick 2:
console.log(JSON.stringify(body, undefined, 2));
We'll save the file and rerun it from the Terminal. When we stringify our JSON and print it to the screen, as we'll see when we rerun the app, we get the entire object showing up. None of the properties are clipped off, we can see the entire address_components array, everything shows up no matter how complex it is:
Next, we have our geometry object, this is where our latitude and longitude are stored, and you can see them as shown here:
Then below that, we have our types, which was cut off before, even though it was an array with one item, which is a string:
Now that we know how to pretty print our objects, it will be a lot easier to scan data inside of the console—none of our properties will get clipped, and it's formatted in a way that makes the data a lot more readable. In the next section, we'll start diving into HTTP and all of the arguments in our callback.
The goal in the previous section was not to understand how HTTP works, or what exactly the arguments, error, response, and body are the goal was to come up with a real-world example of a callback, as opposed to the contrived examples that we've been using so far with setTimeout:
const request = require('request');
request({
url: 'https://maps.googleapis.com/maps/api/geocode/json?address=1301%20lombard%20street%20philadelphia',
json: true
}, (error, response, body) => {
console.log(JSON.stringify(body, undefined, 2));
});
In the preceding case, we had a real callback that got fired once the HTTP request came back from the Google servers. We were able to print the body, and we saw exactly what we had in the website. In this section, we'll dive into these arguments, so let's kick things off by taking a look at the body argument. This is the third argument that request passes to the callback.
Now the body is not something unique to the request module (body is part of HTTP, which stands for the Hypertext Transfer Protocol). When you make a request to a website, the data that comes back is the body of the request. We've actually used the body about a million times in our life. Every single time we request a URL in the browser, what we get rendered inside the screen is the body.
In the case of https://www.npmjs.com, the body that comes back is an HTML web page that the browser knows how to render. The body could also be some JSON information, which is the case in our Google API request. Either way, the body is the core data that comes back from the server. In our case, the body stores all of the location information we need, and we'll be using that information to pull out the formatted address, the latitude, and the longitude in this section.
Before we dive into the body, let's discuss about the response object. We can look at the response object by printing it to the screen. Let's swap out body in the console.log statement for response in the code:
const request = require('request');
request({
url: 'https://maps.googleapis.com/maps/api/geocode/json?address=1301%20lombard%20street%20philadelphia',
json: true
}, (error, response, body) => {
console.log(JSON.stringify(response, undefined, 2));
});
Then save the file and rerun things inside of the Terminal by running the node app.js command. We'll get that little delay while we wait for the request to come back, and then we get a really complex object:
In the preceding screenshot, we can see the first thing we have in the response object is a status code. The status code is something that comes back from an HTTP request; it's a part of the response and tells you exactly how the request went.
In this case, 200 means everything went great, and you're probably familiar with some status codes, like 404 which means the page was not found, or 500 which means the server crashed. There are other body codes we'll be using throughout the book.
In this section, all we care about is that the status code is 200, which means things went well. Next up in the response object, we actually have the body repeated because it is part of the response. Since it's the most useful piece of information that comes back, the request module developers chose to make it the third argument, although you could access it using response.body as you can clearly see in this case. Here, we have all of the information we've already looked at, address components, formatted address geometry, so on.
Next to the body argument, we have something called headers, as shown here:
Now, headers are part of the HTTP protocol, they are key-value pairs as you can see in the preceding screenshot, where the key and the value are both strings. They can be sent in the request, from the Node server to the Google API server, and in the response from the Google API server back to the Node server.
Headers are great, there's a lot of built-in ones like content-type. The content-type is HTML for a website, and in our case, it's application/json. We'll talk about headers more in the later chapters. Most of these headers are not important to our application, and most we're never ever going to use. When we go on and create our own API later in the book, we'll be setting our own headers, so we'll be intimately familiar with how these headers work. For now, we can ignore them completely, all I want you to know is that these headers you see are set by Google, they're headers that come back from their servers.
Next to the headers we have the request object, which stores some information about the request that was made:
As shown in the preceding screenshot, you can see the protocol HTTPS, the host, the maps.googleapis.com website, and other things such as the address parameters, the entire URL, and everything else about the request, which is stored in this part.
Next, we also have our own headers. These are headers that were sent from Node to the Google API:
This header got set when we added json: true to options object in our code. We told request we want JSON back and request went on to tell Google, Hey, we want to accept some JSON data back, so if you can work with that format send it back! And that's exactly what Google did.
This is the response object, which stores information about the response and about the request. While we'll not be using most of the things inside the response argument, it is important to know they exist. So if you ever need to access them, you know where they live. We'll use some of this information throughout the book, but as I mentioned earlier, most of it is not necessary.
For the most part, we're going to be accessing the body argument. One thing we will use is the status. In our case it was 200. This will be important when we're making sure that the request was fulfilled successfully. If we can't fetch the location or if we get an error in the status code, we do not want to go on to try to fetch the weather because obviously we don't have the latitude and longitude information.
For now, we can move on to the final thing which is error. As I just mentioned, the status code can reveal that an error occurred, but this is going to be an error on the Google servers. Maybe the Google servers have a syntax error and their program is crashing, maybe the data that you sent is invalid, for example, you sent an address that doesn't exist. These errors are going to become evident via the status code.
What the error argument contains is errors related to the process of making that HTTP request. For example, maybe the domain is wrong: if I delete s and the dot with go in the URL, in our code, I get a URL that most likely doesn't exist:
const request = require('request');
request({
url: 'https://mapogleapis.com/maps/api/geocode/json?address=1301%20lombard%20street%20philadelphia',
In this case, I'll get an error in the error object because Node cannot make the HTTP request, it can't even connect it to the server. I could also get an error if the machine I'm making the request from does not have access to the internet. It's going to try to reach out to the Google servers, it's going to fail, and we're going to get an error.
Now, we can check out the error object by deleting those pieces of text from the URL and making a request. In this case, I'll swap out response for error, as shown here:
const request = require('request');
request({
url: 'https://mapogleapis.com/maps/api/geocode/json?address=1301%20lombard%20street%20philadelphia',
json: true
}, (error, response, body) => {
console.log(JSON.stringify(error, undefined, 2));
});
Now, inside the Terminal, let's rerun the application by running the node app.js command, and we can see exactly what we get back:
When we make the bad request, we get our error object printing to the screen, and the thing we really care about is the error code. In this case we have the ENOTFOUND error. This means that our local machine could not connect to the host provided. In this case mapogleapis.com, it doesn't exist so we'll get an error right here.
These are going to be the system errors, things such as your program not being able to connect to the internet or the domain not being found. This is also going to be really important when it comes to creating some error handling for our application there is a chance that the user's machine won't be connected to the internet. We're going to want to make sure to take the appropriate action and we'll do that depending on what is inside the error object.
If we can fix the URL, setting it back to maps.googleapis.com, and make the exact same request by using the up arrow key and the enter key, the request error object it's going to be empty, and you can see null print to the screen:
In this case, everything went great, there was no error, and it was able to successfully fetch the data, which it should be able to because we have a valid URL. That is a quick rundown of the body, the response, and the error argument. We will use them in more detail as we add error handling.
Now, we'll print some data from the body to the screen. Let's get started by printing the formatted address, and then we will be responsible for printing both the latitude and the longitude.
We'll start with figure out where the formatted address is. For this, we'll go to the browser and use JSONView. At the bottom of the browser page, you can see that little blue bar shows up when we highlight over items, and it changes as we switch items. For formatted address, for example, we access the results property, results is an array. In the case of most addresses, you'll only get one result:
We'll use the first result every time, so we have the index of 0, then it's the .formatted_address property. This bottom line is exactly what we need to type inside of our Node code.
Inside Atom, in our code, we'll delete the console.log statement, and replace it with a new console.log statement. We'll use template strings to add some nice formatting to this. We'll add Address with a colon and a space, then I'll inject the address using the dollar sign and the curly braces. We'll access the body, results, and the first item in the results array followed by formatted address, as shown here:
const request = require('request');
request({
url: 'https://maps.googleapis.com/maps/api/geocode/json?address=1301%20lombard%20street%20philadelphia',
json: true
}, (error, response, body) => {
console.log(`Address: ${body.results[0].formatted_address}`);
});
With this in place, I can now add a semicolon at the end and save the file. Next, we'll rerun the application inside of the Terminal, and this time around we get our address printing to the screen, as shown here:
Now that we have the address printing to the screen, what we would like to print both the latitude and the longitude next.
In order to get started, inside Atom, we'll add another console.log line right next to the console.log we added for formatted address. We'll use template strings again to add some nice formatting. Let's print the latitude first.
For this, we'll add latitude followed by a colon. Then we can inject our variable using the dollar sign with the curly braces. Then, the variable we want is on the body. Just like the formatted address, it's also in the first results item; results at the index of zero. Next, we'll be going into geometry. From geometry, we'll grab the location property, the latitude, .lat, as shown here:
console.log(`Address: ${body.results[0].formatted_address}`);
console.log(`Latitude: ${body.results[0].geometry.location.lat}`);
});
Now that we have this in place, we'll do the exact same thing for longitude. We'll add another console.log statement in the next line of the code. We'll use template strings once again, typing longitude first. After that, we'll put a colon and then inject the value. In this case, the value is on the body; it's in that same results item, the first one. We'll go into geometry location again. Instead of .lat, we'll access .lng. Then we can add a semicolon at the end and save the file. This will look something like the following:
console.log(`Address: ${body.results[0].formatted_address}`);
console.log(`Latitude: ${body.results[0].geometry.location.lat}`);
console.log(`Longitude: ${body.results[0].geometry.location.lng}`);
});
Now we'll test it from the Terminal. We'll rerun the previous command, and as shown in the following screenshot, you can see we have the latitude, 39.94, and the longitude, -75.16 printing to the screen:
And these are the exact same values we have inside the Chrome browser, 39.94, -75.16. With this in place, we've now successfully pulled off the data we need to make that request to the weather API.
In this chapter, we have gone through a basic example of asynchronous programming. Next, we talked about what happens behind the scenes when you run asynchronous code. We got a really good idea about how your program runs and what tools and tricks are happening behind the scenes to make it run the way it does. We through a few examples that illustrate how the Call Stack, Node APIs, the Callback Queue, and the Event Loop work.
Then, we learned how to use the request module to make an HTTP request for some information, the URL we requested was a Google Maps Geocoding URL, and we passed in the address we want the latitude and the longitude for. Then we used a callback function that got fired once that data came back.
At the end of the section Callback functions and APIs, we looked into a quick tip on how we can format objects when we want to print them to the console. Last, we looked into what makes up the HTTPS request.
In the next chapter, we'll add some error handling to this callback because that's going to be really important for our HTTP requests. There's a chance that things will go wrong, and when they do, we'll want to handle that error by printing a nice error message to the screen.
This chapter is the second part of our asynchronous programming in Node.js. In this chapter, we'll look at callbacks, HTTP requests, and more. We're going to handle a lot of the errors that happen inside callbacks. There's a lot of ways our request in app.js can go wrong, and we'll want to figure out how to recover from errors inside of our callback functions when we're doing asynchronous programming.
Next, we'll be moving our request code block into a separate file and abstracting a lot of details. We'll talk about what that means and why it's important for us. We'll be using Google's Geolocation API, and we'll be using the Dark Sky API to take location information like a zip code and turn that into real-world current weather information.
Then, we'll start wiring up that forecast API, fetching real-time weather data for the address that's geocoded. We'll add our request inside of the callback for geocodeAddress. This will let us take that dynamic set of latitude and longitude coordinates, the lat/lng for the address used in the arguments list, and fetch the weather for that location.
Specifically, we'll look into the following topics:
In this section, you'll learn how to set up yargs for the weather app. You'll also learn how to include user input, which is very important for our application.
As shown in the previous chapter, HTTPS request section, the user will not type their encoded address into the Terminal; instead they will be typing in a plain text address like 1301 Lombard Street.
Now this will not work for our URL, we need to encode those special characters, like the space, replacing them with %20. Now %20 is the special character for the space, other special characters have different encoding values. We'll learn how to encode and decode strings, so we can set up our URL to be dynamic. It's going to be based off of the address provided in the Terminal. That's all we're going to discuss in this section. By the end of the section, you'll be able to type in any address you like, and you'll see the formatted address, the latitude, and the longitude.
Before we can get started doing any encoding, we have to get the address from the user, and before we can set up yargs we have to install it. In the Terminal, we'll run the npm install command, the module name is yargs, and we'll look for version 10.1.1, which is the latest version at the time of writing. We'll use the save flag to run this installation, as shown in the following screenshot:
Now the save flag is great because as you remember. It updates the package.json file and that's exactly what we want. This means that we can get rid of the node modules folder which takes up a ton of space, but we can always regenerate it using npm install.
While the installation is going on, we do a bit of configuration in the app.js file. So we can get started by first loading in yargs. For this, in the app.js file, next to request constant, I'll make a constant called yargs, setting it equal to require(yargs) just like this:
const request = require('request');
const yargs = require('yargs');
Now we can go ahead and actually do that configuration. Next we'll make another constant called argv. This will be the object that stores the final parsed output. That will take the input from the process variable, pass it through yargs, and the result will be right here in the argv constant. This will get set equal to yargs, and we can start adding some calls:
const request = require('request');
const yargs = require('yargs');
const argv = yargs
Now when we created the notes app we had various commands, you could add a note and that required some arguments, list a note which required just the title, list all notes which didn't require any arguments, and we specified all of that inside of yargs.
For the weather app the configuration will be a lot simpler. There is no command, the only command would be get weather, but if we only have one why even make someone type it. In our case, when a user wants to fetch the weather all they will do is type node app.js followed by the address flag just like this:
node app.js --address
Then they can type their address inside of quotes. In my case it could be something like 1301 lombard street:
node app.js --address '1301 lombard street'
This is exactly how the command will get executed. There's no need for an actual command like fetch weather, we go right from the file name right into our arguments.
To configure yargs, things will look a little different but still pretty similar. In the Atom, I'll get started by calling .options, which will let us configure some top level options. In our case, we'll pass in an object where we configure all of the options we need. Now I'll format this like I do for all of my chained calls, where I move the call to the next line and I indent it like this:
const argv = yargs
.options({
})
Now we can set up our options and in this case we just have one, it will be that a option; a will be short for address. I could either type address in the options and I could put a in the alias, or I could put a in the options and type address in the alias. In this case I'll put a as shown here:
const argv = yargs
.options({
a: {
}
})
Next up, I can go ahead and provide that empty object, and we'll go through these same exact options we used inside of the notes app. We will demand it. If you'll fetch the weather we need an address to fetch the weather for, so I'll set demand equal to true:
const argv = yargs
.options({
a: {
demand: true,
}
})
Next up, we can set an alias, I'll set alias equal to address. Then finally we'll set describe, we can set describe to anything we think would be useful, in this case I'll go with Address to fetch weather for, as shown here:
const argv = yargs
.options({
a: {
demand: true,
alias: 'address',
describe: 'Address to fetch weather for'
}
})
Now these are the three options we provided for the notes app, but I'll add a fourth one to make our yargs configuration for the weather app even more full proof. This will be an option called string. Now string takes a Boolean either true or false. In our case we want true to be the value. This tells yargs to always parse the a or address argument as a string, as opposed to something else like a number or a Boolean:
const argv = yargs
.options({
a: {
demand: true,
alias: 'address',
describe: 'Address to fetch weather for',
string: true
}
})
In the Terminal, if I were to delete the actual string address, yargs would still accept this, it would just think I'm trying to add a Boolean flag, which could be useful in some situations. For example, do I want to fetch in Celsius or in Fahrenheit? But in our case, we don't need any sort of true or false flag, we need some data, so we'll set string to true to make sure we get that data.
Now that we have our options configuration in place, we can go ahead and add a couple other calls that we've explored. I'll add .help, calling it as shown in the following code, which adds the help flag. This is really useful especially when someone is first using a command. Then we can access .argv, which takes all of this configuration, runs it through our arguments, and restores the result in the argv variable:
const argv = yargs
.options({
a: {
demand: true,
alias: 'address',
describe: 'Address to fetch weather for',
string: true
}
})
.help()
.argv;
Now the help method adds that help argument, we can also add an alias for it right afterwards by calling .alias. Now .alias takes two arguments, the actual argument that you want to set an alias for and the alias. In our case, we already have help registered, it gets registered when we call help, and we'll set an alias which will just be the letter h, awesome:
.help()
.alias('help', 'h')
.argv;
Now we have all sorts of really great configurations set up for the weather app. For example, inside the Terminal I can now run help, and I can see all of the help information for this application:
I could also use the shortcut -h, and I get the exact same data back:
Now the address is also getting passed through but we don't print it to the screen, so let's do that. Right after the configuration, let's use console.log to print the entire argv variable to the screen. This will include everything that got parsed by yargs:
.help()
.alias('help', 'h')
.argv;
console.log(argv);
Let's go ahead and rerun it in the Terminal, this time passing in an address. I'll use the a flag, and specifying something like 1301 lombard street, closing the quotes, and hitting enter:
node app.js -a '1301 lombard street'
When we do this we get our object, and as shown in the code output, we have 1301 Lombard St, Philadelphia, PA 19147, USA, the plain text address:
In the preceding screenshot, notice that we happen to fetch the latitude and longitude for that address, but that's just because we have it hard coded in the URL in app.js. We still need to make some changes in order to get the address, the one that got typed inside the argument, to be the address that shows up in the URL.
To explore how to encode and decode strings we'll head into the Terminal. Inside the Terminal, first we'll clear the screen using the clear command, and then we boot up a node process by typing the node command as shown:
node
Here we can run any statements we like. When we're exploring a really basic node or JavaScript feature, we'll look into some examples first, and then we go ahead and add it into our actual application. We'll look at two functions, encodeURIComponent and decodeURIComponent. We'll get started with encoding first.
Encoding, the method is called encodeURIComponent, encode URI in uppercase component, and it takes just one argument, the string you want to encode. In our case, that string will be the address, something like 1301 lombard street philadelphia. When we run this address through encodeURIComponent by hitting enter, we get the encoded version back:
encodeURIComponent('1301 lombard street philadelphia')
As shown in the following code output, we can see all the spaces, like the space between 1301 and lombard, have been replaced with their encoded character, and for the case of the space it is %20. By passing our string through encodeURIComponent, we'll create something that's ready to get injected right into the URL so we can fire off that dynamic request.
Now the alternative to encodeURIComponent is. This will take an encoded string like the one in the previous example, and take all the special characters, like %20, and convert them back into their original values, in this case space. For this, inside of decodeURIComponent once again we'll pass a string.
Let's go ahead and type our first and last name. In my case it's Andrew, and instead of a space between them I'll add %20, which we know is the encoded character for a space. Since we're trying to decode something, it's important to have some encoded characters here. Once yours looks like the following code with your first and last name, you can go ahead and hit enter, and what we get back is the decoded version:
decodeURIComponent('Andrew%20Mead')
As shown in the following code output, I have Andrew Mead with the %20 being replaced by the space, exactly what we expected. This is how we can encode and decode URI components in our app:
Now what we want to do is pull the address out of argv, we already saw that it's there, we want to encode it and we want to inject it in our URL in app.js file, replacing the address:
This will essentially create that dynamic request we've been talking about. We'll be able to type in any address we want, whether it's an address or a zip code or a city state combination, and we'll be able to fetch the formatted address, the latitude, and the longitude.
In order to get started, the first thing I'll do is get the encoded address. Let's make a variable called encodedAddress in the app.js next to the argv variable, where we can store that result. We'll set this equal to the return value from the method we just explored in the Terminal, encodeURIComponent. This will take the plain text address and return the encoded result.
Now we do need to pass in the string, and we have that available on argv.address which is the alias:
.help()
.alias('help', 'h')
.argv;
var encodedAddress = encodeURIComponent(argv.address);
Now we have that encoded result all that's left to do is inject it inside of the URL string. In the app.js, currently we're using a regular string. We'll swap this out for a template string so I can inject a variable inside of it.
Now that we have a template string, we can highlight the static address which ends at philadelphia and goes up to the = sign, and remove it, and instead of typing in a static address we can inject the dynamic variable. Inside of my curly braces, encodedAddress, as shown here:
var encodedAddress = encodeURIComponent(argv.address);
request({
url: `https://maps.googleapis.com/maps/api/geocode/json?address=${encodedAddress}`,
With this in place we are now done. We get the address from the Terminal, we encode it, and we use that inside of a geocode call. So the formatted address, latitude, and longitude should match up. Inside the Terminal, we'll shut down node by using control + C twice and use clear to clear the Terminal output.
Then we can go ahead and run our app using node app.js, passing in either the a or address flag. In this case, we'll just use a. Then we can go ahead and type in an address, for example, 1614 south broad street philadelphia as shown here:
node app.js -a '1614 south broad street philadelphia'
In this case we'll find that it's actually taking a little longer than we would expect, about three or four seconds, but we do get the address back:
Here we have the formatted address with a proper zip code state and country, and we also have the latitude and longitude showing up. We'll try a few other examples. For example for a town in Pennsylvania called Chalfont, we can type in chalfont pa which is not a complete address, but the Google Geocode API will convert it into the closest thing, as shown here:
We can see that it's essentially the address of the town, Chalfont, PA 18914 is the zip, with the state USA. Next, we have the general latitude and longitude data for that town, and this will be fine for fetching weather data. The weather isn't exactly changing when you move a few blocks over.
Now that we have our data coming in dynamically, we are able to move on to the next section where we'll handle a lot of the errors that happen inside of callbacks. There are a lot of ways this request can go wrong, and we'll want to figure out how to recover from errors inside of our callback functions when we're doing asynchronous programming.
In this section we'll learn how to handle errors inside of your callback functions, because as you might guess things don't always go as planned. For example, the current version of our app has a few really big flaws, if I try to fetch weather using node app.js with the a flag for a zip that doesn't exist, like 000000, the program crashes, which is a really big problem. It's going off. It's fetching the data, eventually that data will come back and we get an error, as shown here:
It's trying to fetch properties that don't exist, such as body.results[0].formatted_address is not a real property, and this is a big problem.
Our current callback expects everything went as planned. It doesn't care about the error object, doesn't look at response codes; it just starts printing the data that it wants. This is the happy path, but in real world node apps we have to handle errors as well otherwise the applications will become really useless, and a user can get super frustrated when things don't seem to be working as expected.
In order to do this, we'll add a set of if/else statements inside of the callback. This will let us check certain properties to determine whether or not this call, the one to our URL in the app.js, should be considered a success or a failure. For example, if the response code is a 404, we might want to consider that a failure and we'll want to do something other than trying to print the address, latitude and longitude. If everything went well though, this is a perfectly reasonable thing to do.
There are two types of errors that we'll worry about in this section. That will be:
In order to get started, let's take a look at what can happen when we pass a bad data to the Google API.
To view what actually comes back in a call like the previous example, where we have an invalid address, we'll head over to the browser and pull up the URL we used in the app.js file:
We will remove the address we used earlier from the browser history, and type in 000000, hit enter:
We get our results arrive but those are no results, and we have the status, the status says ZERO_RESULTS, and this is the kind of information that's really important to track down. We can use the status text value to determine whether or not the request was successful. If we pass in a real zip code like 19147, which is Philadelphia, we'll get our results back, and as shown in the following image, the status will get set equal to OK:
We can use this status to determine that things went well. Between these status property and the error object, which we have inside of our app, we can determine what exactly to do inside of the callback.
The first thing we'll do is add an if statement as shown below, checking if the error object exists:
request({
url: `https://maps.googleapis.com/maps/api/geocode/json?address=${encodedAddress}`,
json: true
}, (error, response, body) => {
if (error) {
}
This will run the code inside of our code block if the error object exists, if it doesn't fine, we'll move on into the next else if statement, if there is any.
If there is an error, all we'll do is add a console.log and a message to the screen, something like Unable to connect to Google servers:
if (error) {
console.log('Unable to connect Google servers.');
}
This will let the user know that we were unable to connect to the user servers, not that something went wrong with their data, like the address was invalid. This is what be inside of the error object.
Now the next thing that we'll do is add an else if statement, and inside of the condition we'll check the status property. If the status property is ZERO_RESULTS, which it was for the zip code 000000, we want to do something other than trying to print the address. Inside of our conditional in Atom, we can check that using the following statement:
if (error) {
console.log('Unable to connect Google servers.');
} else if (body.status === 'ZERO_RESULTS') {
}
If that's the case, we'll print a different message, other than Unable to connect Google servers, for this one we can use console.log to print Unable to find that address.:
if (error) {
console.log('Unable to connect Google servers.');
} else if (body.status === 'ZERO_RESULTS') {
console.log('Unable to find that address.');
}
This lets the user know that it wasn't a problem with the connection, we were just unable to find the address they provided, and they should try with something else.
Now we have error handling for those system errors, like being unable to connect to the Google servers, and for errors with the input, in this case we're unable to find a location for that address, and this is fantastic, we have both of our errors handled.
In our case, if the status is ZERO_RESULTS, we know the request failed and we can act accordingly. Inside of our app, now we'll add our last else if clause, if things went well.
Now we want to add the else if clause checking if the body.status property equals OK. If it does, we can go ahead and run these three lines inside of the code block:
console.log(`Address: ${body.results[0].formatted_address}`);
console.log(`Latitude: ${body.results[0].geometry.location.lat}`);
console.log(`Longitude: ${body.results[0].geometry.location.lng}`);
});
If it doesn't, these lines shouldn't run because the code block will not execute. Then we'll test things out inside of the Terminal, try to fetch the address of 00000, and make sure that instead of the program crashing we get our error message printing to the screen. Then we go ahead and mess up the URL in the app by removing some of the important characters, and make sure this time we get the Unable to connect to the Google servers. message. And last we'll see what happens when we enter a valid address, and make sure our three console.log statements still execute.
To get started we'll add that else if statement, and inside of the condition we'll check if body.status is OK:
if (error) {
console.log('Unable to connect Google servers.');
} else if (body.status === 'ZERO_RESULTS') {
console.log('Unable to find that address.');
} else if (body.status === 'OK') {
}
If it is OK, then we'll simply take the three console.log lines (shown in the previous code block) and move them in the else if condition. If it is OK, we'll run these three console.log statements:
if (error) {
console.log('Unable to connect Google servers.');
} else if (body.status === 'ZERO_RESULTS') {
console.log('Unable to find that address.');
} else if (body.status === 'OK') {
console.log(`Address: ${body.results[0].formatted_address}`);
console.log(`Latitude: ${body.results[0].geometry.location.lat}`);
console.log(`Longitude: ${body.results[0].geometry.location.lng}`);
}
Now we have a request that handles errors really well. If anything goes wrong we have a special message for it, and if things go right we print exactly what the user expects, the address, the latitude, and the longitude. Next we'll test this.
To test this inside of the Terminal, we'll start by rerunning the command with an address that's invalid:
node app.js -a 000000
When we run this command, we see that Unable to find address. prints to the screen. Instead of the program crashing, printing a bunch of errors, we simply have a little message printing to the screen. This is because the code we have in second else if statement, that tried to access those properties that didn't exist, no longer runs because our first else if condition gets caught and we simply print the message to the screen.
Now we also want to test that the first message (Unable to connect to the Google servers.) prints when it should. For this, we'll delete some part of the URl in our code, let's say, s and ., and save the file:
request({
url: `https://mapgoogleapis.com/maps/api/geocode/json?address=${encodedAddress}`,
json: true
}, (error, response, body) => {
if (error) {
console.log('Unable to connect Google servers.');
} else if (body.status === 'ZERO_RESULTS') {
console.log('Unable to find that address.');
} else if (body.status === 'OK') {
console.log(`Address: ${body.results[0].formatted_address}`);
console.log(`Latitude: ${body.results[0].geometry.location.lat}`);
console.log(`Longitude: ${body.results[0].geometry.location.lng}`);
}
});
Then we'll rerun the previous command in the Terminal. This time around we can see Unable to connect to Google servers. prints to the screen just like it should:
Now we can test it the final thing, by first readjusting the URL to make it correct, and then fetching a valid address from the Terminal. For example, we can use the node app.js, setting address equal to 08822, which is a zip code in New Jersey:
node app.js --address 08822
When we run this command, we do indeed get our formatted address for Flemington, NJ, with a zip code and the state, and we have our latitude and longitude as shown here:
We now have a complete error handling model. When we make a request to Google providing a address that has problems, in this case there's ZERO_RESULTS, the error object will get populated, because it's not technically an error in terms of what request thinks an error is, it's actually in the response object, which is why we have to use body.status in order to check the error.
That is it for this section, we now have error handling in place, we handle system errors, Google server errors, and we have our success case.
In this section, we'll be refactoring app.js, taking a lot of the complex logic related to geocoding and moving it into a separate file. Currently, all of the logic for making the request and determining whether or not the request succeeded, our if else statements, live inside of app.js:
request({
url: `https://maps.googleapis.com/maps/api/geocode/json?address=${encodedAddress}`,
json: true
}, (error, response, body) => {
if (error) {
console.log('Unable to connect Google servers.');
} else if (body.status === 'ZERO_RESULTS') {
console.log('Unable to find that address.');
} else if (body.status === 'OK') {
console.log(`Address: ${body.results[0].formatted_address}`);
console.log(`Latitude: ${body.results[0].geometry.location.lat}`);
console.log(`Longitude: ${body.results[0].geometry.location.lng}`);
}
});
This is not exactly reusable and it really doesn't belong here. What I'd like to do before we add even more logic related to fetching the forecast, that's the topic of the next section, is break this out into its own function. This function will live in a separate file, like we did for the notes application.
In the notes app we had a separate file that had functions for adding, listing, and removing notes from our local adjacent file. We'll be creating a separate function responsible for geocoding a given address. Although the logic will stay the same, there really is no way around it, it will be abstracted out of the app.js file and into its own location.
First up, we will need to create a new directory and a new file then we'll add a few more advanced features to the function. But before that, we'll see what the require statement will look like.
We'll load in via a constant variable called geocode the module, and we'll set it equal to require, since we're requiring a local file we'll add that relative path, ./geocode/geocode.js:
const geocode = require('./geocode/geocode.js');
That means you need to make a directory called geocode in the weather-app folder, and a file called geocode.js. Since we have a .js extension, we can actually leave it off of our require call.
Now, in the app.js file, next to .argv object, we need to call geocode.geocodeAddress. The geocodeAddress function, that will be the function responsible for all the logic we currently have in app.js. The geocodeAddress function will take the address, argv.address:
geocode.geocodeAddress(argv.address);
It will be responsible for doing everything, encoding the URL, making the request, and handling all of the error cases. This means, in that new file we need to export the geocodeAddress function, just like we exported functions from the notes application file. Next, we have all of the logic here:
var encodedAddress = encodedURIComponent(argv.address);
request({
url: `https://maps.googleapis.com/maps/api/geocode/json?address=${encodedAddress}`,
json: true
}, (error, response, body) => {
if (error) {
console.log('Unable to connect Google servers.');
} else if (body.status === 'ZERO_RESULTS') {
console.log('Unable to find that address.');
} else if (body.status === 'OK') {
console.log(`Address: ${body.results[0].formatted_address}`);
console.log(`Latitude: ${body.results[0].geometry.location.lat}`);
console.log(`Longitude: ${body.results[0].geometry.location.lng}`);
}
});
This logic needs to get moved inside of the geocodeAddress function. Now we can copy and paste the preceding shown code directly, there really is no way around some of the more complex logic, but we will need to make a few changes. We'll need to load requests into that new file, since we use it and it isn't going to be required in that file by default. Then we can go ahead and clean up the request require call in the code, since we won't be using it in this file.
Next up, the argv object is not going to exist, we'll get that passed in via the first argument, just like the argv.address in the geocode.Address statement. This means we'll need to swap this out for whatever we call that first argument for example, address. Once this is done, the program should work exactly as it works without any changes in app.js, there should be no change in functionality.
To get started, let's make a brand new directory in the weather-app folder, that's the first thing we need to do. The directory is called geocode, which aligns with the require statement we have in the geocode variable. In geocode folder, we'll make our file geocode.js:
Now inside of geocode.js, we can get started by loading in request, let's make a constant called request, and we'll set it equal to require('request'):
const request = require('request');
Now we can go ahead and define the function responsible for geocoding, this one will be called geocodeAddress. We'll make a variable called geocodeAddress, setting it equal to an arrow function, and this arrow function will get an address argument past in:
var geocodeAddress = (address) => {
};
This is the plain text unencoded address. Now before we copy the code from app.js into this function body, we want to export our geocodeAddress function using module.exports, which we know as an object. Anything we put on module.exports object will be available to any files that require this file. In our case, we want to make a geocodeAddress property available, setting it equal to the geocodeAddress function that we defined in the preceding statement:
var geocodeAddress = (address) => {
};
module.exports.geocodeAddress = geocodeAddress;
Now it's time to actually copy all of the code from app.js in to geocode.js. We'll cut the request function code, move in to geocode.js, and paste it inside of the body of our function:
var geocodeAddress = (address) => {
var encodedAddress = encodedURIComponent(argv.address);
request({
url: `https://maps.googleapis.com/maps/api/geocode/json?address=${encodedAddress}`,
json: true
}, (error, response, body) => {
if (error) {
console.log('Unable to connect Google servers.');
} else if (body.status === 'ZERO_RESULTS') {
console.log('Unable to find that address.');
} else if (body.status === 'OK') {
console.log(`Address: ${body.results[0].formatted_address}`);
console.log(`Latitude: ${body.results[0].geometry.location.lat}`);
console.log(`Longitude: ${body.results[0].geometry.location.lng}`);
}
});
};
module.exports.geocodeAddress = geocodeAddress;
The only thing we need to change inside of this code, is how we get the plaintext address. We no longer have that argv object, instead we get address passed in as an argument. The final code will look like the following code block:
const request = require('request');
var geocodeAddress = (address) => {
var encodedAddress = encodedURIComponent(argv.address);
request({
url: `https://maps.googleapis.com/maps/api/geocode/json?address=${encodedAddress}`,
json: true
}, (error, response, body) => {
if (error) {
console.log('Unable to connect Google servers.');
} else if (body.status === 'ZERO_RESULTS') {
console.log('Unable to find that address.');
} else if (body.status === 'OK') {
console.log(`Address: ${body.results[0].formatted_address}`);
console.log(`Latitude: ${body.results[0].geometry.location.lat}`);
console.log(`Longitude: ${body.results[0].geometry.location.lng}`);
}
});
};
module.exports.geocodeAddress = geocodeAddress;
With this in place, we're now done with the geocode file. It contains all of the complex logic for making and finishing the request. Over at app.js, we can clean things up by removing some extra spaces, and removing the request module which is no longer used in this file. The final app.js file will look like the following code block:
const yargs = require('yargs');
const geocode = require('./geocode/geocode');
const argv = yargs
.options({
a: {
demand: true,
alias: 'address',
describe: 'Address to fetch weather for',
string: true
}
})
.help()
.alias('help', 'h')
.argv;
geocode.geocodeAddress(argv.address);
Now at this point the functionality should be exactly the same. Inside of the Terminal, I'll go ahead and run a few to confirm the changes worked. We'll use the a flag to search for a zip code that does exist, something like 19147, and as shown, we can see the address, the latitude, and the longitude:
Now we'll swap out that zip code to one that does not exist, like 000000, when we run this through the geocoder, you can see Unable to find address prints to screen:
It means all of the logic inside of geocode.js is still working. Now the next step in the process is the process of adding a callback function to geocodeAddress.
The goal of refactoring the code and app.js was not to get rid of the callback, the goal was to abstract all the complex logic related to encoding the data, making that request, and checking for errors. app.js should not care about any of that, it doesn't even need to know that an HTTP request was ever made. All the app.js should care about is passing an address to the function, and doing something with the result. The result being either an error message or the data, the formatted address, the latitude, and the longitude.
Before we go ahead and make any changes in geocode.js, we want to take a look at how we'll structure things inside of app.js. We'll pass an arrow function to geocodeAddress, and this will get called after the request comes back:
geocode.geocodeAddress(argv.address, () => {
});
In the parentheses, we'll expect two arguments, errorMessage, which will be a string, and results, which will contain the address, the latitude, and the longitude:
geocode.geocodeAddress(argv.address, (errorMessage, results) => {
});
Out of these two only one will be available at a time. If we have an error message we'll not have results, and if we have results we'll not have an error message. This will make the logic in the arrow function, of determining whether or not the call succeeded, much simpler. We'll be able to use an if statement, if (errorMessage), and if there is an error message, we can simply print it to the screen using console.log statement:
geocode.geocodeAddress(argv.address, (errorMessage, results) => {
if (errorMessage) {
console.log(errorMessage);
}
});
There's no need to dig into any sort of object and figure out exactly what's going on, all of that logic is abstracted in geocode.js. Now if there is no error message inside of the else clause, we can go ahead and print the results. We'll use that pretty print method we talked about in the previous chapter, we'll add the console.log(JSON.stringify) statement, and we'll pretty print the results object which will be an object containing an address property, a latitude property, and a longitude property.
Then, we'll pass the undefined argument as our second argument. This skips over the filtering function which we don't need, and then we can specify the spacing, which will format this in a really nice way, we'll use two spaces as shown here:
geocode.geocodeAddress(argv.address, (errorMessage, results) => {
if (errorMessage) {
console.log(errorMessage);
} else {
console.log(JSON.stringify(results, undefined, 2));
}
});
Now that we have our function set up inside of geocodeAddress function in app.js, and we have a good idea about how it will look, we can go ahead and implement it inside of geocode.js.
In our arguments definition, instead of just expecting an address argument we'll also expect a callback argument, and we can call this callback argument whenever we like. We'll call it in three places. We'll call it once inside of the if (error) block, instead of calling console.log we'll simply call the callback with the Unable to connect to Google servers. string. This string will be the error message we defined in geocodeAddress function in app.js.
In order to do this, all we need to do is change our console.log call to a callback call. We'll pass it as the first argument our error message. We can take the string exactly as it appeared in console.log, and move it into the arguments for callback. Then I can remove the console.log call and save the file. The resultant code will look like following:
request({
url: `https://maps.googleapis.com/maps/api/geocode/json?address=${encodedAddress}`,
json: true
}, (error, response, body) => {
if (error) {
callback('Unable to connect to Google servers.');
}
Now we can do the exact same thing in the next else if block for our other console.log statement, when there is zero results, we'll replace console.log with callback:
if (error) {
callback('Unable to connect Google servers.');
} else if (body.status === 'ZERO_RESULTS') {
callback('Unable to find that address.');
}
Now the last else if block will be a little trickier. It's a little trickier because we don't exactly have our object. We also need to create an undefined variable for the first argument, since an error message will not be provided when things go well. All we have to do to create that undefined error message is call callback, passing an undefined variable as the first argument. Then we can go ahead and specify our object as the second argument, and this object, this will be exactly what's in the geocodeAddress function, results:
} else if (body.status === 'OK') {
callback(undefined, {
})
console.log(`Address: ${body.results[0].formatted_address}`);
console.log(`Latitude: ${body.results[0].geometry.location.lat}`);
console.log(`Longitude: ${body.results[0].geometry.location.lng}`);
}
Now as I mentioned the results have three properties: the first one will be formatted address, so let's go ahead and knock that out first. We'll set address equal to body.results, just like we have in the Address variable of console.log statement:
} else if (body.status === 'OK') {
callback(undefined, {
address: body.results[0].formatted_address
})
console.log(`Address: ${body.results[0].formatted_address}`);
console.log(`Latitude: ${body.results[0].geometry.location.lat}`);
console.log(`Longitude: ${body.results[0].geometry.location.lng}`);
}
Here we're making things even easier, instead of having complex properties that are nested deep inside of an object inside of app.js, we'll be able to access a simple address property, and we'll do the same thing for Latitude and Longitude of console.log statements.
Next, we'll grab the code that let us fetch the latitude, and I'll add my second property, latitude, setting it equal to the code we grab from the console.log statement. Then we can go ahead and add the last property, which will be longitude, setting that equal to the latitude code, replacing lat with lng. Now that we have this in place we can add a semicolon at the end, and remove the console.log statements since they're no longer necessary, and with this we are done:
if (error) {
callback('Unable to connect Google servers.');
} else if (body.status === 'ZERO_RESULTS') {
callback('Unable to find that address.');
} else if (body.status === 'OK') {
callback(undefined, {
address: body.results[0].formatted_address,
latitude: body.results[0].geometry.location.lat,
longitude: body.results[0].geometry.location.lng
});
}
We can now rerun the file, and when we do we'll pass an address to geocodeAddress, this will go off and make the request, and when the request comes back, we'll be able to handle that response in a really simple way.
Inside of the Terminal, we'll go back to run two node app.js commands; the command where we used the zip code of 19147, everything works as expected and a bad zip code 000000, to show the error message.
As shown in the following code output, we can see our results object with an address property, a latitude property, and a longitude property:
In case of a bad zip code, we just want to make sure the error message still shows up, and it does, Unable to find that address. prints to the screen, as shown here:
This is happening because of the if statement in the geocodeAddress function in app.js.
After abstracting all of that logic to the geocode file, the app.js file is now a lot simpler and a lot easier to maintain. We can also call geocodeAddress in multiple locations. If we want to reuse the code we don't have to copy and paste the code, which would not follow the DRY principle, which stands for Don't Repeat Yourself, instead we can do the DRY thing and simply call geocodeAddress like we have in the app.js file. With this in place we are now done fetching the geocode data.
In this section, you'll make your very first request to the weather API, and we'll do this in a static way at first, meaning that it will not use the actual latitude and longitude for the address we passed in, we'll simply have a static URL. We'll make the request and we'll explore what data we get back in the body.
Now before we can add anything to Atom, we want to go ahead and explore this API so we can see how it works in the browser. This will give us a better idea about what weather data we get back, when we pass a latitude and longitude to the API. To do this we'll head over to the browser, and we'll visit a couple of URLs.
First up let's go to forecast.io. It is a regular weather website, you type in your location and you get all the weather information you'd expect:
As shown in the preceding image, there's warnings, there's radar, there's the current weather, and we also have the weekly forecast in the website as shown in the following image:
This is similar to weather.com, but the one cool thing about forecast.io is that the API that powers this website, it's actually available to you as a developer. You can make a request to our URL, and you can fetch the exact same weather information.
That is exactly what we'll do when we can explore the API by going to the website developer.forecast.io. Here we can sign up for a free developer account, in order to get started making those weather requests:
The Dark Sky Forecast API gives you 1,000 free requests a day, and I do not see us going over that limit. After the 1,000 requests, each costs a one thousandth of a penny, so you get a thousand requests for every penny you spend. We'll never go over that limit so don't even worry about it. There is no credit card required to get started, you'll simply get cut off after you make a thousand requests.
To get started you'll need to register for a free account, it's really simple, we just need an email and a password. Once we've created an account and we can see the dashboard as shown here:
The only piece of information we need from this page is our API key. The API key is like a password, it will be part of the URL we request and it will help forecast.io keep track of how many requests we make a day. Now I'll take this API key and paste it in the app.js, so we have it accessible later when we need it.
The next thing we'll do is explore the documentation, the actual URL structure we need to provide in order to fetch the weather for a given latitude and longitude. We can get that by clicking the API Docs link button, which is present in the top-right side of The Dark Sky Forecast API page. This'll lead us to following page:
In the API Docs link, we have a Forecast Request URL. As shown in the preceding image, this URL is exactly what we need to make a request to in order to fetch the data.
Before we add this URL into our app and use the request library, we need to find the actual URL which we can use to make the request. For this, we'll copy it and paste it into a new tab:
Now, we do need to swap out some of the URL information. For example, we have our API key that needs to get replaced, we also have latitude and longitude. Both of those need to get replaced with the real data. Let's get started with that API key first since we already copy and pasted it inside of app.js. We'll copy the API key, and replace the letters [key] with the actual value:
Next up, we can grab a set of longitude and latitude coordinates. For this, go inside the Terminal and run our app, node app.js, and for the address we can use any zip let's say, 19146 to fetch the latitude and longitude coordinates.
Next up, we'll copy these and place into the URL where they belong. The latitude goes between the forward slash and the comma, and the longitude will go after the comma, as shown here:
Once we have a real URL with all of those three pieces of info swapped out for actual info, we can make the request, and what we'll get back is the forecast information:
Now the data we get back, it is overwhelming. We have a forecast by the minute, we have forecasts by the hour, by the week, by the day, all sorts of information, it's really useful but it's also super overwhelming. In this chapter, we'll be using the first object that is currently. This stores all of the current weather information, things like the current summary which is clear, the temperature, the precipitation probability, the humidity, a lot of really useful information is sitting in it.
In our case, what we really care about is the temperature. The current temperature in Philadelphia is shown 84.95 degrees. This is the kind of information we want to use inside of our application, when someone searches for the weather in a given location.
Now in order to play around with the weather API, we'll take the exact same URL we have defined in the previous section, and we'll make a request in app.js. First, we want to do a little setup work.
Inside of app.js, we'll comment out everything we have so far, and next to our API key we'll make a call to request, requesting this exact URL, just like we did for the geocode API in the previous section/chapter, before we made it dynamic. Then we'll print out the body.currently.temperature property to the screen, so when we run the app we'll see the current temperature for whatever latitude and longitude we used. In our case it's a static latitude and longitude representing Philadelphia.
In order to get started we'll load in request. Now we had it in the app.js file before and then we removed it in the previous section, but we'll add it back once again. We'll add it next to the commented out code, by creating a constant called request, and loading it in, const request equals to require('request'):
const request = require('request');
Now we can go ahead and make the actual request, just like we did for the geocode API by calling request, it's a function just like this:
const request = require('request');
request();
We have to pass in our two arguments, the options object is the first one, and the second one is the arrow function:
request({}, () => {
});
This is our callback function that gets fired once the HTTP request finishes. Before we fill out the actual function, we want to set up our options. There're two options, URL and JSON. We'll set url equal to the static string, the exact URL we have in the browser:
request({
url: 'https://api.forecast.io/forecast/4a04d1c42fd9d32c97a2c291a32d5e2d/39.9396284,-75.18663959999999',
}, () => {
Then in the next line after comma, we can set json equal to true, telling the request library to go ahead and parse that body as JSON, which it is:
request({
url: 'https://api.forecast.io/forecast/4a04d1c42fd9d32c97a2c291a32d5e2d/39.9396284,-75.18663959999999',
json: true
}, () => {
From here, we can go ahead and add our callback arguments; error, response, and body. These are the exact same three arguments we have in the if block of geocode.js file for the geocoding request:
request({
url: 'https://api.forecast.io/forecast/4a04d1c42fd9d32c97a2c291a32d5e2d/39.9396284,-75.18663959999999',
json: true
}, (error, response, body) => {
});
Now that we have this in place, the last thing we need to do is print the current temperature, which is available on the body using console.log statement. We'll use console.log to print body.currently.temperature, as shown here:
request({
url: 'https://api.forecast.io/forecast/4a04d1c42fd9d32c97a2c291a32d5e2d/39.9396284,-75.18663959999999',
json: true
}, (error, response, body) => {
console.log(body.currently.temperature);
});
Now that we have the temperature printing, we need to test it by running it from the Terminal. In the Terminal, we'll rerun the previous command. The address is not actually being used here since we commented out that code, and what we get is 28.65, as shown in this code output:
With this we have our weather API call working inside of the application.
Now we do want to add a little error handling inside of our callback function. We'll handle errors on the error object, and we'll also handle errors that come back from the forecast.io servers. First up, just like we did for the geocoding API, we'll check if error exists. If it does, that means that we were unable to connect to the servers, so we can print a message that relays that message to the user, console.log something like Unable to connect to forecast.io server.:
request({
url: 'https://api.forecast.io/forecast/4a04d1c42fd9d32c97a2c291a32d5e2d/39.9396284,-75.18663959999999',
json: true
}, (error, response, body) => {
if (error){
console.log('Unable to connect to Forecast.io server.');
}
console.log(body.currently.temperature);
});
Now that we've handled general errors, we can move on to a specific error that the forecast.io API throws. This happens when the format of the URL, the latitude and longitude, is not correct.
For example, if we delete some numbers including the comma in the URL, and hit enter we'll get a 400 Bad Request:
This is the actual HTTP status code. If you remember from the geolocation API we had a body.status property that was either OK or ZERO_RESULTS. This is similar to that property, only this uses the HTTP mechanisms instead of some sort of custom solution that Google used. In our case, we'll want to check if the status code is 400. Now if we have a bad API key, I'll add a couple e's in the URL, we'll also get a 400 Bad Request:
So both of these errors can be handled using the same code.
Inside of Atom, we can handle this by checking the status code property. After our if statement closing curly brace, we'll add else if block, else if (response.statusCode), this is the property we looked at when we looked at the response argument in detail. response.statusCode will be equal to 400 if something went wrong, and that's exactly what we'll check for here:
if (error){
console.log('Unable to connect to Forecast.io server.');
} else if (response.statusCode === 400) {
}
If the status code is 400 we'll print a message, console.log('Unable to fetch weather'):
if (error){
console.log('Unable to connect to Forecast.io server.');
} else if (response.statusCode === 400) {
console.log('Unable to fetch weather.');
}
Now we've handled those two errors, and we can move on to the success case. For this we'll add another else if block with response.statusCode equals 200. The status code will equal 200 if everything went well, in that case we'll print the current temperature to the screen.
I'll cut the console.log(body.currently.temperature) line out and paste it inside of the else if code block:
if (error){
console.log('Unable to connect to Forecast.io server.');
} else if (response.statusCode === 400) {
console.log('Unable to fetch weather.');
} else if (response.statusCode === 200) {
console.log(body.currently.temparature);
}
});
There's is another way to represent our entire if block code. The following is an updated code snippet, and we can actually replace everything we have in the current callback function with this code:
if (!error && response.statusCode === 200) {
console.log(body.currently.temperature);
} else {
console.log('Unable to fetch weather.');
}
This condition checks if there is no error and the response status code is a 200, if that's the case what do we do? We simply print the temperature like we were doing last time, that was in the else if clause at the very bottom. Now we have an else case in the updated code snippet, so if there is an error or the status code is not a 200, we'll go ahead and print this message to the screen. This will handle things like the server not having a network connection, or 404s from an invalid or broken URL. All right, use this code instead and everything should be working as expected with the latest version of the weather API.
Now we have some error handling in place and we can go ahead and test that our app still works. From the Terminal we'll rerun the previous command, and we still get a temperature 28.71:
Back inside of Atom, we'll trash some of the data by removing the comma, saving the file:
request({
url: 'https://api.forecast.io/forecast/4a04d1c42fd9d32c97a2c291a32d5e2d/39.9396284-75.18663959999999',
json: true
}, (error, response, body) => {
if (error){
console.log('Unable to connect to Forecast.io server.');
} else if (response.statusCode === 400) {
console.log('Unable to fetch weather.');
} else if (response.statusCode === 200) {
console.log(body.currently.temparature);
}
});
When we rerun it from the Terminal, this time, we would expect Unable to fetch weather. to print to the screen, and when I rerun the app that is exactly what we get, as shown here:
Now, let's add the comma back in and test our last part of the code. To test the if error, we can test that by removing something like the dot from forecast.io:
request({
url: 'https://api.forecastio/forecast/4a04d1c42fd9d32c97a2c291a32d5e2d/39.9396284,-75.18663959999999',
json: true
}, (error, response, body) => {
We can rerun the app, and we see Unable to connect to Forecast.io server.:
All of our error handling works great, and if there is no errors the proper temperature prints to the screen, which is fantastic.
In this section, we'll take the code that we created in the last section, and break it out into its own file. Similar to what we did with the Geocoding API request where we called geocodeAddress instead of actually having the request call in app.js. That means we'll make a new folder, a new file, and we'll create a function in there that gets exported.
After that we'll go ahead and learn how to chain callbacks together. So when we get that address from the Terminal we can convert that into coordinates. And we can take those coordinates and convert them into temperature information, or whatever weather data we want to pull off of the return result from the Forecast API.
Now before we can dive into the refactoring, we'll create a brand new file, and we'll worry about getting the code we created in the previous section into that function. Then we'll go for creating that callback.
First, let's make the directory. The directory will be called weather. And in the weather directory we'll make a new file called weather.js.
Now in this file we can take all of our code from app.js, and paste it in weather.js:
const request = require('request');
request({
url: 'https://api.forecast.io/forecast/4a04d1c42fd9d32c97a2c291a32d5e2d/39.9396284,-75.18663959999999',
json: true
}, (error, response, body) => {
if (error) {
console.log('Unable to connect to Forecast.io server.');
} else if (response.statusCode === 400) {
console.log('Unable to fetch weather.');
} else if (response.statusCode === 200) {
console.log(body.currently.temperature);
}
});
The only thing we need to do in order to take this code and convert it to create that function, which will get exported. And then we can move our call to the request inside of it. We'll make a brand new function called getWeather next to the request variable:
const request = require('request');
var getWeather = () => {
};
getWeather will take some arguments, but that'll be added later. For now we'll leave the arguments list empty. Next, we'll take our call to request and move it inside the getWeather function:
const request = require('request');
var getWeather = () => {
request({
url: 'https://api.forecast.io/forecast/4a04d1c42fd9d32c97a2c291a32d5e2d/39.9396284,-75.18663959999999',
json: true
}, (error, response, body) => {
if (error) {
console.log('Unable to connect to Forecast.io server.');
} else if (response.statusCode === 400) {
console.log('Unable to fetch weather.');
} else if (response.statusCode === 200) {
console.log(body.currently.temperature);
}
});
};
Then, we can go ahead and export this getWeather function. We'll add module.exports.getWeather and set it equal to the getWeather function that we defined up:
module.exports.getWeather = getWeather;
Now that we have this in place, we can go ahead and move into app.js to add some code. The first thing we need do is remove the API key. We no longer need that. And we'll highlight all of the commented code and uncomment it using the command /.
Now we'll import the weather.js file. We'll create a const variable called weather, and setting it equal to the require, return result:
const yargs = require('yargs');
const geocode = require('./geocode/geocode');
const weather = require('');
In this case we're requiring our brand new file we just created. We'll provide a relative path ./ because we're loading in a file that we wrote. Then we'll provide the directory named weather followed by the file named weather.js. And we can leave off that js extension, as we already know:
const weather = require('./weather/weather');
Now that we have the Weather API loaded in, we can go ahead and call it. We'll comment out our call to geocodeAddress and, we'll run weather.getWeather():
// geocode.geocodeAddress(argv.address, (errorMessage, results) => {
// if (errorMessage) {
// console.log(errorMessage);
// } else {
// console.log(JSON.stringify(results, undefined, 2));
// }
//});
weather.getWeather();
Now as I mentioned before, there will be arguments later in the section. For now we'll leave them empty. And we can run our file from the Terminal. This means we should see the weather printing for the coordinates, we hard-coded in the previous section. So, we'll run node app.js. We'll need to provide an address since we haven't commented out the yargs code. So we'll add a dummy address. I'll use a zip code in New Jersey:
node app.js -a 08822
Now, the geolocation code is never running, because that is commented out. But we are running the weather code that got moved to the new file. And we are indeed seeing a temperature 31.82 degrees, which means that the code is properly getting executed in the new file.
Now we'll need to pass in some arguments, including a callback function and inside getWeather variable in weather file. We'll need to use those arguments instead of a static lat/lng pair. And we'll also need to call the callback instead of using console.log. The first thing we'll do before we actually change the weather.js code is change the app.js code. There are three arguments to be added. These are lat, lng and callback.
First up we'll want to pass in the latitude. We'll take the static data, like the latitude part from the URL in weather.js, copy it, and paste it right inside of the arguments list in app.js as first argument. The next one will be the longitude. We'll grab that from the URL, copy it, and paste it inside of app.js as the second argument:
// lat, lng, callback
weather.getWeather(39.9396284, -75.18663959999999);
Then we can go ahead and provide the third one, which will be the callback function. This function will get fired once the weather data comes back from the API. I'll use an arrow function that will get those two arguments we discussed earlier in the previous section: errorMessage and weatherResults:
weather.getWeather(39.9396284, -75.18663959999999, (errorMessage, weatherResults) => {
});
The weatherResults object containing any sort of temperature information we want. In this case it could be the temperature and the actual temperature. Now, we have used weatherResults in place of results, and this is because, we want to differentiate weatherResults from the results variable in geocodeAddress.
Inside of the getWeather function in app.js, we now need to use if-else statements in order to print the appropriate thing to the screen, depending on whether or not the error message exists. If there is errorMessage we do want to go ahead and print it using console.log. In this case we'll pass in the errorMessage variable:
weather.getWeather(39.9396284, -75.18663959999999, (errorMessage, weatherResults) => {
if (errorMessage) {
console.log(errorMessage);
}
});
Now if there is no error message we'll use the weatherResults object. We'll be printing a nice formatted message later. For now we can simply print the weatherResults object using the pretty printing technique we talked about in the previous chapter, where we call JSON.stringify inside of console.log:
weather.getWeather(39.9396284, -75.18663959999999, (errorMessage, weatherResults) => {
if (errorMessage) {
console.log(errorMessage);
} else {
console.log(JSON.stringify());
}
});
Inside the JSON.stringify parentheses, we'll provide those three arguments, the actual object; weatherResults, undefined for our filtering function, and a number for our indentation. In this case we'll go with 2 once again:
weather.getWeather(39.9396284, -75.18663959999999, (errorMessage, weatherResults) => {
if (errorMessage) {
console.log(errorMessage);
} else {
console.log(JSON.stringify(weatherResults, undefined, 2));
}
});
And now that we have our getWeather call getting called with all three arguments, we can go ahead and actually implement this call inside of weather.js.
To get started we'll make the URL in the weather.js file dynamic, which means we need to replace the url strings with template strings. Once we have template strings in place, we can inject the arguments, latitude and longitude, right into the URL.
Let's go ahead and define all the arguments that are getting passed in. We add lat, lng, and our callback:
var getWeather = (lat, lng, callback) => {
First off let's inject that latitude. We'll take the static latitude, remove it, and between the forward slash and the comma we'll inject it using dollar with our curly braces. This lets us inject a value into our template string; in this case lat. And we can do the exact same thing right after the comma with the longitude. We'll remove the static longitude, use the dollar sign with our curly braces to inject the variable into the string:
var getWeather = (lat, lng, callback) => {
request({
url: `https://api.forecast.io/forecast/4a04d1c42fd9d32c97a2c291a32d5e2d/${lat},${lng}`,
Now that the URL is dynamic, the last thing we need to do inside of getWeather is change our console.log calls to callback calls.
To change our console.log into callback calls, for the first two console.log calls we can replace console.log with callback. And this will line up with the arguments that we specified in app.js, where the first one is the errorMessage and the second one is the weatherResults. In this case we'll pass the errorMessage back and the second argument is undefined, which it should be. We can do the same thing for Unable to fetch weather:
if (error) {
callback('Unable to connect to Forecast.io server.');
} else if (response.statusCode === 400) {
callback('Unable to fetch weather.');
}
Now the third console.log call will be a little more complex. We'll have to actually create an object instead of just passing the temperature back. We'll call the callback with the first argument being undefined, because in this case there is no errorMessage. Instead we'll provide that weatherResults object:
if (error) {
callback('Unable to connect to Forecast.io server.');
} else if (response.statusCode === 400) {
callback('Unable to fetch weather.');
} else if (response.statusCode === 200) {
callback(undefined, {
})
console.log(body.currently.temperature);
}
Inside the parentheses, we can define all the temperature properties we like. In this case we'll define temperature, setting it equal to body.currently, which stores all of the currently weather data, .temperature:
else if (response.statusCode === 200) {
callback(undefined, {
temperature: body.currently.temperature
})
console.log(body.currently.temperature);
}
Now that we have the temperature variable we can go ahead and provide that second property to the object, which is actual temperature. Actual temperature will account for things like humidity, wind speed, and other weather conditions. The actual temperature data is available under a property on currently called apparentTemperature. We'll provide that. And as the value we'll use the same thing. This gets us to the currently object, just like we do for temperature. This will be body.currently.apparentTemperature:
else if (response.statusCode === 200) {
callback(undefined, {
temperature: body.currently.temperature,
apparentTemperature: body.currently.apparentTemperature
})
console.log(body.currently.temperature);
}
Now we have our two properties, so we can go ahead and remove that console.log statement. Add a semicolon. The final code will look like:
const request = require('request');
var getWeather = (lat, lng, callback) => {
request({
url: `https://api.forecast.io/forecast/4a04d1c42fd9d32c97a2c291a32d5e2d/${lat},${lng}`,
json: true
}, (error, response, body) => {
if (error) {
callback('Unable to connect to Forecast.io server.');
} else if (response.statusCode === 400) {
callback('Unable to fetch weather.');
} else if (response.statusCode === 200) {
callback(undefined, {
temperature: body.currently.temperature,
apparentTemperature: body.currently.apparentTemperature
});
}
});
};
module.exports.getWeather = getWeather;
Now we can go ahead and run the app. We have our getWeather function wired up both inside of the weather.js file and inside of app.js. Now once again we are still using static coordinates, but this will be the last time we run the file with that static data. From the Terminal we'll rerun the application:
And as shown we get our temperature object printing to the screen. We have our temperature property 48.82 and we have the apparentTemperature, which is already at 47.42 degrees.
With this in place we're now ready to learn how to chain our callbacks together. That means in app.js we'll take the results that come back from geocodeAddress, pass them in to getWeather, and use that to print dynamic weather for the address you provide over here in the Terminal. In this case we would get the address for the town in New Jersey. As opposed to the static address which we're using in the app.js file that latitude/longitude pair is for Philadelphia.
To get started we have to take our getWeather call and actually move it inside of the callback function for geocodeAddress. Because inside this callback function is the only place we have access to the latitude and longitude pairs.
Now if we open the geocode.js file, we can see that we get formatted_address back as the address property, we get the latitude back as latitude, and we get longitude back as longitude. We'll start wiring this up.
First, we do need to remove the comments of geocodeAddress in the app.js.
Next, we'll go ahead and take the console.log statement in the success case and replace it with a console.log call that will print the formatted address:
geocode.geocodeAddress(argv.address, (errorMessage, results) => {
if (errorMessage) {
console.log(errorMessage);
} else {
console.log(results.address);
}
});
This will print the address to the screen, so we know exactly what address we're getting weather data for.
Now that we have our console.log printing the address, we can take the getWeather call, and move it right below the console.log line:
geocode.geocodeAddress(argv.address, (errorMessage, results) => {
if (errorMessage) {
console.log(errorMessage);
} else {
console.log(results.address);
weather.getWeather(39.9396284, -75.18663959999999,
(errorMessage, weatherResults) => {
if (errorMessage) {
console.log(errorMessage);
} else {
console.log(JSON.stringify(weatherResults, undefined, 2));
}
});
}
});
And with this in place we're now really close to actually chaining the two callbacks together. All that's left to do is take these static coordinates and replace them with the dynamic ones, which will be available in the results object.
The first argument will be results.latitude, which we defined in app.js on the object. And the second one will be results.longitude:
geocode.geocodeAddress(argv.address, (errorMessage, results) => {
if (errorMessage) {
console.log(errorMessage);
} else {
console.log(results.address);
weather.getWeather(results.latitude, results.longitude,
(errorMessage, weatherResults) => {
if (errorMessage) {
console.log(errorMessage);
} else {
console.log(JSON.stringify(weatherResults, undefined, 2));
}
});
}
});
This is all we need to do to take the data from geocodeAddress and pass it in to getWeather. This will create an application that prints our dynamic weather, the weather for the address in the Terminal.
Now before we go ahead and run this, we'll replace the object call with a more formatted one. We'll take both of the pieces of information-the temperature variable and the apparentTemperature variable from weather.js file, and use them in that string in app.js. This means that we can remove the console.log in the else block of getWeather call, replacing it with a different console.log statement:
if (errorMessage) {
console.log(errorMessage);
} else {
console.log();
}
We'll use template strings, since we plan to inject a few variables in; these're currently, followed by the temperature. We'll inject that using weatherResults.temperature. And then we can go ahead and put a period, and add something along the lines of: It feels like, followed by the apparentTemperature property, which I'll inject using weatherResults.apparentTemperature. I'll put a period after that:
if (errorMessage) {
console.log(errorMessage);
} else {
console.log(`It's currently ${weatherResults.temperature}. It feels like
${weatherResults.apparentTemperature}`);
}
We now have a console.log statement that prints the weather to the screen. We also have one that prints the address to the screen, and we have error handlers for both geocodeAddress and getWeather.
Let's go ahead and test this by rerunning the node app.js command in the Terminal. We'll use the same zip code, 08822:
node app.js -a 08822
When we run it we get Flemington, NJ as the formatted address and It's currently is 31.01. It feels like 24.9. Now to test that this is working we'll type in something else inside of quotes, something like Key West fl:
node app.js -a 'Key West fl'
And when we run this command we do get Key West, FL as shown as the formatted address, and It's currently 64.51. It feels like 64.52.
With this in place, the weather application is now wired up. We take the address we get the latitude/longitude pair using the Google Geocoding API. Then we use our forecast API to take that latitude/longitude pair and convert it into temperature information.
In this chapter, we learned about how to set up yargs for the weather-app file and how to include user input in it. Next, we looked into how to handle errors inside of our callback functions and how to recover from those errors. We simply added else/if statements inside of the callback function. Callbacks are just one function, so in order to figure out if things went well or if things didn't go well, we have to use else/if statements, this lets us do different things, such as print different messages, depending on whether or not we perceive the request to have gone well. Then, we made our first request to the weather API, and we looked into a way to fetch the weather based off of the latitude-longitude combination.
Last, we looked in chaining the geocodeAddress and getWeather call functions. We took that request call that was originally in app.js, and we moved it into weather.js, defining it there. We used a callback to pass the data from weather.js into app.js where we imported the weather.js file. Then, inside of the callback for geocodeAddress we call getWeather and inside of that callback we printed the weather specific information to the screen. This was all done using callback functions.
In the next chapter, we'll talk about a different way we can synchronize our asynchronous code using ES6 promises.
In the previous two chapters, we looked at many important concepts of asynchronous programming in Node. This chapter is about promises. Promises are available in JavaScript since ES6. Although they have been around in third-party libraries for quite some time, they finally made their way into the core JavaScript language, which is great because they're a really fantastic feature.
In this chapter, we'll learn about how promises work, we'll start to understand exactly why they're useful, and why they've even come to exist inside JavaScript. We'll take a look at a library called axios that supports promises. This will let us simplify our code, creating our promise calls easily. We'll actually rebuild an entire weather app in the last section.
Specifically, we'll look into following topics:
Promises aim to solve a lot of the problems that come up when we have a lot of asynchronous code in our application. They make it a lot easier to manage our asynchronous computations—things such as requesting data from a database. Alternatively, in the case of a weather app, things such as fetching data from a URL.
In the app.js file we do a similar thing using callbacks:
const yargs = require('yargs');
const geocode = require('./geocode/geocode');
const weather = require('./weather/weather');
const argv = yargs
.options({
a: {
demand: true,
alias: 'address',
describe: 'Address to fetch weather for',
string: true
}
})
.help()
.alias('help', 'h')
.argv;
geocode.geocodeAddress(argv.address, (errorMessage, results) => {
if (errorMessage) {
console.log(errorMessage);
} else {
console.log(results.address);
weather.getWeather(results.latitude, results.longitude, (errorMessage, weatherResults) => {
if (errorMessage) {
console.log(errorMessage);
} else {
console.log(`It's currently ${weatherResults.temperature}. It feels like ${weatherResults.apparentTemperature}.`);
}
});
}
});
In this code, we have two callbacks:
We use this to manage our asynchronous actions. In our case, it's things such as fetching data from an API, using an HTTP request. We can use promises in this example to make the code a lot nicer. This is exactly the aim later in the chapter.
In this section, we'll explore the basics concept of promises. We'll compare and contrast callbacks with promises just yet, because there's a lot more subtleties than can be described without knowing exactly how promises work. So, before we talk about why they're better, we will simply create some.
In the Atom, inside the playground folder, we'll create a new file and call it promise.js. Before we define promises and talk about exactly how they work, we will run through a simple example because that is the best way to learn just about anything—going through an example and seeing how it works.
To get started, we'll work through a very basic example. We'll stick to the core promise features.
To get started with this very simple example, we'll make a variable called somePromise. This will eventually store the promise object. We'll be calling various methods on this variable to do something with the promise. We'll set the somePromise variable equal to the return result from the constructor function for promises. We'll use the new keyword to create a new instance of a promise. Then, we'll provide the thing we want to create a new instance of, Promise, as shown here:
var somePromise = new Promise
Now this Promise function, which is indeed a function—we have to call it like one; that is, it takes one argument. This argument will be a function. We'll use an anonymous arrow function (=>), and inside it, we'll do all of the asynchronous stuff we want to do:
var somePromise = new Promise(() => {
});
It will all be abstracted, kind of like we abstract the HTTP request inside the geocodeAddress function in the geocode.js file:
const request = require('request');
var geocodeAddress = (address, callback) => {
var encodedAddress = encodeURIComponent(address);
request({
url: `https://maps.googleapis.com/maps/api/geocode/json?address=${encodedAddress}`,
json: true
}, (error, response, body) => {
if (error) {
callback('Unable to connect to Google servers.');
} else if (body.status === 'ZERO_RESULTS') {
callback('Unable to find that address.');
} else if (body.status === 'OK') {
callback(undefined, {
address: body.results[0].formatted_address,
latitude: body.results[0].geometry.location.lat,
longitude: body.results[0].geometry.location.lng
});
}
});
};
module.exports.geocodeAddress = geocodeAddress;
All of the complex logic in the geocodeAddress function does indeed need to happen, but the app.js file doesn't need to worry about it. The geocode.geocodeAddress function in the app.js file has a very simple if statement that checks whether there's an error. If there is an error, we will print a message, and if there's not, we move on. The same thing will be true with promises.
The new Promise callback function will get called with two arguments, resolve and reject:
var somePromise = new Promise((resolve, reject) => {
});
This is how we'll manage the state of our promise. When we make a promise, we're making a promise; we're saying, "Hey, I'll go off and I'll fetch that website data for you." Now this could go well, in which case, you will resolve the promise, setting its state to fulfilled. When a promise is fulfilled, it's gone out and it's done the thing you've expected it to do. This could be a database request, an HTTP request, or something else completely.
Now when you call reject, you're saying, "Hey, we tried to get that thing done man, but we just could not." So the promise has been considered rejected. These are the two states that you can set a promise to—fulfilled or rejected. Just like inside geocode.js, we either provide one argument for an error, or we provide the second argument if things went well. Instead of doing that though, promises give us two functions we can call.
Now, in order to illustrate exactly how we can use these, we'll call resolve. Once again, this is not asynchronous. We're not doing anything quite yet. So all of this will happen essentially in real time, as far as you see in Terminal. We'll call resolve with some data. In this case, I'll pass in a string, Hey. It worked!, as shown here:
var somePromise = new Promise((resolve, reject) => {
resolve('Hey. It worked!');
});
Now this string is the value the promise was fulfilled with. This is exactly what someone will get back. In case of the geocode.geocodeAddress function in app file, it could be the data, whether it's the results or the error message. In our case though, we're using resolve, so this will be the actual data the user wanted. When things go well, Hey. It worked! is what they expect.
Now in order to actually do something when the promise gets either resolved or rejected, we need to call a promise method called then; somePromise.then. The then method lets us provide callback functions for both success and error cases. This is one of the areas where callbacks differ from promises. In a callback, we had one function that fired no matter what, and the arguments let us know whether or not things went well. With promises we'll have two functions, and this will be what determines whether or not things went as planned.
Now before we dive into adding two functions, let's start with just one. Right here, I'll call then, passing in one function. This function will only get called if the promise gets fulfilled. This means that it works as expected. When it does, it will get called with the value passed to resolve. In our case, it's a simple message, but it can be something like a user object in the case of a database request. For now though, we'll stick with message:
somePromise.then((message) => {
})
This will print message to the screen. Inside the callback, when the promise gets fulfilled we'll call console.log, printing Success, and then as a second argument, we'll print the actual message variable:
somePromise.then((message) => {
console.log('Success: ', message);
})
Now that we have a very basic promise example in place, let's run it from the Terminal using nodemon, which we installed in the previous chapter. We'll add nodemon, and then we'll go into the playground folder, /promise.js:
When we do this right away, our app runs and we get success. Hey. It worked! This happens instantaneously. There was no delay because we haven't done anything asynchronously. Now when we first explored callbacks (refer to Chapter 5, Basics of Asynchronous Programming in Node.js ), we used setTimeout to simulate a delay, and this is exactly what we'll do in this case.
Inside our somePromise function, we'll call setTimeout, passing in the two arguments: the function to call after the delay and the delay in milliseconds. I'll go with 2500, which is 2.5 seconds:
var somePromise = new Promise((resolve, reject) => {
setTimeout(() => {
}, 2500);
Now after those 2.5 seconds are up, then, and only then, do we want to resolve the promise. This means that our function, the one we pass into then will not get called for 2.5 seconds. Because, as we know, this will not get called until the promise resolves. I'll save the file, which will restart nodemon:
In Terminal, you can see we have our delay, and then success: Hey it worked! prints to the screen. This 2.5 second delay was caused by this setTimeout. After the delay was up (in this case it's an artificial delay, but later it'll be a real delay), we're able to resolve with the data.
Now there's a chance that things didn't go well. We have to handle errors inside our Node applications. In that case, we wouldn't call resolve, we would call reject. Let's comment out the resolve line, and create a second one, where we call reject. We'll call reject much the same way we called resolve. We have to pass in one argument, and in this case, a simple error message like Unable to fulfill promise will do:
var somePromise = new Promise((resolve, reject) => {
setTimeout(() => {
// resolve('Hey. It worked!');
reject('Unable to fulfill promise');
}, 2500);
});
Now when we call reject, we're telling the promise that it has been rejected. This means that the thing we tried to do did not go well. Currently, we don't have an argument that handles this. As we mentioned, this function only gets called when things go as expected, not when we have errors. If I save the file and rerun it in Terminal, what we'll get is a promise that rejects:
However, we don't have a handler for it, so nothing will print to the screen. This will be a pretty big problem. We need to do something with that error message. Maybe we will alert the user, or we will try some other code.
As shown in the previous code output, we can see that nothing printed between the restarting and exiting. In order to do something with the error, we'll add a second argument to the then method. This second argument is what lets us handle errors in our promises. This argument will get executed and called with that value. In this case, it's our message. We'll create an argument called errorMessage, as shown here:
somePromise.then((message) => {
console.log('Success: ', message);
}, (errorMessage) => {
});
Inside the argument, we can do something with that. In this case, we'll print it to the screen using console.log, printing Error with a colon and a space to add some nice formatting, followed by the actual value that was rejected:
}, (errorMessage) => {
console.log('Error: ', errorMessage);
});
Now that we have this in place, we can refresh things by saving the file. We will now see our error message in Terminal, because we now have a place for it to do something:
Here, we have a place for it to print the message to the screen; Unable to fulfill promise prints to the screen, which works exactly as expected.
We now have a promise that can either get resolved or rejected. If it gets resolved, meaning the promise was fulfilled, we have a function that handles that. If it gets rejected, we have a function that handles that as well. This is one of the reasons why promises are awesome. You get to provide different functions, depending on whether or not the promise got resolved or rejected. This lets you avoid a lot of complex if statements inside of our code, which we needed to do in app.js to manage whether or not the actual callback succeeded or failed.
Now inside a promise, it's important to understand that you can only either resolve or reject a promise once. If you resolve a promise you can't reject it later, and if you resolve it with one value you can't change your mind at a later point in time. Consider this example, where I have a code like the following code; here I resolve first and then I reject:
var somePromise = new Promise((resolve, reject) => {
setTimeout(() => {
resolve('Hey. It worked!');
reject('Unable to fulfill promise');
}, 2500);
});
somePromise.then((message) => {
console.log('Success: ', message);
}, (errorMessage) => {
console.log('Error: ', errorMessage);
});
In this case, we'll get our success message printing to the screen. We'll never see errorMessage, because, as I just said, you can only do one of these actions once. You can either resolve once or you can reject once. You can't do both; you can't do either twice.
This is another great advantage over callbacks. There's nothing preventing us from accidentally calling the callback function twice. Let's consider the geocode.js file for example. Let's add another line in the if block of geocode request call, as shown here:
const request = require('request');
var geocodeAddress = (address, callback) => {
var encodedAddress = encodeURIComponent(address);
request({
url: `https://maps.googleapis.com/maps/api/geocode/json?address=${encodedAddress}`,
json: true
}, (error, response, body) => {
if (error) {
callback('Unable to connect to Google servers.');
callback();
This is a more obvious example, but it could easily be hidden inside of complex if-else statements. In this case, our callback function in app.js will indeed get called twice, which can cause really big problems for our program. Inside the promise example this callback will never get called twice, no matter how many times you try to call resolve or reject, this function will only get fired once.
We can prove that right now by calling resolve again. In the promise example case, let's save the file with the following changes:
var somePromise = new Promise((resolve, reject) => {
setTimeout(() => {
resolve('Hey. It worked!');
resolve();
reject('Unable to fulfill promise');
}, 2500);
});
Now, let's refresh things; we'll resolve with our message, Hey. It worked! and we'll never ever have the function fired a second time with no message. Because, as we said, the promise is already resolved. Once you set a promise's state to either fulfilled or rejected, you can't set it again.
Now before a promise's resolve or reject function gets called, a promise is in a state known as pending. This means that you're waiting for information to come back, or you're waiting for your async computation to finish. In our case, while we're waiting for the weather data to come back, the promise would be considered pending. A promise is considered settled when it has been either fulfilled or rejected.
No matter which one you chose, you could say the promise has settled, meaning that it's no longer pending. In our case, this would be a settled promise that was indeed fulfilled because resolve is called right here. So these are just a couple of the benefits of promises. You don't have to worry about having callbacks called twice, you can provide multiple functions—one for success handling and one for error handling. It really is a fantastic utility!
Now that we've gone through a quick example of how promises work, going over just the very fundamentals, we'll to move on to something slightly more complex.
In this section, we'll explore two more ways to use promises. We'll create functions that take input and return a promise. Also, we'll explore promise chaining, which will let us combine multiple promises.
Now the problem with the example we discussed in the previous section is that we have a promise function, but it doesn't take any input. This most likely is never going to be the case when we're using real-world promises. We'll want to provide some input, such as the ID of a user to fetch from the database, a URL to request, or a partial URL, for example, just the address component.
In order to do this, we'll have to create a function. For this example, we'll make a variable, which will be a function called asyncAdd:
var asyncAdd = () => {
}
This will be a function that simulates the async functionality using setTimeout. In reality, it's just going to add two numbers together. However, it will illustrate exactly what we need to do, later in this chapter, to get our weather app using promises.
Now in the function, we will take two arguments, a and b, and we'll return a promise:
var asyncAdd = (a, b) => {
};
So, whoever calls this asyncAdd method, they can pass in input, but they can also get the promise back so that they can use then to sync up and wait for it to complete. Inside the asyncAdd function, we'll use return to do this. We'll return the new Promise object using the exact same new Promise syntax we did when we created the somePromise variable. Now this is the same function, so we do need to provide the constructor function that gets called with both resolve and reject, just like this:
var asyncAdd = (a, b) => {
return new Promise((resolve, reject) => {
});
Now we have an asyncAdd function, which takes two numbers and returns a promise. The only thing left to do is to actually simulate the delay, and make the call to resolve. To do this, we'll simulate the delay using setTimeout. Then we'll pass in my callback function, setting the delay to 1.5 seconds, or 1500 milliseconds:
return new Promise((resolve, reject) => {
setTimeout(() => {
}, 1500)
});
In the callback function, we'll write a simple if-else statement that will check if the type of both a and b is a number. If it is, great! We'll resolve the value of the two numbers added. If they're not numbers (one or more), then we'll reject. To do this, we'll use the if statement with the typeof operator:
setTimeout(() => {
if (typeof a === 'number')
}, 1500);
Here, we're using the typeof object to get the string type before the variable. Also, we're checking whether it's equal to a number, which is what will come back from typeof when we have a number. Now similar to a, we'll add typeof b, which is also a number:
if (typeof a === 'number' && typeof b === 'number') {}
We can add the two numbers up, resolving the value. Inside the code block of the if statement, we'll call resolve, passing in a + b:
return new Promise((resolve, reject) => {
setTimeout(() => {
if (typeof a === 'number' && typeof b === 'number') {
resolve(a + b);
}
}, 1500);
This will add the two numbers up, passing in one argument to resolve. Now this is the happy path when both a and b are indeed numbers. If things don't go well, we'll want to add reject. We'll use the else block to do this. If the previous condition fails, we'll reject by calling reject('Arguments must be numbers'):
if (typeof a === 'number' && typeof b === 'number') {
resolve(a + b);
} else {
reject('Argumets must be numbers');
}
Now we have an asyncAdd function that takes two variables, a and b, returns a promise, and anyone who happens to call asyncAdd can add a then call onto the return result to get that value.
Now what exactly will this look like? To show this, first we'll comment out all of the code we have in the newPromise variable of promise.js. Following this, we'll call the asyncAdd variable where we make asyncAdd. We'll call it like we would any other function, by passing in two values. Remember, this could be a database ID or anything else for an async function. In our case, it's just two numbers. Let's say, 5 and 7. Now the return value from this function is a promise. We can make a variable and call then on that variable, but we can also just tack the then method, as shown here:
asyncAdd(5, 7).then
This is exactly what we'll do when we use promises; we'll tack on then, passing in our callbacks. The first callback being the success case, and the second one being the error case:
ouldasyncAdd(5, 7).then(() => {
}, () => {
});
In the second callback, we'll get our errorMessage, which we can log to the screen using the console.log(errorMessage); statement, as shown here:
asyncAdd(5, 7).then(() => {
}, (errorMessage) => {
console.log(errorMessage);
});
If one or more of the numbers are not actually numbers, the error function will fire because we called reject. If both are numbers, all we'll do will get the result and print it to the screen, using console.log. We'll add res and inside the arrow function (=>), we'll add the console.log statement and print the string Result with a colon. Then, as the second argument in console.log, we'll pass in the actual number, which will print it to the screen as well:
asyncAdd(5, 7).then(() => {
console.log('Result:', res);
}, (errorMessage) => {
console.log(errorMessage);
});
Now that we have our promise asyncAdd function in place, let's test this out inside Terminal. To do this, we'll run nodemon to start up nodemon playground/promise.js:
Right away, we'll get the delay and the result, 12 prints to the screen. This is fantastic! We are able to create the function that takes the dynamic input, but still returns a promise.
Now notice that we've taken an async function that usually requires callbacks and we've wrapped it to use promises. This is a good handy feature. As you start using promises in Node, you'll come to realize that some things do not support promises and you'd like them to. For example, the request library that we used to make our HTTP requests does not support promises natively. However, we can wrap our request call inside of a promise, which is what we'll to do later in the section. For now though, we have a basic example illustrating how this works. Next, we'd like to talk about promise chaining.
Promise chaining is the idea of having multiple promises run in a sequence. For example, I want to take an address and convert that into coordinates, and take those coordinates and convert them into weather information; this is an example of needing to synchronize two things. Also, we can do that really easily using promise chaining.
In order to chain our promises, inside our success call we'll return a new promise. In our example, we can return a new promise by calling asyncAdd again. I'll call asyncAdd next to the res and console.log statements, passing in two arguments: the result, whatever the previous promise has returned, and some sort of new number; let's use 33:
asyncAdd(5, 7).then((res) => {
console.log('Result:', res);
return asyncAdd(res, 33);
Now we're returning a promise so we can add my chaining onto it by calling the then method again. The then method will to get called after we close the closing parenthesis for our previous then method. This will also take one or more arguments. We can pass in a success handler, which will be a function and an error handler, which will also be a function:
asyncAdd(5, 7).then((res) => {
console.log('Result:', res);
return asyncAdd(res, 33);
}, (errorMessage) => {
console.log(errorMessage);
}).then(() => {
}, () => {
})
Now that we have our then callbacks set up, we can actually fill them out. Once again we will get a result; this will be the result of 5 plus 7, which is 12, plus 33, which will be 45. Then, we can print console.log ('Should be 45'). Next, we'll print the actual value from results variable:
}).then((res) => {
console.log('Should be 45', res);
}, () => {
});
Now our error handler will also be the same. We'll have errorMessage and we'll print it to the screen using the console.log, printing errorMessage:
}).then((res) => {
console.log('Should be 45', res);
}, (errorMessage) => {
console.log(errorMessage);
});
Now what we have is some chaining. Our first then callback functions will fire based on the result of our first asyncAdd call. If it goes well, the first one will fire. If it goes poorly, the second function will fire. Our second then call will be based on the asyncAdd call, where we add 33. This will let us chain the two results together, and we should get 45 printing to the screen. We'll save this file, which will restart things inside nodemon. Eventually, we'll get our two results: 12 and our Should be 45. As shown in the following code image, we get just that, Result: 12 and Should be 45, printing to the screen:
Now when it comes to error handling, there are a few quirks; so, we'll simulate some errors. First up, let's simulate an error in our second asyncAdd call. We know we can do that by passing in a value that's not a number. In this case, let's wrap 33 inside quotes:
asyncAdd(5, 7).then((res) => {
console.log('Result:', res);
return asyncAdd(res, '33');
}, (errorMessage) => {
console.log(errorMessage);
}).then((res) => {
console.log('Should be 45', res);
}, (errorMessage) => {
concole.log(errorMessage);
})
This will be a string and our call should reject. Now we can save the file and see what happens:
We get Result: 12, then we get our error, Arguments must be numbers. Exactly as we expect, this is printing on the screen. Instead of getting Should be 45, we get our error message.
But things get a little trickier when something earlier on in the promise chain gets rejected. Let's swap '33' with the number 33. Then let's replace 7 with the string '7', as shown here:
asyncAdd(5, '7').then((res) => {
console.log('Result:', res);
return asyncAdd(res, 33);
}, (errorMessage) => {
console.log(errorMessage);
}).then((res) => {
console.log('Should be 45', res);
}, (errorMessage) => {
concole.log(errorMessage);
})
This will cause our first promise to fail, which means we'll never see the result. We should see the error message printing to the screen, but that's not what will happen:
When we restart, we do indeed get the error message printing to the screen, but then we also get Should be 45 undefined. The second then console.log is running because we provided an error handler in the second asyncAdd function. It's running the error handler. Then it says, Okay, things must be good now we ran the error handler. Let's move on to the next then call calling the success case.
To fix the error, we can remove both of our error handlers from both the then calls, and replace them with a call at the very bottom, to a different method, which we'll call .catch:
asyncAdd(5, '7').then((res) => {
console.log('Result:', res);
return asyncAdd(res, 33);
}).then((res) => {
console.log('Should be 45', res);
}).catch;
The catch promise method is similar to then, but it just takes one function. This is the error handler. As shown in the following code, we can specify one error handler if any of our promise calls fail. We'll take errorMessage and print it to the screen using console.log(errorMessage):
asyncAdd(5, '7').then((res) => {
console.log('Result:', res);
return asyncAdd(res, 33);
}).then((res) => {
console.log('Should be 45', res);
}).catch((errorMessage) => {
console.log(errorMessage)
});
For now though, if things are a little blurry that is okay, as long as you're starting to see exactly what we're doing. We're taking the result from one promise and passing it to a different one. In this case, the result works exactly as expected. The first promise fails, we get, Arguments must be numbers printing to the screen. Also, we don't get that broken statement where we try to print 45, but we get undefined instead. Using catch, we can specify an error handler that will fire for all of our previous failures. This is exactly what we want.
Now as I mentioned earlier, some libraries support promises while others don't. The request library does not support promises. We will make a function that wraps request, returning a promise. We'll use some functionalities from the geocode.js file from the previous chapter.
First, let's discuss a quick setup, and then we'll actually fill it out. In the playground folder, we can make a new file to store this, called promise-2.js:
We'll make a function called geocodeAddress. The geocodeAddress function will take the plain text address, and it will return a promise:
var geocodeAddress = (address) => {
};
The geocodeAddress function will return a promise. So if I pass in a ZIP code, such as 19146, I would expect a promise to come back, which I can attach a then call to. This will let me wait for that request to finish. Right here, I'll tack on a call to then, passing in my two functions: the success handler for when the promise is fulfilled and the error handler for when the promise is rejected:
geocodeAddress('19146').then(() => {
}, () => {
})
Now when things go well, I'll expect the location object with the address, the latitude, and the longitude, and when things go poorly, I'll expect the error message:
geocodeAddress('19146').then((location) => {
}, (errorMessage) => {
})
When the error message happens, we'll just print it to the screen using console.log (errorMessage). For now, when things go well and the success case runs, we'll just print that entire object using our pretty printing technique, console.log. Then, we'll call JSON.stringify, like we've done many times before, passing in the three arguments—the object, undefined for the filter method—which we'll never use in the book, and the number 2 for the number of spaces we'd like to use as our indentation:
geocodeAddress('19146').then((location) => {
console.log(JSON.stringify(location, undefined, 2));
}, (errorMessage) => {
console.log(errorMessage);
});
This is what we want to create, the function that lets this functionality work as expected. This then call should work as shown in the previous code.
To get started I'll return the promise by calling: return new Promise, passing in my constructor function:
var geocodeAddress = (address) => {
return new Promise(() => {
});
};
Inside the function, we'll add that call to request. Let's provide the resolve and reject arguments:
return new Promise((resolve, reject) => {
});
};
Now that we have our Promise set up, we can load in the request module on top of the code, creating a constant called request and setting that equal to the return result from require('request'):
const request = require('request');
var geocodeAddress = (address) => {
Next, we'll move into the geocode.js file, grab code inside the geocodeAddress function, and move it over into promise-2 file, inside of the constructor function:
const request = require('request');
var geocodeAddress = (address) => {
return new Promise((resolve, reject) => {
var encodedAddress = encodeURIComponent(address);
request({
url: `https://maps.googleapis.com/maps/api/geocode/json?address=${encodedAddress}`,
json: true
}, (error, response, body) => {
if (error) {
callback('Unable to connect to Google servers.');
} else if (body.status === 'ZERO_RESULTS') {
callback('Unable to find that address.');
} else if (body.status === 'OK') {
callback(undefined, {
address: body.results[0].formatted_address,
latitude: body.results[0].geometry.location.lat,
longitude: body.results[0].geometry.location.lng
});
}
});
});
};
Now we are mostly good to go; we only need to change a few things. The first thing we need to do is to replace our error handlers. In the if block of the code, we have called our callback handler with one argument; instead, we'll call reject, because if this code runs, we want to reject the promise. We have the same thing in the next else block. We'll call reject if we get ZERO_RESULTS. This is indeed a failure, and we do not want to pretend we succeeded:
if (error) {
reject('Unable to connect to Google servers.');
} else if (body.status === 'ZERO_RESULTS') {
reject('Unable to find that address.');
Now in the next else block, this is where things did go well; here we can call resolve. Also, we can remove the first argument, as we know resolve and reject only take one argument:
if (error) {
reject('Unable to connect to Google servers.');
} else if (body.status === 'ZERO_RESULTS') {
reject('Unable to find that address.');
} else if (body.status === 'OK') {
resolve(
We are able to specify multiple values though, because we resolve an object with properties on it. Now that we have this in place, we are done. We can actually save our file, rerun it inside Terminal, and test things out.
To test, we'll save the file, move into Terminal, and shut down nodemon for the promise.js file. We'll run node for the promise.js file. It's in the playground folder, and it's called promise-2.js:
node playground/promise-2.js
Now, when we run this program, we're actually making that HTTP request. As shown in the following code output, we can see the data comes back exactly as we expected:
We get our address, latitude, and longitude variables. This is fantastic! Now let's test to see what happens when we pass in an invalid address, something like 5 zeroes, which we've used before to simulate an error:
const request = require('request');
var geocodeAddress = (address) => {
return new Promise((resolve, reject) => {
var encodedAddress = encodeURIComponent(address);
request({
url: `https://maps.googleapis.com/maps/api/geocode/json?address=${encodedAddress}`,
json: true
}, (error, response, body) => {
if (error) {
reject('Unable to connect to Google servers.');
} else if (body.status === 'ZERO_RESULTS') {
reject('Unable to find that address.');
} else if (body.status === 'OK') {
resolve({
address: body.results[0].formatted_address,
latitude: body.results[0].geometry.location.lat,
longitude: body.results[0].geometry.location.lng
});
}
});
});
};
We'll save the file, rerun the program, and Unable to find that address. prints to the screen:
This happens only because we call reject. We will call reject inside of the Promise constructor function. We have our error handler, which prints the message to the screen. This is an example of how to take a library that does not support promises and wrap it in a promise, creating a promise ready function. In our case, that function is geocodeAddress.
In this section, we'll learn how to use a library that has promises built in. We'll explore the axios library, which is really similar to request. Although, instead of using callbacks as request does, it uses promises. So we don't have to wrap our calls in promises to get that promise functionality. We'll actually be recreating the entire weather app in this section. We'll only have to write about 25 lines of code. We'll go through the entire process: taking the address, getting the coordinates, and then fetching the weather.
To fetch weather app code from the app.js file, we'll duplicate app.js, because we configure yargs in the original app.js file and we'll want to carry the code over to the new project. There's no need to rewrite it. In the weather directory, we'll duplicate app.js, giving it a new name, app-promise.js.
Inside app-promise.js, before we add anything, let's rip some stuff out. We'll be ripping out the geocode and weather variable declarations. We'll not be requiring any files:
Then I'll remove everything after our yargs configuration, which in this case is just our call to geocodeAddress. The resultant code will look like the following:
const yargs = require('yargs');
const argv = yargs
.options({
a: {
demand: true,
alias: 'address',
describe: 'Address to fetch weather for',
string: true
}
})
.help()
.alias('help', 'h')
.argv;
Now that we have a clean slate, we can get started by installing the new library. Before we run the npm install command, we'll see where we can find the documentation. We can get it by visiting: https://www.npmjs.com/package/axios. As shown in the following screenshot, we have the axios npm library page, where we can view all sorts of information about it, including the documentation:
Here we can see some things that look familiar. We have calls to then and catch, just like we do when we use promises outside of axios:
Inside the stats column of this page, you can see that this is a super popular library. The most recent version is 0.13.1. This is the exact version we'll be using. Feel free to go to this page when you use axios in your projects. There are a lot of really good examples and documentation. For now though, we can install it.
To install axios, inside Terminal, we'll be running npm install; the library name is axios, and we'll specify the version 0.17.1 with the save flag updating the package.json file. Now I can run the install command, to install axios:
Inside our app-promise file, we can get started by loading in axios at the top. We'll make a constant called axios, setting it equal to require('axios'), as shown here:
const yargs = require('yargs');
const axios = require('axios');
Now that we have this in place, we can actually start making the calls in the code. This will involve us pulling out some of the functionality from the geocode and weather files. So we'll open up the geocode.js and weather.js files. Because we will be pulling some of the code from these files, things such as the URL and some of the error handling techniques. Although we'll talk about the differences as they come up.
The first thing we need to do is to encode the address and get the geocode URL. Now this stuff happens inside geocode.js. So we'll actually copy the encodedAddress variable line, where we create the encoded address, and paste it in the app-promise file, following the argv variable:
.argv;
var encodedAddress = encodeURIComponent(argv.address);
Now we do need to tweak this a little bit. The address variable doesn't exist; but we have argv.address. So, we'll switch address with argv.address:
var encodeAddress = encodeURIComponent(argv.address);
Now we have the encoded address; the next thing we need to get before we can start using axios is the URL that we want to make the request to. We'll grab that from the geocode.js file as well. In app-promise.js, we will make a new variable called geocodeURI. Then, we'll take the URL present in geocode.js, from the opening tick to the closing tick, copy it, and paste it in app-promise.js, equal to geocodeURI:
var encodedAddress = encodeURIComponent(argv.address);
var geocodeUrl = `https://maps.googleapis.com/maps/api/geocode/json?address=${encodedAddress}`;
Now we use the encoded address variable inside the URL; this is fine because it does exist in our code. So at this point, we have our geocodeUrl variable and we can get started in making our very first axios request.
In our case, we'll be taking the address and getting the latitude and longitude. To make our request, we'll call a method available on axios, axios.get:
var geocodeUrl = `https://maps.googleapis.com/maps/api/geocode/json?address=${encodedAddress}`;
axios.get
The get is the method that lets us make our HTTP get request, which is exactly what we want to do in this case. Also, it's really simple to set up. When you're expecting JSON data, all you have to do is to pass in the URL that we have in the geocodeUrl variable. There's no need to provide any other options, such as an option letting it know it's JSON. axios knows how to automatically parse our JSON data. What get returns is actually a promise, which means we can use .then in order to run some code when the promise gets fulfilled or rejected, whether things go well or poorly:
axios.get(geocodeUrl).then()
Inside then, we'll provide one function. This will be the success case. The success case will get called with one argument, which the axios library recommends that you call response:
axios.get(geocodeUrl).then((response) => {
});
Technically, we could call anything you like. Now inside the function, we'll get access to all of the same information we got inside of the request library; things such as our headers, response, and request headers, as well as the body information; all sorts of useful info. What we really need though is the response.data property. We'll print that using console.log:
axios.get(geocodeUrl).then((response) => {
console.log(response.data);
});
Now that we have this in place, we can run our app-promise file, passing in a valid address. Also, we can see what happens when we make that request.
Inside command line (Terminal), we'll use the clear command first to clear the Terminal output. Then we can run node app-promise.js, passing in an address. Let's use a valid address, for example, 1301 lombard street, philadelphia:
node app-promise.js -a '1301 lombard street philadelphia
The request goes out. And what do we get back? We get back the results object exactly as we saw it when we used the other modules in the previous chapters:
The only difference in this case is that we're using promises built in, instead of having to wrap it in promises or using callbacks.
Now aside from the success handler we used in the previous example, we can also add a call to catch, to let us catch all of the errors that might occur. We'll to get the error object as the one-and-only argument; then we can do something with that error object:
axios.get(geocodeUrl).then((response) => {
console.log(response.data);
});catch((e) => {
});
Inside the function, we'll kick things off, using console.log to print the error argument:
}).catch((e) => {
console.log(e)
});
Now let's simulate an error by removing the dot in the URL:
var encodedAddress = encodeURIComponent(argv.address);
var geocodeUrl = `https://mapsgoogleapis.com/maps/api/geocode/json?address=${encodedAddress}`;
axios.get(geocodeUrl).then((response) => {
console.log(response.data);
}).catch((e) => {
console.log(e)
});
We can see what happens when we rerun the program. Now I'm doing this to explore the axios library. I know exactly what will happen. This is not why I'm doing it. I'm doing it to show you how you should approach new libraries. When you get a new library, you want to play around with all the different ways it works. What exactly comes back in that error argument when we have a request that fails? This is important information to know; so when you write a real-world app, you can add the appropriate error handling code.
In this case, if we rerun the exact same command, we'll get an error:
As you can see, there really is nothing to print on the screen. We have a lot of very cryptic error codes and even the errorMessage property, which usually contains something good or does not. Then we have an error code followed by the URL. What we want instead is print a plain text English message.
To do this, we'll use an if-else statement, checking what the code property is. This is the error code and in this case ENOTFOUND; we know it means that it could not connect to the server. In app-promise.js, inside the error handler, we can add this by having if and checking the condition:
}).catch((e) => {
if (e.code === 'ENOTFOUND') {
}
If that is the case, we'll print some sort of custom message to the screen using console.log:
}).catch((e) => {
if (e.code === 'ENOTFOUND') {
console.log('Unable to connect to API servers.');
}
console.log(e);
});
Now we have an error handler that handles this specific case. So we can remove our call to console.log:
axios.get(geocodeUrl).then((response) => {
console.log(response.data);
}).catch((e) => {
if (e.code === 'ENOTFOUND') {
console.log('Unable to connect to API servers.');
}
});
Now if we save the file, and rerun things from Terminal, we should get a much nicer error message printing to the screen:
This is exactly what we get: Unable to connect to API servers. Now I'll add that dot back in, so things start working. We can worry about the response that comes back.
As you remember, inside the geocode file, there were some things we needed to do. We've already handled the error related to server connection, but there is still another error pending, that is, if the body.status property equals ZERO_RESULTS. We want to print an error message in that case.
To do this, we'll inside app-promise, create our very own error. We'll throw an error inside the axios.get function. This error will cause all of the code after it, not to run. It will move right into the error handler.
Now we only want to throw an error if the status property is set to ZERO_RESULTS. We'll add an if statement at the very top of the get function to check if (response.data.status) equals ZERO_RESULTS:
axios.get(geocodeUrl).then((response) => {
if (response.data.status === 'ZERO_RESULTS') {
}
If that is the case, then things went bad and we do not want to move on to make the weather request. We want to run our catch code we have. To throw a new error that our promise can catch, we'll use a syntax called throw new Error. This creates and throws an error letting Node know that something went wrong. We can provide our own error message, something that's readable to a user: Unable to find that address:
axios.get(geocodeUrl).then((response) => {
if (response.data.status === 'ZERO_RESULTS') {
throw new Error('Unable to find that address.');
}
This is a message that'll let that user know exactly what went wrong. Now when this error gets thrown, the same catch code will run. Currently, we only have one if condition that checks whether the code property is ENOTFOUND. So we'll add an else clause:
axios.get(geocodeUrl).then((response) => {
if (response.data.status === 'ZERO_RESULTS') {
throw new Error('Unable to find that address.');
}
console.log(response.data);
}).catch((e) => {
if (e.code === 'ENOTFOUND') {
console.log('Unable to connect to API servers.');
} else {
}
});
Inside the else block, we can print the error message, which is the string we typed in the throw new Error syntax using the e. message property, as shown here:
axios.get(geocodeUrl).then((response) => {
if (response.data.status === 'ZERO_RESULTS') {
throw new Error('Unable to find that address.');
}
console.log(response.data);
}).catch((e) => {
if (e.code === 'ENOTFOUND') {
console.log('Unable to connect to API servers.');
} else {
console.log(e.message);
}
});
If the error code is not ENOTFOUND, we'll simply print the message to the screen. This will happen if we get zero results. So let's simulate that to make sure the code works. Inside Terminal, we'll rerun the previous command passing in a zip code. At first, we'll use a valid zip code, 08822 and we should get our data back. Then we'll use an invalid one: 00000.
When we run the request with a valid address, we get this:
When we run the request with the invalid address, we get the error:
By calling throw new Error, we're immediately stopping the execution of this function. So console.log with e.message never prints, which is exactly what we want. Now that we have our error handler in place, we can start generating that weather URL.
In order to generate the weather URL, we'll copy the URL from the weather file, taking it with the ticks in place, and moving it into the app-promise file. We'll make a new variable called weatherUrl, setting it equal to the copied URL:
url: `https://api.forecast.io/forecast/4a04d1c42fd9d32c97a2c291a32d5e2d/${lat},${lng}`,
Now weatherUrl does need a few pieces of information. We need the latitude and longitude. We have two variables lat and lng, so let's create them, getting the appropriate value from that response object, var lat and var lng:
var lat;
var lng;
url: `https://api.forecast.io/forecast/4a04d1c42fd9d32c97a2c291a32d5e2d/${lat},${lng}`,
Now in order to pull them off, we have to go through that process of digging into the object. We've done it before. We'll be looking in the response object at the data property, which is similar to the body in the request library. Then we'll go into results, grabbing the first item and accessing the geometry property, then we'll access location.lat:
var lat = response.data.results[0].geometry.location.lat;
Now similarly, we can add things for the longitude variable:
var lat = response.data.results[0].geometry.location.lat;
var lng = response.data.results[0].geometry.location.lng;
Now before we make that weather request, we want to print the formatted address because that's something the previous app did as well. In our console.log(response.data) statement, and instead of printing response.data, we'll dive into the data object getting the formatted address. This is also on the results array's first item. We'll be accessing the formatted_address property:
var lat = response.data.results[0].geometry.location.lat;
var lng = response.data.results[0].geometry.location.lng;
var weatherUrl = `https://api.forecast.io/forecast/4a04d1c42fd9d32c97a2c291a32d5e2d/${lat},${lng}`;
console.log(response.data.results[0].formatted_address);
Now that we have our formatted address printing to the screen, we can make our second call by returning a new promise. This is going to let us chain these calls together.
To get started, we'll return a call to axios.get, passing in the URL. We just defined that, it is weatherUrl:
var lat = response.data.results[0].geometry.location.lat;
var lng = response.data.results[0].geometry.location.lng;
var weatherUrl = `https://api.forecast.io/forecast/4a04d1c42fd9d32c97a2c291a32d5e2d/${lat},${lng}`;
console.log(response.data.results[0].formatted_address);
return axios.get(weatherUrl);
Now that we have this call returning, we can attach another then call right between our previous then call and catch call, by calling then, passing in one function, just like this:
return axios.get(weatherUrl);
}).then(() => {
}).catch((e) => {
if (e.code === 'ENOTFOUND') {
This function will get called when the weather data comes back. We'll get that same response argument, because we're using the same method, axios.get:
}).then((response) => {
Inside the then call, we don't have to worry about throwing any errors, since we never needed to access a body property in order to check if something went wrong. With the weather request if this callback runs, then things went right. We can print the weather information. In order to get that done, we'll make two variables:
The temperature variable will get set equal to response.data. Then we'll access that currently property. Then we'll access temperature. We'll pull out the second variable, the actual temperature or apparentTemperature, which is the property name, var apparentTemperature. We'll be setting this equal to response.data.currently.apparentTemperature:
}).then((response) => {
var temperature = response.data.currently.temperature;
var apparentTemperature = response.data.currently.apparentTemperature;
Now that we have our two things pulled out into variables, we can add those things inside of a call, console.log. We chose to define two variables, so that we don't have to add the two really long property statements to console.log. We can simply reference the variables. We'll add console.log and we'll use template strings in the console.log statement, so that we can inject the previous mentioned two values inside of quotes: It's currently, followed by temperature. Then we can add a period, It feels like, followed by apparentTemperature:
}).then((response) => {
var temperature = response.data.currently.temperature;
var apparentTemperature = response.data.currently.apparentTemperature;
console.log(`It's currently ${temperature}. It feels like ${apparentTemperature}.`);
Now that we have our string printing to the screen, we can test that our app works as expected. We'll save the file and inside Terminal, we'll rerun the command from two commands ago where we had a valid zip code:
When we run this, we get the weather info for Flemington, New Jersey. It's currently 84 degrees, but it feels like 90. If we run something that has a bad address, we do get the error message:
So everything looks great! Using the axios library, we're able to chain promises like the app-promise without needing to do anything too crazy. The axios get method returns a promise, so we can access it directly using then.
In the code, we use then once to do something with that geolocation data. We print the address to the screen. Then we return another promise, where we make the request for the weather. Inside of our second then call, we print the weather to the screen. We also added a catch call, which will handle any errors. If anything goes wrong with either of our promises, or if we throw an error, catch will get fired printing the messages to the screen.
This is all it takes to use axios and set up promises for your HTTP requests. Now one reason people love promises over traditional callbacks is that instead of nesting we can simply chain. So our code doesn't get indented to crazy levels. As we saw in app.js in the previous chapter, we went a few indentation levels deep just to add two calls together. If we needed to add a third it would have gotten even worse. With promises, we can keep everything at the same level, keeping our code a lot easier to maintain.
In this chapter, we've gone through a quick example of how promises work, by going over just the very fundamentals. Async is a critical part to Node.js. We went through the very basics of callbacks and promises. We looked a few examples, creating a pretty cool weather app.
This brings us to the end of our asynchronous Node.js programming, but this does not mean that you have to stop building out the weather app. There are a couple ideas as to what you could do to continue on with this project. First up, you can load in more information. The response we get back from the weather API contains a ton of stuff besides just the current temperature, which is what we used. It'd great if you can incorporate some of that stuff in there, whether it's high/low temperatures, or chances of precipitation.
Next up, it'd be really cool to have a default location ability. There would be a command that lets me set a default location, and then I could run the weather app with no location argument to use that default. We could always specify a location argument to search for weather somewhere else. This would be an awesome feature, and it would work kind of similar to the Notes app, where we save data to the filesystem.
In the next chapter, we'll start creating web servers, which will be async. We'll make APIs, which will be async. Also, we'll create real-time Socket.IO apps, which will be async. We'll move on to creating Node apps that we deploy to servers, making those servers accessible to anybody with a web connection.
We'll cover a ton of exciting stuff in this chapter. We'll learn how to make a web server and how to integrate version control into Node applications. Now to get all this done, we will look at a framework called Express. It's one of the most popular npm libraries, and for good reason. It makes it really easy to do stuff such as creating a web server or an HTTP API. It's kind of similar to the Dark Sky API we used in the last chapter.
Now most courses start with Express, and that can be confusing because it blurs the line between what is Node and what is Express. We'll kick things off by adding Express to a brand new Node app.
Specifically, we'll cover the following topics:
In this section, you'll make your very first Node.js web server, which means you'll have a whole new way for users to access your app. Instead of having them run it from the Terminal passing in arguments, you'll be able to give them a URL they can visit to view your web app or a URL they can make an HTTP request to to fetch some data.
This will be similar to what we did when we used the geocode API in the previous chapters. Instead of using an API though, we'll be able to create our own. We'll also be able to set up a static website for something like a portfolio site. Both are really valid use cases. Now all of this will be done using a library called Express, which is the most popular npm library. It's actually one of the reasons that Node got so popular because it was so easy to make REST APIs and static web servers.
Express is a no-nonsense library. Now there are a lot of different ways to configure it. So it can get pretty complex. That's why we'll be using it throughout the next couple of chapters. To get started, let's make a directory where we can store all of the code for this app. This app will be our web server.
On the desktop let's us make a directory called node-web-server, by running the mkdir node-web-server command in the Terminal:
Once this directory is created, we'll navigate into it using cd:
And we'll also open it up inside Atom. In Atom, we'll open it up from the desktop:
Now before going further, we'll run the npm init command so we can generate the package.json file. As shown in the following code, we'll run npm init:
Then, we'll use the default value just by pressing enter through all of the options shown in the following screenshot. There's no need to customize any of these as of now:
Then we'll type yes in the last statement Is this ok? (yes) and the package.json file goes in place:
As mentioned earlier, Express is a really big library. There's an entire website dedicated to the Express docs. Instead of a simple README.md file, you can go to www.expressjs.com to view everything the website have to offer:
We'll find Getting started, help articles, and many more. The website has the Guide option to help you do things such as Routing, Debugging, Error handling, and an API reference, so we can look into exactly what methods we have access to and what they do. It's a very handy website.
Now that we have our node-web-server directory, we'll install Express so we can get started making our web server. In the Terminal we'll run the clear command first to clear the output. Then we'll run the npm install command. The module name is express and we'll be using the latest version, @4.16.0. We'll also provide the save flag to update the dependencies inside of our package.json file as shown here:
npm install express@4.16.0 --save
Once again we'll use the clear command to clear the Terminal output.
Now that we have Express installed, we can actually create our web server inside Atom. In order to run the server, we will need a file. I'll call this file server.js. It will sit right in the root of our application:
This is where we'll configure the various routes, things like the root of the website, pages like /about, and so on. It's also where we'll start the server, binding it to a port on our machine. Now we'll be deploying to a real server. Later we'll talk about how that works. For now, most of our server examples will happen on our localhost.
Inside server.js, the first thing we'll do is load in Express by making a constant called express and setting it equal to require('express'):
const express = require('express');
Next up, what we'll do is make a new Express app. To do this we'll make a variable called app and we'll set it equal to the return result from calling express as a function:
const express = require('express');
var app = express();
Now there are no arguments we need to pass into express. We will do a ton of configuration, but that will happen in a different way.
In order to create an app, all we have to do is call the method. Next to the variable app we can start setting up all of our HTTP route handlers. For example, if someone visits the root of the website we're going to want to send something back. Maybe it's some JSON data, maybe it's an HTML page.
We can register a handler using app.get function. This will let us set up a handler for an HTTP get request. There are two arguments we have to pass into app.get:
In our case we're looking for the root of the app. So we can just use forward slash (/) for the first argument. In the second argument, we'll use a simple arrow function (=>) as shown here:
const express = require('express');
var app = express();
app.get('/', (req, res) => {
};
Now the arrow function (=>) will get called with two arguments. These are really important to how Express works:
We'll explore both of these in detail. For now though, we'll use one method, res.send. This will let us respond to the request, sending some data back. In app.get function, let's call res.send, passing in a string. In the parenthesis we'll add Hello Express!:
app.get('/', (req, res) => {
res.send('Hello Express!');
});
This is the response for the HTTP request. So when someone views the website they will see this string. If they make a request from an application, they will get back Hello Express! as the body data.
Now at this point we're not quite done. We have one of our routes set up, but the app is never going to actually start listening. What we need to do is call app.listen. The app.listen function will bind the application to a port on our machine. In this case for our local host app, we will use port 3000, a really common port for developing locally. Later in the chapter, we'll talk about how to customize this depending on whatever server you use to deploy your app to production. For now though, a number like 3000 works:
app.get('/', (req, res) => {
res.send('Hello Express!');
});
app.listen(3000);
With this in place we are now done. We have our very first Express server. We can actually run things from the Terminal, and view it in the browser. Inside the Terminal, we'll use nodemon server.js to start up our app:
nodemon server.js
This will start up the app and you'll see that the app never really finishes as shown here:
Right now it's hanging. It's waiting for requests to start coming in. The apps that use app.listen, they will never stop. You'll have to shut them down manually with control + C, like we've done before. It might crash if you have an error in your code. But it'll never stop normally, since we have that binding set up here. It will listen to requests until you tell it to stop.
Now that the server is up, we can move into the browser and open up a new tab visiting the website, localhost: followed by the port 3000:
This will load up the root of the website, and we specify the handler for that route. Hello Express! shows up, which is exactly what we expected. Now there's no thrills. There's no formatting. We're just sending a string from the server back to the client that made the request.
What we'd like to do next is open up the developer tools, so we can explore exactly what happened when that request was made. Inside Chrome you can get to the Developer Tools using Settings| More Tools| Developer Tools:
Or you can use the keyboard shortcut shown along with Developer Tools for the operating system.
We'll now open up the Developer Tools, which should look similar to the ones we used when we ran the Node Inspector debugger. They're a little different, but the idea is the same:
We have a bunch of tabs up top, and then we have our tab specific information down following on the page. In our case, we want to go to the Network tab, and currently we have nothing. So we'll refresh the page with the tab open, and what we see right here is our localhost request:
This is the request that's responsible for showing Hello Express! to the screen. We can actually click the request to view its details:
This page can be a little overwhelming at first. There is a a lot of information. Up on top we have some general info, such as the URL that was requested, the method that the client wanted; in this case, we made a GET request, and the status code that came back. The default status code being 200, meaning that everything went great. We'd like to point the attention to is one response header.
Under Response Headers we have a header called Content-Type. This header tells the client what type of data came back. Now this could be something like an HTML website, some text, or some JSON data and the client could be a web browser, an iPhone, an Android device, or any other computer with network capabilities. In our case, we're telling the browser that what came back is some HTML, so why don't you render it as such. We use the text/html Content-Type. And this automatically got set by Express, which is one of the reasons it's so popular. It handles a lot of that mundane stuff for us.
Now that we have a very basic example, we want to step things up a notch. Inside Atom, we can actually provide some HTML right inside of send by wrapping our Hello Express! message in an h1 tag. Later in this section, we'll be setting up a static website that has HTML files that get served up. We'll also look at templating to create dynamic web pages. But for now, we can actually just pass in some HTML to res.send:
app.get('/', (req, res) => {
res.send('<h1>Hello Express!</h1>');
});
app.listen(3000);
We'll save the server file, which should restart things in the browser. When we give the browser a refresh, we get Hello Express! printing to the screen:
This time though, we have it in an h1 tag, which means it's formatted by the default browser styles. In this case it looks nice and big. With this in place we can now open up the request inside the Network tab, and what we get is the exact same thing we had before. We're still telling the browser that it's HTML. Only one difference this time: we actually have an HTML tag, so it gets rendered using the browser's default styles.
The next thing we'd look into is how we can send some JSON data back. Sending JSON is really easy with Express. To illustrate how we can do it we'll comment out our current call to res.send and add a new one. We'll call res.send passing in an object:
app.get('/', (req, res) => {
// res.send('<h1>Hello Express!</h1>');
res.send({
})
});
On this object we can provide whatever we like. We can create a name property, setting it equal to the string version of any name, say Andrew. We can make a property called likes, setting it equal to an array, and we can specify some things we may like. Let's add Biking as one of them, and then add Cities as another:
res.send({
name: 'Andrew',
likes: [
'Biking',
'Cities'
]
});
When we call res.send passing in an object, Express notices that. Express takes it, converts it into JSON, and sends it back to the browser. When we save server.js and nodemon refreshes, we can refresh the browser, and what we get is my data formatted using JSON view:
This means we can collapse the properties and quickly navigate the JSON data.
Now the only reason JSON view picked up on this is because that Content-Type header that we explored in our last request it actually changed. If I open up localhost, a lot of things look the same. But now Content-Type has an application/json Content-Type:
This Content-Type tells the requester whether it's an Android phone, an iOS device, or the browser that JSON data is coming back, and it should parse it as such. That's exactly what the browser does in this case.
Express also makes it really easy to set up other routes aside from the root route. We can explore that inside Atom by calling app.get a second time. We'll call app.get. We'll create a second route. We'll call this one about:
app.get('/about')
app.listen(3000);
Notice that we just used /about as the route. It's important to keep that forward slash in place, but after that you can type whatever you like. In this case we'll have a /about page that someone can visit. Then I'll provide the handler. The handler will take the req and the res object:
app.get('/about', (req, res) => {
});
app.listen(3000);
This will let us figure out what kind of request came in, and it will let us respond to that request. For now just to illustrate we can create more pages, we'll keep the response simple, res.send. Inside the string we're going to print About Page:
app.get('/about', (req, res) => {
res.send('About Page');
});
Now when we save the server.js file, the server is going to restart. In the browser we can visit localhost:3000/about. At /about we should now see our new data, and that's exactly what we get back, About Page shows up as shown here:
Using app.get we're able to specify as many routes as we like. For now we just have an about route and a / route, which is also referred to as the root route. The root route returns some data, which happens to be JSON, and the about route returns a little bit of HTML. Now that we have this in place and we have a very basic understanding about how we can set up routes in Express, we'd like you to create a new route /bad. This is going to simulate what happens when a request fails.
To show the error handling request with JSON, we're going to call app.get. This app.get is going to let us register another handler for a get HTTP request. In our case the route we're looking for inside of quotes is going to be /bad. When someone makes a request for this page, what we want to do is going to be specified in the callback. The callback will take our two arguments, req and res. We'll use an arrow function (=>), which I've used for all of the handlers so far:
app.get('/bad', (req, res) => {
});
app.listen(3000);
Inside the arrow function (=>), we'll send back some JSON by calling res.send. But instead of passing in a string, or some string HTML, we'll pass in an object:
app.get('/bad', (req, res) => {
res.send({
});
});
Now that we have our object in place we can specify the properties we want to send back. In this case we'll set one errorMessage. We'll set my error message property equal to a string, Unable to handle request:
app.get('/bad', (req, res) => {
res.send({
errorMessage: 'Unable to handle request'
});
});
Next up we'll save the file, restarting it in nodemon, and visit it in the browser. Make sure our error message showed up correctly. In the browser, we'll visit /bad, hit enter, and this is what we get:
We get our JSON showing up using JSON view. We have our error message, and we have the message showing up: Unable to handle request. Now if you are using JSON view and you want to view the raw JSON data, you can actually click on View source, and it will show it in a new tab. Here, we're looking at the raw JSON data, where everything is wrapped in those double quotes:
I'll stick to the JSON view data because it's a lot easier to navigate and view. We now have a very basic Express application up and running. It listens on port 3000 and it currently has handlers for 3 URLs: when we get the root of the page, when we get /about, and when we make a get request for /bad.
In this section, we'll learn how to set up a static directory. So if we have a website with HTML, CSS, JavaScript, and images, we can serve that up without needing to provide a custom route for every single file, which would be a real burden. Now setting this up is really simple. But before we make any updates to server.js, we'd create some static assets inside of our project that we can actually serve up.
In this case we'll make one HTML page that we'll be able to view in the browser. Before we get started, we do need to create a new directory, and everything inside this directory will be accessible via the web server, so it's important to not put anything in here that you don't want prying eyes to see.
Everything in the directory should be intended to be view able by anybody. We'll create a public folder to store all of our static assets, and inside here we'll make an HTML page. We'll create a help page for our example project by creating a file called help.html:
Now in help.html we will make a quick basic HTML file, although we'll not touch on all of the subtleties of HTML, since this is not really an HTML book. Instead, we'll just set up a basic page.
The first thing we need to do is create a DOCTYPE which lets the browser know what version of HTML we're using. That will look something like this:
<!DOCTYPE html>
After the opening tag, and the exclamation mark, we'd type DOCTYPE in uppercase. Then, we provide the actual DOCTYPE for HTML5, the latest version. Then we can use the greater than sign to close things up. In the next line, we'll open up our html tag so we can define our entire HTML file:
<!DOCTYPE html>
<html>
</html>
Inside html, there are two tags we'll use: the head tag which lets us configure our doc, and the body tag which contains everything we want to render to the screen.
We'll create the head tag first:
<!DOCTYPE html>
<html>
<head>
</head>
</html>
Inside head, we'll provide two pieces of info, charset and title tag:
As shown in the following code snippet, we'll set meta. And on meta, we'll set the charset property using equals, and provide the value utf-8:
<head>
<meta charset="utf-8">
</head>
For the title tag, we can set it to whatever we like; Help Page seems appropriate:
<head>
<meta charset="utf-8">
<title>Help Page</title>
</head>
Now that our head is configured, we can add something to the body of our website. This is the stuff that's actually going to be viewable inside the viewport. Next to the head, we'll open and close the body tag:
<body>
</body>
Inside body again, we'll provide two things: an h1 title and a p paragraph tag.
The title is going to match the title tag we used in the head, Help Page, and the paragraph will just have some filler text—Some text here:
<!DOCTYPE html>
<html>
<head>
<meta charset="utf-8">
<title>Help Page</title>
</head>
<body>
<h1>Help Page</h1>
<p>Some text here</p>
</body>
</html>
Now we have an HTML page and the goal is to be able to serve this page up in our Express app without having to manually configure it.
We'll serve our HTML page in the Express app using a piece of Express middleware. Middleware lets us configure how our Express application works, and it's something we'll use extensively throughout the book. For now, we can think of it kind of like a third-party add-on.
In order to add some middleware, we'll call app.use. The app.use takes the middleware function we want to use. In our case, we'll use a built-in piece of middleware. So inside server.js, next to the variable app statement, we'll provide the function off of the express object:
const express = require('express');
var app = express();
app.use();
We will be making our own middleware in the next chapter, so it'll become clear exactly what's getting passed into use in a little bit. For now, we'll pass in express.static and to call it as a function:
var app = express();
app.use(express.static());
Now express.static takes the absolute path to the folder you want to serve up. If we want to be able to serve up /help, we'll need to provide the path to the public folder. This means we need to specify the path from the root of our hard drive, which can be tricky because your projects move around. Luckily we have the __dirname variable:
app.use(express.static(__dirname));
This is the variable that gets passed into our file by the wrapper function we explored. The __dirname variable stores the path to your projects directory. In this case, it stores the path to node-web-server. All we have to do is concatenate /public to tell it to use this directory for our server. We'll concatenate using the plus sign and the string, /public:
app.use(express.static(__dirname + '/public'));
With this in place, we are now done. We have our server set up and there's nothing else to do. Now we should be able to restart our server and access /help.html. We should now see the HTML page we have. In the Terminal we can now start the app using nodemon server.js:
Once the app is up and running we can visit it in the browser. We'll start by going to localhost:3000:
Here we get our JSON data, which is exactly what we expect. And if we change that URL to /help.html we should get our Help Page rendering:
And that is exactly what we get, we have our Help Page showing to the screen. We have the Help Page title as the head, and the Some text here paragraph following as body. Being able to set up a static directory that easily has made Node the go-to choice for simple projects that don't really require a backend. If you want to create a Node app for the sole purpose of serving up a directory you can do it in about four lines of code: the first three lines and the last line in the server.js file.
Now one more thing we'd discuss is the call to app.listen(3000). The app.listen does take a second argument. It's optional. It's a function. This will let us do something once the server is up because it can take a little bit of time to get started. In our case we'll assign console.log a message: Server is up on port 3000:
app.listen(3000, () => {
console.log('Server is up on port 3000');
});
Now it's really clear to the person who started the app that the server is actually ready to go because the message will print to the screen. If we save server.js, and go back into the Terminal we can see Server is up on port 3000 prints:
Back inside the browser we can refresh and we get the exact same results:
That's it for this section. We now have a static directory where we can include JavaScript, CSS, images, or any other file types we like.
In the last couple sections, we looked at multiple ways that we can render HTML using Express. We passed some HTML into response.send, but obviously that was not ideal. It's a real pain to write the markup in a string. We also created a public directory where we can have our static HTML files, such as our help file, and we can serve these up to the browser. Both of those work great but there is a third solution, and that will be the topic in this section. The solution is a templating engine.
A templating engine will let you render HTML but do it in a dynamic way, where we can inject values, such as a username or the current date, inside the template, kind of like we would in Ruby or PHP. Using this templating engine, we'll also be able to create reusable markup for things such as a header or a footer, which is going to be the same on a lot of your pages. This templating engine, handlebars, will be the topic of this section and the next, so let's get started.
The first thing we'll do is install the hbs module. This is a handlebars view engine for Express. Now there are a ton of other view engines for Express, for example EJS or Pug. We'll go with handlebars because its syntax is great. It's a great way to get started.
Now we'll see a few things inside of the browser. First up we will visit handlebarsjs.com. This is the documentation for handlebars. It shows you exactly how to use all of its features, so if we want to use anything, we can always go here to learn how to use it.
Now we'll install a module that's a wrapper around handlebars. It will let us use it as an Express view engine. To view this, we'll go to npmjs.com/package/hbs.
This module is pretty popular. It's a really great view engine. They have a lot of documentation. I just want to let you know this exists as well. Now we can install and integrate it into our application. In the Terminal, we'll install hbs using npm install, the module name is hbs, and the most recent version is @4.0.1. I will use the save flag to update package.json:
Now actually configuring Express to use this handlebars view engine is super simple. All we have to do is import it and add one statement to our Express configuration. We'll do just that inside Atom.
Inside Atom, let's get started by loading in handlebars const hbs = require hbs, as shown and from here we can add that one line:
const express = require('express');
const hbs = require('hbs');
Next, let's call app.set where we call app.use for Express static:
app.set
app.use(express.static(__dirname + '/public'));
This lets us set some various Express-related configurations. There's a lot of built-in ones. We'll be talking about more of them later. For now, about what we'll do is pass in a key-value pair, where the key is the thing you want to set and the value is the value you want to use. In this case, the key we're setting is view engine. This will tell Express what view engine we'd like to use and we'll pass in inside of quotes hbs:
app.set('view engine', 'hbs');
app.use(express.static(__dirname + '/public'));
This is all we need to do to get started.
Now in order to create our very first template, what we'd like to do is make a directory in the project called views. The views is the default directory that Express uses for your templates. So what we'll do is add the views directory and then we'll add a template inside it. We'll make a template for our About Page.
Inside views, we'll add a new file and the file name will be about.hbs. The hbs handlebars extension is important. Make sure to include it.
Now Atom already knows how to parse hbs files. At the bottom of the about.hbs file, where it shows the current language it's using, HTML in parentheses mustache.
What we'll do to get started though is take the contents of help.html and copy it directly. Let's copy this file so we don't have to rewrite that boilerplate, and we'll paste it right in the about.hbs:
<!DOCTYPE html>
<html>
<head>
<meta charset="utf-8">
<title>Help Page</title>
</head>
<body>
<h1>Help Page</h1>
<p>Some text here</p>
</body>
</html>
Now we can try to render this page. We'll change the h1 tag from help page to about page:
<body>
<h1>About Page</h1>
<p>Some text here</p>
</body>
We'll talk about how to dynamically render stuff inside this page later. Before that we'd like to just get this rendering.
Inside server.js, we already have a root for /about, which means we can render our hbs template instead of sending back this about page string. We will remove our call to res.send and we'll replace it with res.render:
app.get('/about', (req, res) => {
res.render
});
Render will let us render any of the templates we have set up with our current view engine about.hbs file. We do indeed have the about template and we can pass that name, about.hbs, in as the first and only argument. We'll render about.hbs:
app.get('/about', (req, res) => {
res.render('about.hbs');
});
This will be enough to get that static page rendering. We'll save server.js and in the Terminal, we'll clear the output and we'll run our server using nodemon server.js:
Once the server is up and running, it is showing on port 3000. We can open up this /about URL and see what we get. We'll head into Chrome and open up localhost:3000 /about, and when we do that, we get the following:
We get my about page rendered just like we'd expect it. We've got an h1 tag, which shows up nice and big, and we have our paragraph tag, which shows up the following. So far we have used hbs but we haven't actually used any of its features. Right now, we're rendering a dynamic page, so we might as well have not even included it. What I want to do is talk about how we can inject data inside of our templates.
Let's come up with some things that we want to make dynamic inside our handlebars file. First up, we'll make this h1 tag dynamic so the page name gets passed into the template in about.hbs page, and we'll also add a footer. For now, we'll just make that a simple footer tag:
<footer>
</footer>
</body>
</html>
Inside of the footer, we'll add a paragraph and that paragraph will have the copyright for our website. We'll just say something like copyright followed by the year, which is 2018:
<footer>
<p>Copyright 2018</p>
</footer>
Now year should also be dynamic, so that as the years change, we don't have to manually update our markup. We'll look at how to make both the 2018 and the about page dynamic, which means they're getting passed in instead of being typed in the handlebars file.
In order to do this, we'll have to do two things:
Passing in data is pretty simple. All we have to do is specify a second argument to res.render in server.js. This will take an object, and on this object we can specify whatever we like. We might have a pageTitle that gets set equal to About Page:
app.get('/about', (req, res) => {
res.render('about.hbs', {
pageTitle: 'About Page'
});
});
We have one piece of data getting injected in the template. It's not used yet but it is indeed getting injected. We could also add another one like currentYear. We'll put currentYear next to the pageTitle and we'll set currentYear equal to the actual year off of the date JavaScript constructor. This will look something like this:
app.get('/about', (req, res) => {
res.render('about.hbs', {
pageTitle: 'About Page',
currentYear: new Date().getFullYear()
});
});
We'll create a new date which makes a new instance of the date object. Then, we'll use a method called getFullYear, which returns the year. In this case, it would return 2018, just like this .getFullYear. Now we have a pageTitle and a currentYear. These are both getting passed in, and we can use them.
In order to use these pieces of data, what we have to do inside of our template is use that handlebars syntax which looks a little bit like shown in the following code. We start by opening up two curly braces in the h1 tag, then we close two curly braces. Inside the curly braces, we can reference any of the props we passed in. In this case, let's use pageTitle, and inside our copyright paragraph, we'll use, inside of double curly braces, currentYear:
<body>
<h1>{{pageTitle}}</h1>
<p>Some text here</p>
<footer>
<p>Copyright 2018</p>
</footer>
</body>
</html>
With this in place, we now have two pieces of dynamic data getting injected inside our application. Now nodemon should have restarted in the background, so there's no need to manually do anything there. When we refresh the page, we do still get About Page, which is great:
This comes from the data we defined in server.js, and we get Copyright 2018 showing up. Well this web page is pretty simple and doesn't look that interesting. At least you know how to create those servers and inject that data inside your web page. All you have to do from here is add some custom styles to get things looking nice.
Before we go ahead, let's move into the about file and swap out the title. Currently, it says Help Page. That's left over from the public folder. Let's change it to Some Website:
<!DOCTYPE html>
<html>
<head>
<meta charset="utf-8">
<title>Some Website</title>
</head>
<body>
<h1>{{pageTitle}}</h1>
<p>Some text here</p>
<footer>
<p>Copyright 2018</p>
</footer>
</body>
</html>
Now that we have this in place. Next, we'll create a brand new template and that template is going to get rendered when someone visits the root of our website, the / route. Now currently, we render some JSON data:
app.get('/', (req, res) => {
// res.send('<h1>Hello Express!</h1>');
res.send({
name: 'Andrew',
likes: [
'Biking',
'Cities'
]
});
What we want to do is replace this with a call to response.render, rendering a brand new view.
To get started, we'll duplicate the about.hbs file so we can start customizing it for our needs. We'll duplicate it, and call this one home.hbs:
<!DOCTYPE html>
<html>
<head>
<meta charset="utf-8">
<title>Some Website</title>
</head>
<body>
<h1>{{pageTitle}}</h1>
<p>Some text here</p>
<footer>
<p>Copyright 2018</p>
</footer>
</body>
</html>
Now from here most things are going to stay the same. We'll keep the pageTitle in place. We'll also keep the Copyright and footer following. What we want to change though is this paragraph. It was fine that the About Page as a static one, but for the home page, we'll set it equal to, inside curly braces, the welcomeMessage property:
<body>
<h1>{{pageTitle}}</h1>
<p>{{welcomeMessage}}</p>
<footer>
<p>Copyright {{currentYear}}</p>
</footer>
</body>
Now welcomeMessage is only going to be available on home.hbs, which is why we have specifying it in home.hbs but not in about.hbs.
Next up, we needed to call response render inside of the callback. This will let us actually render the page. We'll add response.render, passing in the template name we want to render. This one is called home.hbs. Then we'll pass in our data:
app.get('/', (req, res) => {
res.render('home.hbs', {
})
});
Now to get started, we can pass in the page title. We'll set this equal to Home Page and we'll pass in some sort of generic welcome message - Welcome to my website. Then we'll pass in the currentYear, and we already know how to fetch the currentYear: new Date(), and on the date object, we'll call the getFullYear method:
res.render('home.hbs', {
pageTitle: 'Home Page',
welcomeMessage: 'Welcome to my website',
currentYear: new Date().getFullYear()
})
With this in place, all we needed to do is save the file, which is automatically going to restart the server using nodemon and refresh the browser. When we do that, we get the following:
We get our Home Page title, our Welcome to my website message, and my copyright with the year 2018. And if we go to /about, everything still looks great. We have our dynamic page title and copyright and we have our static some text here text:
With this in place, we are now done with the very basics of handlebars. We see how this can be useful inside of a real-world web app. Aside from a realistic example such as the copyright, other reasons you might use this is to inject some sort of dynamic user data - things such as a username and email or anything else.
Now that we have a basic understanding about how to use handlebars to create static pages, we'll look at some more advanced features of hbs inside the next section.
In this section, we'll learn a few more advanced features that handlebars has to offer. This will make it easier to render our markup, especially markup that's used in multiple places, and it will make it easier to inject dynamic data into your web pages.
In order to illustrate the first thing we'll talk about, I want to open up both about.hbs and home.hbs, and you'll notice down at the bottom that they both have the exact same footer code as follows:
<footer>
<p>Copyright {{currentYear}}</p>
</footer>
We have a little copyright message for both and they both have the same header area, which is the h1 tag.
Now this really isn't a problem because we have two pages, but as you add more and more pages it's going to become a real pain to update your header and your footer. You'll have to go into every file and manage the code there, but what we'll talk about instead is something called a partial.
A partial is a partial piece of your website. It's something you can reuse throughout your templates. For example, we might have a footer partial that renders the footer code. You can include that partial on any page you need a footer. You could do the same thing for header. In order to get started, the first thing we need to do is set up our server.js file just a little bit to let handlebars know that we want to add support for partials.
In order to do this, we'll add one line of code in the server.js file where we declared our view engine previously, and it will look something like this (hbs.registerPartials):
hbs.registerPartials
app.set('view engine', 'hbs');
app.use(express.static(__dirname + '/public'));
Now registerPartials is going to take the directory you want to use for all of your handlebar partial files, and we'll be specifying that directory as the first and only argument. Once again, this does need to be the absolute directory, so I'll use the __dirname variable:
hbs.registerPartials(__dirname)
Then we can concatenate the rest of the path, which will be /views. In this case, I want you to use /partials.
hbs.registerPartials(__dirname + '/views/partials')
We'll store our partial files right inside a directory in the views folder. Now we can create that folder right in views called partials.
Inside partials, we can put any of the handlebars partials we like. To illustrate how they work, we'll create a file called footer.hbs:
Inside footer.hbs, we'll have access to the same handlebars features, which means we can write some markup, we can inject variables, we can do whatever we like. For now, what we'll do is copy the footer tag exactly, pasting it inside footer.hbs:
<footer>
<p>Copyright {{getCurrentYear}}</p>
</footer>
Now we have our footer.hbs file, this is the partial and we can include it in both about.hbs and home.hbs. In order to do that, we'll delete the code that we already have in the partial and we'll replace it with opening and closing two curly braces. Now instead of injecting data, we want to inject a template and the syntax for that is to add a greater than symbol with a space, followed by the partial name. In our case that partial is called footer, so we can add this right here:
{{> footer}}
</body>
</html>
Then I can save about and do the same thing over in home.hbs. We now have our footer partial. It's rendering on both pages.
To illustrate how this works, I'll fire up my server and by default nodemon; it's not going to watch your handlebars files. So if you make a change, the website's not going to render as you might expect. We can fix this by running nodemon, passing in server.js and providing the -e flag. This lets us specify all of the extensions we want to watch. In our case, we'll watch the JS extension for the server file, and after the comma, the hds extension:
Now our app is up and running, we can refresh things over in the browser, and they should look the same. We have our about page with our footer:
We have our home page with the exact same footer:
The advantage now is if we want to change that footer, we just do it in one place, in the footer.hbs file.
We can add something to our footer paragraph tag. Let's add a little message created by Andrew Mead with a -:
<footer>
<p>Created By Andrew Mead - Copyright {{CurrentYear}}</p>
</footer>
Now, save the file and when we refresh the browser, we have our brand new footer for Home Page:
We have our brand new footer for About Page:
It will show up for both the home page and the about page. There's no need to do you anything manual in either of these pages, and this is the real power of partials. You have some code, you want to reuse it inside your website, so you simply create a partial and you inject it wherever you like.
Now that we have the footer partial in place, let's create the header partial. That means we'll need to create a brand new file header.hbs. We'll want to add the h1 tag inside that file and then we'll render the partial in both about.hbs and home.hbs. Both pages should still look the same.
We'll get started by creating a new file in the partials folder called header.hbs.
Inside header.hbs, we'll take the h1 tag from our website, paste it right inside and save it:
<h1>{{pageTitle}}</h1>
Now we can use this header partial in both about and home files. Inside of about, we need to do this using the syntax, the double curly braces with the greater than sign, followed by the partial name header. We'll do the exact same thing for the home page. In the home page, we'll delete our h1 tag, inject the header and save the file:
Now we'd create something slightly different just so we can test that it actually is using the partial. We'll type 123 right after the h1 tag in header.hbs:
<h1>{{pageTitle}}</h1>123
Now that all the files are saved, we should be able to refresh the browser, and we see about page with 123 printing, which is fantastic:
This means the header partial is indeed working, and if I go back to the home page, everything still looks great:
Now that we have the header broken out into its own file, we can do all sorts of things. We can take our h1 tag and put it inside of a header tag, which is the appropriate way to declare your header inside of HTML. As shown, we add an opening and closing header tag. We can take the h1 and we can move it right inside:
<header>
<h1>{{pageTitle}}</h1>
</header>
We could also add some links to the other pages on our website. We could add an anchor tag for the homepage by adding an a tag:
<header>
<h1>{{pageTitle}}</h1>
<p><a></a></p>
</header>
Inside the a tag, we'll specify the link text we'd like to show up. I'll go with Home, then inside the href attribute, we can specify the path the link should take you to, which would just be /:
<header>
<h1>{{pageTitle}}</h1>
<p><a href="/">Home</a></p>
</header>
Then we can take the same paragraph tag, copy it and paste it in the next line and make a link for the about page. I'll change the page text to About, the link text, and the URL instead of going to / will go to /about:
<header>
<h1>{{pageTitle}}</h1>
<p><a href="/">Home</a></p>
<p><a href="/about">About</a></p>
</header>
Now we've made a change to our header file and it will be available on all of the pages of our website. I'm on the home page. If I refresh it, I get Home and About page links:
I can click on the About to go to the About Page:
Similarly, I can click on Home to come right back. All of this is much easier to manage now that we have partials inside of our website.
Now before we go further, there is one more thing I want to talk about, that is, a handlebars helper. Handlebars helpers are going to be ways for us to register functions to run to dynamically create some output. For example, inside server.js, we currently inject the current year inside of both of our app.get templates and that's not really necessary.
There is a better way to pass this data in, and this data shouldn't need to be provided because we'll always use the exact same function. We'll always take the new date getfullYear return value passing it in. Instead, we'll use a partial, and we'll set ours up right now. Now a partial is nothing more than a function you can run from inside of your handlebars templates.
All we need to do is register it and I'll do that in the server.js, following on from where we set up our Express middleware. As shown in the following code, we'll call hbs.register and we'll be registering a helper, so we'll call a registerHelper:
hbs.registerPartials(__dirname + '/views/partials')
app.set('view engine', 'hbs');
app.use(express.static(__dirname + '/public'));
hbs.registerHelper();
Now registerHelper takes two arguments:
The first argument right here will be getCurrentYear in our case. We'll create a helper that returns that current year:
hbs.registerHelper('getCurrentYear',);
The second argument will be our function. I'll use an arrow function (=>):
hbs.registerHelper('getCurrentYear', () => {
});
Anything we return from this function will get rendered in place of the getCurrentYear call. That means if we call getCurrentYear inside the footer, it will return the year from the function, and that data is what will get rendered.
In the server.js, we can return the year by using return and having the exact same code we have app.get object:
hbs.registerHelper('getCurrentYear'), () => {
return new Date().getFullYear()
});
We'll make a new date and we'll call its getFullYear method. Now that we have a helper, we can remove this data from every single one of our rendering calls:
hbs.registerHelper('getCurrentYear, () => {
return new Date().getFullYear()
});
app.get('/', (req, res) => {
res.render('home.hbs', {
pageTitle: 'Home Page',
welcomeMessage: 'Welcome to my website'
});
});
app.get('/about', (req, res) => {
res.render('about.hbs', {
pageTitle: 'About Page'
});
});
This is going to be really fantastic because there really is no need to compute it for every page since it's always the same. Now that we've removed that data from the individual calls to render, we will have to use getCurrentYear inside the footer.hbs file:
<footer>
<p>Created By Andrew Mead - Copyright {{getCurrentYear}}</p>
</footer>
Instead referencing the current year, we will use the helper getCurrentYear, and there's no need for any special syntax. When you use something inside curly braces that clearly isn't a partial, handlebars is first going to look for a helper with that name. If there is no helper, it'll look for a piece of data with that getCurrentYear name.
In this case, it will find the helper, so everything will work as expected. We can now save footer.hbs, move into the browser, and give things a refresh. When I refresh the page, we still get Copyright 2018 in Home Page:
If I go to the About Page, everything looks great:
We can prove that data is coming back from our helper by simply returning something else. Let's comment out our helper code in server.js and before the comment, we can use return test, just like this:
hbs.registerHelper('getCurrentYear', () => {
return 'test';//return new Date().getFullYear()
});
We can now save server.js, refresh the browser, and we get tests showing up as shown here:
So the data that renders right after the Copyright word is indeed coming from that helper. Now we can remove the code so we return the proper year.
Helpers can also take arguments, and this is really useful. Let's create a second helper that's going to be a capitalization helper. We'll call the helper screamIt and its job will be to take some text and it will return that text in uppercase.
In order to do this, we will be calling hbs.registerHelper again. This helper will be called screamIt, and it will take a function because we do need to run some code in order to do anything useful:
hbs.registerHelper('getCurrentYear', () => {
return new Date().getFullYear()
});
hbs.registerHelper('screamIt', () => {
});
Now screamIt is going to take text to scream and all it will do is call on that string the toUpperCase method. We'll return text.toUpperCase, just like this:
hbs.registerHelper('screamIt', (text) => {
return text.toUpperCase();
});
Now we can actually use screamIt in one of our files. Let's move into home.hbs. Here, we have our welcome message in the p tag. We'll remove it and we'll scream the welcome message. In order to pass data into one of our helpers, we first have to reference the helper by name, screamIt, then after a space we can specify whatever data we want to pass in as arguments.
In this case, we'll pass in the welcome message, but we could also pass in two arguments by typing a space and passing in some other variable which we don't have access to:
<!DOCTYPE html>
<html>
<head>
<meta charset="utf-8">
<title>Some Website</title>
</head>
<body>
{{> header}}
<p>{{screamIt welcomeMessage}}</p>
{{> footer}}
</body>
</html>
For now, we'll use it like this, which means we'll call the screamIt helper, passing in one argument welcomeMessage. Now we can save home.hbs, move back into the browser, go to the Home Page and as shown following, we get WELCOME TO MY WEBSITE in all uppercase:
Using handlebars helpers, we can create both functions that don't take arguments and functions that do take arguments. So when you need to do something to the data inside of your web page, you can do that with JavaScript. Now that we have this in place, we are done.
In this section, you'll learn how to use Express middleware. Express middleware is a fantastic tool. It allows you to add on to the existing functionality that Express has. So if Express doesn't do something you'd like it to do, you can add some middleware and teach it how to do that thing. Now we've already used a little bit of middleware. In server.js file, we used some middleware and we teach Express how to read from a static directory, which is shown here:
app.use(express.static(__dirname + '/public'));
We called app.use, which is how you register middleware, and then we provided the middleware function we want to use.
Now middleware can do anything. You could just execute some code such as logging something to the screen. You could make a change to the request or the response object. We'll do just that in the next chapter when we add API authentication. We'll want to make sure the right header is sent. That header will be expected to have an API token. We can use middleware to determine whether or not someone's logged in. Basically, it will determine whether or not they should be able to access a specific route, and we can also use middleware to respond to a request. We could send something back from the middleware, just like we would anywhere else, using response.render or response.send.
In order to explore middleware, we'll create some basic middleware. Just following where we call app.use registering our Express static middleware, we'll call app.use again:
app.use(express.static(__dirname + '/public'));
app.use();
Now app.use is how you register middleware, and it takes a function. So, we'll pass in an arrow function (=>):
app.use(() => {
});
The use function takes just one function. There is no need to add any other arguments. This function will get called with the request (req) object, the response (res) object and a third argument, next:
app.use((req, res, next) => {
});
Now request and response objects, these should seem familiar by now. They're the exact same arguments we get whenever we register a handler. The next argument is where things get a little trickier. The next argument exists so you can tell Express when your middleware function is done, and this is useful because you can have as much middleware as you like registered to a single Express app. For example, I have some middleware that serves up a directory. We'll write some more that logs some request data to the screen, and we could have a third piece that helps with application performance, keeping track of response times, all of that is possible.
Now inside app.use function, we can do anything we like. We might log something to the screen. We might make a database request to make sure a user is authenticated. All of that is perfectly valid and we use the next argument to tell Express when we're done. So if we do something asynchronous, the middleware is not going to move on. Only when we call next, will the application continue to run, like this:
app.use((req, res, next) => {
next();
});
Now this means if your middleware doesn't call next, your handlers for each request, they're never going to fire. We can prove this. Let's call app.use, passing in an empty function:
app.use((req, res, next) => {
});
Let's save the file and in the Terminal, we'll run our app using nodemon with server.js:
nodemon server.js
I'll move into the browser and I'll make a request for the home page. I'll refresh the page and you can see that up top, it is trying to load but it's never going to finish:
Now it's not that it can't connect to the server. It connects to the server just fine. The real problem is that inside our app, we have middleware that doesn't call next. To fix this, all we'll do is call next like this:
app.use((req, res, next) => {
next();
});
Now when things refresh over inside the browser, we get our Home Page exactly as we expect it:
The only difference is now we have a place where we can add on some functionality.
Inside app.use, we're going to get started by creating a logger that will log out all of the requests that come in to the server. We'll store a timestamp so we can see exactly when someone made a request for a specific URL.
To get started inside the middleware, let's get the current time. I'll make a variable called now, setting it equal to newDate, creating a new instance of our date object, and I'll call it toString method:
app.use((req, res, next) => {
var now = new Date().toString();
next();
});
The toString method creates a nice formatted date, a human-readable timestamp. Now that we have our now variable in place, we can start creating the actual logger by calling console.log.
Let's call console.log, passing in whatever I like. Let's pass in inside of ticks the now variable with a colon after:
app.use((req, res, next) => {
var now = new Date().toString();
console.log(`${now};`)
next();
});
Now if I save my file, things are going to restart in the Terminal because nodemon is running. When we make a request for the site again and we go into the Terminal, we should see the log:
Currently it's just a timestamp, but we are on the right track. Now everything is working because we called next, so after this console.log call prints to the screen, our application continues and it serves up the page.
Inside middleware, we can add on more functionality by exploring the request object. On the request object, we have access to everything about the request—the HTTP method, the path, query parameters, and anything that comes from the client. Whether the client is an app, a browser, or an iPhone, it is all going to be available in that request object. Two things we'll pull off now are the HTTP method and the path.
If you want to look at a full list of the things you have access to, you can go to expressjs.com, and go to API reference:
We happen to be using a 4.x version of Express, so we'll click that link:
On the right-hand side of this link, we have both Request and Response. We'll look for the request objects, so we'll click that. This'll lead us to the following:
We'll be using two request properties: req.url and req.method. Inside Atom, we can start implementing those, adding them into console.log. Right after the timestamp, we'll print the HTTP method. We'll be using other methods later. For now we've only used the get method. Right inside the console.log, I'll inject request.method printing it to the console:
app.use((req, res, next) => {
var now = new Date().toString();
console.log(`${now}: ${req.method}`)
next();
});
Next up we can print the path so we know exactly what page the person requested. I'll do that by injecting another variable, req.url:
console.log(`${now}: ${req.method} ${req.url}`);
With this in place, we now have a pretty useful piece of middleware. It takes the request object, it spits out some information and then it moves on, letting the server process that request which was added. If we save the file and rerun the app from the browser, we should be able to move into the Terminal and see this new logger printing to the screen, and as shown following we get just that:
We have our timestamp, the HTTP method which is GET, and the path. If we change the path to something more complicated, such as /about, and we move back into the Terminal, we'll see the /about where we accessed req.url:
Now this is a pretty basic example of some middleware. We can take it a step further. Aside from just logging a message to the screen, we'll also print the message to a file.
To print the message to a file, let's load in fs up in the server.js file. We'll create a constant. Call that const fs and set that equal to the return result from requiring the module:
const express = require('express');
const hbs = require('hbs');
const fs = require('fs');
Now we can implement this down following in the app.use. We'll take our template string, which is currently defined inside console.log. We'll cut it out and instead store in a variable. We'll make a variable called log, setting it equal to that template string as shown here:
app.use((req, res, next) => {
var now = new Date().toString();
var log = `${now}: ${req.method} ${req.url}`;
console.log();
next();
});
Now we can pass that log variable into both console.log and into an fs method to write to our file system. For console.log, we will call log like this:
console.log(log);
For fs, I'll call fs.appendFile. Now as you remember, appendFile lets you add on to a file. It takes two arguments: the file name and the thing we want to add. The file name we'll use is server.log. We'll create a nice log file and the actual contents will just be the log message. We will need to add one more thing: we also want to move on to the next line after every single request gets logged, so I'll concatenate the new line character, which will be \n:
fs.appendFile('server.log', log + '\n');
Now that we have this in place, we can test things out. I save the file, which should be restarting things inside of nodemon. Inside Chrome, we can give the page a refresh. If we head back into the Terminal, we do still get my log, which is great:
Notice we also have a request for a favicon.ico. This is usually the icon that's shown in the browser tab. I have one cached from a previous project. There actually is no icon file defined, which is totally fine. The browser still makes the request anyway, which is why that shows up as shown in the previous code snippet.
Inside Atom, we now have our server.log file, and if we open it up, we have a log of all the requests that were made:
We have timestamps, HTTP methods, and paths. Using app.use, we were able to create some middleware that helps us keep track of how our server is working.
Now there are times where you might not want to call next. We learned that we could call next after we do something asynchronous, such as a read from a database, but imagine something goes wrong. You can avoid calling next to never move on to the next piece of middleware. We would like to create a new view inside the views folder. We'll call this one maintenance.hbs. This will be a handlebars template that will render when the site is in maintenance mode.
We'll start with making the maintenance.hbs file by duplicating home.hbs. Inside maintenance.hbs, all we'll do is wipe the body and add a few tags:
<!DOCTYPE html>
<html>
<head>
<meta charset="utf-8">
<title>Some Website</title>
</head>
<body>
</body>
</html>
As shown in the following code, we'll add an h1 tag to print a little message to the user:
<body>
<h1></h1>
</body>
We're going to use something like We'll be right back:
<body>
<h1>We'll be right back</h1>
</body>
Next, I can add a paragraph tag:
<body>
<h1>We'll be right back</h1>
<p>
</p>
</body>
Inside the paragraph, I'll leave a little message: The site is currently being updated:
<p>
The site is currently being updated.
</p>
Now that we have our template file in place, we can define our maintenance middleware. This is going to bypass all of our other handlers, where we render other files and print JSON, and instead it'll just render this template to the screen. We'll save the file, move into server.js, and define that middleware.
Right next to the previously-defined middleware, we can call app.use passing in our function. The function will take those three arguments: request (req), response (res), and next:
app.use((req, res, next) => {
})
Inside the middleware, all we'll need to do is call res.render. We'll add res.render passing in the name of the file we want to render; in this case, it's maintenance.hbs:
app.use((req, res, next) => {
res.render('maintenance.hbs');
});
That is all you needed to do to set up our main middleware. This middleware will stop everything after it from executing. We don't call next, so the actual handlers in the app.get function, they will never get executed and we can test this.
Inside the browser, we'll refresh the page, and we will get the following output:
We get the maintenance page. We can go to the home page and we get the exact same thing:
Now there's one more really important piece to middleware we haven't discussed yet. Remember inside the public folder, we have a help.html file as shown here:
If we visit this in the browser by going to localhost:3000/help.html, we'll still get the help page. We'll not get the maintenance page:
That is because middleware is executed in the order you call app.use. This means the first thing we do is we set up our Express static directory, then we set up our logger, and finally we set up our maintenance.hbs logger:
app.use(express.static(__dirname + '/public'));
app.use((req, res, next) => {
var now = new Date().toString();
var log = `${now}: ${req.method} ${req.url}`;
console.log(log);
fs.appendFile('server.log', log + '\n');
next();
});
app.use((req, res, next) => {
res.render('maintenance.hbs');
});
This is a pretty big problem. If we also want to make the public directory files such as help.html private, we'll have to reorder our calls to app.use because currently the Express server is responding inside of the Express static middleware, so our maintenance middleware doesn't get a chance to execute.
To resolve this, we'll take the app.use Express static call, remove it from the file, and add it after we render the maintenance file to the screen. The resultant code is going to look like this:
app.use((req, res, next) => {
var now = new Date().toString();
var log = `${now}: ${req.method} ${req.url}`;
console.log(log);
fs.appendFile('server.log', log + '\n');
next();
});
app.use((req, res, next) => {
res.render('maintenance.hbs');
});
app.use(express.static(__dirname + '/public'));
Now, everything will work as expected, no matter what we're going to log the request. Then we'll check if we're in maintenance mode if the maintenance middleware function is in place. If it is, we'll render the maintenance file. If it's not, we'll ignore it because it'll be commented out or something like that, and finally we'll be using Express static. This is going to fix all those problems. If I re-render the app now, I get the maintenance page on help.html:
If I go back to the root of the website, I still get the maintenance page:
Now once we're done with the maintenance middleware, we can always comment it out. This will remove it from being executed, and the website will work as expected.
This has been a quick dive into Express middleware. We'll be using it a lot more throughout the book. We'll be using middleware to check if our API requests are actually authenticated. Inside the middleware, we'll be making a database request, checking if the user is indeed who they say they are.
In this chapter you learned about Express and how it can be used to easily create websites. We looked at how we can set up a static web server, so when we have an entire directory of JavaScript, images, CSS, and HTML. We can serve that up easily without needing to provide routes for everything. This will let us create all sorts of applications, which we'll be doing throughout the rest of the book.
Next, we continued on learning how to use Express. We took a look at how we can render dynamic templates, kind of like we would with a PHP or Ruby on Rails file. We have some variables and we rendered a template injecting those variables. Then we learned a little bit about handlebars partials, which let us create reusable chunks of code like headers and footers. We also learned about Handlebars helpers, which is a way to run some JavaScript code from inside of your handlebars templates. Lastly, we moved back to talking about Express and how it can customize our requests, responses, our server.
In the next chapter, we'll look into deploying applications to the web.
In this chapter, we'll worry about adding version control and deploying our applications because when it comes to creating real-world Node apps, deploying your app to the Web is obviously a pretty big part of that. Now in the real world, every single company uses some form of version control. It is essential to the software development process, and most of them aren't using Git. Git has become really popular, dominating the market share for version control. Git is also free and open source, and there is a ton of great educational material. They have a book on how to learn Git. It's free and Stack Overflow is filled with Git-specific questions and answers.
We'll be using Git to save our project. We'll also be using it to back up our work to a service called GitHub, and finally we'll be using Git to deploy our project live to the Web. So we'll be able to take our web server and deploy it for anybody to visit. It won't just be available on localhost.
Specifically, we'll look into the following topics:
In this section, we'll learn how to set up and use Git, which is a version control system. Git will let us keep track of the changes to our project over time. This is really useful when something goes wrong and we need to revert to a previous state in the project where things were working. It's also super useful for backing up our work.
To get started, we will need to install Git on the computer, but luckily for us it is a really simple installation process. It's one of those installers where we just click on the Next button through a few steps. So let's go ahead and do that.
If you're on macOS, you'll need to launch the package installer and you might get the following message box saying that it's from an unidentified developer:
This is because it is distributed via a third party as opposed to being in the macOS App Store. We can go ahead and right-click on the package, then click on the Open button and confirm that we do indeed want to open it.
Once you're at the installer, the process is going to be pretty simple. You can essentially click on Continue and Next throughout every step.
If you're on Windows though, there is an important distinction. Inside the installer you're going to see a screen just like this:
It is really important that you also install Git Bash as shown in the screenshot. Git Bash is a program that simulates a Linux-type Terminal, and it's going to be really essential when we create our SSH keys in the next section to uniquely identify our machine.
Now, let's move in to the Terminal to test the installation. From the Terminal we can go ahead and run git --version. This is going to print a new version of Git we have installed:
git --version
As shown in the following screenshot, we can see we have git version 2.14.3:
With successful installation of Git, we are now ready to turn our node-web-server directory into a Git repository. In order to do this, we'll the following command:
git init
The git init command needs to get executed from the root of our project, the folder that has everything that we want to keep track of. In our case, node-web-server is that folder. It has our server.js file, our package.json file, and all of our directories. So, from the server folder, we'll run git init:
This creates a .git directory inside that folder. We can prove that by running the ls -a command:
ls -a
As shown in the following screenshot, we get all of the directories including the hidden ones and right here I do indeed have .git:
Now this directory is not something we should be manually updating. We'll be using commands from the Terminal in order to make changes to the Git folder.
Let's use the clear command to clear the Terminal output, and now we can start looking at exactly how Git works.
As mentioned earlier, Git is responsible for keeping track of the changes to our project, but by default it doesn't actually track any of our files. We have to tell Git exactly which files we want it to keep track of and there's a good reason for this. There are files in every project that we're most likely not going to want to add to our Git repo, and we'll talk about which ones and why later. For now let's go ahead and run the following command:
git status
Now all these commands need to get executed from inside of the root of the project. If you try to run this outside a repository, you'll get an error like git repository not found. What that means is that Git cannot find that .git directory in order to actually get the status of your repository.
When we run this command, we'll get some output that looks like this:
The important pieces for now is the Untracked files header and all of the files underneath it. These are all of the files and folders that Git seized, but it's currently not tracking. Git doesn't know if you want to keep track of the changes to these files or if you want to ignore them from your repository.
Now the views folder, for example, is something we definitely want to keep track of. This is going to be essential to the project and we want to make sure that whenever someone downloads the repository, they get the views folder. The log file on the other hand doesn't really need to be included in Git. In general our log files are not going to be committed, since they usually contain information specific to a point in time when the server was running.
As shown in the preceding code output, we have server.js, our public folder, and package.json. These are all essential to the process of executing the app. These are definitely going to be added to our Git repository, and the first one above we have is the node_modules folder. The node_modules folder is what's called a generated folder.
Generated folders are easily generated by running a command. In our case, we can regenerate this entire directory using npm install. We're not going to want to add Node modules to our Git repository because its contents differ depending on the version of npm you have installed and depending on the operating system you're using. It's best to leave off Node modules and let every person who uses your repository manually install the modules on the machine they're actually going to be running the app.
Now we have these six folders and files listed, so let's go ahead and add the four folders and files we want to keep. To get started, we'll use any git add command. The git add command lets us tell the Git we want to keep track of a certain file. Let's type the following command:
git add package.json
After we do this, we can run it git status again, and this time we get something very different:
Now we have an Initial commit header. This is new, and we have our old Untracked files header. Notice under Untracked files, we don't have package.json anymore. That is moved up to the Initial commit header. These are all of the files that are going to be saved, also known as committed, when we make our first commit. Now we can move on adding the 3 others. We'll use a git add command again to tell Git we want to track the public directory. We can run a git status command to confirm it was added as expected:
As shown in the preceding screenshot, we can see the public/help.html file is now going to be committed to Git once we run a commit.
Next up we can add server.js with git add server.js, and we can add the views directory using git add views, just like this:
git add server.js
git add views/
We'll run a git status command to confirm:
Everything looks good. Now the Untracked files are going to sit around here until we do one of two things—we either add them to the Git repository or ignore them using a custom file that we're going to create inside Atom.
Inside Atom, we'd like to make a new file called .gitignore, in our root of our project. The gitignore file is going to be part of our Git repository and it tells get which folders and files you want to ignore. In this case we can go ahead and ignore node_modules, just like this:
When we save the gitignore file and rerun git status from the Terminal, we'll now get a really different result:
As shown, we can see we have a new untracked file—.gitignore—but the node_modules directory is nowhere in sight, and that's exactly what we want. We want to remove this completely, making sure that it never ever gets added to the Git repo. Next up, we can go ahead and ignore that server.log file by typing its name, server.log:
node modules/
server.log
We'll save gitignore, run git status from the Terminal one more time, and make sure everything looks great:
As shown, we have a gitignore file as our only untracked file. The server.log file and node_modules are nowhere in sight.
Now that we have gitignore, we are going to be adding it to Git using git add .gitignore and when we run git status, we should be able to see that all the files that show up are under the initial commit:
git add .gitignore
git status
So now it's time to make a commit. A commit really only requires two things. It requires some change in the repository. In this case, we're teaching Git how to track a ton of new files, so we are indeed changing something, and it requires a message. We've already handled the file part of things. We've told Git what we want to save, we just haven't actually saved it yet.
In order to make our first commit and save our first thing into the Git repository, we'll run git commit and provide one flag, the m flag, which is short message. After that inside quotes, we can specify the message that we want to use for this commit. It's really important to use these messages so when someone's digging through the commit history, the list of all the changes to the project can be seen, which are actually useful. In this case, Initial commit is always a good message for your first commit:
git commit -m 'Initial commit'
I'll go ahead and hit enter and as shown in the following screenshot, we see all of the changes that happened to the repo:
We have created a bunch of new files inside of the Git repository. These are all of the files that we told Git we want to keep track of and this is fantastic.
We now have our very first commit, which essentially means that we've saved the project at its current state. If we make a big change to server.js, messing stuff up to not be able figure out how to get it back to the way it was, we can always get it back because we made a Git commit. Now we'll explore some more fancy Git things in the later sections. We'll be talking about how to do most of the things you want to do with Git, including deploying to Heroku and pushing to GitHub.
Now that you have a local Git repository, we'll look at how we can take that code and push it up to a third-party service called GitHub. GitHub is going to let us host our Git repositories remotely, so if our machine ever crashes we can get our code back, and it also has great collaboration tools, so we can open-source a project, letting others use our code, or we can keep it private so only people we choose to collaborate with can see the source code.
Now in order to actually communicate between our machine and GitHub, we'll have to create something called an SSH key. SSH keys were designed to securely communicate between two computers. In this case, it will be our machine and the GitHub server. This will let us confirm that GitHub is who they say they are and it will let GitHub confirm that we indeed have access to the code we're trying to alter. This will all be done with SSH keys and we'll create them first, then we'll configure them, and finally we'll push our code up to GitHub.
The process of setting up SSH keys can be a real burden. This is one of those topics where there's really small room for error. If you type any of the commands wrong, things are just not going to work as expected.
Now if you're on Windows, you'll need to do everything in this section from a Git Bash as opposed to the regular Command Prompt because we'll be using some commands that just are not available on Windows. They are, however, available on Linux and macOS. So if you're using either of those operating systems, you can continue using the Terminal you've been using throughout the book.
Before we dive into the commands, I want to show you a quick guide that exists online in case you get stuck or you have any questions. You can Google GitHub SSH keys, and this is going to link you to an article called generating an SSH key: https://help.github.com/articles/connecting-to-github-with-ssh/. Once you're here, you'll be able to click on the SSH breadcrumb, and this is going to bring you back to all of their articles on SSH keys:
Out of these articles, the nested four are the ones we'll be focusing on checking if we have a key, generating a new key, adding the key to GitHub, and finally testing that everything worked as expected. If you run into any problems along any of these steps, you can always click on the guide for that step and you can pick the operating system you're using so you can see the appropriate commands for that OS. Now that you know this exists, let's go ahead and do it together.
The first command we'll run from the Terminal is going to check if we have an existing SSH key. Now if you don't, that's fine. We'll go ahead and create one. If you do or you're not sure you do, you can run the following command to confirm whether or not you have one: ls with the al flag. This is going to print all the files in a given directory, and the directory where SSH keys are stored by default on your machine is going to be at the user directory, which you can use (~) as a shortcut for /.ssh:
ls -al ~/.ssh
When you run the command, you'll see all of the contents inside of that SSH directory:
In this case I've deleted all of my SSH keys so I have nothing inside my directory. I just have paths for the current directory and the previous one. Now that we have this in place and we've confirmed we don't have a key, we can go ahead and generate one. If you do already have a key, a file like id_rsa, you can go ahead and skip the process of generating the key.
To make a key we'll use the ssh-keygen command. Now the ssh-keygen takes three arguments. We'll pass in t setting it equal to rsa. We'll pass in b which is for bytes, setting that equal to 4096. Make sure to match these arguments exactly, and we'll be setting a capital C flag which will get set equal to your email:
ssh-keygen -t rsa -b 4096 -C 'garyngreig@gmail.com'
Now we can go ahead and hit enter, which will generate two new files in our .ssh folder. When you run this command, you'll get greeted with a few steps. I want you to use the default for all of them:
Here they want to ask you if you want to customize the file name. I do not recommend doing that. You can just hit enter:
Next up they ask you for a passphrase, which we'll not use. I'll hit enter for no passphrase, then I need to confirm the passphrase, so I'll just hit enter again:
As shown, we get a little message that our SSH key was properly created and that it was indeed saved in our folder.
With this in place, I can now cycle back through my previous commands running the ls command, and what do I get?
We get id_rsa and I get the id_rsa.pub file. The id_rsa file contains the private key. This is the key you should never give to anyone. It lives on your machine and your machine only. The .pub file, which is the public file. This one is the one you'll give to third-party services such as GitHub or Heroku, which we'll be doing in the next several sections.
Now that our keys are generated, the last thing we need to do is start up the SSH agent and add this key so it knows that it exists. We'll do this by running two commands. These are:
First up we'll run eval, and then we'll open some quotes and inside the quotes, we'll use the dollar sign and open and close some parentheses just like this:
eval "$()"
Inside our parentheses we'll type ssh-agent with the s flag:
eval "$(ssh-agent -s)"
This will start up the SSH agent program and it will also print the process ID to confirm it is indeed running, and as shown, we get Agent pid 1116:
The process ID is obviously going to be different for everyone. As long as you get something back like this you are good to go.
Next up we have to tell the SSH agent where this file lives. We'll do that using ssh-add. This takes the path to our private key file which we have in the user directory /.ssh/id_rsa:
ssh-add ~/.ssh/id_rsa
When I run this, I should get a message like identity added:
This means that the local machine now knows about this public/private key pair and it'll try to use these credentials when it communicates with a third-party service such as GitHub. Now that we have this in place, we are ready to configure GitHub. We'll make an account, set it up, and then we'll come back and test that things are working as expected.
To configure GitHub, follow these steps:
Here, you need to do two things: give it a name, and add the key.
First add the name. The name can be anything you like. For example, I usually use one that uniquely identifies my computer since I have a couple. I'll use MacBook Pro, just like this.
Next up, add the key.
To add the key, we need to grab the contents of the id_rsa.pub file, we generated in the previous sub-section. That file contains the information that GitHub needs in order to securely communicate between our machine and their machines. There are different methods to grab the key. In the browser, we have the Adding a new SSH key to your GitHub account article for our reference.
Then, move into the Terminal and run it.
pbcopy < ~/.ssh/id_rsa.pub
This copies the contents of the file to the clipboard. You can also open the command up with a regular text editor and copy the contents of the file. We can use any method to copy the file. It doesn't matter how you do it. All that matters is you do.
The contents of id_rsa.pub should start with ssh-rsa and it should end with that email you used.
Now we can go ahead and test that things are working by running one command from the Terminal. Once again this command can be executed from anywhere on your machine. You don't need to be in your project folder to do this.
To test the working of our GitHub configuration, we'll use ssh, which tries to make a connection. We'll use the T flag, followed by the URL we want to connect to you get at git@github.com:
ssh -T git@github.com
This is going to test our connection. It will make sure that the SSH keys are properly set up and we can securely communicate with GitHub. When I run the command I get a message saying that The authenticity of host 'github.com (192.30.253.113)' can't be established.
We know that we want to communicate with github.com. We're expecting that communication to happen, so we can go ahead and enter yes:
From here, we get a message from the GitHub servers as shown in the preceding screenshot. If you are seeing this message with your username then you are done. You're ready to create your first repository and push your code up.
Next, we'll move into GitHub, go back to the home page, and create a new repository.
To create a new repository, follow these steps:
This will lead us to the new repository page:
Once you have a name, you could give it an optional description and you can pick whether you want to go with a public or private repository.
This is going to get brought to your repository page:
It will give you a little setup because currently there is no code to view, so it will give you a few instructions depending on which situation you're in.
Now, out of the preceding three setup instructions, we don't need the one for creating a new repository. We are not going to use the one for importing our code from some other URL. What we have is an existing repository and we want to push it from the command line.
We'll run these two commands from inside our project:
Remotes let Git know which third-party URLs you want to sync up with. Maybe I want to push my code to GitHub to communicate with my co-workers. Maybe I also want to be able to push up to Heroku to deploy my app. That means you would want two remotes. In our case, we'll just add one, so I'll copy this URL, move into the Terminal, paste it, and hit enter:
git remote add origin https://github.com/garygreig/node-course-2-web-server.git
Now that we have our git remote added, we can go ahead and run that second command. We'll use the second command extensively throughout the book. In the Terminal, we can copy and paste the code for second command, and run it:
git push -u origin master
As shown in the preceding screenshot, we can see everything went great. We were able to successfully write all of our data up to GitHub, and if we go back into the browser and refresh the page, we're no longer going to see those setup instructions. Instead, we're going to see our repository, kind of like a tree view:
Here we can see we have our server.js file, which is great. We don't see the log file or node_module file, which is good, because we ignored that. I have my public directory. Everything works really really well. We also have issues tracking, Pull requests. You can create a Wiki page which lets you set up instructions for your repository. There's a lot of really great features that GitHub has to offer. We'll be using just the very basic features.
On our repository, we can see we have one commit and if we click on that one commit button, you can actually go to the commits page and here we see the initial commit message that we typed. We made that commit in the previous section:
This is going to let us keep track of all our code, revert if we make unwanted changes, and manage our repository. Now that we have our code pushed up, we are done.
In this section, you'll deploy your Node app live to the Web using Heroku. By the end of the section, you'll have the URL you can give anybody and they'll be able to go to that URL in their browser to view the application. We'll do this via Heroku.
Heroku is a website. It's a web app for managing web applications that are hosted in the cloud. It's a really great service. They make it almost effortless to create new apps, deploy your apps, update apps, and add cool add-on-things such as logging and error tracking, all of that is built in. Now Heroku, like GitHub, does not require a credit card to sign up and there is a free tier, which we'll use. They have paid plans for just about everything, but we can get away with the free tier for everything we'll do in this section.
To kick things off, we'll open up the browser and go to heroku.com. Here we can go ahead and sign up for a new account. Take a quick moment to either log in to your existing one or sign up for a new one. Once log in, it'll show you the dashboard. Now your dashboard will look something like this:
Although there might be a greeting telling you to create a new application, which you can ignore. I have a bunch of apps. You might not have these. That is perfectly fine.
The next thing we'll do is install the Heroku command-line tools. This will let us create apps, deploy apps, open apps, and do all sorts of really cool stuff from the Terminal, without having to come into the web app. That will save us time and make development a lot easier. We can grab the download by going to toolbelt.heroku.com.
Here we're able to grab the installer for whatever operating system, you happen to be running on. So, let's start the download. It's a really small download so it should happen pretty quickly.
Once it's done, we can go ahead and run through the process:
This is a simple installer where you just click on Install. There is no need to customize anything. You don't have to enter any specific information about your Heroku account. Let's go ahead and complete the installer.
This will give us a new command from the Terminal that we can execute. Before we can do that, we do have to log in locally in the Terminal and that's exactly what we'll do next.
Now we will start off the Terminal. If you already have it running, you might need to restart it in order for your operating system to recognize the new command. You can test that it got installed properly by running the following command:
heroku --help
When you run this command, you'll see that it's installing the CLI for the first time and then we'll get all the help information. This will tell us what commands we have access to and exactly how they work:
Now we will need to log in to the Heroku account locally. This process is pretty simple. In the preceding code output, we have all of the commands available and one of them happens to be login. We can run heroku login just like this to start the process:
heroku login
I'll run the login command and now we just use the email and password that we had set up before:
I'll type in my email and password. Typing for Password is hidden because it's secure. And when I do that you see Logged in as garyngreig@gmail.com shows up and this is fantastic:
Now we're logged in and we're able to successfully communicate between our machine's command line and the Heroku servers. This means we can get started creating and deploying applications.
Now before going ahead, we'll use the clear command to clear the Terminal output and get our SSH key on Heroku, kind of like what we did with GitHub, only this time we can do it via the command line. So it's going to be a lot easier. In order to add our local keys to Heroku, we'll run the heroku keys:add command. This will scan our SSH directory and add the key up:
heroku keys:add
Here you can see it found a key the id_rsa.pub file: Would you like to upload it to Heroku?.
Type Yes and hit enter:
Now we have our key uploaded. That is all it took. Much easier than it was to configure with GitHub. From here, we can use the heroku keys command to print all the keys currently on our account:
heroku keys
We could always remove them using heroku keys:remove command followed by the email related to that key. In this case, we'll keep the Heroku key that we have. Next up, we can test our connection using SSH with the v flag and git@heroku.com:
ssh -v git@heroku.com
This will communicate with the Heroku servers:
As shown, we can see it's asking that same question: The authenticity of the host 'heroku.com' can't be established, Are you sure you want to continue connecting? Type Yes.
You will see the following output:
Now when you run that command, you'll get a lot of cryptic output. What you're looking for is authentication succeeded and then public key in parentheses. If things did not go well, you'll see the permission denied message with public key in parentheses. In this case, the authentication was successful, which means we are good to go. I'll run clear again, clearing the Terminal output.
Now we can turn our attention towards the application code because before we can deploy to Heroku, we will need to make two changes to the code. These are things that Heroku expects your app to have in place in order to run properly because Heroku does a lot of things automatically, which means you have to have some basic stuff set up for Heroku to work. It's not too complex—some really simple changes, a couple one-liners.
First up in the server.js file down at the very bottom of the file, we have the port and our app.listen statically coded inside server.js:
app.listen(3000, () => {
console.log('Server is up on port 3000');
});
We need to make this port dynamic, which means we want to use a variable. We'll be using an environment variable that Heroku is going to set. Heroku will tell your app which port to use because that port will change as you deploy your app, which means that we'll be using that environment variable so we don't have to swap out our code every time we want to deploy.
With environment variables, Heroku can set a variable on the operating system. Your Node app can read that variable and it can use it as the port. Now all machines have environment variables. You can actually view the ones on your machine by running the env command on Linux or macOS or the set command on Windows.
What you'll get when you do that is a really long list of key-value pairs, and this is all environment variables are:
Here, we have a LOGNAME environment variable set to Andrew. I have a HOME environment variable set to my home directory, all sorts of environment variables throughout my operating system.
One of these that Heroku is going to set is called PORT, which means we need to go ahead and grab that port variable and use it in server.js instead of 3000. Up at the very top of the server.js file, we'd to make a constant called port, and this will store the port that we'll use for the app:
const express = require('express');.
const hbs = require('hbs');
const fs = require('fs');
const port
Now the first thing we'll do is grab a port from process.env. The process.env is an object that stores all our environment variables as key-value pairs. We're looking for one that Heroku is going to set called PORT:
const port = process.env.PORT;
This is going to work great for Heroku, but when we run the app locally, the PORT environment variable is not going to exist, so we'll set a default using the OR (||) operator in this statement. If process.env.port does not exist, we'll set port equal to 3000 instead:
const port = process.env.PORT || 3000;
Now we have an app that's configured to work with Heroku and to still run locally, just like it did before. All we have to do is take the PORT variable and use that in app.listen instead of 3000. As shown, I'm going to reference port and inside our message, I'll swap it out for template strings and now I can replace 3000 with the injected port variable, which will change over time:
app.listen(port, () => {
console.log(`Server is up on port ${port}`);
});
With this in place, we have now fixed the first problem with our app. I'll now run node server.js from the Terminal, like we did in the previous chapter:
node server.js
We still get the exact same message: Server is up on port 3000, so your app will still works locally as expected:
Next up, we have to specify a script in package.json. Inside package.json, you might have noticed we have a scripts object, and in there we have a test script.
This gets set by default for npm:
We can create all sorts of scripts inside the scripts object that do whatever we like. A script is nothing more than a command that we run from the Terminal, so we could take this command, node server.js, and turn it into a script instead, and that's exactly what we're going to do.
Inside the scripts object, we'll add a new script. The script needs to be called start:
This is a very specific, built-in script and we'll set it equal to the command that starts our app. In this case, it will be node server.js:
"start": "node server.js"
This is necessary because when Heroku tries to start our app, it will not run Node with your file name because it doesn't know what your file name is called. Instead, it will run the start script and the start script will be responsible for doing the proper thing; in this case, booting up that server file.
Now we can run our app using that start script from the Terminal by using the following command:
npm start
When I do that, we get a little output related to npm and then we get Server is up on port 3000, and if we visit the app in the browser, everything works exactly as it did in the previous chapter:
The big difference is that we are now ready for Heroku. We could also run the test script using from the Terminal npm test:
npm test
Now, we have no tests specified and that is expected:
The next step in the process will be to make the commit and then we can finally start getting it up on the Web. From the Terminal, we'll use some of the Git commands we explored earlier in this chapter. First up, git status. When we run git status, we have something a little new:
Instead of new files, we have modified files here as shown in the code output here. We have a modified package.json file and we have a modified server.js file. These are not going to be committed if we were to run a git commit just yet; we still have to use git add. What we'll do is run git add with the dot as the next argument. Dot is going to add every single thing showing up and get status to the next commit.
Now I only recommend using the syntax of everything you have listed in the Changes not staged for commit header. These are the things you actually want to commit, and in our case, that is indeed what we want. If I run git add and then a rerun git status, we can now see what is going to be committed next, under the Changes to be committed header:
Here we have our package.json file and the server.js file. Now we can go ahead and make that commit.
I'll run a git commit command with the m flag so we can specify our message, and a good message for this commit would be something like Setup start script and heroku port:
git commit -m 'Setup start script and heroku port'
Now we can go ahead and run that command, which will make the commit.
Now we can go ahead and push that up to GitHub using the git push command, and we can leave off the origin remote because the origin is the default remote. I'll go ahead and run the following command:
git push
This will push it up to GitHub, and now we are ready to actually create the app, push our code up, and view it over in the browser:
The next step in the process will be to run a command called heroku create from the Terminal. heroku create needs to get executed from inside your application:
heroku create
Just like we run our Git commands, when I run heroku create, a couple things are going to happen:
Now remember we have an origin remote, which points to our GitHub repository. We'll have a Heroku remote, which points to our Heroku Git repository. When we deploy to the Heroku Git repository, Heroku is going to see that. It will take the changes and it will deploy them to the Web. When we run Heroku create, all of that happens:
Now we do still have to push up to this URL in order to actually do the deploying process, and we can do that using git push followed by heroku:
git push heroku
The brand new remote was just added because we ran heroku create. Now pushing it this time around will go through the normal process. You'll then start seeing some logs.
These are logs coming back from Heroku letting you know how your app is deploying. It's going through the entire process, showing you what happens along the way. This will take about 10 seconds and at the very end we have a success message—Verifying deploy... done:
It also verified that the app was deployed successfully and that did indeed pass. From here we actually have a URL we can visit (https://sleepy-retreat-32096.herokuapp.com/). We can take it, copy it, and paste it in the browser. What I'll do instead is use the following command:
heroku open
The heroku open will open up the Heroku app in the default browser. When I run this, it will switch over to Chrome and we get our application showing up just as expected:
We can switch between pages and everything works just like it did locally. Now we have a URL and this URL was given to us by Heroku. This is the default way Heroku generates app URLs. If you have your own domain registration company, you can go ahead and configure its DNS to point to this application. This will let you use a custom URL for your Heroku app. You'll have to refer to the specific instructions for your domain registrar in order to do that, but it can indeed be done.
Now that we have this in place, we have successfully deployed our Node applications live to Heroku, and this is just fantastic. In order to do this, all we had to do is make a commit to change our code and push it up to a new Git remote. It could not be easier to deploy our code.
You can also manage your application by going back over to the Heroku dashboard. If you give it a refresh, you should see that brand new URL somewhere on the dashboard. Remember mine was sleepy retreat. Yours is going to be something else. If I click on the sleepy retreat, I can view the app page:
Here we can do a lot of configuration. We can manage Activity and Access so we can collaborate with others. We have metrics, we have Resources, all sorts of really cool stuff. With this in place, we are now done with our basic deploying section.
In the next section, your challenge will be to go through that process again. You'll add some changes to the Node app. You'll commit them, deploy them, and view them live in the Web. We'll get started by creating the local changes. That means I'll register a new URL right here using app.get.
We'll create a new page/projects, which is why I have that as the route for my HTTP get handler. Inside the second argument, we can specify our callback function, which will get called with request and response, and like we do for the other routes above, the root route and our about route, we'll be calling response.render to render our template. Inside the render arguments list, we'll provide two.
The first one will be the file name. The file doesn't exist, but we can still go ahead and call render. I'll call it projects.hbs, then we can specify the options we want to pass to the template. In this case, we'll set page title, setting it equal to Projects with a capital P. Excellent! Now with this in place, the server file is all done. There are no more changes there.
What I'll do is go ahead and go to the views directory, creating a new file called projects.hbs. In here, we'll be able to configure our template. To kick things off, I'm going to copy the template from the about page. Since it's really similar, I'll copy it. Close about, paste it into projects, and I'm just going to change this text to project page text would go here. Then we can save the file and make our last change.
The last thing we want to do is update the header. We now have a brand new projects page that lives at /projects. So we'll want to go ahead and add that to the header links list. Right here, I'll create a new paragraph tag and then I'll make an anchor tag. The text for the link will be Projects with a capital P and the href, which is the URL to visit when that link is clicked. We'll set that equal to /projects, just like we did for about, where we set it equal to /about.
Now that we have this in place, all our changes are done and we are ready to test things out locally. I'll fire up the app locally using Node with server.js as the file. To start, we're up on localhost 3000. So over in the browser, I can move to the localhost tab, as opposed to the Heroku app tab, and click on Refresh. Right here we have Home, which goes to home, we have About which goes to about, and we have Projects which does indeed go to /projects, rendering the projects page. Project page text would go here. With this in place we're now done locally.
We have the changes, we've tested them, now it's time to go ahead and make that commit. That will happen over inside the Terminal. I'll shut down the server and run Git status. This will show me all the changes to my repository as of the last commit. I have two modified files: the server file and the header file, and I have my brand new projects file. All of this looks great. I want to add all of this to the next commit, so I can use a Git add with the . to do just that.
Now before I actually make the commit, I do like to test that the proper things got added by running Git status. Right here I can see my changes to be committed are showing up in green. Everything looks great. Next up, we'll run a Git commit to actually make the commit. This is going to save all of the changes into the Git repository. A message for this one would be something like adding a project page.
With a commit made, the next thing you needed to do was push it up to GitHub. This will back our code up and let others collaborate on it. I'll use Git push to do just that. Remember we can leave off the origin remote as origin is the default remote, so if you leave off a remote it'll just use that anyway.
With our GitHub repository updated, the last thing to do is deploy to Heroku and we do that by pushing up the Git repository, using Git push, to the Heroku remote. When we do this, we get our long list of logs as the Heroku server goes through the process of installing our npm modules, building the app, and actually deploying it. Once it's done, we'll get brought back to the Terminal like we are here, and then we can open up the URL in the browser. Now I can copy it from here or run Heroku open. Since I already have a tab open with the URL in place, I'll simply give it a refresh. Now you might have a little delay as you refresh your app. Sometimes starting up the app right after a new app was deployed can take about 10 to 15 seconds. That will only happen as you first visit it. Other times where you click on the Refresh button, it should reload instantly.
Now we have the projects page and if I visit it, everything looks awesome. The navbar is working great and the projects page is indeed rendering at /projects. With this in place, we are now done. We've gone through the process of adding a new feature, testing it locally, making a Git commit, pushing it up to GitHub, and deploying it to Heroku. We now have a workflow for building real-world web applications using Node.js. This also brings a close to this section.
You also learned about Git, GitHub, and Heroku. These are the tools I prefer to use when I'm creating applications. I like to use Git because it's super popular. It's basically the only choice these days. I like to use GitHub because it has a great user interface. It has a ton of awesome features and pretty much everyone else is using it too. There's a great community. And I like to use Heroku because it is just dead simple to deploy new versions of your application. You can swap out any of these tools with any other tools. You can use services such Amazon Web Services to host. You could use Bitbucket as your GitHub alternative. These are perfectly fine solutions. All that really matters is you have some tools that are working for you, you have a Git repository backed up somewhere, whether it's GitHub or Bitbucket, and you have an easy way to deploy so you can make changes quickly and get them out to your users fast.
In different sections, we looked at how to add files to Git and how to make that first commit. Next, we set up both GitHub and Heroku, then we looked at how to push our code and deploy it. Then, we looked at how we can communicate with Heroku to deploy our code. Then after that, we looked at some real-world workflows for creating new commits, pushing to GitHub, and deploying to Heroku.
In the next chapter, we'll look into testing our applications.
In this chapter, we'll look at how we can test our code to make sure it's working as expected. Now, if you've ever set up test cases for other languages, then you know how hard it can be to get started. You have to set up the actual test infrastructure. Then you have to write your individual test cases. Every time I didn't test an application, it was because the setup process and the tools available to me were such a burden. Then you dig around for information online and you get really simple examples, but not examples for testing real-world things like asynchronous code. We'll be doing all of that in this chapter. I'll give you a very simple setup for testing and writing your test cases.
We'll look at the best tools available so you'll actually be excited to write those test cases and see all of those green checkmarks. We'll be testing from here on out as well, so let's dive in looking at how we can test some code.
In this section, you'll create your very first test case so that you can test whether your code is working as expected. By adding automatic testing to our project, we'll be able to verify that a function does what it says it'll do. If we make a function that's supposed to add two numbers together, we can automatically verify it's doing that. And if we have a function that's supposed to fetch a user from the database, we can make sure it's doing that as well.
Now to get started in this section, we'll look at the very basics of setting up a testing suite inside a Node.js project. We'll be testing a real-world function.
In order to get started, we will make a directory to store our code for this chapter. We'll make one on the desktop using mkdir and we'll call this directory node-tests:
mkdir node-tests
Then we'll change directory inside it using cd, so we can go ahead and run npm init. We'll be installing modules and this will require a package.json file:
cd node-tests
npm init
We'll run npm init using the default values for everything, simply hitting enter throughout every single step:
Now once that package.json file is generated, we can open up the directory inside Atom. It's on the desktop and it's called node-tests.
From here, we're ready to actually define a function we want to test. The goal in this section is to learn how to set up testing for a Node project, so the actual functions we'll be testing are going to be pretty trivial, but it will help illustrate exactly how to set up our tests.
To get started, let's make a fake module. This module will have some functions and we'll test those functions. In the root of the project, we'll create a brand new directory and I'll call this directory utils:
We can assume this will store some utility functions, such as adding a number to another number, or stripping out whitespaces from a string, anything kind of hodge-podge that doesn't really belong to any specific location. We'll make a new file in the utils folder called utils.js, and this is a similar pattern to what we did when we created the weather and location directories in our weather app in the previous chapter:
You're probably wondering why we have a folder and a file with the same name. This will be clear when we start testing.
Now before we can write our first test case to make sure something works, we need something to test. I'll make a very basic function that takes two numbers and adds them together. We'll create an adder function as shown in the following code block:
module.exports.add = () => {
}
This arrow function (=>) will take two arguments, a and b, and inside the function, we'll return the value a + b. Nothing too complex here:
module.exports.add = () => {
return a + b;
};
Now since we just have one expression inside our arrow function (=>) and we want to return it, we can actually use the arrow function (=>) expression syntax, which lets us add our expression as shown in the following code, a + b, and it'll be implicitly returned:
module.exports.add = (a, b) => a + b;
There's no need to explicitly add a return keyword on to the function. Now that we have utils.js ready to go, let's explore testing.
We'll be using a framework called Mocha in order to set up our test suite. This will let us configure our individual test cases and also run all of our test files. This will be really important for creating and running tests. The goal here is to make testing simple and we'll use Mocha to do just that. Now that we have a file and a function we actually want to test, let's explore how to create and run a test suite.
We'll be doing the testing using the super popular testing framework Mocha, which you can find at mochajs.org. This is a fantastic framework for creating and running test suites. It's super popular and their page has all the information you'd ever want to know about setting it up, configuring it, and all the cool bells and whistles it has included:
If you scroll down on this page, you'll be able to see a table of contents:
Here you can explore everything Mocha has to offer. We'll be covering most of it in this chapter, but for anything we don't cover, I do want to make you aware you can always learn about it on this page.
Now that we've explored the Mocha documentation page, let's install it and start using it. Inside the Terminal, we'll install Mocha. First up, let's clear the Terminal output. Then we'll install it using the npm install command. When you use npm install, you can also use the shortcut npm i. This has the exact same effect. I'll use npm i with mocha, specifying the version @3.0.0. This is the most recent version of the library as of this filming:
npm i mocha@3.0.0
Now we do want to save this into the package.json file. Previously, we've used the save flag, but we'll talk about a new flag, called save-dev. The save-dev flag is will save this package for development purposes only—and that's exactly what Mocha will be for. We don't actually need Mocha to run our app on a service like Heroku. We just need Mocha locally on our machine to test our code.
When you use the save-dev flag, it installs the module much the same way:
npm i mocha@5.0.0 --save-dev
But if you explore package.json, you'll see things are a little different. Inside our package.json file, instead of a dependencies attribute, we have a devDependencies attribute:
In there we have Mocha, with the version number as the value. The devDependencies are fantastic because they're not going to be installed on Heroku, but they will be installed locally. This will keep the Heroku boot times really, really quick. It won't need to install modules that it's not going to actually need. We'll be installing both devDependencies and dependencies in most of our projects from here on out.
Now that we have Mocha installed, we can go ahead and create a test file. In the utils folder, we'll make a new file called utils.test.js:
This file will store our test cases. We'll not store our test cases in utils.js. This will be our application code. Instead, we'll make a file called utils.test.js. When we use this test.js extension, we're basically telling our app that this will store our test cases. When Mocha goes through our app looking for tests to run, it should run any file with this extension.
Now we have a test file, the only thing left to do is create a test case. A test case is a function that runs some code, and if things go well, great, the test is considered to have passed. And if things do not go well, the test is considered to have failed. We can create a new test case, using it. It is a function provided by Mocha. We'll be running our project test files through Mocha, so there's no reason to import it or do anything like that. We simply call it just like this:
it();
Now it lets us define a new test case and it takes two arguments. These are:
First up, we'll have a string description of what exactly the test is doing. If we're testing that the adder function works, we might have something like:
it('should add two numbers');
Notice here that it plays into the sentence. It should read like this, it should add two numbers; describes exactly what the test will verify. This is called behavior-driven development, or BDD, and that's the principles that Mocha was built on.
Now that we've set up the test string, the next thing to do is add a function as the second argument:
it('should add two numbers', () => {
});
Inside this function, we'll add the code that tests that the add function works as expected. This means it will probably call add and check that the value that comes back is the appropriate value given the two numbers passed in. That means we do need to import the util.js file up at the top. We'll create a constant, call utils, setting it equal to the return result from requiring utils. We're using ./ since we will be requiring a local file. It's in the same directory so I can simply type utils without the js extension as shown here:
const utils = require('./utils');
it('should add two numbers', () => {
});
Now that we have the utils library loaded in, inside the callback we can call it. Let's make a variable to store the return results. We'll call this one results. And we'll set it equal to utils.add passing in two numbers. Let's use something like 33 and 11:
const utils = require('./utils');
it('should add two numbers', () => {
var res = utils.add(33, 11);
});
We would expect it to get 44 back. Now at this point, we do have some code inside of our test suites so we run it. We'll do that by configuring that test script we looked at in the previous chapter inside a package.json.
Currently, the test script simply prints a message to the screen saying that no tests exist. What we'll do instead is call Mocha. As shown in the following code, we'll be calling Mocha, passing in as the one and only argument the actual files we want to test. We can use a globbing pattern to specify multiple files. In this case, we'll be using ** to look in every single directory. We're looking for a file called utils.test.js:
"scripts": {
"test": "mocha **/utils.test.js"
},
Now this is a very specific pattern. It's not going to be particularly useful. Instead, we can swap out the file name with a star as well. Now we're looking for any file on the project that has a file name ending in .test.js:
"scripts": {
"test": "mocha **/*.test.js"
},
And this is exactly what we want. From here, we can run our test suite by saving package.json and moving to the Terminal. We'll use the clear command to clear the Terminal output and then we can run our test script using command shown as follows:
npm test
When we run this, we'll execute that Mocha command:
It'll go off. It'll fetch all of our test files. It'll run all of them and print the results on the screen inside Terminal as shown in the preceding screenshot. Here we can see we have a green checkmark next to our test, should add two numbers. Next, we have a little summary, one passing test, and it happened in 8 milliseconds.
Now in our case, we don't actually assert anything about the number that comes back. It could be 700 and we wouldn't care. The test will always pass. To make a test fail what we have to do is throw an error. That means we can throw a new error and we pass into the constructor function whatever message we want to use as the error as shown in the following code block. In this case, I could say something like Value not correct:
const utils = require('./utils');
it('should add two numbers', () => {
var res = utils.add(33, 11);
throw new Error('Value not correct')
});
Now with this in place, I can save the test file and rerun things from the Terminal by rerunning npm test, and when we do that now we have 0 tests passing and we have 1 test failing:
Next we can see the one test is should add two numbers, and we get our error message, Value not correct. When we throw a new error, the test fails and that's exactly what we want to do for add.
Now, we'll create an if statement for the test. If the response value is not equal to 44, that means we have a problem on our hands and we'll throw an error:
const utils = require('./utils');
it('should add two numbers', () => {
var res = utils.add(33, 11);
if (res != 44){
}
});
Inside the if condition, we can throw a new error and we'll use a template string as our message string because I do want to use the value that comes back in the error message. I'll say Expected 44, but got, then I'll inject the actual value, whatever happens to come back:
const utils = require('./utils');
it('should add two numbers', () => {
var res = utils.add(33, 11);
if (res != 44){
throw new Error(`Expected 44, but got ${res}.`);
}
});
Now in our case, everything will line up great. But what if the add method wasn't working correctly? Let's simulate this by simply tacking on another addition, adding on something like 22 in utils.js:
module.exports.add = (a, b) => a + b + 22;
I'll save the file, rerun the test suite:
Now we get an error message: Expected 44, but got 66. This error message is fantastic. It lets us know that something is going wrong with the test and it even tells us exactly what we got back and what we expected. This will let us go into the add function, look for errors, and hopefully fix them.
Creating test cases doesn't need to be something super complex. In this case, we have a simple test case that tests a simple function.
Now, we'll create a new function that squares a number and returns the result. We'll define that in the utils.js file using module.exports.square. We'll set that equal to an arrow function (=>) that takes in one number, x, and we'll return x times x, x * x, just like this:
module.exports.add = (a, b) => a + b;
module.exports.square = (x) => x * x;
Now we have this brand new function square and we'll create a new test case that makes sure square works as expected. In utils.test.js, next to the if condition for add function, we'll call the it function again:
const utils = require('./utils');
it('should add two numbers', () => {
var res = utils.add(33, 11);
if (res != 44){
throw new Error(`Expected 44, but got ${res}.`);
}
});
it();
Inside the it function, we'll add our two arguments, the string, and the callback function. Inside the string, we'll create our message, should square a number:
it('should square a number', () => {
});
And inside the callback function, we can actually go ahead and call square. Now we do want to create a variable to store the result so we can check that the result is what we expect it to be. Then we can call utils.square passing in a number. I'll go with 3 in this case, which means I should expect 9 to come back:
it('should square a number', () => {
var res = utils.square(3);
});
In the next line, we can have an if statement, if the result does not equal 9, then we'll throw a message because things went wrong:
it('should square a number', () => {
var res = utils.square(3);
if (res !== 9) {
}
});
We can throw an error using throw new Error, passing in whatever message we like. We can use a regular string, but I always prefer using a template string so we can inject values easily. I'll say something like Expected 9, but got, followed by the value that's not correct; in this case, that's stored in the response variable:
it('should square a number', () => {
var res = utils.square(3);
if (res !== 9) {
throw new Error(`Expected 9, but got ${res}`);
}
});
Now I can save this test case and run the test suite from the Terminal. Using the up arrow key and the enter key, we can rerun the last command:
npm test
We get two tests passing, should add two numbers and should square a number both have checkmarks next to them. And we ran both tests in just 14 milliseconds, which is fantastic.
Now the next thing, we want to do is mess up the square function to make sure our test fails when the number is not correct. I'll add 1 on to the result in utils.js, which will cause the test to fail:
module.exports.add = (a, b) => a + b;
module.exports.square = (x) => x * x + 1;
Then we can rerun things from the Terminal and we should see the error message:
We get Expected 9, but got 10. This is fantastic. We now have a test suite capable of testing both the add function and the square function. I'll remove that + 1, and we are done.
We now have a very, very basic test suite that we can execute with Mocha. Currently, we have two tests and to create those tests we used the it method provided by Mocha. In the upcoming sections, we'll be exploring more methods that Mocha gives us and we'll also be looking at better ways to do our assertions. Instead of manually creating them, we'll be using an assertion library to help with the heavy lifting.
Before we write more test cases, let's see an automatic way to rerun our test suite when we change either our test code or our application code. We'll be doing that with nodemon. Now, previously we used nodemon like this:
nodemon app.js
We would type nodemon and we would pass in a file like app.js. Whenever any code in our app changed, it would rerun the app.js file as a Node application. What we can actually do is specify any command in the world we want to run when our files change. This means we can rerun npm test when the files change.
To do this, we'll use the exec flag. This flag tells nodemon that we'll specify a command to run, and it might not necessarily be a Node file. As shown in the following command, we can specify that command. It'll be 'npm test':
nodemon --exec 'npm test'
With this in place, we can now run the nodemon command. It'll kick off for the first time running our test suite:
Here we see we have two tests passing. Let's go ahead into the app utils.js and make a change to one of the functions, so it fails. We'll add 3 or 4 onto the result for add:
module.exports.add = (a, b) => a + b + 4;
module.exports.square = (x) => x * x;
It automatically restarts over here:
And now we see that we have a test suite where one test passes and one tests fails. I can always go ahead and undo that error we added, save the file, and the test suite will automatically rerun.
This will make testing your application that much easier. You won't have to switch to the Terminal and rerun the npm test command every time we make a change to our application. Now we have a command that we can run, we'll shut down nodemon and use the up arrow key to show it again.
And we can actually move this into a script inside of package.json.
Inside package.json we'll make a new script right after the test script. Now we've used the start script and the test script—these are built-in—we'll create a custom one called test-watch, and we can run the test-watch script to kick things off. Inside of test-watch, we'll have the exact same command we ran from Terminal. That means we'll be rounding nodemon. We'll be using the exec flag and inside of quotes, we'll be running npm test:
"scripts": {
"test": "mocha **/*.test.js",
"test-watch": "nodemon --exec 'npm test'"
},
Now that we have this in place, we can run the script from the Terminal as opposed to having to type out this command every single time we want to start up the autotest suite.
To run a script with a custom name, such as test-watch, in the Terminal all we need to do is run npm run followed by the script name, test-watch, as shown in the following command:
npm run test-watch
If I do this, it will start things off. We'll get our test suite and it's still waiting for changes, as shown here:
Now, every time you start the test suite you can simply use npm run test-watch. That'll start up the test-watch script, which starts up nodemon. Every time a change happens in your project, it'll rerun npm test, showing the results of the test suite to the screen.
Now that we have a way to automatically restart our test suite, let's go ahead and get back into the specifics of testing in Node.
In the previous sections, we made two test cases to verify that utils.add and our utils.square method work as expected. We did that using an if condition, that is, if the value was not 44 that means something went wrong and we threw an error. In this section, we'll learn how to use an assertion library, which will take care of all of the if condition in utils.test.js code for us:
if (res !== 44)
throw new Error(`Expected 44, but got ${res}.`)
}
Because when we add more and more tests, the code will end up looking pretty similar and there's no reason to keep rewriting it. Assertion libraries let us make assertions about values, whether it's about their type, the value itself, whether an array contains an element, all sorts of things like that. They really are fantastic.
The one we'll be using is called expect. You can find it by going to Google and googling mjackson expect. And this is the result we're looking for:
It's mjackson's repository, expect. It is a fantastic and super popular assertion library. This library will let us pass in a value and make some assertions about it. On this page, we scroll down past the introduction and the installation we can get down to an example:
As shown in the preceding screenshot, we have our Assertions header and we have our first assertion, toExist. This will verify that a value exists. In the next line, we have an example, we pass in a string to expect:
This is the value we want to make some assertions about. In the context of our application, that would be the response variable in the utils.test.js, shown here:
const utils = require('./utils');
it('should add two numbers', () => {
var res = utils.add(33, 11);
if (res !== 44) {
throw new Error(`Expected 44, but got ${res}.`)
}
});
We want to assert that it is equal to 44. After we call expect, we can start chaining on some assertion calls. In the assertion example, next we check if it does exist:
expect('something truthy').toExist()
This would not throw an error because a string is indeed truthy inside JavaScript. If we passed in something like undefined, which is not truthy, toExist would fail. It would throw an error and the test case would not pass. Using these assertions, we can make it really, really easy to check the values in our tests without having to write all of that code ourselves.
Let's go ahead and start exploring the assertion libraries. First up, let's install the module inside the Terminal by running npm install. The module name itself is called expect and we'll grab the most recent version, @1.20.2. Once again, we'll be using the save-dev flag like we did with Mocha. Because we do indeed want to save this dependency in package.json, but it's a dev dependency, it's not required for the application to run whether it's on Heroku or some other service:
npm install expect@1.20.2 --save-dev
Let's go ahead and install this dependency.
Then we can move to the application, and check out the package.json file, as shown in the following screenshot, it looks great:
We have both expect and Mocha. Now, inside our utils.test file, we can kick things off by loading in the library and making our first assertions using expect. Up at the very top of the file, we'll load in the library, creating a constant called expect and require('expect'), just like this:
const expect = require('expect');
Now, we can get started by swapping out the if condition in the utils.test.js code with a call to expect instead:
const expect = require('expect');
const utils = require('./utils');
it('should add two numbers', () => {
var res = utils.add(33, 11);
// if(res !== 44) {
// throw new Error(`Expected 44, but got ${res}.`)
//}
});
As you saw in the example on assertion/expect page, we'll start all our assertions by calling expect as a function passing in the value we want to make assertions about. In this case, that is the res variable:
const expect = require('expect');
const utils = require('./utils');
it('should add two numbers', () => {
var res = utils.add(33, 11);
expect(res)
// if(res !== 44) {
// throw new Error(`Expected 44, but got ${res}.`)
//}
});
Now, we can assert all sorts of things. In this case, we want to assert that the value is equal to 44. We'll make our assertion toBe. On the documentation page, it looks like this:
This asserts that a value equals another value and that's exactly what we want. We assert that our value passed into expect equals another value using toBe, passing that value in as the first argument. Back inside Atom, we can go ahead and use this assertion, .toBe, and we're expecting the result variable to be the number 44, just like this:
const expect = require('expect');
const utils = require('./utils');
it('should add two numbers', () => {
var res = utils.add(33, 11);
expect(res).toBe(44);
// if(res !== 44) {
// throw new Error(`Expected 44, but got ${res}.`)
//}
});
Now we have our test case and it should work exactly as it did with the if condition.
To prove it does work, let's move into the Terminal and use the clear command to clear the Terminal output. Now we can run that test-watch script as shown in the following command line:
npm run test-watch
As shown in the preceding code output, we get our two tests passing just like they did before. Now we were to change 44 to some other value that would throw an error like 40:
const expect = require('expect');
const utils = require('./utils');
it('should add two numbers', () => {
var res = utils.add(33, 11);
expect(res).toBe(40);
// if(res !== 44) {
// throw new Error(`Expected 44, but got ${res}.`)
//}
});
We save the file, and we'll get an error and the expect library will generate useful error messages for us:
It's saying that we Expected 44 to be 40. Clearly that's not the case, so an error gets thrown. I'll change this back to 44, save the file, and all of our tests will pass.
Now we can also chain together multiple assertions. For example, we could assert that the value that comes back from add is a number. This can be done using another assertion. So let's head into the docs and take a look. Inside Chrome, we'll scroll down through the assertion docs list. There are a lot of methods. We'll be exploring some of them. In this case, we're looking for toBeA, the method that takes a string:
This takes the string type and it uses the typeof operator to assert that the value is of a certain type. Here we're expecting 2 to be a number. We can do that exact same thing over in our code. Inside Atom, right after toBe, we can chain on another call, toBeA, followed by the type. This could be something like a string, it could be something like an object, or in our case, it could be a number, just like this:
const expect = require('expect');
const utils = require('./utils');
it('should add two numbers', () => {
var res = utils.add(33, 11);
expect(res).toBe(44).toBeA('number');
// if(res !== 44) {
// throw new Error(`Expected 44, but got ${res}.`)
//}
});
We'll open up the Terminal so we can see the results. It's currently hidden. Save the file. Our tests will rerun and we can see they're both passing:
Let's use a different type, something that was going to cause the test to fail for example string:
expect(res).toBe(44).toBeA('string');
We would then get an error message, Expected 44 to be a string:
This is really useful. It'll help us clean up our errors really quickly. Let's change the code back to number and we are good to go.
Now we'd like to do the same thing for our tests for square a number function. We'll use expect to assert that the response is indeed the number 9 and that the type is a number. We'll use these same two assertions we do with the add function. First, we need to do to delete the current square if condition code, since we will not be using that anymore. As shown in the following code, we'll make some expectations about the res variable. We'll expect it to be the number 9, just like this:
it('should square a number', () => {
var res = utils.square(3);
expect(res).toBe(9);
});
We'll save the file and make sure the test passes, and it does indeed pass:
Now, we'll assert the type using toBeA. Here, we're checking that the type of the return value from the square method is a number:
it('should square a number', () => {
var res = utils.square(3);
expect(res).toBe(9).toBeA('number');
});
When we save the file, we get both of our tests still passing, which is fantastic:
Now this is just a small test as to what expect can do. Let's create a bogus test case that will explore a few more ways we can use expect. We'll not be testing an actual function. We'll just play around with some assertions inside of the it callback.
To create the bogus test, we'll make a new test using the it callback function:
it('should expect some values');
We can put whatever we want in here, it's not too important. And we'll pass in an arrow function (=>) as our callback function:
it('should expect some values', () => {
});
Now as we've seen already, one of the most fundamental assertions you'll make is you're just going to check for equality. We want to check if something like the response variable equals something else, like the number 44. Inside expect, we can also do the opposite. We can expect that a value like 12 does not equal, using toNotBe. And then we can assert that it doesn't equal some other value, like 11:
it('should expect some values', () => {
expect(12).toNotBe(11);
});
The two aren't equal, so when we save the file over in the Terminal, all three tests should be passing:
If I set that equal to the same value, it'll not work as expected:
it('should expect some values', () => {
expect(12).toNotBe(12);
});
We'll get an error, Expected 12 to not be 12:
Now toBe and toNotBe work great for numbers, strings, and Booleans, but if you're trying to compare arrays or objects, they will not work as expected and we can prove this.
We'll start with removing the current code by commenting it out. We'll leave it around so we use it later:
it('should expect some values', () => {
// expect(12).toNotBe(12);
});
We'll expect an object with the name property set to Andrew, toBe, and we'll assert that it is another object where the name property is equal to Andrew, just like this:
it('should expect some values', () => {
// expect(12).toNotBe(12);
expect({name: 'Andrew'})
});
We'll use toBe, just like we did with number, checking if it is the same as another object where name equals Andrew:
it('should expect some values', () => {
// expect(12).toNotBe(12);
expect({name: 'Andrew'}).toBe({name: 'Andrew'});
});
Now when we save this, you might think the test will pass, but it doesn't:
As shown in the preceding output, we see that we expected the two names to be equal. When objects are compared for equality using the triple equals, which is what toBe uses, they'll not be the same because it's trying to see if they're the exact same object, and they're not. We've created two separate objects with the same properties.
To check if the two names are equal, we'll have to use something different. It's called toEqual as shown here:
it('should expect some values', () => {
// expect(12).toNotBe(12);
expect({name: 'Andrew'}).toEqual({name: 'Andrew'});
});
If we save the file now, this will work. It'll rip into the object properties, making sure they have the same ones:
The same thing goes for toNotEqual. This checks if two objects are not equal. To check this, we'll go ahead and change the first object to have a lowercase a in andrew:
it('should expect some values', () => {
// expect(12).toNotBe(12);
expect({name: 'andrew'}).toNotEqual({name: 'Andrew'});
});
Now, the test passes. They are not equal:
This is how we do equality with our objects and arrays. Now another really useful thing we have is toInclude.
The toInclude assertion checks if an array or an object includes some things. Now if it's an array, we can check if it includes a certain item in the array. If it's an object, we can check if it includes certain properties. Let's run through an example of that.
We'll expect that an array with the numbers 2, 3, and 4 inside the it callback has the number 5 inside and we can do that using toInclude:
it('should expect some values', () => {
// expect(12).toNotBe(12);
// expect({name: 'andrew'}).toNotEqual({name: 'Andrew'});
expect([2,3,4]).toInclude(5);
});
The toInclude assertion takes the item. In this case, we'll check if the array has 5 inside. Now clearly it doesn't, so this test will fail:
We get the message, Expected [ 2, 3, 4] to include 5. That does not exist. Now we change this to a number that does exist, for example 2:
it('should expect some values', () => {
// expect(12).toNotBe(12);
// expect({name: 'andrew'}).toNotEqual({name: 'Andrew'});
expect([2,3,4]).toInclude(2);
});
We'll rerun the test suite and everything will work as expected:
Now, along with toInclude, we have toExclude like this:
it('should expect some values', () => {
// expect(12).toNotBe(12);
// expect({name: 'andrew'}).toNotEqual({name: 'Andrew'});
expect([2,3,4]).toExclude(1);
});
This will check if something does not exist, for example the number 1, which is not in the array. If we run this assertion, the test passes:
The same two methods, toInclude and toExclude, work with objects as well. We can play with that right on the next line. I'll expect that the following object has something on it:
it('should expect some values', () => {
// expect(12).toNotBe(12);
// expect({name: 'andrew'}).toNotEqual({name: 'Andrew'});
// expect([2,3,4]).toExclude(1);
expect({
})
});
Let's go ahead and create an object that has a few properties. These are:
This will look like the following code block:
it('should expect some values', () => {
// expect(12).toNotBe(12);
// expect({name: 'andrew'}).toNotEqual({name: 'Andrew'});
// expect([2,3,4]).toExclude(1);
expect({
name: 'Andrew',
age: 25,
location: 'Philadelphia'
})
});
Now let's say we want to make some assertions about particular properties, not necessarily the entire object. We can use toInclude to assert that the object has some properties and that those property values equals the value we pass in:
it('should expect some values', () => {
// expect(12).toNotBe(12);
// expect({name: 'andrew'}).toNotEqual({name: 'Andrew'});
// expect([2,3,4]).toExclude(1);
expect({
name: 'Andrew',
age: 25,
location: 'Philadelphia'
}).toInclude({
})
});
For example, the age property. Let's say we only care about the age. We can assert that the object has an age property equal to 25 by typing the following code:
it('should expect some values', () => {
// expect(12).toNotBe(12);
// expect({name: 'andrew'}).toNotEqual({name: 'Andrew'});
// expect([2,3,4]).toExclude(1);
expect({
name: 'Andrew',
age: 25,
location: 'Philadelphia'
}).toInclude({
age: 25
})
});
It doesn't matter that there's a name property. The name property could be any value. That is irrelevant in this assertion. Now let's use the value, 23:
.toInclude({
age: 23
})
This test will fail as shown here since the value is not correct:
We expected the age property to be 23, but it was indeed 25, so the test fails. The same thing goes with the toExclude assertion.
Here we can save our test files. This checks if the object does not have a property age equal to 23. It does indeed not have that, so the test passes:
This is just a quick taste as to what expect can do. For a full list of features, I recommend diving through the documentation. There's a ton of other assertions you can use, things like checking if a number is greater than another number, if a number is less than or equal to another number, all sorts of math-related operations are included as well.
Now let's wrap up this section with some more testing. Over in utils.js, we can make a new function, one that we'll be testing, module.exports.setName. The setName function is will take two arguments. It'll take a user object, some fictitious user object with some generic properties, and it'll take fullName as a string:
module.exports.add = (a, b) => a + b;
module.exports.square = (x) => x * x;
module.exports.setName (user, fullName)
The job of setName will be to rip apart fullName into two parts—the first name and the last name—by splitting it on the space. We'll set the two properties, first name and last name, and return the user object. We'll fill out the function then we'll write the test case.
The first thing we'll do is split the name into a names array, var names will be that array:
module.exports.add = (a, b) => a + b;
module.exports.square = (x) => x * x;
module.exports.setName (user, fullName) => {
var names
};
It'll have two values, assuming there's only one space inside of the name. We're assuming someone types their first name, hits a space, and types their last name. We'll set this equal to fullName.split and we'll split on the space. So I'll pass in an empty string with a space inside it as the value to split:
module.exports.add = (a, b) => a + b;
module.exports.square = (x) => x * x;
module.exports.setName (user, fullName) => {
var names = fullName.split(' ');
};
Now we have a names array where the first item is the firstName and the last item is the lastName. So we can start updating the user object. user.firstName will equal the first item in the names array and we'll grab the index of 0, which is the first item. We'll do something similar for last name, user.lastName equals the second item from the names array:
module.exports.add = (a, b) => a + b;
module.exports.square = (x) => x * x;
module.exports.setName (user, fullName) => {
var names = fullName.split(' ');
user.firstName = names[0];
user.lastName = names[1];
};
Now we're all done, we have the names set, and we can return the user object using return user, just like this:
module.exports.add = (a, b) => a + b;
module.exports.square = (x) => x * x;
module.exports.setName (user, fullName) => {
var names = fullName.split(' ');
user.firstName = names[0];
user.lastName = names[1];
return user;
};
Inside the utils.test file, we can now kick things off. First, we'll comment out our it('should expect some values') handler:
const expect = require('expect');
const utils = require('./utils');
it('should add two numbers', () => {
var res = utils.add(33, 11);
expect(res).toBe(44).toBeA('number');
});
it('should square a number', () => {
var res = utils.square(3);
expect(res).toBe(9).toBeA('number');
});
// it('should expect some values', () => {
// // expect(12).toNotBe(12);
// // expect({name: 'andrew'}).toNotEqual({name: 'Andrew'});
// // expect([2,3,4]).toExclude(1);
// expect({
// name: 'Andrew',
// age: 25,
// location: 'Philadelphia'
// }).toExclude({
// age: 23
// })
// });
This is pretty great for documentation. You can always explore it later if you forget how things work. We'll create a new test that should verify first and last names are set.
We'll create a user object. On that user object, we want to set some properties such as age and location. Then we'll pass the variable user into the setName method. That'll be the first argument defined in the utils.js file. We'll pass in a string. The string with firstName followed by a space followed by lastName. Then we'll get the result back and we'll make some assertions about it. We want to assert the returning object includes using the toInclude assertion.
As shown in the following code, we'll call it to make the new test case. We'll be testing:
it('should set firstName and lastName')
Inside it, we can now provide our second argument, which will be our callback function. Let's set that to an arrow function (=>) and now we can make the user object:
it('should set firstName and lastName', () => {
});
The user object will have a few properties. Let's add something like location, setting that equal to Philadelphia, and then set an age property, setting that equal to 25:
it('should set firstName and lastName', () => {
var user = {location: 'Philadelphia', age: 25};
});
Now we'll call the method we defined over in utils.js, the setName method. We'll do that on the next line, creating a variable called res to store the response. Then we'll set that equal to utils.setName passing in the two arguments, the user object and fullName, Andrew Mead:
it('should set firstName and lastName', () => {
var user = {location: 'Philadelphia', age: 25};
var res = utils.setName(user, 'Andrew Mead');
});
Now at this point, the result should be what we expect. We should have the firstName and lastName properties. We should have the location property and the age property.
Now if you know a lot about JavaScript, you might know that objects are passed by reference, so the user variable has actually been updated as well. That is expected. Both user and res will have the exact same value. We can actually go ahead and prove that using an assertion. We'll expect that user equals using toEqual the res:
it('should set firstName and lastName', () => {
var user = {location: 'Philadelphia', age: 25};
var res = utils.setName(user, 'Andrew Mead');
expect(user).toEqual(res);
});
Inside Terminal, we can see the test does indeed pass:
Let's delete expect(user).toEqual(res);. Now, we want check if the user object or the res object includes certain properties. We'll check using expect that the res variable has some properties using toInclude:
it('should set firstName and lastName', () => {
var user = {location: 'Philadelphia', age: 25};
var res = utils.setName(user, 'Andrew Mead');
expect(res).toInclude({
})
});
The properties we're looking for are firstName equal to what we would expect that to be, Andrew, and lastName equal to Mead:
it('should set firstName and lastName', () => {
var user = {location: 'Philadelphia', age: 25};
var res = utils.setName(user, 'Andrew Mead');
expect(res).toInclude({
firstName: 'Andrew',
lastName: 'Mead'
})
});
These are the assertions that should be made in order to verify that setName is working as expected. If I save the file, the test suite reruns and we do indeed get the passing tests as shown here:
We have three of them and it took just 10 milliseconds to run.
And with this in place, we now have an assertion library for our test suite. That's fantastic because writing test cases just got way easier, and the whole goal of the chapter is to make testing approachable and easy.
In the next section, we'll start looking at how we can test more complex asynchronous functions.
In this section, you'll learn how to test asynchronous functions. The process of testing asynchronous functions isn't that different from synchronous ones, like what we've done already, but it is a little different so it justifies its own section.
To kick things off, we'll make a fake async function using setTimeout to simulate a delay inside utils.js. Just below where we make our add function, let's make one called asyncAdd. It'll essentially have the same features, but it'll use setTimeout and it'll have a callback to simulate a delay. Now in the real world, this delay might be a database request or an HTTP request. We'll be dealing with that in the following chapters. For now though, let's add module.exports.asyncAdd:
module.exports.add = (a, b) => a + b;
module.exports.asyncAdd = ()
This will take three arguments, as opposed to the two the add function took, a, b, and callback:
module.exports.add = (a, b) => a + b;
module.exports.asyncAdd = (a, b, callback)
This is what's going to make the function asynchronous. Eventually, once the setTimeout is up, we'll call the callback with the sum, whether it's one plus three being four, or five plus nine being fourteen. Next up, we can put the arrow in arrow function (=>) and open and close our curly braces:
module.exports.asyncAdd = (a, b, callback) => {
};
Inside the arrow function (=>), as mentioned, we'll be using setTimeout to create the delay. We'll pass in a callback and we'll pass in our setTimeout. Let's go with 1 second in this case:
module.exports.asyncAdd = (a, b, callback) => {
setTimeout(() => {
}, 1000);
};
Now, by default, if our tests take longer than 2 seconds, Mocha will assume that is not what we wanted and it'll fail. That's why we're using 1 second in this case. Inside our callback, we can call the actual callback argument with the sum a + b, just like this:
module.exports.asyncAdd = (a, b, callback) => {
setTimeout(() => {
callback(a + b);
}, 1000);
};
We now have an asyncAdd function and we can start writing a test for it.
Inside of the utils.test file, just under our previous test for utils.add, we'll add a new one for asyncAdd. The test setup will look really similar. We will be calling it and passing in a string as the first argument and a callback as the second argument. Then we'll add our callback, just like this:
it('should async add two numbers', () => {
});
Inside the callback, we can get started calling utils.asyncAdd. We'll call it using utils.asyncAdd and we'll pass in those three arguments. We'll use 4 and 3, which should result in 7. And we'll provide the callback function, which should get called with that value, the value being 7:
it('should async add two numbers', () => {
utils.asyncAdd(4, 3, () => {
});
});
Inside the callback arguments, we would expect something like sum to come back:
it('should async add two numbers', () => {
utils.asyncAdd(4, 3, (sum) => {
});
});
Now we can start making some assertions about that sum variable using the expect object. We can pass it into expect to make our assertions, and these assertions aren't going to be new. It's stuff we've already done. We'll expect that the sum variable equals, using toBe, the number 7. Then we'll check that it's a number, using toBeA, inside quotes, number:
it('should async add two numbers', () => {
utils.asyncAdd(4, 3, (sum) => {
expect(sum).toBe(7).toBeA('number');
});
});
Now obviously if it is equal to 7 that means it is a number, but we're using both just to simulate exactly how chaining will work inside of our expect calls.
Now that we have our assertions in place, let's save the file and run our test and see what happens. We'll run it from Terminal, npm run test-watch to start up our nodemon watching script:
npm run test-watch
Now our tests will run and the test does indeed pass:
The only problem is that it's passing for the wrong reasons. If we change 7 to 10 and save the file:
it('should async add two numbers', () => {
utils.asyncAdd(4, 3, (sum) => {
expect(sum).toBe(10).toBeA('number');
});
});
In this case, the test is still going to pass. Right here, you see we have four tests passing:
Now the reason this test is passing is not because the assertion in utils.test.js is valid. It's passing because we have an asynchronous action that takes 1 second. This function will return before the async callback gets fired. When I say function returning, I'm referring to the callback function, the second argument to it.
This is when Mocha thinks your test is done. This means that these assertions never run. The Mocha output has already said our test passes before this callback ever gets fired. What we need to do is tell Mocha this will be an asynchronous test that'll take time. To do this, all we do is we provide an argument inside the callback function we pass to it. We'll call this one done:
it('should async add two numbers', (done) => {
When we have the done argument specified, Mocha knows that means we have an asynchronous test and it'll not finish processing this test until done gets called. This means we can call done after our assertions:
it('should async add two numbers', (done) => {
utils.asyncAdd(4, 3, (sum) => {
expect(sum).toBe(10).toBeA('number');
done();
});
});
With this in place, our test will now run. The function will return right after it calls async.Add, but that's OK because we have done specified. About a second later, our callback function will fire. Inside the asyncAdd callback function, we'll make our assertions. This time the assertions will matter because we have done and we haven't called it yet. After the assertions we call done, this tells Mocha that we're all done with the test. It can go ahead and process the result, letting us know whether it passed or failed. This will fix that error.
If I save the file in this state, it'll rerun the tests and we'll see that our test should async.Add two numbers will indeed fail. Inside Terminal, let's open up the error message, we have Expected 7 to be 10:
This is exactly what we thought would happen the first time around when we didn't use done, but as we can see, we do need to use done when we're doing something asynchronous inside of our tests.
Now we can change this expectation back to 7, save the file:
it('should async add two numbers', (done) => {
utils.asyncAdd(4, 3, (sum) => {
expect(sum).toBe(7).toBeA('number');
done();
});
});
This time around things should work as expected after 1 second delay as it runs this test:
It can't report right away because it has to wait for done to get called. Notice that our total test time is now about a second. We can see that we have four tests passing. Mocha also warns us when a test takes a long time because it assumes that's not expected. Nothing inside Node, even a database or HTTP request, should take even close to a second, so it's essentially letting us know that there's probably an error somewhere inside of your function—it's taking a really, really long time to process. In our case though, the one second delay was clearly set up inside of utils so there's no need to worry about that warning.
With this in place, we now have a test for our very first asynchronous method. All we had to do is add a done as an argument and call it once we were done making our assertions.
Now let's create an asynchronous version of the square method as we did with the synchronous one. In order to get started, we'll define the function first and then we'll worry about writing that test.
Inside the utils file, we can get started next to the square method creating a new one called asyncSquare:
module.exports.square = (x) => x * x;
module.exports.asyncSquare
It'll take two arguments: the original argument which we called x, and the callback function that'll get called after our 1-second delay:
module.exports.square = (x) => x * x;
module.exports.asyncSquare = (x, callback) => {
};
Then we can finish up the arrow function (=>) and we can start working on the body of asyncSquare. It'll look pretty similar to the asyncAdd one. We'll call setTimeout passing in a callback and a delay. In this case, the delay will be the same; we'll go with 1 second:
module.exports.square = (x) => x * x;
module.exports.asyncSquare = (x, callback) => {
setTimeout(() => {
}, 1000);
};
Now we can actually call the callback. This will trigger the callback function that got passed in and we'll pass in the value x times x, which will properly square the number passed in place of x:
module.exports.square = (x) => x * x;
module.exports.asyncSquare = (x, callback) => {
setTimeout(() => {
callback(x * x);
}, 1000);
};
Now inside the test file, things are indeed passing, but we haven't added a test for the asyncSquare function so let's do that. Inside the utils.test file, the next thing you needed to do was call it. Next to it for testing the asyncAdd function, let's call it to make a new test for this asyncSquare function:
it('should square a number', () => {
var res = utils.square(3);
expect(res).toBe(9).toBeA('number');
});
it('should async square a number')
Next up, we'll provide the callback function that'll get called when the test actually executes. And since we are testing an async function, we'll put done in the callback function as shown here:
it('should async square a number', (done) => {
});
This will tell Mocha to wait until done is called to decide whether or not the test passed. Next, we can now call utils.asyncSquare passing in a number of our choice. We'll use 5. Next up, we can pass in a callback:
it('should async square a number', (done) => {
utils.asyncSquare(5, () => {
})
});
This will get the final result. In the arrow function (=>), we'll create a variable to store that result:
utils.asyncSquare(5, (res) => {
});
Now that we have this in place, we can start making our assertions.
The assertions will be done using the expect library. We'll make some assertions about the res variable. We'll assert that it equals, using toBe, the number 25, which is 5 times 5. We'll also use toBeA to assert something about the type of the value:
it('should async square a number', (done) => {
utils.asyncSquare(5, (res) => {
expect(res).toBe(25).toBeA('number');
});
});
In this case, we want to make sure that the square is indeed a number, as opposed to a Boolean, string, or object. With this in place, we do need to call done and then save the file:
it('should async square a number', (done) => {
utils.asyncSquare(5, (res) => {
expect(res).toBe(25).toBeA('number');
done();
});
});
You're getting an error timeout, the 2,000 milliseconds has exceeded. This is when Mocha cuts off your test. If you see this, this usually means two things:
In our case, we have 5 tests passing and it took 2 seconds to do that. This is fantastic:
We now have a way to test synchronous functions and asynchronous functions. This will make testing a lot more flexible. It'll let us test essentially everything inside of our applications.
In this chapter, we looked into testing the synchronous and asynchronous functions. We looked into basic testing. We explored the testing framework, Mocha. Then, we look into using assertion libraries in testing Node modules.
In the next chapter, we'll look at how we can test our Express apps.
In this chapter, we'll continue our journey of testing the Node applications. In the previous chapter, we looked at the basic testing framework and worked on synchronous as well as asynchronous Node application. In this chapter we'll move on to testing the Express applications, then we'll look into a method to organize our test better in the result output, and last but not least we'll get into some advanced methods of testing Node application.
Specifically, we'll look into the following topics:
In this section, we'll be setting up an Express app and then, we'll look at how we can test it to verify that the data that comes back from our routes is what the user should be getting. Now before we do any of that, we will need to create an Express server and that's the goal of this section.
We'll start with installing Express. We'll use npm i, which is short for install, to install Express. Remember, you could always replace install with i. We'll grab the most recent version, @4.16.2. Now, we'll be using the save flag as opposed to the save dev flag that we've used for testing in the previous chapter:
npm i express@4.16.2 --save
This command is going to install Express as a regular dependency, which is exactly what we want:
We need Express when we deploy to production, whether it's Heroku or some other service.
Back inside the app, if we open up package.json, we can see we have dependencies which we've seen before, and devDependencies which is new to us:
"devDependencies": {
"expect": "^1.20.2",
"mocha": "^3.0.0"
},
"dependencies": {
"express": "^4.14.0"
}
}
This is how we can break up the different dependencies. From here, we'll make a server folder inside the root of the project where we can store the server example as well as the test file. We'll make a directory called server. Then inside server, we'll make a file called server.js.
The server.js file will contain the actual code that starts up our server. We'll define our routes, we'll listen to a port, all that stuff is going to happen in here. This is what we had before for the previous server chapter. In server.js, we'll add const express, and this will get equal to the require ('express') return result:
const express = require('express');
Next up, we can make our application by creating a variable called app and setting it equal to a call to express:
const express = require('express');
var app = express();
Then we can start configuring our routes. Let's set up just one for this section, app.get:
const express = require('express');
var app = express();
app.get
This will set up an HTTP GET handler. The URL will be just / (forward slash), the root of the website. And when someone requests that, for the moment we'll specify a really simple string as the return result. We get the request and the response object like we do for all of our express routes. Yo respond, we'll call res.send, sending back the string Hello World!:
app.get('/', (req, res) => {
res.send('Hello world!');
});
The last step in the process will be to listen on a port using app.listen. We'll bind to port 3000 by passing it in as the first and only argument:
app.get('/', (req, res) => {
res.send('Hello world!');
});
app.listen(3000);
With this in place, we are now done. We have a basic Express server. Before we move on to explore how to test these routes, let's start it up. We'll do that by using the following command:
node server/server.js
When we run this, we don't get any logs because we haven't added a callback function for when the server starts, but it should indeed be up.
If we go over to Chrome and visit localhost:3000, we get Hello world! printing to the screen:
Now, we are ready to move on to start testing our Express application.
Now, we'll learn an easy, no-nonsense way to test our Express applications. That means we can verify that when we make an HTTP GET request to the / URL, we get the Hello world! response back.
Now traditionally, testing HTTP apps has been one of the more difficult things to test. We would have to fire up a server, like we did in the previous section. Then we would need some code to actually make the request to the appropriate URL. And then we have to dig through the response, getting what we want, and making assertions about it, whether it's headers, the status code, the body, or anything else. It is a real burden. That is not the goal for this section. Our goal here is to make testing easy and approachable, so we'll use a library called SuperTest to test our Express applications.
SuperTest was created by the developers who originally created Express. It has built-in support for Express and it makes testing your Express apps dead simple.
In order to get started, let's pull up the docs page so you know where it lives if you ever want to look at any other features that it has to offer. If you Google supertest, it should be the first result:
It's the VisionMedia repository and the repository itself is called SuperTest. Let's switch over to the repository page and we can take a quick look at what it has to offer. On this page, we can find installation instructions and introduction stuff. We don't really need that. Let's take a quick look at an example:
As shown in the previous screenshot, we can see an example of how SuperTest works. We create an Express application, just like we normally would, and we define a route. Then we make a call to the request method, which is provided by SuperTest, passing in our Express application. We say we want to make a get request to the / URL. Then we start making assertions. There's no need to manually check either the headers, the status code, or the body. It has built-in assertions for all of that.
To get started, we'll install SuperTest in our application by running npm install from the Terminal. We have the Node server still running. Let's shut that down and then install the module.
We can use npm i, the module name is supertest and we'll be grabbing the most recent version, @2.0.0. This is a test-specific module so we'll be installing it with save. We'll use save-dev to add it to the devDependencies in package.json:
npm i supertest@3.0.0 --save-dev
With SuperTest installed, we are now ready to work on the server.test.js file. As it doesn't yet exist inside the server folder, so we can create it. It's going to sit just alongside server.js:
Now that we have server.test.js in place, we can start setting up our very first test. First, we'll be creating a constant called request and setting that equal to the return result from requiring supertest:
const request = require('supertest');
This is the main method we'll be using to test our Express apps. From here, we can load in the Express application. Now inside server.js, we don't have an export that exports the app, so we'll have to add that. I'll add it next to the app.listen statement by creating module.exports.app and setting that equal to the app variable:
app.listen(3000);
module.exports.app = app;
Now we have an export called app that we can access from other files. The server.js is still going to run as expected when we start it from the Terminal, not in test mode. We just added an export so if anyone happens to require it, they can get access to that app. Inside server.test.js, we'll make a variable to import this. We'll call the variable app. Then we'll require using require('./server.js'), or just server. Then we'll access the .app property:
const request = require('supertest');
var app = require('./server').app;
With this in place, we now have everything we need to write our very first test.
The first test we'll write is a test that verifies when we make an HTTP GET request to the / URL, we get Hello world! back. To do this, we will be calling it just like we did for our other tests in the previous chapter. We're still using mocha as the actual test framework. We're using SuperTest to fill in the gaps:
var app = require('./server').app;
it('should return hello world response')
Now we'll set up the function as follows:
it('should return hello world response', (done) => {
});
This is going to be an asynchronous call so I are providing done as the argument to let mocha know to wait before determining whether or not the test passed or failed. From here, we can now make our very first call to request. To use SuperTest, we call request passing in the actual Express application. In this case, we pass in the app variable:
it('should return hello world response', (done) => {
request(app)
});
Then we can start chaining together all the methods we need to make the request, make our assertions, and finally wrap things up. First up, you'll be using a method to actually make that request, whether it's a get, put, delete, or a post.
For now, we'll be making a get request, so we will use .get. The .get request takes the URL. So, we'll provide / (forward slash), just as we did in server.js:
it('should return hello world response', (done) => {
request(app)
.get('/')
});
Next up, we can make some assertions. To make assertions, we'll use .expect. Now .expect is one of those methods that does different things depending on what you pass to it. In our case, we'll be passing in a string. Let's pass in a string which will be the response body that we assert, Hello world!:
it('should return hello world response', (done) => {
request(app)
.get('/')
.expect('Hello world!')
});
Now that we're done and we've made our assertions, we can wrap things up. To wrap up a request in SuperTest, all we do is we call .end passing in done as the callback:
it('should return hello world response', (done) => {
request(app)
.get('/')
.expect('Hello world!')
.end(done);
});
This handles everything behind the scenes so you don't need to manually call done at a later point in time. All of it is handled by SuperTest. With these four lines (in the previous code), we have successfully tested our very first API request.
We'll kick things off in the Terminal by running our test-watch script:
npm run test-watch
The test script is going to start and as shown here, we have some tests:
We have our test, should return hello world response, showing up in the previous screenshot.
Now we can take things a step further making other assertions about the data that comes back. For example, we can use expect after the .get request in server.test.js to make an assertion about the status code. By default, all of our Express calls are going to return a 200 status code, which means that things went OK:
it('should return hello world response', (done) => {
request(app)
.get('/')
.expect(200)
.expect('Hello world!')
.end(done);
});
If we save the file, the test still passes:
Now let's make some changes to the request to make these tests fail. First up, in server.js we'll just add a few characters (ww) to the string, and save the file:
app.get('/', (req, res) => {
res.send('Hello wwworld!');
});
app.listen(3000);
module.exports.app = app;
This should cause the SuperTest test to fail and it does indeed do that:
As shown in the previous screenshot, we get a message, expected 'Hello world!' response body, but we got 'Hello wwworld!'. This is letting us know exactly what happened. Back inside server.js, we can remove those extra characters (ww) and try something else.
Now we haven't talked about how to set a custom status for our response, but we can do that with one method, .status. Let's add .status in server.js, chaining it on, before, send('Hello world!'), just like this:
app.get('/', (req, res) => {
res.status().send('Hello world!');
});
Then, we can pass in the numerical status code. For example, we could use a 404 for page not found:
app.get('/', (req, res) => {
res.status(404).send('Hello world!');
});
If we save the file this time around, the body is going to match up, but inside the Terminal we can see we now have a different error:
We expected a 200, but we got a 404. Using SuperTest, we can make all sorts of assertions about our application. Now the same thing is true for different types of responses. For example, we can create an object as the response. Let's make a simple object and we'll create a property called error. Then we'll set error equal to a generic error message for a 404, something like Page not found:
app.get('/', (req, res) => {
res.status(404).send({
error: 'Page not found.'
});
});
Now, we're sending back a JSON body, but currently we're not making any assertions about that body so the test is going to fail:
We can update our tests to expect JSON to come back. In order to get that done, all we have to do inside server.test is change what we pass to expect. Instead of passing in a string, we'll pass in an object:
it('should return hello world response', (done) => {
request(app)
.get('/')
.expect(200)
.expect({
})
.end(done);
});
Now we can match up that object exactly. Inside the object, we'll expect that the error property exists and that it equals exactly what we have in server.js:
.expect({
error: 'Page not found.'
})
Then, we'll change the .expect call to a 404 from 200:
.expect(404)
.expect({
error: 'Page not found.'
})
With this in place, our assertions now match up with the actual endpoint we've defined inside the Express application. Let's save the file and see if all the tests pass:
As shown in the previous screenshot, we can see it is indeed passing. The Should return hello world response is passing. It took about 41ms (milliseconds) to complete, and that is perfectly fine.
A lot of the built-in assertions do get the job done for the majority of cases. There are times where you want a little more flexibility. For example, in the previous chapter, we learned about all those cool assertions expect can make. We can use toInclude, toExclude, all of that stuff is really handy and it's a shame to lose it. Luckily, there's a lot of flexibility with SuperTest. What we can do instead of taking an object and passing it into expect, or a number for the status code, we can provide a function. This function will get called by SuperTest and it will get passed the response:
.expect((res) => {
})
This means we can access headers, body, anything we want to access from the HTTP response—it's going to be available in the function. We can pipe it through the regular expect assertion library like we've done in the previous chapter.
Let's load it in, creating a constant called expect and setting it equal to require expect:
const express = require('supertest');
const express = require('express');
Now before we look at how it's going to work, we'll make a change in server.js. Here, we'll add a second property on to the .status object. We'll add an error and then add something else. Let's use name, setting it equal to the application name, Todo App v1.0:
app.get('/', (req, res) => {
res.status(404).send({
error: 'Page not found.',
name: 'Todo App v1.0'
});
});
Now that we have this in place, we can take a look at how we can use those custom assertions inside our test file. In the .expect object, we'll have access to the response and in the response there is a body property. This will be a JavaScript object with key-value pairs, which means we would expect to have an error property and a name property, which we set in server.js.
Back inside our test file, we can make a custom assertion using expect. I'll expect something about the body, res.body. Now we can use any assertion we like, not just the equals assertion, which is the only one SuperTest supports. Let's use the toInclude assertion:
.expect((res) => {
expect(res.body).toInclude({
});
})
Remember, toInclude lets you specify a subset of the properties on the object. As long as it has those ones that's fine. It doesn't matter that it has extra ones. In our case, inside toInclude, we can just specify the error message, leaving off the fact that name exists at all. We want to check that error: Page not found, formatted exactly like we have it inside of server.js:
.expect((res) => {
expect(res.body).toInclude({
error: 'Page not found.'
});
})
Now when we save the file back inside the Terminal, things restart and all of my tests are passing:
Using a combination of SuperTest and expect we can have super flexible test suites for our HTTP endpoints. With this in place, we'll create another express route and we'll define a test that makes sure it works as expected.
There will be two sides to this express route, the actual setup in server.js and the test. We can start inside server.js. In here, we'll make a new route. First, let's add a few comments to specify exactly what we'll do. It's going to be an HTTP GET route. The route itself will be /users and we can just assume this returns an array of users:
app.get('/', (req, res) => {
res.status(404).send({
error: 'Page not found.',
name: 'Todo App v1.0'
});
});
// GET /users
We can pass an array back through the send method, just like we do an object in the previous code. Now this array is going to be an array of objects where each object is a user. For now, we want to give users a name property and an age prop:
// GET /users
// Give users a name prop and age prop
Then we'll create two or three users for this example. Now once we have this done, we'll be responsible for writing a test that asserts it works as expected. That's going to happen in server.test.js. Inside server.test.js, we'll make a new test:
it('should return hello world response', (done) => {
request(app)
.get('/')
.expect(404)
.expect((res) => {
expect(res.body).toInclude({
error: 'Page not found.'
});
})
.end(done);
});
// Make a new test
And this test is going to assert a couple of things. First up, we assert that the status code that comes back is a 200 and we want to make an assertion that inside of that array and we'll do that using toInclude:
// Make a new test
// assert 200
// Assert that you exist in users array
Let's start with defining the endpoint first. Inside server.js, just following the comments, we'll call app.get so we can register the brand new HTTP endpoint for our application. This one is going to be at /users:
app.get('/users')
// GET /users
// Give users a name prop and age prop
Next up, we'll specify the callback that takes both request and response:
app.get('/users', (req, res) => {
});
// GET /users
// Give users a name prop and age prop
This will let us actually respond to the request, and the goal here is just to respond with an array. In this case, I'll call response.send passing in an array of objects:
app.get('/users', (req, res) => {
res.send([{
}])
});
The first object will be name. We'll set the name equal to Mike and we'll set his age equal to 27:
app.get('/users', (req, res) => {
res.send([{
name: 'Mike',
age: 27
}])
});
Then I can add another object. Let's add the second object to the array with a name equal to Andrew and an age equal to 25:
app.get('/users', (req, res) => {
res.send([{
name: 'Mike',
age: 27
}, {
name: 'Andrew',
age: 25
}])
});
In the last one, we'll set the name equal to Jen and the age equal to 26:
app.get('/users', (req, res) => {
res.send([{
name: 'Mike',
age: 27
}, {
name: 'Andrew',
age: 25
}, {
name: 'Jen',
age: 26
}])
});
Now that we have our endpoint done, we can save server.js, move into server.test.js, and start worrying about actually creating our test case.
In server.test.js, just following the comments, we need to start things out by calling it. it is the only way to make a new test:
// Make a new test
// assert 200
// Assert that you exist in users array
it('should return my user object')
Then we'll specify the callback function. It will get past the done argument because this one is going to be asynchronous:
// Make a new test
// assert 200
// Assert that you exist in users array
it('should return my user object', (done) => {
});
To kick things off inside the test case, we'll be calling requests just like we did in hello world response, passing in the Express application:
it('should return my user object', (done) => {
request(app)
});
Now we can set up the actual call. In this case, we're just making a call, a get request, to the following URL, inside of quotes, /users:
it('should return my user object', (done) => {
request(app)
.get('/users')
});
Next up, we can start making our assertions and the first thing we're supposed to assert that the status code is at 200, which is the default status code used by Express. We can assert that by calling .expect and passing in the status code as a number. In this case, we'll pass in 200:
it('should return my user object', (done) => {
request(app)
.get('/users')
.expect(200)
});
After this, we'll use a custom expect assertion. This means that we'll call expect passing in a function and use toInclude inside it to make the assertion that you exist in that users array. We'll call expect the method passing in the function, and that function will get called with the response:
it('should return my user object', (done) => {
request(app)
.get('/users')
.expect(200)
.expect((res) => {
})
});
This will let us make some assertions about the response. What we're actually going to do is make an assertion using expect. We'll expect something about the response body. In this case, we'll be checking that it includes using toInclude, our user object:
it('should return my user object', (done) => {
request(app)
.get('/users')
.expect(200)
.expect((res) => {
expect(res.body).toInclude()
})
});
Now remember you can call toInclude on both arrays and objects. All we do is pass in the item we want to confirm is in the array. In our case, it's an object where the name property equals Andrew and the age property equals 25, which is what we used inside server.js:
expect(res.body).toInclude({
name: 'Andrew',
age: 25
})
Now that we have our custom expect call in place, at the very bottom we can call .end. This is going to wrap up the request and we can pass in done as the callback so it can properly fire off those errors if any actually occurred:
expect(res.body).toInclude({
name: 'Andrew',
age: 25
})
})
.end(done);
With this in place, we are ready to get going. We can save the file.
Inside the Terminal, we can see the tests are indeed rerunning:
We have a test as shown in the previous screenshot, should return my user object. It is passing.
Now we can confirm that we'll not go crazy and test the wrong thing by just messing up the data. We will now add a lowercase a after the uppercase one in Andrew in server.js, as shown here:
app.get('/users', (req, res) => {
res.send([{
name: 'Mike',
age: 27
}, {
name: 'Aandrew',
age: 25
}, {
name: 'Jen',
age: 26
}])
});
The test is going to fail. We can see that in the Terminal:
We have done testing for our Express apps. We'll now talk about one more way we can test our Node code.
In this section, we will learn how to use describe(). describe is a function injected into our test files, just like the it function is. It comes from mocha and it's really fantastic. Essentially, it lets us group tests together. That makes it a lot easier to scan the test output. If we run our npm test command in the Terminal, we get our tests:
We have seven tests and currently they're all grouped together. It's really hard to look for the tests in the utils file and it's impossible to find the tests for asyncAdd without scanning all of the text. What we'll do is call describe(). This will let us make groups of tests. We can give that group a name. It will make our test output much more readable.
In the utils.test.js file, right after the utils constant, we'll call describe():
const expect = require('expect');
const utils = require('./utils');
describe()
The describe object takes two arguments, just like it. The first one is the name and the other is the callback function. We'll use Utils. This will be the describe block that contains all of the tests in the utils.test file. Then we'll provide the function. This is the callback function:
describe('Utils', () => {
});
Inside the callback function, we'll be defining tests. Any test defined in the callback function will be a part of the utils block. That means we can take our existing tests, cut them out of the file, paste them in there, and we'll have a describe block called utils with all of the tests for this file. So, let's do just that.
We'll grab all the tests, excluding the ones that are just playground tests where we play around with various expect functionality. We'll then paste them right into the callback function. The resultant code is going to look like this:
describe('Utils', () => {
it('should add two numbers', () => {
var res = utils.add(33, 11);
expect(res).toBe(44).toBeA('number');
});
it('should async add two numbers', (done) => {
utils.asyncAdd(4, 3, (sum) => {
expect(sum).toBe(7).toBeA('number');
done();
});
});
it('should square a number', () => {
var res = utils.square(3);
expect(res).toBe(9).toBeA('number');
});
it('should async square a number', (done) => {
utils.asyncSquare(5, (res) => {
expect(res).toBe(25).toBeA('number');
done();
});
});
});
These are four tests for add, asyncAdd, square, and asyncSquare respectively. Now we'll save the file and we can start up the test-watch script from the Terminal and check the output:
npm run test-watch
The script will start and run through our tests, and as shown in the following screenshot, we'll have different outputs:
We have a Utils section and under Utils, we have all of the tests in that describe block. This makes reading and scanning your tests much, much easier. We can do the same thing for the individual methods.
Now, in the case of utils.test.js (refer to the previous screenshot), we have one test per method, but if you have a lot of tests that are targeting a complex method, it's best to wrap that in its own describe block. We can nest describe blocks and tests in any way we like. For example, right inside utils just after the describe statement, we can call describe again. We can pass a new description. Let's use # (pound sign) followed by add:
describe('Utils', () => {
describe('#add')
The # (pound sign) followed by the method name is the common syntax for adding a describe block for a specific method. Then we can provide that callback function:
describe('Utils', () => {
describe('#add', () => {
})
Then, we can take any tests we want to add into that group, cut them out, and paste them in:
describe('Utils', () => {
describe('#add', () => {
it('should add two numbers', () => {
var res = utils.add(33, 11);
expect(res).toBe(44).toBeA('number');
});
});
Then I can save the file. This will rerun the test suite and now we have test output that's even more scannable:
It's super easy to find the utils add method tests because they're clearly labelled. Now you could go as crazy or as uncrazy with this as you want. There really is no hard-and-fast rule for how often to use describe to structure your tests. It's really up to you to figure out what makes sense given the amount of tests you have for a method or a file.
In this case, we have quite a few tests in the file so it definitely makes sense to add that utils block. And I just wanted to show you you could nest them, so I added it for add as well. If I was writing this code, I probably wouldn't add a second layer of tests, but if I had more than one test per method, I definitely would add a second describe block.
Now, let's create some describe blocks in the server.test file. We'll create a route describe block called Server. Then we'll create describe blocks for both the route URL and for /users. We'll have GET/. That will have the test case in there, some test case. Then alongside //, we'll have GET /users, and that will have its own test case, some test case as explained in the comments next:
const request = require('supertest');
const expect = require('expect');
var app = require('./server').app;
// Server
// GET /
// some test case
// GET / user
// some test case
Now the test cases are obviously already defined. All we need to do is call describe three times to generate the previously explained structure.
We'll start with calling describe() once following the comments part, and this description will be for the route, so we'll call this one Server:
// Server
// GET /
// some test case
// GET / user
// some test case
describe('Server')
This is going to contain all the tests in our server file. We can add the callback function next and we can move on:
describe('Server', () => {
})
Next up, we'll call describe again. This time we're creating a describe block for tests that test the GET / route and add the callback function:
describe('Server', () => {
describe('GET /', () => {
})
})
Now we can simply take our test, cut it out, and paste it right inside the describe callback. The resultant code is going to look like this:
describe('Server', () => {
describe('GET /', () => {
it('should return hello world response', (done) => {
request(app)
.get('/')
.expect(404)
.expect((res) => {
expect(res.body).toInclude({
error: 'Page not found.'
});
})
.end(done);
});
});
})
Next up, we'll call describe the third time. We'll be calling describe passing in as the description GET /users:
describe('GET /users')
We'll have our callback function as always and then we can copy and paste our test right inside:
describe('GET /users'), () => {
it('should return my user object', (done) => {
request(app)
.get('/users')
.expect(200)
.expect((res) => {
expect(res.body).toInclude({
name: 'Andrew',
age: 25
});
})
.end(done);
});
});
With this in place, we are now done. We have a much better structure for our tests and when we rerun the test suite by saving the file, we'll be able to see that in the Terminal:
As shown in the previous code, we have a much more scannable test suite. We can see our server tests right away. We can create groups of tests for each feature. Since we have static data right now, we really don't need more than one test per feature. But down the line, we will have multiple tests for each of our HTTP requests, so it's a good idea to get into that habit of creating describe blocks early. And that's it for this one!
In this section, which is the final section for the testing chapter, we'll learn some pretty advanced testing techniques. We'll be using these techniques as we build real-world apps, but for now let's start off with an example. We'll worry about the vocabulary for what we're about to do in just a second.
For the moment, we'll close all our current files and create a new directory in the root of the project. We'll make a new folder called spies. We'll talk about what exactly spies are and how they relate to testing in just a moment. Inside spies, we'll make two files: app.js (this is the file that we'll be testing) and a second one, called db.js. In our example, we can just assume that db.js is a file that has all sorts of methods for saving and reading data from the database.
Inside db.js, we'll create one function using module.exports. Let's create a function called saveUser. The saveUser function will be a really simple function, and it will take a user object like this:
module.exports.saveUser = (user) => {
}
Now, we'll just print it to the screen using the console.log statement. We'll print it a little message, Saving the user, and we'll also print out the object as shown here:
module.exports.saveUser = (user) => {
console.log('Saving the user', user);
}
Now obviously, this is not a real saveUser function. We do not interact with any sort of database, but it will illustrate exactly how we will be using spies to test our code.
Next up, we will fill our app.js, and this is the file we'll actually be testing. Inside app.js, we'll create a new function: module.exports.handleSignup. In the context of an application with authentication, handleSignup might take an email and a password; maybe it goes ahead and checks if the email already exists. If it doesn't, great; it saves the user and then it sends some sort of a welcome email. We can simulate that by creating an arrow function (=>) that takes in email and a password:
module.exports.handleSignup = (email, password) => {
};
Inside the arrow function (=>), we'll leave three comments. These will be things that the function is supposed to do. It will check if the email already exists; it will save the user to the database; and finally, we'll send that welcome email:
module.exports.handleSignup = (email, password) => {
// Check if email already exists
// Save the user to the database
// Send the welcome email
};
Now, these three things are just an example of what a handleSignup method might actually do. When we go through the real process, you'll see how it pans out. Now, we already have one of these in place. We just created saveUser, so we'll do is call saveUser instead of having this second comment:
// Check if email already exists
db.saveUser()
// Send the welcome email
It's not imported just yet, but that's not going to stop us from calling it; we'll add the import in just a second, and we'll pass in what it expects, the user object. Now, we don't have a user object; we have an email and a password. We can create that user object by setting email equal to the email argument and setting password equal to the password argument:
db.saveUser({
email: email,
password: password
});
Now one important thing to note: inside ES6, if the property name in an object you're setting is the same as the variable name, you can actually define it like this:
db.saveUser({
email,
password
});
In this example, since we're setting a password property equal to whatever on the password variable, there's no need to have both. This ES6 syntax also allows us to create a much simpler-looking call. There's no need to have it on multiple lines since it's pretty reasonable in length.
Now, at the top, we can load in db by creating a variable, calling it db, and setting it equal to require('db.js'). That is a local file, so we'll start it with a ./ to grab it from the current directory:
var db = require('./db.js');
Now, this is an example of something that we'll want to test inside our code. We have a handleSignup method. It takes an email and a password, and we need to make sure that db.saveUser works as well. That is a big problem, and this means that we're not just testing handleSignup, we are also testing the following:
This is a real pain. What we'll do instead is fake the saveUser function. It's never actually going to execute the code inside it db, but it will let us verify that when we run handleSignup, saveUser gets called. We're going to do this with something called spies.
The spies function let you swap out a real function such as saveUser for a testing utility. When that test function gets called we can create various assertions about it, making sure it was called with certain arguments. Let's start exploring that.
We'll start it with creating a new file. Inside the spies directory, we'll make a new file called app.test.js, and we can start playing around with spies. Now, spies comes built-in with expect, so all we have to do is load it in:
const expect = require('expect');
From here we can create our very first test. We'll put this in a describe block so it's easier to find over in our test output:
const expect = require('expect');
describe('')
We'll call this describe block App and we'll add my callback function:
describe('App', () => {
});
Now we can add individual test cases. First up, we'll call it and make a new test where we can just play around with spies:
describe('App', () => {
it('')
});
We won't be calling the function in our app.js file just yet. We'll add in the it object a string say, Should call the spy correctly:
describe('App', () => {
it('should call the spy correctly', () => {
});
});
In order to visualize how spies work, we'll go through the most basic example we can. First up, creating a spy.
To create a spy, we'll call a function expect.createSpy inside the it callback function:
it('should call the spy correctly', () => {
expect.createSpy();
});
The createSpy is going to return a function, and that is the function that we'll swap out for the real one, which means we do want to store that in a variable. I'll create a variable called spy, setting it equal to the returned result:
it('should call the spy correctly', () => {
var spy = expect.createSpy();
});
And now we would inject spy into our code, whether it's app.js or some other function, and we would wait for it to get called. We can call it directly just like this:
it('should call the spy correctly', () => {
var spy = expect.createSpy();
spy();
});
Next up, we can set up a series of assertions using expect's spies assertions by heading over to the browser and going to the expect documentation, mjackson expect (https://github.com/mjackson/expect).
On this page, we can scroll down to the spies section, where they talk about all the assertions we have access to. We should start seeing spies in the method names, and that's when we know we've gotten there:
As shown in the previous code, we have the toHaveBeenCalled function and this is our first assertion with spies. We can assert that our spy was indeed called. Inside Atom, we'll do that by calling expect and passing in the spy, just like this:
it('should call the spy correctly', () => {
var spy = expect.createSpy();
spy();
expect(spy)
});
Then, we'll add the assertion, toHaveBeenCalled:
expect(spy).toHaveBeenCalled();
This will cause the test to pass if spy was called, which it was, and it'll cause the test to fail if the spy was never called. We can run the test suite inside the Terminal using the npm run test-watch command, and this is going to kick off the tests using nodemon:
As shown in the previous screenshot, we have all our test cases, and under the App one, we have should call the spy correctly. It did indeed pass, which is fantastic.
Now let's comment out the line where I call spy:
it('should call the spy correctly', () => {
var spy = expect.createSpy();
// spy();
expect(spy).toHaveBeenCalled();
});
And this time around, the test should fail because spy was never actually called, and as shown in the following screenshot, we see spy was not called:
Now, checking if a spy was called or not called is great, but we can get even more detail out of our assertions. For example, what if I call the spy with the name Andrew and the age 25:
it('should call the spy correctly', () => {
var spy = expect.createSpy();
spy('Andrew', 25);
expect(spy).toHaveBeenCalled();
});
Now, we want to verify if the spy was not just called but was called with these arguments? Well, luckily, we have an assertion for that too. Instead of toHaveBeenCalled, we can call toHaveBeenCalledWith, and this lets us pass in some arguments and verify the spy was indeed called with those arguments.
As shown in the following code, we'll assert that my spy was called with Andrew and the number 25:
expect(spy).toHaveBeenCalledWith('Andrew', 25);
When we save the file and the test cases restart, we should see all the tests passing, and that's exactly what we get:
Now, if the spy was not called with the mentioned data, I'll remove 25:
it('should call the spy correctly', () => {
var spy = expect.createSpy();
spy('Andrew');
expect(spy).toHaveBeenCalledWith('Andrew', 25);
});
Now if we rerun the test suite, the test will fail. It will give you an error message letting you know that spy was never called with [ 'Andrew', 25 ]. This is causing the test to fail, which is fantastic.
For our purposes, we need a spy so we can simulate that function inside of app.js (saveUser). We need a way to replace saveUser function with a spy. Then we can verify that when handleSignup gets called, it does indeed call saveUser. It doesn't need to actually go through the process over in db.js; this is not important to our tests. The only thing that is important is that the function was called with the correct arguments.
To do that, we'll look at an npm module called rewire, which lets us swap out variables for our tests. In our case, in our test file, we'll be able to replace the db object with something else completely. Then, when the code runs, instead of calling db.saveUser as defined in app.js, it will be calling db.saveUser, which will be a spy.
To get started, we do need to install rewire in the Terminal. It's a fantastic test utility. It's pretty essential for testing functions with side effects, like the one we have seen in this section. Let's run npm install. The module name itself is called rewire, and we'll be grabbing the most recent version as of this filming, version @3.0.2. This is a test-specific module. We'll not need it for our application to run regularly, so we will be using the --save-dev flag to add it to our package.json dependencies list:
npm install rewire@3.0.2 --save-dev
Once the module is installed we can get started using it, and it's pretty simple to set up. Inside app.test.js we can start by loading it in. Up at the very top, we'll create a new constant. This one will be called rewire, and we'll set it equal to the returned result from requiring rewire:
const expect = require('expect');
const rewire = require('rewire');
Now, the way that rewire works is it requires you to use rewire instead of require when you're loading in the file that you want to mock out. For this example, we want to replace db with something else, so when we load an app we have to load it in in a special way. We'll make a variable called app, and we'll set it equal to rewire followed by what we would usually put inside of require. In this case it's a relative file, a file that we created ./app will get the job done:
const expect = require('expect');
const rewire = require('rewire');
var app = rewire('./app');
Now rewire loads your file through require, but it also adds two methods onto app. These methods are:
We can use these to mock out various data inside of app.js. That means we'll make a simulation of the db object, the one that comes back from db.js, but we'll swap out the function with a spy.
Inside our describe block, we can kick things off by making a variable. This variable is going to be called db, and we'll set it equal to an object:
describe('App', () => {
var db = {
}
The only thing we need to mock out in our case is saveUser. Inside the object, we'll define saveUser and then I'll set it equal to a spy by creating one using expect.createSpy, just like this:
describe('App', () => {
var db = {
saveUser: expect.createSpy()
};
Now we have this db variable, and the only thing left to do is replace it. We do that using app.__set__, and this is going to take two arguments:
describe('App', () => {
var db = {
saveUser: expect.createSpy()
};
app.__set__();
The first one is the thing you want to replace. We're trying to replace db, and we're trying to replace it with the db variable, which is our object that has the saveUser function:
describe('App', () => {
var db = {
saveUser: expect.createSpy()
};
app.__set__('db', db);
With that in place, we can now write a test that verifies that handleSignup does indeed call saveUser.
To verify if handleSignup calls saveUser, inside app.test.js, we'll call it:
describe('App', () => {
var db = {
saveUser: expect.createSpy()
};
app.__set__('db', db);
it('should call the spy correctly', () => {
var spy = expect.createSpy();
spy('Andrew', 25);
expect(spy).toHaveBeenCalledWith('Andrew', 25);
});
it('should call saveUser with user object')
Then we can pass in our function, and this is what will actually run when the test gets executed, and there's no need to use any asynchronous done arguments. This will be a synchronous test for now:
it('should call saveUser with user object', () => {
});
Inside the callback function, we can come up with an email and a password that we'll pass in to handleSignup in db.js. We'll make a variable called email setting it equal to some email andrew@example.com, and we can do the same thing with the password, var password; we'll set that equal to 123abc:
it('should call saveUser with user object', () => {
var email = 'andrew@example.com';
var password = '123abc';
});
Next up, we will call handleSignup. This is the function we want to test. We'll call app.handleSignup, passing in our two arguments, email and password:
it('should call saveUser with user object', () => {
var email = 'andrew@example.com';
var password = '123abc';
app.handleSignup(email, password);
});
Now at this point, handleSignup will get executed. This means that the code over here will run and it will fire db.saveUser, but db.saveUser is not the method in db.js; it's a spy instead, which means we can now use those assertions we just learned about.
Inside of the test case, we'll use expect to expect something about db; the variable .saveUser, which we set equal to a spy:
app.handleSignup(email, password);
expect(db.saveUser)
We'll call .toHaveBeenCalledWith with an object because that is what db.js should have been called with. We'll use that same ES6 shortcut: email, password:
app.handleSignup(email, password);
expect(db.saveUser).toHaveBeenCalledWith({email, password});
});
This creates an email attribute set to the email variable, and a password attribute set to the password variable. With this in place, we can now save our test file, and in the Terminal we can restart the test-watch script by using the up arrow key twice to rerun our npm run test-watch command. This is going to kick off our test suite, starting up all of our tests:
As shown in the previous screenshot, we see should call the spy correctly passes. Also, the test case we just created also passes. We can see should call saveUser with the user object, and this is fantastic. We now have a way to test pretty much anything inside Node. We can even test functions that call other functions, verifying that the communication happens as expected. All of this can be done using spies.
In this chapter, we looked into testing the Express applications as we did with the synchronous and async Node applications in the previous chapter. Then, we worked on organizing our tests with the describe() object so that we can see our different test methods right away.
In the last section we explored one more way we can test our Node applications, that is, spies. We created test files for spies, looked into the spy assertions and swapping of a function with spy.
That's the end of the book! Through the course of is book, you learned the fundamentals of Node.js so that you test and deploy Node.js applications on the web. We hope that you liked the journey this book has taken you through. We wish you all the success and hope that you continue to better your Node.js applications.
If you enjoyed this book, you may be interested in another book by Packt:
Node Cookbook - Third Edition
David Mark Clements, Mathias Buus, Matteo Collina, Peter Elger
ISBN: 978-1-78588-008-7
Please share your thoughts on this book with others by leaving a review on the site that you bought it from. If you purchased the book from Amazon, please leave us an honest review on this book's Amazon page. This is vital so that other potential readers can see and use your unbiased opinion to make purchasing decisions, we can understand what our customers think about our products, and our authors can see your feedback on the title that they have worked with Packt to create. It will only take a few minutes of your time, but is valuable to other potential customers, our authors, and Packt. Thank you!