
To illustrate how the asynchronous programming model works, we'll get started with a simple example using console.log. Let's get started by adding a couple of console.log statements in a synchronous way. We'll create one console.log statement at the beginning of the app that will say Starting app, and we will add a second one to the end, and the second one will print Finishing up, as shown here:
console.log('Starting app');

console.log('Finishing up');
Now these are always going to run synchronously. No matter how many times you run the program, Starting app is always going to show up before Finishing up.
In order to add some asynchronous code, we'll take a look at a function that Node provides called setTimeout. The setTimeout function is a great method for illustrating the basics of non-blocking programming. It takes two arguments:
- The first one is a function. This will be referred to as callback function, and it will get fired after a certain amount of time.
- The second argument is a number, which tells the number of milliseconds you want to wait. So if you want to wait for one second, you would pass in a thousand milliseconds.
Let's call setTimeout, passing in an arrow function (=>) as our first argument. This will be callback function. It will get fired right away; that is, it will get fired after the timeout is up, after our two seconds. And then we can set up our second argument which is the delay, 2000 milliseconds, which equals those two seconds:
console.log('Starting app');

setTimeout(() => {

}, 2000);
Inside the arrow function (=>), all we'll do is use a console.log statement so that we can figure out exactly when our function fires, because the statement will print to the screen. We'll add console.log and then inside callback to get the job done, as shown here:
setTimeout(() => {
  console.log('Inside of callback');
}, 2000);
With this in place, we're actually ready to run our very first async program, and I'll not use nodemon to execute it. I'll run this file from the Terminal using the basic Node command; node playground and the file inside the playground folder which is async-basic.js:
node playground/async-basics.js
Now pay close attention to exactly what happens when we hit enter. We'll see two messages show up right away, then two seconds later our final message, Inside of callback, prints to the screen:
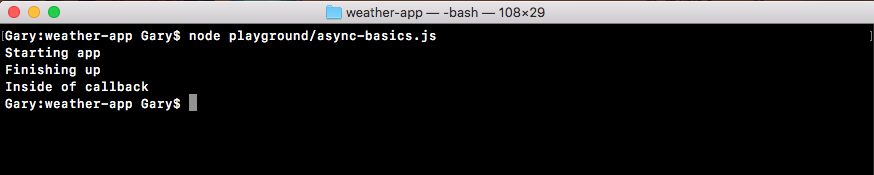
The sequence in which these messages are shown is: first we got Starting app; almost immediately after this, Finishing up prints to the screen and finally (two seconds later), Inside of callback was printed as shown in the previous code. Inside the file, this is not the order in which we wrote the code, but it is the order the code executes in.
The Starting app statement prints to the screen as we expect. Next, we call setTimeout, but we're not actually telling it to wait two seconds. We're registering a callback that will get fired in two seconds. This will be an asynchronous callback, which means that Node can do other things while these two seconds are happening. In this case, the other thing it moves down to the Finishing up message. Now since we did register this callback by using setTimeout, it will fire at some point in time, and two seconds later we do see Inside of callback printing to the screen.
By using non-blocking I/O, we're able to wait, in this case two seconds, without preventing the rest of the program from executing. If this was blocking I/O, we would have to wait two seconds for this code to fire, then the Finishing up message would print to the screen, and obviously that would not be ideal.
Now this is a pretty contrived example, we will not exactly use setTimeout in our real-world apps to create unnecessary arbitrary delays, but the principles are the same. For example, when we fetch data from the Google API we'll need to wait about 100 to 200 milliseconds for that data to come back, and we don't want the rest of the program to just be idle, it will continue. We'll register a callback, and that callback will get fired once the data comes back from the Google servers. The same principles applies even though what's actually happening is quite different.
Now, we want to write another setTimeout right here. We want to register a setTimeout function that prints a message; something like Second setTimeout works. This will be inside the callback, and we want to register a delay of 0 milliseconds, no delay at all. Let's fill out the async basics setTimeout. I'll call setTimeout with my arrow function (=>), passing in a delay of 0 milliseconds, as shown in the following code. Inside the arrow function (=>), I'll use console.log so I can see exactly when this function executes, and I'll use Second setTimeout as the text:
setTimeout(() => {
  console.log('Second setTimeout');
}, 0);
Now that we have this in place, we can run the program from the Terminal, and it's really important to pay attention to the order in which the statements print. Let's run the program:
node playground/async-basics.js
Right away we get three statements and then at the very end, two seconds later, we get our final statement:
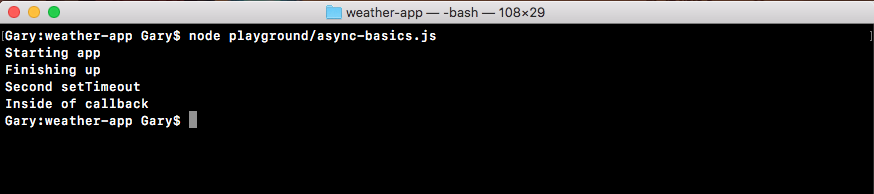
We start with Starting app, which makes sense, it's at the top. Then we get Finishing up. After Finishing up we get Second setTimeout, which seems weird, because we clearly told Node we want to run this function after 0 milliseconds, which should run it right away. But in our example, Second setTimeout printed after Finishing up.
Finally, Inside of callback printed to the screen. This behavior is completely expected. This is exactly how Node.js is supposed to operate, and it will become a lot clearer after the next section, where we'll go through this example exactly, showing you what happens behind the scenes. We'll get started with a more basic example showing you how the call stack works, we'll talk all about that in the next section, and then we'll go on to a more complex example that has some asynchronous events attached to it. We'll discuss the reason why Second setTimeout comes up after the Finishing up message after the next section.