
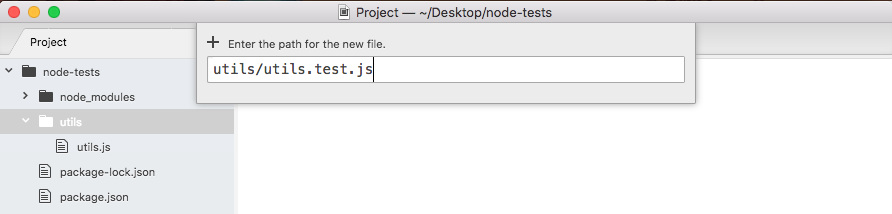
Now that we have Mocha installed, we can go ahead and create a test file. In the utils folder, we'll make a new file called utils.test.js:
This file will store our test cases. We'll not store our test cases in utils.js. This will be our application code. Instead, we'll make a file called utils.test.js. When we use this test.js extension, we're basically telling our app that this will store our test cases. When Mocha goes through our app looking for tests to run, it should run any file with this extension.
Now we have a test file, the only thing left to do is create a test case. A test case is a function that runs some code, and if things go well, great, the test is considered to have passed. And if things do not go well, the test is considered to have failed. We can create a new test case, using it. It is a function provided by Mocha. We'll be running our project test files through Mocha, so there's no reason to import it or do anything like that. We simply call it just like this:
it();
Now it lets us define a new test case and it takes two arguments. These are:
- The first argument is a string
- The second argument is a function
First up, we'll have a string description of what exactly the test is doing. If we're testing that the adder function works, we might have something like:
it('should add two numbers');
Notice here that it plays into the sentence. It should read like this, it should add two numbers; describes exactly what the test will verify. This is called behavior-driven development, or BDD, and that's the principles that Mocha was built on.
Now that we've set up the test string, the next thing to do is add a function as the second argument:
it('should add two numbers', () => {

});
Inside this function, we'll add the code that tests that the add function works as expected. This means it will probably call add and check that the value that comes back is the appropriate value given the two numbers passed in. That means we do need to import the util.js file up at the top. We'll create a constant, call utils, setting it equal to the return result from requiring utils. We're using ./ since we will be requiring a local file. It's in the same directory so I can simply type utils without the js extension as shown here:
const utils = require('./utils');

it('should add two numbers', () => {

});
Now that we have the utils library loaded in, inside the callback we can call it. Let's make a variable to store the return results. We'll call this one results. And we'll set it equal to utils.add passing in two numbers. Let's use something like 33 and 11:
const utils = require('./utils');

it('should add two numbers', () => {
  var res = utils.add(33, 11);
});
We would expect it to get 44 back. Now at this point, we do have some code inside of our test suites so we run it. We'll do that by configuring that test script we looked at in the previous chapter inside a package.json.
Currently, the test script simply prints a message to the screen saying that no tests exist. What we'll do instead is call Mocha. As shown in the following code, we'll be calling Mocha, passing in as the one and only argument the actual files we want to test. We can use a globbing pattern to specify multiple files. In this case, we'll be using ** to look in every single directory. We're looking for a file called utils.test.js:
"scripts": {
  "test": "mocha **/utils.test.js"
},
Now this is a very specific pattern. It's not going to be particularly useful. Instead, we can swap out the file name with a star as well. Now we're looking for any file on the project that has a file name ending in .test.js:
"scripts": {
  "test": "mocha **/*.test.js"
},
And this is exactly what we want. From here, we can run our test suite by saving package.json and moving to the Terminal. We'll use the clear command to clear the Terminal output and then we can run our test script using command shown as follows:
npm test
When we run this, we'll execute that Mocha command:
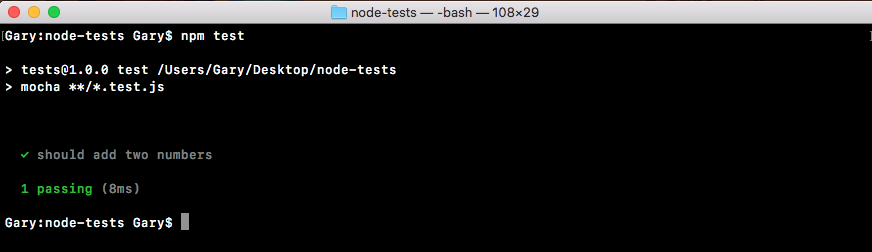
It'll go off. It'll fetch all of our test files. It'll run all of them and print the results on the screen inside Terminal as shown in the preceding screenshot. Here we can see we have a green checkmark next to our test, should add two numbers. Next, we have a little summary, one passing test, and it happened in 8 milliseconds.
Now in our case, we don't actually assert anything about the number that comes back. It could be 700 and we wouldn't care. The test will always pass. To make a test fail what we have to do is throw an error. That means we can throw a new error and we pass into the constructor function whatever message we want to use as the error as shown in the following code block. In this case, I could say something like Value not correct:
const utils = require('./utils');

it('should add two numbers', () => {
  var res = utils.add(33, 11);
  throw new Error('Value not correct')
});
Now with this in place, I can save the test file and rerun things from the Terminal by rerunning npm test, and when we do that now we have 0 tests passing and we have 1 test failing:
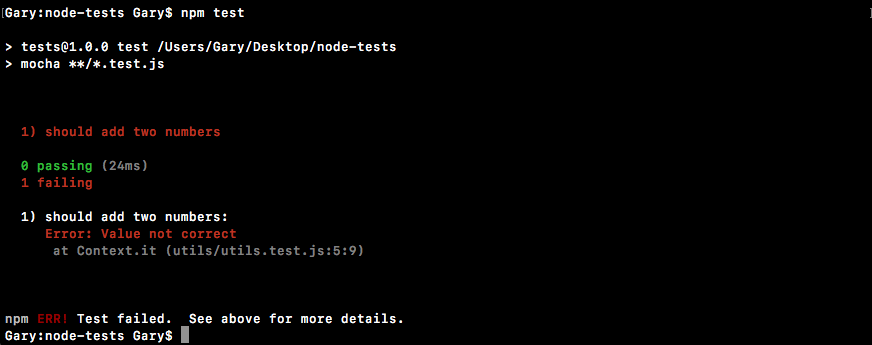
Next we can see the one test is should add two numbers, and we get our error message, Value not correct. When we throw a new error, the test fails and that's exactly what we want to do for add.