HTML has a syntax similar to XML and SLD. The basic principles are the same; we use opening and closing tags, tag attributes, and content. The content can be plain text or other HTML elements. There are only a few elements that we will use to create our web map:
- <html>: The root element of every HTML document grouping the whole content.
- <head>: The group of important elements that are not visualized but alter the default behavior of the web page in some way.
- <body>: The group of visual elements rendered by the web client.
- <title>: The title of the page. It goes inside the <head> element.
- <meta>: The various kinds of metadata of the web page. Very useful to explicitly set the character encoding of the web page.
- <link>: A reference to an external resource, usually a stylesheet.
- <script>: Inline JavaScript code or a reference to an external resource containing valid JavaScript code.
- <h1>: A first-level header emphasized with a large font size.
- <p>: A paragraph of plain text.
- <div>: A division without much purpose on its own. When it contains other elements, it groups them together. This way, visually coherent parts of the website (e.g. navigation bar, main content, sidebars) can be grouped and styled easily with CSS. It is used by web mapping libraries to group map content.
- <input>: The various user inputs based on the attributes of the tag. It can be a radio button, a checkbox, a regular button, a text input, or a numeric input, just to mention a few.
There are some basic rules and guidelines to create a good HTML document. Every element should go in the <html> root element. The root element usually has a single attribute (for example, lang="en"), containing the language abbreviation of the page. Furthermore, it should only contain the <head> and <body> elements. The <head> element should contain everything that is not for direct visualization. Elements such as <title>, <link>, and <meta> should all go into the <head> section. Additionally, JavaScript libraries needed for the web page's custom code should also go into the <head> section. The <body> section should contain the rest of the elements, that is, everything that should be rendered. It can also contain the web page's custom scripts, especially if they are changing the other elements; therefore, they require the DOM tree to be set up by the client when they run. A minimal functional example of the aforementioned elements looks like the following:
<html lang="en">
  <head>
    <title>Your page's title</title>
    <meta charset="utf-8">
    <link href="yourstylesheet.css" rel="stylesheet">
    <script src="yourscript.js" type="text/javascript">
  </head>
  <body>
    The content of your web page.
  </body>
</html>
Apart from the custom attributes specific elements can hold, we should be able to apply some general attributes, mostly on visual elements. With the id attribute, we can assign a unique identifier to individual elements. Using IDs, we can style these elements individually and also get their object references through JavaScript. This is the way in which we can register listener functions to elements, modify them, or query their attributes in our custom code. With the class attribute, we can group elements. Using classes is mostly used to style visually coherent elements with a single CSS rule.
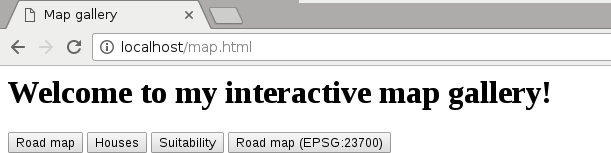
Now that we know about the basic principles, let's create our HTML document. The web page should have a title and a UTF-8 character encoding in its <head> section. In the <body> section, we should have a header with a greeting text and two <div> elements. The first one will contain the map, while the second one will contain a short description. As we would like to be able to select between multiple maps, we should have at least four buttons under the <div> elements. The four maps we will create are the road map, the constrained houses from our PostGIS analysis, the suitability map, and the road map in our local projection.
After putting the required elements together, we should get a simple HTML document similar to the following:
    <html lang="en">
     <head>
       <title>Map gallery</title>
       <meta charset="utf-8">
     </head>
     <body>
       <h1>Welcome to my interactive map gallery!</h1>
       <div id="map"></div>
       <div id="description">
         <p id="description_text"></p>
       </div>
       <input id="roadmap" type="button" class="mapchooser"
        value="Road map">
       <input id="suitability" type="button" class="mapchooser"
        value="Suitability">
       <input id="houses" type="button" class="mapchooser"
        value="Houses">
       <input id="roadmap_23700" type="button" class="mapchooser"
        value="Road map (EPSG:23700)">
     </body>
    </html>
If we save our edits made to our HTML document and open it in our browser (http://localhost/map.html), we will able to see our raw HTML elements rendered with their default styles: