Table of Contents for
Practical Malware Analysis
 Practical Malware Analysis
Published by
No Starch Press, 2012
Practical Malware Analysis
Published by
No Starch Press, 2012
- Cover
- Practical Malware Analysis: The Hands-On Guide to Dissecting Malicious Software
- Praise for Practical Malware Analysis
- Warning
- About the Authors
- About the Technical Reviewer
- About the Contributing Authors
- Foreword
- Acknowledgments
- Individual Thanks
- Introduction
- What Is Malware Analysis?
- Prerequisites
- Practical, Hands-On Learning
- What’s in the Book?
- 0. Malware Analysis Primer
- The Goals of Malware Analysis
- Malware Analysis Techniques
- Types of Malware
- General Rules for Malware Analysis
- I. Basic Analysis
- 1. Basic Static Techniques
- Antivirus Scanning: A Useful First Step
- Hashing: A Fingerprint for Malware
- Finding Strings
- Packed and Obfuscated Malware
- Portable Executable File Format
- Linked Libraries and Functions
- Static Analysis in Practice
- The PE File Headers and Sections
- Conclusion
- Labs
- 2. Malware Analysis in Virtual Machines
- The Structure of a Virtual Machine
- Creating Your Malware Analysis Machine
- Using Your Malware Analysis Machine
- The Risks of Using VMware for Malware Analysis
- Record/Replay: Running Your Computer in Reverse
- Conclusion
- 3. Basic Dynamic Analysis
- Sandboxes: The Quick-and-Dirty Approach
- Running Malware
- Monitoring with Process Monitor
- Viewing Processes with Process Explorer
- Comparing Registry Snapshots with Regshot
- Faking a Network
- Packet Sniffing with Wireshark
- Using INetSim
- Basic Dynamic Tools in Practice
- Conclusion
- Labs
- II. Advanced Static Analysis
- 4. A Crash Course in x86 Disassembly
- Levels of Abstraction
- Reverse-Engineering
- The x86 Architecture
- Conclusion
- 5. IDA Pro
- Loading an Executable
- The IDA Pro Interface
- Using Cross-References
- Analyzing Functions
- Using Graphing Options
- Enhancing Disassembly
- Extending IDA with Plug-ins
- Conclusion
- Labs
- 6. Recognizing C Code Constructs in Assembly
- Global vs. Local Variables
- Disassembling Arithmetic Operations
- Recognizing if Statements
- Recognizing Loops
- Understanding Function Call Conventions
- Analyzing switch Statements
- Disassembling Arrays
- Identifying Structs
- Analyzing Linked List Traversal
- Conclusion
- Labs
- 7. Analyzing Malicious Windows Programs
- The Windows API
- The Windows Registry
- Networking APIs
- Following Running Malware
- Kernel vs. User Mode
- The Native API
- Conclusion
- Labs
- III. Advanced Dynamic Analysis
- 8. Debugging
- Source-Level vs. Assembly-Level Debuggers
- Kernel vs. User-Mode Debugging
- Using a Debugger
- Exceptions
- Modifying Execution with a Debugger
- Modifying Program Execution in Practice
- Conclusion
- 9. OllyDbg
- Loading Malware
- The OllyDbg Interface
- Memory Map
- Viewing Threads and Stacks
- Executing Code
- Breakpoints
- Loading DLLs
- Tracing
- Exception Handling
- Patching
- Analyzing Shellcode
- Assistance Features
- Plug-ins
- Scriptable Debugging
- Conclusion
- Labs
- 10. Kernel Debugging with WinDbg
- Drivers and Kernel Code
- Setting Up Kernel Debugging
- Using WinDbg
- Microsoft Symbols
- Kernel Debugging in Practice
- Rootkits
- Loading Drivers
- Kernel Issues for Windows Vista, Windows 7, and x64 Versions
- Conclusion
- Labs
- IV. Malware Functionality
- 11. Malware Behavior
- Downloaders and Launchers
- Backdoors
- Credential Stealers
- Persistence Mechanisms
- Privilege Escalation
- Covering Its Tracks—User-Mode Rootkits
- Conclusion
- Labs
- 12. Covert Malware Launching
- Launchers
- Process Injection
- Process Replacement
- Hook Injection
- Detours
- APC Injection
- Conclusion
- Labs
- 13. Data Encoding
- The Goal of Analyzing Encoding Algorithms
- Simple Ciphers
- Common Cryptographic Algorithms
- Custom Encoding
- Decoding
- Conclusion
- Labs
- 14. Malware-Focused Network Signatures
- Network Countermeasures
- Safely Investigate an Attacker Online
- Content-Based Network Countermeasures
- Combining Dynamic and Static Analysis Techniques
- Understanding the Attacker’s Perspective
- Conclusion
- Labs
- V. Anti-Reverse-Engineering
- 15. Anti-Disassembly
- Understanding Anti-Disassembly
- Defeating Disassembly Algorithms
- Anti-Disassembly Techniques
- Obscuring Flow Control
- Thwarting Stack-Frame Analysis
- Conclusion
- Labs
- 16. Anti-Debugging
- Windows Debugger Detection
- Identifying Debugger Behavior
- Interfering with Debugger Functionality
- Debugger Vulnerabilities
- Conclusion
- Labs
- 17. Anti-Virtual Machine Techniques
- VMware Artifacts
- Vulnerable Instructions
- Tweaking Settings
- Escaping the Virtual Machine
- Conclusion
- Labs
- 18. Packers and Unpacking
- Packer Anatomy
- Identifying Packed Programs
- Unpacking Options
- Automated Unpacking
- Manual Unpacking
- Tips and Tricks for Common Packers
- Analyzing Without Fully Unpacking
- Packed DLLs
- Conclusion
- Labs
- VI. Special Topics
- 19. Shellcode Analysis
- Loading Shellcode for Analysis
- Position-Independent Code
- Identifying Execution Location
- Manual Symbol Resolution
- A Full Hello World Example
- Shellcode Encodings
- NOP Sleds
- Finding Shellcode
- Conclusion
- Labs
- 20. C++ Analysis
- Object-Oriented Programming
- Virtual vs. Nonvirtual Functions
- Creating and Destroying Objects
- Conclusion
- Labs
- 21. 64-Bit Malware
- Why 64-Bit Malware?
- Differences in x64 Architecture
- Windows 32-Bit on Windows 64-Bit
- 64-Bit Hints at Malware Functionality
- Conclusion
- Labs
- A. Important Windows Functions
- B. Tools for Malware Analysis
- C. Solutions to Labs
- Lab 1-1 Solutions
- Lab 1-2 Solutions
- Lab 1-3 Solutions
- Lab 1-4 Solutions
- Lab 3-1 Solutions
- Lab 3-2 Solutions
- Lab 3-3 Solutions
- Lab 3-4 Solutions
- Lab 5-1 Solutions
- Lab 6-1 Solutions
- Lab 6-2 Solutions
- Lab 6-3 Solutions
- Lab 6-4 Solutions
- Lab 7-1 Solutions
- Lab 7-2 Solutions
- Lab 7-3 Solutions
- Lab 9-1 Solutions
- Lab 9-2 Solutions
- Lab 9-3 Solutions
- Lab 10-1 Solutions
- Lab 10-2 Solutions
- Lab 10-3 Solutions
- Lab 11-1 Solutions
- Lab 11-2 Solutions
- Lab 11-3 Solutions
- Lab 12-1 Solutions
- Lab 12-2 Solutions
- Lab 12-3 Solutions
- Lab 12-4 Solutions
- Lab 13-1 Solutions
- Lab 13-2 Solutions
- Lab 13-3 Solutions
- Lab 14-1 Solutions
- Lab 14-2 Solutions
- Lab 14-3 Solutions
- Lab 15-1 Solutions
- Lab 15-2 Solutions
- Lab 15-3 Solutions
- Lab 16-1 Solutions
- Lab 16-2 Solutions
- Lab 16-3 Solutions
- Lab 17-1 Solutions
- Lab 17-2 Solutions
- Lab 17-3 Solutions
- Lab 18-1 Solutions
- Lab 18-2 Solutions
- Lab 18-3 Solutions
- Lab 18-4 Solutions
- Lab 18-5 Solutions
- Lab 19-1 Solutions
- Lab 19-2 Solutions
- Lab 19-3 Solutions
- Lab 20-1 Solutions
- Lab 20-2 Solutions
- Lab 20-3 Solutions
- Lab 21-1 Solutions
- Lab 21-2 Solutions
- Index
- Index
- Index
- Index
- Index
- Index
- Index
- Index
- Index
- Index
- Index
- Index
- Index
- Index
- Index
- Index
- Index
- Index
- Index
- Index
- Index
- Index
- Index
- Index
- Index
- Index
- Index
- Updates
- About the Authors
- Copyright
Shellcode exists as a binary blob that gains execution. It must do something useful once it gains execution, which usually means interacting with the system through APIs.
Remember that shellcode cannot use the Windows loader to ensure that all required libraries
are loaded and available, and to make sure that all external symbols are resolved. Instead, it must
find the symbols itself. The shellcode in the previous examples used hard-coded addresses to find
the symbols, but this very fragile method will work only on a specific version of an OS and service
pack. Shellcode must dynamically locate the functions in order to work reliably in different
environments, and for that task, it typically uses LoadLibraryA
and GetProcAddress.
LoadLibraryA loads the specified library and returns a
handle. The GetProcAddress function searches the library’s
exports for the given symbol name or ordinal number. If shellcode has access to these two functions,
it can load any library on the system and find exported symbols, at which point it has full access
to the API.
Both functions are exported from kernel32.dll, so the shellcode must do the following:
Find kernel32.dll in memory.
Parse kernel32.dll’s PE file and search the exported functions for
LoadLibraryAandGetProcAddress.
In order to locate kernel32.dll, we’ll follow a series of undocumented Windows structures. One of these structures contains the load address of kernel32.dll.
Note
Most of the Windows structures are listed on the Microsoft Developer Network (MSDN) site, but they are not fully documented. Many contain byte arrays named Reserved, with the warning “This structure may be altered in future versions of Windows.” For full listings of these structures, see http://undocumented.ntinternals.net/.
Figure 19-1 shows the data structures that are typically followed in order to find the base address for kernel32.dll (only relevant fields and offsets within each structure are shown).
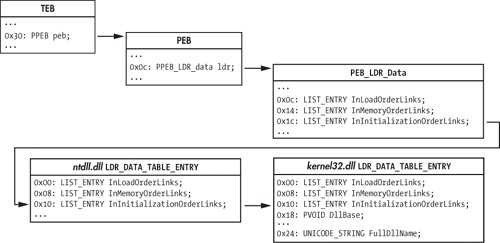
The process begins with the TEB, accessible from the FS segment register. Offset 0x30 within
the TEB is the pointer to the PEB. Offset 0xc within the PEB is the pointer to the PEB_LDR_DATA structure, which contains three doubly linked lists of
LDR_DATA_TABLE structures—one for each loaded module. The
DllBase field in the kernel32.dll entry is
the value we’re seeking.
Three LIST_ENTRY structures link the LDR_DATA_TABLE entries together in different orders, by name. The InInitializationOrderLinks entry is typically followed by shellcode. From
Windows 2000 through Vista, kernel32.dll is the second DLL initialized, just
after ntdll.dll, which means that the second entry in the InInitializationOrderLinks list of structures should belong to
kernel32.dll. However, beginning with Windows 7,
kernel32.dll is no longer the second module to be initialized, so this simple
algorithm no longer works. Portable shellcode will instead need to examine the UNICODE_STRING
FullDllName field to confirm it is
kernel32.dll.
When traversing the LIST_ENTRY structures, it is important
to realize that the Flink and Blink pointers point to the equivalent LIST_ENTRY in
the next and previous LDR_DATA_TABLE structures. This means that
when following the InInitializationOrderLinks to get to
kernel32.dll’s LDR_DATA_TABLE_ENTRY,
you need to add only eight to the pointer to get the DllBase,
instead of adding 0x18, which you would have to do if the pointer pointed to the start of the
structure.
Example 19-4 contains sample assembly code that finds the base address of kernel32.dll.
Example 19-4. findKernel32Base implementation
; __stdcall DWORD findKernel32Base(void);
findKernel32Base:
    push    esi
    xor     eax, eax
    mov     eax, [fs:eax+0x30] ❶  ; eax gets pointer to PEB
    test    eax, eax              ; if high bit set: Win9x
    js      .kernel32_9x ❷
    mov     eax, [eax + 0x0c] ❹   ; eax gets pointer to PEB_LDR_DATA
    ;esi gets pointer to 1st
    ;LDR_DATA_TABLE_ENTRY.InInitializationOrderLinks.Flink
    mov     esi, [eax + 0x1c]
    ;eax gets pointer to 2nd
    ;LDR_DATA_TABLE_ENTRY.InInitializationOrderLinks.Flink
    lodsd ❺
    mov     eax, [eax + 8]        ; eax gets LDR_DATA_TABLE_ENTRY.DllBase
    jmp     near .finished
.kernel32_9x:
    jmp     near .kernel32_9x ❸   ; Win9x not supported: infinite loop
.finished:
    pop     esi
    ret
The listing accesses the TEB using the FS segment register at ❶ to get the pointer to the PEB. The js (jump if
signed) instruction at ❷ is used to test whether the
most significant bit of the PEB pointer is set, in order to differentiate between Win9x and WinNT
systems. In WinNT (including Windows 2000, XP, and Vista), the most significant bit of the PEB
pointer is typically never set, because high memory addresses are reserved for the OS. Using the
sign bit to identify the OS family fails on systems that use the /3GB boot option, which causes the user-level/kernel-level memory split to occur at
0xC0000000 instead of 0x8000000, but this is ignored for this simple example. This shellcode chose
not to support Win9x, so it enters an infinite loop at ❸
if Win9x is detected.
The shellcode proceeds to PEB_LDR_DATA at ❹. It assumes that it is running under Windows Vista or earlier,
so it can simply retrieve the second LDR_DATA_TABLE_ENTRY in the
InInitializationOrderLinks linked list at ❺ and return its DllBase
field.
Once you find the base address for kernel32.dll, you must parse it to find exported symbols. As with finding the location of kernel32.dll, this process involves following several structures in memory.
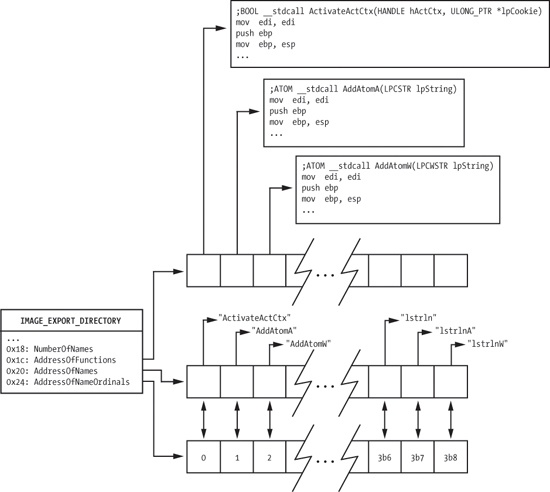
PE files use relative virtual addresses (RVAs) when defining locations within a file. These addresses can be thought of as offsets within the PE image in memory, so the PE image base address must be added to each RVA to turn it into a valid pointer.
The export data is stored in IMAGE_EXPORT_DIRECTORY. An RVA
to this is stored in the array of IMAGE_DATA_DIRECTORY structures
at the end of the IMAGE_OPTIONAL_HEADER. The location of the
IMAGE_DATA_DIRECTORY array depends on whether the PE file is for
a 32-bit application or a 64-bit application. Typical shellcode assumes it is running on a 32-bit
platform, so it knows at compile time that the correct offset from the PE signature to the directory
array is as follows:
sizeof(PE_Signature) + sizeof(IMAGE_FILE_HEADER) + sizeof(IMAGE_OPTIONAL_HEADER) = 120 bytes
The relevant fields in the IMAGE_EXPORT_DIRECTORY structure
are shown in Figure 19-2. AddressOfFunctions is an array of RVAs that points to the actual export functions. It is
indexed by an export ordinal (an alternative way of finding an exported symbol).
The shellcode needs to map the export name to the ordinal in order to use this array, and it
does so using the AddressOfNames and AddressOfNameOrdinals arrays. These two arrays exist in parallel. They have the same
number of entries, and equivalent indices into these arrays are directly related. AddressOfNames is an array of 32-bit RVAs that point to the strings of
symbol names. AddressOfNameOrdinals is an array of 16-bit
ordinals. For a given index idx into these arrays, the symbol at
AddressOfNames[idx] has the export ordinal value at AddressOfNameOrdinals[idx]. The AddressOfNames array is sorted alphabetically so that a binary search can quickly find a
specific string, though most shellcode simply performs a linear search starting at the beginning of
the array.
To find the export address of a symbol, follow these steps:
Iterate over the
AddressOfNamesarray looking at eachchar*entry, and perform a string comparison against the desired symbol until a match is found. Call this index intoAddressOfNamesiName.Index into the
AddressOfNameOrdinalsarray usingiName. The value retrieved is the valueiOrdinal.Use
iOrdinalto index into theAddressOfFunctionsarray. The value retrieved is the RVA of the exported symbol. Return this value to the requester.
A sample implementation of this algorithm is shown later in the chapter as part of a full Hello World example.
Once the shellcode finds LoadLibraryA, it can load
arbitrary libraries. The return value of LoadLibraryA is treated
as a HANDLE in the Win32 API. Examining the HANDLE values shows that it is actually a 32-bit pointer to the dllBase of the library that was loaded, which means that the shellcode can
skip using GetProcAddress and continue using its own PE parsing
code with the dllBase pointers returned from LoadLibraryA (which is also beneficial when hashed names are used, as
explained in the next section).
The algorithm just discussed has a weakness: It performs a strcmp against each export name until it finds the correct one. This requires that the
full name of each API function the shellcode uses be included as an ASCII string. When the size of
the shellcode is constrained, these strings could push the size of the shellcode over the
limit.
A common way to address this problem is to calculate a hash of each symbol string and compare the result with a precomputed value stored in the shellcode. The hash function does not need to be sophisticated; it only needs to guarantee that within each DLL used by the shellcode, the hashes that the shellcode uses are unique. Hash collisions between symbols in different DLLs and between symbols the shellcode does not use are fine.
The most common hash function is the 32-bit rotate-right-additive hash, as shown in Example 19-5.
Example 19-5. hashString implementation
; __stdcall DWORD hashString(char* symbol);
hashString:
    push    esi
    push    edi
    mov     esi, dword [esp+0x0c]   ; load function argument in esi
.calc_hash:
    xor     edi, edi ❶
    cld
.hash_iter:
    xor     eax, eax
    lodsb ❷                         ; load next byte of input string
    cmp     al, ah
    je      .hash_done              ; check if at end of symbol
    ror     edi, 0x0d ❸             ; rotate right 13 (0x0d)
    add     edi, eax
    jmp     near .hash_iter
.hash_done:
    mov     eax, edi
    pop     edi
    pop     esi
    retn    4
This function calculates a 32-bit DWORD hash value of the
string pointer argument. The EDI register is treated as the current hash value, and is initialized
to zero at ❶. Each byte of the input string is loaded
via the lodsb instruction at ❷. If the byte is not NULL, the current hash is rotated right by 13 (0x0d) at ❸, and the current
byte is added into the hash. This hash is returned in EAX so that its caller can compare the result
with the value compiled into the code.
Note
The particular algorithm in Example 19-5 has become commonly used due to its inclusion in Metasploit, but variations that use different rotation amounts and hash sizes are sometimes seen.