Table of Contents for
Practical Malware Analysis
 Practical Malware Analysis
Published by
No Starch Press, 2012
Practical Malware Analysis
Published by
No Starch Press, 2012
- Cover
- Practical Malware Analysis: The Hands-On Guide to Dissecting Malicious Software
- Praise for Practical Malware Analysis
- Warning
- About the Authors
- About the Technical Reviewer
- About the Contributing Authors
- Foreword
- Acknowledgments
- Individual Thanks
- Introduction
- What Is Malware Analysis?
- Prerequisites
- Practical, Hands-On Learning
- What’s in the Book?
- 0. Malware Analysis Primer
- The Goals of Malware Analysis
- Malware Analysis Techniques
- Types of Malware
- General Rules for Malware Analysis
- I. Basic Analysis
- 1. Basic Static Techniques
- Antivirus Scanning: A Useful First Step
- Hashing: A Fingerprint for Malware
- Finding Strings
- Packed and Obfuscated Malware
- Portable Executable File Format
- Linked Libraries and Functions
- Static Analysis in Practice
- The PE File Headers and Sections
- Conclusion
- Labs
- 2. Malware Analysis in Virtual Machines
- The Structure of a Virtual Machine
- Creating Your Malware Analysis Machine
- Using Your Malware Analysis Machine
- The Risks of Using VMware for Malware Analysis
- Record/Replay: Running Your Computer in Reverse
- Conclusion
- 3. Basic Dynamic Analysis
- Sandboxes: The Quick-and-Dirty Approach
- Running Malware
- Monitoring with Process Monitor
- Viewing Processes with Process Explorer
- Comparing Registry Snapshots with Regshot
- Faking a Network
- Packet Sniffing with Wireshark
- Using INetSim
- Basic Dynamic Tools in Practice
- Conclusion
- Labs
- II. Advanced Static Analysis
- 4. A Crash Course in x86 Disassembly
- Levels of Abstraction
- Reverse-Engineering
- The x86 Architecture
- Conclusion
- 5. IDA Pro
- Loading an Executable
- The IDA Pro Interface
- Using Cross-References
- Analyzing Functions
- Using Graphing Options
- Enhancing Disassembly
- Extending IDA with Plug-ins
- Conclusion
- Labs
- 6. Recognizing C Code Constructs in Assembly
- Global vs. Local Variables
- Disassembling Arithmetic Operations
- Recognizing if Statements
- Recognizing Loops
- Understanding Function Call Conventions
- Analyzing switch Statements
- Disassembling Arrays
- Identifying Structs
- Analyzing Linked List Traversal
- Conclusion
- Labs
- 7. Analyzing Malicious Windows Programs
- The Windows API
- The Windows Registry
- Networking APIs
- Following Running Malware
- Kernel vs. User Mode
- The Native API
- Conclusion
- Labs
- III. Advanced Dynamic Analysis
- 8. Debugging
- Source-Level vs. Assembly-Level Debuggers
- Kernel vs. User-Mode Debugging
- Using a Debugger
- Exceptions
- Modifying Execution with a Debugger
- Modifying Program Execution in Practice
- Conclusion
- 9. OllyDbg
- Loading Malware
- The OllyDbg Interface
- Memory Map
- Viewing Threads and Stacks
- Executing Code
- Breakpoints
- Loading DLLs
- Tracing
- Exception Handling
- Patching
- Analyzing Shellcode
- Assistance Features
- Plug-ins
- Scriptable Debugging
- Conclusion
- Labs
- 10. Kernel Debugging with WinDbg
- Drivers and Kernel Code
- Setting Up Kernel Debugging
- Using WinDbg
- Microsoft Symbols
- Kernel Debugging in Practice
- Rootkits
- Loading Drivers
- Kernel Issues for Windows Vista, Windows 7, and x64 Versions
- Conclusion
- Labs
- IV. Malware Functionality
- 11. Malware Behavior
- Downloaders and Launchers
- Backdoors
- Credential Stealers
- Persistence Mechanisms
- Privilege Escalation
- Covering Its Tracks—User-Mode Rootkits
- Conclusion
- Labs
- 12. Covert Malware Launching
- Launchers
- Process Injection
- Process Replacement
- Hook Injection
- Detours
- APC Injection
- Conclusion
- Labs
- 13. Data Encoding
- The Goal of Analyzing Encoding Algorithms
- Simple Ciphers
- Common Cryptographic Algorithms
- Custom Encoding
- Decoding
- Conclusion
- Labs
- 14. Malware-Focused Network Signatures
- Network Countermeasures
- Safely Investigate an Attacker Online
- Content-Based Network Countermeasures
- Combining Dynamic and Static Analysis Techniques
- Understanding the Attacker’s Perspective
- Conclusion
- Labs
- V. Anti-Reverse-Engineering
- 15. Anti-Disassembly
- Understanding Anti-Disassembly
- Defeating Disassembly Algorithms
- Anti-Disassembly Techniques
- Obscuring Flow Control
- Thwarting Stack-Frame Analysis
- Conclusion
- Labs
- 16. Anti-Debugging
- Windows Debugger Detection
- Identifying Debugger Behavior
- Interfering with Debugger Functionality
- Debugger Vulnerabilities
- Conclusion
- Labs
- 17. Anti-Virtual Machine Techniques
- VMware Artifacts
- Vulnerable Instructions
- Tweaking Settings
- Escaping the Virtual Machine
- Conclusion
- Labs
- 18. Packers and Unpacking
- Packer Anatomy
- Identifying Packed Programs
- Unpacking Options
- Automated Unpacking
- Manual Unpacking
- Tips and Tricks for Common Packers
- Analyzing Without Fully Unpacking
- Packed DLLs
- Conclusion
- Labs
- VI. Special Topics
- 19. Shellcode Analysis
- Loading Shellcode for Analysis
- Position-Independent Code
- Identifying Execution Location
- Manual Symbol Resolution
- A Full Hello World Example
- Shellcode Encodings
- NOP Sleds
- Finding Shellcode
- Conclusion
- Labs
- 20. C++ Analysis
- Object-Oriented Programming
- Virtual vs. Nonvirtual Functions
- Creating and Destroying Objects
- Conclusion
- Labs
- 21. 64-Bit Malware
- Why 64-Bit Malware?
- Differences in x64 Architecture
- Windows 32-Bit on Windows 64-Bit
- 64-Bit Hints at Malware Functionality
- Conclusion
- Labs
- A. Important Windows Functions
- B. Tools for Malware Analysis
- C. Solutions to Labs
- Lab 1-1 Solutions
- Lab 1-2 Solutions
- Lab 1-3 Solutions
- Lab 1-4 Solutions
- Lab 3-1 Solutions
- Lab 3-2 Solutions
- Lab 3-3 Solutions
- Lab 3-4 Solutions
- Lab 5-1 Solutions
- Lab 6-1 Solutions
- Lab 6-2 Solutions
- Lab 6-3 Solutions
- Lab 6-4 Solutions
- Lab 7-1 Solutions
- Lab 7-2 Solutions
- Lab 7-3 Solutions
- Lab 9-1 Solutions
- Lab 9-2 Solutions
- Lab 9-3 Solutions
- Lab 10-1 Solutions
- Lab 10-2 Solutions
- Lab 10-3 Solutions
- Lab 11-1 Solutions
- Lab 11-2 Solutions
- Lab 11-3 Solutions
- Lab 12-1 Solutions
- Lab 12-2 Solutions
- Lab 12-3 Solutions
- Lab 12-4 Solutions
- Lab 13-1 Solutions
- Lab 13-2 Solutions
- Lab 13-3 Solutions
- Lab 14-1 Solutions
- Lab 14-2 Solutions
- Lab 14-3 Solutions
- Lab 15-1 Solutions
- Lab 15-2 Solutions
- Lab 15-3 Solutions
- Lab 16-1 Solutions
- Lab 16-2 Solutions
- Lab 16-3 Solutions
- Lab 17-1 Solutions
- Lab 17-2 Solutions
- Lab 17-3 Solutions
- Lab 18-1 Solutions
- Lab 18-2 Solutions
- Lab 18-3 Solutions
- Lab 18-4 Solutions
- Lab 18-5 Solutions
- Lab 19-1 Solutions
- Lab 19-2 Solutions
- Lab 19-3 Solutions
- Lab 20-1 Solutions
- Lab 20-2 Solutions
- Lab 20-3 Solutions
- Lab 21-1 Solutions
- Lab 21-2 Solutions
- Index
- Index
- Index
- Index
- Index
- Index
- Index
- Index
- Index
- Index
- Index
- Index
- Index
- Index
- Index
- Index
- Index
- Index
- Index
- Index
- Index
- Index
- Index
- Index
- Index
- Index
- Index
- Updates
- About the Authors
- Copyright
One of IDA Pro’s best features is that it allows you to modify its disassembly to suit your goals. The changes that you make can greatly increase the speed with which you can analyze a binary.
IDA Pro does a good job of automatically naming virtual address and stack variables, but you
can also modify these names to make them more meaningful. Auto-generated names (also known as
dummy names) such as sub_401000 don’t
tell you much; a function named ReverseBackdoorThread would be a
lot more useful. You should rename these dummy names to something more meaningful. This will also
help ensure that you reverse-engineer a function only once. When renaming dummy names, you need to
do so in only one place. IDA Pro will propagate the new name wherever that item is
referenced.
After you’ve renamed a dummy name to something more meaningful, cross-references will
become much easier to parse. For example, if a function sub_401200 is called many times throughout a program and you rename it to DNSrequest, it will be renamed DNSrequest throughout the program. Imagine how much time this will save you during
analysis, when you can read the meaningful name instead of needing to reverse the function again or
to remember what sub_401200 does.
Table 5-2 shows an example of how we might rename local
variables and arguments. The left column contains an assembly listing with no arguments renamed, and
the right column shows the listing with the arguments renamed. We can actually glean some
information from the column on the right. Here, we have renamed arg_4 to port_str and var_598 to port. You can see that these renamed
elements are much more meaningful than their dummy names.
IDA Pro lets you embed comments throughout your disassembly and adds many comments automatically.
To add your own comments, place the cursor on a line of disassembly and press the colon (:) key on your keyboard to bring up a comment window. To insert a repeatable comment to be echoed across the disassembly window whenever there is a cross-reference to the address in which you added the comment, press the semicolon (;) key.
When disassembling, IDA Pro makes decisions regarding how to format operands for each instruction that it disassembles. Unless there is context, the data displayed is typically formatted as hex values. IDA Pro allows you to change this data if needed to make it more understandable.
Table 5-2. Function Operand Manipulation
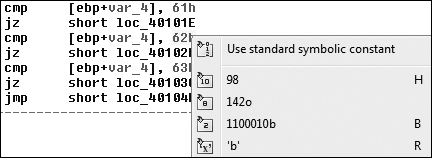
Figure 5-10 shows an example of modifying operands
in an instruction, where 62h is compared to the local variable
var_4. If you were to right-click 62h, you would be presented with options to change the 62h into 98 in decimal, 142o in octal,
1100010b in binary, or the character b in
ASCII—whatever suits your needs and your situation.
To change whether an operand references memory or stays as data, press the O key on your
keyboard. For example, suppose when you’re analyzing disassembly with a link to loc_410000, you trace the link back and see the following
instructions:
mov eax, loc_410000
add ebx, eax
mul ebx
At the assembly level, everything is a number, but IDA Pro has mislabeled the number 4259840 (0x410000 in hex) as a reference to the address 410000. To correct this mistake, press the O key to change this address to the number 410000h and remove the offending cross-reference from the disassembly window.
Malware authors (and programmers in general) often use named
constants such as GENERIC_READ in their source code.
Named constants provide an easily remembered name for the programmer, but they are implemented as an
integer in the binary. Unfortunately, once the compiler is done with the source code, it is no
longer possible to determine whether the source used a symbolic constant or a literal.
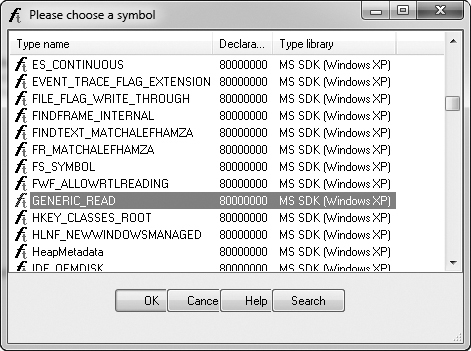
Fortunately, IDA Pro provides a large catalog of named constants for the Windows API and the C
standard library, and you can use the Use Standard Symbolic Constant option (shown in Figure 5-10) on an operand in your disassembly. Figure 5-11 shows the window that appears when you select Use
Standard Symbolic Constant on the value 0x800000000.
The code snippets in Table 5-3 show the effect
of applying the standard symbolic constants for a Windows API call to CreateFileA. Note how much more meaningful the code is on the right.
Note
To determine which value to choose from the often extensive list provided in the standard symbolic constant window, you will need to go to the MSDN page for the Windows API call. There you will see the symbolic constants that are associated with each parameter. We will discuss this further in Chapter 7, when we discuss Windows concepts.
Sometimes a particular standard symbolic constant that you want will not appear, and you will
need to load the relevant type library manually. To do so, select View
▶ Open Subviews ▶ Type Libraries to view the currently loaded libraries.
Normally, mssdk and vc6win
will automatically be loaded, but if not, you can load them manually (as is often necessary with
malware that uses the Native API, the Windows NT family API). To get the symbolic constants for the
Native API, load ntapi (the Microsoft Windows NT 4.0 Native API).
In the same vein, when analyzing a Linux binary, you may need to manually load the gnuunx (GNU C++ UNIX) libraries.
Table 5-3. Code Before and After Standard Symbolic Constants
When IDA Pro performs its initial disassembly of a program, bytes are occasionally categorized incorrectly; code may be defined as data, data defined as code, and so on. The most common way to redefine code in the disassembly window is to press the U key to undefine functions, code, or data. When you undefine code, the underlying bytes will be reformatted as a list of raw bytes.
To define the raw bytes as code, press C. For example, Table 5-4 shows a malicious PDF document named paycuts.pdf. At offset 0x8387 into the file, we discover shellcode (defined as raw bytes) at ❶, so we press C at that location. This disassembles the shellcode and allows us to discover that it contains an XOR decoding loop with 0x97 at ❷.
Depending on your goals, you can similarly define raw bytes as data or ASCII strings by pressing D or A, respectively.