Table of Contents for
Practical Malware Analysis
 Practical Malware Analysis
Published by
No Starch Press, 2012
Practical Malware Analysis
Published by
No Starch Press, 2012
- Cover
- Practical Malware Analysis: The Hands-On Guide to Dissecting Malicious Software
- Praise for Practical Malware Analysis
- Warning
- About the Authors
- About the Technical Reviewer
- About the Contributing Authors
- Foreword
- Acknowledgments
- Individual Thanks
- Introduction
- What Is Malware Analysis?
- Prerequisites
- Practical, Hands-On Learning
- What’s in the Book?
- 0. Malware Analysis Primer
- The Goals of Malware Analysis
- Malware Analysis Techniques
- Types of Malware
- General Rules for Malware Analysis
- I. Basic Analysis
- 1. Basic Static Techniques
- Antivirus Scanning: A Useful First Step
- Hashing: A Fingerprint for Malware
- Finding Strings
- Packed and Obfuscated Malware
- Portable Executable File Format
- Linked Libraries and Functions
- Static Analysis in Practice
- The PE File Headers and Sections
- Conclusion
- Labs
- 2. Malware Analysis in Virtual Machines
- The Structure of a Virtual Machine
- Creating Your Malware Analysis Machine
- Using Your Malware Analysis Machine
- The Risks of Using VMware for Malware Analysis
- Record/Replay: Running Your Computer in Reverse
- Conclusion
- 3. Basic Dynamic Analysis
- Sandboxes: The Quick-and-Dirty Approach
- Running Malware
- Monitoring with Process Monitor
- Viewing Processes with Process Explorer
- Comparing Registry Snapshots with Regshot
- Faking a Network
- Packet Sniffing with Wireshark
- Using INetSim
- Basic Dynamic Tools in Practice
- Conclusion
- Labs
- II. Advanced Static Analysis
- 4. A Crash Course in x86 Disassembly
- Levels of Abstraction
- Reverse-Engineering
- The x86 Architecture
- Conclusion
- 5. IDA Pro
- Loading an Executable
- The IDA Pro Interface
- Using Cross-References
- Analyzing Functions
- Using Graphing Options
- Enhancing Disassembly
- Extending IDA with Plug-ins
- Conclusion
- Labs
- 6. Recognizing C Code Constructs in Assembly
- Global vs. Local Variables
- Disassembling Arithmetic Operations
- Recognizing if Statements
- Recognizing Loops
- Understanding Function Call Conventions
- Analyzing switch Statements
- Disassembling Arrays
- Identifying Structs
- Analyzing Linked List Traversal
- Conclusion
- Labs
- 7. Analyzing Malicious Windows Programs
- The Windows API
- The Windows Registry
- Networking APIs
- Following Running Malware
- Kernel vs. User Mode
- The Native API
- Conclusion
- Labs
- III. Advanced Dynamic Analysis
- 8. Debugging
- Source-Level vs. Assembly-Level Debuggers
- Kernel vs. User-Mode Debugging
- Using a Debugger
- Exceptions
- Modifying Execution with a Debugger
- Modifying Program Execution in Practice
- Conclusion
- 9. OllyDbg
- Loading Malware
- The OllyDbg Interface
- Memory Map
- Viewing Threads and Stacks
- Executing Code
- Breakpoints
- Loading DLLs
- Tracing
- Exception Handling
- Patching
- Analyzing Shellcode
- Assistance Features
- Plug-ins
- Scriptable Debugging
- Conclusion
- Labs
- 10. Kernel Debugging with WinDbg
- Drivers and Kernel Code
- Setting Up Kernel Debugging
- Using WinDbg
- Microsoft Symbols
- Kernel Debugging in Practice
- Rootkits
- Loading Drivers
- Kernel Issues for Windows Vista, Windows 7, and x64 Versions
- Conclusion
- Labs
- IV. Malware Functionality
- 11. Malware Behavior
- Downloaders and Launchers
- Backdoors
- Credential Stealers
- Persistence Mechanisms
- Privilege Escalation
- Covering Its Tracks—User-Mode Rootkits
- Conclusion
- Labs
- 12. Covert Malware Launching
- Launchers
- Process Injection
- Process Replacement
- Hook Injection
- Detours
- APC Injection
- Conclusion
- Labs
- 13. Data Encoding
- The Goal of Analyzing Encoding Algorithms
- Simple Ciphers
- Common Cryptographic Algorithms
- Custom Encoding
- Decoding
- Conclusion
- Labs
- 14. Malware-Focused Network Signatures
- Network Countermeasures
- Safely Investigate an Attacker Online
- Content-Based Network Countermeasures
- Combining Dynamic and Static Analysis Techniques
- Understanding the Attacker’s Perspective
- Conclusion
- Labs
- V. Anti-Reverse-Engineering
- 15. Anti-Disassembly
- Understanding Anti-Disassembly
- Defeating Disassembly Algorithms
- Anti-Disassembly Techniques
- Obscuring Flow Control
- Thwarting Stack-Frame Analysis
- Conclusion
- Labs
- 16. Anti-Debugging
- Windows Debugger Detection
- Identifying Debugger Behavior
- Interfering with Debugger Functionality
- Debugger Vulnerabilities
- Conclusion
- Labs
- 17. Anti-Virtual Machine Techniques
- VMware Artifacts
- Vulnerable Instructions
- Tweaking Settings
- Escaping the Virtual Machine
- Conclusion
- Labs
- 18. Packers and Unpacking
- Packer Anatomy
- Identifying Packed Programs
- Unpacking Options
- Automated Unpacking
- Manual Unpacking
- Tips and Tricks for Common Packers
- Analyzing Without Fully Unpacking
- Packed DLLs
- Conclusion
- Labs
- VI. Special Topics
- 19. Shellcode Analysis
- Loading Shellcode for Analysis
- Position-Independent Code
- Identifying Execution Location
- Manual Symbol Resolution
- A Full Hello World Example
- Shellcode Encodings
- NOP Sleds
- Finding Shellcode
- Conclusion
- Labs
- 20. C++ Analysis
- Object-Oriented Programming
- Virtual vs. Nonvirtual Functions
- Creating and Destroying Objects
- Conclusion
- Labs
- 21. 64-Bit Malware
- Why 64-Bit Malware?
- Differences in x64 Architecture
- Windows 32-Bit on Windows 64-Bit
- 64-Bit Hints at Malware Functionality
- Conclusion
- Labs
- A. Important Windows Functions
- B. Tools for Malware Analysis
- C. Solutions to Labs
- Lab 1-1 Solutions
- Lab 1-2 Solutions
- Lab 1-3 Solutions
- Lab 1-4 Solutions
- Lab 3-1 Solutions
- Lab 3-2 Solutions
- Lab 3-3 Solutions
- Lab 3-4 Solutions
- Lab 5-1 Solutions
- Lab 6-1 Solutions
- Lab 6-2 Solutions
- Lab 6-3 Solutions
- Lab 6-4 Solutions
- Lab 7-1 Solutions
- Lab 7-2 Solutions
- Lab 7-3 Solutions
- Lab 9-1 Solutions
- Lab 9-2 Solutions
- Lab 9-3 Solutions
- Lab 10-1 Solutions
- Lab 10-2 Solutions
- Lab 10-3 Solutions
- Lab 11-1 Solutions
- Lab 11-2 Solutions
- Lab 11-3 Solutions
- Lab 12-1 Solutions
- Lab 12-2 Solutions
- Lab 12-3 Solutions
- Lab 12-4 Solutions
- Lab 13-1 Solutions
- Lab 13-2 Solutions
- Lab 13-3 Solutions
- Lab 14-1 Solutions
- Lab 14-2 Solutions
- Lab 14-3 Solutions
- Lab 15-1 Solutions
- Lab 15-2 Solutions
- Lab 15-3 Solutions
- Lab 16-1 Solutions
- Lab 16-2 Solutions
- Lab 16-3 Solutions
- Lab 17-1 Solutions
- Lab 17-2 Solutions
- Lab 17-3 Solutions
- Lab 18-1 Solutions
- Lab 18-2 Solutions
- Lab 18-3 Solutions
- Lab 18-4 Solutions
- Lab 18-5 Solutions
- Lab 19-1 Solutions
- Lab 19-2 Solutions
- Lab 19-3 Solutions
- Lab 20-1 Solutions
- Lab 20-2 Solutions
- Lab 20-3 Solutions
- Lab 21-1 Solutions
- Lab 21-2 Solutions
- Index
- Index
- Index
- Index
- Index
- Index
- Index
- Index
- Index
- Index
- Index
- Index
- Index
- Index
- Index
- Index
- Index
- Index
- Index
- Index
- Index
- Index
- Index
- Index
- Index
- Index
- Index
- Updates
- About the Authors
- Copyright
PE file headers can provide considerably more information than just imports. The PE file format contains a header followed by a series of sections. The header contains metadata about the file itself. Following the header are the actual sections of the file, each of which contains useful information. As we progress through the book, we will continue to discuss strategies for viewing the information in each of these sections. The following are the most common and interesting sections in a PE file:
.text. The.textsection contains the instructions that the CPU executes. All other sections store data and supporting information. Generally, this is the only section that can execute, and it should be the only section that includes code..rdata. The.rdatasection typically contains the import and export information, which is the same information available from both Dependency Walker and PEview. This section can also store other read-only data used by the program. Sometimes a file will contain an.idataand.edatasection, which store the import and export information (see Table 1-4)..data. The.datasection contains the program’s global data, which is accessible from anywhere in the program. Local data is not stored in this section, or anywhere else in the PE file. (We address this topic in Chapter 6.).rsrc. The.rsrcsection includes the resources used by the executable that are not considered part of the executable, such as icons, images, menus, and strings. Strings can be stored either in the.rsrcsection or in the main program, but they are often stored in the.rsrcsection for multilanguage support.
Section names are often consistent across a compiler, but can vary across different compilers.
For example, Visual Studio uses .text for executable code, but
Borland Delphi uses CODE. Windows doesn’t care about the
actual name since it uses other information in the PE header to determine how a section is used.
Furthermore, the section names are sometimes obfuscated to make analysis more difficult. Luckily,
the default names are used most of the time. Table 1-4 lists the most common you’ll
encounter.
Table 1-4. Sections of a PE File for a Windows Executable
Executable | Description |
|---|---|
| Contains the executable code |
| Holds read-only data that is globally accessible within the program |
| Stores global data accessed throughout the program |
| Sometimes present and stores the import function information; if this
section is not present, the import function information is stored in the |
| Sometimes present and stores the export function information; if this
section is not present, the export function information is stored in the |
| Present only in 64-bit executables and stores exception-handling information |
| Stores resources needed by the executable |
| Contains information for relocation of library files |
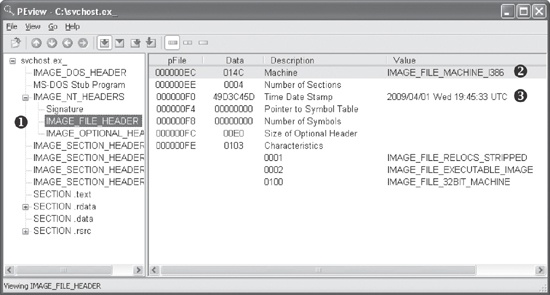
The PE file format stores interesting information within its header. We can use the PEview tool to browse through the information, as shown in Figure 1-7.
In the figure, the left pane at ❶ displays the
main parts of a PE header. The IMAGE_FILE_HEADER entry is
highlighted because it is currently selected.
The first two parts of the PE header—the IMAGE_DOS_HEADER and MS-DOS Stub Program—are historical and offer no information of
particular interest to us.
The next section of the PE header, IMAGE_NT_HEADERS, shows
the NT headers. The signature is always the same and can be ignored.
The IMAGE_FILE_HEADER entry, highlighted and displayed in
the right panel at ❷, contains basic information about
the file. The Time Date Stamp description at ❸ tells us when this
executable was compiled, which can be very useful in malware analysis and incident response. For
example, an old compile time suggests that this is an older attack, and antivirus programs might
contain signatures for the malware. A new compile time suggests the reverse.
That said, the compile time is a bit problematic. All Delphi programs use a compile time of June 19, 1992. If you see that compile time, you’re probably looking at a Delphi program, and you won’t really know when it was compiled. In addition, a competent malware writer can easily fake the compile time. If you see a compile time that makes no sense, it probably was faked.
The IMAGE_OPTIONAL_HEADER section includes several
important pieces of information. The Subsystem description indicates whether this is a console or
GUI program. Console programs have the value IMAGE_SUBSYSTEM_WINDOWS_CUI and run inside a command window. GUI programs have the value
IMAGE_SUBSYSTEM_WINDOWS_GUI and run within the Windows system.
Less common subsystems such as Native or Xbox also are used.
The most interesting information comes from the section headers, which are in IMAGE_SECTION_HEADER, as shown in Figure 1-8. These headers are used to describe each
section of a PE file. The compiler generally creates and names the sections of an executable, and
the user has little control over these names. As a result, the sections are usually consistent from
executable to executable (see Table 1-4), and any
deviations may be suspicious.
For example, in Figure 1-8, Virtual Size at ❶ tells us how much space is allocated for a section during the loading process. The Size of Raw Data at ❷ shows how big the section is on disk. These two values should usually be equal, because data should take up just as much space on the disk as it does in memory. Small differences are normal, and are due to differences between alignment in memory and on disk.
The section sizes can be useful in detecting packed executables. For example, if the Virtual
Size is much larger than the Size of Raw Data, you know that the section takes up more space in
memory than it does on disk. This is often indicative of packed code, particularly if the .text section is larger in memory than on disk.
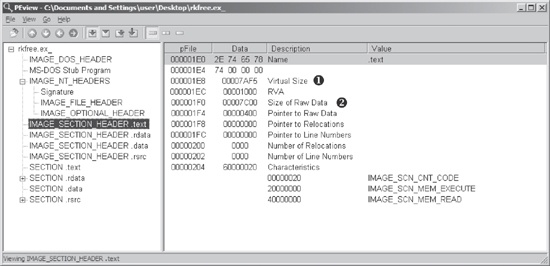
Table 1-5 shows the sections from
PotentialKeylogger.exe. As you can see, the .text, .rdata, and .rsrc sections each has a Virtual Size and Size of Raw Data value of about the same size.
The .data section may seem suspicious because it has a much
larger virtual size than raw data size, but this is normal for the .data section in Windows programs. But note that this information alone does not tell us
that the program is not malicious; it simply shows that it is likely not packed and that the PE file
header was generated by a compiler.
Table 1-5. Section Information for PotentialKeylogger.exe
Section | Virtual size | Size of raw data |
|---|---|---|
| 7AF5 | 7C00 |
| 17A0 | 0200 |
| 1AF5 | 1C00 |
| 72B8 | 7400 |
Table 1-6 shows the sections from
PackedProgram.exe. The sections in this file have a number of anomalies: The
sections named Dijfpds, .sdfuok, and Kijijl are unusual, and the .text, .data, and .rdata sections are suspicious. The .text section has a Size of Raw Data value of 0, meaning that it takes up no space on
disk, and its Virtual Size value is A000, which means that space will be allocated for the .text segment. This tells us that a packer will unpack the executable code
to the allocated .text section.
Now that we’re finished looking at the header for the PE file, we can look at some of
the sections. The only section we can examine without additional knowledge from later chapters is
the resource section. You can use the free Resource Hacker tool found at http://www.angusj.com/ to browse the .rsrc
section. When you click through the items in Resource Hacker, you’ll see the strings, icons,
and menus. The menus displayed are identical to what the program uses. Figure 1-9 shows the Resource Hacker display for the
Windows Calculator program, calc.exe.
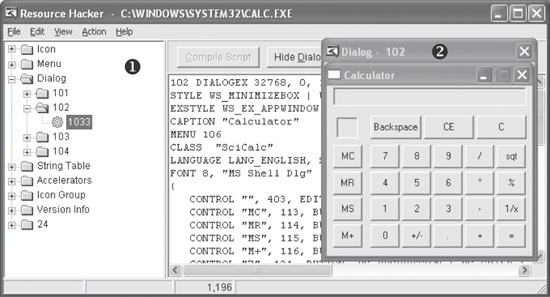
The panel on the left shows all resources included in this executable. Each root folder shown in the left pane at ❶ stores a different type of resource. The informative sections for malware analysis include:
The Icon section lists images shown when the executable is in a file listing.
The Menu section stores all menus that appear in various windows, such as the File, Edit, and View menus. This section contains the names of all the menus, as well as the text shown for each. The names should give you a good idea of their functionality.
The Dialog section contains the program’s dialog menus. The dialog at ❷ shows what the user will see when running calc.exe. If we knew nothing else about calc.exe, we could identify it as a calculator program simply by looking at this dialog menu.
The String Table section stores strings.
The Version Info section contains a version number and often the company name and a copyright statement.
The .rsrc section shown in Figure 1-9 is typical of Windows applications and can
include whatever a programmer requires.
Many other tools are available for browsing a PE header. Two of the most useful tools are PEBrowse Professional and PE Explorer.
PEBrowse Professional (http://www.smidgeonsoft.prohosting.com/pebrowse-profile-viewer.html) is similar
to PEview. It allows you to look at the bytes from each section and shows the parsed data. PEBrowse
Professional does the better job of presenting information from the resource (.rsrc) section.
PE Explorer (http://www.heaventools.com/) has a rich GUI that allows you to navigate through the various parts of the PE file. You can edit certain parts of the PE file, and its included resource editor is great for browsing and editing the file’s resources. The tool’s main drawback is that it is not free.
The PE header contains useful information for the malware analyst, and we will continue to examine it in subsequent chapters. Table 1-7 reviews the key information that can be obtained from a PE header.
Table 1-7. Information in the PE Header
Field | Information revealed |
|---|---|
Imports | Functions from other libraries that are used by the malware |
Exports | Functions in the malware that are meant to be called by other programs or libraries |
Time Date Stamp | Time when the program was compiled |
Sections | Names of sections in the file and their sizes on disk and in memory |
Subsystem | Indicates whether the program is a command-line or GUI application |
Resources | Strings, icons, menus, and other information included in the file |