Table of Contents for
Practical Malware Analysis
 Practical Malware Analysis
Published by
No Starch Press, 2012
Practical Malware Analysis
Published by
No Starch Press, 2012
- Cover
- Practical Malware Analysis: The Hands-On Guide to Dissecting Malicious Software
- Praise for Practical Malware Analysis
- Warning
- About the Authors
- About the Technical Reviewer
- About the Contributing Authors
- Foreword
- Acknowledgments
- Individual Thanks
- Introduction
- What Is Malware Analysis?
- Prerequisites
- Practical, Hands-On Learning
- What’s in the Book?
- 0. Malware Analysis Primer
- The Goals of Malware Analysis
- Malware Analysis Techniques
- Types of Malware
- General Rules for Malware Analysis
- I. Basic Analysis
- 1. Basic Static Techniques
- Antivirus Scanning: A Useful First Step
- Hashing: A Fingerprint for Malware
- Finding Strings
- Packed and Obfuscated Malware
- Portable Executable File Format
- Linked Libraries and Functions
- Static Analysis in Practice
- The PE File Headers and Sections
- Conclusion
- Labs
- 2. Malware Analysis in Virtual Machines
- The Structure of a Virtual Machine
- Creating Your Malware Analysis Machine
- Using Your Malware Analysis Machine
- The Risks of Using VMware for Malware Analysis
- Record/Replay: Running Your Computer in Reverse
- Conclusion
- 3. Basic Dynamic Analysis
- Sandboxes: The Quick-and-Dirty Approach
- Running Malware
- Monitoring with Process Monitor
- Viewing Processes with Process Explorer
- Comparing Registry Snapshots with Regshot
- Faking a Network
- Packet Sniffing with Wireshark
- Using INetSim
- Basic Dynamic Tools in Practice
- Conclusion
- Labs
- II. Advanced Static Analysis
- 4. A Crash Course in x86 Disassembly
- Levels of Abstraction
- Reverse-Engineering
- The x86 Architecture
- Conclusion
- 5. IDA Pro
- Loading an Executable
- The IDA Pro Interface
- Using Cross-References
- Analyzing Functions
- Using Graphing Options
- Enhancing Disassembly
- Extending IDA with Plug-ins
- Conclusion
- Labs
- 6. Recognizing C Code Constructs in Assembly
- Global vs. Local Variables
- Disassembling Arithmetic Operations
- Recognizing if Statements
- Recognizing Loops
- Understanding Function Call Conventions
- Analyzing switch Statements
- Disassembling Arrays
- Identifying Structs
- Analyzing Linked List Traversal
- Conclusion
- Labs
- 7. Analyzing Malicious Windows Programs
- The Windows API
- The Windows Registry
- Networking APIs
- Following Running Malware
- Kernel vs. User Mode
- The Native API
- Conclusion
- Labs
- III. Advanced Dynamic Analysis
- 8. Debugging
- Source-Level vs. Assembly-Level Debuggers
- Kernel vs. User-Mode Debugging
- Using a Debugger
- Exceptions
- Modifying Execution with a Debugger
- Modifying Program Execution in Practice
- Conclusion
- 9. OllyDbg
- Loading Malware
- The OllyDbg Interface
- Memory Map
- Viewing Threads and Stacks
- Executing Code
- Breakpoints
- Loading DLLs
- Tracing
- Exception Handling
- Patching
- Analyzing Shellcode
- Assistance Features
- Plug-ins
- Scriptable Debugging
- Conclusion
- Labs
- 10. Kernel Debugging with WinDbg
- Drivers and Kernel Code
- Setting Up Kernel Debugging
- Using WinDbg
- Microsoft Symbols
- Kernel Debugging in Practice
- Rootkits
- Loading Drivers
- Kernel Issues for Windows Vista, Windows 7, and x64 Versions
- Conclusion
- Labs
- IV. Malware Functionality
- 11. Malware Behavior
- Downloaders and Launchers
- Backdoors
- Credential Stealers
- Persistence Mechanisms
- Privilege Escalation
- Covering Its Tracks—User-Mode Rootkits
- Conclusion
- Labs
- 12. Covert Malware Launching
- Launchers
- Process Injection
- Process Replacement
- Hook Injection
- Detours
- APC Injection
- Conclusion
- Labs
- 13. Data Encoding
- The Goal of Analyzing Encoding Algorithms
- Simple Ciphers
- Common Cryptographic Algorithms
- Custom Encoding
- Decoding
- Conclusion
- Labs
- 14. Malware-Focused Network Signatures
- Network Countermeasures
- Safely Investigate an Attacker Online
- Content-Based Network Countermeasures
- Combining Dynamic and Static Analysis Techniques
- Understanding the Attacker’s Perspective
- Conclusion
- Labs
- V. Anti-Reverse-Engineering
- 15. Anti-Disassembly
- Understanding Anti-Disassembly
- Defeating Disassembly Algorithms
- Anti-Disassembly Techniques
- Obscuring Flow Control
- Thwarting Stack-Frame Analysis
- Conclusion
- Labs
- 16. Anti-Debugging
- Windows Debugger Detection
- Identifying Debugger Behavior
- Interfering with Debugger Functionality
- Debugger Vulnerabilities
- Conclusion
- Labs
- 17. Anti-Virtual Machine Techniques
- VMware Artifacts
- Vulnerable Instructions
- Tweaking Settings
- Escaping the Virtual Machine
- Conclusion
- Labs
- 18. Packers and Unpacking
- Packer Anatomy
- Identifying Packed Programs
- Unpacking Options
- Automated Unpacking
- Manual Unpacking
- Tips and Tricks for Common Packers
- Analyzing Without Fully Unpacking
- Packed DLLs
- Conclusion
- Labs
- VI. Special Topics
- 19. Shellcode Analysis
- Loading Shellcode for Analysis
- Position-Independent Code
- Identifying Execution Location
- Manual Symbol Resolution
- A Full Hello World Example
- Shellcode Encodings
- NOP Sleds
- Finding Shellcode
- Conclusion
- Labs
- 20. C++ Analysis
- Object-Oriented Programming
- Virtual vs. Nonvirtual Functions
- Creating and Destroying Objects
- Conclusion
- Labs
- 21. 64-Bit Malware
- Why 64-Bit Malware?
- Differences in x64 Architecture
- Windows 32-Bit on Windows 64-Bit
- 64-Bit Hints at Malware Functionality
- Conclusion
- Labs
- A. Important Windows Functions
- B. Tools for Malware Analysis
- C. Solutions to Labs
- Lab 1-1 Solutions
- Lab 1-2 Solutions
- Lab 1-3 Solutions
- Lab 1-4 Solutions
- Lab 3-1 Solutions
- Lab 3-2 Solutions
- Lab 3-3 Solutions
- Lab 3-4 Solutions
- Lab 5-1 Solutions
- Lab 6-1 Solutions
- Lab 6-2 Solutions
- Lab 6-3 Solutions
- Lab 6-4 Solutions
- Lab 7-1 Solutions
- Lab 7-2 Solutions
- Lab 7-3 Solutions
- Lab 9-1 Solutions
- Lab 9-2 Solutions
- Lab 9-3 Solutions
- Lab 10-1 Solutions
- Lab 10-2 Solutions
- Lab 10-3 Solutions
- Lab 11-1 Solutions
- Lab 11-2 Solutions
- Lab 11-3 Solutions
- Lab 12-1 Solutions
- Lab 12-2 Solutions
- Lab 12-3 Solutions
- Lab 12-4 Solutions
- Lab 13-1 Solutions
- Lab 13-2 Solutions
- Lab 13-3 Solutions
- Lab 14-1 Solutions
- Lab 14-2 Solutions
- Lab 14-3 Solutions
- Lab 15-1 Solutions
- Lab 15-2 Solutions
- Lab 15-3 Solutions
- Lab 16-1 Solutions
- Lab 16-2 Solutions
- Lab 16-3 Solutions
- Lab 17-1 Solutions
- Lab 17-2 Solutions
- Lab 17-3 Solutions
- Lab 18-1 Solutions
- Lab 18-2 Solutions
- Lab 18-3 Solutions
- Lab 18-4 Solutions
- Lab 18-5 Solutions
- Lab 19-1 Solutions
- Lab 19-2 Solutions
- Lab 19-3 Solutions
- Lab 20-1 Solutions
- Lab 20-2 Solutions
- Lab 20-3 Solutions
- Lab 21-1 Solutions
- Lab 21-2 Solutions
- Index
- Index
- Index
- Index
- Index
- Index
- Index
- Index
- Index
- Index
- Index
- Index
- Index
- Index
- Index
- Index
- Index
- Index
- Index
- Index
- Index
- Index
- Index
- Index
- Index
- Index
- Index
- Updates
- About the Authors
- Copyright
Lab13-02.exe creates large, seemingly random files in its current directory with names that start with temp and end with eight hexadecimal digits that vary for each file.
The XOR search technique identifies potential encoding-related functions at
sub_401570andsub_401739. The other three techniques suggested find nothing.The encoding functions might be found just before the call to
WriteFile.The encoding function is
sub_40181F.The source content is a screen capture.
The algorithm is nonstandard and not easily determined, so the easiest way to decode traffic is via instrumentation.
See the detailed analysis for how to recover the original source of an encoded file.
We launch the malware and see that it creates new files at a regular interval in its current directory. These files are fairly large (multiple megabytes) and contain seemingly random data with filenames that start with temp and end with some random-looking characters, something like the ones shown in Example C-101.
Example C-101. Example filenames created by Lab13-02.exe
temp062da212
temp062dcb25
temp062df572
temp062e1f50
temp062e491f
Next, we search the malware for evidence of encoding techniques using static analysis. The
PEiD KANAL plug-in, FindCrypt2 plug-in for IDA Pro, and IDA Entropy Plugin fail to find anything of
interest. However, a search for xor instructions yields the
results shown in Table C-5.
Table C-5. The xor Instructions Found in
Lab13-02.exe
Address | Function | Instruction | |
|---|---|---|---|
00401040 |
|
|
|
004012D6 |
|
|
|
0040171F | ❺ |
|
|
0040176F |
|
|
|
0040177A |
|
|
|
00401785 |
|
|
|
00401795 |
|
|
|
004017A1 |
|
|
|
004017AC |
|
|
|
004017BD |
|
|
|
004017C9 |
|
|
|
004017D4 |
|
|
|
004017E5 |
|
|
|
004017F1 |
|
|
|
004017FC |
|
|
|
0040191E |
|
|
|
0040311A |
|
| |
0040311E |
|
| |
00403688 |
|
| |
004036A5 |
|
| |
The instructions labeled ❶ in Table C-5 represent the clearing of a register and can be
ignored. The instructions labeled ❷ are contained in
library functions and can also be ignored. We are left with two functions of interest: sub_40128D
❸ and sub_401739
❹. Additionally, at 0x0040171F is in an area of code
❺ that has not been defined as a function.
We’ll refer to sub_401739 as heavy_xor since it has so many xor instructions, and
sub_40128D as single_xor since
it has only one. heavy_xor takes four arguments, and it is a
single loop with a large block of code containing many SHL and
SHR instructions in addition to the xor instructions. Looking at the functions called by heavy_xor, we see that single_xor is related to
heavy_xor since the caller of single_xor is also called by heavy_xor, as shown in
Figure C-48.
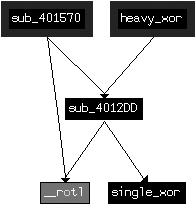
Looking at the xor instruction at ❺ in Table C-5
(0x0040171F), we see that it is in a function, but the function was not automatically identified due
to lack of use. Defining a function at 0x00401570 results in the creation of a function that
encompasses the previously orphaned xor instruction. As seen in
Figure C-48, this unused function is also related to the
same cluster of likely encoding functions.
To confirm that heavy_xor is the encoding function,
let’s see how it is related to the temp files that were written to disk.
We can find where the data is written to disk, and then trace backward to determine if and how
encoding functions are used. Looking at the imported functions, we see WriteFile.
Checking the cross-references to WriteFile, we find
sub_401000, which takes as arguments a buffer, a length, and a
filename, and opens the file and writes the buffer to the file. We’ll rename sub_401000 to writeBufferToFile. sub_401851 is the only function that calls writeBufferToFile, and Example C-102 shows the contents of
sub_401851 (which we rename doStuffAndWriteFile), leading up to the call to writeBufferToFile at ❶.
Example C-102. Writing encrypted files
lea     eax, [ebp+nNumberOfBytesToWrite]
push    eax
lea     ecx, [ebp+lpBuffer]
push    ecx
call    sub_401070 ❷   ; renamed to getContent
add     esp, 8
mov     edx, [ebp+nNumberOfBytesToWrite]
push    edx
mov     eax, [ebp+lpBuffer]
push    eax
call    sub_40181F ❸   ; renamed to encodingWrapper
add     esp, 8
call    ds:GetTickCount ❺
mov     [ebp+var_4], eax
mov     ecx, [ebp+var_4]
push    ecx
push    offset Format   ; "temp%08x" ❹
lea     edx, [ebp+FileName]
push    edx             ; Dest
call    _sprintf
add     esp, 0Ch
lea     eax, [ebp+FileName] ❻
push    eax             ; lpFileName
mov     ecx, [ebp+nNumberOfBytesToWrite]
push    ecx             ; nNumberOfBytesToWrite
mov     edx, [ebp+lpBuffer]
push    edx             ; lpBuffer
call    writeBufferToFile ❶
Working from the start of Example C-102, we see two function calls
to sub_401070 at ❷
and sub_40181F at ❸
that both use the buffer and length as arguments. The format string "temp%08x" at ❹ combined with the result of
GetTickCount at ❺
reveals the source of the filename, which is the current time printed in hexadecimal. IDA Pro has
labeled the filename, as indicated at ❻. From the code
in Example C-102, a good hypothesis is that sub_401070 at ❷ is used to fetch some content
(let’s call it getContent), and that sub_40181F at ❸ is used to
encrypt the contents (which we’ll rename encodingWrapper).
Looking first at our hypothesized encoding function encodingWrapper (at 0x0040181F), we see that it is merely a wrapper for heavy_xor. This confirms that the functions depicted in Figure C-48 are our encoding functions. The function encodingWrapper sets up four arguments for the encoding: a local variable
that is cleared before use, two pointers both pointing to the same buffer that is passed in from
doStuffAndWriteFile, and a buffer size that is also passed in
from doStuffAndWriteFile. The two pointers pointing to the same
buffer suggest that the encoding function takes source and destination buffers along with a
length, and that, in this case, the encoding is performed in place.
Next, we identify the source of the content that is encoded and written to disk. As we
mentioned earlier, the function getContent (at 0x00401070)
appears to acquire some content. Looking at getContent, we see a
single block of code with numerous system functions, as shown in Example C-103.
Example C-103. Windows API functions called in getContent (sub_401070)
GetSystemMetricsGetDesktopWindowGetDC CreateCompatibleDC CreateCompatibleBitmap SelectObjectBitBltGetObjectA GlobalAlloc GlobalLockGetDIBits_memcpy GlobalUnlock GlobalFree ReleaseDC DeleteDC DeleteObject
Based on this list, it is a good guess that this function is trying to capture the screen.
Notably, GetDesktopWindow (bolded) gets a handle to the desktop
window that covers the entire screen, and the functions BitBlt
and GetDIBits (also bolded) are related to retrieving bitmap
information and copying it to a buffer.
We conclude that the malware repeatedly takes snapshots of the user’s desktop and writes an encrypted version of the screen capture to a file.
In order to verify our conclusion, we can take one of the captured files, run it back through the encryption algorithm, and retrieve the originally captured image. (This assumes that the algorithm is a stream cipher and that encryption is reversible; that is, encryption and decryption do the same thing). Since we have few clues about the algorithm used, the easiest way to implement this is to use instrumentation and let the code perform the decoding for us.
Since the code already has instructions that take a buffer, encrypt it, and then write it to a file, we’ll reuse them as follows:
Let the program run as normal until just before encryption.
Replace the buffer holding the screen capture with a buffer holding a previously saved file that we wish to decrypt.
Let the program write the output to the temporary filename based on the current time.
Break the program after the first file is written.
We can implement this strategy manually using OllyDbg or use a script-based approach to provide more flexibility. We’ll look at the manual approach first.
We can implement the instrumentation strategy using OllyDbg by identifying two key
breakpoints. The first will be just before encoding, so we can use 0x00401880 as the breakpoint,
where the call to encodingWrapper occurs (❸ in Example C-102). The second
breakpoint will be after the first file is written, so we set it at 0x0040190A.
After starting the malware with OllyDbg, setting the breakpoints, and running the program, the malware will stop at the first breakpoint (0x00401880). At this point, the arguments on the stack represent the buffer to be encrypted and its length.
Right-click the top value on the stack in the stack pane (the value located at ESP) and select Follow in Dump. Next, open one of the encrypted files that the malware created in WinHex and select Edit ▸ Copy All ▸ Hex Values. Then, in OllyDbg, select the values from the top of the dump pane to the end of the memory block (OllyDbg requires the entire target area to be selected before allowing you to paste content). This selection represents the buffer that is about to be encoded, which we will now fill with the contents of the file. (Don’t worry if the memory block is longer than the buffer size; OllyDbg will paste the content only up to the length of the file.)
Now right-click the Hex dump portion of the dump pane and
select Binary ▸ Binary Paste. (If you’re using an
editor that allows you to copy binary values directly, paste into the ASCII portion of the dump pane instead.) With the buffer prepared, run OllyDbg until the
final breakpoint, and then check the malware’s directory for a new file with the same naming
convention as the previously created ones. Give this file a .bmp extension and
open it. You should see a screenshot that was taken while the malware was running.
Note
Ensure that the file size is the same as that of the second argument passed to the encryption function. If you didn’t change the screen resolution between the initial malware run and this decryption run, the sizes should be the same. If the file size is larger than the memory buffer, this technique may fail.
In order to implement the instrumentation strategy more generically (in a way that does not depend on available buffer sizes), we use the Python-based debugger API in Immunity Debugger (ImmDbg), as discussed in Scriptable Debugging, as well as in Chapter 13. We create the Python script shown in Example C-104 by saving the file with a .py extension in the PyScripts folder under the ImmDbg installation directory.
Note
Customize the example filename (C:\\temp062da212) opened and
assigned to cfile at ❶ in Example C-104 based on your
environment.
Example C-104. ImmDbg decryption script
#!/usr/bin/env python

import immlib
def main():
    imm = immlib.Debugger()
    imm.setBreakpoint(0x00401875)             # break just before pushing args for encoding
    imm.Run()                                 # Execute until breakpoint before crypto
    cfile = open("C:\\temp062da212",'rb') ❶
    buffer = cfile.read()                     # Read encrypted file into buffer
    sz = len (buffer)
    membuf = imm.remoteVirtualAlloc(sz) ❷     # Allocate memory within debugger process
    imm.writeMemory(membuf,buffer)
    regs = imm.getRegs()
    imm.writeLong(regs['EBP']-12, membuf) ❸   # Set stack variables
    imm.writeLong(regs['EBP']-8, sz)
    imm.setBreakpoint(0x0040190A)             # after single loop
    imm.Run()
As you can see in Example C-104, the first breakpoint stops
execution just before the arguments are pushed on the stack. The open call at ❶ opens the encrypted file that
has already been written to the filesystem. The next few lines read the file into memory and
calculate the size of the buffer. The remoteVirtualAlloc call at
❷ is used to create an appropriately sized buffer in the
memory of the running process, and writeMemory is used to copy
the file contents into that new buffer. The two writeLong calls
at ❸ replace the stack variables for the buffer to be
encrypted and its size. The next few instructions push those variables onto the stack to be used for
the following encryption routine and the writing of the file.
Open the malware in ImmDbg, choose ImmLib ▸ Run Python Script, and then select the script that has been created. The script should run, and the debugger should halt at the second breakpoint. At this point, the malware should have written a single file in its own directory. Navigate to the malware’s directory and identify the most recently written file. Change the extension of this file to .bmp and open it. You should see the decrypted screenshot that was taken earlier by the malware.