Table of Contents for
Practical Malware Analysis
 Practical Malware Analysis
Published by
No Starch Press, 2012
Practical Malware Analysis
Published by
No Starch Press, 2012
- Cover
- Practical Malware Analysis: The Hands-On Guide to Dissecting Malicious Software
- Praise for Practical Malware Analysis
- Warning
- About the Authors
- About the Technical Reviewer
- About the Contributing Authors
- Foreword
- Acknowledgments
- Individual Thanks
- Introduction
- What Is Malware Analysis?
- Prerequisites
- Practical, Hands-On Learning
- What’s in the Book?
- 0. Malware Analysis Primer
- The Goals of Malware Analysis
- Malware Analysis Techniques
- Types of Malware
- General Rules for Malware Analysis
- I. Basic Analysis
- 1. Basic Static Techniques
- Antivirus Scanning: A Useful First Step
- Hashing: A Fingerprint for Malware
- Finding Strings
- Packed and Obfuscated Malware
- Portable Executable File Format
- Linked Libraries and Functions
- Static Analysis in Practice
- The PE File Headers and Sections
- Conclusion
- Labs
- 2. Malware Analysis in Virtual Machines
- The Structure of a Virtual Machine
- Creating Your Malware Analysis Machine
- Using Your Malware Analysis Machine
- The Risks of Using VMware for Malware Analysis
- Record/Replay: Running Your Computer in Reverse
- Conclusion
- 3. Basic Dynamic Analysis
- Sandboxes: The Quick-and-Dirty Approach
- Running Malware
- Monitoring with Process Monitor
- Viewing Processes with Process Explorer
- Comparing Registry Snapshots with Regshot
- Faking a Network
- Packet Sniffing with Wireshark
- Using INetSim
- Basic Dynamic Tools in Practice
- Conclusion
- Labs
- II. Advanced Static Analysis
- 4. A Crash Course in x86 Disassembly
- Levels of Abstraction
- Reverse-Engineering
- The x86 Architecture
- Conclusion
- 5. IDA Pro
- Loading an Executable
- The IDA Pro Interface
- Using Cross-References
- Analyzing Functions
- Using Graphing Options
- Enhancing Disassembly
- Extending IDA with Plug-ins
- Conclusion
- Labs
- 6. Recognizing C Code Constructs in Assembly
- Global vs. Local Variables
- Disassembling Arithmetic Operations
- Recognizing if Statements
- Recognizing Loops
- Understanding Function Call Conventions
- Analyzing switch Statements
- Disassembling Arrays
- Identifying Structs
- Analyzing Linked List Traversal
- Conclusion
- Labs
- 7. Analyzing Malicious Windows Programs
- The Windows API
- The Windows Registry
- Networking APIs
- Following Running Malware
- Kernel vs. User Mode
- The Native API
- Conclusion
- Labs
- III. Advanced Dynamic Analysis
- 8. Debugging
- Source-Level vs. Assembly-Level Debuggers
- Kernel vs. User-Mode Debugging
- Using a Debugger
- Exceptions
- Modifying Execution with a Debugger
- Modifying Program Execution in Practice
- Conclusion
- 9. OllyDbg
- Loading Malware
- The OllyDbg Interface
- Memory Map
- Viewing Threads and Stacks
- Executing Code
- Breakpoints
- Loading DLLs
- Tracing
- Exception Handling
- Patching
- Analyzing Shellcode
- Assistance Features
- Plug-ins
- Scriptable Debugging
- Conclusion
- Labs
- 10. Kernel Debugging with WinDbg
- Drivers and Kernel Code
- Setting Up Kernel Debugging
- Using WinDbg
- Microsoft Symbols
- Kernel Debugging in Practice
- Rootkits
- Loading Drivers
- Kernel Issues for Windows Vista, Windows 7, and x64 Versions
- Conclusion
- Labs
- IV. Malware Functionality
- 11. Malware Behavior
- Downloaders and Launchers
- Backdoors
- Credential Stealers
- Persistence Mechanisms
- Privilege Escalation
- Covering Its Tracks—User-Mode Rootkits
- Conclusion
- Labs
- 12. Covert Malware Launching
- Launchers
- Process Injection
- Process Replacement
- Hook Injection
- Detours
- APC Injection
- Conclusion
- Labs
- 13. Data Encoding
- The Goal of Analyzing Encoding Algorithms
- Simple Ciphers
- Common Cryptographic Algorithms
- Custom Encoding
- Decoding
- Conclusion
- Labs
- 14. Malware-Focused Network Signatures
- Network Countermeasures
- Safely Investigate an Attacker Online
- Content-Based Network Countermeasures
- Combining Dynamic and Static Analysis Techniques
- Understanding the Attacker’s Perspective
- Conclusion
- Labs
- V. Anti-Reverse-Engineering
- 15. Anti-Disassembly
- Understanding Anti-Disassembly
- Defeating Disassembly Algorithms
- Anti-Disassembly Techniques
- Obscuring Flow Control
- Thwarting Stack-Frame Analysis
- Conclusion
- Labs
- 16. Anti-Debugging
- Windows Debugger Detection
- Identifying Debugger Behavior
- Interfering with Debugger Functionality
- Debugger Vulnerabilities
- Conclusion
- Labs
- 17. Anti-Virtual Machine Techniques
- VMware Artifacts
- Vulnerable Instructions
- Tweaking Settings
- Escaping the Virtual Machine
- Conclusion
- Labs
- 18. Packers and Unpacking
- Packer Anatomy
- Identifying Packed Programs
- Unpacking Options
- Automated Unpacking
- Manual Unpacking
- Tips and Tricks for Common Packers
- Analyzing Without Fully Unpacking
- Packed DLLs
- Conclusion
- Labs
- VI. Special Topics
- 19. Shellcode Analysis
- Loading Shellcode for Analysis
- Position-Independent Code
- Identifying Execution Location
- Manual Symbol Resolution
- A Full Hello World Example
- Shellcode Encodings
- NOP Sleds
- Finding Shellcode
- Conclusion
- Labs
- 20. C++ Analysis
- Object-Oriented Programming
- Virtual vs. Nonvirtual Functions
- Creating and Destroying Objects
- Conclusion
- Labs
- 21. 64-Bit Malware
- Why 64-Bit Malware?
- Differences in x64 Architecture
- Windows 32-Bit on Windows 64-Bit
- 64-Bit Hints at Malware Functionality
- Conclusion
- Labs
- A. Important Windows Functions
- B. Tools for Malware Analysis
- C. Solutions to Labs
- Lab 1-1 Solutions
- Lab 1-2 Solutions
- Lab 1-3 Solutions
- Lab 1-4 Solutions
- Lab 3-1 Solutions
- Lab 3-2 Solutions
- Lab 3-3 Solutions
- Lab 3-4 Solutions
- Lab 5-1 Solutions
- Lab 6-1 Solutions
- Lab 6-2 Solutions
- Lab 6-3 Solutions
- Lab 6-4 Solutions
- Lab 7-1 Solutions
- Lab 7-2 Solutions
- Lab 7-3 Solutions
- Lab 9-1 Solutions
- Lab 9-2 Solutions
- Lab 9-3 Solutions
- Lab 10-1 Solutions
- Lab 10-2 Solutions
- Lab 10-3 Solutions
- Lab 11-1 Solutions
- Lab 11-2 Solutions
- Lab 11-3 Solutions
- Lab 12-1 Solutions
- Lab 12-2 Solutions
- Lab 12-3 Solutions
- Lab 12-4 Solutions
- Lab 13-1 Solutions
- Lab 13-2 Solutions
- Lab 13-3 Solutions
- Lab 14-1 Solutions
- Lab 14-2 Solutions
- Lab 14-3 Solutions
- Lab 15-1 Solutions
- Lab 15-2 Solutions
- Lab 15-3 Solutions
- Lab 16-1 Solutions
- Lab 16-2 Solutions
- Lab 16-3 Solutions
- Lab 17-1 Solutions
- Lab 17-2 Solutions
- Lab 17-3 Solutions
- Lab 18-1 Solutions
- Lab 18-2 Solutions
- Lab 18-3 Solutions
- Lab 18-4 Solutions
- Lab 18-5 Solutions
- Lab 19-1 Solutions
- Lab 19-2 Solutions
- Lab 19-3 Solutions
- Lab 20-1 Solutions
- Lab 20-2 Solutions
- Lab 20-3 Solutions
- Lab 21-1 Solutions
- Lab 21-2 Solutions
- Index
- Index
- Index
- Index
- Index
- Index
- Index
- Index
- Index
- Index
- Index
- Index
- Index
- Index
- Index
- Index
- Index
- Index
- Index
- Index
- Index
- Index
- Index
- Index
- Index
- Index
- Index
- Updates
- About the Authors
- Copyright
When malware has been packed, an analyst typically has access to only the packed file, and cannot examine the original unpacked program or the program that packed the malware. In order to unpack an executable, we must undo the work performed by the packer, which requires that we understand how a packer operates.
All packers take an executable file as input and produce an executable file as output. The packed executable is compressed, encrypted, or otherwise transformed, making it harder to recognize and reverse-engineer.
Most packers use a compression algorithm to compress the original executable. A packer designed to make the file difficult to analyze may encrypt the original executable and employ anti-reverse-engineering techniques, such as anti-disassembly, anti-debugging, or anti-VM. Packers can pack the entire executable, including all data and the resource section, or pack only the code and data sections.
To maintain the functionality of the original program, a packing program needs to store the program’s import information. The information can be stored in any format, and there are several common strategies, which are covered in depth later in this chapter. When unpacking a program, reconstructing the import section can sometimes be challenging and time-consuming, but it’s necessary for analyzing the program’s functionality.
Nonpacked executables are loaded by the OS. With packed programs, the unpacking stub is loaded by the OS, and then the unpacking stub loads the original program. The code entry point for the executable points to the unpacking stub rather than the original code. The original program is generally stored in one or more extra sections of the file.
The unpacking stub can be viewed by a malware analyst, and understanding the different parts of the stub is fundamental to unpacking the executable. The unpacking stub is often small, since it does not contribute to the main functionality of the program, and its function is typically simple: unpack the original executable. If you attempt to perform static analysis on the packed program, you will be analyzing the stub, not the original program.
The unpacking stub performs three steps:
Unpacks the original executable into memory
Resolves all of the imports of the original executable
Transfers execution to the original entry point (OEP)
When regular executables load, a loader reads the PE header on the disk, and allocates memory for each of the executable’s sections based on that header. The loader then copies the sections into the allocated spaces in memory.
Packed executables also format the PE header so that the loader will allocate space for the sections, which can come from the original program, or the unpacking stub can create the sections. The unpacking stub unpacks the code for each section and copies it into the space that was allocated. The exact unpacking method used depends on the goals of the packer, and it is generally contained within the stub.
As discussed in Chapter 1, nonpacked PE files include a section that tells the loader which functions to import, and another section that stores the addresses of the names of all the imported functions. The Windows loader reads the import information, determines which functions are needed, and then fills in the addresses.
The Windows loader cannot read import information that is packed. For a packed executable, the unpacking stub will resolve the imports. The specific approach depends on the packer.
The most common approach is to have the unpacking stub import only the LoadLibrary and GetProcAddress
functions. After the unpacking stub unpacks the original executable, it reads the original import
information. It will call LoadLibrary for each library, in order
to load the DLL into memory, and will then use GetProcAddress to
get the address for each function.
Another approach is to keep the original import table intact, so that the Windows loader can load the DLLs and the imported functions. This is the simplest approach, since the unpacking stub does not need to resolve the imports. However, static analysis of the packed program will reveal all the original imports, so this approach lacks stealth. Additionally, since the imported functions are stored in plaintext in the executable, the compression possible with this approach is not optimal.
A third approach is to keep one import function from each DLL contained in the original import table. This approach will reveal only one function per imported library during analysis, so it’s stealthier than the previous approach, but analysis will still reveal all the libraries that are imported. This approach is simpler for the packer to implement than the first approach, since the libraries do not need to be loaded by the unpacking stub, but the unpacking stub must still resolve the majority of the functions.
The final approach is the removal of all imports (including LoadLibrary and GetProcAddress). The packer must find
all the functions needed from other libraries without using functions, or it must find LoadLibrary and GetProcAddress, and use
them to locate all the other libraries. This process is discussed in Chapter 19, because it is similar to what shellcode must do. The benefit of this
approach is that the packed program includes no imports at all, which makes it stealthy. However, in
order to use this approach, the unpacking stub must be complex.
Once the unpacking stub is complete, it must transfer execution to the OEP. The instruction that transfers execution to the OEP is commonly referred to as the tail jump.
A jump instruction is the simplest and most popular way to
transfer execution. Since it’s so common, many malicious packers will attempt to obscure this
function by using a ret or call instruction. Sometimes the tail jump is obscured with OS functions that transfer
control, such as NtContinue or ZwContinue.
Figure 18-1 through Figure 18-4 illustrate the packing and unpacking process, as follows:
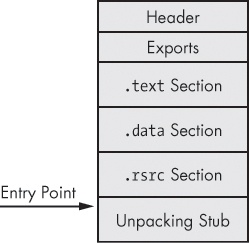
Figure 18-1 shows the original executable. The header and sections are visible, and the starting point is set to the OEP.
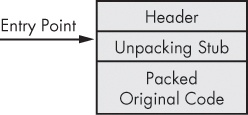
Figure 18-2 shows the packed executable as it exists on disk. All that is visible is the new header, the unpacking stub, and packed original code.
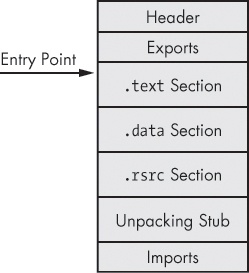
Figure 18-3 shows the packed executable as it exists when it’s loaded into memory. The unpacking stub has unpacked the original code, and valid
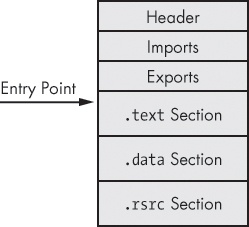
.textand.datasections are visible. The starting point for the executable still points to the unpacking stub, and the import table is usually not valid at this stage.Figure 18-4 shows the fully unpacked executable. The import table has been reconstructed, and the starting point has been edited to point to the OEP.
Note that the final unpacked program is different than the original program. The unpacked program still has the unpacking stub and any other code that the packing program added. The unpacking program has a PE header that has been reconstructed by the unpacker and will not be exactly the same as the original program.