Table of Contents for
Practical Malware Analysis
 Practical Malware Analysis
Published by
No Starch Press, 2012
Practical Malware Analysis
Published by
No Starch Press, 2012
- Cover
- Practical Malware Analysis: The Hands-On Guide to Dissecting Malicious Software
- Praise for Practical Malware Analysis
- Warning
- About the Authors
- About the Technical Reviewer
- About the Contributing Authors
- Foreword
- Acknowledgments
- Individual Thanks
- Introduction
- What Is Malware Analysis?
- Prerequisites
- Practical, Hands-On Learning
- What’s in the Book?
- 0. Malware Analysis Primer
- The Goals of Malware Analysis
- Malware Analysis Techniques
- Types of Malware
- General Rules for Malware Analysis
- I. Basic Analysis
- 1. Basic Static Techniques
- Antivirus Scanning: A Useful First Step
- Hashing: A Fingerprint for Malware
- Finding Strings
- Packed and Obfuscated Malware
- Portable Executable File Format
- Linked Libraries and Functions
- Static Analysis in Practice
- The PE File Headers and Sections
- Conclusion
- Labs
- 2. Malware Analysis in Virtual Machines
- The Structure of a Virtual Machine
- Creating Your Malware Analysis Machine
- Using Your Malware Analysis Machine
- The Risks of Using VMware for Malware Analysis
- Record/Replay: Running Your Computer in Reverse
- Conclusion
- 3. Basic Dynamic Analysis
- Sandboxes: The Quick-and-Dirty Approach
- Running Malware
- Monitoring with Process Monitor
- Viewing Processes with Process Explorer
- Comparing Registry Snapshots with Regshot
- Faking a Network
- Packet Sniffing with Wireshark
- Using INetSim
- Basic Dynamic Tools in Practice
- Conclusion
- Labs
- II. Advanced Static Analysis
- 4. A Crash Course in x86 Disassembly
- Levels of Abstraction
- Reverse-Engineering
- The x86 Architecture
- Conclusion
- 5. IDA Pro
- Loading an Executable
- The IDA Pro Interface
- Using Cross-References
- Analyzing Functions
- Using Graphing Options
- Enhancing Disassembly
- Extending IDA with Plug-ins
- Conclusion
- Labs
- 6. Recognizing C Code Constructs in Assembly
- Global vs. Local Variables
- Disassembling Arithmetic Operations
- Recognizing if Statements
- Recognizing Loops
- Understanding Function Call Conventions
- Analyzing switch Statements
- Disassembling Arrays
- Identifying Structs
- Analyzing Linked List Traversal
- Conclusion
- Labs
- 7. Analyzing Malicious Windows Programs
- The Windows API
- The Windows Registry
- Networking APIs
- Following Running Malware
- Kernel vs. User Mode
- The Native API
- Conclusion
- Labs
- III. Advanced Dynamic Analysis
- 8. Debugging
- Source-Level vs. Assembly-Level Debuggers
- Kernel vs. User-Mode Debugging
- Using a Debugger
- Exceptions
- Modifying Execution with a Debugger
- Modifying Program Execution in Practice
- Conclusion
- 9. OllyDbg
- Loading Malware
- The OllyDbg Interface
- Memory Map
- Viewing Threads and Stacks
- Executing Code
- Breakpoints
- Loading DLLs
- Tracing
- Exception Handling
- Patching
- Analyzing Shellcode
- Assistance Features
- Plug-ins
- Scriptable Debugging
- Conclusion
- Labs
- 10. Kernel Debugging with WinDbg
- Drivers and Kernel Code
- Setting Up Kernel Debugging
- Using WinDbg
- Microsoft Symbols
- Kernel Debugging in Practice
- Rootkits
- Loading Drivers
- Kernel Issues for Windows Vista, Windows 7, and x64 Versions
- Conclusion
- Labs
- IV. Malware Functionality
- 11. Malware Behavior
- Downloaders and Launchers
- Backdoors
- Credential Stealers
- Persistence Mechanisms
- Privilege Escalation
- Covering Its Tracks—User-Mode Rootkits
- Conclusion
- Labs
- 12. Covert Malware Launching
- Launchers
- Process Injection
- Process Replacement
- Hook Injection
- Detours
- APC Injection
- Conclusion
- Labs
- 13. Data Encoding
- The Goal of Analyzing Encoding Algorithms
- Simple Ciphers
- Common Cryptographic Algorithms
- Custom Encoding
- Decoding
- Conclusion
- Labs
- 14. Malware-Focused Network Signatures
- Network Countermeasures
- Safely Investigate an Attacker Online
- Content-Based Network Countermeasures
- Combining Dynamic and Static Analysis Techniques
- Understanding the Attacker’s Perspective
- Conclusion
- Labs
- V. Anti-Reverse-Engineering
- 15. Anti-Disassembly
- Understanding Anti-Disassembly
- Defeating Disassembly Algorithms
- Anti-Disassembly Techniques
- Obscuring Flow Control
- Thwarting Stack-Frame Analysis
- Conclusion
- Labs
- 16. Anti-Debugging
- Windows Debugger Detection
- Identifying Debugger Behavior
- Interfering with Debugger Functionality
- Debugger Vulnerabilities
- Conclusion
- Labs
- 17. Anti-Virtual Machine Techniques
- VMware Artifacts
- Vulnerable Instructions
- Tweaking Settings
- Escaping the Virtual Machine
- Conclusion
- Labs
- 18. Packers and Unpacking
- Packer Anatomy
- Identifying Packed Programs
- Unpacking Options
- Automated Unpacking
- Manual Unpacking
- Tips and Tricks for Common Packers
- Analyzing Without Fully Unpacking
- Packed DLLs
- Conclusion
- Labs
- VI. Special Topics
- 19. Shellcode Analysis
- Loading Shellcode for Analysis
- Position-Independent Code
- Identifying Execution Location
- Manual Symbol Resolution
- A Full Hello World Example
- Shellcode Encodings
- NOP Sleds
- Finding Shellcode
- Conclusion
- Labs
- 20. C++ Analysis
- Object-Oriented Programming
- Virtual vs. Nonvirtual Functions
- Creating and Destroying Objects
- Conclusion
- Labs
- 21. 64-Bit Malware
- Why 64-Bit Malware?
- Differences in x64 Architecture
- Windows 32-Bit on Windows 64-Bit
- 64-Bit Hints at Malware Functionality
- Conclusion
- Labs
- A. Important Windows Functions
- B. Tools for Malware Analysis
- C. Solutions to Labs
- Lab 1-1 Solutions
- Lab 1-2 Solutions
- Lab 1-3 Solutions
- Lab 1-4 Solutions
- Lab 3-1 Solutions
- Lab 3-2 Solutions
- Lab 3-3 Solutions
- Lab 3-4 Solutions
- Lab 5-1 Solutions
- Lab 6-1 Solutions
- Lab 6-2 Solutions
- Lab 6-3 Solutions
- Lab 6-4 Solutions
- Lab 7-1 Solutions
- Lab 7-2 Solutions
- Lab 7-3 Solutions
- Lab 9-1 Solutions
- Lab 9-2 Solutions
- Lab 9-3 Solutions
- Lab 10-1 Solutions
- Lab 10-2 Solutions
- Lab 10-3 Solutions
- Lab 11-1 Solutions
- Lab 11-2 Solutions
- Lab 11-3 Solutions
- Lab 12-1 Solutions
- Lab 12-2 Solutions
- Lab 12-3 Solutions
- Lab 12-4 Solutions
- Lab 13-1 Solutions
- Lab 13-2 Solutions
- Lab 13-3 Solutions
- Lab 14-1 Solutions
- Lab 14-2 Solutions
- Lab 14-3 Solutions
- Lab 15-1 Solutions
- Lab 15-2 Solutions
- Lab 15-3 Solutions
- Lab 16-1 Solutions
- Lab 16-2 Solutions
- Lab 16-3 Solutions
- Lab 17-1 Solutions
- Lab 17-2 Solutions
- Lab 17-3 Solutions
- Lab 18-1 Solutions
- Lab 18-2 Solutions
- Lab 18-3 Solutions
- Lab 18-4 Solutions
- Lab 18-5 Solutions
- Lab 19-1 Solutions
- Lab 19-2 Solutions
- Lab 19-3 Solutions
- Lab 20-1 Solutions
- Lab 20-2 Solutions
- Lab 20-3 Solutions
- Lab 21-1 Solutions
- Lab 21-2 Solutions
- Index
- Index
- Index
- Index
- Index
- Index
- Index
- Index
- Index
- Index
- Index
- Index
- Index
- Index
- Index
- Index
- Index
- Index
- Index
- Index
- Index
- Index
- Index
- Index
- Index
- Index
- Index
- Updates
- About the Authors
- Copyright
The program creates the file C:\Windows\System32\Mlwx486.sys. You can use procmon or another dynamic monitoring tool to see the file being created, but you cannot see the file on disk because it is hidden.
The program has a kernel component. It is stored in the file’s resource section, and then written to disk and loaded into the kernel as a service.
The program is a rootkit designed to hide files. It uses SSDT hooking to overwrite the entry to
NtQueryDirectoryFile, which it uses to prevent the display of any files beginning with Mlwx (case-sensitive) in directory listings.
Looking at the imports section of this executable, we see imports for Close-ServiceHandle, CreateServiceA, OpenSCManagerA, and StartServiceA, which tell us that this program will create and start a
service. Because the program also calls CreateFile and WriteFile, we know that it will write to a file at some point. We also see
calls to LoadResource and SizeOfResource, which tell us that this program will do something with the resource
section of Lab10-02.exe.
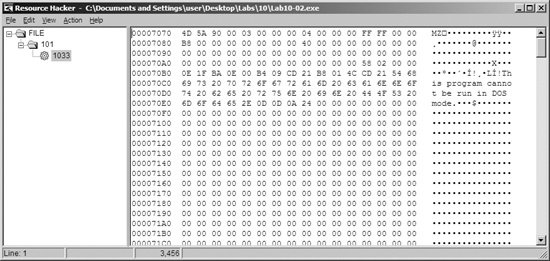
Recognizing that the program accesses the resource section, we use Resource Hacker to examine the resource section. There, we see that the file contains another PE header within the resource section, as shown in Figure C-32. This is probably another file of malicious code that Lab10-02.exe will use.
Next, we run the program and find that it creates a file and a service. Using procmon, we see that the program creates a file in C:\Windows\System32, and that it creates a service that uses that file as the executable. That file contains the kernel code that will be loaded by the OS.
We should next find the file that the program creates in order to analyze it and determine what the kernel code is doing. However, when we look in C:\Windows\System32, we find that there’s nothing there. We can see in procmon that the file is created, and there are no calls that would delete the file. Based on the facts that the file doesn’t appear but we don’t see how it was deleted and that a driver is involved, we should be suspicious that we’re dealing with a rootkit.
In order to continue investigating, we want to check to see if our kernel driver is loaded. To
do that, we use the sc command to check on the status of the
service that is running our kernel driver, as shown in Example C-29.
Example C-29. Using the sc command to get information about a
service
C:\>sc query "486 WS Driver"❶

SERVICE_NAME: 486 WS Driver
        TYPE               :   1  KERNEL_DRIVER
        STATE              : ❷4   RUNNING
                                (STOPPABLE,NOT_PAUSABLE,IGNORES_SHUTDOWN)
        WIN32_EXIT_CODE    : 0  (0x0)
        SERVICE_EXIT_CODE  : 0  (0x0)
        CHECKPOINT         : 0x0
        WAIT_HINT          : 0x0
We query for the service name 486 WS Driver at ❶, which was specified in the call to CreateServiceA. We see at ❷ that the service
is still running, which tells us that the kernel code is in memory. Something fishy is going on
because the driver is still running, but it’s not on disk. Now, to determine what’s
going on, we connect the kernel debugger to our virtual machine, and we check to see if the driver
was actually loaded using the lm command. We see an entry that
matches the filename that was created by Lab10-02.exe:
f7c4d000 f7c4dd80 Mlwx486 (deferred)
We are now certain that the driver is loaded into memory with the filename Mlwx486.sys, but the file does not appear on disk, suggesting that this might be a rootkit.
Next, we check the SSDT for any modified entries, as shown in Example C-30.
Example C-30. An excerpt from the SSDT with one entry that has been modified by a rootkit
kd> dd dwo(KeServiceDescriptorTable) L100
...
80501dbc  8060cb50 8060cb50 8053c02e 80606e68
80501dcc  80607ac8 ❶ f7c4d486 805b3de0 8056f3ca
80501ddc  806053a4 8056c222 8060c2dc 8056fc46
...
We see that the entry at ❶ is in a memory location
that is clearly outside the bounds of the ntoskrnl module but
within the loaded Mlwx486.sys driver. To determine which normal function is
being replaced, we revert our virtual machine to before the rootkit was installed to see which
function was stored at the offset into the SSDT that was overwritten. In this case, the function is
NtQueryDirectoryFile, which is a versatile function that
retrieves information about files and directories used by FindFirstFile and FindNextFile to traverse directory
structures. This function is also used by Windows Explorer to display files and directories. If the
rootkit is hooking this function, it could be hiding files, which would explain why we can’t
find Mlwx486.sys. Now that we’ve found a function that is hooking the
SSDT, we must analyze what that function is doing.
We now look more closely at the function called instead of NtQueryDirectoryFile, which we’ll call PatchFunction. The malicious PatchFunction must work
with the same interface as the original function, so we first check the documentation of the
original function. We find that NtQueryDirectoryFile is
technically undocumented according to Microsoft, but a quick Internet search will provide all the
information we need. The NtQueryDirectoryFile function is a very
flexible one with a lot of different parameters that determine what will be returned.
Now, we want to look at the malicious function to see what is being done with the requests. We
set a breakpoint on PatchFunction and discover that the first
thing it does is call the original NtQueryDirectoryFile with all
of the original parameters, as shown in Example C-31.
Example C-31. Assembly listing of PatchFunction
f7c4d490 ff7530          push    dword ptr [ebp+30h]
f7c4d493 ff752c          push    dword ptr [ebp+2Ch]
f7c4d496 ff7528          push    dword ptr [ebp+28h]
f7c4d499 ff7524          push    dword ptr [ebp+24h]
f7c4d49c ff7520          push    dword ptr [ebp+20h]
f7c4d49f 56              push    esi
f7c4d4a0 ff7518          push    dword ptr [ebp+18h]
f7c4d4a3 ff7514          push    dword ptr [ebp+14h]
f7c4d4a6 ff7510          push    dword ptr [ebp+10h]
f7c4d4a9 ff750c          push    dword ptr [ebp+0Ch]
f7c4d4ac ff7508          push    dword ptr [ebp+8]
f7c4d4af e860000000      call    Mlwx486+0x514 (f7c4d514)
Note
It’s probably not completely clear from Example C-31 that the function being called is NtQueryDirectoryFile. However, if we single-step over the
call function, we see that it goes to
another section of the file that jumps to NtQueryDirectoryFile. In IDA Pro, this call would have been labeled
NtQueryDirectoryFile, but the disassembler
included in WinDbg is much less sophisticated. Ideally, we would have the file to view in IDA Pro
while we are debugging, but we can’t find this file because it’s
hidden.
The PatchFunction checks the eighth parameter, FileInformationClass, and if it is any value other than 3, it returns
NtQueryDirectoryFile’s original return value. It also
checks the return value from NtQueryDirectoryFile and the value
of the ninth parameter, ReturnSingleEntry. PatchFunction is looking for certain parameters. If the parameters
don’t meet the criteria, then the functionality is exactly the same as the original NtQueryDirectoryFile. If the parameters do meet the criteria, PatchFunction will change the return value, which is what we’re
interested in. To examine what happens during a call to PatchFunction with the correct parameters, we set a breakpoint on PatchFunction.
If we set a breakpoint on PatchFunction, it will break
every time the function is called, but we’re interested in only some of the function calls.
This is the perfect time to use a conditional breakpoint so that the breakpoint is hit only when the
parameters to PatchFunction match our criteria. We set a
breakpoint on PatchFunction, but the breakpoint will be hit only
if the value of ReturnSingleEntry is 0, as follows:
kd> bp f7c4d486 ".if dwo(esp+0x24)==0 {} .else {gc}"Note
If you have Windows Explorer open in a directory, you might see this breakpoint hit
over and over again in different threads, which could be annoying while you’re trying to
analyze the function. To make it easier to analyze, you should close all of your Windows Explorer
windows and use the dir command at a command
line to trigger the breakpoint.
Once the code filters out interesting calls, we see another function stored at offset
0xf7c4d590. Although it isn’t automatically labeled by WinDbg, we can determine that it is
RtlCompareMemory by looking at the disassembly or stepping into
the function call. The code in Example C-32 shows the
call to RtlCompareMemory at ❶.
Example C-32. Comparison of the filename to determine whether the rootkit will modify the returned
information from NtQueryDirectoryFile
f7c4d4ca 6a08             push    8
f7c4d4cc 681ad5c4f7       push    offset Mlwx486+0x51a (f7c4d51a)
f7c4d4d1 8d465e          ❷lea     eax,[esi+5Eh]
f7c4d4d4 50               push    eax
f7c4d4d5 32db             xor     bl,bl
f7c4d4d7 ff1590d5c4f7     call    dword ptr [Mlwx486+0x590 (f7c4d590)]❶
f7c4d4dd 83f808           cmp     eax,8
f7c4d4e0 7512             jne     Mlwx486+0x4f4 (f7c4d4f4)
We can now see what PatchFunction is comparing. As
shown in Example C-32, the first parameter to RtlCompareMemory is eax, which stores
the offset at esi+5eh at ❷, which is the offset to a filename. Earlier in our disassembly, we saw that esi was FileInformation, which contains
the information filled in by NtQueryDirectoryFile. Examining the
documentation for NtQueryDirectoryFile, we see that this is a
FILE_BOTH_DIR_INFORMATION structure, and that an offset of 0x5E
is where the filename is stored as a wide character string. (We could also use WinDbg to tell us
what is stored there.)
To see what is stored at location esi+5eh, we use the
db command, as shown in Example C-33. This reveals that the filename is
Installer.h.
Example C-33. Examining the first argument to RtlCompareMemory
kd>db esi+5e036a302e 49 00 6e 00 73 00 74 00-61 00 6c 00 6c 00 65 00I.n.s.t.a.l.l.e. 036a303e 72 00 68 00 00 00 00 00-00 00 f6 bb be f0 6e 70r.h...........np 036a304e c7 01 47 c0 db 46 25 75-cb 01 50 1e c1 f0 6e 70 ..G..F%u..P...np 036a305e c7 01 50 1e c1 f0 6e 70-c7 01 00 00 00 00 00 00 ..P...np........
The other operand of the comparison is the fixed location f7c4d51a, and we can use the
db command to view that as well. Example C-34 shows that the second parameter to RtlCompareMemory stores the letters Mlwx, which
reminds us of the driver Mlwx486.sys.
Example C-34. Examining the second argument to RtlCompareMemory
kd>db f7c4d51af7c4d51a 4d 00 6c 00 77 00 78 00-00 00 00 00 00 00 00 00M.l.w.x......... f7c4d52a 00 00 00 00 00 00 00 00-00 00 00 00 00 00 00 00 ................ f7c4d53a 00 00 00 00 00 00 00 00-00 00 00 00 00 00 00 00 ................
The call to RtlCompareMemory specifies a size of 8 bytes,
which represents four characters in wide character strings. The code is comparing every file to see
if it starts with the four characters Mlwx. We now have a pretty good idea that
this driver is hiding files that begin with Mlwx.
Having discovered which filenames PatchFunction will
operate on, we analyze how it will change the return values of NtQueryDirectoryFile. Examining the documentation for NtQueryDirectoryFile, we see the FileInformation
structure with a series of FILE_BOTH_DIR_INFORMATION structures.
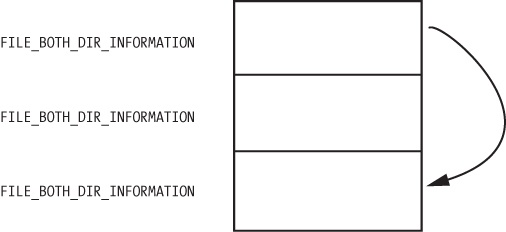
The first field in the FILE_BOTH_DIR_INFORMATION structure is the
offset that points to the next FILE_BOTH_DIR_INFORMATION. As
shown in Figure C-33, PatchFunction manipulates this field to hide certain files from the directory listing by
moving the offset forward to point to the next entry if the current entry has a filename beginning
with Mlwx.
Figure C-33 shows what the return value of
NtQueryDirectoryFile looks like for a directory that contains
three files. There is one FILE_BOTH_DIR_INFORMATION structure for
each file. Normally, the first structure would point to the second, and the second would point to
the third, but the rootkit has modified the structure so that the first structure points to the
third, thereby hiding the middle structure. This trick ensures that any files that begin with
Mlwx are skipped and hidden from directory listings.
Recovering the Hidden File
Having identified the program that is hiding files, we can try to obtain the original file used by the driver in order to perform additional analysis. There are several ways to do this:
Disable the service that starts the driver and reboot. When you reboot, the code won’t be running and the file won’t be hidden.
Extract the file from the resource section of the executable file that installed it.
Access the file even though it’s not available in the directory listing. The hook to
NtQueryDirectoryFileprevents the file from being shown in a directory listing, but the file still exists. For example, you could copy the file using the DOS commandcopy Mlwx486.sys NewFilename.sys. The NewFilename.sys file would not be hidden.
All of these options are simple enough, but the first is the best because it disables the driver. With the driver disabled, you should first search your system for files beginning with Mlwx in case there are other files being hidden by the Mlwx486.sys driver. (There are none in this case.)
Opening Mlwx486.sys in IDA Pro, we see that it is very small, so we
should analyze all of it to make sure that the driver isn’t doing anything else that
we’re not aware of. We see that the DriverEntry routine
calls RtlInitUnicodeString with KeServiceDescriptorTable and NtQueryDirectoryFile,
and then calls MmGetSystemRoutineAddress to find the
offsets for those two addresses. It next looks for the entry in the SSDT for NtQueryDirectoryFile and overwrites that entry with the address of the
PatchFunction. It doesn’t create a device, and it
doesn’t add any function handlers to the driver object.