Table of Contents for
Practical Malware Analysis
 Practical Malware Analysis
Published by
No Starch Press, 2012
Practical Malware Analysis
Published by
No Starch Press, 2012
- Cover
- Practical Malware Analysis: The Hands-On Guide to Dissecting Malicious Software
- Praise for Practical Malware Analysis
- Warning
- About the Authors
- About the Technical Reviewer
- About the Contributing Authors
- Foreword
- Acknowledgments
- Individual Thanks
- Introduction
- What Is Malware Analysis?
- Prerequisites
- Practical, Hands-On Learning
- What’s in the Book?
- 0. Malware Analysis Primer
- The Goals of Malware Analysis
- Malware Analysis Techniques
- Types of Malware
- General Rules for Malware Analysis
- I. Basic Analysis
- 1. Basic Static Techniques
- Antivirus Scanning: A Useful First Step
- Hashing: A Fingerprint for Malware
- Finding Strings
- Packed and Obfuscated Malware
- Portable Executable File Format
- Linked Libraries and Functions
- Static Analysis in Practice
- The PE File Headers and Sections
- Conclusion
- Labs
- 2. Malware Analysis in Virtual Machines
- The Structure of a Virtual Machine
- Creating Your Malware Analysis Machine
- Using Your Malware Analysis Machine
- The Risks of Using VMware for Malware Analysis
- Record/Replay: Running Your Computer in Reverse
- Conclusion
- 3. Basic Dynamic Analysis
- Sandboxes: The Quick-and-Dirty Approach
- Running Malware
- Monitoring with Process Monitor
- Viewing Processes with Process Explorer
- Comparing Registry Snapshots with Regshot
- Faking a Network
- Packet Sniffing with Wireshark
- Using INetSim
- Basic Dynamic Tools in Practice
- Conclusion
- Labs
- II. Advanced Static Analysis
- 4. A Crash Course in x86 Disassembly
- Levels of Abstraction
- Reverse-Engineering
- The x86 Architecture
- Conclusion
- 5. IDA Pro
- Loading an Executable
- The IDA Pro Interface
- Using Cross-References
- Analyzing Functions
- Using Graphing Options
- Enhancing Disassembly
- Extending IDA with Plug-ins
- Conclusion
- Labs
- 6. Recognizing C Code Constructs in Assembly
- Global vs. Local Variables
- Disassembling Arithmetic Operations
- Recognizing if Statements
- Recognizing Loops
- Understanding Function Call Conventions
- Analyzing switch Statements
- Disassembling Arrays
- Identifying Structs
- Analyzing Linked List Traversal
- Conclusion
- Labs
- 7. Analyzing Malicious Windows Programs
- The Windows API
- The Windows Registry
- Networking APIs
- Following Running Malware
- Kernel vs. User Mode
- The Native API
- Conclusion
- Labs
- III. Advanced Dynamic Analysis
- 8. Debugging
- Source-Level vs. Assembly-Level Debuggers
- Kernel vs. User-Mode Debugging
- Using a Debugger
- Exceptions
- Modifying Execution with a Debugger
- Modifying Program Execution in Practice
- Conclusion
- 9. OllyDbg
- Loading Malware
- The OllyDbg Interface
- Memory Map
- Viewing Threads and Stacks
- Executing Code
- Breakpoints
- Loading DLLs
- Tracing
- Exception Handling
- Patching
- Analyzing Shellcode
- Assistance Features
- Plug-ins
- Scriptable Debugging
- Conclusion
- Labs
- 10. Kernel Debugging with WinDbg
- Drivers and Kernel Code
- Setting Up Kernel Debugging
- Using WinDbg
- Microsoft Symbols
- Kernel Debugging in Practice
- Rootkits
- Loading Drivers
- Kernel Issues for Windows Vista, Windows 7, and x64 Versions
- Conclusion
- Labs
- IV. Malware Functionality
- 11. Malware Behavior
- Downloaders and Launchers
- Backdoors
- Credential Stealers
- Persistence Mechanisms
- Privilege Escalation
- Covering Its Tracks—User-Mode Rootkits
- Conclusion
- Labs
- 12. Covert Malware Launching
- Launchers
- Process Injection
- Process Replacement
- Hook Injection
- Detours
- APC Injection
- Conclusion
- Labs
- 13. Data Encoding
- The Goal of Analyzing Encoding Algorithms
- Simple Ciphers
- Common Cryptographic Algorithms
- Custom Encoding
- Decoding
- Conclusion
- Labs
- 14. Malware-Focused Network Signatures
- Network Countermeasures
- Safely Investigate an Attacker Online
- Content-Based Network Countermeasures
- Combining Dynamic and Static Analysis Techniques
- Understanding the Attacker’s Perspective
- Conclusion
- Labs
- V. Anti-Reverse-Engineering
- 15. Anti-Disassembly
- Understanding Anti-Disassembly
- Defeating Disassembly Algorithms
- Anti-Disassembly Techniques
- Obscuring Flow Control
- Thwarting Stack-Frame Analysis
- Conclusion
- Labs
- 16. Anti-Debugging
- Windows Debugger Detection
- Identifying Debugger Behavior
- Interfering with Debugger Functionality
- Debugger Vulnerabilities
- Conclusion
- Labs
- 17. Anti-Virtual Machine Techniques
- VMware Artifacts
- Vulnerable Instructions
- Tweaking Settings
- Escaping the Virtual Machine
- Conclusion
- Labs
- 18. Packers and Unpacking
- Packer Anatomy
- Identifying Packed Programs
- Unpacking Options
- Automated Unpacking
- Manual Unpacking
- Tips and Tricks for Common Packers
- Analyzing Without Fully Unpacking
- Packed DLLs
- Conclusion
- Labs
- VI. Special Topics
- 19. Shellcode Analysis
- Loading Shellcode for Analysis
- Position-Independent Code
- Identifying Execution Location
- Manual Symbol Resolution
- A Full Hello World Example
- Shellcode Encodings
- NOP Sleds
- Finding Shellcode
- Conclusion
- Labs
- 20. C++ Analysis
- Object-Oriented Programming
- Virtual vs. Nonvirtual Functions
- Creating and Destroying Objects
- Conclusion
- Labs
- 21. 64-Bit Malware
- Why 64-Bit Malware?
- Differences in x64 Architecture
- Windows 32-Bit on Windows 64-Bit
- 64-Bit Hints at Malware Functionality
- Conclusion
- Labs
- A. Important Windows Functions
- B. Tools for Malware Analysis
- C. Solutions to Labs
- Lab 1-1 Solutions
- Lab 1-2 Solutions
- Lab 1-3 Solutions
- Lab 1-4 Solutions
- Lab 3-1 Solutions
- Lab 3-2 Solutions
- Lab 3-3 Solutions
- Lab 3-4 Solutions
- Lab 5-1 Solutions
- Lab 6-1 Solutions
- Lab 6-2 Solutions
- Lab 6-3 Solutions
- Lab 6-4 Solutions
- Lab 7-1 Solutions
- Lab 7-2 Solutions
- Lab 7-3 Solutions
- Lab 9-1 Solutions
- Lab 9-2 Solutions
- Lab 9-3 Solutions
- Lab 10-1 Solutions
- Lab 10-2 Solutions
- Lab 10-3 Solutions
- Lab 11-1 Solutions
- Lab 11-2 Solutions
- Lab 11-3 Solutions
- Lab 12-1 Solutions
- Lab 12-2 Solutions
- Lab 12-3 Solutions
- Lab 12-4 Solutions
- Lab 13-1 Solutions
- Lab 13-2 Solutions
- Lab 13-3 Solutions
- Lab 14-1 Solutions
- Lab 14-2 Solutions
- Lab 14-3 Solutions
- Lab 15-1 Solutions
- Lab 15-2 Solutions
- Lab 15-3 Solutions
- Lab 16-1 Solutions
- Lab 16-2 Solutions
- Lab 16-3 Solutions
- Lab 17-1 Solutions
- Lab 17-2 Solutions
- Lab 17-3 Solutions
- Lab 18-1 Solutions
- Lab 18-2 Solutions
- Lab 18-3 Solutions
- Lab 18-4 Solutions
- Lab 18-5 Solutions
- Lab 19-1 Solutions
- Lab 19-2 Solutions
- Lab 19-3 Solutions
- Lab 20-1 Solutions
- Lab 20-2 Solutions
- Lab 20-3 Solutions
- Lab 21-1 Solutions
- Lab 21-2 Solutions
- Index
- Index
- Index
- Index
- Index
- Index
- Index
- Index
- Index
- Index
- Index
- Index
- Index
- Index
- Index
- Index
- Index
- Index
- Index
- Index
- Index
- Index
- Index
- Index
- Index
- Index
- Index
- Updates
- About the Authors
- Copyright
The purpose of this program is to covertly launch another program.
The program uses process replacement to hide execution.
The malicious payload is stored in the program’s resource section. The resource has type
UNICODEand the nameLOCALIZATION.The malicious payload stored in the program’s resource section is XOR-encoded. This decode routine can be found at
sub_40132C. The XOR byte is found at 0x0040141B.The strings are XOR-encoded using the function at
sub_401000.
Since we’ve already analyzed this binary in the labs for Chapter 3, let’s begin by opening the file with IDA Pro and
looking at the function imports. Many functions in the list provide little information because they
are commonly imported by all Windows executables, but a few stand out. Specifically, Cre-ateProcessA, GetThreadContext, and SetThreadContext
indicate that this program creates new processes and is modifying the execution context of
processes. The imports ReadProcessMemory and WriteProcessMemory tell us that the program is reading and writing
directly to process memory spaces. The imports LockResource and
SizeOfResource tell us where data important to the process may be
stored. We’ll focus first on the purpose of the CreateProcessA function call found at location 0x0040115F, as shown in Example C-68.
Example C-68. Creating a suspended process and accessing the main thread’s context
00401145         lea     edx, [ebp+ProcessInformation]
00401148         push    edx ❷                   ; lpProcessInformation
00401149         lea     eax, [ebp+StartupInfo]
0040114C         push    eax                     ; lpStartupInfo
0040114D         push    0                       ; lpCurrentDirectory
0040114F         push    0                       ; lpEnvironment
00401151         push    4 ❶                     ; dwCreationFlags
00401153         push    0                       ; bInheritHandles
00401155         push    0                       ; lpThreadAttributes
00401157         push    0                       ; lpProcessAttributes
00401159         push    0                       ; lpCommandLine
0040115B         mov     ecx, [ebp+lpApplicationName]
0040115E         push    ecx                     ; lpApplicationName
0040115F         call    ds:CreateProcessA
...
00401191         mov     ecx, [ebp+ProcessInformation.hThread]
00401194         push    ecx                     ; hThread
00401195         call    ds:GetThreadContext ❸
At ❶ in Example C-68, we see a push
4, which IDA Pro labels as the parameter dwCreationFlags. The MSDN documentation for CreateProcess tells us that this is the CREATE_SUSPENDED flag, which allows the process to be created but not started. The
process will not execute until the main process thread is started via the ResumeThread API.
At ❸, we see the program accessing the context of
a thread. The hThread parameter for GetThreadContext comes from the same buffer passed to CreateProcessA at ❷, which tells us that the
program is accessing the context of the suspended thread. Obtaining the thread handle is important
because the program will use the thread handle to interact with the suspended process.
After the call to GetThreadContext, we see the context used
in a call to ReadProcessMemory. To better determine what the
program is doing with the context, we need to add the CONTEXT
structure in IDA Pro. To add this standard structure, click the Structures tab and press the INS key. Next, click
the Add Standard Structure button and locate the structure named
CONTEXT. Once you’ve added the structure, right-click
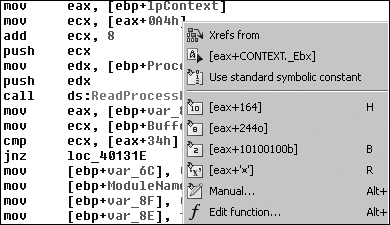
location 0x004011C3 to allow the resolution of the structure offset, as shown in Figure C-43. As you can see, the offset 0xA4 actually references
the EBX register of the thread by the [eax+CONTEXT._Ebx].
The EBX register of a suspended newly created process always contains a pointer to the Process Environment Block (PEB) data structure. As shown in Example C-69, at ❶, the program increments the PEB data structure by 8 bytes and pushes the value onto the stack as the start address for the memory read.
Example C-69. Reading a PEB data structure
004011B8         push    0                       ; lpNumberOfBytesRead
004011BA         push    4 ❷                     ; nSize
004011BC         lea     edx, [ebp+Buffer]
004011BF         push    edx                     ; lpBuffer
004011C0         mov     eax, [ebp+lpContext]
004011C3         mov     ecx, [eax+CONTEXT._Ebx]
004011C9         add     ecx, 8 ❶
004011CC         push    ecx                     ; lpBaseAddress
004011CD         mov     edx, [ebp+ProcessInformation.hProcess]
004011D0         push    edx                     ; hProcess
004011D1         call    ds:ReadProcessMemory
Because the PEB data structure is not part of the standard IDA Pro data structures, we
can use an Internet search or WinDbg to help determine what is at offset 8 of the PEB data
structure: a pointer to the ImageBaseAddress or the start of the
loaded executable. Passing this address as the read location and reading 4 bytes at ❷, we see that what IDA Pro has labeled Buffer will contain the ImageBase of the suspended
process.
The program manually resolves the import UnMapViewOfSection
using GetProcAddress at
0x004011E8, and at 0x004011FE, the ImageBaseAddress is a
parameter of UnMapViewOfSection. The call to UnMapViewOfSection removes the suspended process from memory, at which
point the program can no longer execute.
In Example C-70, we see the parameters pushed
onto the stack for a call to VirtualAllocEx.
Example C-70. Allocating memory for an executable within a suspended process
00401209         push    40h❹                    ; flProtect
0040120B         push    3000h                   ; flAllocationType
00401210         mov     edx, [ebp+var_8]
00401213         mov     eax, [edx+50h]❸
00401216         push    eax                     ; dwSize
00401217         mov     ecx, [ebp+var_8]
0040121A         mov     edx, [ecx+34h]❷
0040121D         push    edx                     ; lpAddress
0040121E         mov     eax, [ebp+ProcessInformation.hProcess]❶
00401221         push    eax                     ; hProcess
00401222         call    ds:VirtualAllocEx
Notice that this listing shows the program allocating memory within the suspended processes address space, at ❶. This is behavior that requires further investigation.
At the beginning of the function, the program checks for the MZ magic value at 0x004010FE and
a PE magic value at 0x00401119. If the checks are valid, we know that var_8 contains a pointer to the PE header loaded in memory.
At ❷, the program requests that the memory be
allocated at the address of the ImageBase of the buffer-based PE
file, which tells the Windows loader where the executable would prefer to be loaded into memory. At ❸, the program requests the size of memory specified by the PE
header value ImageSize (offset 0x50). Finally, at ❹, we use the MSDN documentation to determine that the memory is
being allocated with PAGE_EXECUTE_READWRITE permissions.
Once the memory has been allocated, a WriteProcessMemory at
0x00401251 writes data from the beginning of the PE file into the memory just allocated within the
suspended process. The number of bytes written is taken from offset 0x54 of the PE header, SizeOfHeaders. This first WriteProcessMemory copies the PE file headers into the suspended process, which suggests
that this program is moving a PE file into another process’s address space.
Next, in Example C-71, we see a loop at ❶ where the loop counter var_70
is initialized to 0 at 0x00401257.
Example C-71. Copying PE sections into memory
00401257         mov     [ebp+var_70], 0
0040125E         jmp     short loc_401269
00401260 loc_401260:                        ; CODE XREF: sub_4010EA+1CD_j
00401260         mov     eax, [ebp+var_70]
00401263         add     eax, 1
00401266         mov     [ebp+var_70], eax
00401269
00401269 loc_401269:                        ; CODE XREF: sub_4010EA+174_j
00401269         mov     ecx, [ebp+var_8]
0040126C         xor     edx, edx
0040126E         mov     dx, [ecx+6]
00401272         cmp     [ebp+var_70], edx ❷
00401275         jge     short loc_4012B9
00401277         mov     eax, [ebp+var_4]
0040127A         mov     ecx, [ebp+lpBuffer]
0040127D         add     ecx, [eax+3Ch] ❸
00401280         mov     edx, [ebp+var_70]
00401283         imul    edx, 28h ❺
00401286         lea     eax, [ecx+edx+0F8h] ❹
0040128D         mov     [ebp+var_74], eax
00401290         push    0                       ; lpNumberOfBytesWritten
00401292         mov     ecx, [ebp+var_74]
00401295         mov     edx, [ecx+10h]
00401298         push    edx                     ; nSize
00401299         mov     eax, [ebp+var_74]
0040129C         mov     ecx, [ebp+lpBuffer]
0040129F         add     ecx, [eax+14h]
004012A2         push    ecx                     ; lpBuffer
004012A3         mov     edx, [ebp+var_74]
004012A6         mov     eax, [ebp+lpBaseAddress]
004012A9         add     eax, [edx+0Ch]
004012AC         push    eax                     ; lpBaseAddress
004012AD         mov     ecx, [ebp+ProcessInformation.hProcess]
004012B0         push    ecx                     ; hProcess
004012B1         call    ds:WriteProcessMemory
004012B7         jmp     short loc_401260 ❶
The loop counter is compared to the value at offset 6 bytes into the PE header at
❷, which is the NumberOfSections. Because executable sections contain the data necessary to run an
executable—such as the code, data, relocations, and so on—we know that this loop is
probably copying the PE executable sections into the suspended process, but let’s be
sure.
var_4 contains a pointer to the MZ/PE file in memory
(labeled lpBuffer by IDA Pro), which is initialized at location
0x004010F3. We know that the first part of a PE executable is an MZ header, and at ❸, we see the program adding offset 0x3C (offset to PE header) to
the MZ header buffer, which makes ECX point to the beginning of the PE header. At ❹, we see a pointer being obtained. EDX is 0 the first time
through the loop, so we can remove EDX from the pointer calculation. That leaves us with ECX and
0xF8.
Looking at the PE header offsets, we see 0xF8 is the start of the IMAGE_HEADER_SECTION array. A simple sizeof(IMAGE_HEADER_SECTION) tells us that this structure is 40 bytes, which matches the
multiplication performed on the loop counter at ❺.
Now we can leverage IDA Pro standard structures again by adding in IMAGE_DOS_HEADER, IMAGE_NT_HEADERS, and IMAGE_SECTION_HEADER. Using the knowledge we’ve gained about each
register at the different stages, we can transform the disassembly in Example C-71 into the much more readable version in Example C-72 (the changes are in bold in this
listing).
Example C-72. Copying PE sections into memory using IDA Pro structures
00401260 loc_401260:                            ; CODE XREF: sub_4010EA+1CD_j
00401260        mov     eax, [ebp+var_70]
00401263        add     eax, 1
00401266        mov     [ebp+var_70], eax
00401269
00401269 loc_401269:                            ; CODE XREF: sub_4010EA+174_j
00401269        mov     ecx, [ebp+var_8]
0040126C        xor     edx, edx
0040126E        mov     dx,[ecx+IMAGE_NT_HEADERS.FileHeader.NumberOfSections]
00401272        cmp     [ebp+var_70], edx
00401275        jge     short loc_4012B9
00401277        mov     eax, [ebp+var_4]
0040127A        mov     ecx, [ebp+lpBuffer]
0040127D        add     ecx, [eax+IMAGE_DOS_HEADER.e_lfanew]
00401280        mov     edx, [ebp+var_70]
00401283        imul    edx, 28h
00401286        lea     eax, [ecx+edx+(size IMAGE_NT_HEADERS)]
0040128D        mov     [ebp+var_74], eax
00401290        push    0                       ; lpNumberOfBytesWritten
00401292        mov     ecx, [ebp+var_74]
00401295        mov     edx, [ecx+IMAGE_SECTION_HEADER.SizeOfRawData]
00401298        push    edx                     ; nSize
00401299        mov     eax, [ebp+var_74]
0040129C        mov     ecx, [ebp+lpBuffer]
0040129F        add     ecx, [eax+IMAGE_SECTION_HEADER.PointerToRawData]
004012A2        push    ecx                     ; lpBuffer
004012A3        mov     edx, [ebp+var_74]
004012A6        mov     eax, [ebp+lpBaseAddress]
004012A9        add     eax, [edx+IMAGE_SECTION_HEADER.VirtualAddress]
004012AC        push    eax                     ; lpBaseAddress
004012AD        mov     ecx, [ebp+ProcessInformation.hProcess]
004012B0        push    ecx                     ; hProcess
004012B1        call    ds:WriteProcessMemory
004012B7        jmp     short loc_401260
In Example C-72, it’s much easier to
see that the SizeOfRawData, PointerToRawData, and VirtualAddress values of each
section header are being used to perform the copy operations, confirming our earlier suspicion that
the program copies each section into the suspended process’s memory space. The program has
taken the necessary steps to load an executable into another process’s address space.
In Example C-73, we see that the program uses SetThreadContext, which sets the EAX register at ❶ to the entry point of the executable that was just loaded into
the suspended process’s memory space. Once the program performs the ResumeThread at ❷, it will have successfully
achieved process replacement on the process created using CreateProcessA at the beginning of this function.
Example C-73. Resuming a suspended process
004012DB    mov    eax, [ebp+var_8]
004012DE    mov    ecx, [ebp+lpBaseAddress]
004012E1    add    ecx, [eax+IMAGE_NT_HEADERS.OptionalHeader.AddressOfEntryPoint]
004012E4    mov    edx, [ebp+lpContext]
004012E7    mov    [edx+CONTEXT._Eax], ecx ❶
004012ED    mov    eax, [ebp+lpContext]
004012F0    push   eax                     ; lpContext
004012F1    mov    ecx, [ebp+ProcessInformation.hThread]
004012F4    push   ecx                     ; hThread
004012F5    call   ds:SetThreadContext
004012FB    mov    edx, [ebp+ProcessInformation.hThread]
004012FE    push   edx                     ; hThread
004012FF    call   ds:ResumeThread ❷
Now that we know process replacement is occurring, it’s important to determine which
process is being replaced and which process is being covertly executed, cloaked within another.
First, we need to discover the origin of lpApplicationName, the
label created by IDA Pro seen in Example C-68 being
provided to the CreateProcessA API call.
Pressing CTRL-X with the cursor at the start of the
sub_4010EA function shows all cross-references, including the
callers sub_40144B and main.
Following main brings us to 0x00401544, where the variable
Dst is loaded into a register to be passed to sub_4010EA as the process name for CreateProcessA. Placing the cursor over Dst highlights
the variable throughout the function, thereby allowing us to follow the variable in order to
determine its origin.
The variable is first seen as shown in Example C-74 at ❶, as the second parameter to sub_40149D.
Example C-74. Building the path string
00401508         push    400h                    ; uSize
0040150D         lea     eax, [ebp+Dst] ❶
00401513         push    eax                     ; Str
00401514         push    offset aSvchost_exe ❷   ; "\\svchost.exe"
00401519         call    sub_40149D
A quick look at sub_40149D shows it to be a simple
function that copies %SystemRoot%\System32\ into the second
parameter, and then concatenates the first parameter onto the end of that. Since Dst is the second parameter, it receives this new path, so we backtrack
through to the first parameter of sub_40149D, at ❷, which we can see is \\svchost.exe. This tells us that the replaced process is
%SystemRoot%\System32\svchost.exe.
Now we know that the program is starting svchost.exe, but we still need
to determine the process that is replacing svchost.exe. To do so, we follow the
PE buffer passed to sub_4010EA by following the variable lpBuffer at 0x00401539, just as we backtracked Dst earlier.
We locate lpBuffer, which is receiving EAX at ❶ in Example C-75.
By examining earlier instructions, we find a function call at ❷. Remembering that EAX is the return value for a function, we know the buffer is coming
from the function sub_40132C, which appears to take the variable
hModule, a memory pointer to the program itself,
Lab12-02.exe.
Example C-75. Loading the executable that replaces svchost.exe
00401521         mov     ecx, [ebp+hModule]
00401527         push    ecx                     ; hModule
00401528         call    sub_40132C ❷
0040152D         add     esp, 4
00401530         mov     [ebp+lpBuffer], eax ❶
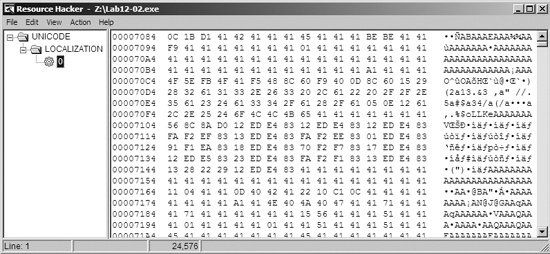
The function sub_40132C calls the functions FindResource, LoadResource, LockResource, SizeOfResource, VirtualAlloc, and memcpy. The program
copies data from the executable’s resource section into memory. We’ll use Resource
Hacker to view the items in the resource section and export them to independent files. Figure C-44 shows Lab12-02.exe inside
Resource Hacker with an encoded binary in the resource section. We can use Resource Hacker to export
this binary.
At this point, we need to continue examining the disassembly to determine how the executable
is decoded. At 0x00401425, we see that the buffer is passed to function sub_401000, which looks like an XOR routine. Looking back at the third parameter passed
to the function at location 0x0040141B, we see 0x41. Using
WinHex, we can quickly XOR the entire file exported earlier from Resource Hacker by selecting
Edit ▸ Modify Data ▸ XOR and entering 0x41. After performing this conversion,
we have a valid PE executable that is later used to replace an instance of
svchost.exe.
Note
WinHex is a hex editor available at http://www.x-ways.net/winhex/ and the free trial version is useful for malware analysis. We use it here for illustrative purposes, but most hex editors can perform a single-byte XOR operation.
We can conclude that this malware decodes a binary from its resource section and performs process replacement on svchost.exe with the decoded binary.