Table of Contents for
Practical Malware Analysis
 Practical Malware Analysis
Published by
No Starch Press, 2012
Practical Malware Analysis
Published by
No Starch Press, 2012
- Cover
- Practical Malware Analysis: The Hands-On Guide to Dissecting Malicious Software
- Praise for Practical Malware Analysis
- Warning
- About the Authors
- About the Technical Reviewer
- About the Contributing Authors
- Foreword
- Acknowledgments
- Individual Thanks
- Introduction
- What Is Malware Analysis?
- Prerequisites
- Practical, Hands-On Learning
- What’s in the Book?
- 0. Malware Analysis Primer
- The Goals of Malware Analysis
- Malware Analysis Techniques
- Types of Malware
- General Rules for Malware Analysis
- I. Basic Analysis
- 1. Basic Static Techniques
- Antivirus Scanning: A Useful First Step
- Hashing: A Fingerprint for Malware
- Finding Strings
- Packed and Obfuscated Malware
- Portable Executable File Format
- Linked Libraries and Functions
- Static Analysis in Practice
- The PE File Headers and Sections
- Conclusion
- Labs
- 2. Malware Analysis in Virtual Machines
- The Structure of a Virtual Machine
- Creating Your Malware Analysis Machine
- Using Your Malware Analysis Machine
- The Risks of Using VMware for Malware Analysis
- Record/Replay: Running Your Computer in Reverse
- Conclusion
- 3. Basic Dynamic Analysis
- Sandboxes: The Quick-and-Dirty Approach
- Running Malware
- Monitoring with Process Monitor
- Viewing Processes with Process Explorer
- Comparing Registry Snapshots with Regshot
- Faking a Network
- Packet Sniffing with Wireshark
- Using INetSim
- Basic Dynamic Tools in Practice
- Conclusion
- Labs
- II. Advanced Static Analysis
- 4. A Crash Course in x86 Disassembly
- Levels of Abstraction
- Reverse-Engineering
- The x86 Architecture
- Conclusion
- 5. IDA Pro
- Loading an Executable
- The IDA Pro Interface
- Using Cross-References
- Analyzing Functions
- Using Graphing Options
- Enhancing Disassembly
- Extending IDA with Plug-ins
- Conclusion
- Labs
- 6. Recognizing C Code Constructs in Assembly
- Global vs. Local Variables
- Disassembling Arithmetic Operations
- Recognizing if Statements
- Recognizing Loops
- Understanding Function Call Conventions
- Analyzing switch Statements
- Disassembling Arrays
- Identifying Structs
- Analyzing Linked List Traversal
- Conclusion
- Labs
- 7. Analyzing Malicious Windows Programs
- The Windows API
- The Windows Registry
- Networking APIs
- Following Running Malware
- Kernel vs. User Mode
- The Native API
- Conclusion
- Labs
- III. Advanced Dynamic Analysis
- 8. Debugging
- Source-Level vs. Assembly-Level Debuggers
- Kernel vs. User-Mode Debugging
- Using a Debugger
- Exceptions
- Modifying Execution with a Debugger
- Modifying Program Execution in Practice
- Conclusion
- 9. OllyDbg
- Loading Malware
- The OllyDbg Interface
- Memory Map
- Viewing Threads and Stacks
- Executing Code
- Breakpoints
- Loading DLLs
- Tracing
- Exception Handling
- Patching
- Analyzing Shellcode
- Assistance Features
- Plug-ins
- Scriptable Debugging
- Conclusion
- Labs
- 10. Kernel Debugging with WinDbg
- Drivers and Kernel Code
- Setting Up Kernel Debugging
- Using WinDbg
- Microsoft Symbols
- Kernel Debugging in Practice
- Rootkits
- Loading Drivers
- Kernel Issues for Windows Vista, Windows 7, and x64 Versions
- Conclusion
- Labs
- IV. Malware Functionality
- 11. Malware Behavior
- Downloaders and Launchers
- Backdoors
- Credential Stealers
- Persistence Mechanisms
- Privilege Escalation
- Covering Its Tracks—User-Mode Rootkits
- Conclusion
- Labs
- 12. Covert Malware Launching
- Launchers
- Process Injection
- Process Replacement
- Hook Injection
- Detours
- APC Injection
- Conclusion
- Labs
- 13. Data Encoding
- The Goal of Analyzing Encoding Algorithms
- Simple Ciphers
- Common Cryptographic Algorithms
- Custom Encoding
- Decoding
- Conclusion
- Labs
- 14. Malware-Focused Network Signatures
- Network Countermeasures
- Safely Investigate an Attacker Online
- Content-Based Network Countermeasures
- Combining Dynamic and Static Analysis Techniques
- Understanding the Attacker’s Perspective
- Conclusion
- Labs
- V. Anti-Reverse-Engineering
- 15. Anti-Disassembly
- Understanding Anti-Disassembly
- Defeating Disassembly Algorithms
- Anti-Disassembly Techniques
- Obscuring Flow Control
- Thwarting Stack-Frame Analysis
- Conclusion
- Labs
- 16. Anti-Debugging
- Windows Debugger Detection
- Identifying Debugger Behavior
- Interfering with Debugger Functionality
- Debugger Vulnerabilities
- Conclusion
- Labs
- 17. Anti-Virtual Machine Techniques
- VMware Artifacts
- Vulnerable Instructions
- Tweaking Settings
- Escaping the Virtual Machine
- Conclusion
- Labs
- 18. Packers and Unpacking
- Packer Anatomy
- Identifying Packed Programs
- Unpacking Options
- Automated Unpacking
- Manual Unpacking
- Tips and Tricks for Common Packers
- Analyzing Without Fully Unpacking
- Packed DLLs
- Conclusion
- Labs
- VI. Special Topics
- 19. Shellcode Analysis
- Loading Shellcode for Analysis
- Position-Independent Code
- Identifying Execution Location
- Manual Symbol Resolution
- A Full Hello World Example
- Shellcode Encodings
- NOP Sleds
- Finding Shellcode
- Conclusion
- Labs
- 20. C++ Analysis
- Object-Oriented Programming
- Virtual vs. Nonvirtual Functions
- Creating and Destroying Objects
- Conclusion
- Labs
- 21. 64-Bit Malware
- Why 64-Bit Malware?
- Differences in x64 Architecture
- Windows 32-Bit on Windows 64-Bit
- 64-Bit Hints at Malware Functionality
- Conclusion
- Labs
- A. Important Windows Functions
- B. Tools for Malware Analysis
- C. Solutions to Labs
- Lab 1-1 Solutions
- Lab 1-2 Solutions
- Lab 1-3 Solutions
- Lab 1-4 Solutions
- Lab 3-1 Solutions
- Lab 3-2 Solutions
- Lab 3-3 Solutions
- Lab 3-4 Solutions
- Lab 5-1 Solutions
- Lab 6-1 Solutions
- Lab 6-2 Solutions
- Lab 6-3 Solutions
- Lab 6-4 Solutions
- Lab 7-1 Solutions
- Lab 7-2 Solutions
- Lab 7-3 Solutions
- Lab 9-1 Solutions
- Lab 9-2 Solutions
- Lab 9-3 Solutions
- Lab 10-1 Solutions
- Lab 10-2 Solutions
- Lab 10-3 Solutions
- Lab 11-1 Solutions
- Lab 11-2 Solutions
- Lab 11-3 Solutions
- Lab 12-1 Solutions
- Lab 12-2 Solutions
- Lab 12-3 Solutions
- Lab 12-4 Solutions
- Lab 13-1 Solutions
- Lab 13-2 Solutions
- Lab 13-3 Solutions
- Lab 14-1 Solutions
- Lab 14-2 Solutions
- Lab 14-3 Solutions
- Lab 15-1 Solutions
- Lab 15-2 Solutions
- Lab 15-3 Solutions
- Lab 16-1 Solutions
- Lab 16-2 Solutions
- Lab 16-3 Solutions
- Lab 17-1 Solutions
- Lab 17-2 Solutions
- Lab 17-3 Solutions
- Lab 18-1 Solutions
- Lab 18-2 Solutions
- Lab 18-3 Solutions
- Lab 18-4 Solutions
- Lab 18-5 Solutions
- Lab 19-1 Solutions
- Lab 19-2 Solutions
- Lab 19-3 Solutions
- Lab 20-1 Solutions
- Lab 20-2 Solutions
- Lab 20-3 Solutions
- Lab 21-1 Solutions
- Lab 21-2 Solutions
- Index
- Index
- Index
- Index
- Index
- Index
- Index
- Index
- Index
- Index
- Index
- Index
- Index
- Index
- Index
- Index
- Index
- Index
- Index
- Index
- Index
- Index
- Index
- Index
- Index
- Index
- Index
- Updates
- About the Authors
- Copyright
The virtual machine monitor program monitors the virtual machine’s execution. It runs on the host operating system to present the guest operating system with a virtual platform. It also has a couple of security weaknesses that can allow malware to detect virtualization.
Note
The x86 instruction-related issues in virtual machines discussed in this section were originally outlined in the USENIX 2000 paper “Analysis of the Intel Pentium’s Ability to Support a Secure Virtual Machine Monitor” by John Robin and Cynthia Irvine.
In kernel mode, VMware uses binary translation for emulation. Certain privileged instructions in kernel mode are interpreted and emulated, so they don’t run on the physical processor. Conversely, in user mode, the code runs directly on the processor, and nearly every instruction that interacts with hardware is either privileged or generates a kernel trap or interrupt. VMware catches all the interrupts and processes them, so that the virtual machine still thinks it is a regular machine.
Some instructions in x86 access hardware-based information but don’t generate
interrupts. These include sidt, sgdt, sldt, and cpuid, among others. In order to virtualize these instructions properly, VMware would
need to perform binary translation on every instruction (not just kernel-mode instructions),
resulting in a huge performance hit. To avoid huge performance hits from doing full-instruction
emulation, VMware allows certain instructions to execute without being properly virtualized.
Ultimately, this means that certain instruction sequences will return different results when running
under VMware than they will on native hardware.
The processor uses certain key structures and tables, which are loaded at different offsets as a side effect of this lack of full translation. The interrupt descriptor table (IDT) is a data structure internal to the CPU, which is used by the operating system to determine the correct response to interrupts and exceptions. Under x86, all memory accesses pass through either the global descriptor table (GDT) or the local descriptor table (LDT). These tables contain segment descriptors that provide access details for each segment, including the base address, type, length, access rights, and so on. IDT (IDTR), GDT (GDTR), and LDT (LDTR) are the internal registers that contain the address and size of these respective tables.
Note that operating systems do not need to utilize these tables. For example, Windows implements a flat memory model and uses only the GDT by default. It does not use the LDT.
Three sensitive instructions—sidt, sgdt, and sldt—read the location
of these tables, and all store the respective register into a memory location. While these
instructions are typically used by the operating system, they are not privileged in the x86
architecture, and they can be executed from user space.
An x86 processor has only three registers to store the locations of these three tables.
Therefore, these registers must contain values valid for the underlying host operating system and
will diverge from values expected by the virtualized (guest) operating system. Since the sidt, sgdt, and sldt instructions can be invoked at any time by user-mode code without
being trapped and properly virtualized by VMware, they can be used to detect its presence.
Red Pill is an anti-VM technique that executes the sidt
instruction to grab the value of the IDTR register. The virtual machine monitor must relocate the
guest’s IDTR to avoid conflict with the host’s IDTR. Since the virtual machine monitor
is not notified when the virtual machine runs the sidt
instruction, the IDTR for the virtual machine is returned. The Red Pill tests for this discrepancy
to detect the usage of VMware.
Example 17-2 shows how Red Pill might be used by malware.
Example 17-2. Red Pill in malware
  push    ebp
  mov     ebp, esp
  sub     esp, 454h
  push    ebx
  push    esi
  push    edi
  push    8               ; Size
  push    0               ; Val
  lea     eax, [ebp+Dst]
  push    eax             ; Dst
  call    _memset
  add     esp, 0Ch
  lea     eax, [ebp+Dst]
❶ sidt    fword ptr [eax]
  mov     al, [eax+5]
  cmp     al, 0FFh
  jnz     short loc_401E19
The malware issues the sidt instruction at ❶, which stores the contents of IDTR into the memory location
pointed to by EAX. The IDTR is 6 bytes, and the fifth byte offset contains the start of the base
memory address. That fifth byte is compared to 0xFF, the VMware signature.
Red Pill succeeds only on a single-processor machine. It won’t work consistently against
multicore processors because each processor (guest or host) has an IDT assigned to it. Therefore,
the result of the sidt instruction can vary, and the signature
used by Red Pill can be unreliable.
To thwart this technique, run on a multicore processor machine or simply NOP-out the sidt instruction.
The sgdt and sldt
instruction technique for VMware detection is commonly known as No Pill. Unlike Red Pill, No Pill
relies on the fact that the LDT structure is assigned to a processor, not an operating system. And
because Windows does not normally use the LDT structure, but VMware provides virtual support for it,
the table will differ predictably: The LDT location on the host machine will be zero, and on the
virtual machine, it will be nonzero. A simple check for zero against the result of the sldt instruction does the trick.
The sldt method can be subverted in VMware by disabling
acceleration. To do this, select VM ▶ Settings ▶ Processors and check
the Disable Acceleration box. No Pill solves this acceleration
issue by using the smsw instruction if the sldt method fails. This method involves inspecting the undocumented
high-order bits returned by the smsw instruction.
Perhaps the most popular anti-VMware technique currently in use is that of querying the I/O communication port. This technique is frequently encountered in worms and bots, such as the Storm worm and Phatbot.
VMware uses virtual I/O ports for communication between the virtual machine and the host operating system to support functionality like copy and paste between the two systems. The port can be queried and compared with a magic number to identify the use of VMware.
The success of this technique depends on the x86 in
instruction, which copies data from the I/O port specified by the source operand to a memory
location specified by the destination operand. VMware monitors the use of the in instruction and captures the I/O destined for the communication channel
port 0x5668 (VX). Therefore, the second operand needs to be
loaded with VX in order to check for VMware, which happens only
when the EAX register is loaded with the magic number 0x564D5868
(VMXh). ECX must be loaded with a value corresponding to the
action you wish to perform on the port. The value 0xA means
“get VMware version type,” and 0x14 means “get
the memory size.” Both can be used to detect VMware, but 0xA is more popular because it may determine the VMware version.
Phatbot, also known as Agobot, is a botnet that is simple to use. One of its features is its built-in support of the I/O communication port technique, as shown in Example 17-3.
Example 17-3. Phatbot’s VMware detection
004014FA        push    eax
004014FB        push    ebx
004014FC        push    ecx
004014FD        push    edx
004014FE        mov     eax, 'VMXh' ❶
00401503        mov     ebx, [ebp+var_1C]
00401506        mov     ecx, 0xA
00401509        mov     dx, 'VX' ❷
0040150E        in      eax, dx
0040150F        mov     [ebp+var_24], eax
00401512        mov     [ebp+var_1C], ebx
00401515        mov     [ebp+var_20], ecx
00401518        mov     [ebp+var_28], edx
...
0040153E        mov     eax, [ebp+var_1C]
00401541        cmp     eax, 'VMXh' ❸
00401546        jnz     short loc_40155C
The malware first loads the magic number 0x564D5868
(VMXh) into the EAX register at ❶. Next, it loads the local variable var_1c into EBX,
a memory address that will return any reply from VMware. ECX is loaded with the value 0xA to get the VMware version type. At ❷, 0x5668 (VX) is
loaded into DX, to be used in the following in instruction to
specify the VMware I/O communication port.
Upon execution, the in instruction is trapped by the
virtual machine and emulated to execute it. The in instruction
uses parameters of EAX (magic value), ECX (operation), and EBX (return information). If the magic
value matches VMXh and the code is running in a virtual machine,
the virtual machine monitor will echo that back in the memory location specified by the EBX
register.
The check at ❸ determines whether the code is being run in a virtual machine. Since the get version type option is selected, the ECX register will contain the type of VMware (1=Express, 2=ESX, 3=GSX, and 4=Workstation).
The easiest way to overcome this technique is to NOP-out the in instruction or to patch the conditional jump to allow it regardless of the outcome of
the comparison.
The str instruction retrieves the segment selector from the
task register, which points to the task state segment (TSS) of the currently executing task. Malware
authors can use the str instruction to detect the presence of a
virtual machine, since the values returned by the instruction may differ on the virtual machine
versus a native system. (This technique does not work on multiprocessor hardware.)
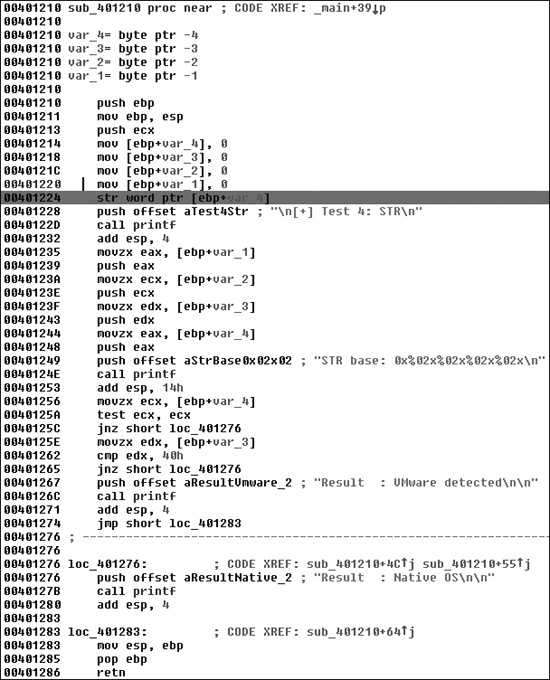
Figure 17-2 shows the str instruction at 0x401224 in malware known as SNG.exe. This loads
the TSS into the 4 bytes: var_1 through var_4, as labeled by IDA Pro. Two comparisons are made at 0x40125A and 0x401262 to
determine if VMware is detected.
We’ve just reviewed the most common instructions used by malware to employ anti-VM techniques. These instructions are as follows:
sidtsgdtsldtsmswstrin(with the second operand set toVX)cpuid
Malware will not typically run these instructions unless it is performing VMware detection, and avoiding this detection can be as easy as patching the binary to avoid calling these instructions. These instructions are basically useless if executed in user mode, so if you see them, they’re likely part of anti-VMware code. VMware describes roughly 20 instructions as “not virtualizable,” of which the preceding are the most commonly used by malware.
You can search for the instructions listed in the previous section in IDA Pro using the IDAPython script shown in Example 17-4. This script looks for the instructions, highlights any in red, and prints the total number of anti-VM instructions found in IDA’s output window.
Figure 17-2 shows a partial result of running this
script against SNG.exe with one location (str at 0x401224) highlighted by the bar. Examining the highlighted code in IDA Pro will
allow you to quickly see if the instruction found is involved in an anti-VM technique. Further
investigation shows that the str instruction is being used to
detect VMware.
Example 17-4. IDA Pro script to find anti-VM instructions
from idautils import *
from idc import *

heads = Heads(SegStart(ScreenEA()), SegEnd(ScreenEA()))
antiVM = []
for i in heads:
  if (GetMnem(i) == "sidt" or GetMnem(i) == "sgdt" or GetMnem(i) == "sldt" or
GetMnem(i) == "smsw" or GetMnem(i) == "str" or GetMnem(i) == "in" or
GetMnem(i) == "cpuid"):
    antiVM.append(i)
print "Number of potential Anti-VM instructions: %d" % (len(antiVM))
for i in antiVM:
  SetColor(i, CIC_ITEM, 0x0000ff)
Message("Anti-VM: %08x\n" % i)ScoopyNG (http://www.trapkit.de/) is a free VMware detection tool that implements seven different checks for a virtual machine, as follows:
The first three checks look for the
sidt,sgdt, andsldt(Red Pill and No Pill) instructions.The fourth check looks for
str.The fifth and sixth use the backdoor I/O port
0xaand0x14options, respectively.The seventh check relies on a bug in older VMware versions running in emulation mode.
For a disassembled version of ScoopyNG’s fourth check, see Figure 17-2.