Table of Contents for
Practical Malware Analysis
 Practical Malware Analysis
Published by
No Starch Press, 2012
Practical Malware Analysis
Published by
No Starch Press, 2012
- Cover
- Practical Malware Analysis: The Hands-On Guide to Dissecting Malicious Software
- Praise for Practical Malware Analysis
- Warning
- About the Authors
- About the Technical Reviewer
- About the Contributing Authors
- Foreword
- Acknowledgments
- Individual Thanks
- Introduction
- What Is Malware Analysis?
- Prerequisites
- Practical, Hands-On Learning
- What’s in the Book?
- 0. Malware Analysis Primer
- The Goals of Malware Analysis
- Malware Analysis Techniques
- Types of Malware
- General Rules for Malware Analysis
- I. Basic Analysis
- 1. Basic Static Techniques
- Antivirus Scanning: A Useful First Step
- Hashing: A Fingerprint for Malware
- Finding Strings
- Packed and Obfuscated Malware
- Portable Executable File Format
- Linked Libraries and Functions
- Static Analysis in Practice
- The PE File Headers and Sections
- Conclusion
- Labs
- 2. Malware Analysis in Virtual Machines
- The Structure of a Virtual Machine
- Creating Your Malware Analysis Machine
- Using Your Malware Analysis Machine
- The Risks of Using VMware for Malware Analysis
- Record/Replay: Running Your Computer in Reverse
- Conclusion
- 3. Basic Dynamic Analysis
- Sandboxes: The Quick-and-Dirty Approach
- Running Malware
- Monitoring with Process Monitor
- Viewing Processes with Process Explorer
- Comparing Registry Snapshots with Regshot
- Faking a Network
- Packet Sniffing with Wireshark
- Using INetSim
- Basic Dynamic Tools in Practice
- Conclusion
- Labs
- II. Advanced Static Analysis
- 4. A Crash Course in x86 Disassembly
- Levels of Abstraction
- Reverse-Engineering
- The x86 Architecture
- Conclusion
- 5. IDA Pro
- Loading an Executable
- The IDA Pro Interface
- Using Cross-References
- Analyzing Functions
- Using Graphing Options
- Enhancing Disassembly
- Extending IDA with Plug-ins
- Conclusion
- Labs
- 6. Recognizing C Code Constructs in Assembly
- Global vs. Local Variables
- Disassembling Arithmetic Operations
- Recognizing if Statements
- Recognizing Loops
- Understanding Function Call Conventions
- Analyzing switch Statements
- Disassembling Arrays
- Identifying Structs
- Analyzing Linked List Traversal
- Conclusion
- Labs
- 7. Analyzing Malicious Windows Programs
- The Windows API
- The Windows Registry
- Networking APIs
- Following Running Malware
- Kernel vs. User Mode
- The Native API
- Conclusion
- Labs
- III. Advanced Dynamic Analysis
- 8. Debugging
- Source-Level vs. Assembly-Level Debuggers
- Kernel vs. User-Mode Debugging
- Using a Debugger
- Exceptions
- Modifying Execution with a Debugger
- Modifying Program Execution in Practice
- Conclusion
- 9. OllyDbg
- Loading Malware
- The OllyDbg Interface
- Memory Map
- Viewing Threads and Stacks
- Executing Code
- Breakpoints
- Loading DLLs
- Tracing
- Exception Handling
- Patching
- Analyzing Shellcode
- Assistance Features
- Plug-ins
- Scriptable Debugging
- Conclusion
- Labs
- 10. Kernel Debugging with WinDbg
- Drivers and Kernel Code
- Setting Up Kernel Debugging
- Using WinDbg
- Microsoft Symbols
- Kernel Debugging in Practice
- Rootkits
- Loading Drivers
- Kernel Issues for Windows Vista, Windows 7, and x64 Versions
- Conclusion
- Labs
- IV. Malware Functionality
- 11. Malware Behavior
- Downloaders and Launchers
- Backdoors
- Credential Stealers
- Persistence Mechanisms
- Privilege Escalation
- Covering Its Tracks—User-Mode Rootkits
- Conclusion
- Labs
- 12. Covert Malware Launching
- Launchers
- Process Injection
- Process Replacement
- Hook Injection
- Detours
- APC Injection
- Conclusion
- Labs
- 13. Data Encoding
- The Goal of Analyzing Encoding Algorithms
- Simple Ciphers
- Common Cryptographic Algorithms
- Custom Encoding
- Decoding
- Conclusion
- Labs
- 14. Malware-Focused Network Signatures
- Network Countermeasures
- Safely Investigate an Attacker Online
- Content-Based Network Countermeasures
- Combining Dynamic and Static Analysis Techniques
- Understanding the Attacker’s Perspective
- Conclusion
- Labs
- V. Anti-Reverse-Engineering
- 15. Anti-Disassembly
- Understanding Anti-Disassembly
- Defeating Disassembly Algorithms
- Anti-Disassembly Techniques
- Obscuring Flow Control
- Thwarting Stack-Frame Analysis
- Conclusion
- Labs
- 16. Anti-Debugging
- Windows Debugger Detection
- Identifying Debugger Behavior
- Interfering with Debugger Functionality
- Debugger Vulnerabilities
- Conclusion
- Labs
- 17. Anti-Virtual Machine Techniques
- VMware Artifacts
- Vulnerable Instructions
- Tweaking Settings
- Escaping the Virtual Machine
- Conclusion
- Labs
- 18. Packers and Unpacking
- Packer Anatomy
- Identifying Packed Programs
- Unpacking Options
- Automated Unpacking
- Manual Unpacking
- Tips and Tricks for Common Packers
- Analyzing Without Fully Unpacking
- Packed DLLs
- Conclusion
- Labs
- VI. Special Topics
- 19. Shellcode Analysis
- Loading Shellcode for Analysis
- Position-Independent Code
- Identifying Execution Location
- Manual Symbol Resolution
- A Full Hello World Example
- Shellcode Encodings
- NOP Sleds
- Finding Shellcode
- Conclusion
- Labs
- 20. C++ Analysis
- Object-Oriented Programming
- Virtual vs. Nonvirtual Functions
- Creating and Destroying Objects
- Conclusion
- Labs
- 21. 64-Bit Malware
- Why 64-Bit Malware?
- Differences in x64 Architecture
- Windows 32-Bit on Windows 64-Bit
- 64-Bit Hints at Malware Functionality
- Conclusion
- Labs
- A. Important Windows Functions
- B. Tools for Malware Analysis
- C. Solutions to Labs
- Lab 1-1 Solutions
- Lab 1-2 Solutions
- Lab 1-3 Solutions
- Lab 1-4 Solutions
- Lab 3-1 Solutions
- Lab 3-2 Solutions
- Lab 3-3 Solutions
- Lab 3-4 Solutions
- Lab 5-1 Solutions
- Lab 6-1 Solutions
- Lab 6-2 Solutions
- Lab 6-3 Solutions
- Lab 6-4 Solutions
- Lab 7-1 Solutions
- Lab 7-2 Solutions
- Lab 7-3 Solutions
- Lab 9-1 Solutions
- Lab 9-2 Solutions
- Lab 9-3 Solutions
- Lab 10-1 Solutions
- Lab 10-2 Solutions
- Lab 10-3 Solutions
- Lab 11-1 Solutions
- Lab 11-2 Solutions
- Lab 11-3 Solutions
- Lab 12-1 Solutions
- Lab 12-2 Solutions
- Lab 12-3 Solutions
- Lab 12-4 Solutions
- Lab 13-1 Solutions
- Lab 13-2 Solutions
- Lab 13-3 Solutions
- Lab 14-1 Solutions
- Lab 14-2 Solutions
- Lab 14-3 Solutions
- Lab 15-1 Solutions
- Lab 15-2 Solutions
- Lab 15-3 Solutions
- Lab 16-1 Solutions
- Lab 16-2 Solutions
- Lab 16-3 Solutions
- Lab 17-1 Solutions
- Lab 17-2 Solutions
- Lab 17-3 Solutions
- Lab 18-1 Solutions
- Lab 18-2 Solutions
- Lab 18-3 Solutions
- Lab 18-4 Solutions
- Lab 18-5 Solutions
- Lab 19-1 Solutions
- Lab 19-2 Solutions
- Lab 19-3 Solutions
- Lab 20-1 Solutions
- Lab 20-2 Solutions
- Lab 20-3 Solutions
- Lab 21-1 Solutions
- Lab 21-2 Solutions
- Index
- Index
- Index
- Index
- Index
- Index
- Index
- Index
- Index
- Index
- Index
- Index
- Index
- Index
- Index
- Index
- Index
- Index
- Index
- Index
- Index
- Index
- Index
- Index
- Index
- Index
- Index
- Updates
- About the Authors
- Copyright
When you run Lab16-02.exe from the command line, it prints a usage string asking for a four-character password.
If you input an incorrect password, the program will respond “Incorrect password, Try again.”
The
strncmpfunction is called at 0x40123A.The program immediately terminates when loaded into OllyDbg using the default settings.
The program contains a
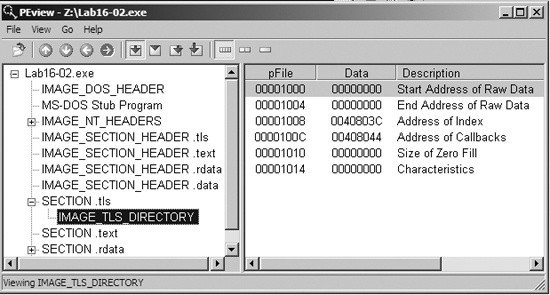
.tlssection.The TLS callback starts at 0x401060.
The
FindWindowAfunction is used to terminate the malware. It looks for a window with the class nameOLLYDBGand terminates the program if it is found. You can change the window class name using an OllyDbg plug-in like PhantOm, or NOP-out the call to exit at 0x40107C.At first, the password appears to be
bzqrwhen you set a breakpoint at thestrncmpcall.This password found in the debugger doesn’t work on the command line.
The result of
OutputDebugStringAand theBeingDebuggedflag are used as inputs to the decoding algorithm. You can use the PhantOm plug-in to ensure that theBeingDebuggedflag is 0, and you can NOP-out theaddinstruction at 0x401051.
We first run the program from the command line and see the following printed to the screen:
usage: Lab16-02.exe <4 character password>
The program is expecting a four-character password. Next, we attempt to provide the password
abcd on the command line, and get the following output:
Incorrect password, Try again.
Now, we look for a string comparison in the code so we can run the program in a debugger and
set a breakpoint at the string comparison in order to see the password. The fourth Lab 16-2 Solutions question hinted that strncmp is
used. If we load the program into IDA Pro, we see strncmp in the
main function at 0x40123A. Let’s load the program into
OllyDbg and set a breakpoint at 0x40123A.
After we load Lab16-02.exe into OllyDbg, it immediately terminates without pausing the program. We suspect something is amiss, so we check the PE file structure. Figure C-62 shows the PE header section names in PEview.
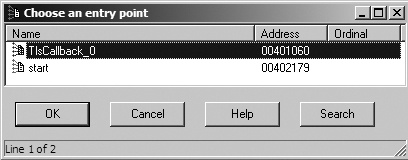
The TLS section contains callback functions that gain execution and prematurely terminate the program in OllyDbg. In IDA Pro, press CTRL-E to see the location of all entry points for the program, as shown in Figure C-63.
Double-click the TLS callback function at 0x401060 to navigate directly to the function and see if there is any anti-debugging functionality. Example C-145 shows the TLS callback code.
Example C-145. FindWindowA check for system residue of OllyDbg
00401063         cmp     [ebp+arg_4], 1
00401067         jnz     short loc_401081
00401069         push    0                       ; lpWindowName
0040106B         push    offset ClassName        ; "OLLYDBG"
00401070         call    ds:FindWindowA ❶
00401076         test    eax, eax
00401078         jz      short loc_401081
0040107A         push    0                       ; int
0040107C         call    _exit ❷
The TLS callback starts with a comparison of arg_4 to 1 to
determine whether the TLS callback is being called as a result of the process starting up. (TLS
callback functions are called at different times by the system.) In other words, this anti-debugging
technique executes only during program startup.
At ❶, the callback calls the FindWindowA function with the class name OLLYDBG. This call makes it easy for the malware to see if OllyDbg is running with its default window name. If FindWindowA finds
the window, it returns a nonzero value, which will cause the exit
function to terminate the program at ❷.
To disable this technique, NOP-out the call to exit at ❷, or use the PhantOm plug-in for OllyDbg as discussed in the previous lab. (Figure C-61 displays the options for the PhantOm plug-in.) If you’re using the PhantOm plug-in, check the Load Driver and Hide OllyDbg Windows boxes to protect against this technique.
Now load the program into OllyDbg, set a breakpoint at the strncmp call at 0x40123A, and add a command-line argument of abcd in OllyDbg before clicking the play button. When you click play, the strncmp function appears to compare abcd to bzqrp@ss; however, strncmp checks only the first 4 bytes of the bzqrp@ss
string. We conclude that the password must be bzqr, but if we try
that password on the command line outside a debugger, we receive the incorrect password error
message. We dig deeper into the code to determine if something else is going on.
We begin by properly labeling the encoded string in the listing. The second parameter passed
on the stack to strncmp is byte_408030 (a global variable), which we know to be a byte array of size 4. We change
this into a 4-byte array and rename it encoded_password.
Next, we see CreateThread called just before the call to
strncmp in the main function.
To look at the code in the thread created by this call, double-click the parameter labeled StartAddress. This function appears to be a decoding routine since it
contains many logical and shift operations on encoded_password.
Examining the decoding routine closely, we see the BeingDebugged
flag accessed, as shown in Example C-146 at ❶ and ❷.
Example C-146. Decoding routine incorporating anti-debugging in its decoding
00401124         ror     encoded_password+2, 7
0040112B         mov     ebx, large fs:30h ❶
00401132         xor     encoded_password+3, 0C5h
...
0040117D         rol     encoded_password, 6
00401184         xor     encoded_password, 72h
0040118B         mov     bl, [ebx+2] ❷
0040118E         rol     encoded_password+1, 1
...
004011A2         add     encoded_password+2, bl ❸
The PEB structure is loaded into EBX at ❶, and
then the BeingDebugged flag is moved into BL at ❷. BL is then used at ❸ to modify the password. The easiest way to prevent the program from using this
technique is to ensure that the BeingDebugged flag is 0, which
can be set either manually or with the PhantOm plug-in for OllyDbg, as discussed in the previous
lab.
We load the program into OllyDbg again and break at the strncmp call at 0x40123A. This time, the password appears to be bzrr. But when we try this password on the command line, we receive the incorrect
password error message again.
Returning to the decoding routine, we see that it uses a global variable, byte_40A968, as shown in Example C-147.
Example C-147. Global byte_40A968 used in the password decoding
0040109B         mov     bl, byte_40A968 ❶
004010A1         or      al, 1
...
0040110A         rol     encoded_password, 2
00401111         add     encoded_password+1, bl ❷
At ❶, byte_40A968 is moved into BL, and BL is used in the decoding code, as seen at ❷. Double-clicking byte_40A968,
we see that it is initialized to 0, but it has a cross-reference to sub_401020. That function is shown in Example C-148.
Example C-148. OutputDebugStringA anti-debugging technique
00401024         mov     [ebp+dwErrCode], 3039h
0040102B         mov     eax, [ebp+dwErrCode]
0040102E         push    eax                     ; dwErrCode
0040102F         call    ds:SetLastError ❷
00401035         push    offset OutputString     ; "b"
0040103A         call    ds:OutputDebugStringA ❶
00401040         call    ds:GetLastError
00401046         cmp     eax, [ebp+dwErrCode] ❸
00401049         jnz     short loc_40105A
0040104B         mov     cl, byte_40A968
00401051         add     cl, 1 ❹
00401054         mov     byte_40A968, cl
At ❶, OutputDebugStringA is called, which sends a string (in this case, "b") to a debugger for display. If there is no debugger attached, an error
code is set. At ❷, SetLastError sets the error code to 0x3039, and the function checks to see if that error
is still present with the comparison at ❸. The error
code changes if the program is running outside a debugger; therefore, the comparison will set the
zero flag if the error code has not changed (running in a debugger). If this check is successful,
the code increments byte_40A968 by 1 at ❹. The easiest way to defeat this technique is to NOP-out the
add instruction at ❹.
Next, we want to track down how the function from Example C-148 (sub_401020)
is called. We check the cross-reference and see that sub_401020
is called from the TLS callback, as shown in Example C-149 (in bold).
Example C-149. The check and call from within the TLS callback
00401081         cmp     [ebp+arg_4], 2
00401085         jnz     short loc_40108C
00401087         call    sub_401020
The code in Example C-149 starts by
comparing arg_4 to the number 2. Recall from our earlier
discussion that arg_4 to the TLS callback is used to determine
when the TLS callback is made: 1 is used for when the process is starting up, 2 for when a thread is
starting up, and 3 when the process is being terminated. Therefore, this TLS callback was called
again when the CreateThread executed and caused the OutputDebugStringA to execute.
To finally get the password, we start with our OllyDbg PhantOm plug-in installed and set up to
protect us from the BeingDebugged flag check and the FindWindow check. We load the program into OllyDbg, NOP-out the add instruction at 0x401051, and set a breakpoint at the strncmp call (0x40123A). This time, the password appears to be byrr. Trying this on the command line, we get the following
message:
You entered the correct password!