Table of Contents for
Practical Malware Analysis
 Practical Malware Analysis
Published by
No Starch Press, 2012
Practical Malware Analysis
Published by
No Starch Press, 2012
- Cover
- Practical Malware Analysis: The Hands-On Guide to Dissecting Malicious Software
- Praise for Practical Malware Analysis
- Warning
- About the Authors
- About the Technical Reviewer
- About the Contributing Authors
- Foreword
- Acknowledgments
- Individual Thanks
- Introduction
- What Is Malware Analysis?
- Prerequisites
- Practical, Hands-On Learning
- What’s in the Book?
- 0. Malware Analysis Primer
- The Goals of Malware Analysis
- Malware Analysis Techniques
- Types of Malware
- General Rules for Malware Analysis
- I. Basic Analysis
- 1. Basic Static Techniques
- Antivirus Scanning: A Useful First Step
- Hashing: A Fingerprint for Malware
- Finding Strings
- Packed and Obfuscated Malware
- Portable Executable File Format
- Linked Libraries and Functions
- Static Analysis in Practice
- The PE File Headers and Sections
- Conclusion
- Labs
- 2. Malware Analysis in Virtual Machines
- The Structure of a Virtual Machine
- Creating Your Malware Analysis Machine
- Using Your Malware Analysis Machine
- The Risks of Using VMware for Malware Analysis
- Record/Replay: Running Your Computer in Reverse
- Conclusion
- 3. Basic Dynamic Analysis
- Sandboxes: The Quick-and-Dirty Approach
- Running Malware
- Monitoring with Process Monitor
- Viewing Processes with Process Explorer
- Comparing Registry Snapshots with Regshot
- Faking a Network
- Packet Sniffing with Wireshark
- Using INetSim
- Basic Dynamic Tools in Practice
- Conclusion
- Labs
- II. Advanced Static Analysis
- 4. A Crash Course in x86 Disassembly
- Levels of Abstraction
- Reverse-Engineering
- The x86 Architecture
- Conclusion
- 5. IDA Pro
- Loading an Executable
- The IDA Pro Interface
- Using Cross-References
- Analyzing Functions
- Using Graphing Options
- Enhancing Disassembly
- Extending IDA with Plug-ins
- Conclusion
- Labs
- 6. Recognizing C Code Constructs in Assembly
- Global vs. Local Variables
- Disassembling Arithmetic Operations
- Recognizing if Statements
- Recognizing Loops
- Understanding Function Call Conventions
- Analyzing switch Statements
- Disassembling Arrays
- Identifying Structs
- Analyzing Linked List Traversal
- Conclusion
- Labs
- 7. Analyzing Malicious Windows Programs
- The Windows API
- The Windows Registry
- Networking APIs
- Following Running Malware
- Kernel vs. User Mode
- The Native API
- Conclusion
- Labs
- III. Advanced Dynamic Analysis
- 8. Debugging
- Source-Level vs. Assembly-Level Debuggers
- Kernel vs. User-Mode Debugging
- Using a Debugger
- Exceptions
- Modifying Execution with a Debugger
- Modifying Program Execution in Practice
- Conclusion
- 9. OllyDbg
- Loading Malware
- The OllyDbg Interface
- Memory Map
- Viewing Threads and Stacks
- Executing Code
- Breakpoints
- Loading DLLs
- Tracing
- Exception Handling
- Patching
- Analyzing Shellcode
- Assistance Features
- Plug-ins
- Scriptable Debugging
- Conclusion
- Labs
- 10. Kernel Debugging with WinDbg
- Drivers and Kernel Code
- Setting Up Kernel Debugging
- Using WinDbg
- Microsoft Symbols
- Kernel Debugging in Practice
- Rootkits
- Loading Drivers
- Kernel Issues for Windows Vista, Windows 7, and x64 Versions
- Conclusion
- Labs
- IV. Malware Functionality
- 11. Malware Behavior
- Downloaders and Launchers
- Backdoors
- Credential Stealers
- Persistence Mechanisms
- Privilege Escalation
- Covering Its Tracks—User-Mode Rootkits
- Conclusion
- Labs
- 12. Covert Malware Launching
- Launchers
- Process Injection
- Process Replacement
- Hook Injection
- Detours
- APC Injection
- Conclusion
- Labs
- 13. Data Encoding
- The Goal of Analyzing Encoding Algorithms
- Simple Ciphers
- Common Cryptographic Algorithms
- Custom Encoding
- Decoding
- Conclusion
- Labs
- 14. Malware-Focused Network Signatures
- Network Countermeasures
- Safely Investigate an Attacker Online
- Content-Based Network Countermeasures
- Combining Dynamic and Static Analysis Techniques
- Understanding the Attacker’s Perspective
- Conclusion
- Labs
- V. Anti-Reverse-Engineering
- 15. Anti-Disassembly
- Understanding Anti-Disassembly
- Defeating Disassembly Algorithms
- Anti-Disassembly Techniques
- Obscuring Flow Control
- Thwarting Stack-Frame Analysis
- Conclusion
- Labs
- 16. Anti-Debugging
- Windows Debugger Detection
- Identifying Debugger Behavior
- Interfering with Debugger Functionality
- Debugger Vulnerabilities
- Conclusion
- Labs
- 17. Anti-Virtual Machine Techniques
- VMware Artifacts
- Vulnerable Instructions
- Tweaking Settings
- Escaping the Virtual Machine
- Conclusion
- Labs
- 18. Packers and Unpacking
- Packer Anatomy
- Identifying Packed Programs
- Unpacking Options
- Automated Unpacking
- Manual Unpacking
- Tips and Tricks for Common Packers
- Analyzing Without Fully Unpacking
- Packed DLLs
- Conclusion
- Labs
- VI. Special Topics
- 19. Shellcode Analysis
- Loading Shellcode for Analysis
- Position-Independent Code
- Identifying Execution Location
- Manual Symbol Resolution
- A Full Hello World Example
- Shellcode Encodings
- NOP Sleds
- Finding Shellcode
- Conclusion
- Labs
- 20. C++ Analysis
- Object-Oriented Programming
- Virtual vs. Nonvirtual Functions
- Creating and Destroying Objects
- Conclusion
- Labs
- 21. 64-Bit Malware
- Why 64-Bit Malware?
- Differences in x64 Architecture
- Windows 32-Bit on Windows 64-Bit
- 64-Bit Hints at Malware Functionality
- Conclusion
- Labs
- A. Important Windows Functions
- B. Tools for Malware Analysis
- C. Solutions to Labs
- Lab 1-1 Solutions
- Lab 1-2 Solutions
- Lab 1-3 Solutions
- Lab 1-4 Solutions
- Lab 3-1 Solutions
- Lab 3-2 Solutions
- Lab 3-3 Solutions
- Lab 3-4 Solutions
- Lab 5-1 Solutions
- Lab 6-1 Solutions
- Lab 6-2 Solutions
- Lab 6-3 Solutions
- Lab 6-4 Solutions
- Lab 7-1 Solutions
- Lab 7-2 Solutions
- Lab 7-3 Solutions
- Lab 9-1 Solutions
- Lab 9-2 Solutions
- Lab 9-3 Solutions
- Lab 10-1 Solutions
- Lab 10-2 Solutions
- Lab 10-3 Solutions
- Lab 11-1 Solutions
- Lab 11-2 Solutions
- Lab 11-3 Solutions
- Lab 12-1 Solutions
- Lab 12-2 Solutions
- Lab 12-3 Solutions
- Lab 12-4 Solutions
- Lab 13-1 Solutions
- Lab 13-2 Solutions
- Lab 13-3 Solutions
- Lab 14-1 Solutions
- Lab 14-2 Solutions
- Lab 14-3 Solutions
- Lab 15-1 Solutions
- Lab 15-2 Solutions
- Lab 15-3 Solutions
- Lab 16-1 Solutions
- Lab 16-2 Solutions
- Lab 16-3 Solutions
- Lab 17-1 Solutions
- Lab 17-2 Solutions
- Lab 17-3 Solutions
- Lab 18-1 Solutions
- Lab 18-2 Solutions
- Lab 18-3 Solutions
- Lab 18-4 Solutions
- Lab 18-5 Solutions
- Lab 19-1 Solutions
- Lab 19-2 Solutions
- Lab 19-3 Solutions
- Lab 20-1 Solutions
- Lab 20-2 Solutions
- Lab 20-3 Solutions
- Lab 21-1 Solutions
- Lab 21-2 Solutions
- Index
- Index
- Index
- Index
- Index
- Index
- Index
- Index
- Index
- Index
- Index
- Index
- Index
- Index
- Index
- Index
- Index
- Index
- Index
- Index
- Index
- Index
- Index
- Index
- Index
- Index
- Index
- Updates
- About the Authors
- Copyright
Dynamic analysis might reveal some random-looking content that may be encoded. There are no recognizable strings in the program output, so nothing else suggests encoding.
Searching for
xorinstructions reveals six separate functions that may be associated with encoding, but the type of encoding is not immediately clear.All three techniques identify the Advanced Encryption Standard (AES) algorithm (Rijndael algorithm), which is associated with all six of the XOR functions identified. The IDA Entropy Plugin also identifies a custom Base64 indexing string, which shows no evidence of association with
xorinstructions.The malware uses AES and a custom Base64 cipher.
The key for AES is
ijklmnopqrstuvwx. The key for the custom Base64 cipher is the index string:CDEFGHIJKLMNOPQRSTUVWXYZABcdefghijklmnopqrstuvwxyzab0123456789+/
The index string is sufficient for the custom Base64 implementation. For AES, variables other than the key may be needed to implement decryption, including the key-generation algorithm if one is used, the key size, the mode of operation, and the initialization vector if one is needed.
The malware establishes a reverse command shell with the incoming commands decoded using the custom Base64 cipher and the outgoing command-shell responses encrypted with AES.
See the detailed analysis for an example of how to decrypt content.
Starting with basic dynamic analysis, we see that the malware tries to resolve the domain name www.practicalmalwareanalysis.com and connect out on TCP port 8910 to that host. We use Netcat to send some content over the connection, and see the malware respond with some random content, but not with any recognizable strings. If we then terminate the socket from the Netcat side, we see a message like this:
ERROR: API    = ReadConsole.
   error code = 0.
   message    = The operation completed successfully.
Examining the output of strings, we see evidence related to all of the strings we have seen so
far: www.practicalmalwareanalysis.com, ERROR: API = %s., error code = %d., message = %s., and ReadConsole. There
are other relevant strings, like WriteConsole and DuplicateHandle, which may be part of error messages like the preceding
ReadConsole error.
The random content seen during dynamic analysis suggests that encoding is being used, although
we can’t tell what is encoded. Certain strings suggest that the malware performs encryption,
including Data not multiple of Block Size, Empty key, Incorrect key length, and
Incorrect block length.
Examining the xor instructions and eliminating those
associated with register clearing and library functions, we find six that contain xor. Given the large number of identified functions, let’s just
label them for now and see how they correspond with the additional techniques we will apply. Table C-6 summarizes how we rename the IDA Pro function
names.
Using the FindCrypt2 plug-in for IDA Pro, we find the constants shown in Example C-105.
Example C-105. FindCrypt2 output
40CB08: found const array Rijndael_Te0 (used in Rijndael)
40CF08: found const array Rijndael_Te1 (used in Rijndael)
40D308: found const array Rijndael_Te2 (used in Rijndael)
40D708: found const array Rijndael_Te3 (used in Rijndael)
40DB08: found const array Rijndael_Td0 (used in Rijndael)
40DF08: found const array Rijndael_Td1 (used in Rijndael)
40E308: found const array Rijndael_Td2 (used in Rijndael)
40E708: found const array Rijndael_Td3 (used in Rijndael)
Found 8 known constant arrays in total.
Example C-105 refers to Rijndael, the original name of the AES cipher.
After looking at the cross-references, it is clear that s_xor2
and s_xor4 are connected with the encryption constants (_TeX), and s_xor3 and s_xor5 are connected with the decryption constants (_TdX).
The PEiD KANAL plug-in reveals AES constants in a similar location. Example C-106 shows the output of the PEiD tool. PEiD’s identification
of S and S-inv refer to the
S-box structures that are a basic component of some cryptographic algorithms.
Example C-106. PEiD KANAL output
RIJNDAEL [S] [char] :: 0000C908 :: 0040C908
RIJNDAEL [S-inv] [char] :: 0000CA08 :: 0040CA08
Finally, the IDA Entropy Plugin shows areas of high entropy. First, an examination of regions
of high 8-bit entropy (256-bit chunk size with a minimum entropy value of 7.9) highlights the area
between 0x0040C900 and 0x0040CB00—the same area previously identified as S-box regions.
Looking at regions of high 6-bit entropy (64-bit chunk size with a minimum entropy value of 5.95),
we also find an area within the .data section between 0x004120A3
and 0x004120A7, as shown in Figure C-49.
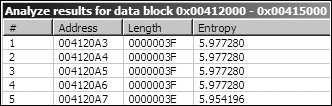
Looking at the high entropy areas shown in Figure C-49, we see a string starting at 0x004120A4 that contains all 64 Base64 characters:
CDEFGHIJKLMNOPQRSTUVWXYZABcdefghijklmnopqrstuvwxyzab0123456789+/
Notice that this is not the standard Base64 string, because the capital AB and the lowercase ab have been moved
to the back of their uppercase or lowercase sections. This malware may use a custom Base64-encoding
algorithm.
Let’s review the relationship between the XOR-related functions we identified and other
information we have collected. From the location of the Rijndael constants we’ve identified,
it is clear that the s_xor2 and s_xor4 functions are related to AES encryption, and that the s_xor3 and s_xor5 functions are related to AES
decryption.
The code inside the s_xor6 function is shown in Figure C-50.
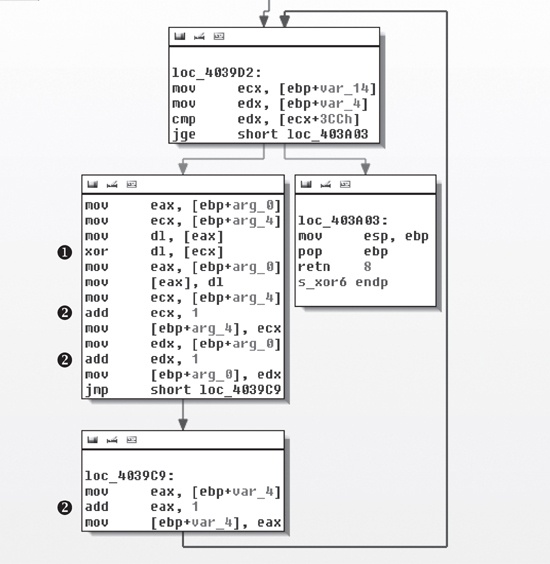
The loop in Figure C-50 contains the xor instruction at ❶ that
shows that s_xor6 is being used for XOR encoding. The variable
arg_0 is a pointer to a source buffer that is being transformed,
and arg_4 points to the buffer providing the XOR material. As the
loop is followed, pointers to the two buffers (arg_0 and arg_4), as well as the counter var_4,
are updated as shown by the three references at ❷.
To determine if s_xor6 is related to the other encoding
functions, we examine its cross-references. The function that calls s_xor6 starts at 0x0040352D. Figure C-51
shows a graph of the function cross-references from 0x0040352D.
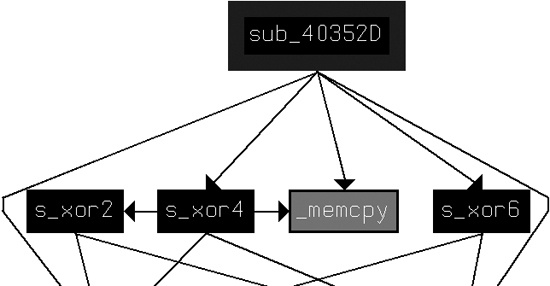
From this graph, we see that s_xor6 is indeed related to
the other AES encryption functions s_xor2 and s_xor4.
Although we have evidence that s_xor3 and s_xor5 are related to AES decryption, the relationship of these two
functions to other functions is less clear. For example, when we look for the cross-reference to
s_xor5, we see that the two locations from which s_xor5 is called (0x004037EE and 0x0040392D) appear to contain valid code,
but the area is not defined as a function. This suggests that while AES code was linked to the
malware, decryption is not used, and thus the decryption routines show up initially as dead
code.
Having identified the function from which s_xor5 is called
(0x00403745) as a decryption function, we re-create a graph that shows all of the functions called
from 0x00403745 (which we rename s_AES_decrypt) and 0x0040352D
(which we rename s_AES_encrypt), as shown in Figure C-52.
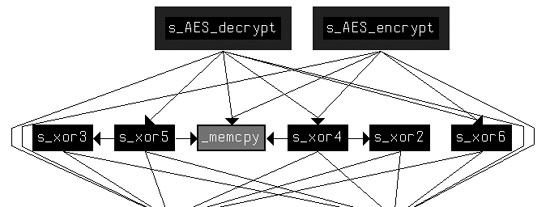
This graph shows more clearly the relationship among all of the AES functions, and in it
we can see that all XOR functions other than s_xor1 are related
to the AES implementation.
Looking at s_xor1, we see several early branches in the
code that occur when the arguments are incorrect, and luckily the malware still has the error
messages present. These error messages include Empty key,
Incorrect key length, and Incorrect
block length, implying that this is the key initialization code.
To confirm that we’ve identified the key initialization code, we can try to find a
connection between this function and the previously identified AES functions. Looking at the calling
function for s_xor1, we see that just before s_xor1 is called, there is a reference to unk_412EF8. This offset is passed to the s_xor1
function using ECX. Looking at other references to unk_412EF8, we
find that 0x401429 is one of the places that the offset of unk_412EF8 is loaded into ECX, just before the call to s_AES_encrypt. The address unk_412EF8 must be a C++
object representing the AES encryptor, and s_xor1 is the
initialization function for that encryptor.
Looking back at s_xor1, we see that the Empty key message is issued after a test of the arg_0 parameter. From this, we can assume that the arg_0 parameter is the key. Looking at the parameter setup in main near the call to s_xor1 (at 0x401895), we can
associate arg_0 with the string ijklmnopqrstuvwx, which is pushed on the stack. This string is the key used for AES in
this malware.
Here’s a review of what we know about how AES is used in this malware:
s_AES_encryptis used in the function at 0x0040132B. The encryption occurs between a call toReadFileand a call toWriteFile.s_xor1is the AES initialization function that occurs once at the start of the process.s_xor1sets the AES password asijklmnopqrstuvwx.
In addition to AES, we identified the possible use of a custom Base64 cipher with the use of
the IDA Entropy Plugin (indicated in Figure C-49).
Examining the references to the string CDEFGHIJKLMNOPQRSTUVWXYZABcdefghijklmnopqrstuvwxyzab0123456789+/, we learn that this
string is in the function at 0x0040103F. This function does the indexed lookup into the string, and
the calling function (at 0x00401082) divides the string to be decoded into 4-byte chunks. The
function at 0x00401082 then is the custom Base64 decode function, and we can see in the function
that calls it (0x0040147C) that the decode function lies in between a ReadFile and a WriteFile. This is the same pattern we
saw for the use of AES, but in a different function.
Before we can decrypt content, we need to determine the connection between the content and
encoding algorithm. As we know, the AES encryption function is used by the function starting at
0x0040132B. Looking at the function that calls the function at 0x0040132B in Example C-107, we see that 0x0040132B is the start of a new
thread created with the CreateThread shown at ❶, so we rename 0x0040132B to aes_thread.
Example C-107. Parameters to CreateThread for aes_thread
00401823                 mov     eax, [ebp+var_18]
00401826                 mov     [ebp+var_58], eax ❷
00401829                 mov     ecx, [ebp+arg_10]
0040182C                 mov     [ebp+var_54], ecx ❸
0040182F                 mov     edx, dword_41336C
00401835                 mov     [ebp+var_50], edx ❹
00401838                 lea     eax, [ebp+var_3C]
0040183B                 push    eax               ; lpThreadId
0040183C                 push    0                 ; dwCreationFlags
0040183E                 lea     ecx, [ebp+var_58]
00401841                 push    ecx               ; lpParameter
00401842                 push    offset aes_thread ; lpStartAddress
00401847                 push    0                 ; dwStackSize
00401849                 push    0                 ; lpThreadAttributes
0040184B                 call    ds:CreateThread ❶
The parameters to the thread start function are passed as the location of var_58, and we see three variables pushed onto the stack relative to
var_58 as follows:
var_18is moved tovar_58at ❷.arg_10is moved tovar_54at ❸.dword_41336Cis moved tovar_50at ❹.
In aes_thread (0x40132B), we see how the parameters are
used. Example C-108 shows select portions of aes_thread with calls to ReadFile and
WriteFile, and the origin of the handles passed to those
functions.
Example C-108. Handles passed to ReadFile and WriteFile in aes_thread
0040137A         mov     eax, [ebp+arg_0]
0040137D         mov     [ebp+var_BE0], eax
...
004013A2         mov     ecx, [ebp+var_BE0]
004013A8         mov     edx, [ecx]
004013AA         push    edx ❶            ; hFile
004013AB         call    ds:ReadFile
...
0040144A         mov     eax, [ebp+var_BE0]
00401450         mov     ecx, [eax+4]
00401453         push    ecx ❷            ; hFile
00401454         call    ds:WriteFile
The value pushed for ReadFile at ❶ can be mapped back to var_58/var_18, as shown in Example C-107 at ❷. The value pushed for WriteFile in Example C-108 at ❷ can be mapped back to var_54/arg_10, as shown in Example C-107 at ❸.
Tracing the handle values back to their origin, we find first that var_58 and var_18 hold a handle to a
pipe that is created early in the function at 0x0040132B, and that this pipe is connected with the
output of a command shell. The command hSourceHandle is copied to
the standard output and standard error of the command shell started by the CreateProcess command at 0x0040177B, as shown in Example C-109.
Example C-109. Connecting a pipe to shell output
00401748                 mov     ecx, [ebp+hSourceHandle]
0040174B                 mov     [ebp+StartupInfo.hStdOutput], ecx
0040174E                 mov     edx, [ebp+hSourceHandle]
00401751                 mov     [ebp+StartupInfo.hStdError], edx
The other handle used by WriteFile in aes_thread (var_54/arg_10) can be traced to the parameter passed in from the _main function (0x00401879)—a networking socket created with the
connect call.
The aes_thread (0x0040132B) function reads the output of
the launched command shell and encrypts it before writing it to the network socket.
The custom Base64-encoding function (0x00401082) is also used in a function (0x0040147C) that is started via its own thread. The tracing of inputs is very similar to the tracing of the inputs for the AES thread, with a mirror image conclusion: The Base64 thread reads as input the remote socket, and after it decodes the function, it sends the result to the input of the command shell.
Having established the two types of encoding in this malware, let’s try to decrypt the
content. Beginning with the custom Base64 encoding, we’ll assume that part of the captured
network communication coming from the remote site is the string: BInaEi==. Example C-110 shows a custom script for
decrypting modified Base64 implementations.
Example C-110. Custom Base64 decryption script
import string
import base64

s = ""
tab = 'CDEFGHIJKLMNOPQRSTUVWXYZABcdefghijklmnopqrstuvwxyzab0123456789+/'
b64 = 'ABCDEFGHIJKLMNOPQRSTUVWXYZabcdefghijklmnopqrstuvwxyz0123456789+/'

ciphertext = 'BInaEi=='

for ch in ciphertext:
    if (ch in tab):
        s += b64[string.find(tab,str(ch))]
    elif (ch == '='):
        s += '='

print base64.decodestring(s)
Note
The code in Example C-110 is a generic
script that can be repurposed for any custom Base64 implementation by redefining the tab variable.
Using this script, we translate the string to see what command was sent to the command shell.
The output in Example C-111 shows that the attacker is
sending a request for a directory listing (dir).
Translating the AES side of the command channel is slightly more challenging. For example, say that the malware sends the raw stream content shown in Example C-112.
Example C-112. AES-encrypted network content
00000000  37 f3 1f 04 51 20 e0 b5  86 ac b6 0f 65 20 89 92 7...Q .. ....e ..
00000010  4f af 98 a4 c8 76 98 a6  4d d5 51 8f a5 cb 51 c5 O....v.. M.Q...Q.
00000020  cf 86 11 0d c5 35 38 5c  9c c5 ab 66 78 40 1d df .....58\ ...fx@..
00000030  4a 53 f0 11 0f 57 6d 4f  b7 c9 c8 bf 29 79 2f c1 JS...WmO ....)y/.
00000040  ec 60 b2 23 00 7b 28 fa  4d c1 7b 81 93 bb ca 9e .`.#.{(. M.{.....
00000050  bb 27 dd 47 b6 be 0b 0f  66 10 95 17 9e d7 c4 8d .'.G.... f.......
00000060  ee 11 09 99 20 49 3b df  de be 6e ef 6a 12 db bd .... I;. ..n.j...
00000070  a6 76 b0 22 13 ee a9 38  2d 2f 56 06 78 cb 2f 91 .v."...8 -/V.x./.
00000080  af 64 af a6 d1 43 f1 f5  47 f6 c2 c8 6f 00 49 39 .d...C.. G...o.I9
The PyCrypto library provides convenient cryptographic routines for dealing with data like this. Using the code shown in Example C-113, we can decrypt the content.
Example C-113. AES decryption script
from Crypto.Cipher import AES
import binascii

raw = ' 37 f3 1f 04 51 20 e0 b5  86 ac b6 0f 65 20 89 92 ' + \
' 4f af 98 a4 c8 76 98 a6  4d d5 51 8f a5 cb 51 c5 ' + \
' cf 86 11 0d c5 35 38 5c  9c c5 ab 66 78 40 1d df ' + \
' 4a 53 f0 11 0f 57 6d 4f  b7 c9 c8 bf 29 79 2f c1 ' + \
' ec 60 b2 23 00 7b 28 fa  4d c1 7b 81 93 bb ca 9e ' + \
' bb 27 dd 47 b6 be 0b 0f  66 10 95 17 9e d7 c4 8d ' + \
' ee 11 09 99 20 49 3b df  de be 6e ef 6a 12 db bd ' + \
' a6 76 b0 22 13 ee a9 38  2d 2f 56 06 78 cb 2f 91 ' + \
' af 64 af a6 d1 43 f1 f5  47 f6 c2 c8 6f 00 49 39 ' ❶

ciphertext = binascii.unhexlify(raw.replace(' ','')) ❷
obj = AES.new('ijklmnopqrstuvwx', AES.MODE_CBC) ❸
print 'Plaintext is:\n' + obj.decrypt(ciphertext) ❹
The raw variable defined at ❶ contains the raw network content identified in Example C-112. The raw.replace
function at ❷ removes the spaces from the raw string, and the binascii.unhexlify
function turns the hex representation into a binary string. The AES.new call at ❸ creates a new AES object
with the appropriate password and mode of operation, which allows for the following decrypt call at
❹.
The output of the AES script is shown in Example C-114. Note that this captured content was simply a command prompt.
The default use of the PyCrypto library routines worked successfully in Lab 13-3 Solutions, but there are many potential pitfalls when trying to implement decryption routines directly, including the following:
Block cryptography algorithms have many possible modes of operation, such as Electronic Code Book (ECB), Cipher Block Chaining (CBC), and Cipher Feedback (CFB). Each mode requires a different set of steps between the encoding or decoding of each block, and some require an initialization vector in addition to a password. If you don’t match the implementation used, decryption may work only partially or not at all.
In this lab, the key was provided directly. A given implementation may have its own technique for generating a key given a user-provided or string-based password. In such cases, the key-generation algorithm will need to be identified and duplicated separately.
Within a standard algorithm, there may be options that must be specified correctly. For example, a single encryption algorithm may allow multiple key sizes, block sizes, rounds of encryption or decryption, and padding strategies.