Table of Contents for
Practical Malware Analysis
 Practical Malware Analysis
Published by
No Starch Press, 2012
Practical Malware Analysis
Published by
No Starch Press, 2012
- Cover
- Practical Malware Analysis: The Hands-On Guide to Dissecting Malicious Software
- Praise for Practical Malware Analysis
- Warning
- About the Authors
- About the Technical Reviewer
- About the Contributing Authors
- Foreword
- Acknowledgments
- Individual Thanks
- Introduction
- What Is Malware Analysis?
- Prerequisites
- Practical, Hands-On Learning
- What’s in the Book?
- 0. Malware Analysis Primer
- The Goals of Malware Analysis
- Malware Analysis Techniques
- Types of Malware
- General Rules for Malware Analysis
- I. Basic Analysis
- 1. Basic Static Techniques
- Antivirus Scanning: A Useful First Step
- Hashing: A Fingerprint for Malware
- Finding Strings
- Packed and Obfuscated Malware
- Portable Executable File Format
- Linked Libraries and Functions
- Static Analysis in Practice
- The PE File Headers and Sections
- Conclusion
- Labs
- 2. Malware Analysis in Virtual Machines
- The Structure of a Virtual Machine
- Creating Your Malware Analysis Machine
- Using Your Malware Analysis Machine
- The Risks of Using VMware for Malware Analysis
- Record/Replay: Running Your Computer in Reverse
- Conclusion
- 3. Basic Dynamic Analysis
- Sandboxes: The Quick-and-Dirty Approach
- Running Malware
- Monitoring with Process Monitor
- Viewing Processes with Process Explorer
- Comparing Registry Snapshots with Regshot
- Faking a Network
- Packet Sniffing with Wireshark
- Using INetSim
- Basic Dynamic Tools in Practice
- Conclusion
- Labs
- II. Advanced Static Analysis
- 4. A Crash Course in x86 Disassembly
- Levels of Abstraction
- Reverse-Engineering
- The x86 Architecture
- Conclusion
- 5. IDA Pro
- Loading an Executable
- The IDA Pro Interface
- Using Cross-References
- Analyzing Functions
- Using Graphing Options
- Enhancing Disassembly
- Extending IDA with Plug-ins
- Conclusion
- Labs
- 6. Recognizing C Code Constructs in Assembly
- Global vs. Local Variables
- Disassembling Arithmetic Operations
- Recognizing if Statements
- Recognizing Loops
- Understanding Function Call Conventions
- Analyzing switch Statements
- Disassembling Arrays
- Identifying Structs
- Analyzing Linked List Traversal
- Conclusion
- Labs
- 7. Analyzing Malicious Windows Programs
- The Windows API
- The Windows Registry
- Networking APIs
- Following Running Malware
- Kernel vs. User Mode
- The Native API
- Conclusion
- Labs
- III. Advanced Dynamic Analysis
- 8. Debugging
- Source-Level vs. Assembly-Level Debuggers
- Kernel vs. User-Mode Debugging
- Using a Debugger
- Exceptions
- Modifying Execution with a Debugger
- Modifying Program Execution in Practice
- Conclusion
- 9. OllyDbg
- Loading Malware
- The OllyDbg Interface
- Memory Map
- Viewing Threads and Stacks
- Executing Code
- Breakpoints
- Loading DLLs
- Tracing
- Exception Handling
- Patching
- Analyzing Shellcode
- Assistance Features
- Plug-ins
- Scriptable Debugging
- Conclusion
- Labs
- 10. Kernel Debugging with WinDbg
- Drivers and Kernel Code
- Setting Up Kernel Debugging
- Using WinDbg
- Microsoft Symbols
- Kernel Debugging in Practice
- Rootkits
- Loading Drivers
- Kernel Issues for Windows Vista, Windows 7, and x64 Versions
- Conclusion
- Labs
- IV. Malware Functionality
- 11. Malware Behavior
- Downloaders and Launchers
- Backdoors
- Credential Stealers
- Persistence Mechanisms
- Privilege Escalation
- Covering Its Tracks—User-Mode Rootkits
- Conclusion
- Labs
- 12. Covert Malware Launching
- Launchers
- Process Injection
- Process Replacement
- Hook Injection
- Detours
- APC Injection
- Conclusion
- Labs
- 13. Data Encoding
- The Goal of Analyzing Encoding Algorithms
- Simple Ciphers
- Common Cryptographic Algorithms
- Custom Encoding
- Decoding
- Conclusion
- Labs
- 14. Malware-Focused Network Signatures
- Network Countermeasures
- Safely Investigate an Attacker Online
- Content-Based Network Countermeasures
- Combining Dynamic and Static Analysis Techniques
- Understanding the Attacker’s Perspective
- Conclusion
- Labs
- V. Anti-Reverse-Engineering
- 15. Anti-Disassembly
- Understanding Anti-Disassembly
- Defeating Disassembly Algorithms
- Anti-Disassembly Techniques
- Obscuring Flow Control
- Thwarting Stack-Frame Analysis
- Conclusion
- Labs
- 16. Anti-Debugging
- Windows Debugger Detection
- Identifying Debugger Behavior
- Interfering with Debugger Functionality
- Debugger Vulnerabilities
- Conclusion
- Labs
- 17. Anti-Virtual Machine Techniques
- VMware Artifacts
- Vulnerable Instructions
- Tweaking Settings
- Escaping the Virtual Machine
- Conclusion
- Labs
- 18. Packers and Unpacking
- Packer Anatomy
- Identifying Packed Programs
- Unpacking Options
- Automated Unpacking
- Manual Unpacking
- Tips and Tricks for Common Packers
- Analyzing Without Fully Unpacking
- Packed DLLs
- Conclusion
- Labs
- VI. Special Topics
- 19. Shellcode Analysis
- Loading Shellcode for Analysis
- Position-Independent Code
- Identifying Execution Location
- Manual Symbol Resolution
- A Full Hello World Example
- Shellcode Encodings
- NOP Sleds
- Finding Shellcode
- Conclusion
- Labs
- 20. C++ Analysis
- Object-Oriented Programming
- Virtual vs. Nonvirtual Functions
- Creating and Destroying Objects
- Conclusion
- Labs
- 21. 64-Bit Malware
- Why 64-Bit Malware?
- Differences in x64 Architecture
- Windows 32-Bit on Windows 64-Bit
- 64-Bit Hints at Malware Functionality
- Conclusion
- Labs
- A. Important Windows Functions
- B. Tools for Malware Analysis
- C. Solutions to Labs
- Lab 1-1 Solutions
- Lab 1-2 Solutions
- Lab 1-3 Solutions
- Lab 1-4 Solutions
- Lab 3-1 Solutions
- Lab 3-2 Solutions
- Lab 3-3 Solutions
- Lab 3-4 Solutions
- Lab 5-1 Solutions
- Lab 6-1 Solutions
- Lab 6-2 Solutions
- Lab 6-3 Solutions
- Lab 6-4 Solutions
- Lab 7-1 Solutions
- Lab 7-2 Solutions
- Lab 7-3 Solutions
- Lab 9-1 Solutions
- Lab 9-2 Solutions
- Lab 9-3 Solutions
- Lab 10-1 Solutions
- Lab 10-2 Solutions
- Lab 10-3 Solutions
- Lab 11-1 Solutions
- Lab 11-2 Solutions
- Lab 11-3 Solutions
- Lab 12-1 Solutions
- Lab 12-2 Solutions
- Lab 12-3 Solutions
- Lab 12-4 Solutions
- Lab 13-1 Solutions
- Lab 13-2 Solutions
- Lab 13-3 Solutions
- Lab 14-1 Solutions
- Lab 14-2 Solutions
- Lab 14-3 Solutions
- Lab 15-1 Solutions
- Lab 15-2 Solutions
- Lab 15-3 Solutions
- Lab 16-1 Solutions
- Lab 16-2 Solutions
- Lab 16-3 Solutions
- Lab 17-1 Solutions
- Lab 17-2 Solutions
- Lab 17-3 Solutions
- Lab 18-1 Solutions
- Lab 18-2 Solutions
- Lab 18-3 Solutions
- Lab 18-4 Solutions
- Lab 18-5 Solutions
- Lab 19-1 Solutions
- Lab 19-2 Solutions
- Lab 19-3 Solutions
- Lab 20-1 Solutions
- Lab 20-2 Solutions
- Lab 20-3 Solutions
- Lab 21-1 Solutions
- Lab 21-2 Solutions
- Index
- Index
- Index
- Index
- Index
- Index
- Index
- Index
- Index
- Index
- Index
- Index
- Index
- Index
- Index
- Index
- Index
- Index
- Index
- Index
- Index
- Index
- Index
- Index
- Index
- Index
- Index
- Updates
- About the Authors
- Copyright
The malware immediately terminates inside a VM, unlike Lab 12-2 Solutions, which performs process replacement on svchost.exe.
If you force the jumps at 0x4019A1, 0x4019C0, and 0x401467 to be taken, and the jump at 0x401A2F to not be taken, the malware performs process replacement using a keylogger from its resource section.
The malware uses four different anti-VM techniques:
It uses the backdoor I/O communication port.
It searches the registry key
SYSTEM\CurrentControlSet\Control\DeviceClassesfor the stringvmware.It checks the MAC address to see if it is the default used by VMware.
It searches the process list with a string-hashing function for processes starting with the string
vmware.
To avoid the anti-VM techniques used by this malware, you can remove VMware tools and modify the MAC address.
In OllyDbg, you can apply the following patches:
NOP-out the instruction at 0x40145D.
Change the instructions at 0x40199F and 0x4019BE to
xor eax, eax.Modify the instruction at 0x40169F to
jmp 0x40184A.
As noted in the lab description, this malware is the same as Lab12-02.exe except that it includes anti-VM techniques. Therefore, a good place to start is with a review of Lab 12-2 Solutions.
We begin by loading the binary into IDA Pro and searching for vulnerable x86 instructions
using findAntiVM.py (as in Lab 17-1 Solutions). This script
identifies one anti-VM instruction at 0x401AC8 and highlights it in red. We notice that this is the
backdoor I/O communication port being queried via the in
instruction. This anti-VM technique is contained in the function named sub_401A80 by IDA Pro. This function returns 1 if it is executing inside a VM; otherwise,
it returns 0. There is only one cross-reference from the beginning of the main function, as shown at ❶ in Example C-165.
Example C-165. The check after the call to query the I/O communication port
0040199A         call    sub_401A80 ❶   ; Query I/O communication port
0040199F         test    eax, eax ❸
004019A1         jz      short loc_4019AA ❷
004019A3         xor     eax, eax
004019A5         jmp     loc_401A71
The jz instruction at ❷ must be taken, or the main
method will terminate immediately by jumping to 0x401A71. We disable this anti-VM technique by
setting the zero flag to 1 when execution arrives at the jz
instruction. To permanently disable this technique, change the test instruction at ❸ into xor eax, eax as follows:
Start OllyDbg and place your cursor on line 0x40199F.
Press the spacebar and enter
xor eax,
eax
in the text box.Click Assemble.
Next, we use Strings to compare the output from Lab 12-2 Solutions to the output from Lab17-03.exe. The following are the new strings found in this lab:
vmware
SYSTEM\CurrentControlSet\Control\DeviceClasses
Iphlpapi.dll
GetAdaptersInfo
These strings provide us with interesting leads. For example, the string SYSTEM\CurrentControlSet\Control\DeviceClasses appears to be a registry
path, and GetAdaptersInfo is a function used for getting
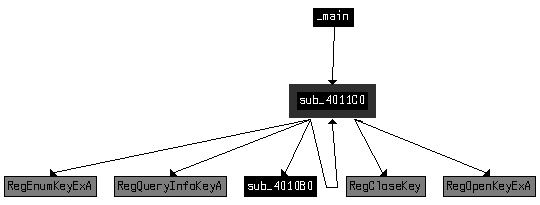
information about the network adapter. Digging deeper into the first string in the listing, vmware, with IDA Pro, we find only one cross-reference to this string from
the subroutine sub_4011C0.
Figure C-66 shows the cross-reference graph for
sub_4011C0. The arrows leaving sub_4011C0 show that it calls several registry functions. The function also calls itself,
as shown by the arrow that loops back (making it a recursive function). Based on the graph, we
suspect that the function is recursively checking the registry for the string vmware. Finally, Figure C-66 shows that sub_4011C0 is called from main.
Example C-166 shows where sub_4011C0 is called at ❶
inside the main function. Three parameters are pushed onto the
stack before the call, including the registry key, which we saw in the strings listing.
Example C-166. The parameters for sub_4011C0 and the check after
004019AA         push    2                ; int
004019AC         push    offset SubKey    ; "SYSTEM\\CurrentControlSet\\Control\\Device"...
004019B1         push    80000002h        ; hKey
004019B6         call    sub_4011C0 ❶
004019BB         add     esp, 0Ch
004019BE         test    eax, eax ❸
004019C0         jz      short loc_4019C9 ❷
Since SYSTEM\CurrentControlSet\Control\DeviceClasses
is passed to a recursive registry function, we can assume this function is recursively checking the
registry from that path on. This is a system residue check, as described in Chapter 17. If you examine sub_4011C0 further, you will see it loop through the registry subkeys under DeviceClasses. It compares the first six characters (after changing them
to lowercase) of each subkey name to the string vmware.
Since our goal is to have the malware run in our safe environment, we just need to ensure that
the jz instruction at ❷ is taken; otherwise, the program will terminate immediately. We disable this anti-VM
technique by making sure the zero flag is 1 when we arrive at the jz instruction. We can permanently disable this check by changing the test instruction at ❸ into
xor eax, eax using OllyDbg, as described in Searching for Vulnerable Instructions.
Next, we use IDA Pro to check the cross-references for the string GetAdaptersInfo. In Example C-167, we see the
string referenced at ❶.
Example C-167. The dynamic resolution of GetAdaptersInfo
004019C9         push    offset aGetadaptersinf  ; "GetAdaptersInfo" ❶
004019CE         push    offset LibFileName      ; "Iphlpapi.dll"
004019D3         call    ds:LoadLibraryA
004019D9         push    eax                     ; hModule
004019DA         call    ds:GetProcAddress
004019E0         mov     GetAdaptersInfo_Address ❷, eax
The malware dynamically resolves GetAdaptersInfo using
LoadLibraryA and GetProcAddress, and loads the resulting address into a global variable, which we have
renamed GetAdaptersInfo_Address at ❷ to make it easier to recognize function calls to the
runtime-loaded address of GetAdaptersInfo.
Checking the cross-references to GetAdaptersInfo_Address,
we see it called in two places within the function sub_401670. At
a high level, this function appears similar to a function we examined in Lab 12-2 Solutions that loaded the resource section containing the keylogger. However,
the function in this lab appears to have a bunch of code added to the start. Let’s examine
that code.
Example C-168 shows the start of a series of byte
moves at ❶. This byte array initialization can be
converted to a byte array by double-clicking var_38 and setting
it to an array of size 27. We rename the array to Byte_Array to
aid our analysis later on.
Example C-168. Byte array initialization and first call to GetAdaptersInfo_Address
004016A8        mov     [ebp+var_38], 0 ❶
004016AC        mov     [ebp+var_37], 50h
004016B0        mov     [ebp+var_36], 56h
004016B4        mov     [ebp+var_35], 0
004016B8        mov     [ebp+var_34], 0Ch
004016BC        mov     [ebp+var_33], 29h
...
0040170C        mov     [ebp+var_1F], 0
00401710        mov     [ebp+var_1E], 27h
00401714        mov     [ebp+dwBytes], 0
0040171B        lea     eax, [ebp+dwBytes]
0040171E        push    eax
0040171F        push    0
00401721        call    GetAdaptersInfo_Address ❷
The call to GetAdaptersInfo_Address at ❷ in Example C-168
takes two parameters: a linked list of IP_ADAPTER_INFO structures
and the size of that linked list. Here, the linked list passed in is NULL, and the size will be
returned in dwBytes. Calling GetAdaptersInfo_Address with the first parameter set to NULL is an easy way to figure out
how much data it returns in order to allocate memory for the linked list structure to be used in a
second call to GetAdaptersInfo_Address. This is the reason the
malware uses dwBytes in subsequent calls to GetProcessHeap and HeapAlloc.
Example C-169 shows that the malware uses
HeapAlloc at ❶ and
calls GetAdaptersInfo_Address a second time at ❷.
Example C-169. Second call to GetAdaptersInfo_Address, which populates
the results
0040174B         call    ds:HeapAlloc ❶
00401751         mov     [ebp+lpMem], eax ❸
00401754         cmp     [ebp+lpMem], 0
...
00401766         lea     edx, [ebp+dwBytes]
00401769         push    edx
0040176A         mov     eax, [ebp+lpMem]
0040176D         push    eax
0040176E         call    GetAdaptersInfo_Address ❷
The parameter labeled lpMem by IDA Pro is the return value
from HeapAlloc, as seen at ❸. This parameter is passed to the second call of GetAdaptersInfo_Address at ❷ instead of NULL.
After the call to GetAdaptersInfo_Address, the lpMem parameter is a pointer to a linked list of IP_ADAPTER_INFO structures with a size of dwBytes.
We must add the IP_ADAPTER_INFO structure to IDA Pro since
it failed to recognize and label things fully. To do so, press the INSERT key within the Structures window and add the standard structure IP_ADAPTER_INFO. Now apply the structure to data in our disassembly as
shown in Table C-9 at ❶, ❷, and ❸.
Table C-9. Before and After Applying Structure Information and Standard Constants
The left side of Table C-9 shows the code
listing before we apply the IP_ADAPTER_INFO structure offsets and
standard constants to the data. To apply the structure, right-click the locations ❶, ❷, and ❸, and you will be given the option to turn numbers into the
descriptive strings shown in bold in the right side of the table. Using the MSDN page for IP_ADAPTER_INFO as reference, we learn about the standard constants for
Type and see that 0x6 and 0x71 correspond to an adapter type of
Ethernet or 802.11 wireless (so the address will be a MAC address).
In the three comparisons shown in Table C-9, the malware is checking for Ethernet or wireless interfaces, and then confirming that the adapter address length is greater than 2. If this check fails, the malware loops to the next adapter in the linked list. If the check succeeds, the code shown in Example C-170 will execute.
Example C-170. Comparing the adapter address to Byte_Array
004017CC         jmp     short loc_4017D7
004017CE         mov     edx, [ebp+var_3C]
004017D1         add     edx, 3 ❸
004017D4         mov     [ebp+var_3C], edx
...
004017DD         mov     ecx, 3 ❹
004017E2         mov     eax, [ebp+var_3C]
004017E5         lea     edi, [ebp+eax+Byte_Array] ❷
004017E9         mov     esi, [ebp+lpMem]
004017EC         add     esi, 194h ❶
004017F2         xor     edx, edx
004017F4         repe cmpsb
004017F6         jnz     short loc_401814
To make this code more readable, right-click the 194h at
❶ and change it to IP_ADAPTER_INFO.Address.
The code is comparing the currently referenced IP_ADAPTER_INFO’s address to an index in Byte_Array. Byte_Array is indexed at ❷ using EAX, which is filled with var_3C, a loop counter that we see incremented by 3 at ❸. The repe cmpsb instruction compares Byte_Array to the IP_ADAPTER_INFO.Address for 3 bytes (because ECX is set to 3 at ❹), which means it is checking to see if the first 3 bytes of the
MAC address are {00h,50h,56h} or {00h,0Ch,29h} and so on. An Internet search for “00,0C,29” tells us that it is a common start of the
default MAC address for VMware. Since the array is of size 27, we know that this code compares nine
different MAC addresses (most associated with VMware).
We permanently disable this check by avoiding the MAC address comparisons altogether. Modify
the jnz instruction at 0x40169F to be jmp 0x40184A using OllyDbg’s Assemble functionality, as we did earlier to force the
malware to skip the adapter checks and go straight to the resource section manipulation code.
The final anti-VM check in this malware is in sub_401400,
which performs process replacement. The code in Example C-171 shows a call
at ❶, which determines if the jz at ❷ will be taken. If the jump is not
taken, the code will terminate without performing the process replacement.
Example C-171. Final anti-VM check
00401448         xor     eax, eax ❸
...
00401456         push    6
00401458         push    0F30D12A5h
0040145D         call    sub_401130 ❶
00401462         add     esp, 8
00401465         test    eax, eax
00401467         jz      short loc_401470 ❷
As shown in Example C-171, the anti-VM function sub_401130 takes two parameters: 6 and
the integer 0xF30D12A5. This function loops through the process
listing by calling CreateToolhelp32Snapshot, Process32First, and Process32Next.
Process32Next is inside a loop with the code shown in Example C-172.
Example C-172. Code for comparing a process name string
0040116D         mov     edx, [ebp+arg_4]
00401170         push    edx
00401171         lea     eax, [ebp+pe.szExeFile]
00401177         push    eax
00401178         call    sub_401060 ❶  ; make lowercase
0040117D         add     esp, 4
00401180         push    eax
00401181         call    sub_401000 ❷  ; get string hash
00401186         add     esp, 8
00401189         mov     [ebp+var_130], eax
0040118F         mov     ecx, [ebp+var_130]
00401195         cmp     ecx, [ebp+arg_0] ❸
The function sub_401060 called at ❶ takes a single parameter containing the name of the process and
sets all of the parameter’s characters to lowercase. The function sub_401000 called at ❷ takes two parameters:
6 (arg_4) and the lowercase
string returned from sub_401060. The result of this function is
compared to the 0xF30D12A5 (arg_0) at ❸. If the result is equal to 0xF30D12A5, the function will return
1, which will cause the malware to terminate. In other words, sub_401000 is taking the process name and turning it into a number, and then seeing if
that number is equal to a preset value. sub_401000 is a simple
string-hashing function. Given the parameter "vmware", it returns
0xF30D12A5. The malware is cleverly using a string hash to avoid using the string vmware in the comparison, which would have made easy pickings for the
malware analyst.
To permanently disable this final anti-VM check, we can NOP-out the call to sub_401130 at 0x40145D. This forces the malware to skip the check and go
straight to the process-replacement code because the xor at
❸ in Example C-171 ensures that
the EAX register will be 0.
This malware performs four different checks for VMware. Three of these check for system residue, and the other queries the I/O communication port. The system residue checking techniques include the following:
Check the first 3 bytes of the MAC address for known values associated with virtual machines.
Check the registry for the key
vmwareunder the registry pathSYSTEM\CurrentControlSet\Control\DeviceClasses.Check the process listing for processes beginning with the string
vmwarein any combination of uppercase and lowercase letters.