Table of Contents for
Practical Malware Analysis
 Practical Malware Analysis
Published by
No Starch Press, 2012
Practical Malware Analysis
Published by
No Starch Press, 2012
- Cover
- Practical Malware Analysis: The Hands-On Guide to Dissecting Malicious Software
- Praise for Practical Malware Analysis
- Warning
- About the Authors
- About the Technical Reviewer
- About the Contributing Authors
- Foreword
- Acknowledgments
- Individual Thanks
- Introduction
- What Is Malware Analysis?
- Prerequisites
- Practical, Hands-On Learning
- What’s in the Book?
- 0. Malware Analysis Primer
- The Goals of Malware Analysis
- Malware Analysis Techniques
- Types of Malware
- General Rules for Malware Analysis
- I. Basic Analysis
- 1. Basic Static Techniques
- Antivirus Scanning: A Useful First Step
- Hashing: A Fingerprint for Malware
- Finding Strings
- Packed and Obfuscated Malware
- Portable Executable File Format
- Linked Libraries and Functions
- Static Analysis in Practice
- The PE File Headers and Sections
- Conclusion
- Labs
- 2. Malware Analysis in Virtual Machines
- The Structure of a Virtual Machine
- Creating Your Malware Analysis Machine
- Using Your Malware Analysis Machine
- The Risks of Using VMware for Malware Analysis
- Record/Replay: Running Your Computer in Reverse
- Conclusion
- 3. Basic Dynamic Analysis
- Sandboxes: The Quick-and-Dirty Approach
- Running Malware
- Monitoring with Process Monitor
- Viewing Processes with Process Explorer
- Comparing Registry Snapshots with Regshot
- Faking a Network
- Packet Sniffing with Wireshark
- Using INetSim
- Basic Dynamic Tools in Practice
- Conclusion
- Labs
- II. Advanced Static Analysis
- 4. A Crash Course in x86 Disassembly
- Levels of Abstraction
- Reverse-Engineering
- The x86 Architecture
- Conclusion
- 5. IDA Pro
- Loading an Executable
- The IDA Pro Interface
- Using Cross-References
- Analyzing Functions
- Using Graphing Options
- Enhancing Disassembly
- Extending IDA with Plug-ins
- Conclusion
- Labs
- 6. Recognizing C Code Constructs in Assembly
- Global vs. Local Variables
- Disassembling Arithmetic Operations
- Recognizing if Statements
- Recognizing Loops
- Understanding Function Call Conventions
- Analyzing switch Statements
- Disassembling Arrays
- Identifying Structs
- Analyzing Linked List Traversal
- Conclusion
- Labs
- 7. Analyzing Malicious Windows Programs
- The Windows API
- The Windows Registry
- Networking APIs
- Following Running Malware
- Kernel vs. User Mode
- The Native API
- Conclusion
- Labs
- III. Advanced Dynamic Analysis
- 8. Debugging
- Source-Level vs. Assembly-Level Debuggers
- Kernel vs. User-Mode Debugging
- Using a Debugger
- Exceptions
- Modifying Execution with a Debugger
- Modifying Program Execution in Practice
- Conclusion
- 9. OllyDbg
- Loading Malware
- The OllyDbg Interface
- Memory Map
- Viewing Threads and Stacks
- Executing Code
- Breakpoints
- Loading DLLs
- Tracing
- Exception Handling
- Patching
- Analyzing Shellcode
- Assistance Features
- Plug-ins
- Scriptable Debugging
- Conclusion
- Labs
- 10. Kernel Debugging with WinDbg
- Drivers and Kernel Code
- Setting Up Kernel Debugging
- Using WinDbg
- Microsoft Symbols
- Kernel Debugging in Practice
- Rootkits
- Loading Drivers
- Kernel Issues for Windows Vista, Windows 7, and x64 Versions
- Conclusion
- Labs
- IV. Malware Functionality
- 11. Malware Behavior
- Downloaders and Launchers
- Backdoors
- Credential Stealers
- Persistence Mechanisms
- Privilege Escalation
- Covering Its Tracks—User-Mode Rootkits
- Conclusion
- Labs
- 12. Covert Malware Launching
- Launchers
- Process Injection
- Process Replacement
- Hook Injection
- Detours
- APC Injection
- Conclusion
- Labs
- 13. Data Encoding
- The Goal of Analyzing Encoding Algorithms
- Simple Ciphers
- Common Cryptographic Algorithms
- Custom Encoding
- Decoding
- Conclusion
- Labs
- 14. Malware-Focused Network Signatures
- Network Countermeasures
- Safely Investigate an Attacker Online
- Content-Based Network Countermeasures
- Combining Dynamic and Static Analysis Techniques
- Understanding the Attacker’s Perspective
- Conclusion
- Labs
- V. Anti-Reverse-Engineering
- 15. Anti-Disassembly
- Understanding Anti-Disassembly
- Defeating Disassembly Algorithms
- Anti-Disassembly Techniques
- Obscuring Flow Control
- Thwarting Stack-Frame Analysis
- Conclusion
- Labs
- 16. Anti-Debugging
- Windows Debugger Detection
- Identifying Debugger Behavior
- Interfering with Debugger Functionality
- Debugger Vulnerabilities
- Conclusion
- Labs
- 17. Anti-Virtual Machine Techniques
- VMware Artifacts
- Vulnerable Instructions
- Tweaking Settings
- Escaping the Virtual Machine
- Conclusion
- Labs
- 18. Packers and Unpacking
- Packer Anatomy
- Identifying Packed Programs
- Unpacking Options
- Automated Unpacking
- Manual Unpacking
- Tips and Tricks for Common Packers
- Analyzing Without Fully Unpacking
- Packed DLLs
- Conclusion
- Labs
- VI. Special Topics
- 19. Shellcode Analysis
- Loading Shellcode for Analysis
- Position-Independent Code
- Identifying Execution Location
- Manual Symbol Resolution
- A Full Hello World Example
- Shellcode Encodings
- NOP Sleds
- Finding Shellcode
- Conclusion
- Labs
- 20. C++ Analysis
- Object-Oriented Programming
- Virtual vs. Nonvirtual Functions
- Creating and Destroying Objects
- Conclusion
- Labs
- 21. 64-Bit Malware
- Why 64-Bit Malware?
- Differences in x64 Architecture
- Windows 32-Bit on Windows 64-Bit
- 64-Bit Hints at Malware Functionality
- Conclusion
- Labs
- A. Important Windows Functions
- B. Tools for Malware Analysis
- C. Solutions to Labs
- Lab 1-1 Solutions
- Lab 1-2 Solutions
- Lab 1-3 Solutions
- Lab 1-4 Solutions
- Lab 3-1 Solutions
- Lab 3-2 Solutions
- Lab 3-3 Solutions
- Lab 3-4 Solutions
- Lab 5-1 Solutions
- Lab 6-1 Solutions
- Lab 6-2 Solutions
- Lab 6-3 Solutions
- Lab 6-4 Solutions
- Lab 7-1 Solutions
- Lab 7-2 Solutions
- Lab 7-3 Solutions
- Lab 9-1 Solutions
- Lab 9-2 Solutions
- Lab 9-3 Solutions
- Lab 10-1 Solutions
- Lab 10-2 Solutions
- Lab 10-3 Solutions
- Lab 11-1 Solutions
- Lab 11-2 Solutions
- Lab 11-3 Solutions
- Lab 12-1 Solutions
- Lab 12-2 Solutions
- Lab 12-3 Solutions
- Lab 12-4 Solutions
- Lab 13-1 Solutions
- Lab 13-2 Solutions
- Lab 13-3 Solutions
- Lab 14-1 Solutions
- Lab 14-2 Solutions
- Lab 14-3 Solutions
- Lab 15-1 Solutions
- Lab 15-2 Solutions
- Lab 15-3 Solutions
- Lab 16-1 Solutions
- Lab 16-2 Solutions
- Lab 16-3 Solutions
- Lab 17-1 Solutions
- Lab 17-2 Solutions
- Lab 17-3 Solutions
- Lab 18-1 Solutions
- Lab 18-2 Solutions
- Lab 18-3 Solutions
- Lab 18-4 Solutions
- Lab 18-5 Solutions
- Lab 19-1 Solutions
- Lab 19-2 Solutions
- Lab 19-3 Solutions
- Lab 20-1 Solutions
- Lab 20-2 Solutions
- Lab 20-3 Solutions
- Lab 21-1 Solutions
- Lab 21-2 Solutions
- Index
- Index
- Index
- Index
- Index
- Index
- Index
- Index
- Index
- Index
- Index
- Index
- Index
- Index
- Index
- Index
- Index
- Index
- Index
- Index
- Index
- Index
- Index
- Index
- Index
- Index
- Index
- Updates
- About the Authors
- Copyright
You can get the program to install itself by providing it with the
-inoption, along with the password. Alternatively, you can patch the binary to skip the password verification check.The command-line options for the program are one of four values and the password. The password is the string
abcdand is required for all actions except the default behavior. The-inoption instructs the malware to install itself. The-reoption instructs the malware to remove itself. The-coption instructs the malware to update its configuration, including its beacon IP address. The-ccoption instructs the malware to print its current configuration to the console. By default, this malware functions as a backdoor if installed.You can patch the binary by changing the first bytes of the function at address 0x402510 to always return true. The assembly instruction for this behavior is
MOV EAX,
0x1; RETN;
, which corresponds to the byte sequence B8 01 00 00 00 C3.The malware creates the registry key
HKLM\Software\Microsoft\XPS\Configuration(note the trailing space afterMicrosoft). The malware also creates the serviceXYZManager Service, whereXYZcan be a parameter provided at install time or the name of the malware executable. Finally, when the malware copies itself into the Windows System directory, it may change the filename to match the service name.The malware can be instructed to execute one of five commands via the network:
SLEEP,UPLOAD,DOWNLOAD,CMD, orNOTHING. TheSLEEPcommand instructs the malware to perform no action for a given period of time. TheUPLOADcommand reads a file from the network and writes it to the local system at a specified path. TheDOWNLOADcommand instructs the malware to send the contents of a local file over the network to the remote host. TheCMDcommand causes the malware to execute a shell command on the local system. TheNOTHINGcommand is a no-op command that causes the malware to do nothing.By default, the malware beacons http://www.practicalmalwareanalysis.com/; however, this is configurable. The beacons are HTTP/1.0
GETrequests for resources in the formxxxx/xxxx.xxx, wherexis a random alphanumeric ASCII character. The malware does not provide any HTTP headers with its requests.
We start by debugging the malware with OllyDbg. We use the F8 key to step-over until we arrive
at the address 0x403945, which is the call to the main function.
(The easiest way to figure out that the main function starts at
0x402AF0 is by using IDA Pro.) Next, we use the F7 key to step-into the call to the main function. We continue to step forward using F7 and F8 while noting
the behavior of the sample. (If you accidentally go too far, you can reset execution to the
beginning by pressing CTRL-F2.)
First, the malware checks to see if the number of command-line arguments equals 1 at address
0x402AFD. We have not specified any parameters, so the check succeeds, and execution resumes at
address 0x401000. Next, it attempts to open the registry key HKLM\SOFTWARE\Microsoft \XPS; however, since the registry key does not exist, the
function returns zero, so execution calls into the function at 0x402410.
The function at 0x402410 uses GetModuleFilenameA to get the
path of the current executable and builds the ASCII string /c del
path-to-executable >> NUL. Figure C-21 shows an instance of the string in the registers window of OllyDbg. Note that the contents of EDX
are 0x12E248, but OllyDbg correctly interprets this as a pointer
to an ASCII string. The malware attempts to delete itself from the disk by combining the constructed
string with program cmd.exe in a call to ShellExecuteA. Fortunately, we have the file open in OllyDbg, so Windows does not allow
the file to be deleted. This behavior is consistent with what we saw during basic dynamic analysis
of the sample in the Chapter 3 labs.

Our next task is to coerce the malware to run properly. We have at least two options: we can provide more command-line arguments to satisfy the check at address 0x402AFD, or we can modify the code path that checks for the registry keys. Modifying the code path may have unintended effects. Later instructions can depend on information stored in these keys, and if that information is changed, the malware could fail to execute. Let’s try providing more command-line arguments first, to avoid potential issues.
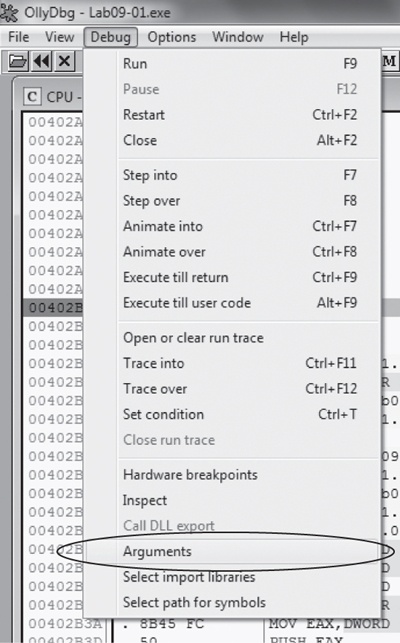
Choose any entry from the strings listing, such as -in, and
use it as a command-line argument to test whether the malware does something interesting. To do
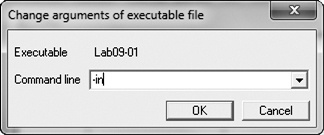
this, choose Debug ▸ Arguments, as shown in Figure C-22. Then add the -in
argument in the OllyDbg arguments dialog, as shown in Figure C-23.
When the malware is executed with the argument -in, it
still tries to delete itself, which tells us that the command-line arguments are not yet valid.
Let’s use OllyDbg to step through the code flow when we give the malware a parameter to see
what’s happening.
Example C-11 shows the function setup and parameter check.
Example C-11. Function setup and argc comparison
00402AF0        PUSH EBP
00402AF1        MOV EBP,ESP
00402AF3        MOV EAX,182C
00402AF8        CALL Lab09-01.00402EB0
00402AFD       ❶CMP DWORD PTR SS:[EBP+8],1
00402B01        JNZ SHORT Lab09-01.00402B1D
We see that after checking a command-line parameter, execution takes the jump at 0x402B01.
argc, the number of string arguments passed to the program, is
found 8 bytes above the frame pointer ❶, since it is the
first argument to the main function.
At 0x402B2E, the last command-line argument is passed into the function that starts at address
0x402510. We know it is the last argument because the main function of a standard C program takes
two parameters: argc, the number of command-line parameters, and
argv, an array of pointers to the command-line parameters. EAX
contains argc, and ECX contains argv, as shown in Example C-12 at ❶ and ❷. The
instruction at ❸ performs pointer arithmetic to select the last element in the array of command-line parameters. This
pointer ends up in EAX, and is pushed onto the top of the stack prior to the function call.
Example C-12. Pointer to the last element in argv is pushed on the
stack
00402B1D       ❶MOV EAX,DWORD PTR SS:[EBP+8]        ; ARGC
00402B20       ❷MOV ECX,DWORD PTR SS:[EBP+C]        ; ARGV
00402B23        MOV EDX,DWORD PTR DS:[ECX+EAX*4-4] ❸
00402B27        MOV DWORD PTR SS:[EBP-4],EDX
00402B2A        MOV EAX,DWORD PTR SS:[EBP-4]
00402B2D        PUSH EAX
The basic disassembly view provided by OllyDbg gives a rough overview of the function that
starts at address 0x402510. There are no function calls, but by scanning the instructions, we see
the use of the arithmetic operations ADD, SUB, MUL, and XOR on byte-sized operands, such as at addresses 0x402532 through 0x402539. It looks like
this routine does a sanity check of the input using a convoluted, hard-coded algorithm. Most likely
the input is some type of password or code.
Note
If you perform a full analysis of 0x4025120, you can determine that the password is abcd. You will be equally successful using the password or the patch method we explain next.
Rather than reversing the algorithm, we patch the binary so that the password check function
at 0x402510 will always return the value associated with a successful check. This will allow us to
continue analyzing the meat of the malware. We note that there is an inline function call to
strlen at addresses 0x40251B through 0x402521. If the argument
fails this check, EAX is zeroed out, and execution resumes at the function cleanup at 0x4025A0.
Further reversing reveals that only the correct argument will cause the function to return the value
1, but we’ll patch it so that it returns 1 in all cases, regardless of the argument. To do
this, we insert the instructions shown in Example C-13.
We assemble these instructions using the Assemble option in
OllyDbg and get the 6-byte sequence: B8 01 00 00 00 C3. Because
the CALL instruction prepares the stack, and the RET instruction cleans it up, we can overwrite the instructions at the
very beginning of the password check function, at address 0x402510. Edit the instructions by
right-clicking the start address you wish to edit and selecting Binary
▸ Edit. Figure C-24 shows the relevant context menu
items.
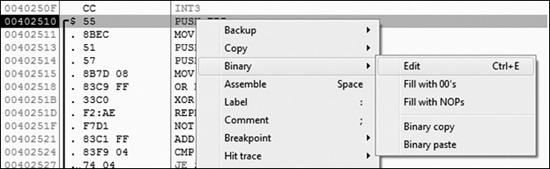
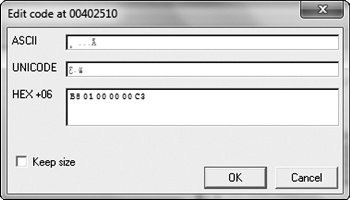
Figure C-25 shows the assembled instructions after they have been entered into the edit dialog. Since we want to write 6 bytes over a previous instruction that took only 1 byte, we uncheck the box labeled Keep size. We then enter the assembled hex values in the HEX+06 field and click OK. OllyDbg will automatically assemble and display the new instructions at the appropriate location. Next, save the changes to the executable by right-clicking the disassembly window and selecting Copy to executable ▸ All modifications. Accept all dialogs, and save the new version as Lab09-01-patched.exe.
To test whether the password check function was successfully disabled, we try debugging it
with the command-line parameter -in again. This time, the malware
successfully passes the check at address 0x402510 and jumps to address 0x402B3F. Six instructions
later, a pointer to the first command-line parameter is pushed onto the stack next to a pointer to
another ASCII string, -in. Figure C-26 shows the state of the stack at this
point.

The function at address 0x40380F is __mbscmp, which is a
string-comparison function recognized by IDA Pro’s FLIRT signature database. The malware uses
__mbscmp to check the command-line parameter against a list of
supported options that determine its behavior.
Next, the malware checks that two command-line parameters were provided. Since we have
provided only one (-in), the check fails, and the malware
attempts to delete itself again. We can pass this check by providing an additional command-line
parameter.
Recall that the last command-line parameter is treated as a password, but since we patched the
password function, we can provide any string as the password. Set a breakpoint at address 0x402B63
so we can quickly return to the command-line parameter check, add a junk command-line argument after -in, and restart the debugging process. The malware accepts all the
command-line parameters and performs its intended behavior.
If we continue to debug the malware, we see the malware attempt to open the service manager at
address 0x4026CC using the same basename as the malware executable. The
basename is the portion of a path with the directory and file extension
information stripped. If the service does not exist, the malware creates an autostart service with a
name in the form basename
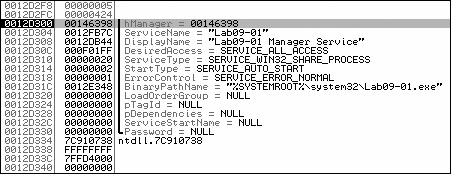
Manager Service, and the binary path %SYSTEMROOT%\system32\<filename>. Figure C-27 shows the state of the call stack when CreateServiceA is called and includes the ASCII string name, description,
and path. At address 0x4028A1, the malware copies itself into
%SYSTEMROOT%\system32\. The function at address 0x4015B0 alters the modified,
accessed, and changed timestamps of the copy to match those of the system file
kernel32.dll. Modifying timestamps to match another file is known as
timestomping.
Finally, the malware creates the registry key HKLM\SOFTWARE\Microsoft
\XPS. The trailing space after Microsoft makes this a
unique host-based indicator. It fills the value named Configuration with the contents of a buffer pointed to by the EDX register at address
0x4011BE. To find out what the contents of that buffer were, set a breakpoint at the address
0x4011BE, and run (press F9) to it. Right-click the contents of the EDX register in the registers
window and select Follow in Dump. The hex dump view shows four
NULL-terminated strings followed by many zeros, as shown in Figure C-28. The strings contain the values ups, http://www.practicalmalwareanalysis.com, 80, and
60. This looks like it may be the configuration data related to a
network capability of the malware.

With the installation routine of the malware documented, we can now explore the other
functionality by continuing to debug it with OllyDbg or disassembling it with IDA Pro. First,
we’ll use IDA Pro to describe other code paths. This sample supports the switches -in,
-re, -c, and -cc, as shown in Table C-2. These
can be easily identified in the main function by looking for
calls to __mbscmp.
Table C-2. Supported Command-Line Switches
Command-line switch | Address of implementation | Behavior |
|---|---|---|
| 0x402600 | Installs a service |
| 0x402900 | Uninstalls a service |
| 0x401070 | Sets a configuration key |
| 0x401280 | Prints a configuration key |
Compare the function that starts at address 0x402900, which corresponds to the command-line
parameter -re, with the installation function that we examined
earlier. The -re function does the exact opposite of the function
at 0x402600. It opens the service manager (address 0x402915), locates an installation of the malware
(address 0x402944), and deletes the service (address 0x402977). Finally, it deletes the copy of the
malware located in %SYSTEMROOT%\system32 and removes the configuration registry
value (addresses 0x402A9D and 0x402AD5).
Next, look at the function that starts at address 0x401070, which runs if we provide the
-c switch. If you’ve been diligent in renaming functions
with descriptive names in IDA Pro, then it will be obvious that we have already encountered this
function, during both the installation and uninstallation routines. If you’ve forgotten to
update this function name, use the cross-reference feature of IDA Pro to verify that this function
is used in all those places. To do this, navigate to the function implementation, click the function
name, right-click the name, and select Xrefs to.
The function that starts at 0x401070 takes four parameters, which it concatenates together.
The string concatenation functions are inline and can be identified by the REP MOVSx (REPeat MOVe String) instructions. The function writes the resultant buffer to
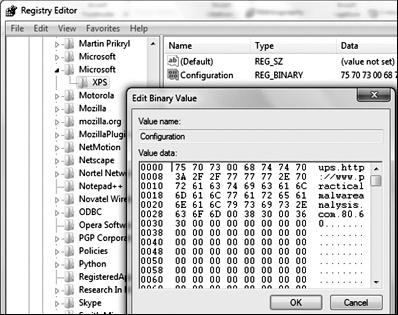
the registry value Configuration of the Windows registry key
HKLM\SOFTWARE\Microsoft
\XPS
. Providing the -c switch to the malware allows the user to update the malware
configuration in the Windows registry. Figure C-29 shows the
entry in the Windows registry using Regedit after a default installation of the malware.
The function at 0x401280, which executes if the -cc switch
is provided, is the reverse of the configure function (0x401070),
as it reads the contents of the configuration registry value and places the fields into buffers
specified as function arguments. If the -cc switch is provided to
the malware, the current configuration is read from the registry and formatted into a string. The
malware then prints this string to the console. Here is the output of the -cc switch after a default installation of the malware:
C:>Lab09-01-patched.exe –cc epar
k:ups h:http://www.practicalmalwareanalysis.com p:80 per:60
The final code path is reached when the malware is installed and not provided with any command-line parameters. The malware checks for installation at address 0x401000 by determining whether the registry key was created. The implementation of the default behavior is found in the function starting at address 0x402360. Note the jump up at 0x402403 and back to 0x40236D, which indicates a loop, and that the three exit conditions (at addresses 0x4023B6, 0x4023E0, and 0x402408) lead directly to program termination. It looks like the malware gets the current configuration, calls a function, sleeps for a second, and then repeats the process forever.
The backdoor functionality is implemented in a chain of functions first called from the
infinite loop. The function at 0x402020 calls the function starting at address 0x401E60, and
compares the beginning of the string returned against a list of the supported values: SLEEP, UPLOAD, DOWNLOAD, CMD, and NOTHING. If the malware encounters one of these strings, it will call a function that
responds to that request, in a process similar to the parsing of the command-line arguments. Table C-3 summarizes the supported commands, showing the adjustable parameters
in italics.
Table C-3. Supported Commands
Command | Address of implementation | Command-string format | Behavior |
|---|---|---|---|
| 0x402076 |
| Sleeps for |
| 0x4019E0 |
| Creates the file |
| 0x401870 |
| Reads the file |
0x402268 |
| Executes the shell command | |
| 0x402356 |
| No operation |
At this point, we see that we have a full-featured backdoor on our hands. The malware can execute arbitrary shell commands and built-in routines for file upload and download. Next, we’ll explore the function that starts at address 0x401E60 and returns the command to the behavior dispatcher. This will show how a command is communicated to the malware from the remote host, which may enable us to create network-based signatures for this sample.
While browsing the contents of 0x401E60, we see quite a few calls to functions with only one
cross-reference. Rather than fully reverse each function, we debug this code path using OllyDbg.
Before doing this, ensure that the malware has been successfully installed by running the malware
with the -cc option, which should print out the current
configuration if the program is installed, or attempt to delete itself if it is not.
Next, open the malware with OllyDbg and delete any saved command-line parameters so that the
malware will perform its default behavior. Set a breakpoint at address 0x401E60. You can easily
navigate to this address by pressing CTRL-G and entering
401E60. Set the breakpoint at
that location by pressing F2.
Run through this region a few times using Step Over (press F8). Pay particular attention to the function arguments and return values.
First, we’ll examine the function that starts at 0x401420. We set a breakpoint at the
call at address 0x401E85 and at the instruction immediately after it (0x401E8A). At the first
breakpoint, two parameters have been pushed onto the stack. On the top of the stack, we see the
address 0x12BAAC, followed by the integer 0x400. If we follow the address in the dump view, we see
that it contains a large chunk of zeros—probably at least 0x400 bytes of free space. Next, run
the malware (press F9) to the second breakpoint. In the function that starts at address 0x401420,
the malware writes the ASCII string http://www.practicalmalwareanalysis.com into the buffer. We can now (correctly)
hypothesize that this function gets a particular configuration value from the Windows registry,
which was initialized during installation, and puts it in a buffer. Now let’s try the same
approach with the functions that start at addresses 0x401470 and 0x401D80.
The function that starts at 0x401470 is analogous to the function that starts at
0x401420, except that it returns the number 80 (0x50) rather than a URL. This string contains the port number associated
with the server at http://www.practicalmalwareanalysis.com/.
The function that starts at 0x401D80 is a little different in that it does not return the same
value at each invocation. Rather, it appears to return an ASCII string containing random characters.
After debugging this function many times, a pattern will appear that involves the forward slash
(/) and dot (.) characters.
Perhaps the returned string corresponds to a URL-like scheme.
When the malware is analyzed in an isolated testing environment, it will repeatedly fail
somewhere within the next function, which starts at address 0x401D80. Returning to the disassembly
view of IDA Pro, we see that within this function, the malware constructs an HTTP/1.0 GET request and connects to a remote system. This connection is unlikely
to be blocked by corporate firewalls, since it is a valid outbound HTTP request. If your malware
analysis virtual machine has networking disabled, the outbound connection will never succeed, and
the malware fails. However, by following the disassembly listing carefully, you will see that the
malware does, in fact, attempt to connect to the domain and port recorded in the registry
configuration key, and requests a randomly named resource. Further analysis of the disassembly shows
that the malware searches the document returned by the server for the particular strings `'`'` (backtick, apostrophe, backtick, apostrophe, backtick) and '`'`' (apostrophe, backtick, apostrophe, backtick, apostrophe), and uses
these to delineate the command-and-control protocol.
This sample is an HTTP reverse backdoor. The password abcd
must be provided as the last parameter when invoking the malware for installation, configuration,
and removal. It installs itself by copying itself to the
%SYSTEMROOT%\WINDOWS\system32 directory and creating an autorun service. The
malware can be cleanly removed by passing the command-line argument -re, or reconfigured using the -c flag.
When run after installation, the malware uses a registry key to fetch server configuration
information, and makes HTTP/1.0 GET requests to the remote
system. The command-and-control protocol is embedded within the response document. The malware
recognizes five commands, including one that specifies the execution of arbitrary shell
commands.