
Instead of writing the table creation code from scratch, the phpMyAdmin database management tool can come in handy to prepare this code:
For example, to create the table that was used in this recipe, follow these steps:
- Select the wordpressdev database in phpMyAdmin.
- Under the Create table section, enter wpdev_ch8_bug_data in the Name field and the number 5 as Number of fields.
- Click on the Go button.
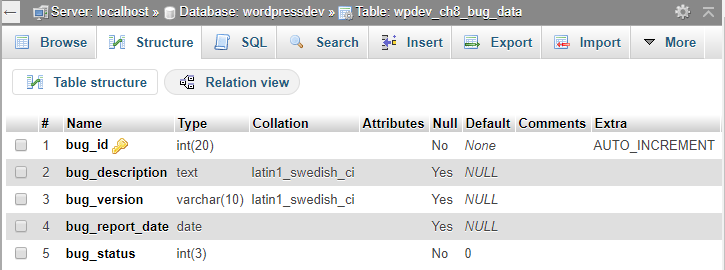
- In the table creation grid that is displayed, set the name of each Field based on the Column names listed in the previous screenshot.
- Set the Type of each Field based on the Type column in the previous screenshot.
- For items that have a value in parentheses next to their Type, use the numeric value to indicate the Length/Values of these items.
- Set the Default value for each field based on the previous screenshot. You can select NULL from the drop-down list for the items that have a NULL default. For items that have a specific value, select As defined: in the drop-down and indicate the value in the adjacent field.
- For items that are allowed to have a NULL value (shown with a Yes in the previous screenshot), make sure that the Null box is checked.
- Select PRIMARY under the Index drop-down list for the bug_id field to indicate that it will be the primary key for the table. Then, click on Go in the index creation pop-up dialog that appears.
- Check the A_I box for the bug_id field to indicate that it should auto-increment when new values are inserted in the table.
- Click on the Save button to complete the table creation process.
At this time, phpMyAdmin will create the table on the server. To access the SQL command used to create the table, click on the Export tab and click on Go to download a text file containing the SQL code. While the export file will contain some extra information, the important section is the actual CREATE TABLE segment that, as you will see, looks very similar to the code written in this recipe.