
- Navigate to the WordPress plugin directory of your development installation.
- Create a new directory called ch3-multi-level-menu.
- Navigate to this directory and create a new text file called ch3-multi-level-menu.php.
- Open the new file in a code editor and add an appropriate header at the top of the plugin file, naming the plugin Chapter 3 - Multi-level menu.
- Add the following line of code to register a function that will be called when WordPress is preparing data to display the site's administration menu:
add_action( 'admin_menu', 'ch3mlm_admin_menu' );
- Add the following code section to provide an implementation for the ch3mlm_admin_menu function:
function ch3mlm_admin_menu() {
    // Create top-level menu item
    add_menu_page( 'My Complex Plugin Configuration Page',
                   'My Complex Plugin', 'manage_options',
                   'ch3mlm-main-menu', 'ch3mlm_my_complex_main',
                   plugins_url( 'myplugin.png', __FILE__ ) );

    // Create a sub-menu under the top-level menu
    add_submenu_page( 'ch3mlm-main-menu',
                      'My Complex Menu Sub-Config Page',
                      'Sub-Config Page',
                      'manage_options', 'ch3mlm-sub-menu',
                      'ch3mlm_my_complex_submenu' );
}
- Save and close the plugin file.
- Find and download a PNG format 24 x 24 pixel icon from a site, such as IconArchive (http://www.iconarchive.com), resize it to 20 x 20 pixels, and save it as myplugin.png in the plugin directory.
- Navigate to the Plugins section of your site's administration area.
- Activate your new plugin.
- You will now see a new menu item in the administration menu.
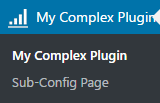
- Expand the top-level new menu item to see the submenu item.
As with the previous recipe, clicking on the menu items will display an error, since we have not implemented a function to generate actual content for these menu items. We will not be implementing pages for these two menu items, but you can use a technique similar to what is shown in the Rendering the admin page contents using HTML recipe to create your own ch3mlm_my_complex_main and ch3mlm_my_complex_submenu functions.