
- Navigate to the WordPress plugin directory of your development installation.
- Create a new directory called ch2-page-header-output.
- Navigate to this directory and create a new text file called ch2-page-header-output.php.
- Open the new file in a code editor and add an appropriate header at the top of the plugin file, naming the plugin Chapter 2 - Page Header Output.
- Add the following line of code to register a function that will be called when WordPress renders the page header:
add_action( 'wp_head', 'ch2pho_page_header_output' );
- Add the following code section to provide an implementation for the ch2pho_page_header_output function:
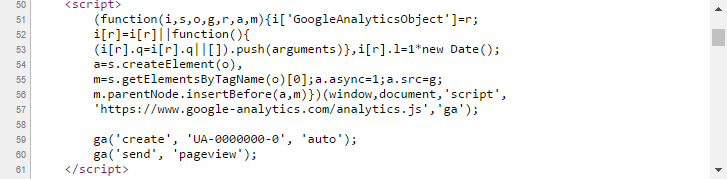
function ch2pho_page_header_output() { ?>
    <script>
        (function(i,s,o,g,r,a,m){i['GoogleAnalyticsObject']=r;
        i[r]=i[r]||function(){
        (i[r].q=i[r].q||[]).push(arguments)},i[r].l=1*new Date();
        a=s.createElement(o),
        m=s.getElementsByTagName(o)[0];a.async=1;a.src=g;
        m.parentNode.insertBefore(a,m)})(window,document,'script',
        'https://www.google-analytics.com/analytics.js','ga');

        ga('create', 'UA-0000000-0', 'auto');
        ga('send', 'pageview');
    </script>
<?php }
- Save and close the plugin file.
- Log in to the administration page of your development WordPress installation.
- Click on Plugins in the left-hand navigation menu.
- Activate your new plugin.
- Navigate to your website's front page and use your browser's View Page Source function to see the HTML source code for the site. The exact name of this function will be slightly different based on which browser you are using. Reading through the page source code, all of the code contained between the two curled brackets of our new function will be visible on your website's header:
If you are copying and pasting code from a digital version of this book, you will lose the original code indentation and should correct it in your code editor.