- Navigate to the WordPress plugin directory of your development installation.
- Create a new directory called ch8-bug-tracker.
- Navigate to the directory and create a text file called ch8-bug-tracker.php.
- Open the new file in a code editor and add an appropriate header at the top of the plugin file, naming the plugin Chapter 8 - Bug Tracker.
- Add the following line of code to register a function to be called on plugin activation:
register_activation_hook( __FILE__, 'ch8bt_activation' );
- Add the following code segment to provide an implementation for the ch8bt_activation function:
function ch8bt_activation() {
    // Get access to global database access class
    global $wpdb;

    // Create table on main blog in network mode or single blog
    ch8bt_create_table( $wpdb->get_blog_prefix() );
}
- Insert the following code to provide an implementation for the ch8bt_create_table function responsible for the actual table creation:
function ch8bt_create_table( $prefix ) {
    // Prepare SQL query to create database table
    // using function parameter

    $creation_query = 'CREATE TABLE IF NOT EXISTS ' .
                      $prefix . 'ch8_bug_data (
                      `bug_id` int(20) NOT NULL AUTO_INCREMENT,
                      `bug_description` text,
                      `bug_version` varchar(10) DEFAULT NULL,
                      `bug_report_date` date DEFAULT NULL,
                      `bug_status` int(3) NOT NULL DEFAULT 0,
                      PRIMARY KEY (`bug_id`)
                      );';

    global $wpdb;
    $wpdb->query( $creation_query );
}
- Save and close the plugin file.
- Navigate to the Plugins management page and Activate the Chapter 8 - Bug Tracker plugin.
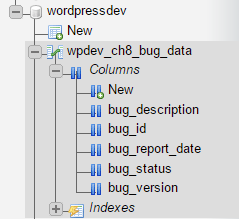
- Using phpMyAdmin, connect to your MySQL database to see that a new table was created when the plugin was activated: