- Navigate to the WordPress plugin directory of your development installation.
- Create a new directory called ch9-calendar-picker along with a subdirectory called css.
- Visit https://www.jqueryui.com/download, toggle all the components to be unchecked, and select only Datepicker. Then, select UI lightness as the theme to be included and download the latest version of the jQuery UI package.
- Open the resulting file with an archive management tool and extract the file jquery-ui.min.css to the css folder of the newly created plugin directory.
- Extract the entire images directory from the archive to the css folder.
- Create a text file called ch9-calendar-picker.php in the plugin directory.
- Open the new file in a code editor and add an appropriate header at the top of the plugin file, naming the plugin Chapter 9 - Calendar Picker.
- Add the following line of code to register a function to be called when script loading requests are made:
add_action( 'admin_enqueue_scripts', 'ch9cp_admin_scripts' );
- Add the following code segment to provide an implementation for the ch9cp_admin_scripts function:
function ch9cp_admin_scripts() {
    $screen = get_current_screen();
    if ( 'post' == $screen->base &&
         'post' == $screen->post_type ) {
        wp_enqueue_script( 'jquery' );
        wp_enqueue_script( 'jquery-ui-core' );
        wp_enqueue_script( 'jquery-ui-datepicker' );
        wp_enqueue_style( 'datepickercss',
            plugins_url( 'css/jquery-ui.min.css',
                   __FILE__ ), array(), '1.12.1' );
    }
}
- Insert the following line of code to register a function to be called when meta boxes are created:
add_action( 'add_meta_boxes', 'ch9cp_register_meta_box' );
- Append the following block of code to provide an implementation for the ch9cp_register_meta_box function:
function ch9cp_register_meta_box() {
    add_meta_box( 'ch9cp_datepicker_box', 'Assign Date',
                  'ch9cp_date_meta_box', 'post', 'normal');
}
- Insert the following code block to implement the ch9cp_date_meta_box function that was declared in the call to add_meta_box:
function ch9cp_date_meta_box( $post ) { ?>
    <input type="text" id="ch9cp_date" name="ch9cp_date" />

    <!-- JavaScript function to display calendar button -->
    <!-- and associate date selection with field -->
    <script type='text/javascript'>
        jQuery( document ).ready( function() {
        jQuery( '#ch9cp_date' ).datepicker( { minDate: '+0',
            dateFormat: 'yy-mm-dd', showOn: 'both',
            constrainInput: true} );
        } );
    </script>
<?php }
- Save and close the plugin file.
- Navigate to the Plugins management page and Activate the Chapter 9 - Calendar Picker plugin.
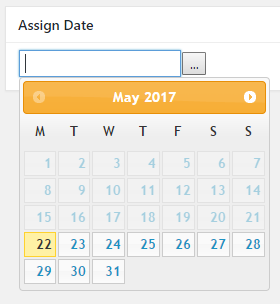
- Select any item in the Posts management section and edit it to see the new date assignment meta box.
- Click on the ... button or click on the Assign Date textbox to display the pop-up calendar and select a date: