- Browse to the Plugins section of the administration section of your site and deactivate the Chapter 2 - Page Header Output plugin.
- Navigate to the ch2-page-header-output folder of the WordPress plugin directory of your development installation.
- Copy the file ch2-page-header-output.php to ch2-page-header-output-metaboxes.php.
- Open the ch2-page-header-output-metaboxes.php file in a text editor.
- Change the plugin name in the header from Chapter 2 - Page Header Output to Chapter 2 - Page Header Output Meta Boxes.
- Right under the top plugin header comment, add a line of code to declare a global variable to hold the identifier for the options page:
global $options_page;
- Find the ch2pho_settings_menu function in the existing code.
- Add a line at the top of the function to point to the global options page variable:
global $options_page;
- Find the ch2pho_help_tabs function within the plugin code.
- Add the following block of code at the end of the function body to create meta boxes to be drawn on the screen and specify functions to be called to populate these boxes:
global $options_page;
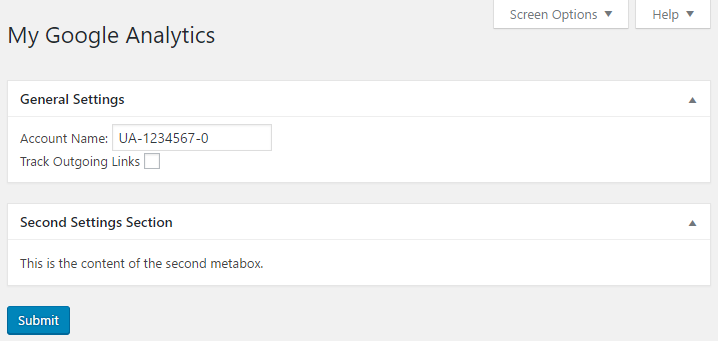
add_meta_box( 'ch2pho_general_meta_box', 'General Settings',
'ch2pho_plugin_meta_box', $options_page,
'normal', 'core' );
add_meta_box( 'ch2pho_second_meta_box', 'Second Settings Section',
'ch2pho_second_meta_box', $options_page,
'normal', 'core' );
- Add a line of code at the end of the plugin code file to register a function to be called when administration page styles are placed in a queue:
add_action( 'admin_enqueue_scripts', 'ch2pho_load_admin_scripts' );
- Insert the following code segment to provide an implementation for the ch2pho_load_admin_scripts function:
function ch2pho_load_admin_scripts() {
    global $current_screen;
    global $options_page;

    if ( $current_screen->id == $options_page ) {
        wp_enqueue_script( 'common' );
        wp_enqueue_script( 'wp-lists' );
        wp_enqueue_script( 'postbox' );
    }
}
- Create a new function to implement the ch2pho_plugin_meta_box function that was declared a few steps back. Notice that the body of the function is a direct copy and paste of the previous form code that was used to render the Account Name and Track Outgoing Links field:
function ch2pho_plugin_meta_box( $options ) { ?>
    Account Name: <input type="text" name="ga_account_name"
        value="<?php echo esc_html( $options['ga_account_name'] );
        ?>"/><br />

    Track Outgoing Links <input type="checkbox"
        name="track_outgoing_links"
        <?php checked( $options['track_outgoing_links'] ); ?>/>
        <br />
<?php }
- Add the following code to provide an implementation for the ch2pho_second_meta_box function to display a second meta box. This second box will not have any real content. It will only be used to illustrate some of the meta box functionality:
function ch2pho_second_meta_box( $options ) { ?>
    <p>This is the content of the second metabox.</p>
<?php }
- Find the code for the ch2pho_config_page function in your code and modify it as shown in the following code, where all the new code segments are in bold. Delete the original code that rendered the ga_account_name and track_outgoing_links fields:
function ch2pho_config_page() {
    // Retrieve plugin configuration options from database
    $options = ch2pho_get_options();
    global $options_page;
    ?>

    <div id="ch2pho-general" class="wrap">
    <h2>My Google Analytics</h2><br />

    <?php if ( isset( $_GET['message'] ) &&
               $_GET['message'] == '1' ) { ?>
        <div id='message' class='updated fade'>
        <p><strong>Settings Saved</strong></p>
        </div>
    <?php } ?>

    <form action="admin-post.php" method="post">
    <input type="hidden" name="action"
           value="save_ch2pho_options" />

    <!-- Adding security through hidden referrer field -->
    <?php wp_nonce_field( 'ch2pho' ); ?>

    <!-- Security fields for meta box save processing -->
    <?php wp_nonce_field( 'closedpostboxes',
                          'closedpostboxesnonce', false ); ?>
    <?php wp_nonce_field( 'meta-box-order',
                          'meta-box-order-nonce', false ); ?>

    <div id="poststuff" class="metabox-holder">
        <div id="post-body">
            <div id="post-body-content">
            <?php do_meta_boxes( $options_page, 'normal',
                                                $options ); ?>
            <input type="submit" value="Submit"
                   class="button-primary"/>
            </div>
        </div>
        <br class="clear"/>
    </div>
    </form>
    </div>

    <script type="text/javascript">
    //<![CDATA[
    jQuery( document ).ready( function( $ ) {
        // close postboxes that should be closed
        $( '.if-js-closed' ) .removeClass( 'if-js-closed' ).
            addClass( 'closed' );

        // postboxes setup
        postboxes.add_postbox_toggles(
            '<?php echo $options_page; ?>' );
    });

    //]]>
    </script>
<?php }
- Save and close the plugin file.
- Activate your new plugin.
- Click on the Settings section on the left-hand navigation menu to expand it.
- Click on the My Google Analytics in the tree to display the re-designed administration page.
- Drag and drop one of the meta boxes to re-order them.
- Click on one of the meta box titles to collapse that section.
- Click on the Screen Options menu in the top-right corner to open a menu to control the visibility of all the meta boxes.
- Move to another section of the administration menu and come back to the My Google Analytics section to see that all the changes made to the layout of the configuration page have been retained.