- Navigate to the WordPress plugin directory of your development installation.
- Navigate to the ch9-calendar-picker directory.
- Create a new subdirectory called tiptip.
- Visit the TipTip jQuery home page, available at https://drew.tenderapp.com/kb/tiptip-jquery-plugin/tiptip-downloads.
- Download Version 1.3 of the plugin source code to your local computer.
- Open the resulting file with an archive management tool and extract the jquery.tipTip.minified.js and tipTip.css files to the tiptip directory.
- Open the main plugin file ch9-calendar-picker.php in a code editor.
- Find the ch9cp_admin_scripts function and add the following lines of code at the end of the if condition, so that the new scripts are only loaded on the page and post editors, like the others:
wp_enqueue_script( 'tiptipjs',
                   plugins_url( 'tiptip/jquery.tipTip.minified.js',
                                __FILE__ ),
                   array(), '1.3' );
wp_enqueue_style( 'tiptip',
                  plugins_url( 'tiptip/tipTip.css', __FILE__ ),
                               array(), '1.3' );
- Locate the ch9cp_date_meta_box function and modify the line that renders the textbox, as shown in the following highlighted code:
<input type="text" class="ch9cp_tooltip"
        id="ch9cp_date"
       name="ch9cp_date" />
- Again, in the ch9cp_date_meta_box function, add the following highlighted block of code to the existing block of JavaScript code:
<script type='text/javascript'>
    jQuery( document ).ready( function() {
        jQuery( '#ch9cp_date' ).datepicker( { minDate: '+0',
                dateFormat: 'yy-mm-dd', showOn: 'both',
                constrainInput: true } );

        jQuery( '.ch9cp_tooltip' ).each( function() {
                jQuery( this ).tipTip();
            }
        );
    });
</script>
- Save and close the plugin file.
- Select any item in the Posts management section and edit it.
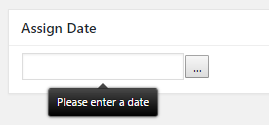
- Move the mouse over the date field to see the new tooltip appear: