
- Navigate to the root directory of your WordPress development installation.
- Open the wp-config.php file in a text editor.
- Set the WP_DEBUG variable to be true:
define('WP_DEBUG', true);
- Save the configuration file.
- Navigate to the ch2-page-header-output folder of the WordPress plugin directory of your development installation.
- Open the ch2-page-header-output.php file in a text editor.
- Add the following line of code to register a function to be called when WordPress is building the administration pages menu:
add_action( 'admin_menu', 'ch2pho_settings_menu' );
- Add the following code section to provide an implementation for the ch2pho_settings_menu function:
function ch2pho_settings_menu() {
    add_options_page( 'My Google Analytics Configuration',
                      'My Google Analytics', 'manage_options',
                      'ch2pho-my-google-analytics',
                      'ch2pho_config_page' );
}
- Save and close the plugin file.
- Navigate to the administration page of your development WordPress installation.
- Activate the Chapter 2 - Page Header Output plugin if you left it deactivated after following the previous recipe.
- Click on the Settings section on the left-hand navigation menu to expand it. You will see a new menu item called My Google Analytics in the tree, created from the code that was just added to the plugin.
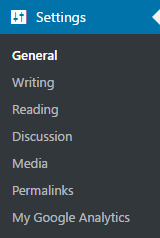
- Click on the My Google Analytics menu item. You will see an error message displayed, since WordPress cannot find the function intended to populate the configuration page. This error will go away once you perform the recipe titled Rendering the admin page contents using HTML.
- Back in the wp-config.php file, return the WP_DEBUG variable to its default value of false:
define('WP_DEBUG', false);
- Save and close the configuration file.
If you had not set the WP_DEBUG variable to be true at the beginning of this recipe, WordPress would only display a blank page after performing step 13, instead of displaying an error message.