Carry out the following steps:
- Create the openlayers.html file and add the <head> and <body> tags. In the <head> tag, import the OpenLayers JavaScript library by executing the following code:
        <!doctype html>
        <html>
          <head>
            <title>OpenLayers Example</title>
            <script src="http://openlayers.org/api/OpenLayers.js">
            </script>
          </head>
          <body>
          </body>
        </html>
- First, add a <div> element in the <body> tag that will contain the OpenLayers map. The map should be given a width of 900 pixels and a height of 500 pixels, using the following code:
<div style="width:900px; height:500px" id="map"></div>
- Just after the map is placed in <div>, add a JavaScript script and create an OpenLayers map object. In the map constructor parameters, you will add an empty controls array and declare that the map has a Spherical Mercator's projection, as shown in the following code:
        <script defer="defer" type="text/javascript">
          // instantiate the map object
          var map = new OpenLayers.Map("map", {
            controls: [],
            projection: new OpenLayers.Projection("EPSG:3857")
          });
        </script>
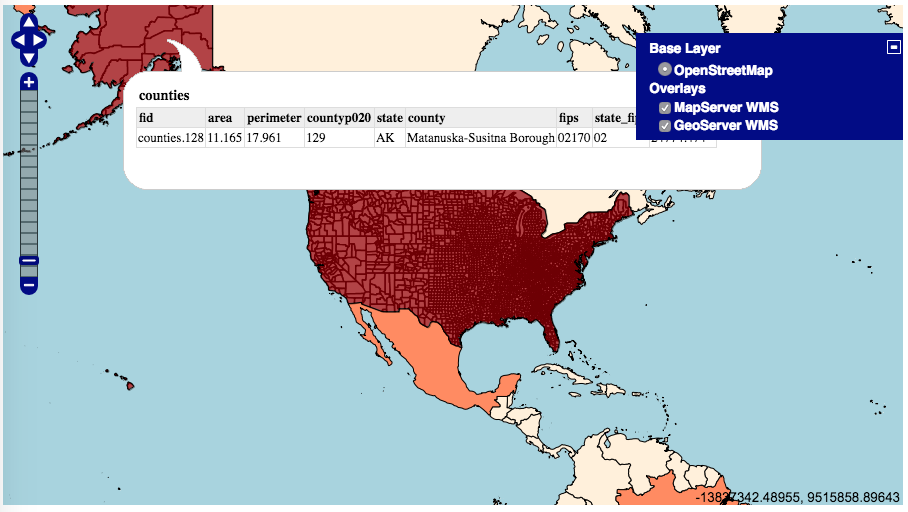
- Right after the map variable is declared, add some OpenLayers controls to the map. For the web GIS viewer you are creating, you will add the Navigation control (which handles map browsing with mouse events, such as dragging, double-clicking, and scrolling the wheel), the PanZoomBar control (a four-direction navigation using the arrows present above the zooming vertical slider), the LayerSwitcher control (which handles the switching on and off of layers added to the map), and the MousePosition control (which displays the map coordinates as they change while the user is moving the mouse), using the following code:
        // add some controls on the map
        map.addControl(new OpenLayers.Control.Navigation());
        map.addControl(new OpenLayers.Control.PanZoomBar()),
        map.addControl(new OpenLayers.Control.LayerSwitcher(
           {"div":OpenLayers.Util.getElement("layerswitcher")}));
        map.addControl(new OpenLayers.Control.MousePosition());
- Now create an OSM base layer, using the following code:
        // set the OSM layer
        var osm_layer = new OpenLayers.Layer.OSM();
- Set two variables for the WMS GeoServer and the MapServer URL that you will use (they are the URLs of the services you created in the first two recipes of this chapter):
-
- For Linux, add the following code:
                // set the WMS
                var geoserver_url = "http://localhost:8080/geoserver/wms";
                var mapserver_url = http://localhost/cgi-
                bin/mapserv?map=/var/www/data/countries.map&
-
- For Windows, add the following code:
                // set the WMS
                var geoserver_url = "http://localhost:8080/geoserver/wms";
                var mapserver_url = http://localhost/cgi-
                bin/mapserv.exe?map=C:\\ms4w\\Apache\\
                htdocs\\countries.map&
-
- For macOS, add the following code:
               // set the WMS
               var geoserver_url = "http://localhost:8080/geoserver/wms";
               var mapserver_url = http://localhost/cgi-
               bin/mapserv? map=/Library/WebServer/
               Documents/countries.map&
- Now, create a WMS GeoServer layer to display the OpenLayers map the counties from the PostGIS layer. You will set an opacity for this layer, so that it is possible to see the other layer (counties) behind it. The isBaseLayer property is set to false, since you want to have this layer over the Google Maps base layers and not as an alternative to them (by default, all of the WMS layers in OpenLayers are considered to be base layers). Create the WMS GeoServer layer, using the following code:
        // set the GeoServer WMS
        var geoserver_wms = new OpenLayers.Layer.WMS( "GeoServer WMS",
        geoserver_url,
        {
          layers: "postgis_cookbook:counties",
          transparent: "true",
          format: "image/png",
        },
        {
          isBaseLayer: false,
          opacity: 0.4
        } );
- Now, create a WMS MapServer layer to display the countries from the PostGIS layer in the OpenLayers map, using the following code:
        // set the MapServer WMS
        var mapserver_wms = new OpenLayers.Layer.WMS( "MapServer WMS",
        mapserver_url,
        {
          layers: "countries",
          transparent: "true",
          format: "image/png",
        },
        {
          isBaseLayer: false
        } );
- After creating the OSM and WMS layers, you need to add all of them to the map, using the following code:
        // add all of the layers to the map
        map.addLayers([mapserver_wms, geoserver_wms, osm_layer]);
        map.zoomToMaxExtent();
        Proxy...
        // add the WMSGetFeatureInfo control
        OpenLayers.ProxyHost = "/cgi-bin/proxy.cgi?url=";
- You want to provide the user the possibility to identify features of the counties WMS. Add the WMSGetFeatureInfo OpenLayers control (which will send GetFeatureInfo requests to the WMS behind the scenes) that points to the counties PostGIS layer served by the GeoServer WMS, using the following code:
        var info = new OpenLayers.Control.WMSGetFeatureInfo({
          url: geoserver_url,
          title: 'Identify',
          queryVisible: true,
          eventListeners: {
            getfeatureinfo: function(event) {
              map.addPopup(new OpenLayers.Popup.FramedCloud(
                "WMSIdentify",
                map.getLonLatFromPixel(event.xy),
                null,
                event.text,
                null,
                true
              ));
            }
          }
        });
        map.addControl(info);
        info.activate();
- Finally, set the center of the map and its initial zoom level, using the following code:
        // center map
        var cpoint = new OpenLayers.LonLat(-11000000, 4800000);
        map.setCenter(cpoint, 3);
Your HTML file should now look like the openlayers.html file contained in data/chp09. You can finally deploy this file to your web server (Apache HTTPD or IIS). If you are using Apache HTTPD in Linux, you could copy the file to the data directory under /var/www, and if you are using Windows, you could copy it to the data directory under C:\ms4w\Apache\htdocs (create the data directory if it does not already exist). Then, access it using the URL http://localhost/data/openlayers.html.
Now, access the openlayers web page using your favorite browser. Start browsing the map: zoom, pan, try to switch the base and overlays layers on and off using the layer switcher control, and try to click on a point to identify one feature from the counties PostGIS layer. A map is shown in the following screenshot: