Carry out the following steps:
- MapServer exposes its map services using mapfile, a text file format, with which it is possible to define the PostGIS layers on the web, enable any vector and raster format supported by GDAL, and specify which services (WMS/WFS/WCS) to expose per layer. Create a new text file named countries.map and add the following code:
        MAP # Start of mapfile
        NAME 'population_per_country_map'
        IMAGETYPE         PNG
        EXTENT            -180 -90 180 90
        SIZE              800 400
        IMAGECOLOR        255 255 255

        # map projection definition
        PROJECTION
          'init=epsg:4326'
        END

        # web section: here we define the ows services
        WEB
          # WMS and WFS server settings
          METADATA
            'ows_enable_request'          '*'
            'ows_title'                   'Mapserver sample map'
            'ows_abstract'                'OWS services about
                                          population per
                                          country map'
            'wms_onlineresource'          'http://localhost/cgi-
                                            bin/mapserv?map=/var
                                            /www/data/
                                            countries.map&'
            'ows_srs'                     'EPSG:4326 EPSG:900913
                                          EPSG:3857'
            'wms_enable_request'          'GetCapabilities,
                                          GetMap,
                                          GetFeatureInfo'
            'wms_feature_info_mime_type'  'text/html'
          END
        END

        # Start of layers definition
        LAYER # Countries polygon layer begins here
          NAME            countries
          CONNECTIONTYPE  POSTGIS
          CONNECTION      'host=localhost dbname=postgis_cookbook
                           user=me password=mypassword port=5432'
          DATA            'the_geom from chp09.countries'
          TEMPLATE 'template.html'
          METADATA
            'ows_title' 'countries'
            'ows_abstract' 'OWS service about population per
              country map in 2005'
            'gml_include_items' 'all'
          END
          STATUS          ON
          TYPE            POLYGON
          # layer projection definition
          PROJECTION
            'init=epsg:4326'
          END

          # we define 3 population classes based on the pop2005
            attribute
          CLASSITEM 'pop2005'
          CLASS # first class
            NAME '0 - 50M inhabitants'
            EXPRESSION ( ([pop2005] >= 0) AND ([pop2005] <=
              50000000) )
            STYLE
              WIDTH 1
              OUTLINECOLOR 0 0 0
              COLOR 254 240 217
            END # end of style
          END # end of first class
          CLASS # second class
            NAME '50M - 200M inhabitants'
            EXPRESSION ( ([pop2005] > 50000000) AND
              ([pop2005] <= 200000000) )
            STYLE
              WIDTH 1
              OUTLINECOLOR 0 0 0
              COLOR 252 141 89
            END # end of style
          END # end of second class
          CLASS # third class
            NAME '> 200M inhabitants'
            EXPRESSION ( ([pop2005] > 200000000) )
            STYLE
              WIDTH 1
              OUTLINECOLOR 0 0 0
              COLOR 179 0 0
            END # end of style
          END # end of third class

        END # Countries polygon layer ends here

        END # End of mapfile
- Save the file we just created in a location that is accessible to the Apache user. For example, in Debian, it is /var/www/data, while in Windows, it can be C:\ms4w\Apache\htdocs; for macOS, you should use /Library/WebServer/Documents.
Be sure that both the file and the directory containing it are accessible to the Apache user.
- Create a file named template.html in the same location as the mapfile and enter the following code in it (this file is used by the GetFeatureInfo WMS request to output an HTML response to the client):
       <!-- MapServer Template -->
       <ul>
         <li><strong>Name: </strong>[item name=name]</li>
         <li><strong>ISO2: </strong>[item name=iso2]</li>
         <li><strong>ISO3: </strong>[item name=iso3]</li>
         <li>
           <strong>Population 2005:</strong> [item name=pop2005]
         </li>
        </ul>
- With the mapfile you just created, you exposed the countries PostGIS layer, both as a WMS and WFS service. Both of these services expose to the user a series of requests and you will now test them using a browser. First, without invoking any services, test whether the mapfile is working correctly by typing the following URL in the browser:
- http://localhost/cgi-bin/mapserv?map=/var/www/data/countries.map&layer=countries&mode=map (for Linux)
- http://localhost/cgi-bin/mapserv.exe?map=C:\ms4w\Apache\htdocs\countries.map&layer=countries&mode=map (for Windows)
- http://localhost/cgi-bin/mapserv?map=/Library/WebServer/Documents/countries.map&layer=countries&mode=map (for macOS)
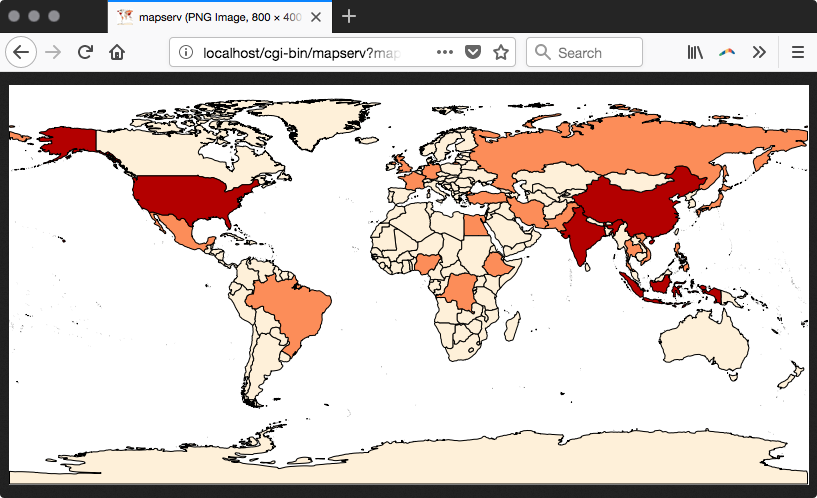
You should see the countries layer rendered with the three symbology classes defined in the mapfile, as shown in the following screenshot:
As you can see, there is a small difference between the URLs used in Windows, Linux, and macOS. We will refer to Linux from now on, but you can easily adapt the URLs to Windows or macOS.
- Now you will start testing the WMS service; you will try running the GetCapabilities, GetMap, and GetFeatureInfo requests. To test the GetCapabilities request, type the URL in the browser: http://localhost/cgi-bin/mapserv?map=/var/www/data/countries.map&SERVICE=WMS&VERSION=1.1.1&REQUEST=GetCapabilities. You should receive a long XML response (as follows) from the server, where the more important fragments are the WMS service definitions in the <Service> section, the requests are enabled in the <Capability> section, and the layers exposed and their main details (for example, name, abstract, projection, and extent) are in the <Layer> section of each of the layers:
<WMT_MS_Capabilities version="1.1.1">
...
<Service>
<Name>OGC:WMS</Name>
<Title>Population per country map</Title>
<Abstract>Map server sample map</Abstract>
<OnlineResource
xmlns:xlink="http://www.w3.org/1999/xlink"
xlink:href="http://localhost/cgi-
bin/mapserv?map=/var/www/data/countries.map&"/>
<ContactInformation> </ContactInformation>
</Service>
<Capability>
<Request>
<GetCapabilities>
...
</GetCapabilities>
<GetMap>
<Format>image/png</Format>
...
<Format>image/tiff</Format>
...
</GetMap>
<GetFeatureInfo>
<Format>text/plain</Format>
...
</GetFeatureInfo>
...
</Request>
...
<Layer>
<Name>population_per_country_map</Name>
<Title>Population per country map</Title>
<Abstract>OWS service about population per country map
in 2005</Abstract>
<SRS>EPSG:4326</SRS>
<SRS>EPSG:3857</SRS>
<LatLonBoundingBox minx="-180" miny="-90" maxx="180"
maxy="90" />
...
</Layer>
</Layer>
</Capability>
</WMT_MS_Capabilities>
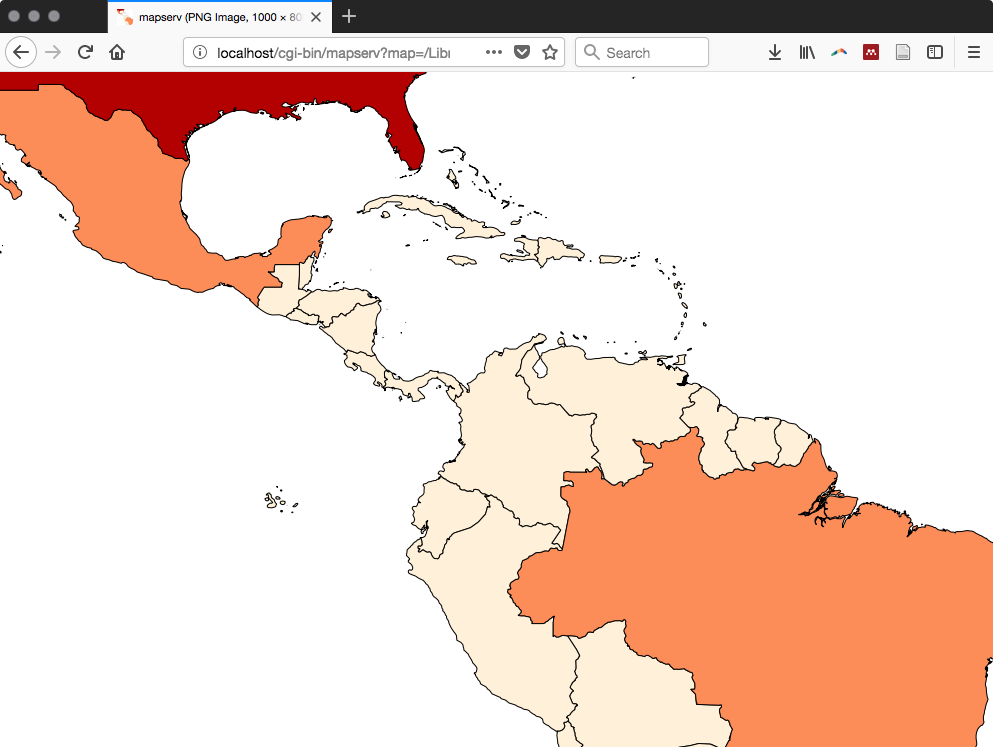
- Now test the WMS service with its typical GetMap WMS request, used on many clients to display a map to the user. Type the URL http://localhost//cgi-bin/mapserv?map=/var/www/data/countries.map&SERVICE=WMS&VERSION=1.3.0&REQUEST=GetMap&BBOX=-26,-111,36,-38&CRS=EPSG:4326&WIDTH=1000&HEIGHT=800&LAYERS=countries&STYLES=&FORMAT=image/png
- Into the browser and check the image that is sent back in response by the MapServer GetMap request, as shown in the following screenshot:
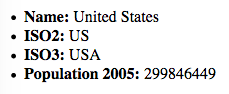
- Another typical WMS request is GetFeatureInfo, used by clients to query the map layer at the given coordinates (points). Type the following URL and you should see the field values for a given feature as the output (the output is built using the template.html file):
      http://localhost/cgi-bin/mapserv?map=/var/www/data/
      countries.map&layer=countries&REQUEST=GetFeatureInfo&
      SERVICE=WMS&VERSION=1.1.1&LAYERS=countries&
      QUERY_LAYERS=countries&SRS=EPSG:4326&BBOX=-122.545074509804,
      37.6736653056517,-122.35457254902,37.8428758708189&
      X=652&Y=368&WIDTH=1020&HEIGHT=906&INFO_FORMAT=text/html
The output should be as follows:
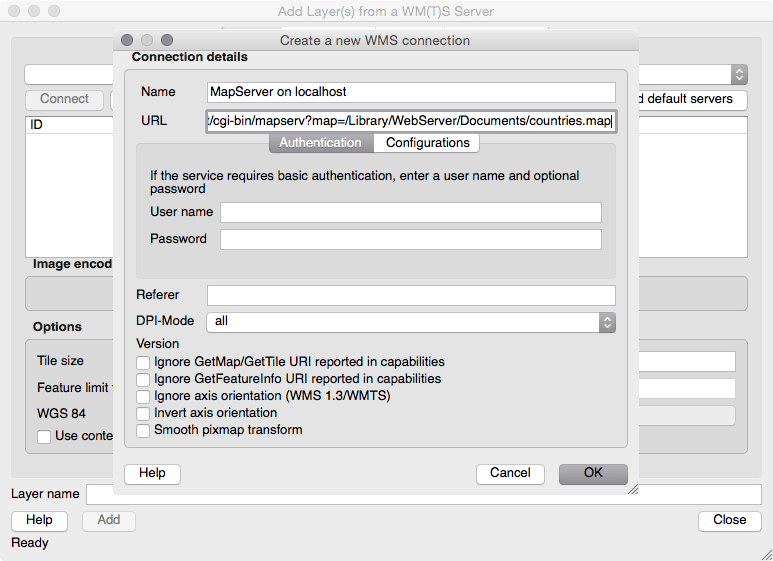
- Now, you will use QGIS to use the WMS service. Launch QGIS, click on the Add WMS layer button (alternatively, navigate to Layer | Add WMS Layer or use the QGIS browser), and create a new WMS connection, as shown in the following screenshot. Type something such as MapServer on localhost in the Name field and http://localhost/cgi-bin/mapserv?map=/var/www/data/countries.map&SERVICE=WMS&VERSION=1.1.1&REQUEST=GetCapabilities in the URL field, and click on the OK button (remember to adjust the Apache URL according to the configuration of your OS; check step 4):
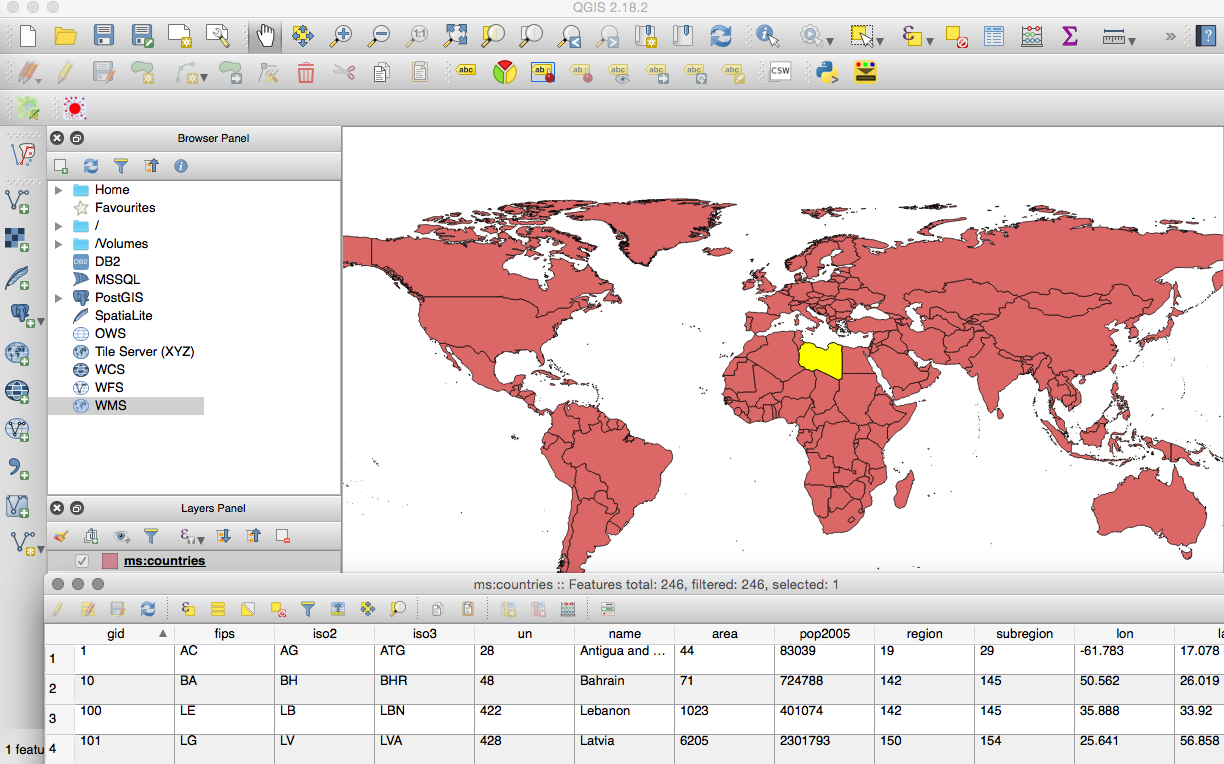
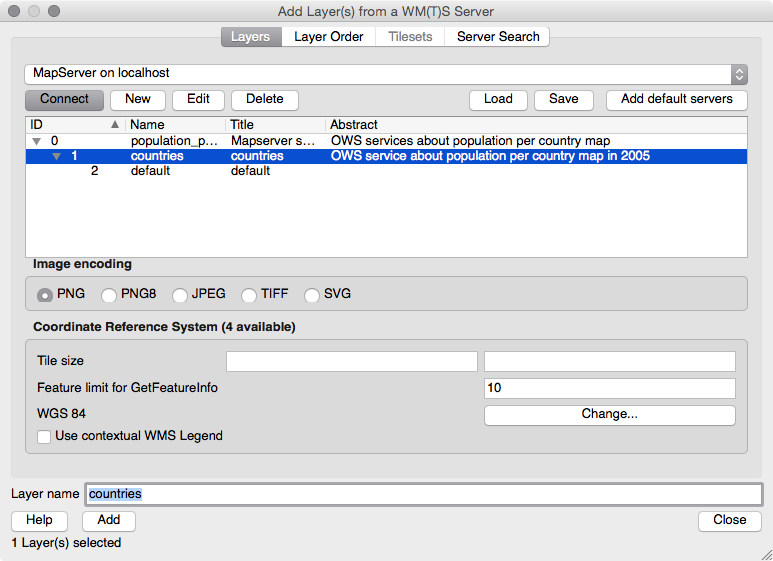
- Now click on the Connect button, as shown in the following screenshot. Then, select the countries layer and add it to the QGIS map window using the Add button, making sure to select the coordinate system EPSG:4326:
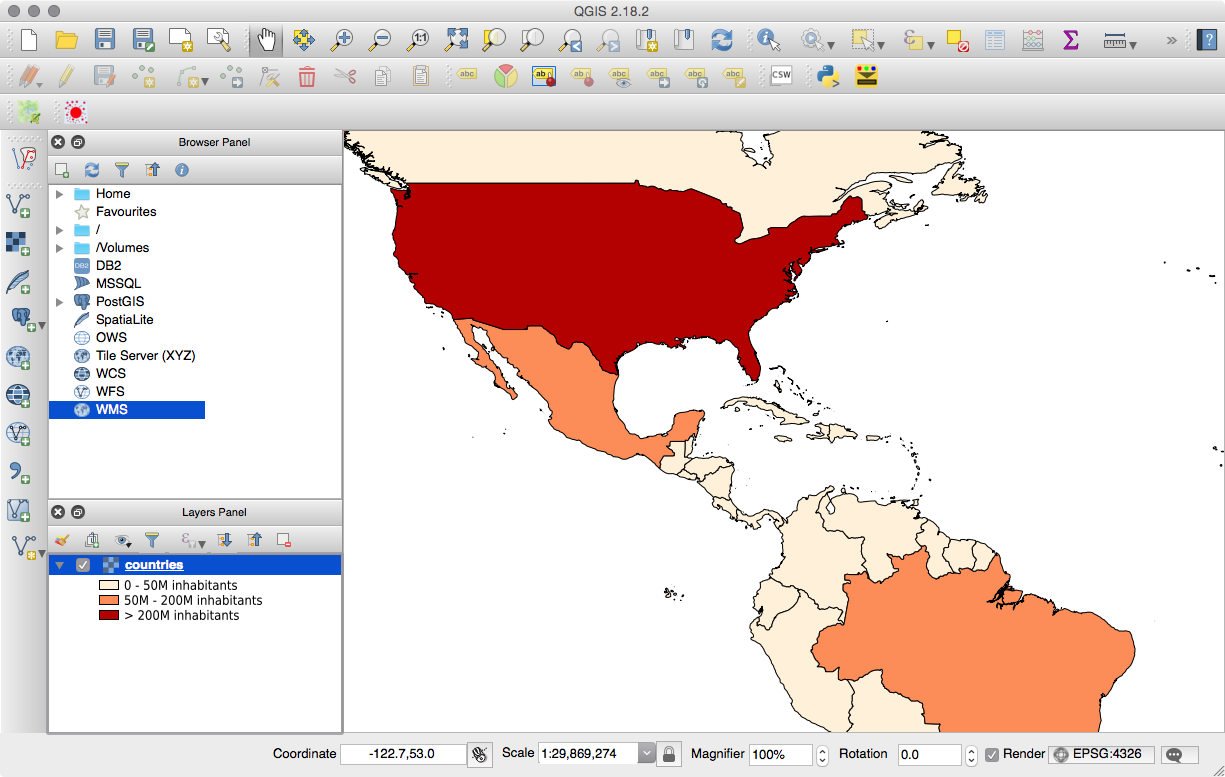
- Now browse to your WMS countries layer and try to perform some identification operations. QGIS will raise the needed GetMap and GetFeatureInfo WMS requests for you behind the scenes to give the following output:
- Having seen how the WMS service works, you will now start using WFS. Like WMS, WFS offers the user a GetCapabilities request as well, resulting in a similar output to the GetCapabilities request of WMS. Type the URL http://localhost/cgi-bin/mapserv?map=/var/www/data/countries.map&SERVICE=WFS&VERSION=1.0.0&REQUEST=GetCapabilities into the browser window to inspect the XML response.
- The main WFS request is GetFeature. It lets you query the map layer using several criteria, returning a collection of features in response as Geography Markup Language (GML) output. Test the request by typing this URL in the browser: http://localhost/cgi-bin/mapserv?map=/var/www/data/countries.map&SERVICE=WFS&VERSION=1.0.0&REQUEST=getfeature&TYPENAME=countries&MAXFEATURES=5.
- You should get an XML (GML) response from the browser, as shown in the following code, with a <wfs:FeatureCollection> element composed of five <gml:featureMember> elements (as indicated in the MAXFEATURES parameter of the request), each representing one country. For each feature, the WFS returns the geometry and all of the field values (this behavior was specified by setting the gml_include_items variable in the METADATA layer directive in the mapfile). You will see a geometry as follows:
        <gml:featureMember>
          <ms:countries>
            <gml:boundedBy>
              <gml:Box srsName="EPSG:4326">
                <gml:coordinates>-61.891113,16.989719 -
                 61.666389,17.724998</gml:coordinates>
              </gml:Box>
            </gml:boundedBy>

            <ms:msGeometry>
              <gml:MultiPolygon srsName="EPSG:4326">
                <gml:polygonMember>
                  <gml:Polygon>
                    <gml:outerBoundaryIs>
                      <gml:LinearRing>
                        <gml:coordinates>
                          -61.686668,17.024441 ...
                        </gml:coordinates>
                      </gml:LinearRing>
                    </gml:outerBoundaryIs>
                  </gml:Polygon>
                </gml:polygonMember>
                ...
              </gml:MultiPolygon>
            </ms:msGeometry>
            <ms:gid>1</ms:gid>
            <ms:fips>AC</ms:fips>
            <ms:iso2>AG</ms:iso2>
            <ms:iso3>ATG</ms:iso3>
            <ms:un>28</ms:un>
            <ms:name>Antigua and Barbuda</ms:name>
            <ms:area>44</ms:area>
            <ms:pop2005>83039</ms:pop2005>
            <ms:region>19</ms:region>
            <ms:subregion>29</ms:subregion>
            <ms:lon>-61.783</ms:lon>
            <ms:lat>17.078</ms:lat>
          </ms:countries>
        </gml:featureMember>
- As a result of the WFS GetFeature request executed in the previous step, MapServer has returned only the first five features of the countries layers. Now, use the GetFeature request to make a query to the layer using a filter and get back the corresponding features. By typing the URL http://localhost/cgi-bin/mapserv?map=/var/www/data/countries.map&SERVICE=WFS&VERSION=1.0.0&REQUEST=getfeature&TYPENAME=countries&MAXFEATURES=5&Filter=<Filter> <PropertyIsEqualTo><PropertyName>name</PropertyName> <Literal>Italy</Literal></PropertyIsEqualTo></Filter>, you will get the feature in the database that has the name field set to Italy.
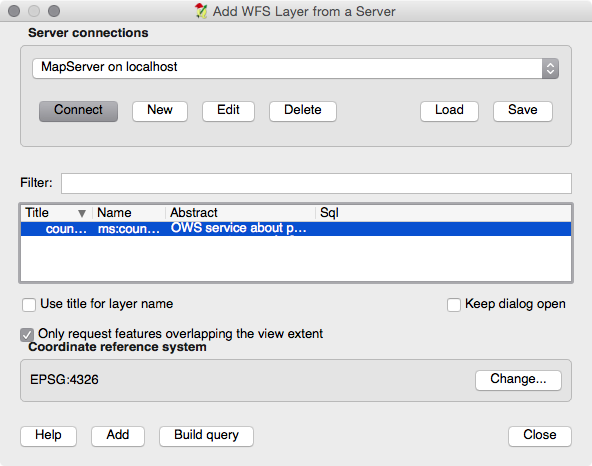
- After testing the WFS requests in a browser, try to open the WFS service in QGIS using the Add WFS Layer button (alternatively, navigate to Layer | Add WFS Layer or use the QGIS browser). You should see the same MapServer on Localhost connection you created a few steps earlier. Click on the Connect button and select the countries layer, add it to the QGIS project, and browse through it by zooming, panning, and identifying some features. The biggest difference when compared to WMS is that, with WFS, you receive the feature geometries from the server and not just an image, so you can even export the layer to a different format, such as a shapefile or spatialite! The Add WFS layer from a Server window is as shown in the following screenshot:
You should now be able to see the vector map in QGIS and inspect the features: