
Carry out the following steps:
- Create a new file named wfst.html. Open it and add the <head> and <body> tags. In the <head> tag, import the following OpenLayers library:
        <html>
          <head>
            <title>Consuming a WFS-T with OpenLayers</title>
            <script
             src="http://openlayers.org/api/OpenLayers.js">
            </script>
          </head>
          <body>
          </body>
        </html>
- Add a <div> tag in the <body> tag to contain the OpenLayers map, as shown in the following code; the map will have a width of 700 pixels and a height of 400 pixels:
<div style="width:700px; height:400px" id="map"></div>
- Just after the <div> tag is made to contain the map, add a JavaScript script. Inside the script, start setting ProxyHost to the web location where you deployed your proxy script. Then create a new OpenLayers map, as shown in the following code:
        <script type="text/javascript">
          // set the proxy
          OpenLayers.ProxyHost = "/cgi-bin/proxy.cgi?url=";
          // create the map
          var map = new OpenLayers.Map('map');
        </script>
- Now, in the script, after creating the map, create an OpenStreetMap layer that you will use in the map as the base layer, using the following code:
       // create an OSM base layer
       var osm = new OpenLayers.Layer.OSM();
- Now, create the WFS-T layer's OpenLayers object using the StyleMap object to render the PostGIS layer features with red points, as shown in the following screenshot:
        // create the wfs layer
        var saveStrategy = new OpenLayers.Strategy.Save();
        var wfs = new OpenLayers.Layer.Vector("Sites",
        {
          strategies: [new OpenLayers.Strategy.BBOX(), saveStrategy],
          projection: new OpenLayers.Projection("EPSG:4326"),
                      styleMap: new OpenLayers.StyleMap({
            pointRadius: 7,
            fillColor: "#FF0000"
          }),
          protocol: new OpenLayers.Protocol.WFS({
            version: "1.1.0",
            srsName: "EPSG:4326",
            url: "http://localhost:8080/geoserver/wfs",
            featurePrefix: 'postgis_cookbook',
            featureType: "sites",
            featureNS: "https://www.packtpub.com/application-development/
                        postgis-cookbook-second-edition",
            geometryName: "the_geom"
          })
        });
- Add the WFS layer to the map, center align the map, and set the initial zoom. You can use the geometry transform method to convert a point from EPSG:4326, in which the layer is stored, to ESPG:900913, which is used by the viewer, as shown in the following code:
      // add layers to map and center it
      map.addLayers([osm, wfs]);
      var fromProjection = new OpenLayers.Projection("EPSG:4326");
      var toProjection   = new OpenLayers.Projection("EPSG:900913");
      var cpoint = new OpenLayers.LonLat(12.5, 41.85).transform(
                   fromProjection, toProjection);
      map.setCenter(cpoint, 10);
- Now, you will create a panel with a Draw Point tool (to add new features) and a Save Features tool (to save the features to the underlying WFS-T). We first create the panel, as shown in the following code:
        // create a panel for tools
        var panel = new OpenLayers.Control.Panel({
          displayClass: "olControlEditingToolbar"
        });
- Now, we will create the Draw Point tool, as shown in the following code:
        // create a draw point tool
        var draw = new OpenLayers.Control.DrawFeature(
          wfs, OpenLayers.Handler.Point,
          {
            handlerOptions: {freehand: false, multi: false},
            displayClass: "olControlDrawFeaturePoint"
          }
        );
- Then, we will create the Save Features tool, using the following code:
        // create a save tool
        var save = new OpenLayers.Control.Button({
          title: "Save Features",
          trigger: function() {
            saveStrategy.save();
          },
          displayClass: "olControlSaveFeatures"
        });
- Finally, add the tools to the panel, including a navigation control, and the panel as a control to the map, using the following code:
       // add tools to panel and add it to map
       panel.addControls([
         new OpenLayers.Control.Navigation(),
         save, draw
       ]);
       map.addControl(panel);
- Your HTML file should now look like the wfst.html file contained in the chp09 directory. Deploy this file to your web server (that is, Apache HTTPD or IIS). If you are using Apache HTTPD in Linux, you could copy the file to the data directory under /var/www, whereas if you are using Windows, you could copy it to the data directory under C:\ms4w\Apache\htdocs (create the data directory if it does not already exist). Then, access it using http://localhost/data/wfst.html.
- Open the web page using your favorite browser and start adding some points to the map. Now, click on the Save button and reload the page; the previously added points should still be there, as they had been stored in the underlying PostGIS table by WFS-T, as shown in the following screenshot:
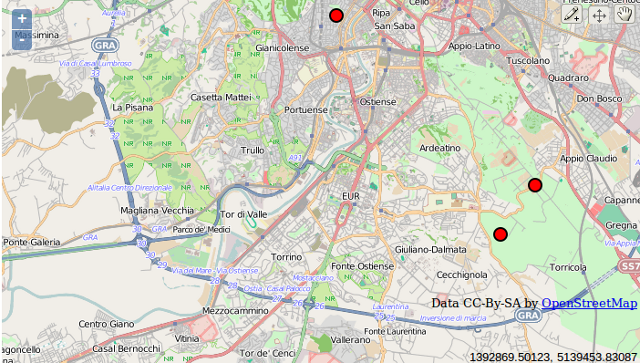
Added points using OpenLayers controls viewed on a browser