
Now, the last thing I want to talk about is how to validate an ObjectID. What we've done so far is we've created a valid ObjectID. It's just of a value that is not in the collection, but if we were to do something like tack on two 1s, we would actually have an invalid ID which is going to cause errors in the program. Now, you might wonder why this would ever happen, but it could happen because the user is the one specifying the ID. We're going to add a catch call onto findById. We're going to get that error and simply print it to the screen using console.log:
Todo.findById(id).then((todo) => {
  if(!todo) {
    return console.log('Id not found');
  }
  console.log('Todo By Id', todo);
}).catch((e) => console.log(e));
Now, to illustrate this we don't need all three queries. In order to clean up the Terminal output, I'm going to go ahead and comment out Todo.find and Todo.findOne. With this in place, our invalid ID, and the catch callback we can save the file, and over in the Terminal we should get a really long error message:
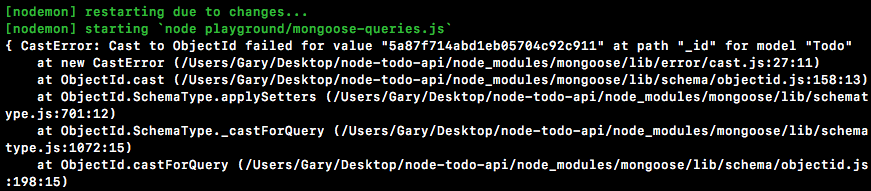
We have an error message, CastError: Cast to ObjectId failed, for the given value. This is warning you that your ObjectID doesn't just not exist in the collection, it's actually completely invalid. Now, running this with a catch method does let us handle the error. We could do something like tell the user, hey, the ID that you sent through is invalid, but there's also another way to get it done that I prefer. What we're going to do is load in the ObjectID off of the MongoDB native driver and that's something we did before. Right here in mongodb-connect we loaded in the, ObjectID. Inside of mongoose-queries we're going to do the same thing. I'm going to make a constant called ObjectID and we're going to get it from the mongodb library:
const {ObjectID} = require('mongodb');
Now, on ObjectID we have a lot of utility methods. We've looked at how we can create new ObjectIDs, but one thing we also have access to is a method called ObjectId.isValid. The isValid method takes the value, in this case it's our string right in id, and it returns true if it's valid, and false if it's not valid, which means we can add if conditions to validate the ID before we ever run the query.
We're going to add an if statement, and we're going to check if the value is not valid. I'm going to flip it using an exclamation mark, then we can call ObjectID.isValid. By flipping it we've essentially created a method that tests whether an ObjectID is not valid. The value I'm going to pass in is just going to be the string stored in the id variable, and now we can add some code to run when the ID is not valid, console.log('ID not valid'):
if(!ObjectID.isValid(id)) {
   console.log('ID not valid');
}
Now, if I go ahead and save the file, we should get our ID not valid message, and then after that we should get our error message printing to the Terminal because we do still have our catch call, and this query is still going to run. Over here we get just that. ID not valid prints to the screen:

But now we know how to validate IDs and that's going to come in handy in the next section.
With this in place it's now time for a challenge. Before I set up the challenge, I'm going to comment out the id and our isValid call, and down below I'll comment out findById. I'm going to leave them here; you can use them as a reference for what to do in the challenge. Your challenge is going to be to query the users collection. That means that you're going to want to go ahead and move into Robomongo and grab an ID from your users collection. Here I have just one document; if you have zero documents for whatever reason, you can always right-click Insert Document, and all you have to do is specify the email.
Now, in order to make that query over inside of Atom you are going to need to load in the user Mongoose model because currently we only have the Todo one, require. Down below I want you to use User.findById to query the ID that you picked over in Robomongo. Then you're going to go ahead and handle the three cases. There's going to be the case where the query works, but there is no user. In that case you're going to print something like User not found. You're also going to handle the case where the user was found. I want you to go ahead and print the user to the screen. Then finally you're going to handle any errors that might have occurred. You can simply print the error object to the screen for that. There's no need to use isValid for this one, all you have to do is fill out the findById call.
Now, the first thing I'm going to do is import the user file. I'm going to make a const, I'm going to grab the User variable off of the return result from require, and we're going to follow the same path we have here. We have to go out of the playground directory, into the server/models directory, and finally the filename is user:
const {User} = require('./../server/models/user');
Now that we have the user imported, we can query it down below. Before I write the query I am going to fetch an ID over in Robomongo:

I can edit the document, highlight it, copy it, and move back into Atom. Inside of Atom I'm going to set up my User.findById call. All I have to do is pass in the ID; I have that in the clipboard, and I'm going to wrap it in quotes. Next up, the callbacks. I'm going to attach a then callback, passing in two functions. The first one is when the promise gets resolved, and the second one is when the promise gets rejected. For rejections, all we're going to do is print that error object to the screen, which means we can use console.log(e). Now, if things go well, there are still a few exceptions. We want to make sure that the user actually does exist. The query is still going to pass if the ID doesn't match anything found inside of the collection. If there is no user, we are going to stop function execution using return, then we're going to go ahead and print using console.log('Unable to find user'):
User,findById('57bdb0fcdedf88450bfa2d66').then((user) => {
   if(!user) {
         return console.log('Unable to find user');
   }
}, (e) => {
   console.log(e);
});
Now, the last case we need to handle is if things actually go well, which means that the query was indeed valid and the ID was found inside of the users collection. I'm going to add console.log using our pretty printing technique, the user variable, JSON.stringify, passing in our three arguments, user, undefined, and the number 2:
User.findById('5a8708e0e40b324268c5206c').then((user) => {
   if(!user) {
        return console.log('Unable to find user');
   }
   console.log(JSON.stringify(user, undefined, 2));
}, (e) => {
   console.log(e);
});
With this in place I can now go ahead and save the file and open up the Terminal since it's currently hidden, we get our user showing up in the Terminal:

This is fantastic; if you're seeing this you've successfully completed the challenge. Now I can also test that my other cases are working as expected. I'm going to change 6 at the end of my ID to a 7 and save the file:

When it restarts I get Unable to find user, which is expected. Next up, I'm going to change it back to a 6, but I am going to tack on a few 1s, or any other characters. In this case, I'll use two 1s and two a characters. This time we do get our error, we're unable to cast that value to an ObjectId. Let's undo the change to the ID and now we're done.
I'm going to wrap this section up by committing our changes. I'm going to shut down nodemon, run a git status command, and we have one new file:
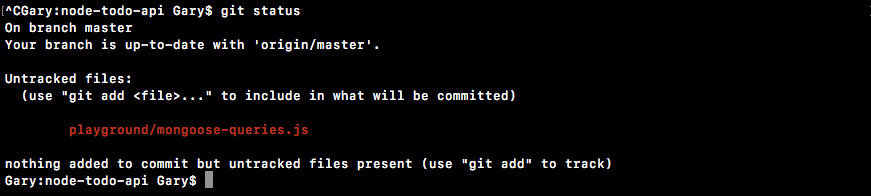
I can use git add to add it to the next commit, then I can use git commit to make the commit. A good message for this one is Add queries playground file:
git commit -m 'Add queries playground file'
With this in place I'm going to push it up to GitHub using the git push command, and we are done. In the next section you will be responsible for creating an entire API request.