
Now that you know how to emit and listen to custom events, we're going to move on to creating two events that we'll actually use in the chat app. These are going to be newMessage and createMessage:
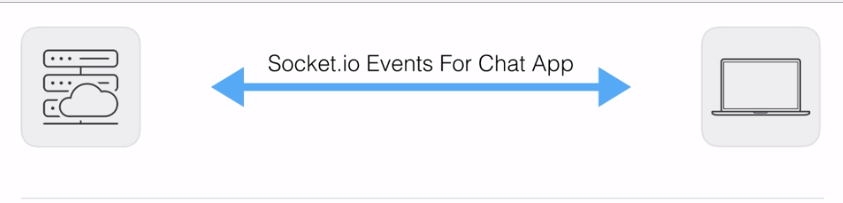
Now, for the chat app, we once again have our server, which is going to be the server we build; and we have our client, which is going to be a user who is in the chat app. There are most likely going to be multiple users who all want to communicate with each other.
Now, the first event we'll have is a newMessage event. This is going to be emitted by the server and listened to on the client:
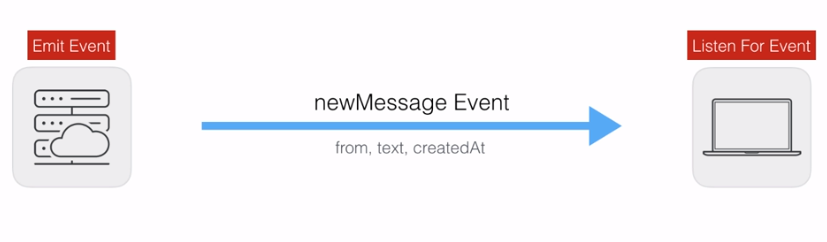
When a new message comes in, the server will send it to everyone connected to the chat room, so they can display it to the screen and a user can go ahead and respond to it. The newMessage event is going to require some data. We're going to need to know who the message was from; a string of someone's name, such as Andrew, the text of the message, something like, hey, can you meet up at six, and a createdAt timestamp.
All of this data is going to get rendered inside our chat application in the browser. We'll be doing that for real in a little bit, but for now we'll just print it to the console. So, this is the first event I want you to create. You'll make this newMessage event, emit it from the server—for now, you can simply emit it when a user connects—and you'll listen to it on the client. For now, on the client, you can just print with console.log a little message when you get the data. You can say something like got new message, printing the object that was passed with this data.
Next up, the second event we'll work with is createMessage. This will come from the client to the server. So if I'm user 1, I'll fire a createMessage event from my browser. This will go to the server, and the server will fire newMessage events to everyone else so they can see my message, which means the createMessage event is going to get emitted from the client and the server is going to be the one who's listening for the event:
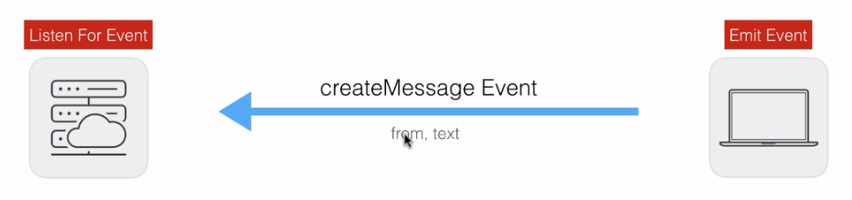
Now, this event will require some data. We'll need to know who the message was from and also the text: what did they want to say? We need both of these pieces of information.
Now, notice a discrepancy here: we're sending the from, text, and createdAt properties to the client, but we're not asking for a createdAt property from the client when they create a message. This createdAt property is actually going to get created on the server. This is going to prevent the user from being able to spoof the time a message was created at. There are certain properties we're going to trust the user to provide us with; there's others that we will not trust them to provide us with, and one of those is going to be createdAt.
Now, for createMessage, all you have to do is set up an event listener on the server that waits for this to fire, and once again, you can simply print a message, for example, create message, and then you can provide the data that was passed along to console.log, printing it to the Terminal. Now, once you have that listener in place, you'll want to emit it. You can emit it when you user first connects, and you can also fire a couple of socket.emit calls from Chrome Developer Tools, making sure that all of the messages show up in the Terminal, listening for the createMessage event.
We're going to get started inside server.js by listening for that createMessage event, and this is going to happen down below the socket.emit function in server.js. Now, we have an old event listener from createEmail; we can remove that, and we can call socket.on to listen to our brand new event, createMessage:
socket.on('createMessage');
The createMessage event is going to require a function to call when the event actually happens. We'll want to do something with the message data:
socket.on('createMessage', () => {

});
For the moment, all you need to do is use console.log to print it to the Terminal so we can verify that everything works as expected. We'll get our message data, which will include a from property and a text property, and we'll print it to the screen. You don't have to specify the exact message I used; I'll just say createMessage, and the second argument will be the data that was passed from the client to the server:
socket.on('createMessage', (message) => {
  console.log('createMessage', message);
});
Now that we have our listener in place, we can go ahead and emit this inside the client in index.js. Now, we currently have an emit call for the createEmail event. I'll remove this emit call. We'll call socket.emit first and then emit('createMessage'):
socket.on('connect', function () {
  console.log('Connected to server');

  socket.emit('createMessage');
});
Next, we'll emit createMessage with the necessary data.
For the data, we'll provide an object with two properties: from, this one's from Andrew; and text, which is the actual text of the message, which could be something like Yup, that works for me:
socket.emit('createMessage', {
  from: 'Andrew',
  text: 'Yup, that works for me.'
});
This is going to be the event we emit. I'm going to save index.js, head over to the browser, and we should be able to refresh the app and see the data in the Terminal:

As shown in the preceding screenshot, inside the Terminal we have createMessage with the from property that we specified, and the text, Yup, that works for me.
Now, we can also emit events from Chrome Developer Tools to play around with Socket.io. We can add socket.emit, and we can emit any event we like, passing in some data:
socket.emit('createMessage', {from: 'Jen', text: 'Nope'});
The event we'll emit is createMessage, and the data is a from attribute; this one's from Jen and a text attribute, Nope:
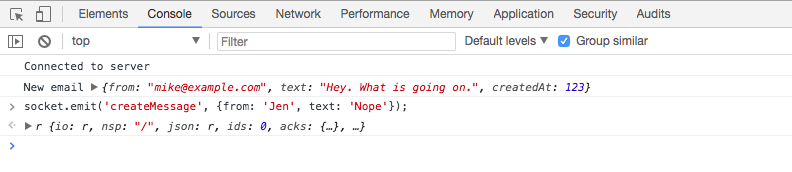
When I send this off, the message shows up on the server in real time, and as shown in the following screenshot, you can see it's from Jen, the text is Nope, and everything is working as expected:

Now, that's the first event; the other one is the newMessage event, which is going to be emitted by the server and listened to by the client.