Table of Contents for
Advanced Node.js Development

Version ebook / Retour

Cover image for bash Cookbook, 2nd Edition Advanced Node.js Development by Andrew Mead Published by Packt Publishing, 2018
  1. Advanced Node.js Development
  2. Title Page
  3. Copyright and Credits
  4. Advanced Node.js Development
  5. Packt Upsell
  6. Why subscribe?
  7. PacktPub.com
  8. Contributors
  9. About the author
  10. Packt is searching for authors like you
  11. Table of Contents
  12. Preface
  13. Who this book is for
  14. What this book covers
  15. To get the most out of this book
  16. Download the example code files
  17. Download the color images
  18. Conventions used
  19. Get in touch
  20. Reviews
  21. Getting Set Up
  22. Installing MongoDB and Robomongo for Linux and macOS
  23. Installing MongoDB and Robomongo for Windows
  24. Creating and reading data
  25. Summary
  26. MongoDB, Mongoose, and REST APIs – Part 1
  27. Connecting to MongoDB and writing data
  28. Creating a directory for the project
  29. Connecting the mongodb-connect file to the database
  30. Adding a string as the first argument
  31. Adding the callback function as the second argument
  32. Error handling in mongodb-connect
  33. Running the file in the Terminal
  34. Adding data to the database
  35. Adding a new record into a collection
  36. The ObjectId
  37. The _id property in the context of MongoDB
  38. Calling the .getTimestamp function
  39. Using object destructuring ES6
  40. Creating a new instance of objectID
  41. Fetching data
  42. Fetching todos in Robomongo file
  43. The find method
  44. Writing a query to fetch certain values
  45. Writing a query to fetch completed todos
  46. Qureying todos by id
  47. Implementing the count method
  48. Querying users collection
  49. Setting up the repo
  50. Deleting documents
  51. Exploring methods to delete data
  52. The deleteMany method
  53. The deleteOne Method
  54. The deleteOne method
  55. The findOneAndDelete method
  56. Using the deleteMany and findOneAndDelete methods
  57. Removing duplicate documents
  58. Targeting the documents using ID
  59. Running the findOneAndDelete and deleteMany statements
  60. Making commit for the deleting documents methods
  61. Updating data
  62. Summary
  63. MongoDB, Mongoose, and REST APIs – Part 2
  64. Setting up Mongoose
  65. Setting up root of the project
  66. Connecting mongoose to database
  67. Creating the todo model
  68. Creating a brand-new Todo
  69. Saving the instance to the database
  70. Running the Todos script
  71. Creating a second Todo model
  72. Validators, Types, and Defaults
  73. Mongoose validators
  74. Customizing the Todo text property
  75. Mongoose defaults
  76. Mongoose types
  77. Creating a Mongoose user model for authentication
  78. Setting up the email property
  79. Installing Postman
  80. Making an HTTP request to Google
  81. Illustrating working of the JSON data
  82. Resource Creation Endpoint - POST /todos
  83. Refactoring the server.js file to create POST todos route
  84. Configuring the Todo and Users file
  85. Loading Todo and User file in server.js
  86. Configuring the Express application
  87. Configuring the POST route
  88. Getting body data from the client
  89. Creating an instance of Mongoose model
  90. Setting up HTTP status code
  91. Testing POST /todos inside of Postman
  92. Adding more Todos to the database
  93. Testing POST /todos
  94. Installing npm modules for testing POST /todos route
  95. Setting up the test files
  96. Loading the test files
  97. Adding describe block for the test cases
  98. Making the POST requests via supertest 
  99. Making assertions about the POST request
  100. Making a request to fetch the Todos from the database
  101. Adding the catch call for the error handling
  102. Setting up test scripts in package.json
  103. Adding testing life cycle method in server.test.js file
  104. Running the test suite
  105. Test case: should not create todo with invalid body data
  106. Making assertions about the length of the Todos collection
  107. Making commit for POST /todos route
  108. List Resources - GET /todos
  109. Creating the GET /todos route
  110. Testing the GET /todos route 
  111. Setting up Post request to create a todo
  112. Testing GET /todos
  113. Adding seed data for the GET /todos test case
  114. Adding a describe block to the test case
  115. Adding assertions to the test case
  116. Summary
  117. MongoDB, Mongoose, and REST APIs – Part 3
  118. Mongoose queries and ID validation
  119. Todo.find method
  120. Todo.findOne method
  121. Todo.findById method
  122. Handling situations where the ID doesn't exist
  123. Validating an ObjectID
  124. Getting an individual resource – GET /todos/:id
  125. Taking on the challenge
  126. Challenge step 1 - filling the code
  127. Challenge step 2 - Making the query
  128. challenge step 3 - success path
  129. Testing GET /todos/:id
  130.  Writing test cases for GET/todos/:id
  131. Test 1 - Super test request
  132. Test 2 - Verifying invalid ID
  133. Test 3 - Validating invalid ObjectID
  134. Deploying the API to Heroku
  135. Creating a Heroku app
  136. Heroku logs
  137. Postman environments
  138. Managing Postman environments
  139. Todo App Local environment
  140. Todo App Heroku environment
  141. Deleting a resource – DELETE /todos/:id
  142. Todo.remove method
  143. Todo.findOneAndRemove method
  144. Todo.findByIdAndRemove method
  145. Creating a delete route
  146. Testing DELETE /todos/:id
  147. Test case 1 - should remove a todo
  148. Test case 2 - should return 404 if todo not found
  149. Test case 3 - should return 404 if object id is invalid 
  150. Test case 4 - should return 404 if todo not found
  151. Updating a Resource - PATCH /todos/:id
  152. Installing Lodash library
  153. Testing Todos for the patch call
  154. Testing PATCH /todos/:id
  155. Test 1 -  To complete the incomplete todo
  156. Test 2 - to make complete todo incomplete
  157. Creating a Test database
  158. Summary
  159. Real-Time Web Apps with Socket.io
  160. Creating a new web app project
  161. Setting up our basic app structure
  162. Setting up the index.html file for DOCTYPE
  163. Setting up the server.js file for the public directory
  164. The join method
  165. Configuring basic server setup
  166. Setting up a gitignore file
  167. Making a commit with the current uncommitted files
  168. Adding Socket.io to an app
  169. Setting up Socket.io
  170. Creating a server using the http library
  171. Configuring the server to use Socket.io
  172. Communication between the client and server
  173. The io.on method
  174. Adding a connection event in the client
  175. The disconnect event
  176. Emitting and listening to custom events
  177. Creating custom events inside an application
  178. Moving the JavaScript into a separate file
  179. Adding a newEmail custom event
  180. The emit method
  181. Testing the newEmail event
  182. Adding a createEmail custom event
  183. socket.emit in the developer console
  184. The custom events in the chat app
  185. The newMessage event
  186. Broadcasting events
  187. Wiring up the createMessage listener for all users
  188. Testing the messaging events
  189. Committing and deploying messaging to Heroku
  190. Testing messaging in a Firefox browser using Heroku
  191. Broadcasting events to other users
  192. Emitting two events when a user connects
  193. Greeting an individual user
  194. Broadcasting a new user in the chat
  195. Testing the user connection
  196. Summary
  197. Generating newMessage and newLocationMessage
  198. Message generator and tests
  199. Generating the newMessage object using the utility function
  200. Writing test cases
  201. Adding the test-watch script
  202. Adding the test script
  203. Running the test suite for the message utility
  204. Integrate the utility function into our application
  205. Event acknowledgements
  206. Setting up acknowledgements
  207. Sending an acknowledgement from server to the client
  208. Updating the event emitter
  209. Updating the event listener
  210. The message form and jQuery
  211. Using the jQuery library
  212. Adding the form field in index.html
  213. Setting up the form tag
  214. Adding the text field
  215. Testing the form's rendering
  216. Using jQuery to select element
  217. Adding the selector element to index.js
  218. Testing the update event listener
  219. Rendering incoming messages to the screen
  220. Creating an ordered list to render messages
  221. Using jQuery to create element in index.js
  222. Testing the incoming messages
  223. Making a commit for the message form
  224. Geolocation
  225. Adding the Send Location button to the application
  226. Adding a click listener to the Send Location button
  227. Checking access to the geolocation API
  228. Fetching a user's position
  229. Adding the coordinates object in the users position
  230. Passing coordinates data with the connected users
  231. Rendering clickable link in place of text coordinates
  232. Sorting out the URL structure
  233. Emitting newLoactionMessage
  234. Adding generateLocationMessage in the message.js file
  235. Adding an event listener for newLocationMessage
  236. Adding test case for generateLocationMessage
  237. Adding variables for the test case
  238. Making assertion for generateLocationMessage
  239. Running the test case for generateLocationMessage
  240. Summary
  241. Styling Our Chat Page as a Web App
  242. Styling the chat page
  243. Storing the template styles
  244. Tweaking the structure for alignment
  245. Making user experience improvements
  246. Changing the form submit listener
  247. Updating the input tag
  248. Customizing the Send Location
  249. Updating the button text
  250. Timestamps and formatting with Moment
  251. Timestamps in Node
  252. The Date object
  253. Using Moment for timestamps
  254. The Moment documentation
  255. Formatting date using Moment
  256. The Manipulate section in Moment
  257. Printing message timestamps
  258. Getting the formatted values back from timestamps
  259. Updating the message.js file
  260. Integrating Moment on client
  261. Updating the newMessage property
  262. Updating the newLocationMessage property
  263. Mustache.js
  264. Adding mustache.js to the directory
  265. Creating and rendering template for newMessage
  266. Implementing the Mustache.js rendering method
  267. Getting all the data showing up
  268. Providing a custom structure
  269. Adding the list item tag
  270. Adding the message body tag
  271. Creating template for the newLocation message
  272. Rendering the newLocation template
  273. Autoscrolling
  274. Running a height properties calculation
  275. Creating a new variable to scroll messages to the bottom
  276. Determining the calculation
  277. Taking into account the height of new message
  278. Testing the calculations
  279. Scrolling a user when necessary
  280. Committing the calculation-related changes
  281. Summary
  282. The Join Page and Passing Room Data
  283. Adding a join page
  284. Updating the HTML file
  285. Adding the head tag in the HTML file
  286. Adding the body tag in the HTML file
  287. Adding the form-fields for the chat page
  288. Committing the changes in index.html
  289. Passing room data
  290. Getting data to the server
  291. The params and deparams
  292. Setting up listener in server.js
  293. Defining the isRealString function
  294. Calling the isRealString function in server.js
  295. Adding error handler case in chat.js
  296. Adding test cases for the new validation function
  297. Test case 1 – should reject non-string values
  298. Test case 2 – should reject string with only spaces
  299. Test case 3 – should allow strings with non-space characters
  300. Socket.io rooms
  301. Targeting the specific user
  302. Testing the specific user set up
  303. Summary
  304. ES7 classes
  305. Storing users with ES6 classes – Part I
  306. The ES6 class syntax
  307. Creating the ES6 class for a person
  308. The constructor function
  309. The method function
  310. Adding the users class
  311. Adding the test case for addUser
  312. Adding new instances in the users.test file
  313. Making the assertions for the users call
  314. Running the addUser test case
  315. Adding the removeUser, getUser, and getUserList methods
  316. Adding seed data for the test file
  317. Filling the getUserList
  318. Adding test case for getUserList
  319. Filling the getUser
  320. Test case – should find user
  321. Test case – should not find user
  322. Filling the removeUser method
  323. Test case – should remove a user
  324. Test case – should not remove user
  325. Wiring up user list
  326. Adding People list in the chat room
  327. Adding jQuery to update the DOM
  328. Adding user to the user's list
  329. Adding users with unique ID
  330. Emitting the event to the clients
  331. Testing the users list in the chatroom
  332. Removing users when they leave the chatroom
  333. Updating the users list when someone left the chatroom
  334. Emitting custom message
  335. Rendering the users name to the chatroom
  336. Adding a jQuery to add the users to the list
  337. Rendering the updated People list
  338. Testing the users name in the chatroom
  339. Making a commit for updated users list
  340. Sending messages to room only
  341. Updating the chat.js and server.js files
  342. Emitting event to the individual room
  343. Wiring up createLoactionMessage for individual room
  344. Committing the individual room changes
  345. New feature ideas
  346. Summary
  347. Async/Await Project Setup
  348. Using async/await features in promises
  349. Setting up the getUser project
  350. The array find method
  351. Running the getUser object test
  352. Setting up the getGrades project
  353. Creating grades for the getGrades project
  354. Returning a new promise
  355. Setting up the getStatus project
  356. Resolving the getStatus string
  357. Calculating the average
  358. Returning the template string
  359. Async/await basics
  360. Using the async function
  361. Rejecting an error using the async function
  362. Using the await function
  363. A real-world example
  364. Creating a currency-converter using the async/await function
  365. Exploring APIs for currency exchange rate
  366. Taking advantage of axios inside our application
  367. The getExchangeRate function
  368. The getCountries function
  369. Creating convertCurrencyAlt as the async/await function
  370. Handling errors and awaiting async function
  371. Converting getExchangeRate and getCountries into the async function
  372. Error handling in the async function
  373. Printing an error to the screen
  374. Error handling for the getExchangeRate function
  375. Summary
  376. Other Books You May Enjoy
  377. Leave a review - let other readers know what you think

Updating data

You know how to insert, delete, and fetch documents out of MongoDB. In this section, you're going to learn how to update documents in your MongoDB collections. To kick things off, as usual, we're going to duplicate the last script we wrote, and we'll update it for this section.

I'm going to duplicate the mongodb-delete file, renaming it to mongodb-update.js, and this is where we'll write our update statements. I'm also going to delete all of the statements we wrote, which is the deleted data. Now that we have this in place, we can explore the one method we'll be looking at in this section. This one is called findOneAndUpdate. It's kind of similar to findOneAndDelete. It lets us update an item and get the new document back. So if I update a Todo, set it as completed equal to true, I will get that document back in the response. Now in order to get started, we're going to be updating one of the items that we have inside of our Todos collection. If I view the documents, we currently have two. The goal here is going to be to update the second item, the one where text equals Eat lunch. We're going to try to set the completed value to true, which would be a pretty common action.

If I check off a Todo item, we want to toggle that completed Boolean value. Back inside of Atom, we're going to kick things off by accessing the appropriate collection. That'll be db.collection. The collection name is Todos, and the method we'll be using is findOneAndUpdate. Now, findOneAndUpdate is going to take the most arguments we've used so far, so let's go ahead and look up the documentation for it for future reference.

Over inside of Chrome, we currently have the Cursor tab open. This is where we have the count method defined. If we scroll next the Cursor tab, we have our other tabs. The one we're looking for is Collection. Now, inside of the Collection section, we have our typedefs and our methods. We're looking at methods here, so if I scroll down, we should be able to find findOneAndUpdate and click it. Now, findOneAndUpdate takes quite a few arguments. The first one is the filter. The update argument lets us target the document we want to update. Maybe we have the text, or most likely we have the ID of the document. Next up is the actual updates we want to make. We don't want to update the ID, we just want to filter by ID. In this case, the updates are going to be updating the completed Boolean. Then we have some options, which we are going to define. We'll use just one of them. We also have our callback. We're going to leave off the callback as we've been doing so so far, in favor of promises. As you can see on the documentation page, it returns a promise if no callback is passed in, and that's exactly what we expect. Let's go ahead and start filling out the appropriate arguments for findOneAndUpdate, kicking things off with the filter. What I'm going to do is filter by ID. In Robomongo, I can grab the ID of this document. I'm going to edit it and copy the ID to the clipboard. Now, in Atom, we can start querying the first object, filter. We're only looking for documents where the _id equals new ObjectID with the value that we copied to the clipboard. This is all we need for the filter argument. Next up is going to be the actual updates we want to apply, and this is not exactly straightforward. What we have to do here is learn about the MongoDB update operators.

We can view a complete list of these operators and exactly what they are by googling mongodb update operators. When I do this, we're looking for the mongodb.com documentation:

Now this documentation is specific to MongoDB, which means it's going to work with all of the drivers. In this case, it is going to work with our Node.js driver. If we scroll down further, we can look at all of the update operators we have access to. The most important, and the one we're going to get started with, is the $set operator. This lets us set a field's value inside of our update, which is exactly what we want to do. There's other operators, like increment. This one, $inc, lets you increment a field's value, like the age field in our Users collection. Although these are super useful, we're going to get started with $set. In order to use one of these operators, what we need to do is type it out, $set, and then set it equal to an object. In this object, these are the things that we're actually going to be setting. For example, we want to set completed equal to true. If we tried to put completed equal to true at the root of the object like this, it would not work as expected. We have to use these update operators, which means we need this. Now that we have our updates in place using the set update operator, we can go ahead and provide our third and final argument. If you head over to the documentation for findOneAndUpdate, we can take a look at the options real quick. The one we care about is returnOriginal.

The returnOriginal method is defaulted to true, which means that it returns the original document, not the updated one, and we don't want that. When we update a document, we want to get back that updated document. What we're going to do is set returnOriginal to false, and that's going to happen in our third and final argument. This one is also going to be an object, returnOriginal, which is going to be setting equal to false.

With this in place, we are done. We can tack on a then call to do something with the results. I'll get my result back and I can simply print it to the screen, and we can take a look at exactly what comes back:

db.collection('Todos').findOneAndUpdate({ 
  _id: new ObjectID('5a86c378baa6685dd161da6e') 
}, { 
  $set: { 
    completed:true 
  } 
}, { 
  returnOriginal: false 
}).then((result) => { 
  console.log(result); 
}); 

Now, let's go ahead and run this from the Terminal. I'm going to save my file inside the Terminal. We're going to be running node. The file is in the playground folder, and we will call it mongodb-update.js. I'm going to run the following script:

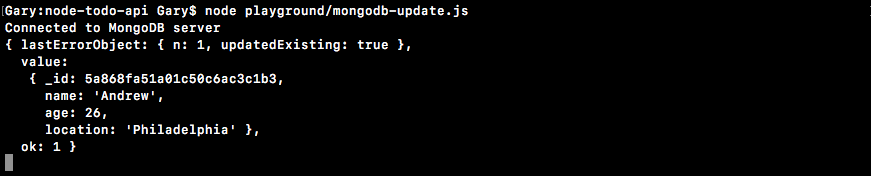
node playground/mongodb-update.js

We get back the value prop, just like we did when we used findOneAndDelete, and this has our document with the completed value set to true, which is the brand-new value we just set, which is fantastic:

If we head over to Robomongo, we can confirm that the value was indeed updated. We can see this in the old document, where the value is false. I'm going to open up a new view for Todos:

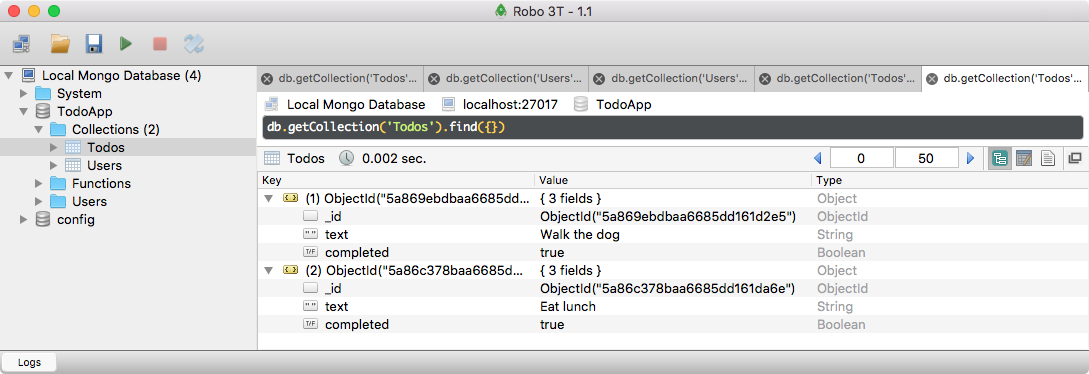
We have Eat lunch, with a completed value of true. Now that we have this in place, we know how to insert, delete, update, and read documents from our MongoDB collections. To wrap this section up, I want to give you a quick challenge. Over inside of the Users collection, you should have a document. It should have a name. It's probably not Jen; it's probably something that you set. What I want you to do is update this name to your name. Now if it's already your name, that's fine; you can change it to something else. I also want you to use $inc, the increment operator that we talked about, to increment this by 1. Now I'm not going to tell you exactly how increment works. What I want you to do is head over to the docs, click on the operator, and then scroll down to see the examples. There's examples for each operator. It's going to become really useful for you to learn how to read documentation. Now, documentation for libraries is not always going to be the same; everyone does it a little differently; but once you learn how to read the docs for one library, it gets a lot easier to read the docs for others, and I can only teach so much in this course. The real goal of this course is to get you writing your own code, doing your own research, and looking up your own documentation, so your goal once again is to update this document, setting the name to something other than what it's currently set to, and incrementing the age by 1.

To kick things off, I'm going to grab the ID of the document in Robomongo, since this is the document I want to update. I'll copy the ID to the clipboard, and now we can focus on writing that statement in Atom. First up, we'll update the name, since we already know how to do that. In Atom, I'm going to go ahead and duplicate the statement:

db.collection('Todos').findOneAndUpdate({
  _id: new ObjectID('57bc4b15b3b6a3801d8c47a2')
}, {
  $set: {
    completed:true
  }
}, {
  returnOriginal: false
}).then((result) => {
  console.log(result);
});

I'll copy it and paste it. Back inside of Atom, we can start swapping things out. First up, we're going to swap out the old ID for the new one, and we're going to change what we passed to set. Instead of updating completed, we want to update name. I'm going to set the name equal to something other than Jen. I'm going to go ahead and use my name, Andrew. Now, we are going to keep returnOriginal set to false. We want to get the new document back, not the original. Now, the other thing that we need to do is increment the age. This is going to be done via the increment operator, which you should have explored using the documentation over inside of Chrome. If you click on $inc, it's going to bring you to the $inc part of the documentation, and if you scroll down, you should be able to see an example. Right here, we have an example of what it looks like to increment:

We set $inc just like we set set. Then, inside of the object, we specify the things we want to increment, and the degree to which we want to increment them. It could be -2, or in our case, it would be positive, 1. In Atom, we can implement this, as shown in the following code:

db.collection('Users').findOneAndUpdate({ 
  _id: new ObjectID('57abbcf4fd13a094e481cf2c') 
}, { 
  $set: { 
    name: 'Andrew' 
  }, 
  $inc: { 
    age: 1 
  } 
}, { 
  returnOriginal: false 
}).then((result) => { 
  console.log(result); 
}); 

I'll set $inc equal to an object, and in there, we'll increment the age by 1. With this in place, we are now done. Before I run this file, I am going to comment out to the other call to findOneAndUpdate, just leaving the new one. I also need to swap out the collection. We're no longer updating the Todos collection; we're updating the Users collection. Now, we are good to go. We're setting the name equal to Andrew and we're incrementing the age by 1, which means that we would expect the age in Robomongo to be 26 instead of 25. Let's go ahead and run this by restarting the script over in the Terminal:

We can see our new document, where the name is indeed Andrew and the age is indeed 26, and this is fantastic. Now that you know how to use the increment operator, you can also go off and learn all of the other operators you have available to you inside of your update calls. I can double-check that everything worked as expected in Robomongo. I'm going to go ahead and refresh the Users collection:

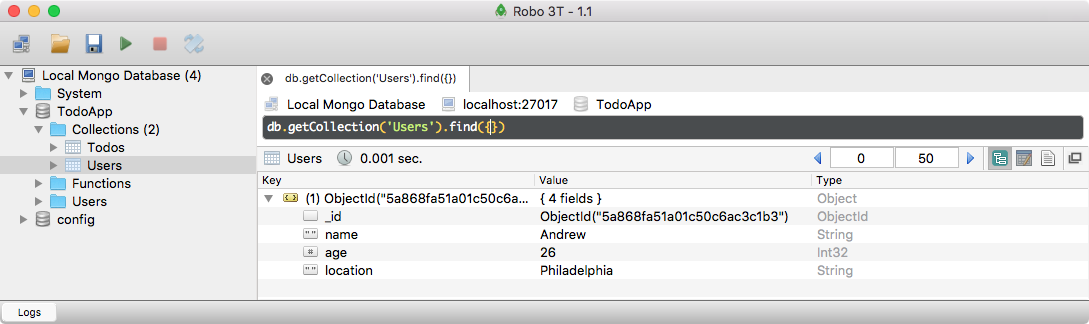
We have our updated document right here. Well, let's wrap this section up by committing our changes. In the Terminal, I'm going to run git status so we can view all of the changes to the repository:

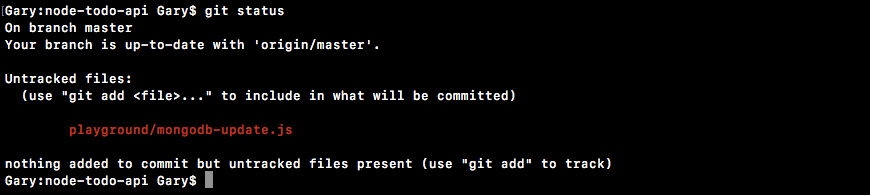
Here, we just have one untracked file, our mongodb-update script. I'm going to use git add . to add that to the next commit, and then I'll use git commit to actually make the commit. I am going to provide the -m argument for message so we can specify a message, which is going to be Add update script:

git add .
git commit -m 'Add update script'

And now we can run the commit command and push it up to GitHub, so our code is backed up on our GitHub repository:

git push

With updating in place, we now have all of the basic CRUD (Creating, Reading, Updating, and Deleting) operations down. Up next, we're going to talk about something called Mongoose, which we'll be using for the Todo API.