Table of Contents for
Advanced Node.js Development

Version ebook / Retour

Cover image for bash Cookbook, 2nd Edition Advanced Node.js Development by Andrew Mead Published by Packt Publishing, 2018
  1. Advanced Node.js Development
  2. Title Page
  3. Copyright and Credits
  4. Advanced Node.js Development
  5. Packt Upsell
  6. Why subscribe?
  7. PacktPub.com
  8. Contributors
  9. About the author
  10. Packt is searching for authors like you
  11. Table of Contents
  12. Preface
  13. Who this book is for
  14. What this book covers
  15. To get the most out of this book
  16. Download the example code files
  17. Download the color images
  18. Conventions used
  19. Get in touch
  20. Reviews
  21. Getting Set Up
  22. Installing MongoDB and Robomongo for Linux and macOS
  23. Installing MongoDB and Robomongo for Windows
  24. Creating and reading data
  25. Summary
  26. MongoDB, Mongoose, and REST APIs – Part 1
  27. Connecting to MongoDB and writing data
  28. Creating a directory for the project
  29. Connecting the mongodb-connect file to the database
  30. Adding a string as the first argument
  31. Adding the callback function as the second argument
  32. Error handling in mongodb-connect
  33. Running the file in the Terminal
  34. Adding data to the database
  35. Adding a new record into a collection
  36. The ObjectId
  37. The _id property in the context of MongoDB
  38. Calling the .getTimestamp function
  39. Using object destructuring ES6
  40. Creating a new instance of objectID
  41. Fetching data
  42. Fetching todos in Robomongo file
  43. The find method
  44. Writing a query to fetch certain values
  45. Writing a query to fetch completed todos
  46. Qureying todos by id
  47. Implementing the count method
  48. Querying users collection
  49. Setting up the repo
  50. Deleting documents
  51. Exploring methods to delete data
  52. The deleteMany method
  53. The deleteOne Method
  54. The deleteOne method
  55. The findOneAndDelete method
  56. Using the deleteMany and findOneAndDelete methods
  57. Removing duplicate documents
  58. Targeting the documents using ID
  59. Running the findOneAndDelete and deleteMany statements
  60. Making commit for the deleting documents methods
  61. Updating data
  62. Summary
  63. MongoDB, Mongoose, and REST APIs – Part 2
  64. Setting up Mongoose
  65. Setting up root of the project
  66. Connecting mongoose to database
  67. Creating the todo model
  68. Creating a brand-new Todo
  69. Saving the instance to the database
  70. Running the Todos script
  71. Creating a second Todo model
  72. Validators, Types, and Defaults
  73. Mongoose validators
  74. Customizing the Todo text property
  75. Mongoose defaults
  76. Mongoose types
  77. Creating a Mongoose user model for authentication
  78. Setting up the email property
  79. Installing Postman
  80. Making an HTTP request to Google
  81. Illustrating working of the JSON data
  82. Resource Creation Endpoint - POST /todos
  83. Refactoring the server.js file to create POST todos route
  84. Configuring the Todo and Users file
  85. Loading Todo and User file in server.js
  86. Configuring the Express application
  87. Configuring the POST route
  88. Getting body data from the client
  89. Creating an instance of Mongoose model
  90. Setting up HTTP status code
  91. Testing POST /todos inside of Postman
  92. Adding more Todos to the database
  93. Testing POST /todos
  94. Installing npm modules for testing POST /todos route
  95. Setting up the test files
  96. Loading the test files
  97. Adding describe block for the test cases
  98. Making the POST requests via supertest 
  99. Making assertions about the POST request
  100. Making a request to fetch the Todos from the database
  101. Adding the catch call for the error handling
  102. Setting up test scripts in package.json
  103. Adding testing life cycle method in server.test.js file
  104. Running the test suite
  105. Test case: should not create todo with invalid body data
  106. Making assertions about the length of the Todos collection
  107. Making commit for POST /todos route
  108. List Resources - GET /todos
  109. Creating the GET /todos route
  110. Testing the GET /todos route 
  111. Setting up Post request to create a todo
  112. Testing GET /todos
  113. Adding seed data for the GET /todos test case
  114. Adding a describe block to the test case
  115. Adding assertions to the test case
  116. Summary
  117. MongoDB, Mongoose, and REST APIs – Part 3
  118. Mongoose queries and ID validation
  119. Todo.find method
  120. Todo.findOne method
  121. Todo.findById method
  122. Handling situations where the ID doesn't exist
  123. Validating an ObjectID
  124. Getting an individual resource – GET /todos/:id
  125. Taking on the challenge
  126. Challenge step 1 - filling the code
  127. Challenge step 2 - Making the query
  128. challenge step 3 - success path
  129. Testing GET /todos/:id
  130.  Writing test cases for GET/todos/:id
  131. Test 1 - Super test request
  132. Test 2 - Verifying invalid ID
  133. Test 3 - Validating invalid ObjectID
  134. Deploying the API to Heroku
  135. Creating a Heroku app
  136. Heroku logs
  137. Postman environments
  138. Managing Postman environments
  139. Todo App Local environment
  140. Todo App Heroku environment
  141. Deleting a resource – DELETE /todos/:id
  142. Todo.remove method
  143. Todo.findOneAndRemove method
  144. Todo.findByIdAndRemove method
  145. Creating a delete route
  146. Testing DELETE /todos/:id
  147. Test case 1 - should remove a todo
  148. Test case 2 - should return 404 if todo not found
  149. Test case 3 - should return 404 if object id is invalid 
  150. Test case 4 - should return 404 if todo not found
  151. Updating a Resource - PATCH /todos/:id
  152. Installing Lodash library
  153. Testing Todos for the patch call
  154. Testing PATCH /todos/:id
  155. Test 1 -  To complete the incomplete todo
  156. Test 2 - to make complete todo incomplete
  157. Creating a Test database
  158. Summary
  159. Real-Time Web Apps with Socket.io
  160. Creating a new web app project
  161. Setting up our basic app structure
  162. Setting up the index.html file for DOCTYPE
  163. Setting up the server.js file for the public directory
  164. The join method
  165. Configuring basic server setup
  166. Setting up a gitignore file
  167. Making a commit with the current uncommitted files
  168. Adding Socket.io to an app
  169. Setting up Socket.io
  170. Creating a server using the http library
  171. Configuring the server to use Socket.io
  172. Communication between the client and server
  173. The io.on method
  174. Adding a connection event in the client
  175. The disconnect event
  176. Emitting and listening to custom events
  177. Creating custom events inside an application
  178. Moving the JavaScript into a separate file
  179. Adding a newEmail custom event
  180. The emit method
  181. Testing the newEmail event
  182. Adding a createEmail custom event
  183. socket.emit in the developer console
  184. The custom events in the chat app
  185. The newMessage event
  186. Broadcasting events
  187. Wiring up the createMessage listener for all users
  188. Testing the messaging events
  189. Committing and deploying messaging to Heroku
  190. Testing messaging in a Firefox browser using Heroku
  191. Broadcasting events to other users
  192. Emitting two events when a user connects
  193. Greeting an individual user
  194. Broadcasting a new user in the chat
  195. Testing the user connection
  196. Summary
  197. Generating newMessage and newLocationMessage
  198. Message generator and tests
  199. Generating the newMessage object using the utility function
  200. Writing test cases
  201. Adding the test-watch script
  202. Adding the test script
  203. Running the test suite for the message utility
  204. Integrate the utility function into our application
  205. Event acknowledgements
  206. Setting up acknowledgements
  207. Sending an acknowledgement from server to the client
  208. Updating the event emitter
  209. Updating the event listener
  210. The message form and jQuery
  211. Using the jQuery library
  212. Adding the form field in index.html
  213. Setting up the form tag
  214. Adding the text field
  215. Testing the form's rendering
  216. Using jQuery to select element
  217. Adding the selector element to index.js
  218. Testing the update event listener
  219. Rendering incoming messages to the screen
  220. Creating an ordered list to render messages
  221. Using jQuery to create element in index.js
  222. Testing the incoming messages
  223. Making a commit for the message form
  224. Geolocation
  225. Adding the Send Location button to the application
  226. Adding a click listener to the Send Location button
  227. Checking access to the geolocation API
  228. Fetching a user's position
  229. Adding the coordinates object in the users position
  230. Passing coordinates data with the connected users
  231. Rendering clickable link in place of text coordinates
  232. Sorting out the URL structure
  233. Emitting newLoactionMessage
  234. Adding generateLocationMessage in the message.js file
  235. Adding an event listener for newLocationMessage
  236. Adding test case for generateLocationMessage
  237. Adding variables for the test case
  238. Making assertion for generateLocationMessage
  239. Running the test case for generateLocationMessage
  240. Summary
  241. Styling Our Chat Page as a Web App
  242. Styling the chat page
  243. Storing the template styles
  244. Tweaking the structure for alignment
  245. Making user experience improvements
  246. Changing the form submit listener
  247. Updating the input tag
  248. Customizing the Send Location
  249. Updating the button text
  250. Timestamps and formatting with Moment
  251. Timestamps in Node
  252. The Date object
  253. Using Moment for timestamps
  254. The Moment documentation
  255. Formatting date using Moment
  256. The Manipulate section in Moment
  257. Printing message timestamps
  258. Getting the formatted values back from timestamps
  259. Updating the message.js file
  260. Integrating Moment on client
  261. Updating the newMessage property
  262. Updating the newLocationMessage property
  263. Mustache.js
  264. Adding mustache.js to the directory
  265. Creating and rendering template for newMessage
  266. Implementing the Mustache.js rendering method
  267. Getting all the data showing up
  268. Providing a custom structure
  269. Adding the list item tag
  270. Adding the message body tag
  271. Creating template for the newLocation message
  272. Rendering the newLocation template
  273. Autoscrolling
  274. Running a height properties calculation
  275. Creating a new variable to scroll messages to the bottom
  276. Determining the calculation
  277. Taking into account the height of new message
  278. Testing the calculations
  279. Scrolling a user when necessary
  280. Committing the calculation-related changes
  281. Summary
  282. The Join Page and Passing Room Data
  283. Adding a join page
  284. Updating the HTML file
  285. Adding the head tag in the HTML file
  286. Adding the body tag in the HTML file
  287. Adding the form-fields for the chat page
  288. Committing the changes in index.html
  289. Passing room data
  290. Getting data to the server
  291. The params and deparams
  292. Setting up listener in server.js
  293. Defining the isRealString function
  294. Calling the isRealString function in server.js
  295. Adding error handler case in chat.js
  296. Adding test cases for the new validation function
  297. Test case 1 – should reject non-string values
  298. Test case 2 – should reject string with only spaces
  299. Test case 3 – should allow strings with non-space characters
  300. Socket.io rooms
  301. Targeting the specific user
  302. Testing the specific user set up
  303. Summary
  304. ES7 classes
  305. Storing users with ES6 classes – Part I
  306. The ES6 class syntax
  307. Creating the ES6 class for a person
  308. The constructor function
  309. The method function
  310. Adding the users class
  311. Adding the test case for addUser
  312. Adding new instances in the users.test file
  313. Making the assertions for the users call
  314. Running the addUser test case
  315. Adding the removeUser, getUser, and getUserList methods
  316. Adding seed data for the test file
  317. Filling the getUserList
  318. Adding test case for getUserList
  319. Filling the getUser
  320. Test case – should find user
  321. Test case – should not find user
  322. Filling the removeUser method
  323. Test case – should remove a user
  324. Test case – should not remove user
  325. Wiring up user list
  326. Adding People list in the chat room
  327. Adding jQuery to update the DOM
  328. Adding user to the user's list
  329. Adding users with unique ID
  330. Emitting the event to the clients
  331. Testing the users list in the chatroom
  332. Removing users when they leave the chatroom
  333. Updating the users list when someone left the chatroom
  334. Emitting custom message
  335. Rendering the users name to the chatroom
  336. Adding a jQuery to add the users to the list
  337. Rendering the updated People list
  338. Testing the users name in the chatroom
  339. Making a commit for updated users list
  340. Sending messages to room only
  341. Updating the chat.js and server.js files
  342. Emitting event to the individual room
  343. Wiring up createLoactionMessage for individual room
  344. Committing the individual room changes
  345. New feature ideas
  346. Summary
  347. Async/Await Project Setup
  348. Using async/await features in promises
  349. Setting up the getUser project
  350. The array find method
  351. Running the getUser object test
  352. Setting up the getGrades project
  353. Creating grades for the getGrades project
  354. Returning a new promise
  355. Setting up the getStatus project
  356. Resolving the getStatus string
  357. Calculating the average
  358. Returning the template string
  359. Async/await basics
  360. Using the async function
  361. Rejecting an error using the async function
  362. Using the await function
  363. A real-world example
  364. Creating a currency-converter using the async/await function
  365. Exploring APIs for currency exchange rate
  366. Taking advantage of axios inside our application
  367. The getExchangeRate function
  368. The getCountries function
  369. Creating convertCurrencyAlt as the async/await function
  370. Handling errors and awaiting async function
  371. Converting getExchangeRate and getCountries into the async function
  372. Error handling in the async function
  373. Printing an error to the screen
  374. Error handling for the getExchangeRate function
  375. Summary
  376. Other Books You May Enjoy
  377. Leave a review - let other readers know what you think

Installing MongoDB and Robomongo for Linux and macOS

This section is for macOS and Linux users. If you are on Windows, I have written a separate section for you.

The first thing we'll do is to download and set up MongoDB, as this will be the database we will use. We'll be using a third-party service to host our database when we eventually deploy it to Heroku, but on our local machine we'll need to download MongoDB so that we can start up a database server. This will let us connect to it via our Node applications to read and write data.

In order to grab the database, we'll head over to mongodb.com. Then we can go to the Download page and download the appropriate version.

On this page, scroll down and select Community Server; this is the one we'll be using. Also, there are options for different operating systems, whether it's Windows, Linux, macOS, or Solaris. I'm on macOS, so I'll use this download:

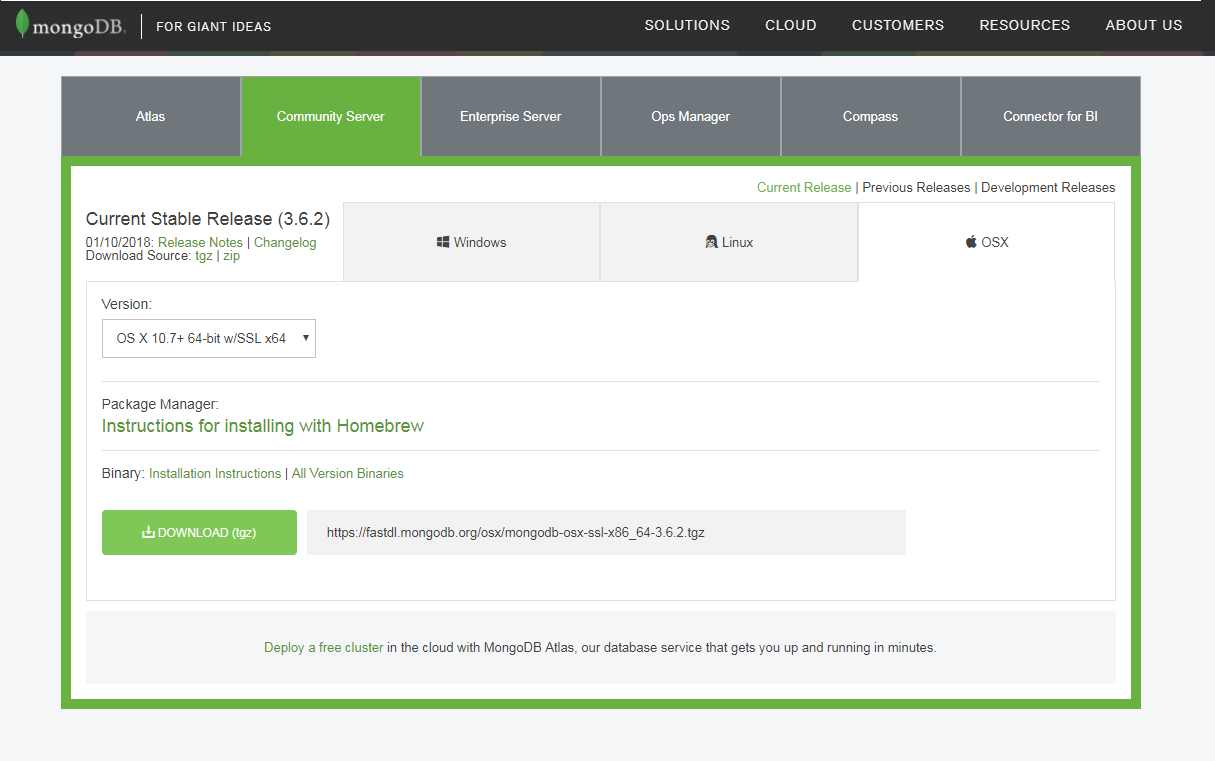
If you're on Linux, click on Linux; then go to the Version drop down and select the appropriate version. For example, if you're on Ubuntu 14.04, you can download the correct one from the Linux tab. Then, you can simply click on the Download button and follow along.

Next you can open it up. We'll just extract the directory, creating a brand new folder in the Downloads folder. If you're on Linux, you might need to manually extract the contents of that archive into the Downloads folder.

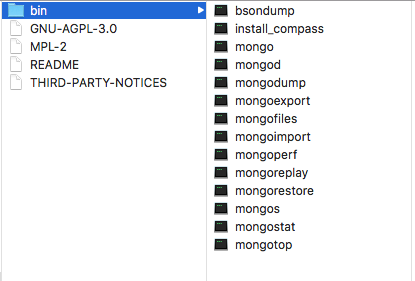
Now this folder contains a bin folder, and in there we have all of the executables that we need in order to do things such as connecting to the database and starting a database server:

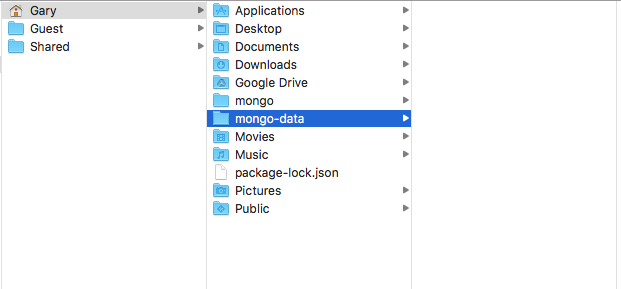
Before we go ahead and run any of them. We'll rename this directory to mongo and then move it into the user directory. You can see that now in the user directory, I have the mongo folder. We'll also create a brand new directory alongside of mongo called mongo-data, and this will store the actual data inside of the database:

So when we insert a new record into the Todos table, for example, that will live in the mongo-data folder. Once you have the mongo folder moved into the user directory and you have the new mongo-data folder, you are ready to actually run the database server from Terminal. I'll go into Terminal and navigate into that brand new mongo folder that is in the user directory, where I currently am, so I can cd into mongo, then I'll cd into the bin directory by tacking it on right there:

cd mongo/bin

From here, we have a bunch of executables that we can run:

We have things such as bisondump and mongodump. In this section, we'll focus on: mongod, which will start up the database server, and mongo, which will let us connect to the server and run some commands. Just like when we type node we can run some JavaScript commands right in Terminal, when we type mongo, we'll be able to run some Mongo commands to insert, fetch, or do anything we like with the data.

First up though, let's start up the database server. I'll use ./ to run a file in the current directory. The file we'll run is called mongod; also, we do need to provide one argument: the dbpath argument. The dbpath argument will get set equal to the path of the directory we just created, the mongo-data directory. I'll use ~ (the tilde) to navigate to the user directory, and then to /mongo-data, as shown here:

./mongod --dbpath ~/mongo-data

Running this command will start up the server. This will create an active connection, which we can connect to for manipulating our data. The last line that you see when you run the command should be, waiting for connections on port 27017:

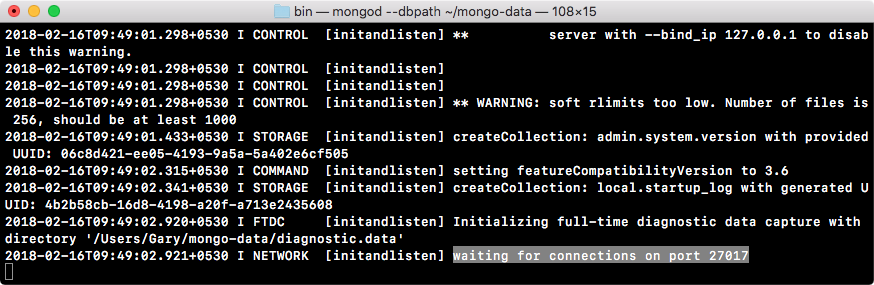
If you see this, it means that your server is up and running.

Next up, let's open a new tab, which starts in the exact same directory, and this time around, instead of running mongod, we'll run the mongo file:

./mongo

When we run mongo, we open up a console. It connects to the database server we just started, and from here, we can start running some commands. These commands are just to test that things are working as expected. We'll be going over all of this in detail later in this section. For now though, we can access db.Todos, and then we'll call .insert to create a brand new Todo record. I'll call it like a function:

db.Todos.insert({})

Next, inside of insert, we'll pass in our document. This will be the MongoDB document we want to create. For now, we'll keep things really simple. On our object, we'll specify one attribute, text, setting it equal to a string. Inside of quotes, type anything you want to do. I'll say Film new node course:

db.Todos.insert({text: 'Film new node course'})

With your command looking just like this, you can press enter, and you should get back a WriteResult object with an nInserted property, which is short for the number inserted: a value set to 1. This means that one new record was created, and that is fantastic!

Now that we've inserted a record, let's fetch the record just to make sure that everything worked as expected.

Instead of calling insert, we'll call find without any arguments. We want to return every single item in the Todos collection:

db.Todos.find()

When I run this, what do we get? We get one object-looking thing back:

We have our text attribute set to the text that we provided, and we have an _id property. This is the unique identifier for each record, which we'll talk about later. As long as you're seeing the text property coming back to what you set, you are good to go.

We can shut down the mongo command. However, we will still leave the mongod command running because there's one more thing I want to install. It's called Robomongo, and it's a graphic user interface for managing your Mongo database. This will be really useful as you start playing around with Mongo. You'll be able to view the exact data saved in the database; you can manipulate it and do all sorts of stuff.

Over in Finder, we have our mongo-data directory, and you can see that there is a ton of stuff in here. This means that our data was successfully saved. All of the data is in this mongo-data directory. To download and install Robomongo, which is available for Linux, Windows and macOS, we'll head over to robomongo.org and grab the installer for our operating system:

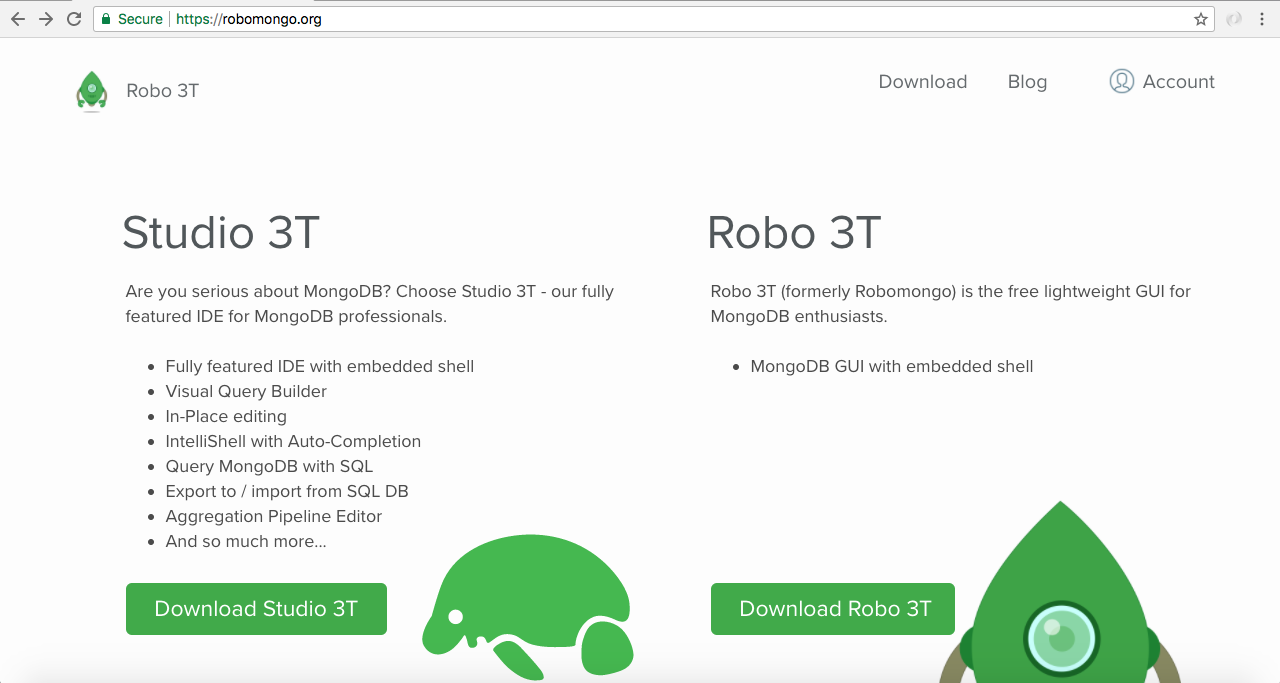
We can click on Download Robo 3T and download the most recent version; it should automatically detect your OS. Download the installer for either Linux or macOS. The one for macOS is really simple. It's one of those installers where you take the icon and drag it into the Applications folder. For Linux, you'll need to extract the archive and run the program in the bin directory. This will start up Robomongo on your Linux distribution.

Since I'm using macOS, I'll just quickly drag the icon over to Applications, and then we can play around with the program itself. Next, I'll open it up inside the Finder. When you first open up Robomongo, you might get a warning like the following on macOS, since it's a program that we downloaded and it's not from an identified macOS developer:

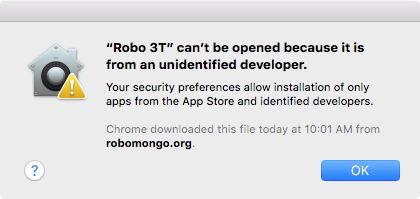
This is fine; most programs you download from the web will not be official since they did not come from the App Store. You can right-click on the downloaded package, select Open, and then click on Open again to run that program. When you first open it, you'll see some screens like the following:

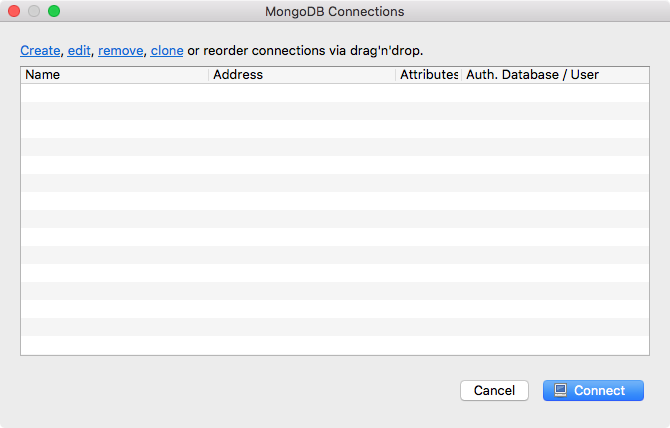
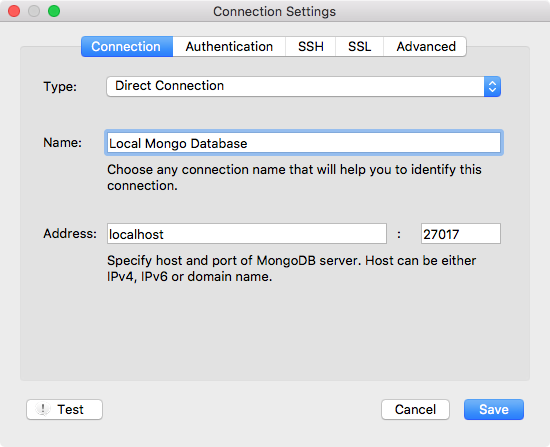
We have a little screen in the background and a list of connections; currently that list is empty. What we need to do is to create a connection for our local MongoDB database so that we can connect to it and manipulate that data. We have Create. I'll click on this, and the only thing we'll need to update is Name. I'll give it a more descriptive name, such as Local Mongo Database. I'll set Address to localhost and the 27017 port is correct; there's no need to change these. So, I'll click on Save:

Next, I'll double-click on the database to connect to it. Inside the tiny window, we have our database. We are connected to it; we can do all sorts of things to manage it.

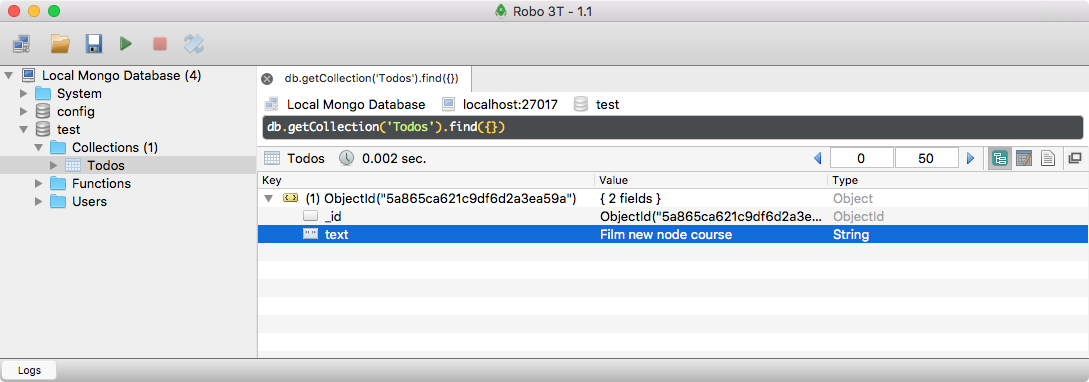
We can open up the test database, and in there, we should see one Collections folder. If we expand this folder, we have our Todos collection, and from there, we can right-click on the collection. Next, click on View Documents, and we should get our one Todo item, the one that we created over inside the Mongo console:

I can expand it to view the text property. Film new node course shows up:

If you're seeing this, then you are done.

The next section is for Windows users.