Table of Contents for
Advanced Node.js Development

Version ebook / Retour

Cover image for bash Cookbook, 2nd Edition Advanced Node.js Development by Andrew Mead Published by Packt Publishing, 2018
  1. Advanced Node.js Development
  2. Title Page
  3. Copyright and Credits
  4. Advanced Node.js Development
  5. Packt Upsell
  6. Why subscribe?
  7. PacktPub.com
  8. Contributors
  9. About the author
  10. Packt is searching for authors like you
  11. Table of Contents
  12. Preface
  13. Who this book is for
  14. What this book covers
  15. To get the most out of this book
  16. Download the example code files
  17. Download the color images
  18. Conventions used
  19. Get in touch
  20. Reviews
  21. Getting Set Up
  22. Installing MongoDB and Robomongo for Linux and macOS
  23. Installing MongoDB and Robomongo for Windows
  24. Creating and reading data
  25. Summary
  26. MongoDB, Mongoose, and REST APIs – Part 1
  27. Connecting to MongoDB and writing data
  28. Creating a directory for the project
  29. Connecting the mongodb-connect file to the database
  30. Adding a string as the first argument
  31. Adding the callback function as the second argument
  32. Error handling in mongodb-connect
  33. Running the file in the Terminal
  34. Adding data to the database
  35. Adding a new record into a collection
  36. The ObjectId
  37. The _id property in the context of MongoDB
  38. Calling the .getTimestamp function
  39. Using object destructuring ES6
  40. Creating a new instance of objectID
  41. Fetching data
  42. Fetching todos in Robomongo file
  43. The find method
  44. Writing a query to fetch certain values
  45. Writing a query to fetch completed todos
  46. Qureying todos by id
  47. Implementing the count method
  48. Querying users collection
  49. Setting up the repo
  50. Deleting documents
  51. Exploring methods to delete data
  52. The deleteMany method
  53. The deleteOne Method
  54. The deleteOne method
  55. The findOneAndDelete method
  56. Using the deleteMany and findOneAndDelete methods
  57. Removing duplicate documents
  58. Targeting the documents using ID
  59. Running the findOneAndDelete and deleteMany statements
  60. Making commit for the deleting documents methods
  61. Updating data
  62. Summary
  63. MongoDB, Mongoose, and REST APIs – Part 2
  64. Setting up Mongoose
  65. Setting up root of the project
  66. Connecting mongoose to database
  67. Creating the todo model
  68. Creating a brand-new Todo
  69. Saving the instance to the database
  70. Running the Todos script
  71. Creating a second Todo model
  72. Validators, Types, and Defaults
  73. Mongoose validators
  74. Customizing the Todo text property
  75. Mongoose defaults
  76. Mongoose types
  77. Creating a Mongoose user model for authentication
  78. Setting up the email property
  79. Installing Postman
  80. Making an HTTP request to Google
  81. Illustrating working of the JSON data
  82. Resource Creation Endpoint - POST /todos
  83. Refactoring the server.js file to create POST todos route
  84. Configuring the Todo and Users file
  85. Loading Todo and User file in server.js
  86. Configuring the Express application
  87. Configuring the POST route
  88. Getting body data from the client
  89. Creating an instance of Mongoose model
  90. Setting up HTTP status code
  91. Testing POST /todos inside of Postman
  92. Adding more Todos to the database
  93. Testing POST /todos
  94. Installing npm modules for testing POST /todos route
  95. Setting up the test files
  96. Loading the test files
  97. Adding describe block for the test cases
  98. Making the POST requests via supertest 
  99. Making assertions about the POST request
  100. Making a request to fetch the Todos from the database
  101. Adding the catch call for the error handling
  102. Setting up test scripts in package.json
  103. Adding testing life cycle method in server.test.js file
  104. Running the test suite
  105. Test case: should not create todo with invalid body data
  106. Making assertions about the length of the Todos collection
  107. Making commit for POST /todos route
  108. List Resources - GET /todos
  109. Creating the GET /todos route
  110. Testing the GET /todos route 
  111. Setting up Post request to create a todo
  112. Testing GET /todos
  113. Adding seed data for the GET /todos test case
  114. Adding a describe block to the test case
  115. Adding assertions to the test case
  116. Summary
  117. MongoDB, Mongoose, and REST APIs – Part 3
  118. Mongoose queries and ID validation
  119. Todo.find method
  120. Todo.findOne method
  121. Todo.findById method
  122. Handling situations where the ID doesn't exist
  123. Validating an ObjectID
  124. Getting an individual resource – GET /todos/:id
  125. Taking on the challenge
  126. Challenge step 1 - filling the code
  127. Challenge step 2 - Making the query
  128. challenge step 3 - success path
  129. Testing GET /todos/:id
  130.  Writing test cases for GET/todos/:id
  131. Test 1 - Super test request
  132. Test 2 - Verifying invalid ID
  133. Test 3 - Validating invalid ObjectID
  134. Deploying the API to Heroku
  135. Creating a Heroku app
  136. Heroku logs
  137. Postman environments
  138. Managing Postman environments
  139. Todo App Local environment
  140. Todo App Heroku environment
  141. Deleting a resource – DELETE /todos/:id
  142. Todo.remove method
  143. Todo.findOneAndRemove method
  144. Todo.findByIdAndRemove method
  145. Creating a delete route
  146. Testing DELETE /todos/:id
  147. Test case 1 - should remove a todo
  148. Test case 2 - should return 404 if todo not found
  149. Test case 3 - should return 404 if object id is invalid 
  150. Test case 4 - should return 404 if todo not found
  151. Updating a Resource - PATCH /todos/:id
  152. Installing Lodash library
  153. Testing Todos for the patch call
  154. Testing PATCH /todos/:id
  155. Test 1 -  To complete the incomplete todo
  156. Test 2 - to make complete todo incomplete
  157. Creating a Test database
  158. Summary
  159. Real-Time Web Apps with Socket.io
  160. Creating a new web app project
  161. Setting up our basic app structure
  162. Setting up the index.html file for DOCTYPE
  163. Setting up the server.js file for the public directory
  164. The join method
  165. Configuring basic server setup
  166. Setting up a gitignore file
  167. Making a commit with the current uncommitted files
  168. Adding Socket.io to an app
  169. Setting up Socket.io
  170. Creating a server using the http library
  171. Configuring the server to use Socket.io
  172. Communication between the client and server
  173. The io.on method
  174. Adding a connection event in the client
  175. The disconnect event
  176. Emitting and listening to custom events
  177. Creating custom events inside an application
  178. Moving the JavaScript into a separate file
  179. Adding a newEmail custom event
  180. The emit method
  181. Testing the newEmail event
  182. Adding a createEmail custom event
  183. socket.emit in the developer console
  184. The custom events in the chat app
  185. The newMessage event
  186. Broadcasting events
  187. Wiring up the createMessage listener for all users
  188. Testing the messaging events
  189. Committing and deploying messaging to Heroku
  190. Testing messaging in a Firefox browser using Heroku
  191. Broadcasting events to other users
  192. Emitting two events when a user connects
  193. Greeting an individual user
  194. Broadcasting a new user in the chat
  195. Testing the user connection
  196. Summary
  197. Generating newMessage and newLocationMessage
  198. Message generator and tests
  199. Generating the newMessage object using the utility function
  200. Writing test cases
  201. Adding the test-watch script
  202. Adding the test script
  203. Running the test suite for the message utility
  204. Integrate the utility function into our application
  205. Event acknowledgements
  206. Setting up acknowledgements
  207. Sending an acknowledgement from server to the client
  208. Updating the event emitter
  209. Updating the event listener
  210. The message form and jQuery
  211. Using the jQuery library
  212. Adding the form field in index.html
  213. Setting up the form tag
  214. Adding the text field
  215. Testing the form's rendering
  216. Using jQuery to select element
  217. Adding the selector element to index.js
  218. Testing the update event listener
  219. Rendering incoming messages to the screen
  220. Creating an ordered list to render messages
  221. Using jQuery to create element in index.js
  222. Testing the incoming messages
  223. Making a commit for the message form
  224. Geolocation
  225. Adding the Send Location button to the application
  226. Adding a click listener to the Send Location button
  227. Checking access to the geolocation API
  228. Fetching a user's position
  229. Adding the coordinates object in the users position
  230. Passing coordinates data with the connected users
  231. Rendering clickable link in place of text coordinates
  232. Sorting out the URL structure
  233. Emitting newLoactionMessage
  234. Adding generateLocationMessage in the message.js file
  235. Adding an event listener for newLocationMessage
  236. Adding test case for generateLocationMessage
  237. Adding variables for the test case
  238. Making assertion for generateLocationMessage
  239. Running the test case for generateLocationMessage
  240. Summary
  241. Styling Our Chat Page as a Web App
  242. Styling the chat page
  243. Storing the template styles
  244. Tweaking the structure for alignment
  245. Making user experience improvements
  246. Changing the form submit listener
  247. Updating the input tag
  248. Customizing the Send Location
  249. Updating the button text
  250. Timestamps and formatting with Moment
  251. Timestamps in Node
  252. The Date object
  253. Using Moment for timestamps
  254. The Moment documentation
  255. Formatting date using Moment
  256. The Manipulate section in Moment
  257. Printing message timestamps
  258. Getting the formatted values back from timestamps
  259. Updating the message.js file
  260. Integrating Moment on client
  261. Updating the newMessage property
  262. Updating the newLocationMessage property
  263. Mustache.js
  264. Adding mustache.js to the directory
  265. Creating and rendering template for newMessage
  266. Implementing the Mustache.js rendering method
  267. Getting all the data showing up
  268. Providing a custom structure
  269. Adding the list item tag
  270. Adding the message body tag
  271. Creating template for the newLocation message
  272. Rendering the newLocation template
  273. Autoscrolling
  274. Running a height properties calculation
  275. Creating a new variable to scroll messages to the bottom
  276. Determining the calculation
  277. Taking into account the height of new message
  278. Testing the calculations
  279. Scrolling a user when necessary
  280. Committing the calculation-related changes
  281. Summary
  282. The Join Page and Passing Room Data
  283. Adding a join page
  284. Updating the HTML file
  285. Adding the head tag in the HTML file
  286. Adding the body tag in the HTML file
  287. Adding the form-fields for the chat page
  288. Committing the changes in index.html
  289. Passing room data
  290. Getting data to the server
  291. The params and deparams
  292. Setting up listener in server.js
  293. Defining the isRealString function
  294. Calling the isRealString function in server.js
  295. Adding error handler case in chat.js
  296. Adding test cases for the new validation function
  297. Test case 1 – should reject non-string values
  298. Test case 2 – should reject string with only spaces
  299. Test case 3 – should allow strings with non-space characters
  300. Socket.io rooms
  301. Targeting the specific user
  302. Testing the specific user set up
  303. Summary
  304. ES7 classes
  305. Storing users with ES6 classes – Part I
  306. The ES6 class syntax
  307. Creating the ES6 class for a person
  308. The constructor function
  309. The method function
  310. Adding the users class
  311. Adding the test case for addUser
  312. Adding new instances in the users.test file
  313. Making the assertions for the users call
  314. Running the addUser test case
  315. Adding the removeUser, getUser, and getUserList methods
  316. Adding seed data for the test file
  317. Filling the getUserList
  318. Adding test case for getUserList
  319. Filling the getUser
  320. Test case – should find user
  321. Test case – should not find user
  322. Filling the removeUser method
  323. Test case – should remove a user
  324. Test case – should not remove user
  325. Wiring up user list
  326. Adding People list in the chat room
  327. Adding jQuery to update the DOM
  328. Adding user to the user's list
  329. Adding users with unique ID
  330. Emitting the event to the clients
  331. Testing the users list in the chatroom
  332. Removing users when they leave the chatroom
  333. Updating the users list when someone left the chatroom
  334. Emitting custom message
  335. Rendering the users name to the chatroom
  336. Adding a jQuery to add the users to the list
  337. Rendering the updated People list
  338. Testing the users name in the chatroom
  339. Making a commit for updated users list
  340. Sending messages to room only
  341. Updating the chat.js and server.js files
  342. Emitting event to the individual room
  343. Wiring up createLoactionMessage for individual room
  344. Committing the individual room changes
  345. New feature ideas
  346. Summary
  347. Async/Await Project Setup
  348. Using async/await features in promises
  349. Setting up the getUser project
  350. The array find method
  351. Running the getUser object test
  352. Setting up the getGrades project
  353. Creating grades for the getGrades project
  354. Returning a new promise
  355. Setting up the getStatus project
  356. Resolving the getStatus string
  357. Calculating the average
  358. Returning the template string
  359. Async/await basics
  360. Using the async function
  361. Rejecting an error using the async function
  362. Using the await function
  363. A real-world example
  364. Creating a currency-converter using the async/await function
  365. Exploring APIs for currency exchange rate
  366. Taking advantage of axios inside our application
  367. The getExchangeRate function
  368. The getCountries function
  369. Creating convertCurrencyAlt as the async/await function
  370. Handling errors and awaiting async function
  371. Converting getExchangeRate and getCountries into the async function
  372. Error handling in the async function
  373. Printing an error to the screen
  374. Error handling for the getExchangeRate function
  375. Summary
  376. Other Books You May Enjoy
  377. Leave a review - let other readers know what you think

Adding an event listener for newLocationMessage

The last piece to the puzzle to really get all this working is to add an event listener for the newLocationMessage event. In index.js we can call socket.on to do just that. We're going to pass in our two arguments. First up is the event name we want to listen for, newLocationMessage, and the second and final argument is our function. This is going to get called with the message information once the event occurs:

socket.on('newLocationMessage', function (message) { 
 
}); 

Now that we have this, we can go ahead and start generating the DOM elements that we want to spit out to the user, and just like we did above, we're going to make a list item and we're going to add our anchor tag, our link inside of it.

We're going to make a variable called list item and we're going to make a new element using jQuery. As that first argument we're going to pass in our string and we are going to go ahead and set it equal to the list item:

socket.on('newLocationMessage', function (message) {
var li = jQuery('<li></li>');
});

Next up we can go ahead and create the second element we're going to need. I'm going to make a variable, call this variable a for the anchor tag, and set it equal to the return value once again to a call to jQuery. This time around we're going to create the anchor tag. Now the anchor tag uses the a tag, and the contents inside of the tag, that's the link text; in our case, we're going to go with My current location:

socket.on('newLocationMessage', function (message) {
var li = jQuery('<li></li>');
var a = jQuery('<a>My current location</a>');
});

Now we are going to be specifying one attribute on the anchor tag. This is going to be a non-dynamic attribute, meaning it's not going to come from the message object, this one is going to be called target, and we're going to set target equal to " _blank":

var a = jQuery('<a target="_blank">My current location</a>');

When you set target equal to _blank, it tells the browser to open up the URL in a new tab as opposed to redirecting the current tab. If we redirected the current tab, I'd get kicked out of the chatroom. If I clicked one of the links with the target set to blank, we'll simply open up a new tab to view the Google Maps information:

socket.on('newLocationMessage', function (message) { 
  var li = jQuery('<li></li>'); 
  var a = jQuery('<a target="_blank">My current location</a>'); 
 
}); 

Next up, we're going to go ahead and set some properties on these attributes. We're going to set the text using li.text. This is going to let us set the person's name as well as that colon. Right inside template strings, we are going to inject the value message.from. After that value, we're going to add a colon and a space:

var a = jQuery('<a target="_blank">My current location</a>');

li.text(`${message.from}: `);

Next up, we're going to go ahead and update our anchor tag, a.attr. You can set and fetch attributes on your jQuery-selected elements using this method. If you provide one argument, like target, it fetches the value, in which case it would return the string _blank. If you specify two arguments, it actually sets the value. Here, we can set the href value equal to our URL, which we have under message.url:

li.text(`${message.from}: `);
a.attr('href', message.url)

Now you'll notice for all these dynamic values, I'm not simply adding them in template strings. Instead, I'm using these safe methods like li.text and a.attribute. This prevents any malicious behavior; if someone tries to inject HTML, they shouldn't be injecting using this code.

With this in place we can now go ahead and append the anchor tag to the end of the list item, which is going to add it after the text we just set using li.append, and we're going to append the anchor tag. And now we can go ahead and add all of this to the DOM using the exact same statement in case of newMessage event listener. I'm going to copy and paste it in the newLocagtionMesaage event listener:

socket.on('newLocationMessage', function (message) {
var li = jQuery('<li></li>');
var a = jQuery('<a target="_blank">My current location'</a>);

li.text(`${message.from}: `);
a.attr('href', message.url);
li.append(a);
jQuery('#messages').append(li);
});

With this in place we are done. Now I'm going to save index.js and restart things over in the browser. We made quite a few changes so it's alright if you had a few typos; as long as you're able to track them down it's no big deal.

I'm going to refresh both of my tabs over inside Chrome; this is going to get the new connections up and running using the latest client-side code, and to kick things off I'm going to send a simple message from the second tab to the first tab. It's showing up here in the second tab, and if I go over to the first tab we see User: test. Now I can click on Send Location, this is going to take about one to three seconds to actually get the location. Then it's going to go through the Socket.io chain and what do we get? We get the link My current location showing up for user one:

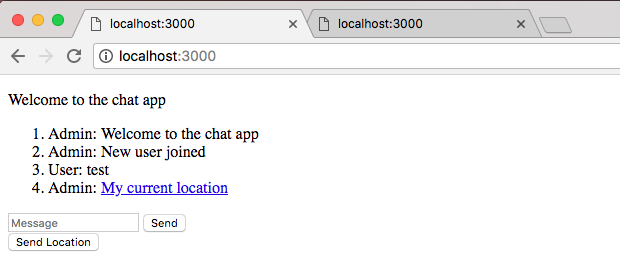
And for user two as well. Now if I click on that link, it should open up a brand new tab with the proper URL, latitude, and longitude information rendered in it.

Right here, we have the location for the user who clicked that Send Location button. With this in place, we have a fantastic geolocation feature. All you do is you click on the button; it fetches your current location no matter where you are, and it renders a clickable link so anyone else can view it inside Google Maps. Now before we go, I would like you to add a single test case for that brand new generateLocationMessage function.