Table of Contents for
Mastering PostCSS for Web Design
 Mastering PostCSS for Web Design
Published by
Packt Publishing, 2016
Mastering PostCSS for Web Design
Published by
Packt Publishing, 2016
- Cover
- Table of Contents
- Mastering PostCSS for Web Design
- Mastering PostCSS for Web Design
- Credits
- About the Author
- About the Reviewer
- www.PacktPub.com
- Preface
- What you need for this book
- Who this book is for
- Conventions
- Reader feedback
- Customer support
- 1. Introducing PostCSS
- Introducing PostCSS
- Setting up a development environment
- Creating a simple example using PostCSS
- Linting code using plugins
- Exploring how PostCSS works
- Summary
- 2. Creating Variables and Mixins
- Creating a hover effect example
- Transitioning to using PostCSS
- Adding variable support to PostCSS
- Updating our hover effect demo
- Setting the order of plugins
- Creating mixins with PostCSS
- Looping content with PostCSS
- Summary
- 3. Nesting Rules
- Navigating through pages
- Transitioning to using PostCSS plugins
- Exploring the pitfalls of nesting
- Making the switch to BEM
- Exploring our changes in more detail
- Summary
- 4. Building Media Queries
- Exploring custom media queries in PostCSS
- Making images responsive
- Adding responsive text support
- Optimizing media queries
- Retrofitting support for older browsers
- Moving away from responsive design
- Taking things further with CSS4
- Summary
- 5. Managing Colors, Images, and Fonts
- Managing fonts with PostCSS
- Creating image sprites
- Working with SVG in PostCSS
- Adding support for WebP images
- Manipulating colors and color palettes
- Creating color functions with PostCSS
- Summary
- 6. Creating Grids
- Creating an example with Bourbon Neat
- Exploring the grid plugins in PostCSS
- Transitioning to using PostCSS-Neat
- Creating a site using Neat and PostCSS
- Adding responsive capabilities
- Summary
- 7. Animating Elements
- Moving away from jQuery
- Making use of pre-built libraries
- Switching to using SASS
- Making the switch to PostCSS
- Exploring plugin options within PostCSS
- Updating code to use PostCSS
- Creating a demo in PostCSS
- Optimizing our animations
- Using our own animation plugin
- Summary
- 8. Creating PostCSS Plugins
- Dissecting the architecture of a standard plugin
- Creating an transition plugin
- Building a custom font plugin
- Simplifying the development process
- Guidelines for plugin building
- Making the plugin available for use
- Summary
- 9. Working with Shortcuts, Fallbacks, and Packs
- Exploring plugin packs for PostCSS
- Adding shortcuts with Rucksack
- Linting and optimizing your code
- Providing fallback support
- Summary
- 10. Building a Custom Processor
- Exploring our processor
- Dissecting issues with our processor
- Optimizing the output
- Adding reload capabilities
- Extending our processor further
- Testing the final pre-processor
- Getting started with some hints and tips
- Introducing the CSStyle library
- Summary
- 11. Manipulating Custom Syntaxes
- Preparing our environment
- Implementing custom syntax plugins
- Parsing CSS
- Formatting the output with the API
- Highlighting our syntax code
- Summary
- 12. Mixing Preprocessors
- Exploring the conversion process
- Introducing the Pleeease library
- Compiling with other preprocessors
- Using the PreCSS library
- Converting a WordPress installation
- Setting up our environment
- Considering the conversion process
- Making changes to our code
- Compiling and testing the changes
- Summary
- 13. Troubleshooting PostCSS Issues
- Exploring some common issues
- Getting help from others
- Summary
- 14. Preparing for the Future
- Converting CSS4 styles for use
- Supporting future syntax with cssnext
- Creating plugins to provide extra CSS4 support
- Summary
- Index
Throughout the course of this chapter, we've covered a number of plugins that handle support for the upcoming CSS4 standards, and explored how we can use the cssnext plugin pack to manage the transition to using these new styles.
There is more out there that we can do—the great thing about PostCSS is that we can absolutely write our own plugins to help bolster support for CSS4 attributes. To help prove this, over the next few pages we'll work our way through fixing some issues in CSS, and altering an existing CSS4 color plugin to add support for a different color; we'll start with adding a little color to our next demo, if you pardon the pun!
"She made it to six. For almost twelve hours, she was six…"
There is something of a poignant twist to this next demo—the color rebeccapurple, which forms the basis for this next exercise, came about as a tribute to Eric Meyer's daughter, Rebecca, who passed away on her sixth birthday in June 2014, due to cancer.
As anyone who spends any time developing CSS styles will know, Eric has been a major advocate of web standards, and in particular CSS—it is often said that one would be hard pushed not to read a book about CSS during their development that had not been written by Eric! The community proposed the addition of rebeccapurple as a color in Rebecca's memory (it was her favorite color), and in recognition of Eric's contribution. It was announced by the CSS Working Group that the change had been approved, to be added as part of the upcoming CSS4 standard.
To help support the change for browsers that have not yet caught up, the developer Maxime Thirouin created a PostCSS plugin to transform the rebeccapurple color to the more compatible format of rgb(102, 51, 153)—the source for this plugin is available at https://github.com/postcss/postcss-color-rebeccapurple.
Let's take a look at the plugin in more detail:
- We'll start by installing the
postcss-color-rebeccapurpleplugin, so go ahead and fire up a Node.js command prompt, and change the working folder to our project root. - At the prompt, go ahead and enter the following command:
npm install postcss-color-rebeccapurple –save-devThen press Enter—if all is well, we should see something akin to this screenshot:
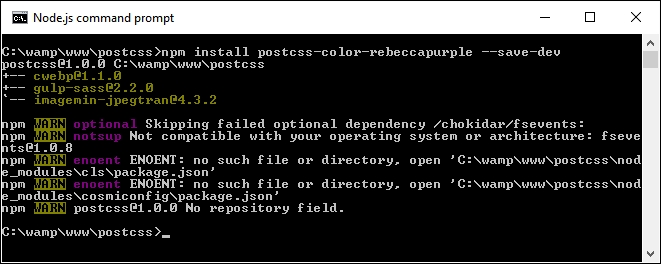
Keep the window open—we'll need it shortly.
- Next, go ahead and extract a copy of the
T72 - adding rebeccapurple colorfolder from the code download that accompanies this book—save the folder to the root of our project area. - Copy the
styles – pre-compile.cssfrom within theT72 - adding rebeccapurple colorfolder to the rootsrcfolder of our project area, and rename asstyles.css - Copy the
gulpfile.jsandpackage.jsonfiles from theT72 - adding rebeccapurple colorfolder to the root of our project area. - Revert to the Node.js command prompt session, then enter
gulpat the prompt and press Enter. - When compilation has finished, copy the contents of the
destfolder from the root of our project area to thecssfolder underT72 - adding rebeccapurple color. - Try previewing the results—if all is well, we should see this simple box, which has been backfilled with the color
rebeccapurple: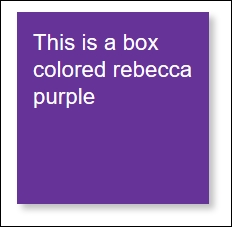
To prove it works, have a look at the .css file from within the css folder under T72 - adding rebeccapurple color—we should see the compiled RGB value within:
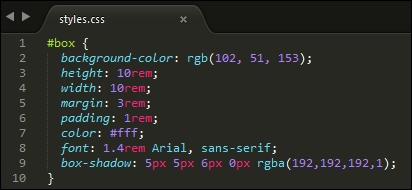
We can also validate this with a quick check using a site such as ColorHexa.com—check out http://www.colorhexa.com/663399; searching for rebecca purple will show the same page.
There is a perfect opportunity here—I believe that there is always something good that can come from something tragic. Leaving aside the raison d'être for this plugin, we can use it as a basis for adding support for additional colors from the CSS4 Color Module standard.
The changes we need to make are relatively straightforward, and can easily form the basis for a new plugin. Let's take a look at what's involved; for this demo we will use burlywood, which is a light shade of brown:
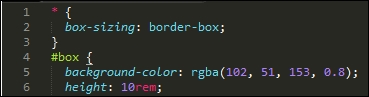
- We'll start by editing our CSS file—open up
styles.cssin thesrcfolder under the root of our project area and change the highlighted line as indicated:#box { background-color: burlywood; height: 10rem; - Next, we need to update the
rebeccapurpleplugin file to change existing color references to use the new color—we'll start with the initial declaration:var postcss = require("postcss") var color = require("color")("burlywood").rgbString() - We then need to change the check made in the code that changes each instance of the color:
if (value && value.indexOf("burlywood") !== -1) { decl.value = value.replace(/(burlywood)\b/gi, color) } }) - For now, go ahead and save the file—yes, the plugin name doesn't represent the color, but this is only a test, so it won't matter.
- Fire up a Node.js command prompt, then change the working folder to our project area. At the prompt, enter
gulpthen press Enter. - Copy the contents of the root
destfolder to thecssfolder in theT73 - adding support for new colorfolder. - Run
testpage.html—if all is well, we can see the compiled RGB value within, as before: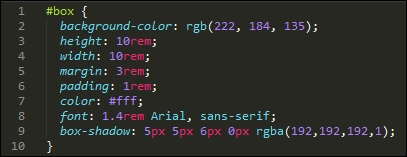
- Try re-running the
testpage.htmlfile from within theT73 - adding support for new colorfolder; we should see the change in color (and yes, it's definitely not purple!):
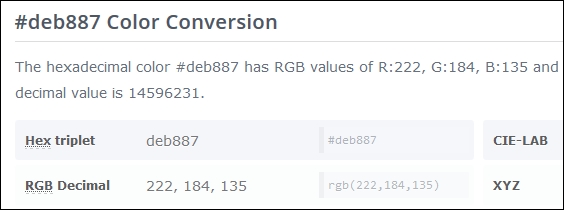
We can verify that the color displayed is indeed burleywood, using the same principle as before. This time check out http://www.colorhexa.com/deb887, which clearly shows the HEX and RGB values:
All that remains for you now is to convert this into a plugin. This should be easy to do: try taking a copy of the existing rebeccapurple plugin, then performing a search and replace with the color of your choice. It's not perfect, but will give you a head start—the next part will be to use what we learnt back in Chapter 8, Creating PostCSS Plugins, to turn it into a fully-fledged plugin available in the NPM repository.
Tip
To get a list of the CSS4 Module colors, have a look on Google—there are plenty of links; try this as a start: https://github.com/segundofdez/css4-colors/blob/master/less/colors.less.
Okay, time to change focus: although this chapter is meant to be about looking forward, we're going to change direction and look backwards for a moment.
The reason for this? A number of mistakes in the design of CSS have been acknowledged by the CSS Working Group. A PostCSS plugin by Jonathan Neal provides a short-term fix for a number of these issues—some which could well be fixed properly in a future version of CSS!
When developing code, I'm a great fan of only developing for modern browsers as a rule—ideally n-1, or current plus one previous version. In the main, this isn't an issue for the likes of Firefox or Chrome, but it's a different story for IE. Where possible, older versions of IE will very likely be left by the wayside…but that's another story!
The one exception we can make though is not around browser support, but trying to correct some issues with attribute naming. The CSS Working Group have acknowledged that some of the attribute names weren't defined correctly when they were released—you can see a complete list at https://wiki.csswg.org/ideas/mistakes, which is regularly updated.
To help with this, and as a precursor to the second demo in this section, we're going to install the Time Machine plugin for PostCSS (hence the title of this section!). This provides a short-term fix for some of the bugs in CSS. We will then use this as inspiration to design a quick and dirty plugin to fix another bug that is listed on the CSSWG site, but which is not fixed by the Time Machine plugin.
Note
The source for this plugin is available from https://github.com/jonathantneal/postcss-time-machine.
For this demo, we will reuse the simple demo created to display the rebeccapurple color from Adding future color support to CSS. The compiled results from that demo use an RGBA function—the CSSWG have stated that RGBA should not exist, and instead the alpha channel should have been added as the fourth channel for the RGB() function. We'll fix that as part of our demo—the plugin will allow us to write what was intended, whilst compiling it to code that can be understood by any browser.
Let's make a start on installing the plugin for use in our demo:
- We'll start by installing the plugin, so go ahead and fire up a Node.js command prompt session, then change the working folder to our project area.
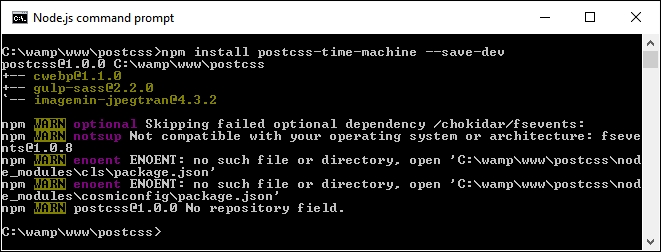
- At the prompt, enter this command and press Enter:
npm install postcss-time-machine --save-devIf all is well, we should see something akin to this screenshot—keep the session open, as we will need it shortly:
- Next, go ahead and extract a copy of the
T74 - going back in timefolder from the code download that accompanies this book—save the folder to the root of our project area. - Copy the
styles – pre-compile.cssfrom within theT74 - going back in timefolder to the rootsrcfolder of our project area, and rename itstyles.css. - Copy the
gulpfile.jsandpackage.jsonfiles from the sameT74 - going back in timefolder to the root folder of our project area. - Revert to the Node.js command prompt, then at the prompt, enter
gulpand press Enter. - If all is well, we should see our usual compiled files appear in the
destfolder—copy these to thecssfolder underT74 - going back in time.
At this point, try previewing the results of our demo, if all is well, we should see the same box as before, but this time with a slightly lighter shade of rebecca purple as its color:
If we take a look at the CSS styles though, the keen-eyed may spot something—how come we're using 194 as our alpha value, yet the code shows 0.8? The answer is simple: this plugin was designed to use 0 to 255 for each value, including the alpha channel. Simply divide 194 by 255:

The answer is 0.8. Okay, you will actually get something like 0.76078, but if we round up to one decimal place, this will become 0.8:
Now, before we continue, there is something we should consider: the practical application of this plugin. It's not meant to pour cold water on a nice idea, but adoption may take a little time—developers in a team will be used to writing styles that include functions such as rgba(), background-blend-mode, or hsla(), so it may take some time to change the mindset!
This said, it is a useful fix if we want to adhere to the intended standards, and can manage the change of mindset to not type function names that we may have been doing for some time. We can even take things a step further and create our own plugin—Time Machine doesn't include fixes for all of the attributes, so let's take a look at creating one to manage the bug that surrounds the background-blend-mode attribute in CSS.
One of the attributes not fixed by the Time Machine plugin is the background-blend-mode function—this is normally used to calculate the final color pixel when layers overlap each other.
The bug that was introduced relates to the name—the CSS Working Group (CSSWG) have acknowledged that all blend-mode variants should be written without -mode in the name, so that in our case, background-blend-mode would be written as background-blend.
It's an easy fix to make, here's a perfect opportunity for you to try creating your own plugin! We're going to take a different route at this point—time for some audience participation, so to speak!
To help you along the way, it's worth taking another look at Chapter 8, Creating PostCSS Plugins; when creating the plugin, we can use this code:
var postcss = require('postcss');

module.exports = postcss.plugin('backgroundblend', function backgroundblend(options) {
  return function (css) {
    options = options || {};

    // Processing code will be added here
    css.eachDecl('background-blend', function (decl) {
      if (decl.prop.indexOf('background-blend') !== -1) {
        decl.prop  = 'background-blend-mode';
      }
    });
  };
});
Most of this code is boilerplate, but the key to making this work is this excerpt:
    css.eachDecl('background-blend', function (decl) {
      if (decl.prop.indexOf('background-blend') !== -1) {
        decl.prop = 'background-blend-mode';
      }
    });
In a nutshell, we parse each CSS rule in turn—if any contain background-blend, we simply replace each instance with background-blend-mode.
To prove it works, we can use the following code to test if our plugin works:
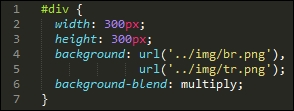
<!DOCType html>
<head>
  <meta charset="utf-8">
  <title>Demo: Creating new plugin to change blend-mode</title>
  <link rel="stylesheet" type="text/css" href="css/styles.css">
</head>
<body>
  <div id="div"></div>
</body>
</html>
If all is well, we should get something akin to this screenshot:

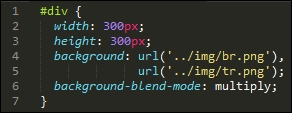
If you get stuck, then a completed version is available in the code download that accompanies this book; a quick peek in the T75 - back in time change folder for styles – pre-compile.css will show this:
When compiled, we can clearly see it shows the version we will be used to seeing:
It's a quick and dirty plugin, which will likely need a little more development before putting it into production use—for example, it caters purely for background-blend-mode, whereas we should support any attribute that contains blend-mode within the name!