Table of Contents for
Mastering PostCSS for Web Design
 Mastering PostCSS for Web Design
Published by
Packt Publishing, 2016
Mastering PostCSS for Web Design
Published by
Packt Publishing, 2016
- Cover
- Table of Contents
- Mastering PostCSS for Web Design
- Mastering PostCSS for Web Design
- Credits
- About the Author
- About the Reviewer
- www.PacktPub.com
- Preface
- What you need for this book
- Who this book is for
- Conventions
- Reader feedback
- Customer support
- 1. Introducing PostCSS
- Introducing PostCSS
- Setting up a development environment
- Creating a simple example using PostCSS
- Linting code using plugins
- Exploring how PostCSS works
- Summary
- 2. Creating Variables and Mixins
- Creating a hover effect example
- Transitioning to using PostCSS
- Adding variable support to PostCSS
- Updating our hover effect demo
- Setting the order of plugins
- Creating mixins with PostCSS
- Looping content with PostCSS
- Summary
- 3. Nesting Rules
- Navigating through pages
- Transitioning to using PostCSS plugins
- Exploring the pitfalls of nesting
- Making the switch to BEM
- Exploring our changes in more detail
- Summary
- 4. Building Media Queries
- Exploring custom media queries in PostCSS
- Making images responsive
- Adding responsive text support
- Optimizing media queries
- Retrofitting support for older browsers
- Moving away from responsive design
- Taking things further with CSS4
- Summary
- 5. Managing Colors, Images, and Fonts
- Managing fonts with PostCSS
- Creating image sprites
- Working with SVG in PostCSS
- Adding support for WebP images
- Manipulating colors and color palettes
- Creating color functions with PostCSS
- Summary
- 6. Creating Grids
- Creating an example with Bourbon Neat
- Exploring the grid plugins in PostCSS
- Transitioning to using PostCSS-Neat
- Creating a site using Neat and PostCSS
- Adding responsive capabilities
- Summary
- 7. Animating Elements
- Moving away from jQuery
- Making use of pre-built libraries
- Switching to using SASS
- Making the switch to PostCSS
- Exploring plugin options within PostCSS
- Updating code to use PostCSS
- Creating a demo in PostCSS
- Optimizing our animations
- Using our own animation plugin
- Summary
- 8. Creating PostCSS Plugins
- Dissecting the architecture of a standard plugin
- Creating an transition plugin
- Building a custom font plugin
- Simplifying the development process
- Guidelines for plugin building
- Making the plugin available for use
- Summary
- 9. Working with Shortcuts, Fallbacks, and Packs
- Exploring plugin packs for PostCSS
- Adding shortcuts with Rucksack
- Linting and optimizing your code
- Providing fallback support
- Summary
- 10. Building a Custom Processor
- Exploring our processor
- Dissecting issues with our processor
- Optimizing the output
- Adding reload capabilities
- Extending our processor further
- Testing the final pre-processor
- Getting started with some hints and tips
- Introducing the CSStyle library
- Summary
- 11. Manipulating Custom Syntaxes
- Preparing our environment
- Implementing custom syntax plugins
- Parsing CSS
- Formatting the output with the API
- Highlighting our syntax code
- Summary
- 12. Mixing Preprocessors
- Exploring the conversion process
- Introducing the Pleeease library
- Compiling with other preprocessors
- Using the PreCSS library
- Converting a WordPress installation
- Setting up our environment
- Considering the conversion process
- Making changes to our code
- Compiling and testing the changes
- Summary
- 13. Troubleshooting PostCSS Issues
- Exploring some common issues
- Getting help from others
- Summary
- 14. Preparing for the Future
- Converting CSS4 styles for use
- Supporting future syntax with cssnext
- Creating plugins to provide extra CSS4 support
- Summary
- Index
Our orchid demo so far uses a number of variables to define values in our code. While this works well, it is somewhat limiting; after all, creating lots of variables to handle different values is an expensive use of resources!
A smarter approach is using mixins; this works well when we can group several statements together as a single definition, then clone this definition into multiple rule sets. Users of pre-processors will of course recognize this functionality; the PostCSS team have created a plugin to offer similar functionality within PostCSS.
The plugin source is available from https://github.com/postcss/postcss-mixins, and can be installed via Node, using the same method we've covered throughout this chapter. We will also make use of the postcss-calc plugin (from https://github.com/postcss/postcss-calc) to create a simple mixin that handles pixel fall-back for rem values in our code. Let's dive in and see how it works in action:
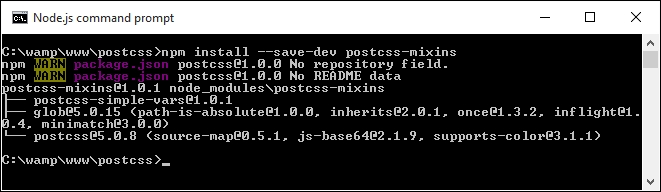
- We'll start—as always—by installing the
postcss-mixinsplugin; for this, fire up a NodeJS command prompt, then change the working folder to our project area. - At the prompt, enter each command separately, pressing Enter after each:
npm install --save-dev postcss-mixins
npm install --save-dev postcss-calc
- If all is well, we should see the results of the output on-screen, as shown in this screenshot:
At this point we will have support for mixins within PostCSS installed. Let's make use of them by updating our gulp task file and style sheet. We'll begin with the gulp task file:
- Let's start by opening a copy of
gulpfile.jsfrom our project area, then adding the following lines immediately below the block ofvardeclarations (on or around line 10):var cssmixins = require('postcss-mixins'); var calc = require('postcss-calc'); - Next, go ahead and alter this line, from within the
autoprefixertask:.pipe(postcss([ autoprefixer, cssvariables(/* options */), cssmixins(/* options */), calc(/*options*/) ])) - Save the file. We now need a copy of the demo files from the code download that accompanies this book—go ahead and save a copy of
Tutorial3to within our project area. - Open a copy of
style.cssfrom within thesrcfolder, then add this block of code immediately after the variable declarations declared in the--rootrule:@define-mixin fontstyle $size, $color { font-size: $(size)px; font-size: calc($size/16)rem; color: $color; } - With the mixin in place, we now need to adjust our code to make use of the mixin; this requires a few changes. The first change is in the
h3rule declaration:h3 { @mixin fontstyle 32, #fff; text-transform: uppercase; - A little further down, go ahead and change the first two lines of the
.info h3rule, as indicated:.info h3 { @mixin fontstyle 20, #fff; - The third and final change is in the rule for
.info p. Change it as shown:.info p { @mixin fontstyle 12, #bbb; padding: 50px 5px; - Save the file, then copy it to the
srcfolder in our project area. - Fire up a NodeJS command prompt, then switch to the project area, enter the usual command at the prompt, and press Enter:
gulp - Copy the compiled code back to the
srcfolder withinTutorial3. If all is well, when we preview the results in a browser, we should see our demo continue to work as shown at the start of the first part of this exercise.
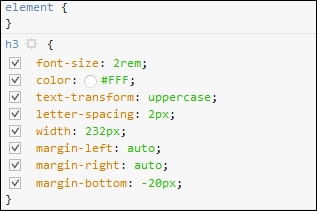
Although our demo won't appear any different, there will be a noticeable difference in the code—a quick peek using a DOM inspector such as Firebug shows the use of rem values:
The use of mixins does raise some important points. Indeed, one might be forgiven for thinking they simply replicate functionality from SASS. The plugin we've used does not follow the same format, even if the principles are the same; let's pause for a moment and take a look at how these stack up against standard processors.
The use of mixins is a great way to automatically insert pre-defined blocks of code, either static or dynamic, into our stylesheet, at the compilation phase.
The key thing to note is that, although the end result may be similar, the similarity is just in name; the mixin plugin we've used was not designed to replicate existing functionality available within SASS. Instead, this plugin exposes the power of JavaScript within PostCSS, and should be used to define function mixins, as a replacement for if or while statements that are not available within PostCSS.
This is particularly true if we need to change any property names within the mixin; an example of this would be when referencing multiple images that each need similar style classes to be applied:
require('postcss-mixins')({
  mixins: {
    icons: function (mixin, dir) {
      fs.readdirSync('/images/' + dir).forEach(function (file) {
        var icon = file.replace(/\.svg$/, '');
        var rule = postcss.rule('.icon.icon-' + icon);
        rule.append({
          prop:  'background',
          value: 'url(' + dir + '/' + file + ')'
        });
        mixin.replaceWith(rule);
      });
    }
  }
});
If we were to call this mixin with @mixin icons signin; from our code, we would see this as a result:
.icon.icon-back { background: url(signin/back.svg) }
.icon.icon-secret { background: url(signin/secret.svg) }
This does pose an interesting question: where should the cut-off point between using JavaScript in our task file be, in comparison to our CSS? Taking this approach does mean that we have the benefit of using standard JavaScript, but at the expense of simplicity!
This is one of the decisions you will need to make as a developer. PostCSS's flexibility means that not only do we need to choose the right plugin, but that the order they are all called in can also have an effect on the outcome of our code. In this instance, an alternative plugin—postcss-simple-vars—shares the same syntax as postcss-mixins, but does not support changing of property names.
But, to bring it back to our example: we used the classic mixin for providing pixel fall-back when using older versions of IE.
We could have used an alternative plugin here, in the form of postcss-simple-mixins (available from https://www.npmjs.com/package/postcss-simple-mixin). This is designed to provide simple support for mixins, and doesn't have the baggage associated with postcss-mixins.
The key consideration, though, will depend on what you plan to achieve within your code; choosing the right plugin will reduce the inclusion of redundant functionality and help keep our custom processor as lean as possible.
There is another reason why choosing plugins is critical: instead of using a mixin to just support older versions of IE, we can use the postcss-pxtorem plugin to generate rem values during compilation. After all, although most browsers have supported rem units for some time, there is always one that is late to the party:
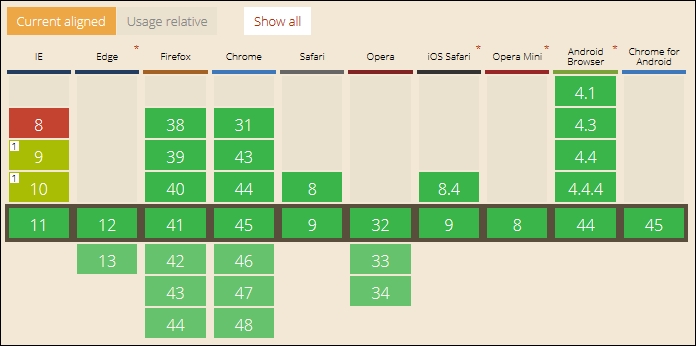
Screenshot taken from the CanIUse site, at http://www.caniuse.com
Switching to using this plugin has the added benefit of simplifying our code, as the server can handle the grunt work of replacing pixel values with the equivalent rem units. The grunt work can be shifted to a central location, so that anyone using it will receive consistent results.
Note
It's important to also note that the cross over between mixins and functions also exists within PostCSS. We will explore using functions more in Chapter 5, Managing Colors, Images, and Fonts, when we learn how PostCSS can be used to make our lives easier when working with colors or media.
Okay, onwards we go. Time to switch topics completely, and take a look at another key part of PostCSS: creating loops. Anyone familiar with SASS or Less will be aware of how mundane it can get when applying very similar styles to identical objects; a perfect example are the classic social media icons that frequently grace posts on a page. PostCSS has a plugin that allows us to mimic this functionality, so let's explore how to use it in action.