Table of Contents for
Mastering PostCSS for Web Design
 Mastering PostCSS for Web Design
Published by
Packt Publishing, 2016
Mastering PostCSS for Web Design
Published by
Packt Publishing, 2016
- Cover
- Table of Contents
- Mastering PostCSS for Web Design
- Mastering PostCSS for Web Design
- Credits
- About the Author
- About the Reviewer
- www.PacktPub.com
- Preface
- What you need for this book
- Who this book is for
- Conventions
- Reader feedback
- Customer support
- 1. Introducing PostCSS
- Introducing PostCSS
- Setting up a development environment
- Creating a simple example using PostCSS
- Linting code using plugins
- Exploring how PostCSS works
- Summary
- 2. Creating Variables and Mixins
- Creating a hover effect example
- Transitioning to using PostCSS
- Adding variable support to PostCSS
- Updating our hover effect demo
- Setting the order of plugins
- Creating mixins with PostCSS
- Looping content with PostCSS
- Summary
- 3. Nesting Rules
- Navigating through pages
- Transitioning to using PostCSS plugins
- Exploring the pitfalls of nesting
- Making the switch to BEM
- Exploring our changes in more detail
- Summary
- 4. Building Media Queries
- Exploring custom media queries in PostCSS
- Making images responsive
- Adding responsive text support
- Optimizing media queries
- Retrofitting support for older browsers
- Moving away from responsive design
- Taking things further with CSS4
- Summary
- 5. Managing Colors, Images, and Fonts
- Managing fonts with PostCSS
- Creating image sprites
- Working with SVG in PostCSS
- Adding support for WebP images
- Manipulating colors and color palettes
- Creating color functions with PostCSS
- Summary
- 6. Creating Grids
- Creating an example with Bourbon Neat
- Exploring the grid plugins in PostCSS
- Transitioning to using PostCSS-Neat
- Creating a site using Neat and PostCSS
- Adding responsive capabilities
- Summary
- 7. Animating Elements
- Moving away from jQuery
- Making use of pre-built libraries
- Switching to using SASS
- Making the switch to PostCSS
- Exploring plugin options within PostCSS
- Updating code to use PostCSS
- Creating a demo in PostCSS
- Optimizing our animations
- Using our own animation plugin
- Summary
- 8. Creating PostCSS Plugins
- Dissecting the architecture of a standard plugin
- Creating an transition plugin
- Building a custom font plugin
- Simplifying the development process
- Guidelines for plugin building
- Making the plugin available for use
- Summary
- 9. Working with Shortcuts, Fallbacks, and Packs
- Exploring plugin packs for PostCSS
- Adding shortcuts with Rucksack
- Linting and optimizing your code
- Providing fallback support
- Summary
- 10. Building a Custom Processor
- Exploring our processor
- Dissecting issues with our processor
- Optimizing the output
- Adding reload capabilities
- Extending our processor further
- Testing the final pre-processor
- Getting started with some hints and tips
- Introducing the CSStyle library
- Summary
- 11. Manipulating Custom Syntaxes
- Preparing our environment
- Implementing custom syntax plugins
- Parsing CSS
- Formatting the output with the API
- Highlighting our syntax code
- Summary
- 12. Mixing Preprocessors
- Exploring the conversion process
- Introducing the Pleeease library
- Compiling with other preprocessors
- Using the PreCSS library
- Converting a WordPress installation
- Setting up our environment
- Considering the conversion process
- Making changes to our code
- Compiling and testing the changes
- Summary
- 13. Troubleshooting PostCSS Issues
- Exploring some common issues
- Getting help from others
- Summary
- 14. Preparing for the Future
- Converting CSS4 styles for use
- Supporting future syntax with cssnext
- Creating plugins to provide extra CSS4 support
- Summary
- Index
At the beginning of this chapter, I mentioned that we would focus on creating our own preprocessor, right? Well, I have a little confession to make: we're not. Hold on, what gives?
Well, we will create a preprocessor…but we will also create a postprocessor too. Let me explain why—our alternative "option" allows us to create both at the same time. Our alternative option is PostCSS, which can be downloaded from https://github.com/postcss/postcss. PostCSS is used by some major companies, such as Twitter, Google, Bootstrap and CodePen, and even WordPress (in a limited capacity).
PostCSS was built as a Node.js module, so will work with any number of the existing plugins already available for Node.js—we will be using a number of these plugins throughout the book. Let's take a moment to explore some of the benefits of this tool.
What do we mean by PostCSS? In a nutshell, it can be used to refer to one of two things—the PostCSS core tool or the plugin ecosystem that is powered by the tool. On its own, it doesn't actually do a lot; once we start adding plugins, we can achieve a great deal. Let's explore what this means in practice:
- Its modular architecture means we can pick and choose what we use; this allows us to keep the size of the library very small and responsive.
- Existing processors tend to fall into one of two camps—pre- or post-processing—which is a limiting factor when choosing which to use. PostCSS allows us to perform both operations within the same process, meaning we get the benefits of both worlds of processing!
- PostCSS comes with seamless support for all of the common task runners such as Gulp, Grunt, or Broccoli; we can combine it with a number of other tasks that can be automated.
- There are no dependencies for compiling, PostCSS is written entirely in JavaScript, so no need for Ruby, or libraries such as
libsass, in order to compile code. The only dependency (as such) is Node.js—many developers will likely already have this installed. - There is no need to learn any new languages; every developer will be familiar with JavaScript, and use it in their development process.
- We can change any plugin in use for something else when needed; we do not get this choice when using a larger library.
- Its relatively low barrier of entry means we can create any plugins we need very easily, or potentially modify existing ones to better suit our needs.
- PostCSS is quick—in a test using the
postcss-benchmarkplugin (available from https://github.com/postcss/benchmark), which contained parsed code, nested rules, mixins, variables, and math, PostCSS came out a clear winner: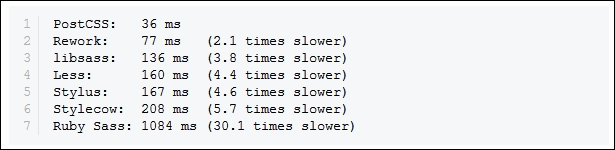
- Perfect—no need to continually update SASS, or have to download a new version of the
libsasslibrary, right?
Well, there are some considerations to using a custom processor; the key thing to remember is that PostCSS is neither a pre- nor post-processor, but more of a Swiss Army Knife of a toolbox that we can use to process our CSS code. Let's take a look at some of these drawbacks:
- Although we don't need to learn a new language in order to use PostCSS, creating a custom processor will add a layer of complexity to our development process.
- Its flexible approach means some may treat PostCSS as either a preprocessor or a postprocessor; this short-sighted approach means that you will miss opportunities, so it is crucial to keep an open mind in terms of what PostCSS can offer your development process.
- Converting code from an existing preprocessor to using PostCSS can be painful; this process only works if we don't try to convert explicitly, but use it as a basis for progressively moving to using PostCSS.
- PostCSS requires syntactically correct CSS from the start; although we could use any syntax (as PostCSS files are just plain text), compilation can easily fail, even through use of a single line comment!
- The real benefit of using PostCSS, though, is in its seamless integration into tools such as Gulp—imagine this scenario if you will:
You already develop sites using a preprocessor such as SASS. You can compile code using a standalone processor, but normally prefer to use Node.js and Gulp to complete the task. Sound about right? What about making the move to using PostCSS?
No problem, we can include a section for processing CSS files using PostCSS. The key here is to not use PostCSS to perform the initial compilation, but to perform the post-processing, such as adding vendor prefixes or minifying the results. Once this is established, we can start to incorporate some of the plugins available for PostCSS that allow us to replicate functionality, such as from within SASS. Once we've adjusted existing code to use the format required by the plugins, we can then switch to using PostCSS, and begin to remove our dependency on using SASS.
At this point, it is worth spending a few minutes to help clear up some common misconceptions about PostCSS, although many associate it as being a preprocessor, or even a postprocessor, this isn't what was intended:
- Classing PostCSS as a postprocessor, as opposed to a preprocessor (such as Less or SASS) is misguided; PostCSS is capable of compiling in a variety of different use-case scenarios, working on code compiled using any preprocessor, or just plain CSS.
- PostCSS should not be classed as a tool that should be tied in to any one process (such as writing SASS-based loops or conditionals). There are plugins available to do both, but this is just a small part of the role that PostCSS can play in your development workflow.
- If you find yourself in a position where "PostCSS" doesn't appear to perform as expected, it is unlikely to be PostCSS itself, but more likely to be a plugin being used that is causing the issue. Although PostCSS is still relatively young, there are plenty of plugins available, so it is worth trying alternatives if you can as a first port of call.
Okay, let's move on, I think it's time for less chat and more action, right? Let's get stuck in to producing something; there's no better time than now to get PostCSS installed and ready for use.
Before we do so, we just need to cover a couple of requirements. First, we need to set up a local web server. It's not critical, but gives a better effect. I personally use WAMP Server (for PC, from http://www.wampserver.com/en), otherwise, Mac users can try MAMP (http://www.mamp.info/en), or the cross-platform Apache web server (from http://www.apachefriends.org). In each case, default settings should be sufficient.
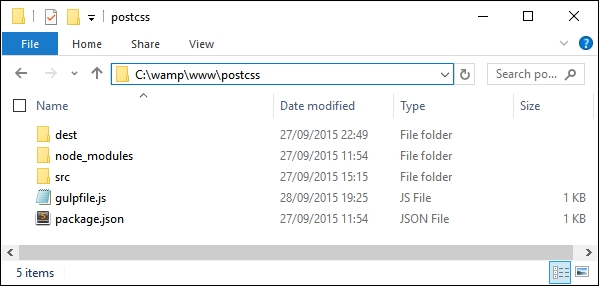
The second requirement is to set up a project area; assuming you have set up a WAMP as a local web server, go ahead and set up a folder called postcss in c:\wamp\www, as shown in this screenshot:
Right, with that out of the way, let's make a start on getting PostCSS installed!