Table of Contents for
Mastering PostCSS for Web Design
 Mastering PostCSS for Web Design
Published by
Packt Publishing, 2016
Mastering PostCSS for Web Design
Published by
Packt Publishing, 2016
- Cover
- Table of Contents
- Mastering PostCSS for Web Design
- Mastering PostCSS for Web Design
- Credits
- About the Author
- About the Reviewer
- www.PacktPub.com
- Preface
- What you need for this book
- Who this book is for
- Conventions
- Reader feedback
- Customer support
- 1. Introducing PostCSS
- Introducing PostCSS
- Setting up a development environment
- Creating a simple example using PostCSS
- Linting code using plugins
- Exploring how PostCSS works
- Summary
- 2. Creating Variables and Mixins
- Creating a hover effect example
- Transitioning to using PostCSS
- Adding variable support to PostCSS
- Updating our hover effect demo
- Setting the order of plugins
- Creating mixins with PostCSS
- Looping content with PostCSS
- Summary
- 3. Nesting Rules
- Navigating through pages
- Transitioning to using PostCSS plugins
- Exploring the pitfalls of nesting
- Making the switch to BEM
- Exploring our changes in more detail
- Summary
- 4. Building Media Queries
- Exploring custom media queries in PostCSS
- Making images responsive
- Adding responsive text support
- Optimizing media queries
- Retrofitting support for older browsers
- Moving away from responsive design
- Taking things further with CSS4
- Summary
- 5. Managing Colors, Images, and Fonts
- Managing fonts with PostCSS
- Creating image sprites
- Working with SVG in PostCSS
- Adding support for WebP images
- Manipulating colors and color palettes
- Creating color functions with PostCSS
- Summary
- 6. Creating Grids
- Creating an example with Bourbon Neat
- Exploring the grid plugins in PostCSS
- Transitioning to using PostCSS-Neat
- Creating a site using Neat and PostCSS
- Adding responsive capabilities
- Summary
- 7. Animating Elements
- Moving away from jQuery
- Making use of pre-built libraries
- Switching to using SASS
- Making the switch to PostCSS
- Exploring plugin options within PostCSS
- Updating code to use PostCSS
- Creating a demo in PostCSS
- Optimizing our animations
- Using our own animation plugin
- Summary
- 8. Creating PostCSS Plugins
- Dissecting the architecture of a standard plugin
- Creating an transition plugin
- Building a custom font plugin
- Simplifying the development process
- Guidelines for plugin building
- Making the plugin available for use
- Summary
- 9. Working with Shortcuts, Fallbacks, and Packs
- Exploring plugin packs for PostCSS
- Adding shortcuts with Rucksack
- Linting and optimizing your code
- Providing fallback support
- Summary
- 10. Building a Custom Processor
- Exploring our processor
- Dissecting issues with our processor
- Optimizing the output
- Adding reload capabilities
- Extending our processor further
- Testing the final pre-processor
- Getting started with some hints and tips
- Introducing the CSStyle library
- Summary
- 11. Manipulating Custom Syntaxes
- Preparing our environment
- Implementing custom syntax plugins
- Parsing CSS
- Formatting the output with the API
- Highlighting our syntax code
- Summary
- 12. Mixing Preprocessors
- Exploring the conversion process
- Introducing the Pleeease library
- Compiling with other preprocessors
- Using the PreCSS library
- Converting a WordPress installation
- Setting up our environment
- Considering the conversion process
- Making changes to our code
- Compiling and testing the changes
- Summary
- 13. Troubleshooting PostCSS Issues
- Exploring some common issues
- Getting help from others
- Summary
- 14. Preparing for the Future
- Converting CSS4 styles for use
- Supporting future syntax with cssnext
- Creating plugins to provide extra CSS4 support
- Summary
- Index
The idea for this plugin is not new; it's loosely based on the postcss-transform-shortcut plugin by Jonathan Neal, available from https://github.com/jonathantneal/postcss-transform-shortcut. The concept is not necessarily a shorter means to create transition statements, but it makes it easier by allowing authors to specify values independently. These are then automatically inserted into the correct order within the transition declaration.
Note
The source code for this plugin is also available on GitHub, at https://github.com/alexlibby/postcss-transition-shortcut; the NPM package is also available at https://www.npmjs.com/package/postcss-transition-shortcut.
Let's dive in and take a look at how it is put together, in more detail:
- We'll start by installing Git—this is required for installing the plugin boilerplate. To do this, browse to https://git-scm.com/book/en/v2/Getting-Started-Installing-Git, and follow the instructions for your platform.
- Open a Node.js command prompt, then change the working folder to our project directory.
- In the prompt, enter this command then press Enter:
git clone https://github.com/postcss/postcss-plugin-boilerplate.git - Git will clone the
postcss-plugin-boilerplaterepository to our project area, as shown in this screenshot: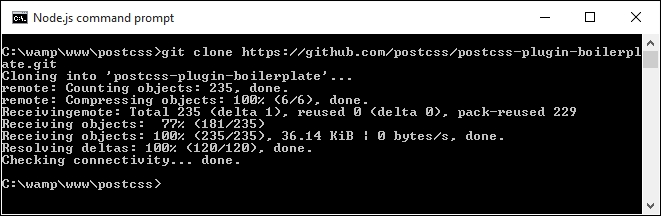
- The plugin boilerplate includes a script to automatically generate the skeleton for our plugin—go ahead and run this command in the prompt:
node ./postcss-plugin-boilerplate/start - It will show a series of prompts for various bits of information. Go ahead and fill in appropriate responses, similar to that shown in this screenshot. Note that it is not obligatory to have a GitHub account, as the information is simply added to the
package.jsonfile; if you spend any time developing plugins in the future, then it is recommended that you go ahead and create one:
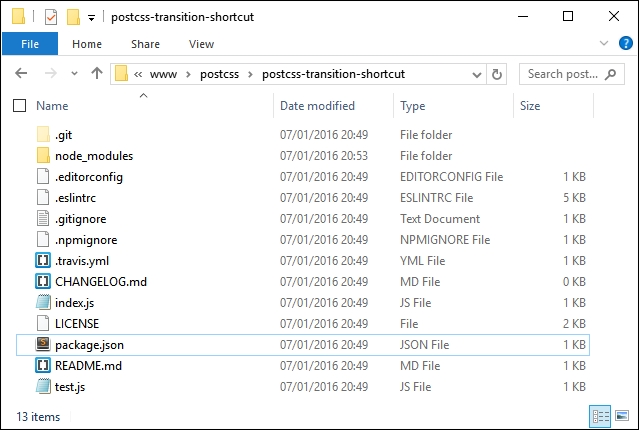
- Once the plugin folder has been created, we can remove the
postcss-plugin-boilerplatefolder from the project root folder, as this is no longer needed. - If all is well, we should see something akin to this screenshot, when browsing the contents of our plugin folder:
- At this point, we can now add the code for our plugin into
index.js—to do this, open up a copy of the file from within thepostcss-transition-shortcutplugin from within our project area, and alter the code as shown:var postcss = require('postcss'); module.exports = postcss.plugin('postcss-transition-shortcut', function (opts) { opts = opts || {}; var defaults = { property: 'all', duration: '1s', timing: 'ease-in-out', delay: '1s' }; return function (css, result) { css.walkRules(function (rule) { var transitionRule; var transitionValues = []; var index = -1, node; var attributes = /^ (property|duration|timing|delay)$/; while (node = rule.nodes[++index]) { if (attributes.test(node.prop)) { transitionRule = transitionRule || node.cloneBefore({ prop: 'transition' }); var transValues = postcss.list.space(node.value); transitionValues.push(transValues.join(',')); node.remove(); --index; } } transitionRule.value = transitionValues.join(' '); }); }; });
At this stage we will have a working plugin—the proof, though (to quote an old English saying), is in the pudding: does the plugin work as we expect? Well, there's no better way to find out than by trying it out, so let's set up a quick demo to confirm it works as expected. Before we do so, though, there is one important point I need to make, which concerns the generation of PostCSS plugins.
The sharp-eyed amongst you will notice though that if we don't specify one of the four values for our transition plugin, then the code at present won't use the default; hopefully an update will come in a future version of the plugin.
This aside, the process for testing our plugin uses the AVA test runner, available from https://github.com/sindresorhus/ava. The framework for the test is already created within the plugin boilerplate, which leaves us to add the test code to test.js file. Let's take a peek at what's required:
- We'll start by installing the AVA test runner—for this, fire up a Node.js command prompt, and change the working folder to the root of our plugin folder.
- In the prompt, enter these commands, pressing Enter after each—the first installs AVA, with the second adding it to our
package.jsonfile:npm install --global ava ava --init
- Open a new file in your text editor of choice—go ahead and add the following highlighted lines to
test.js, within the plugin folder we created in the previous exercise:t.same(result.warnings().length, 0); }); } test('transitionShtct', t => { return run( t, 'div { property: all; duration: 1s; timing: ease-in-out; delay: 1s; }', 'div { transition: all 1s ease-in-out 1s; }', { }); }); - Next, fire up a Node.js command prompt, then change the working directory to our plugin project folder.
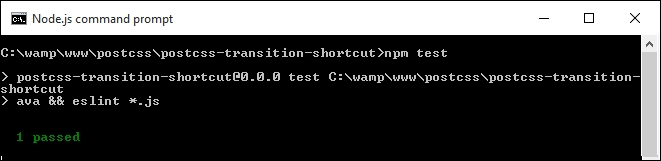
- At the prompt, enter
npm testand press Enter. - AVA will perform the test, which is then linted using ESLint. If all is well, we should see the results shown in this screenshot—assuming nothing was amiss with the test:
All good so far, right—at this point, we're OK to create a simple demo to prove plugin works…or are we? Well, the test shows a pass, so the code should be OK. But further down there are a ton of errors displayed, similar to this screenshot—what gives?

The test has passed, yet the tests would seem to indicate otherwise; a look further down reveals yet more errors:
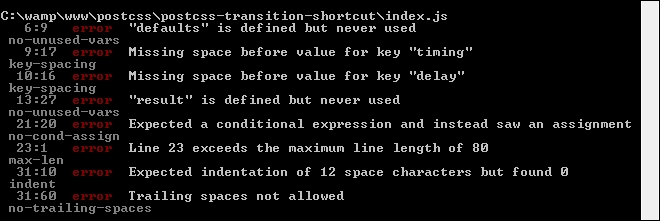
This raises some important points about testing, so let's cover these before continuing with our demo.
The main error, or Exported linebreaks to be 'LF'…, is a simple one to fix—it's being caused by Sublime Text being set to use Windows as the default line endings setting. Assuming we're using Sublime Text, let's go ahead and deal with that error:
- Open up Sublime Text, then open
index.jsfrom our plugin folder. - Click on View | Line Endings.
- Change the selected option to Unix, and save the file.
- Repeat steps 1 to 3 for
test.js—once done, close both files.
If we re-run the test, we should see a significant drop in listed errors—there will be some left for us to fix in index.js and test.js, similar to this screenshot:
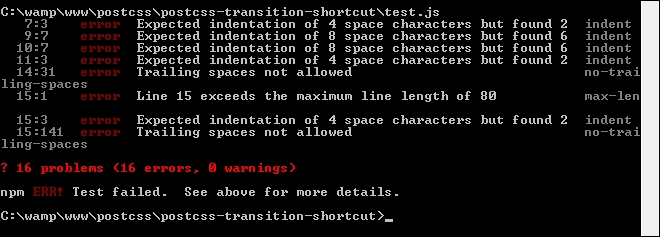
Most of the errors are self-explanatory—the two that are less obvious are Expected indentation of X spaces… and Line X exceeds the maximum line length…. We can fix the first by replacing all instances of tabs with four individual spaces per tab. The second error is simple to fix—simply split the line of code into two lines.
We need to work through all of the remaining errors, as far as possible—these won't entirely be the same for your version of the plugin, but some will be similar.
Tip
If you come across any errors where you want to understand the reason behind the error, take a look at https://jslinterrors.com/—it's a great source for defining what an error means!
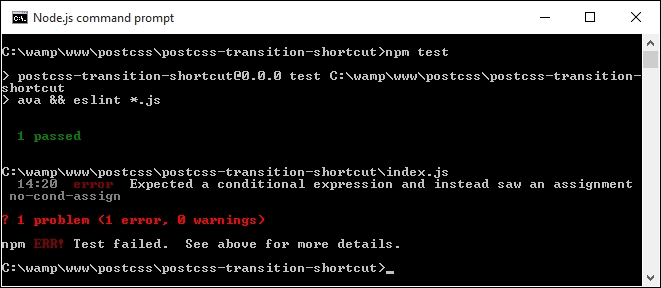
Assuming we've cleared most of the errors, we should be left with just one:
Is this an error we should fix, and therefore can clear from the report? The simple answer is that it depends—it highlights an important point about using linting for code, so let's take a moment to cover this in more detail.
The last error shown in the report presents some challenges—the code is valid, yet ESLint flags the error. The reason for this is that it has found an assignment expression within a while statement initializer; it is treated as a possible mistake in the code and may have unintended effects on the code.
In some respects, it can be treated as a warning, and not necessarily as an error. Prior to July 2013 we could have configured our test to ignore this, but changes made to ESLint since that date mean that this error cannot be cleared without reworking the code.
Note
If you would like to understand more about the causes of this error, then please refer to http://jslinterrors.com/unexpected-assignment-expression/.
In our instance, the code is valid and will not cause any errors—it leaves us with several options as to what we can do going forward:
- We can simply ignore the error and carry on—it's not great that the test fails, but in this case it won't cause any harm to our code
- We can switch off the test for it, so that while this condition is not tested, the test will at least show a 100% pass
- We can look to alter the code to design out the error/warning—this is the ideal solution, but it may be a longer term route, depending on the nature of the changes we need to make
For now, we're going to switch off the test for this error—we can do this by editing the .eslintrc file from within our plugin, and set the value in square brackets to 0:

This will work in the short term, but with a view to revisiting the code to design out the ambiguity at some point in the future.
With our plugin in place, let's test it out—for this, we need a couple of files from the code download that accompanies this book; the files are available in the T43 – building a transition shortcut plugin folder:
- Go ahead and extract copies of
gulpfile.jsandpackage.json, then save them to the root of our project area. - In a new file, add the following CSS styles, saving it as
style.cssin thesrcfolder in our project area:div { property: all; duration: 1s; timing: ease-in-out; delay: 1s; } - Fire up a Node.js command prompt, then change the working directory to our project area.
- At the prompt, enter
gulpthen press Enter—PostCSS will go away and compile the source style sheet. If all is well, we should see the compiled results of our style sheet in thedestfolder of our project area: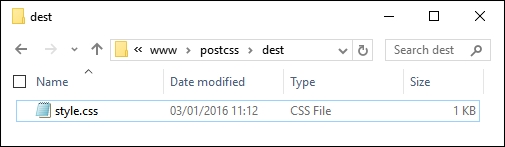
At this stage, we've run the test for our plugin—we go one step further, and add our plugin to a test runner service such as Travis CI (at https://travis-ci.org). Although this is a mandatory part of the process for creating any PostCSS plugin, there is a fairly steep learning curve, and anyone working on Windows may run into difficulties! If you are a Windows user, you will have to make test.js executable via the command line—this requires prior knowledge of using Git, which is beyond the scope of this book.
For now, we'll skip past the Travis CI part of the process—the plugin is sufficiently straightforward that the local testing with test.js will suffice. Let's change tack—our plugin contains a number of useful concepts in PostCSS, so let's explore how it is put together in more detail.
The inspiration for this plugin is twofold—at the time of writing, PostCSS doesn't have a great number of animation-based plugins, and it borrows the same concept used in the postcss-transform-shortcut plugin.
We start with the ubiquitous call to initialize PostCSS as a dependency for our plugin:
var postcss = require('postcss');Next up, we initialize postcss.plugin, to expose functionality within our plugin to the ecosystem:
module.exports = postcss.plugin('postcss-transition-shortcut', function (options) {At present, our plugin doesn't contain any options, so it will be set as blank; if we had had some options set, then these will be stored in the options array:
options = options || {};A key part of our plugin is to set some default options—we need to have some default values set, if we don't specify one or more values:
var defaults = {
  property: 'all',
  duration: '1s',
  timing: 'ease-in-out',
  delay: '1s'
};
Up next comes the crux of our plugin—it returns the result of this function:
  return function (css) {
     css.walkRules(function (rule) {
       var transitionRule;
       var transitionValues = [];
       var index = -1, node;
       var attributes = /^(property|duration|timing|delay)$/;
We walk through each rule using css.walkRules—it sets up a number of variables and an array; we also set a search string that will be used to find any instance of our transition properties.
If we find a suitable instance of our property, we then clone it, adding the property name transition before it. We then work through each of up to four properties that may be set, joining them together into the final transition declaration:
       while (node = rule.nodes[++index]) {
        if (attributes.test(node.prop)) {
          transitionRule = transitionRule || node.cloneBefore({ prop: 'transition' });
           var transValues = postcss.list.space(node.value);
           transitionValues.push(transValues.join(','));
           node.remove();
           --index;
         }
       }
       transitionRule.value = transitionValues.join(' ');
    });
  };
});
Let's move on. Our first example was a straightforward plugin; although it does need some further development (as indicated in Testing our plugin), it still serves a useful purpose. In our next example, we'll take a different approach: we will use an existing plugin as a basis for our new version. This plugin, unlike the first one, will not see the light of day in GitHub, though—we'll explore the reasons for this, and more, as part of our next exercise.