Table of Contents for
Mastering PostCSS for Web Design
 Mastering PostCSS for Web Design
Published by
Packt Publishing, 2016
Mastering PostCSS for Web Design
Published by
Packt Publishing, 2016
- Cover
- Table of Contents
- Mastering PostCSS for Web Design
- Mastering PostCSS for Web Design
- Credits
- About the Author
- About the Reviewer
- www.PacktPub.com
- Preface
- What you need for this book
- Who this book is for
- Conventions
- Reader feedback
- Customer support
- 1. Introducing PostCSS
- Introducing PostCSS
- Setting up a development environment
- Creating a simple example using PostCSS
- Linting code using plugins
- Exploring how PostCSS works
- Summary
- 2. Creating Variables and Mixins
- Creating a hover effect example
- Transitioning to using PostCSS
- Adding variable support to PostCSS
- Updating our hover effect demo
- Setting the order of plugins
- Creating mixins with PostCSS
- Looping content with PostCSS
- Summary
- 3. Nesting Rules
- Navigating through pages
- Transitioning to using PostCSS plugins
- Exploring the pitfalls of nesting
- Making the switch to BEM
- Exploring our changes in more detail
- Summary
- 4. Building Media Queries
- Exploring custom media queries in PostCSS
- Making images responsive
- Adding responsive text support
- Optimizing media queries
- Retrofitting support for older browsers
- Moving away from responsive design
- Taking things further with CSS4
- Summary
- 5. Managing Colors, Images, and Fonts
- Managing fonts with PostCSS
- Creating image sprites
- Working with SVG in PostCSS
- Adding support for WebP images
- Manipulating colors and color palettes
- Creating color functions with PostCSS
- Summary
- 6. Creating Grids
- Creating an example with Bourbon Neat
- Exploring the grid plugins in PostCSS
- Transitioning to using PostCSS-Neat
- Creating a site using Neat and PostCSS
- Adding responsive capabilities
- Summary
- 7. Animating Elements
- Moving away from jQuery
- Making use of pre-built libraries
- Switching to using SASS
- Making the switch to PostCSS
- Exploring plugin options within PostCSS
- Updating code to use PostCSS
- Creating a demo in PostCSS
- Optimizing our animations
- Using our own animation plugin
- Summary
- 8. Creating PostCSS Plugins
- Dissecting the architecture of a standard plugin
- Creating an transition plugin
- Building a custom font plugin
- Simplifying the development process
- Guidelines for plugin building
- Making the plugin available for use
- Summary
- 9. Working with Shortcuts, Fallbacks, and Packs
- Exploring plugin packs for PostCSS
- Adding shortcuts with Rucksack
- Linting and optimizing your code
- Providing fallback support
- Summary
- 10. Building a Custom Processor
- Exploring our processor
- Dissecting issues with our processor
- Optimizing the output
- Adding reload capabilities
- Extending our processor further
- Testing the final pre-processor
- Getting started with some hints and tips
- Introducing the CSStyle library
- Summary
- 11. Manipulating Custom Syntaxes
- Preparing our environment
- Implementing custom syntax plugins
- Parsing CSS
- Formatting the output with the API
- Highlighting our syntax code
- Summary
- 12. Mixing Preprocessors
- Exploring the conversion process
- Introducing the Pleeease library
- Compiling with other preprocessors
- Using the PreCSS library
- Converting a WordPress installation
- Setting up our environment
- Considering the conversion process
- Making changes to our code
- Compiling and testing the changes
- Summary
- 13. Troubleshooting PostCSS Issues
- Exploring some common issues
- Getting help from others
- Summary
- 14. Preparing for the Future
- Converting CSS4 styles for use
- Supporting future syntax with cssnext
- Creating plugins to provide extra CSS4 support
- Summary
- Index
The idea behind basing CSS4 around a series of modules was aimed at making it easier (and ultimately quicker) to update each standard; it does mean that modules will be in a state of flux, at least for the time being!
This said, there are some clear styles we can recreate using current CSS3 styles—one such example is CSS4 Selectors. Even though it is still in draft at the time of writing, a PostCSS plugin is available in the form of postcss-selector-not (from https://github.com/postcss/postcss-selector-not). A sister style that is also available as a PostCSS plugin is postcss-selector-matches (available from https://github.com/postcss/postcss-selector-matches)—these two are intended to replicate the :not negation and :matches pseudo-selectors that are coming as part of the new CSS4 standard.
Note
For more information on individual CSS4 selectors, take a look at the full list available at http://css4-selectors.com/selectors/. This will also give you an indication of available browser support—this list will be updated with changes as selectors are ratified for use.
Looking further afield, there are a small handful of plugins that provide support for upcoming CSS4 standards—in addition to the :matches and :not plugins, we can use any of the following:
|
Name of plugin |
Purpose of plugin |
|---|---|
|
|
Currently in beta, this plugin provides limited support for the Media Queries Level 4 hover media feature—it is available from https://github.com/twbs/mq4-hover-shim. |
|
|
Working with the Shadow DOM? If you need to make |
|
|
How many times have you had to add pseudo-selectors such as Head over to https://github.com/jonathantneal/postcss-pseudo-class-any-link for more details. |
|
|
The PostCSS Initial plugin resets a specified property's value to what it was initially set in code (and not by the browser). For more details, head over to https://github.com/maximkoretskiy/postcss-initial. |
|
|
This plugin transforms The source for the plugin is available at https://github.com/postcss/postcss-font-variant. |
|
|
This plugin allows us to style input range elements. We need to provide unprefixed CSS styles, and the plugin will automatically handle support for all of the various prefixes required to allow this element to be styled across different browsers. The source for this plugin can be downloaded from https://github.com/jonathantneal/postcss-input-range. |
Okay, let's move on: I feel a demo coming! Let's take a look at using the postcss-selector-matches property, to see how we can use it in action.
How many times have you come across e-mail submissions from your site, where you aren't 100% sure your visitors have left a valid e-mail address?
If we leave aside exact numbers, it goes without saying that any requests submitted from any website must have a valid e-mail address; with the plethora of top level domains that are now available, it's even more critical that they be valid!
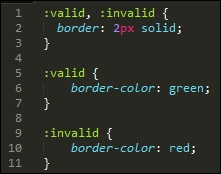
To help with this, we can use the :invalid and :valid attributes to style <input> fields—whilst they may not be able to tell if .design is a valid TLD (and yes, it is), they can at least cope with the basics of ensuring that you have a TLD present, an @ symbol, and the name of a recipient.
Tip
You can perform a test in your browser to gauge support for these and other CSS4 selectors—check out the CSS4 Selectors site, at http://css4-selectors.com/.
Let's knock up a simple example using the postcss-selectors-matches plugin for PostCSS, to see how we can style such fields:
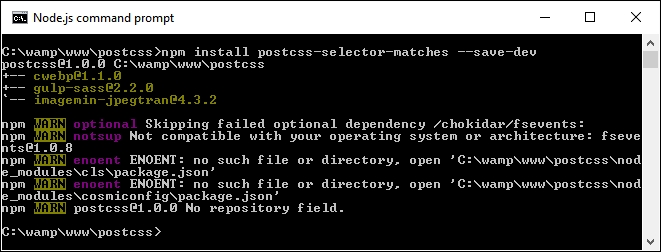
- We'll start as always by firing up a Node.js command prompt session, then changing the working folder to our project area.
- At the prompt, go ahead and enter this command, then press Enter:
npm install postcss-selector-matches --save-devKeep the window open, we will need it shortly. If all is well, we should see this appear:
- Next, extract a copy of the
T69 - matches pseudo-selectorfolder from the code download that accompanies this book, and save it to the root of our project area. - Copy
matches – pre-compile.cssfrom thecss—completed version folder withinT69 - matches pseudo-selector, and save it to thesrcfolder at the root of our project area. - Copy the
gulpfile.jsandpackage.jsonfiles from theT69 - matches pseudo-selectorfolder to the root of our project area, and rename itmatches.css - Revert to the Node.js command prompt session from earlier, then at the prompt enter
gulpand press Enter. - If all is well, PostCSS will go away and compile our code into valid CSS—we should see the now familiar files appear in the
destfolder. - Copy the contents of this
destfolder to thecssfolder underneathT69 - matches pseudo-selector, then try previewing thematches.htmlfile in a browser. If all is well, we should see something akin to this:
It's a simple demo, and yes, somewhat contrived. At this level, it wouldn't be necessary to use :matches, as it ends up generating more code than is necessary! But it does show how easy it is to apply the technique, and have it provide valid CSS, as in the case of our example:
Okay, let's change tack: we will stay with the range theme for our next demo, but this time look at a more stylish example, where we can really go to town on transforming the appearance of our selected element.
The range input element is one that has been traditionally hard to style, more often than not, we may end up resorting to using jQuery UI to change its appearance! Not so with CSS4—we can use a series of new CSS attributes to apply styles, without the use of any additional libraries. Let's take a look at this in more detail.
A quick question, how many times have you had to create a site where you needed to choose a value, say from 1 to 100? Or pick a specific opacity of color, from almost transparent to completely opaque?
Okay, perhaps they're an odd couple of questions to ask, but the eagle-eyed should spot that I am of course referring to using sliders, which we can adjust to select a specific value. There are different ways to add these to a page, but which in the main will require some help to style, perhaps the most recognizable tool being jQuery UI!
This is fine if we need to use jQuery UI in our pages to provide other functionality, but what if we only needed it for the slider? It's a bit of overkill—thankfully, we can fix that with the use of the
postcss-input-range plugin, available from https://github.com/jonathantneal/postcss-input-range. It's time for that demo, so let's knock up a quick example of how one can be styled to represent a progress bar:
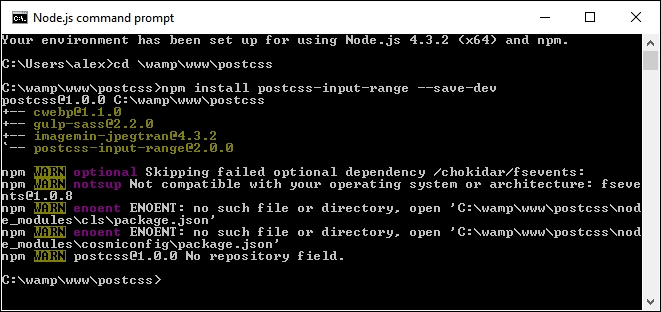
- We'll start by installing the
postcss-input-rangeplugin, for this, go ahead and fire up a Node.js command prompt, then change the working folder to our project area. - At the prompt, enter the following command, then press Enter:
npm install postcss-input-range --save-devIf all is well, we should see something akin to this screenshot:
- Next, extract a copy of the
T70 - using range inputfolder from the code download that accompanies this book. Go ahead and save it in our project area. - In the
cssfolder ofT70 - using range input, copy therange – pre-compile.cssfile to thesrcfolder of our project area, and rename itrange.css. - Copy the
gulpfile.jsandpackage.jsonfiles from theT70 - using range inputfolder to the root of our project area. - Revert to the Node.js command prompt window, then at the prompt enter
gulpand press Enter. - Gulp will now run our compilation process, if all is well, we should see the now familiar style sheet files appear in the
destfolder, along with a map file in the maps subfolder. Copy these to thecssfolder underT70 - using range input. - If all is well, we should see something akin to this screenshot when previewing the results in a browser:

There is nothing complicated in this demo, even though we've only scratched the surface of what is possible when styling the range element—for example, we can add datalists to define certain values to scroll through, such as specific times of the day.
Browser support is still limited, but for an idea of what is possible, check out http://demo.agektmr.com/datalist/; the CSS guru Chris Coyier also has a couple of articles on the use of range inputs on his site at http://www.css-tricks.com.
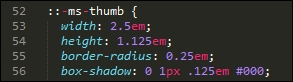
The real magic in our demo appears when we take a look at the compiled code—one of the key elements for styling a range input is the range-thumb attribute, which is the knob we use to select a value on the slider. Here are two examples of how our code now looks, with support added for Firefox:
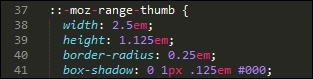
This has support for Internet Explorer (which has been superseded by Edge):
When using this plugin, we don't have to worry about adding vendor prefixes—our original code contains just the unprefixed versions; the relevant prefixes will be added at compilation, until such time as they are no longer needed for styling our input element.
Tip
If you would like help with styling the new range input element, then check out http://danielstern.ca/range.css/—it's a useful tool!
Over the course of the last two demos, we've briefly scratched the surface of what is possible when using PostCSS—we've used the same format of Gulp task file to incorporate support for each plugin, which when run, has produced the requisite CSS style sheet for each demo. Nothing outrageous here, right? After all, it's followed the same principles we covered earlier, such as one plugin for one task…or can we do better?
Yes, by now you should know that I always like to go one better if I can. Remember how I said it is preferable to create tasks in our runner that worked on a one-to-one basis? Was each task in our (Gulp) file related to a specific plugin? Well, as someone once said, rules are meant to be broken—it's time to throw out the rulebook, and consider a different approach, at least for future syntax…