Table of Contents for
Mastering PostCSS for Web Design
 Mastering PostCSS for Web Design
Published by
Packt Publishing, 2016
Mastering PostCSS for Web Design
Published by
Packt Publishing, 2016
- Cover
- Table of Contents
- Mastering PostCSS for Web Design
- Mastering PostCSS for Web Design
- Credits
- About the Author
- About the Reviewer
- www.PacktPub.com
- Preface
- What you need for this book
- Who this book is for
- Conventions
- Reader feedback
- Customer support
- 1. Introducing PostCSS
- Introducing PostCSS
- Setting up a development environment
- Creating a simple example using PostCSS
- Linting code using plugins
- Exploring how PostCSS works
- Summary
- 2. Creating Variables and Mixins
- Creating a hover effect example
- Transitioning to using PostCSS
- Adding variable support to PostCSS
- Updating our hover effect demo
- Setting the order of plugins
- Creating mixins with PostCSS
- Looping content with PostCSS
- Summary
- 3. Nesting Rules
- Navigating through pages
- Transitioning to using PostCSS plugins
- Exploring the pitfalls of nesting
- Making the switch to BEM
- Exploring our changes in more detail
- Summary
- 4. Building Media Queries
- Exploring custom media queries in PostCSS
- Making images responsive
- Adding responsive text support
- Optimizing media queries
- Retrofitting support for older browsers
- Moving away from responsive design
- Taking things further with CSS4
- Summary
- 5. Managing Colors, Images, and Fonts
- Managing fonts with PostCSS
- Creating image sprites
- Working with SVG in PostCSS
- Adding support for WebP images
- Manipulating colors and color palettes
- Creating color functions with PostCSS
- Summary
- 6. Creating Grids
- Creating an example with Bourbon Neat
- Exploring the grid plugins in PostCSS
- Transitioning to using PostCSS-Neat
- Creating a site using Neat and PostCSS
- Adding responsive capabilities
- Summary
- 7. Animating Elements
- Moving away from jQuery
- Making use of pre-built libraries
- Switching to using SASS
- Making the switch to PostCSS
- Exploring plugin options within PostCSS
- Updating code to use PostCSS
- Creating a demo in PostCSS
- Optimizing our animations
- Using our own animation plugin
- Summary
- 8. Creating PostCSS Plugins
- Dissecting the architecture of a standard plugin
- Creating an transition plugin
- Building a custom font plugin
- Simplifying the development process
- Guidelines for plugin building
- Making the plugin available for use
- Summary
- 9. Working with Shortcuts, Fallbacks, and Packs
- Exploring plugin packs for PostCSS
- Adding shortcuts with Rucksack
- Linting and optimizing your code
- Providing fallback support
- Summary
- 10. Building a Custom Processor
- Exploring our processor
- Dissecting issues with our processor
- Optimizing the output
- Adding reload capabilities
- Extending our processor further
- Testing the final pre-processor
- Getting started with some hints and tips
- Introducing the CSStyle library
- Summary
- 11. Manipulating Custom Syntaxes
- Preparing our environment
- Implementing custom syntax plugins
- Parsing CSS
- Formatting the output with the API
- Highlighting our syntax code
- Summary
- 12. Mixing Preprocessors
- Exploring the conversion process
- Introducing the Pleeease library
- Compiling with other preprocessors
- Using the PreCSS library
- Converting a WordPress installation
- Setting up our environment
- Considering the conversion process
- Making changes to our code
- Compiling and testing the changes
- Summary
- 13. Troubleshooting PostCSS Issues
- Exploring some common issues
- Getting help from others
- Summary
- 14. Preparing for the Future
- Converting CSS4 styles for use
- Supporting future syntax with cssnext
- Creating plugins to provide extra CSS4 support
- Summary
- Index
Animating content can be a contentious subject, particularly if jQuery or JavaScript is used—if we were to take a straw poll of 100 people and ask which they used, it is very likely that we would get mixed answers! A key answer of it depends is likely to feature at or near the top of the list of responses; many will argue that animating content should be done using CSS, while others will affirm that JavaScript-based solutions still have value.
Leaving aside that…shall we say…lively debate, if we're looking to move away from using jQuery, and in particular .animate(), then we have some options available to us:
- Upgrade your version of jQuery! Yes—this might sound at odds with the theme of this chapter, but the most recent versions of jQuery introduced the use of
requestAnimationFrame, which improved performance, particularly on mobile devices. - A quick and dirty route is to use the jQuery Animate Enhanced plugin, available from http://playground.benbarnett.net/jquery-animate-enhanced/; although a little old, it still serves a useful purpose. It will (where possible) convert
.animate()calls into CSS3 equivalents; it isn't able to convert all, so any that are not converted will remain as.animate()calls. - Using the same principle, we can even take advantage of the JavaScript animation library, GSAP—the Greensock team have made available a plugin (from https://greensock.com/jquery-gsap-plugin), that replaces
jQuery.animate()with their own GSAP library. The latter is reputed to be 20 times faster than standard jQuery! With a little effort, we can look to rework our existing code—in place of using.animate(), we can add the equivalent CSS3 style(s) into our stylesheet and replace existing calls to.animate()with either.removeClass()or.addClass(), as appropriate. - We can switch to using libraries such as Transit (http://ricostacruz.com/jquery.transit/), it still requires the use of jQuery, but gives better performance than using the standard
.animate()command. - Another alternative is Velocity JS by Jonathan Shapiro, available from http://julian.com/research/velocity/; this has the benefit of not having jQuery as a dependency. There is even talk of incorporating all or part of the library into jQuery, as a replacement for
.animate()—for more details, check out the issue log at https://github.com/jquery/jquery/issues/2053.
Many people automatically assume that CSS animations are faster than JavaScript (or even jQuery). After all, we don't need to call an external library (jQuery); we can use styles that are already baked into the browser, right? The truth is not as straightforward as this—in short, the right use of either will depend on your requirements and the limits of each method. For example, CSS animations are great for simple state changes, but if sequencing is required, then you may have to resort to using the JavaScript route.
The key, however, is less in the method used, and more in how many frames per second are displayed on screen. Most people cannot distinguish above 60FPS—this produces a very smooth experience. Anything less than around 25FPS will produce blur and occasionally appear jerky—it's up to us to select the best method available, that produces the most effective solution.
Tip
To see the difference in frame rate, take a look at https://frames-per-second.appspot.com/—the animations on this page can be controlled; it's easy to see why 60FPS produces a superior experience!
So, which route should we take? Well, over the next few pages, we'll take a brief look at each of these options. At this point, you may well be asking, "How is this relevant to PostCSS though, given that this is the subject of this book?"
In a nutshell, they are all methods that either improve how animations run, or allow us to remove the dependency on .animate(), which we know is not very efficient! True, some of these alternatives still use jQuery, but the key here is that your existing code could be using any or a mix of these methods. Later in this chapter, we'll take a look at how we can begin to remove jQuery, and focus more on using CSS3 animations, using the PostCSS plugin system.
Note
A small word of note, all of the demos over the next few pages were run at the same time as a YouTube video was being run; this was to help simulate a little load and get a more realistic comparison. Running animations under load means less graphics processing power is available, which results in a lower FPS count.
Let's kick off with a look at our first option, the Transit.js library.
In an ideal world, any project we build will have as few dependencies as possible; this applies equally to JavaScript or jQuery-based content as it does to CSS styling.
To help with reducing dependencies, we can use libraries such as TransitJS or Velocity to construct our animations. The key here is to make use of the animations that these libraries create, as a basis for applying styles we can then manipulate using .addClass() or .removeClass(). To see what I mean, let's explore this concept with a simple demo:
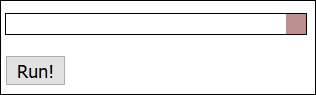
- We'll start by opening up a copy of
animate.html—to make it easier, we need to change the reference tosquare-smallfrom a class to a selector:<div id="square-small"></div>
- Next, go ahead and add in a reference to the Transit library, immediately before the closing
</head>tag:<script src="js/jquery.transit.min.js"></script>
- The Transit library uses a slightly different syntax, so go ahead and update the call to
.animate()as indicated:smallsquare.transition({x: 280}, 'slow');
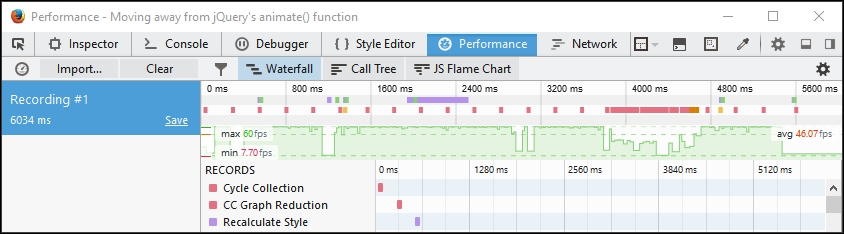
Save the file, then try previewing the results in a browser—if all is well, we should see no material change in the demo:
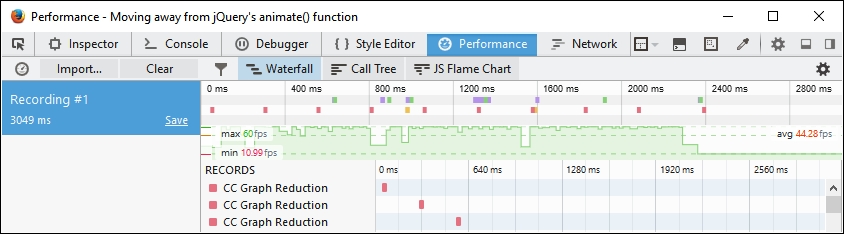
However, the animation will be significantly smoother—the frame count is higher, at 44.28FPS, with fewer dips:
Let's compare this with the same profile screenshot taken for the Revisiting basic animations section, earlier in this chapter—notice anything?
Profiling browser activity can be complex, but there are only two things we need to concern ourselves with here: the FPS value and the state of the green line. The FPS value, or Frames Per Second, is over three times higher, and for a large part, the green line is more consistent, with fewer, more short-lived dips.
This means that we have a smoother, more consistent performance; at approximately 44FPS, the average frame rate is significantly better than using standard jQuery—but we're still using jQuery!
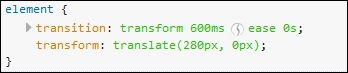
There is a difference, though—libraries such as Transit or Velocity convert animations, where possible, to CSS3 equivalents—if we take a peek under the covers, we can see this in the flesh:
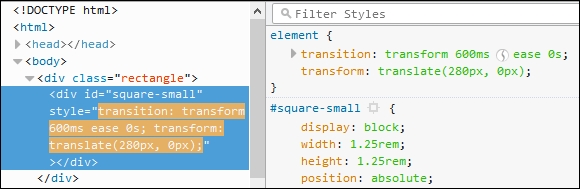
We can use this to our advantage, by removing the need to use .animate() and simply use .addClass() or .removeClass()—we'll see this in action later in this chapter, in the Switching classes using jQuery section.
To take it to the next step, we can use the Velocity library to create a version of our demo using plain JavaScript—we'll see how as part of the next demo. Beware though—this isn't an excuse to still use JavaScript; as we'll see, there is little difference in the frame count!
Many developers are used to working with jQuery—after all, it makes it a cinch to reference just about any element on a page! Sometimes though, it is preferable to work in native JavaScript; this could be for speed. If we only need to support newer browsers (such as IE11 or Edge, and recent versions of Chrome or Firefox), then adding jQuery as a dependency isn't always necessary.
The beauty about libraries such as Transit (or Velocity) means that we don't always have to use jQuery to still achieve the same effect; as we'll see shortly, removing jQuery can help improve matters! Let's put this to the test, and adapt our earlier demo to work without using jQuery:
- We'll start by extracting a copy of the
T35Bfolder from the code download that accompanies this book. Save this to the root of our project area. - Next, we need to edit a copy of
animate.htmlwithin this folder—go ahead and remove the link to jQuery, then remove the link tovelocity.ui.min.js; we should be left with this in the<head>of our file:<link rel="stylesheet" type="text/css" href="css/style.css"> <script src="js/velocity.min.js"></script> </head>
- A little further down, alter the
<script>block as shown:<script> var smallsquare = document.getElementById('square-small'); var animbutton = document.getElementById('animation-button'); animbutton.addEventListener("click", function() { Velocity(document.getElementById('square-small'), {left: 280}, {duration: 'slow'}); }); </script> - Save the file, then preview the results in a browser—if we monitor the performance of our demo using a DOM Inspector, we can see a similar frame rate being recorded in our demo:
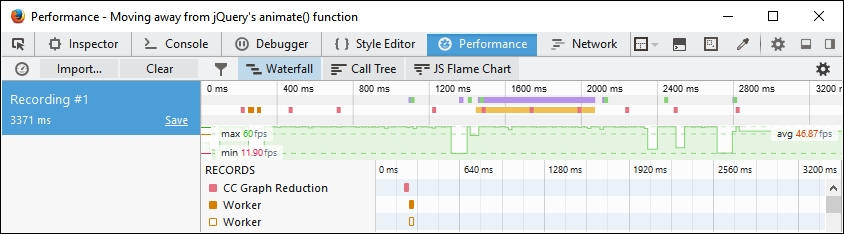
With jQuery as a dependency no longer in the picture, we can clearly see that the frame rate has improved; the downside, though, is that support is reduced for some browsers, such as IE8 or 9. This may not be an issue for your site—both Microsoft and the jQuery Core Team have announced changes to drop support for IE8 - 10 and IE8 respectively, which will help encourage users to upgrade to newer browsers.
It has to be said though, that while using CSS3 is preferable for speed and keeping our pages as lightweight as possible, using Velocity does provide a raft of extra opportunities that may be of use to your projects. The key here, though, is to carefully consider if you really do need them, or whether CSS3 will suffice, and allow you to use PostCSS.
At this point, there is one question that comes to mind: what about using class-based animation? By this, I mean dropping any dependency on external animation libraries, and switching to using plain jQuery with either .addClass() or .removeClass() methods.
In theory, it sounds like a great idea—we can remove the need to use .animate(), and simply swap classes as needed, right? Well, it's an improvement, but it is still lower than using a combination of pure JavaScript and switching classes. It all boils down to a trade-off between using the ease of jQuery to reference elements, against pure JavaScript for speed:
- We'll start by opening a copy of
animate.htmlfrom the previous exercise—first, go ahead and replace the call to Velocity.JS with this line, within the<head>of our document:<script src="js/jquery.min.js"></script>
- Next, remove the code between the
<script>tags, and replace it with this:var smallsquare = $('.rectangle').find('.square-small'); $('#animation-button').on("click", function() { smallsquare.addClass("move"); smallsquare.one('transitionend', function(e) { $('.rectangle').find('.square-small') .removeClass("move"); }); }); - Save the file—if we preview the results in a browser, we should see no apparent change in how the demo appears, but the transition is marginally more performant than using a combination of jQuery and Transit:
The real change in our code, though, will be apparent if we take a peek under the covers using a DOM Inspector:
Instead of using .animate(), we are using CSS3 animation styles to move our square-small <div>. Most browsers will accept the use of transition and transform, but it is worth running our code through a process such as Autocomplete, to ensure we apply the right vendor prefixes to our code.
The beauty of using CSS3 here is that, while it might not suit large, complex animations, we can at least begin to incorporate the use of external stylesheets such as Animate.css, or even use a preprocessor such as SASS to create our styles.
It's an easy change to make, so without further ado, and as the next step on our journey to using PostCSS, let's take a look at this in more detail.
Tip
If you would like to create custom keyframe-based animations, then take a look at http://cssanimate.com/, which provides a GUI-based interface for designing them, and will pipe out the appropriate code when requested.