Table of Contents for
Mastering PostCSS for Web Design
 Mastering PostCSS for Web Design
Published by
Packt Publishing, 2016
Mastering PostCSS for Web Design
Published by
Packt Publishing, 2016
- Cover
- Table of Contents
- Mastering PostCSS for Web Design
- Mastering PostCSS for Web Design
- Credits
- About the Author
- About the Reviewer
- www.PacktPub.com
- Preface
- What you need for this book
- Who this book is for
- Conventions
- Reader feedback
- Customer support
- 1. Introducing PostCSS
- Introducing PostCSS
- Setting up a development environment
- Creating a simple example using PostCSS
- Linting code using plugins
- Exploring how PostCSS works
- Summary
- 2. Creating Variables and Mixins
- Creating a hover effect example
- Transitioning to using PostCSS
- Adding variable support to PostCSS
- Updating our hover effect demo
- Setting the order of plugins
- Creating mixins with PostCSS
- Looping content with PostCSS
- Summary
- 3. Nesting Rules
- Navigating through pages
- Transitioning to using PostCSS plugins
- Exploring the pitfalls of nesting
- Making the switch to BEM
- Exploring our changes in more detail
- Summary
- 4. Building Media Queries
- Exploring custom media queries in PostCSS
- Making images responsive
- Adding responsive text support
- Optimizing media queries
- Retrofitting support for older browsers
- Moving away from responsive design
- Taking things further with CSS4
- Summary
- 5. Managing Colors, Images, and Fonts
- Managing fonts with PostCSS
- Creating image sprites
- Working with SVG in PostCSS
- Adding support for WebP images
- Manipulating colors and color palettes
- Creating color functions with PostCSS
- Summary
- 6. Creating Grids
- Creating an example with Bourbon Neat
- Exploring the grid plugins in PostCSS
- Transitioning to using PostCSS-Neat
- Creating a site using Neat and PostCSS
- Adding responsive capabilities
- Summary
- 7. Animating Elements
- Moving away from jQuery
- Making use of pre-built libraries
- Switching to using SASS
- Making the switch to PostCSS
- Exploring plugin options within PostCSS
- Updating code to use PostCSS
- Creating a demo in PostCSS
- Optimizing our animations
- Using our own animation plugin
- Summary
- 8. Creating PostCSS Plugins
- Dissecting the architecture of a standard plugin
- Creating an transition plugin
- Building a custom font plugin
- Simplifying the development process
- Guidelines for plugin building
- Making the plugin available for use
- Summary
- 9. Working with Shortcuts, Fallbacks, and Packs
- Exploring plugin packs for PostCSS
- Adding shortcuts with Rucksack
- Linting and optimizing your code
- Providing fallback support
- Summary
- 10. Building a Custom Processor
- Exploring our processor
- Dissecting issues with our processor
- Optimizing the output
- Adding reload capabilities
- Extending our processor further
- Testing the final pre-processor
- Getting started with some hints and tips
- Introducing the CSStyle library
- Summary
- 11. Manipulating Custom Syntaxes
- Preparing our environment
- Implementing custom syntax plugins
- Parsing CSS
- Formatting the output with the API
- Highlighting our syntax code
- Summary
- 12. Mixing Preprocessors
- Exploring the conversion process
- Introducing the Pleeease library
- Compiling with other preprocessors
- Using the PreCSS library
- Converting a WordPress installation
- Setting up our environment
- Considering the conversion process
- Making changes to our code
- Compiling and testing the changes
- Summary
- 13. Troubleshooting PostCSS Issues
- Exploring some common issues
- Getting help from others
- Summary
- 14. Preparing for the Future
- Converting CSS4 styles for use
- Supporting future syntax with cssnext
- Creating plugins to provide extra CSS4 support
- Summary
- Index
Throughout the course of this chapter, we've used the small number of animation-based plugins that are available for PostCSS, and demonstrated some of the effects possible. This is all well and good, but one can't help but feel that this is a little limiting—and can we do something about it?
Absolutely, the beauty of PostCSS is that if there is a need for a plugin, then we can create something to fill that gap. A perfect example of this is the lack of CSS-based animation plugins available; at present, all we have is postcss-animations, which inserts animations from the Animate.css style sheet created by Dan Eden. I've used this as a basis for a new plugin—we'll use the same framework, but convert it to use the Magic set of animations, available from http://www.minimamente.com/example/magic_animations/.
We will cover the construction of plugins in more detail in Chapter 8, Creating PostCSS Plugins. Let's make a start:
- From the code download that accompanies this book, go ahead and extract a copy of the
T41folder, and save the contents to the root of our project area. - Copy the
postcss-animationandpostcss-animation-datafolders to thenode_modulesfolder within our project area. - Copy the
gulpfile.jsandpackage.jsonfiles to the root of our project area—if any are already present, replace them (or take copies for safekeeping). - Crack open your text editor and add the following code, saving it as
style.cssin thesrcfolder of our project area:.foo { animation-name: openDownLeft; } - Fire up a Node.js folder, then change the working folder to our project area.
- At the prompt, enter
gulp, then press Enter—PostCSS will go away and compile the code; if all is well, we should see the@keyframescode added to our compiled style sheet (in thedestfolder), as shown in this screenshot: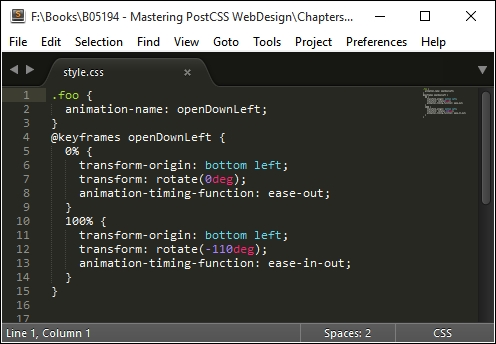
Although our example only shows the single style, this doesn't matter—any style sheet that uses animation-name can be used, provided the animation-name value used matches one in the postcss-animation-data plugin. There are a few key points, though, that we should cover, so let's take a moment to explore these in more detail.
Our new plugin is a perfect example of how we can adapt an existing framework to use different values—there are a few key points we should note when using this plugin:
- A key point to consider when constructing any plugin: don't worry about adding vendor prefixes. These should be added as part of the compilation stage when the plugin is used within your projects; this will take care of any vendor prefixes that are required.
- At present, the plugin only lists two animation types from the Magic Animations library as examples—the full list of original animations is available from the Magic Animations GitHub repository at https://github.com/miniMAC/magic/blob/master/magic.css. We can easily add in any that we need, using the format of
"<name of animation>" : "<keyframe to use>", as shown in this screenshot:
As an experiment, how about trying to convert the animations from the Motion UI library at http://zurb.com/playground/motion-ui, for example? Or we can try the animations for AngularJS at http://www.justinaguilar.com/animations/# - it's entirely up to you!
- Alternatively, it's worth applying the same principles to the
postcss-easingsplugin available from https://github.com/postcss/postcss-easings; this has some well-known easings built in, but they can easily be replaced. A great tool for this purpose is the site at http://www.cubic-bezier.com. For example, if we take theeaseInExpoeasing, we create a Bezier curve that looks something like this: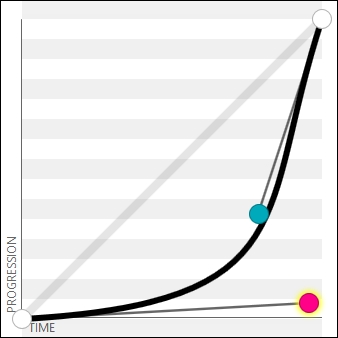
Note
This translates to a value of cubic-bezier(.95,.05,.79,.35), which we can use in our code. It's worth noting that some sites will show this easing as (0.05, 0.795, 0.035)—http://cubic-bezier.com/ only shows values to two decimal places.
There are plenty of ways we can extend, modify, or create new plugins—the key to any should be that they are kept simple, limited to one task only, and that where possible, you should use the PostCSS plugin boilerplate as the basis for creating the plugins. The plugin we used in this exercise was created manually—this isn't an issue if you are creating it for your own needs, and don't intend to publish the plugin. In the next chapter, we will explore how easy it is to create something using the boilerplate code—it avoids a lot of issues at a later date!