Table of Contents for
Mastering PostCSS for Web Design
 Mastering PostCSS for Web Design
Published by
Packt Publishing, 2016
Mastering PostCSS for Web Design
Published by
Packt Publishing, 2016
- Cover
- Table of Contents
- Mastering PostCSS for Web Design
- Mastering PostCSS for Web Design
- Credits
- About the Author
- About the Reviewer
- www.PacktPub.com
- Preface
- What you need for this book
- Who this book is for
- Conventions
- Reader feedback
- Customer support
- 1. Introducing PostCSS
- Introducing PostCSS
- Setting up a development environment
- Creating a simple example using PostCSS
- Linting code using plugins
- Exploring how PostCSS works
- Summary
- 2. Creating Variables and Mixins
- Creating a hover effect example
- Transitioning to using PostCSS
- Adding variable support to PostCSS
- Updating our hover effect demo
- Setting the order of plugins
- Creating mixins with PostCSS
- Looping content with PostCSS
- Summary
- 3. Nesting Rules
- Navigating through pages
- Transitioning to using PostCSS plugins
- Exploring the pitfalls of nesting
- Making the switch to BEM
- Exploring our changes in more detail
- Summary
- 4. Building Media Queries
- Exploring custom media queries in PostCSS
- Making images responsive
- Adding responsive text support
- Optimizing media queries
- Retrofitting support for older browsers
- Moving away from responsive design
- Taking things further with CSS4
- Summary
- 5. Managing Colors, Images, and Fonts
- Managing fonts with PostCSS
- Creating image sprites
- Working with SVG in PostCSS
- Adding support for WebP images
- Manipulating colors and color palettes
- Creating color functions with PostCSS
- Summary
- 6. Creating Grids
- Creating an example with Bourbon Neat
- Exploring the grid plugins in PostCSS
- Transitioning to using PostCSS-Neat
- Creating a site using Neat and PostCSS
- Adding responsive capabilities
- Summary
- 7. Animating Elements
- Moving away from jQuery
- Making use of pre-built libraries
- Switching to using SASS
- Making the switch to PostCSS
- Exploring plugin options within PostCSS
- Updating code to use PostCSS
- Creating a demo in PostCSS
- Optimizing our animations
- Using our own animation plugin
- Summary
- 8. Creating PostCSS Plugins
- Dissecting the architecture of a standard plugin
- Creating an transition plugin
- Building a custom font plugin
- Simplifying the development process
- Guidelines for plugin building
- Making the plugin available for use
- Summary
- 9. Working with Shortcuts, Fallbacks, and Packs
- Exploring plugin packs for PostCSS
- Adding shortcuts with Rucksack
- Linting and optimizing your code
- Providing fallback support
- Summary
- 10. Building a Custom Processor
- Exploring our processor
- Dissecting issues with our processor
- Optimizing the output
- Adding reload capabilities
- Extending our processor further
- Testing the final pre-processor
- Getting started with some hints and tips
- Introducing the CSStyle library
- Summary
- 11. Manipulating Custom Syntaxes
- Preparing our environment
- Implementing custom syntax plugins
- Parsing CSS
- Formatting the output with the API
- Highlighting our syntax code
- Summary
- 12. Mixing Preprocessors
- Exploring the conversion process
- Introducing the Pleeease library
- Compiling with other preprocessors
- Using the PreCSS library
- Converting a WordPress installation
- Setting up our environment
- Considering the conversion process
- Making changes to our code
- Compiling and testing the changes
- Summary
- 13. Troubleshooting PostCSS Issues
- Exploring some common issues
- Getting help from others
- Summary
- 14. Preparing for the Future
- Converting CSS4 styles for use
- Supporting future syntax with cssnext
- Creating plugins to provide extra CSS4 support
- Summary
- Index
The Pleeease library, available from http://pleeease.io/, is designed to simplify the use of preprocessors, and combine the benefits of using multiple tools in one library. It means we can configure it to any one of three processors, such as SASS, Less, or Stylus, in addition to PostCSS, when compiling our code. The compilation can also include all of the typical tasks we might otherwise have to do, such as generating source maps, adding vendor prefixes, and minifying the results.
The library is easy to install—in its simplest format, we can use a configuration file to compile at the command line. Alternatively, we can use any one of several plugins to hook into a task runner, such as Gulp or Grunt. Let's take a moment to explore this in more detail, beginning with installing and configuring the plugin for use.
The Pleeease library is based on Node.js; it is a cinch to install, either for use manually at the command line, or via a task runner such as Gulp. Let's make a start on getting everything set up for use:
- We'll begin by installing the Pleeease library—for this, go ahead and fire up a Node.js command prompt session, then change the working folder to our project area.
- At the prompt, enter
npm install -g pleeease-cli, then press Enter—wait for Node to complete the installation.
At this point, the Pleeease library is installed and configured for use from the command line—if Node complains of elements that need to be updated, then it may be necessary to run npm update –g n to bring your version up to date. If you are a Windows user, then there is a handy PowerShell script available at https://github.com/felixrieseberg/npm-windows-upgrade to help with this process.
Assuming we did not encounter any issues with installing Pleeease (over and above some deprecation warnings, as already mentioned), then we are now ready to use Pleeease in anger. Over the next few pages, we will take a look at compiling manually as well as using Gulp as our favored task runner. Let's begin by exploring how easy it is to perform a basic compilation at the command line using a .pleeeaserc file.
The simplest way to compile code using the Pleeease library is with a .pleeeaserc configuration file.
This resembles a (simplified) JSON file, and will look something like this:
{
  "in": ["foo.css", "bar.css"],
  "out": "baz.css",
  "browsers": ["last 3 versions", "Android 2.3"]
}
Looks pretty straightforward, doesn't it? We simply need to specify our source files (in), and what we should get (out). In this example, we've gone one step further, to specify the level of browser support needed—this is mainly to ensure that the right vendor prefixes have been applied.
This setting uses the same configuration as Autoprefixer: we can equally pass it a valid query from the Browserslist query list at https://github.com/ai/browserslist#queries.
This is a useful method for compiling if our requirements do not stretch to using a task runner, or we want to keep our processes simple. The only downside is that we can't tie in any other tasks that could be automated, such as renaming the compiled style sheet with a .min.css extension—for this, we will need to use a task runner such as Gulp.
If we do use a task runner, this opens up all kinds of possibilities, such as automating processes to resize images, renaming compiled style sheets, and checking our code for consistency. Before we do so, let's just cover a useful tip—the Pleeease site includes an online playground (available at http://pleeease.io/play/). We can use this to help familiarize ourselves with using the library before committing ourselves to compiling code for a production site:

Okay, enough chitchat: it's time to get practical, so to speak! For some, compiling at the command line might be enough, but in this modern age of automation, why spend time performing manual processes that can easily be automated?
If you haven't already guessed by now, I'm a big fan of using Node.js—my task runner of choice is Gulp. It used to be Grunt, but there is something about Gulp that I find is easier to use—I'm not sure why! Anyway, either can be used with Pleeease, so if your preference isn't Gulp, then please feel free to alter the code accordingly.
Let's work through the steps needed to use Gulp to run our compilation process:
- Fire up a Node.js command prompt session, then change the working folder to our project area.
- At the prompt, enter these commands, pressing Enter after each:
npm install gulp-pleeeaseKeep the Node.js command prompt session open—we will need it shortly.
- Extract a copy of the
T65 – using gulp-pleeeasefolder from the code download that accompanies this book to the root of our project area. - Copy the
package.jsonandgulpfile.jsfiles to the root of our project area, then copyexample.cssfrom thesrcfolder underT65 – using gulp-pleeeaseto thesrcfolder at the root of our project area. - Revert to the Node.js command prompt session, then at the prompt enter
gulpand press Enter: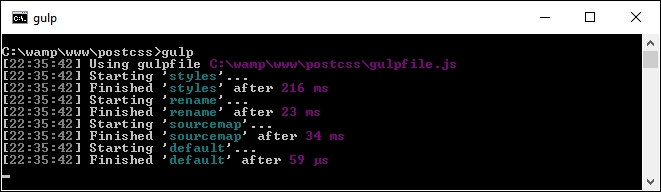
Assuming compilation is successful, Gulp will produce the now familiar files within the dest folder at the root of our project area. If we take a look at the results, we should see that it has minified the file, added vendor prefixes, and converted the blue and red color attributes to their equivalent HEX values.
Let's put this technique to good use and create a simple web page as an example of how we can use Pleeease. When checking our Gulp file, we will see that we don't need to use half of the plugins we've used in previous exercises, as Pleeease adds that support from within its plugin.
Throughout many of the demos in this book, we've had to import a series of plugins to manage different tasks such as minifying code, or checking it for consistency.
There is nothing technically wrong with this approach, but it is inefficient—after all, why use six tools when one will suffice, so to speak? We've tried to maintain a one plugin—one job rule throughout the book, so why are we breaking with convention?
The great thing about using Pleeease is that it already contains support for some of these tasks that would otherwise require separate plugins; this means we can remove some of the plugins referenced in the Gulp task file. Pleeease is simply a layer that abstracts support for six other plugins through one common interface.
Let's put that to use in the form of compiling styles for a simple web page:
Let's make a start:
- We'll start, as always, by extracting a copy of the
TXX – creating a page using pleeeasefolder from the code download that accompanies this book; save it to the root of our project area. - From the
css – completed versionfolder, copy thestyles – pre compile.cssfile to thesrcfolder at the root of our project area; rename itstyles.css. - Copy the
gulpfile.jsandpackage.jsonfiles from the root of thetutorialfolder to the root of the project area—these should replace any already present at the root of our project area. - Fire up a Node.js command prompt session, then change the working folder to the project area.
- At the prompt, type
gulpthen press Enter—Pleeease will now go away and compile our code, and spit out valid style sheet files in thedestfolder at the root of our project area. - Once completed, copy the contents of the
destfolder to thecssfolder within thetutorialfolder.
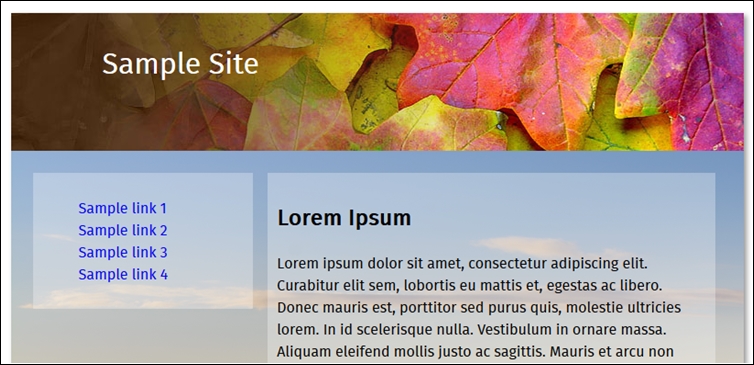
If we try previewing the results of our work by double-clicking on webpage.html, we should see a web page appear, similar to the screenshot at the start of this demo. The real proof, though, is in the Gulp task file—in comparison to other examples we've created in earlier demos, we've managed to remove one task completely, and reduce the number of plugins referenced by over half!