Table of Contents for
Mastering PostCSS for Web Design
 Mastering PostCSS for Web Design
Published by
Packt Publishing, 2016
Mastering PostCSS for Web Design
Published by
Packt Publishing, 2016
- Cover
- Table of Contents
- Mastering PostCSS for Web Design
- Mastering PostCSS for Web Design
- Credits
- About the Author
- About the Reviewer
- www.PacktPub.com
- Preface
- What you need for this book
- Who this book is for
- Conventions
- Reader feedback
- Customer support
- 1. Introducing PostCSS
- Introducing PostCSS
- Setting up a development environment
- Creating a simple example using PostCSS
- Linting code using plugins
- Exploring how PostCSS works
- Summary
- 2. Creating Variables and Mixins
- Creating a hover effect example
- Transitioning to using PostCSS
- Adding variable support to PostCSS
- Updating our hover effect demo
- Setting the order of plugins
- Creating mixins with PostCSS
- Looping content with PostCSS
- Summary
- 3. Nesting Rules
- Navigating through pages
- Transitioning to using PostCSS plugins
- Exploring the pitfalls of nesting
- Making the switch to BEM
- Exploring our changes in more detail
- Summary
- 4. Building Media Queries
- Exploring custom media queries in PostCSS
- Making images responsive
- Adding responsive text support
- Optimizing media queries
- Retrofitting support for older browsers
- Moving away from responsive design
- Taking things further with CSS4
- Summary
- 5. Managing Colors, Images, and Fonts
- Managing fonts with PostCSS
- Creating image sprites
- Working with SVG in PostCSS
- Adding support for WebP images
- Manipulating colors and color palettes
- Creating color functions with PostCSS
- Summary
- 6. Creating Grids
- Creating an example with Bourbon Neat
- Exploring the grid plugins in PostCSS
- Transitioning to using PostCSS-Neat
- Creating a site using Neat and PostCSS
- Adding responsive capabilities
- Summary
- 7. Animating Elements
- Moving away from jQuery
- Making use of pre-built libraries
- Switching to using SASS
- Making the switch to PostCSS
- Exploring plugin options within PostCSS
- Updating code to use PostCSS
- Creating a demo in PostCSS
- Optimizing our animations
- Using our own animation plugin
- Summary
- 8. Creating PostCSS Plugins
- Dissecting the architecture of a standard plugin
- Creating an transition plugin
- Building a custom font plugin
- Simplifying the development process
- Guidelines for plugin building
- Making the plugin available for use
- Summary
- 9. Working with Shortcuts, Fallbacks, and Packs
- Exploring plugin packs for PostCSS
- Adding shortcuts with Rucksack
- Linting and optimizing your code
- Providing fallback support
- Summary
- 10. Building a Custom Processor
- Exploring our processor
- Dissecting issues with our processor
- Optimizing the output
- Adding reload capabilities
- Extending our processor further
- Testing the final pre-processor
- Getting started with some hints and tips
- Introducing the CSStyle library
- Summary
- 11. Manipulating Custom Syntaxes
- Preparing our environment
- Implementing custom syntax plugins
- Parsing CSS
- Formatting the output with the API
- Highlighting our syntax code
- Summary
- 12. Mixing Preprocessors
- Exploring the conversion process
- Introducing the Pleeease library
- Compiling with other preprocessors
- Using the PreCSS library
- Converting a WordPress installation
- Setting up our environment
- Considering the conversion process
- Making changes to our code
- Compiling and testing the changes
- Summary
- 13. Troubleshooting PostCSS Issues
- Exploring some common issues
- Getting help from others
- Summary
- 14. Preparing for the Future
- Converting CSS4 styles for use
- Supporting future syntax with cssnext
- Creating plugins to provide extra CSS4 support
- Summary
- Index
So far, we've covered the basics of setting up and using PostCSS. It's worth taking a moment to learn about how it works, to better understand how we can use it and develop our own plugins for the platform.
PostCSS is like me on a Saturday morning after a good night out: it does nothing! Yes, it's true, by itself, the application doesn't do anything at all; it's when we add plugins into the mix that it starts to become useful.
The key to PostCSS is treating it as an enabler, it is not meant as a direct replacement for your existing preprocessor, or even postprocessor, but to complement them. It works on the basis of parsing code, processing it with any assigned plugins, and rendering the results:
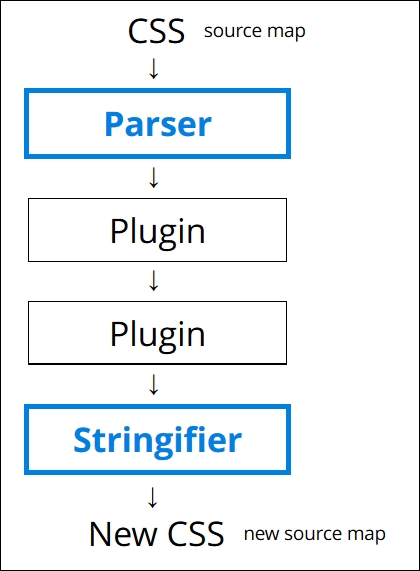
It works by parsing content into an Abstract Syntax Tree (or AST) with a series of nodes. Each node in the tree contains a symbolic representation of an element in your code. In other words, if you had a condition statement that pointed to three possible outcomes, then the AST would have a single node, with three branches representing the possible outcomes.
Note
For an example of an AST, take a look at http://jointjs.com/demos/javascript-ast, which shows the breakdown of a simple arithmetic function using plain JavaScript.
Our AST is then sent through one or more plugins (we must always use one plugin, but can have many in our gulp file). It then converts the code to a long string, before processing it through any assigned plugins and spitting out the result in the form of valid CSS. We can use this as a basis for creating our own plugins, using the boilerplate code and API that are both available from the main PostCSS site on GitHub.
The trick to the plugin stage is in the mix of plugins we must use to satisfy our needs; the better ones should only perform one role. Any that perform multiple tasks are less ideal, as they are likely to contain excess functionality that we don't need in our projects.
Assuming we decided to use PostCSS, there is almost always one question at the top of everyone's mind: how do we make the move?
In short, the key here is not to simply assume existing code can be put through the PostCSS process, as it will likely not work. Instead, we should take an iterative process, and begin to convert low-hanging fruit to using PostCSS. The process will of course require some work, but there are tips on how we can reduce the pain involved in making the switch to PostCSS.
The key to making the transfer is to work out what functionality needs to be processed, then to create the initial framework for a build process (for example, a Gulp or Grunt task file), then to gradually add in plugin support one by one, until you have a fully working compiler.
We can take this a step further, and use plugins that replicate SASS code format into PostCSS; an ideal plugin to start with is Autoprefixer, followed by plugins such as postcss-mixins or postcss-partial-import. We will explore using SASS as a basis for a custom syntax in Chapter 11, Manipulating Custom Syntaxes, where we will use these two plugins, and more, to help make the transition process easier and help remove the dependencies on preprocessors such as SASS or Less. Oh, and above all, being based on JavaScript makes it portable; what more could a developer ask for, I wonder?
Note
Many of the SASS format plugins for PostCSS now come in the PreCSS pack. We will explore using this in Chapter 10, Building a Custom Preprocessor.
Okay, on we go. Over the course of the next few chapters, we will take a look at different processor elements that are commonly used to create build processors, such as variables or mixins. We'll see how they might typically be written in processors such as SASS or Less, then work on converting our code to use PostCSS equivalents before processing to produce valid CSS. We will then finish up with pulling everything together to build your own custom processor for use in future projects.