Table of Contents for
Mastering PostCSS for Web Design
 Mastering PostCSS for Web Design
Published by
Packt Publishing, 2016
Mastering PostCSS for Web Design
Published by
Packt Publishing, 2016
- Cover
- Table of Contents
- Mastering PostCSS for Web Design
- Mastering PostCSS for Web Design
- Credits
- About the Author
- About the Reviewer
- www.PacktPub.com
- Preface
- What you need for this book
- Who this book is for
- Conventions
- Reader feedback
- Customer support
- 1. Introducing PostCSS
- Introducing PostCSS
- Setting up a development environment
- Creating a simple example using PostCSS
- Linting code using plugins
- Exploring how PostCSS works
- Summary
- 2. Creating Variables and Mixins
- Creating a hover effect example
- Transitioning to using PostCSS
- Adding variable support to PostCSS
- Updating our hover effect demo
- Setting the order of plugins
- Creating mixins with PostCSS
- Looping content with PostCSS
- Summary
- 3. Nesting Rules
- Navigating through pages
- Transitioning to using PostCSS plugins
- Exploring the pitfalls of nesting
- Making the switch to BEM
- Exploring our changes in more detail
- Summary
- 4. Building Media Queries
- Exploring custom media queries in PostCSS
- Making images responsive
- Adding responsive text support
- Optimizing media queries
- Retrofitting support for older browsers
- Moving away from responsive design
- Taking things further with CSS4
- Summary
- 5. Managing Colors, Images, and Fonts
- Managing fonts with PostCSS
- Creating image sprites
- Working with SVG in PostCSS
- Adding support for WebP images
- Manipulating colors and color palettes
- Creating color functions with PostCSS
- Summary
- 6. Creating Grids
- Creating an example with Bourbon Neat
- Exploring the grid plugins in PostCSS
- Transitioning to using PostCSS-Neat
- Creating a site using Neat and PostCSS
- Adding responsive capabilities
- Summary
- 7. Animating Elements
- Moving away from jQuery
- Making use of pre-built libraries
- Switching to using SASS
- Making the switch to PostCSS
- Exploring plugin options within PostCSS
- Updating code to use PostCSS
- Creating a demo in PostCSS
- Optimizing our animations
- Using our own animation plugin
- Summary
- 8. Creating PostCSS Plugins
- Dissecting the architecture of a standard plugin
- Creating an transition plugin
- Building a custom font plugin
- Simplifying the development process
- Guidelines for plugin building
- Making the plugin available for use
- Summary
- 9. Working with Shortcuts, Fallbacks, and Packs
- Exploring plugin packs for PostCSS
- Adding shortcuts with Rucksack
- Linting and optimizing your code
- Providing fallback support
- Summary
- 10. Building a Custom Processor
- Exploring our processor
- Dissecting issues with our processor
- Optimizing the output
- Adding reload capabilities
- Extending our processor further
- Testing the final pre-processor
- Getting started with some hints and tips
- Introducing the CSStyle library
- Summary
- 11. Manipulating Custom Syntaxes
- Preparing our environment
- Implementing custom syntax plugins
- Parsing CSS
- Formatting the output with the API
- Highlighting our syntax code
- Summary
- 12. Mixing Preprocessors
- Exploring the conversion process
- Introducing the Pleeease library
- Compiling with other preprocessors
- Using the PreCSS library
- Converting a WordPress installation
- Setting up our environment
- Considering the conversion process
- Making changes to our code
- Compiling and testing the changes
- Summary
- 13. Troubleshooting PostCSS Issues
- Exploring some common issues
- Getting help from others
- Summary
- 14. Preparing for the Future
- Converting CSS4 styles for use
- Supporting future syntax with cssnext
- Creating plugins to provide extra CSS4 support
- Summary
- Index
In our journey through manipulating colors using PostCSS, we've so far seen how to define colors using palettes—this may work in some instances, but there will be occasions when we need to specify a color that doesn't feature in a palette.
We can always try to specify the value manually, but what happens if we need to alter it? Do we try to find every instance of it, and risk the possibility of missing an instance?
The answer is no. Instead, we can use the postcss-color-function plugin to create our colors dynamically; we can then assign the resulting value to a variable if we find ourselves frequently using this color. We can use this route to produce some nice shades of colors, so let's get stuck in and explore using this plugin in more detail.
A useful facility within most CSS preprocessors is the ability to create new colors dynamically, we can do this either by adjusting a color channel, or applying a filter effect to the color, such as making it darker:

The benefit of this is simple, it allows us to reduce the number of base colors we assign by default; the remaining colors can be created automatically. If we need to change one of our base colors, then any colors created dynamically should still work.
Thankfully, we can achieve the same effects within PostCSS, to do this, we need to make use of the postcss-color-function plugin, available from https://github.com/postcss/postcss-color-function. We'll also be using the css-color-converter plugin, to help manage conversion between different color formats.
Let's explore this in more detail with a simple demo:
- We start by extracting a copy of the
Tutorial25folder from within the code download that accompanies this book—go ahead and save this to our project area. - If the project area already has a
package.jsonand/or agulpfile.jspresent, then remove them; replace them with the files from within theTutorial25folder. - Although we have the right configuration files in place, we still need to install the plugin—go ahead and fire up a Node.js command prompt session, then change the working folder to our project area.
- At the prompt, enter these commands, pressing Enter after each:
npm install postcss-color-function --save-dev
npm install css-color-converter --save-dev
- At this point, we can now go ahead and compile our style sheet—look for
styles – pre-compile.cssfrom within thecss – completed versionsubfolder, and save it to thesrcfolder within our project area asstyle.css. - Switch to the Node.js command prompt from earlier, then enter
gulpat the prompt and press Enter. - If all is well, we should see the by now compiled style sheets appear (both uncompressed and minified), along with the source map in the
destfolder. Copy the contents of this folder to thecssfolder within theTutorial25folder.
Try previewing the results within a browser, if the compilation was successful, we should see four boxes with different shades of red appear, as shown at the start of this exercise. The question is though, we've seen the results appear, but how does PostCSS know to create these colors?
It's a good question, the conversion process is very simple; the trick to it, though, lies not within compiling, but working out how to achieve the color! Odd as it may seem, choosing the color isn't as easy as it looks; let me explain more:
The compilation process is, like other PostCSS plugins, very easy to configure—we begin of course with creating a variable that defines the color-function plugin:
var colorfunction = require('postcss-color-function');Next up, we add a reference to our principal gulp task, here we've used both autoprefixer and the color-function plugin together, but the former isn't strictly needed, as we're not adding any vendor prefixes:
gulp.task('autoprefixer', function() {
  return gulp.src('src/*.css')
    .pipe(postcss([  autoprefixer, colorfunction() ]))
    .pipe(gulp.dest('dest/'));
});
The real magic, though, is in the colors we assign within our style sheet—our first box is a control, with a standard red color:
#box0 { background-color: #ff0000; }Next up, we're adding a tint of 60% to box1, which has the effect of turning it a light pink:
#box1 { background-color: color(red tint(60%)); }
Box2 goes the other way, even though we've used a lightness filter (where you might expect a similar result as box1), the negative number makes it a brown-red color:
#box2 { background-color: color(red lightness(-20%)); }The final box, box3, continues the brown theme from box2, but makes it lighter. Note though, that in the comment, this shade is what would be produced if we had applied a sepia tone:
#box3 { background-color: sepia(red, 0.7);}The question is, how would we know that this is indeed a sepia filter being applied?
At face value, it looks like we've selected red, then altered each channel by a specific amount to get the final result.
A drawback of using this plugin is that it doesn't have functions to support all of the equivalent CSS3 filters available today; it does mean we have to be resourceful, and calculate what the color should be directly. We will be able to change that in the next demo—there will be occasions when we need to create our own custom filters; a good example is sepia. It does mean more work upfront, but it allows us to then call a sepia() function by name, rather than approximate the final result.
If you struggle to find what a color should be once a filter is applied, take a look at http://jackiebalzer.com/color; this is a great site that allows us to choose a color and see what the results are when filters are applied. It is written for SASS, but the end result will be identical for PostCSS. A site such as ColorHexa.com (http://www.colorhexa.com) is a good help too, we can use it to verify what color values should be when a filter has been applied.
On we go. We discovered during our exercise that the postcss-color-function plugin doesn't cover all of the CSS3 filters that we can use in CSS; for the sepia example, we had to assign a calculated color value, rather than applying a filter effect. Let's fix that now. With a bit of upfront rework to our demo, we can create our own custom functions. It means that if, for example, we want a sepia effect, then we can call sepia(), rather than calculate what the final color should be!
In our previous demo, we took a look at programmatically changing colors—this is a function that has been present in most CSS processors (such as SASS or Less) for some time.
There may be occasions where we require a finer degree of control over changing colors, and that simply using existing functions provided by the postcss-color-function plugin isn't sufficient, or that the desired filter isn't available. If we're feeling inclined, we can create our own color functions; for this, we can use the postcss-functions plugin, available from https://github.com/andyjansson/postcss-functions, to expose the use of JavaScript functions in our task file.
It's worth noting, though, that if a CSS3 filter doesn't exist, then most can be created using a combination of different calculations (such as the sepia example from the previous demo). This may technically work okay, but it is easier to simply reference a sepia filter by name, rather than work out that #box3 has a sepia effect applied!
I feel a demo coming on, so without further ado, here's a screenshot of what we're going to create:

In short, we're using a standard shade of red (#ff0000, just to be clear!), and calculating various shades using a tint, darken, or sepia filter.
Let's take a look at how to create these colors in more detail:
- We'll start by extracting a copy of the
Tutorial26folder from the code download that accompanies this book; save it to the root of our project area. - Next, go ahead and remove any copies of
gulpfile.jsandpackage.jsonfrom the root of our project area. - From the
Tutorial26folder, copy bothpackage.jsonandgulpfile.jsto the root of our project area. - With these files in place, we still need to install the plugins. In a Node.js command prompt window, change the working folder to our project, then enter these commands, and press Enter after each:
npm install postcss-functions --save-dev
npm install css-color-converter --save-dev
- From the
Tutorial26folder, copystyle – pre-compile.cssto thesrcfolder in the project area; rename it tostyle.css. - Revert back to the Node.js command prompt window, then at the prompt, enter
gulpand press Enter. - If all is well, we should see a source map and two compiled style sheets appear in the
destfolder; copy these to thecssfolder within theTutorial26folder. - Try running the demo in a browser. If all is well, we should see four boxes appear, with various shades of red, as shown at the start of this exercise.
If we take a look at the contents of the gulp task file in more detail, it will look larger than previous exercises; it might look like we're doing more, but in reality, a lot of it we've already seen before, in earlier demos. Let's take a look at it in more detail.
If we open up our gulp task file, we can see it contains a number of functions, along with tasks that we've used in previous demos, such as lint-styles. The key in this demo is the three color functions, along with the main part of the autoprefixer task.
Let's start with the color functions, using darkenColor as our example:
function darkenColor (value, frac) {
  var darken = 1 - parseFloat(frac);
  var rgba = color(value).toRgbaArray();
  var r = rgba[0] * darken;
  var g = rgba[1] * darken;
  var b = rgba[2] * darken;
  return color([r,g,b]).toHexString();
}
We begin by extracting the decimal value, then subtracting it (as frac) from 1. This gives us our adjust value, or the value by how much we will darken our colors. Next up, we convert the color used (in this case, red) to a valid RGBA value, and split it into the RGBA array. We then multiply each array value from rgba by the darken value, and reform it as a valid color, before converting it to a HEX value.
Once each function has been created, we can then reference it from our gulp task, as shown:
gulp.task('autoprefixer', function() {
  return gulp.src('src/*.css')
  .pipe(postcss([  autoprefixer, functions({
    functions: {
      tint: tintColor,
      darken: darkenColor,
      sepia: sepiaColor
    }
  })
  ]))
  .pipe(gulp.dest('dest/'));
});
All of the functions use a similar process, but the main calculations that use the values from the rgba[] array, such as adding a tint (tintColor), or working in a sepia effect (sepiaColor), will be different.
The question you may ask though, is where do we get the calculations from? Well, there are plenty of sources available on the Internet, such as this link on Stack Overflow: http://stackoverflow.com/questions/6615002/given-an-rgb-value-how-do-i-create-a-tint-or-shade. Another alternative that may be worth a look is on Chris Coyier's CSS Tricks site, at https://css-tricks.com/snippets/javascript/lighten-darken-color/. In reality though, the best site I've seen so far is in the CamanJS library, at http://www.camanjs.com; the examples in this demo are based on the functions available from this library at http://camanjs.com/docs/filters.html.
Tip
A useful little tip, if you want to check what color values should be displayed for a particular tint or shade, is to check out http://highintegritydesign.com/tools/tinter-shader/.
A key question we must ask at this stage is "why should we go through the effort of creating individual functions, when we could easily use a library such as CamanJS?"
Well, there are some key reasons for taking the route that we used in our demo:
- CamanJS is a great library, and produces some wonderful effects, but it is an external dependency; we run the risk that development may be discontinued in the future, which might have an impact on our code.
- Using PostCSS means that we can remove the dependency on external libraries, we are in control over which effects should be included, and which are surplus to requirements. If we use a library such as
CamanJS, then we may be forced to include lots of extra baggage that unnecessarily inflates our code. - Not every browser will support standard CSS3 filters—using PostCSS gives us an opportunity to design our own filters that can apply similar effects.
- We can always use existing processors, such as SASS, but again we have a dependency on an external library; using PostCSS means we can still apply the same principles, but without the dependency.
The key here, though, is that filter support in browsers is very good, save for IE—we should always consider using CSS3 filters first, but can look to create an IE-specific style sheet that allows us to use our own versions from within PostCSS.
Creating filters with PostCSS shouldn't be all boring though, we can absolutely have some fun with filters! A quick and easy way to apply some additional style to an image is through the use of Instagram filters—thankfully there is a pre-built plugin we can use for this purpose.
Enter the Instagram plugin, available from https://github.com/azat-io/postcss-instagram. Let's get stuck in and create a simple demo:
- We'll begin, as always, by extracting a copy of the
Tutorial27folder from the code download that accompanies this book—save this to the project area. - Next, extract copies of
gulpfile.jsandpackage.json, replace any that are stored at the root of our project area, with these new copies. - We now need to install the
postcss-instagramplugin, so go ahead and fire up a Node.js command prompt session, then change the working folder to our project area. - At the prompt, go ahead and enter this command, then press Enter:
npm install postcss-instagram --save-dev - Copy the
style – pre-compile.cssfile to thesrcfolder at the root of our project area, then rename it asstyle.css. - Once the plugin is installed, enter
gulpat the prompt, then press Enter. - PostCSS will go away and compile our code, if all is well, we should see the usual files appear in the
destfolder; copy these to thecssfolder within theTutorial27folder.
At this point, if we try to preview the results in a browser, we should see something akin to this screenshot:
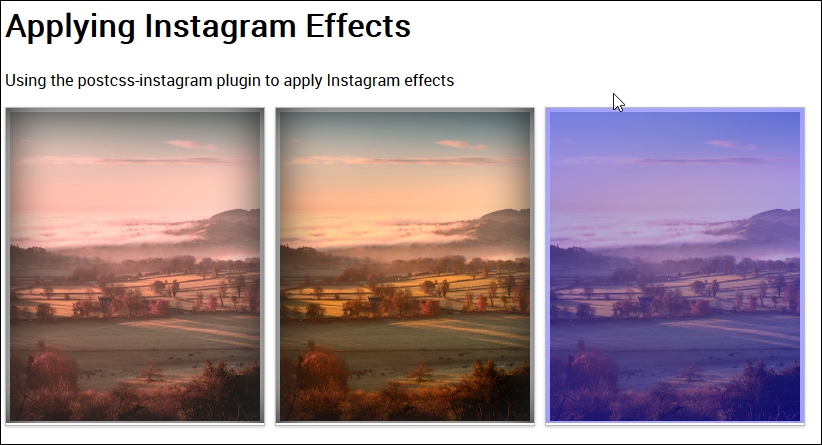
The key to this is in the main CSS style sheet, we can apply the required filter using nothing more than this within the rule:
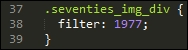
This applies the 1977 filter (one of the filters available with the plugin). If we take a look at the compiled code, we can see that the plugin has added some additional rules; one to take care of creating the filter, and two to take care of positioning the filter on top of the image.
If we take a look at the compiled code, we can see the changes made by the plugin:
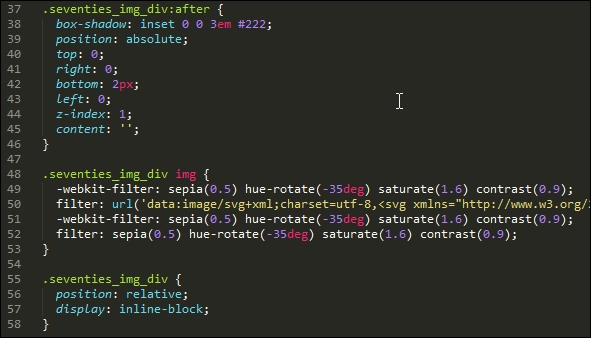
If you really want to get into the depths, then it's worth taking a look at the source code for this plugin, at https://github.com/azat-io/postcss-instagram/blob/master/index.js. It is fairly complex, but if you look carefully, you can see signs of the filter code that is used to apply the effect to our images.