Table of Contents for
Mastering PostCSS for Web Design
 Mastering PostCSS for Web Design
Published by
Packt Publishing, 2016
Mastering PostCSS for Web Design
Published by
Packt Publishing, 2016
- Cover
- Table of Contents
- Mastering PostCSS for Web Design
- Mastering PostCSS for Web Design
- Credits
- About the Author
- About the Reviewer
- www.PacktPub.com
- Preface
- What you need for this book
- Who this book is for
- Conventions
- Reader feedback
- Customer support
- 1. Introducing PostCSS
- Introducing PostCSS
- Setting up a development environment
- Creating a simple example using PostCSS
- Linting code using plugins
- Exploring how PostCSS works
- Summary
- 2. Creating Variables and Mixins
- Creating a hover effect example
- Transitioning to using PostCSS
- Adding variable support to PostCSS
- Updating our hover effect demo
- Setting the order of plugins
- Creating mixins with PostCSS
- Looping content with PostCSS
- Summary
- 3. Nesting Rules
- Navigating through pages
- Transitioning to using PostCSS plugins
- Exploring the pitfalls of nesting
- Making the switch to BEM
- Exploring our changes in more detail
- Summary
- 4. Building Media Queries
- Exploring custom media queries in PostCSS
- Making images responsive
- Adding responsive text support
- Optimizing media queries
- Retrofitting support for older browsers
- Moving away from responsive design
- Taking things further with CSS4
- Summary
- 5. Managing Colors, Images, and Fonts
- Managing fonts with PostCSS
- Creating image sprites
- Working with SVG in PostCSS
- Adding support for WebP images
- Manipulating colors and color palettes
- Creating color functions with PostCSS
- Summary
- 6. Creating Grids
- Creating an example with Bourbon Neat
- Exploring the grid plugins in PostCSS
- Transitioning to using PostCSS-Neat
- Creating a site using Neat and PostCSS
- Adding responsive capabilities
- Summary
- 7. Animating Elements
- Moving away from jQuery
- Making use of pre-built libraries
- Switching to using SASS
- Making the switch to PostCSS
- Exploring plugin options within PostCSS
- Updating code to use PostCSS
- Creating a demo in PostCSS
- Optimizing our animations
- Using our own animation plugin
- Summary
- 8. Creating PostCSS Plugins
- Dissecting the architecture of a standard plugin
- Creating an transition plugin
- Building a custom font plugin
- Simplifying the development process
- Guidelines for plugin building
- Making the plugin available for use
- Summary
- 9. Working with Shortcuts, Fallbacks, and Packs
- Exploring plugin packs for PostCSS
- Adding shortcuts with Rucksack
- Linting and optimizing your code
- Providing fallback support
- Summary
- 10. Building a Custom Processor
- Exploring our processor
- Dissecting issues with our processor
- Optimizing the output
- Adding reload capabilities
- Extending our processor further
- Testing the final pre-processor
- Getting started with some hints and tips
- Introducing the CSStyle library
- Summary
- 11. Manipulating Custom Syntaxes
- Preparing our environment
- Implementing custom syntax plugins
- Parsing CSS
- Formatting the output with the API
- Highlighting our syntax code
- Summary
- 12. Mixing Preprocessors
- Exploring the conversion process
- Introducing the Pleeease library
- Compiling with other preprocessors
- Using the PreCSS library
- Converting a WordPress installation
- Setting up our environment
- Considering the conversion process
- Making changes to our code
- Compiling and testing the changes
- Summary
- 13. Troubleshooting PostCSS Issues
- Exploring some common issues
- Getting help from others
- Summary
- 14. Preparing for the Future
- Converting CSS4 styles for use
- Supporting future syntax with cssnext
- Creating plugins to provide extra CSS4 support
- Summary
- Index
Adding a reload capability reduces the amount of time spent manually reloading our pages after a code change; the latter can be a real pain, especially when working with complex CSS styles!
The downside to this is that it only works in Chrome—if this isn't an issue, then these are the steps you would need to follow to make this work:
- We'll start by extracting copies of the
gulpfile.jsandpackage.jsonfiles from theT53 – adding livereload capabilitiesfolder, from the code download that accompanies this book. Save both copies to the root of our project area. - From the same
T53 – adding livereload capabilitiesfolder, extract and save a copy of thestyle.cssfile from thesrcfolder within, to thesrcfolder at the root of our project area. - Fire up a Node.js command prompt, then change the working folder to our project area.
- In the prompt, enter
npm install gulp-livereload –save-devand press Enter—let this install. - Download and install the Chrome applet for LiveReload from http://bit.ly/IKI2MY.
- Add this line at the end of the
sourcemaptask:.pipe(plugins.livereload());
- Remove the semi-colon at the end of line 60.
- Add this line to our
watchtask:plugins.livereload.listen();
- Our task file will look like this, with the changes made at lines 61 and 68:
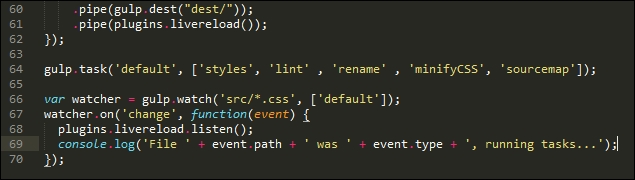
At this point, we can test to ensure it works by making a change to our style sheet—if all is well, Gulp will kick in and recompile our code; if we have a site open in a browser that we're developing, then this would be automatically reloaded by the plugin.
Note
For those of you interested in using this plugin in more detail, please refer to the documentation available on the GitHub site at https://github.com/vohof/gulp-livereload. There is a full version of the code used in this example, within the T53 - adding livereload capabilities folder in the code download that accompanies this book.
Right, onwards we go! We're almost at the end of our journey through the art of the possible; before we move onto testing our processor, I thought I would leave you with a few more ideas that you may like to consider using in your processors. All of them should install using the same process that we've seen throughout this book.