Table of Contents for
Mastering PostCSS for Web Design
 Mastering PostCSS for Web Design
Published by
Packt Publishing, 2016
Mastering PostCSS for Web Design
Published by
Packt Publishing, 2016
- Cover
- Table of Contents
- Mastering PostCSS for Web Design
- Mastering PostCSS for Web Design
- Credits
- About the Author
- About the Reviewer
- www.PacktPub.com
- Preface
- What you need for this book
- Who this book is for
- Conventions
- Reader feedback
- Customer support
- 1. Introducing PostCSS
- Introducing PostCSS
- Setting up a development environment
- Creating a simple example using PostCSS
- Linting code using plugins
- Exploring how PostCSS works
- Summary
- 2. Creating Variables and Mixins
- Creating a hover effect example
- Transitioning to using PostCSS
- Adding variable support to PostCSS
- Updating our hover effect demo
- Setting the order of plugins
- Creating mixins with PostCSS
- Looping content with PostCSS
- Summary
- 3. Nesting Rules
- Navigating through pages
- Transitioning to using PostCSS plugins
- Exploring the pitfalls of nesting
- Making the switch to BEM
- Exploring our changes in more detail
- Summary
- 4. Building Media Queries
- Exploring custom media queries in PostCSS
- Making images responsive
- Adding responsive text support
- Optimizing media queries
- Retrofitting support for older browsers
- Moving away from responsive design
- Taking things further with CSS4
- Summary
- 5. Managing Colors, Images, and Fonts
- Managing fonts with PostCSS
- Creating image sprites
- Working with SVG in PostCSS
- Adding support for WebP images
- Manipulating colors and color palettes
- Creating color functions with PostCSS
- Summary
- 6. Creating Grids
- Creating an example with Bourbon Neat
- Exploring the grid plugins in PostCSS
- Transitioning to using PostCSS-Neat
- Creating a site using Neat and PostCSS
- Adding responsive capabilities
- Summary
- 7. Animating Elements
- Moving away from jQuery
- Making use of pre-built libraries
- Switching to using SASS
- Making the switch to PostCSS
- Exploring plugin options within PostCSS
- Updating code to use PostCSS
- Creating a demo in PostCSS
- Optimizing our animations
- Using our own animation plugin
- Summary
- 8. Creating PostCSS Plugins
- Dissecting the architecture of a standard plugin
- Creating an transition plugin
- Building a custom font plugin
- Simplifying the development process
- Guidelines for plugin building
- Making the plugin available for use
- Summary
- 9. Working with Shortcuts, Fallbacks, and Packs
- Exploring plugin packs for PostCSS
- Adding shortcuts with Rucksack
- Linting and optimizing your code
- Providing fallback support
- Summary
- 10. Building a Custom Processor
- Exploring our processor
- Dissecting issues with our processor
- Optimizing the output
- Adding reload capabilities
- Extending our processor further
- Testing the final pre-processor
- Getting started with some hints and tips
- Introducing the CSStyle library
- Summary
- 11. Manipulating Custom Syntaxes
- Preparing our environment
- Implementing custom syntax plugins
- Parsing CSS
- Formatting the output with the API
- Highlighting our syntax code
- Summary
- 12. Mixing Preprocessors
- Exploring the conversion process
- Introducing the Pleeease library
- Compiling with other preprocessors
- Using the PreCSS library
- Converting a WordPress installation
- Setting up our environment
- Considering the conversion process
- Making changes to our code
- Compiling and testing the changes
- Summary
- 13. Troubleshooting PostCSS Issues
- Exploring some common issues
- Getting help from others
- Summary
- 14. Preparing for the Future
- Converting CSS4 styles for use
- Supporting future syntax with cssnext
- Creating plugins to provide extra CSS4 support
- Summary
- Index
Over the last few pages, we've explored a number of ways to improve our existing processor, as well as a few ideas for extending functionality. Although we can always keep to PostCSS plugins, we run the risk of limiting the "art of the possible", or what is available for us to use.
Sometimes, we might want to go a little further afield—creating a processor isn't just about the nitty-gritty of compiling code, but also about our working environment and the processes required to support it (at least in part). To prove this, we're going to explore installing the postcss-stats plugin as an example of how we can extend both our plugin and working environment.
This plugin helps provide useful statistics about each project as it is compiled—it's based on the CSS Stats system, and is available online at http://www.cssstats.com.
The source for this plugin is available on GitHub at https://github.com/cssstats/postcss-cssstats, and can be installed using the usual route. Let's dive in and take a look:
- We'll start by firing up a Node.js command prompt session, then changing the working directory to the root of our project area.
- We need to install the plugin, so in the prompt, enter this command and press Enter:
npm install postcss-cssstats --save-dev
Keep this open—we will need it later in the exercise.
Next, we need to update our gulpfile.js and package.json files—go ahead and extract copies of both files from the T54 - using cssstats folder in the code download that accompanies this book. Save both files to the root of our project area:
- With our files in place, we can now test that it works—go ahead and save a copy of
style.cssfrom the same folder into thesrcfolder of our project area. - Revert to the Node.js command prompt we had open earlier—in the prompt, enter
gulp, and press Enter. - PostCSS will compile our code—if all is well, we should see files appear in the now familiar
destfolder…and we should also see something akin to this screenshot: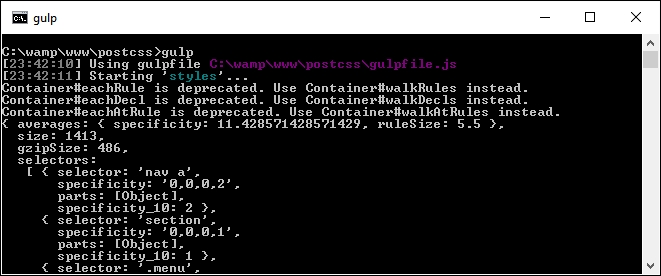
If I were a betting man (I'm not, but assume I am for this)—I would bet even odds that you're probably thinking "What on earth does all of that text mean?" Well, let me shed some light on what it all means.
In a nutshell, we've installed what is effectively a reporting system—this details a bunch of statistics about our code. It contains details about all kinds of information, including the number of selectors, colors, the level of CSS specificity, declarations, and so on. It's an easy way to get information about our code, as a means of documenting it for later use. The reason it is so easy to get the information lies in how it is configured—take a look at the gulpfile.js file; we will add a call to the plugin at the top:
var reporter = require('postcss-reporter');We can then modify the styles single task, by adding this line near the end:
    .pipe(postcss([ cssstats( function(stats) {
      console.log(stats);
    })
  ]))
  .pipe(gulp.dest('dest/'));
})
The trouble is, whilst it might be easy to get the information, it's not so easy to store it! We can absolutely improve on it; instead of getting the information via our processor, we can go directly to the source. Let's explore how to make this happen:
- We'll start by firing up a Node.js command prompt, then changing the working folder to the root of our project area.
- At the prompt, go ahead and enter
npm install gulp-stylestats --save-dev, then press Enter. - We now need to edit the
gulpfile.jsandpackage.jsonfiles we used in the previous exercise, so open thegulpfile.jsfile in a text editor, and add these lines immediately below the closing bracket of thesourcemaptask:gulp.task('stylestats', ['minifyCSS'], function () { gulp.src('dest/*.css') .pipe(stylestats({ type: 'json', outfile: true })) .pipe(gulp.dest('dest/')); }); - Next, we need to update the default task—alter it as indicated:
gulp.task('default', ['styles', 'lint', 'rename', 'minifyCSS', 'sourcemap', 'stylestats']); - Revert to the Node.js command prompt, then enter
gulpand press Enter—assuming we still have the samestyle.cssfile in thesrcfolder, we should see this appear in thedestfolder at the root of our project area:
- Whilst we clearly need to alter the parameters of our Gulp file to prevent it producing minified JSON files, we can at least see the result of the (uncompressed) JSON file. Go ahead and open it up—it will look something like this:
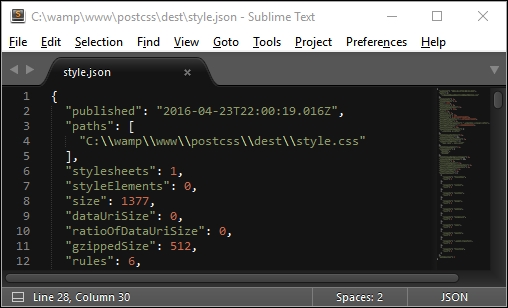
Although we're still only seeing code, we can now parse the content at will; we could, for instance, use jQuery to explore the contents and render it on screen using an appropriate style and format. I am sure you will agree though that this is a much easier way to view (and store) the information! The plugin needs minimal configuration to get started. We can use it to view any standard CSS file, once it has been through the compilation process.
Right, we now have a completed processor; hopefully, this will also include a style guide that is running, using one of the plugins we've just discussed in the previous exercise. It's time we moved on—there is one task we should complete, though, before we embark on the next stage of our journey. It's time we put our processor to the test…