Table of Contents for
Mastering PostCSS for Web Design
 Mastering PostCSS for Web Design
Published by
Packt Publishing, 2016
Mastering PostCSS for Web Design
Published by
Packt Publishing, 2016
- Cover
- Table of Contents
- Mastering PostCSS for Web Design
- Mastering PostCSS for Web Design
- Credits
- About the Author
- About the Reviewer
- www.PacktPub.com
- Preface
- What you need for this book
- Who this book is for
- Conventions
- Reader feedback
- Customer support
- 1. Introducing PostCSS
- Introducing PostCSS
- Setting up a development environment
- Creating a simple example using PostCSS
- Linting code using plugins
- Exploring how PostCSS works
- Summary
- 2. Creating Variables and Mixins
- Creating a hover effect example
- Transitioning to using PostCSS
- Adding variable support to PostCSS
- Updating our hover effect demo
- Setting the order of plugins
- Creating mixins with PostCSS
- Looping content with PostCSS
- Summary
- 3. Nesting Rules
- Navigating through pages
- Transitioning to using PostCSS plugins
- Exploring the pitfalls of nesting
- Making the switch to BEM
- Exploring our changes in more detail
- Summary
- 4. Building Media Queries
- Exploring custom media queries in PostCSS
- Making images responsive
- Adding responsive text support
- Optimizing media queries
- Retrofitting support for older browsers
- Moving away from responsive design
- Taking things further with CSS4
- Summary
- 5. Managing Colors, Images, and Fonts
- Managing fonts with PostCSS
- Creating image sprites
- Working with SVG in PostCSS
- Adding support for WebP images
- Manipulating colors and color palettes
- Creating color functions with PostCSS
- Summary
- 6. Creating Grids
- Creating an example with Bourbon Neat
- Exploring the grid plugins in PostCSS
- Transitioning to using PostCSS-Neat
- Creating a site using Neat and PostCSS
- Adding responsive capabilities
- Summary
- 7. Animating Elements
- Moving away from jQuery
- Making use of pre-built libraries
- Switching to using SASS
- Making the switch to PostCSS
- Exploring plugin options within PostCSS
- Updating code to use PostCSS
- Creating a demo in PostCSS
- Optimizing our animations
- Using our own animation plugin
- Summary
- 8. Creating PostCSS Plugins
- Dissecting the architecture of a standard plugin
- Creating an transition plugin
- Building a custom font plugin
- Simplifying the development process
- Guidelines for plugin building
- Making the plugin available for use
- Summary
- 9. Working with Shortcuts, Fallbacks, and Packs
- Exploring plugin packs for PostCSS
- Adding shortcuts with Rucksack
- Linting and optimizing your code
- Providing fallback support
- Summary
- 10. Building a Custom Processor
- Exploring our processor
- Dissecting issues with our processor
- Optimizing the output
- Adding reload capabilities
- Extending our processor further
- Testing the final pre-processor
- Getting started with some hints and tips
- Introducing the CSStyle library
- Summary
- 11. Manipulating Custom Syntaxes
- Preparing our environment
- Implementing custom syntax plugins
- Parsing CSS
- Formatting the output with the API
- Highlighting our syntax code
- Summary
- 12. Mixing Preprocessors
- Exploring the conversion process
- Introducing the Pleeease library
- Compiling with other preprocessors
- Using the PreCSS library
- Converting a WordPress installation
- Setting up our environment
- Considering the conversion process
- Making changes to our code
- Compiling and testing the changes
- Summary
- 13. Troubleshooting PostCSS Issues
- Exploring some common issues
- Getting help from others
- Summary
- 14. Preparing for the Future
- Converting CSS4 styles for use
- Supporting future syntax with cssnext
- Creating plugins to provide extra CSS4 support
- Summary
- Index
As a developer or designer, if our development workflow includes the use of SASS, then the temptation is to use mixins such as this to construct our styles:
@mixin transition ($value...) {
  @if length($value) >= 1 { // If we set value
    @include prefixer($property: transition, $value: $value);
  } @else { // If value is not set, return default value
    @include prefixer($property: transition, $value: all 0.15s ease-in 0.05s);
  }
}
There's nothing wrong with this, but it will take effort to manage our mixins if we need to use more than just a small handful! The easier option is to explore using a pre-built animation library, as a way of reducing our development effort.
There are a number of developers who have created mixin libraries to handle animations; a perfect example is the SASS port of Animate, by Geoff Graham, which is available for download at https://github.com/geoffgraham/animate.scss.
There is something, though, that we have to be mindful of when working with mixins—it's all too easy to use them to manage vendor prefixes, such as this:
@mixin prefixer($property, $value) {
  -webkit-#{$property}: $value; // Attach webkit prefix (Chrome, Safary, Some Android native browsers)
  -moz-#{$property}: $value; // Attach moz prefix (FireFox)
  -o-#{$property}: $value; // Attach o prefix (Opera)
  #{$property}: $value; // no prefix (modern browsers and latest IE versions)
}
Although it will add the relevant vendor prefixes when the code is compiled, it's not considered best practice.
The onus is on us to ensure that each animation includes all of the relevant vendor prefixes—with the best will in the world, it's a challenge to keep up! There is also the issue of adding rules that won't have any effect—for example, there is no point in adding –o as a prefix for transition; this prefix is no longer needed.
Fortunately, there is a better way to handle prefixes—we can use Autoprefixer (from https://twitter.com/autoprefixer) to automatically handle vendor prefixes for us. The great thing about Autoprefixer is that it uses the Can I Use (http://www.caniuse.com) database to keep details up to date.
There are various plugins available that allow us to use task runners such as Grunt or Gulp. We can of course use a standalone GUI-based compiler for this purpose, but why run something like this when we can tie in much more functionality when using a task runner? We can even use any one of several plugins to remove vendor prefixes, prior to running a new compilation—this will ensure any redundant prefixes are removed.
With this in mind, let's get practical. For our next demo, we're going to construct a simple gallery effect, which showcases the same animations we saw earlier, but this time using the SASS version of Animate.css. We'll use Gulp as our task runner to compile the SASS code, before adding a source map, checking our code for consistency, adding vendor prefixes, and so on. You get the idea!
Suffice to say that we can do a lot using a task runner, so without further ado, let's get started with constructing our gallery.
Animating content can be a double-edged sword. Added with care, it can really lift a site to the next level. If it is done badly, then patronage of the site is likely to drop like a stone!
In our last demo, we constructed a simple gallery effect—this was more to show off the different types of animated effects we can add, rather than produce something that would win awards. Over the next few pages, we'll continue with our demo, but this time reconfigure it to use the SASS version of Animate.css. We will also introduce the use of a task runner to compile our code—as this is a requirement for using PostCSS, it seems a perfect point to start using it, as the final part of our transition to working with animation and PostCSS.
Without further ado, let's add the changes to our previous demo:
- We need to download the SASS version of Animate—it's available from https://github.com/geoffgraham/animate.scss/archive/master.zip. Go ahead and extract the contents of
Animate.scss-masterinto thesrcfolder at the root of our project area. - In the
srcfolder, rename theAnimate.scssfile to_animate.scss—this is to indicate that it is a partial, which prevents it being compiled as a separate file by the SASS compiler. - In the
srcfolder, go ahead and rename it asstyle.scss—this changes it to a SASS file, which is required for compilation later in the exercise. We should have something akin to this screenshot in oursrcfolder: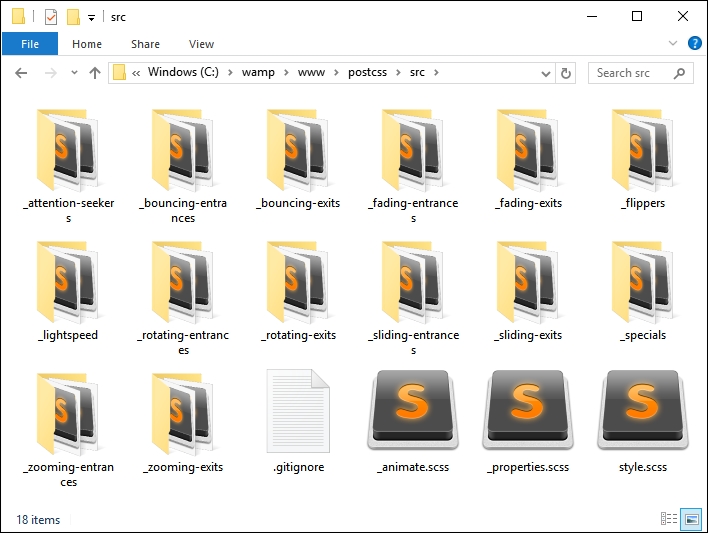
- Go ahead and open up the
style.scssfile. At the bottom, add this line at the top of the stylesheet:@import "_animate.scss";
- Next, add the following additional lines at the end of the stylesheet—these pull in the animations from the SASS version of
Animate.css; the timing has also been extended to five seconds, as the original example was too quick:.bounce { @include bounce(); } .flip { @include flip(); } .hinge { @include hinge(); } .flash { @include flash(); } .shake { @include shake(); } .swing { @include swing(); } .animated:hover { animation-duration: 5s; animation-fill-mode: both; }
- Save the file, then copy the contents of the
srcfolder underT38to thesrcfolder at the root of our project area—we will be compiling this file shortly. - In a new file, go ahead and add the following code, then save it as
gulpfile.jsto the root of our project area—this will form our gulp file, which we will use to compile our code:'use strict'; var gulp = require('gulp'); var postcss = require('gulp-postcss'); var sass = require('gulp-sass'); gulp.task('sass', function () { return gulp.src('src/*.scss') .pipe(sass().on('error', sass.logError)) .pipe(gulp.dest('dest/')); }); gulp.task('default', ['sass']); var watcher = gulp.watch('src/*.scss', ['sass']); watcher.on('change', function(event) { console.log('File ' + event.path + ' was ' + event.type + ', running tasks...'); }); - We also need a
package.jsonfile—this will store details of the plugins we will be using. For now, we will limit ourselves to usinggulp-sass, but this will soon change! Go ahead and add the following lines to a new file, saving it aspackage.jsonin the root of our project area:{ "name": "postcss", "version": "1.0.0", "description": "Configuration file for PostCSS", "main": "index.js", "scripts": { "test": "echo \"Error: no test specified\" && exit 1" }, "author": "Alex Libby", "license": "ISC", "dependencies": { "postcss": "^5.0.8" }, "devDependencies": { "gulp": "^3.9.0", "gulp-postcss": "^6.0.0", "gulp-sass": "^2.1.1" } } - The keen-eyed among you should spot that we've not installed the gulp-sass plugin. Let's fix that now by firing up a Node.js command prompt, then changing the working directory to the project area. Go ahead and run this command from the prompt:
npm install gulp-sass --save-dev - At the prompt, enter
gulpthen press Enter—Gulp will now go away and compile our file; if all is well, we should see a compiled style sheet appear in thedestfolder of our project area. - At this point, try running
animate.htmlin a browser—if all is well, we should see no change to our gallery effect, but can be safe in the knowledge that we're now using the SASS version ofAnimate.css.
Our demo has now been converted to using Animate.scss—we could easily have chosen to use any one of several compilers (such as Koala—http://www.koala-app.com), but instead chose to use Gulp. It acts as a perfect route into making the transition to using PostCSS—as we've seen in earlier demos, we've already used a task runner in the form of Gulp for this purpose. This allows us to make that gradual transition—when all of the SASS elements have been converted, we simply drop the task from within our gulp file to complete the transition.
So, what next? We've created a basic gulp task file, which we used to compile our SASS code to valid styles.
But this is just a small part of the story; we need to add a lot more to make our compilation process useful and ready for conversion to using PostCSS.
Let's get started:
- The first change we need to make is in the
package.jsonfile—go ahead and add the lines as highlighted:"cssnano": "^3.2.0", "gulp": "^3.9.0", "gulp-postcss": "^6.0.0", "gulp-rename": "^1.2.2", "gulp-sass": "^2.1.1", "gulp-sourcemaps": "^1.5.2", "postcss-reporter": "^1.3.0", "stylelint": "^2.3.7" } } - Next, we need to configure our gulp file with some additional tasks—the first task is to add references to some additional plugins that we've already used from earlier in the book. Go ahead and add the following highlighted lines:
var sass = require('gulp-sass'); var autoprefixer = require('autoprefixer'); var cssnano = require('cssnano'); var sourcemaps = require('gulp-sourcemaps'); var rename = require('gulp-rename'); var stylelint = require('stylelint'); var reporter = require('postcss-reporter'); - With the additional plugin references added, we now need to add in our extra tasks—immediately below the SASS task, add in this task; this manages the linting of our code, for consistency:
gulp.task("lint-styles", ['sass'], function() { return gulp.src("dest/*.css") .pipe(postcss([ stylelint({ "rules": { "color-no-invalid-hex": 2, "declaration-colon-space-before": [2, "never"], "indentation": [2, 2], "number-leading-zero": [2, "always"] } }), reporter({ clearMessages: true, }) ])) }); - Add this next task immediately below the previous step—this renames the files as part of the minification process:
gulp.task('rename', ['lint-styles'], function () { return gulp.src('dest/*.css') .pipe(postcss([ cssnano() ])) .pipe(rename('style.min.css')) .pipe(gulp.dest("dest/")); }); - Our next gulp task manages the generation of source maps—this can be done within SASS automatically, but using a separate plugin allows flexibility during compilation. Go ahead and add this task immediately below the previous one:
gulp.task('sourcemap', ['rename'], function () { return gulp.src('dest/*.css') .pipe(sourcemaps.init()) .pipe(sourcemaps.write('maps/')) .pipe(gulp.dest("dest/")); }); - We're almost at the end—go ahead and alter these lines as indicated:
gulp.task('default', ['sass', 'lint-styles', 'rename', 'sourcemap']); var watcher = gulp.watch('src/*.scss', ['sass', 'lint-styles', 'rename', 'sourcemap']); watcher.on('change', function(event) { console.log('File ' + event.path + ' was ' + event.type + ', running tasks...'); }); - Save the file. Go ahead and fire up a Node.js command prompt, then change the working folder to our project area.
- At the prompt, type in
gulpthen press Enter—Gulp will go away and compile our file. - If we take a look in the
destfolder, we should see the same compiledstyle.cssfile, but this time with accompanying minified versions of the source map and style sheet:
If we preview the results of our work, we should see no change in functionality within the demo, but can be safe in the knowledge that we now have minified versions of our files available for use—after all, it is always better to use minified files in a production environment!
We've now laid the groundwork for our conversion to using PostCSS—the keen-eyed among you should spot that the plugin reference for PostCSS has already been added to our gulp file, ready for the next stage in our conversion process. Everything is now in place in our gulp file, save for the SASS task – at the appropriate point we will remove the SASS task and replace it with a PostCSS equivalent; this will take place in our next exercise. Before we do so, it's worth taking a little time to explore what is available within the PostCSS ecosystem—although there isn't a great deal on offer, we can still produce usable code for compilation within PostCSS.