Table of Contents for
Mastering PostCSS for Web Design
 Mastering PostCSS for Web Design
Published by
Packt Publishing, 2016
Mastering PostCSS for Web Design
Published by
Packt Publishing, 2016
- Cover
- Table of Contents
- Mastering PostCSS for Web Design
- Mastering PostCSS for Web Design
- Credits
- About the Author
- About the Reviewer
- www.PacktPub.com
- Preface
- What you need for this book
- Who this book is for
- Conventions
- Reader feedback
- Customer support
- 1. Introducing PostCSS
- Introducing PostCSS
- Setting up a development environment
- Creating a simple example using PostCSS
- Linting code using plugins
- Exploring how PostCSS works
- Summary
- 2. Creating Variables and Mixins
- Creating a hover effect example
- Transitioning to using PostCSS
- Adding variable support to PostCSS
- Updating our hover effect demo
- Setting the order of plugins
- Creating mixins with PostCSS
- Looping content with PostCSS
- Summary
- 3. Nesting Rules
- Navigating through pages
- Transitioning to using PostCSS plugins
- Exploring the pitfalls of nesting
- Making the switch to BEM
- Exploring our changes in more detail
- Summary
- 4. Building Media Queries
- Exploring custom media queries in PostCSS
- Making images responsive
- Adding responsive text support
- Optimizing media queries
- Retrofitting support for older browsers
- Moving away from responsive design
- Taking things further with CSS4
- Summary
- 5. Managing Colors, Images, and Fonts
- Managing fonts with PostCSS
- Creating image sprites
- Working with SVG in PostCSS
- Adding support for WebP images
- Manipulating colors and color palettes
- Creating color functions with PostCSS
- Summary
- 6. Creating Grids
- Creating an example with Bourbon Neat
- Exploring the grid plugins in PostCSS
- Transitioning to using PostCSS-Neat
- Creating a site using Neat and PostCSS
- Adding responsive capabilities
- Summary
- 7. Animating Elements
- Moving away from jQuery
- Making use of pre-built libraries
- Switching to using SASS
- Making the switch to PostCSS
- Exploring plugin options within PostCSS
- Updating code to use PostCSS
- Creating a demo in PostCSS
- Optimizing our animations
- Using our own animation plugin
- Summary
- 8. Creating PostCSS Plugins
- Dissecting the architecture of a standard plugin
- Creating an transition plugin
- Building a custom font plugin
- Simplifying the development process
- Guidelines for plugin building
- Making the plugin available for use
- Summary
- 9. Working with Shortcuts, Fallbacks, and Packs
- Exploring plugin packs for PostCSS
- Adding shortcuts with Rucksack
- Linting and optimizing your code
- Providing fallback support
- Summary
- 10. Building a Custom Processor
- Exploring our processor
- Dissecting issues with our processor
- Optimizing the output
- Adding reload capabilities
- Extending our processor further
- Testing the final pre-processor
- Getting started with some hints and tips
- Introducing the CSStyle library
- Summary
- 11. Manipulating Custom Syntaxes
- Preparing our environment
- Implementing custom syntax plugins
- Parsing CSS
- Formatting the output with the API
- Highlighting our syntax code
- Summary
- 12. Mixing Preprocessors
- Exploring the conversion process
- Introducing the Pleeease library
- Compiling with other preprocessors
- Using the PreCSS library
- Converting a WordPress installation
- Setting up our environment
- Considering the conversion process
- Making changes to our code
- Compiling and testing the changes
- Summary
- 13. Troubleshooting PostCSS Issues
- Exploring some common issues
- Getting help from others
- Summary
- 14. Preparing for the Future
- Converting CSS4 styles for use
- Supporting future syntax with cssnext
- Creating plugins to provide extra CSS4 support
- Summary
- Index
Although the PostCSS ecosystem doesn't yet have a plentiful selection of animation-based plugins, this should not stop us from using it to compile our animation styles. To prove this, we're going to modify the jQuery and .add/remove class version of our previous demo—we'll use PostCSS to add an animation easing from the Animate.css library created by Dan Eden.
The plugin we require is the postcss-animation plugin, which is available from https://github.com/zhouwenbin/postcss-animation and uses the postcss-animation-data plugin from https://github.com/zhouwenbin/postcss-animation-data. It's a cinch to install the plugin, which uses the same method as all of the other plugins we've installed to date.
Let's get started on the demo:
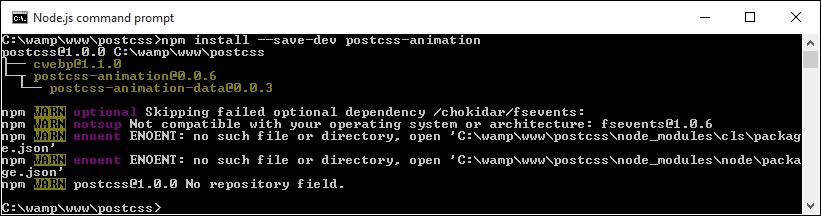
- We'll start by installing the
postcss-animationplugin—for this, go ahead and open a Node.js session, then change the working directory to our project area. - At the prompt, enter this command and press Enter:
npm install postcss-animation --save-devIf all is well, we should see the plugin install:
- From the code download that accompanies this book, extract and save a copy of the contents of the
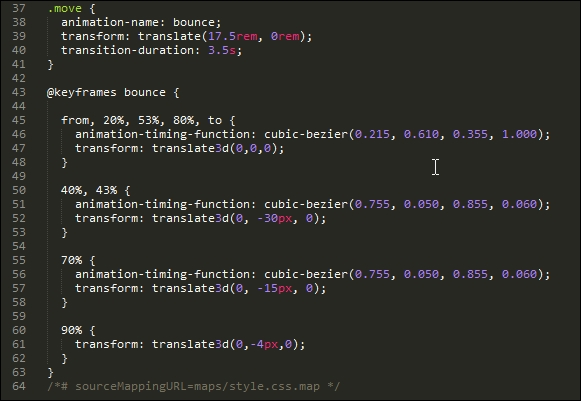
T39folder to our project area—we'll use this as a basis for converting to PostCSS. - Open
style.cssfrom thecsssub-folder of the tutorial folder, then at the bottom, modify the.moverule as indicated:.move { animation-name: bounce; transform: translate(17.5rem, 0rem); transition-duration: 3.5s; } - Save this file into the
srcfolder, then fire up a Node.js command prompt and change the working folder to our project area. - At the prompt, enter
gulpthen press Enter—if all is well, we should see these files appear in thedestfolder:
- The last step is to copy the contents of this folder into the
cssfolder within theT39folder.
At this point we're good to test our demo—if we try previewing the results of our work, we should see no change in appearance of our demo, but can be safe in the knowledge that we're now compiling our code using PostCSS.
Although we may not see any change in the appearance of our demo, there will clearly be a difference in how it behaves. To view this, we need to take a look under the covers of our demo, at the code.
For this demo, we added an animation-name property, and assigned it the name bounce; when compiled, PostCSS adds in the appropriate @keyframes rules to the code:
So, if we were to take a look at the performance, how does it compare? Even with the extra animation property assigned, it still pulls a respectable frame rate of 48.29FPS, when compared to using standard .animate():
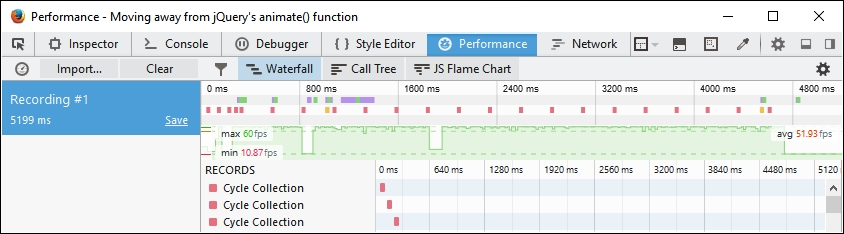
This helps reinforce that where possible, we can improve performance by removing any dependency on using .animate() in our code. The use of CSS styling to animate content isn't quite ready to replace JavaScript, but it is slowly getting there!
Okay, onwards we go: we've briefly looked at the various ways to animate content; it's time to make that final transition to using PostCSS. How many times have you seen forms that display the label above, or to the left of, each field? Sure, it gets boring after a while, seeing the same old design! It's easy to change, so there is no excuse for not doing so. To prove this, we're going to use PostCSS to slide each label up when that field has focus. Yes, you heard me right…slide up. Let's take a look at how we can provide a new take on that venerable piece of functionality for any site.