Table of Contents for
Mastering PostCSS for Web Design
 Mastering PostCSS for Web Design
Published by
Packt Publishing, 2016
Mastering PostCSS for Web Design
Published by
Packt Publishing, 2016
- Cover
- Table of Contents
- Mastering PostCSS for Web Design
- Mastering PostCSS for Web Design
- Credits
- About the Author
- About the Reviewer
- www.PacktPub.com
- Preface
- What you need for this book
- Who this book is for
- Conventions
- Reader feedback
- Customer support
- 1. Introducing PostCSS
- Introducing PostCSS
- Setting up a development environment
- Creating a simple example using PostCSS
- Linting code using plugins
- Exploring how PostCSS works
- Summary
- 2. Creating Variables and Mixins
- Creating a hover effect example
- Transitioning to using PostCSS
- Adding variable support to PostCSS
- Updating our hover effect demo
- Setting the order of plugins
- Creating mixins with PostCSS
- Looping content with PostCSS
- Summary
- 3. Nesting Rules
- Navigating through pages
- Transitioning to using PostCSS plugins
- Exploring the pitfalls of nesting
- Making the switch to BEM
- Exploring our changes in more detail
- Summary
- 4. Building Media Queries
- Exploring custom media queries in PostCSS
- Making images responsive
- Adding responsive text support
- Optimizing media queries
- Retrofitting support for older browsers
- Moving away from responsive design
- Taking things further with CSS4
- Summary
- 5. Managing Colors, Images, and Fonts
- Managing fonts with PostCSS
- Creating image sprites
- Working with SVG in PostCSS
- Adding support for WebP images
- Manipulating colors and color palettes
- Creating color functions with PostCSS
- Summary
- 6. Creating Grids
- Creating an example with Bourbon Neat
- Exploring the grid plugins in PostCSS
- Transitioning to using PostCSS-Neat
- Creating a site using Neat and PostCSS
- Adding responsive capabilities
- Summary
- 7. Animating Elements
- Moving away from jQuery
- Making use of pre-built libraries
- Switching to using SASS
- Making the switch to PostCSS
- Exploring plugin options within PostCSS
- Updating code to use PostCSS
- Creating a demo in PostCSS
- Optimizing our animations
- Using our own animation plugin
- Summary
- 8. Creating PostCSS Plugins
- Dissecting the architecture of a standard plugin
- Creating an transition plugin
- Building a custom font plugin
- Simplifying the development process
- Guidelines for plugin building
- Making the plugin available for use
- Summary
- 9. Working with Shortcuts, Fallbacks, and Packs
- Exploring plugin packs for PostCSS
- Adding shortcuts with Rucksack
- Linting and optimizing your code
- Providing fallback support
- Summary
- 10. Building a Custom Processor
- Exploring our processor
- Dissecting issues with our processor
- Optimizing the output
- Adding reload capabilities
- Extending our processor further
- Testing the final pre-processor
- Getting started with some hints and tips
- Introducing the CSStyle library
- Summary
- 11. Manipulating Custom Syntaxes
- Preparing our environment
- Implementing custom syntax plugins
- Parsing CSS
- Formatting the output with the API
- Highlighting our syntax code
- Summary
- 12. Mixing Preprocessors
- Exploring the conversion process
- Introducing the Pleeease library
- Compiling with other preprocessors
- Using the PreCSS library
- Converting a WordPress installation
- Setting up our environment
- Considering the conversion process
- Making changes to our code
- Compiling and testing the changes
- Summary
- 13. Troubleshooting PostCSS Issues
- Exploring some common issues
- Getting help from others
- Summary
- 14. Preparing for the Future
- Converting CSS4 styles for use
- Supporting future syntax with cssnext
- Creating plugins to provide extra CSS4 support
- Summary
- Index
When parsing CSS, the output by default is going to resemble something as shown in the following screenshot:
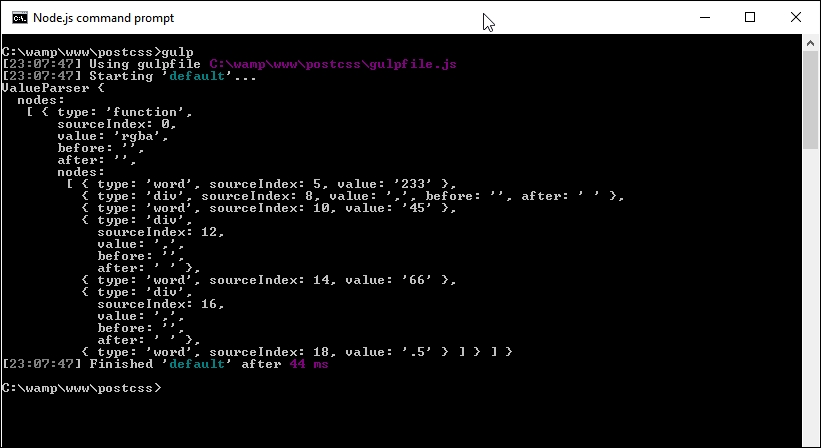
It looks a really ugly mess, but is in fact the standard format for an AST tree. The trouble is, it's not very helpful if we want to use details from it in our code! To get around this, we need to convert our content into a string format: the simplest method is to use the .toString() method, which is perfect for saving the content to disk.
All of the code for the next exercise is in the T62 – adding a stringifier folder in the code download that accompanies this book.
It's a cinch to use in our Gulp file; let's take a look as part of our next exercise:
- We'll start by creating a new Gulp task file. In your usual text editor of choice, add the following code; there is a reasonable amount involved, so we will go through it in sections, beginning with the declarations for the plugins used:
'use strict'; var gulp = require('gulp'); var postcss = require('postcss'); var util = require('util'); var autoprefixer = require('autoprefixer'); var fs = require('fs'); - We need to set up a few variables; these will be used to store values generated during the compilation process:
var newValue = 'white', result, selectors = [], root, decl;
- Next up is the start of our task. The first step is to parse some simple CSS, as a basis for our demo. We then get the first child in our code, and save it to the
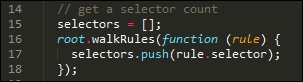
declvariable:gulp.task('default', function () { root = postcss.parse('a { color: black }'); decl = root.first.first; - The first piece of information we want is a selector count; this next block will count through each selector using
root.walkRules, and push the value into theselectorsarray:// get a selector count selectors = []; root.walkRules(function (rule) { selectors.push(rule.selector); }); - At this point, we're ready to pipe out a summary report of our code—we use
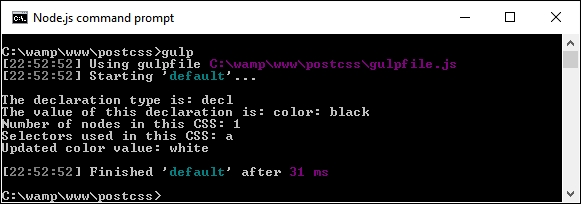
console.logto display a number of different values on screen:console.log("\nThe declaration type is: " + decl.type); console.log("The value of this declaration is: " + decl.toString()); console.log("Number of nodes in this CSS: " + root.nodes.length); console.log("Selectors used in this CSS: " + selectors.toString()); - We're almost there—in this next block, we do the PostCSS equivalent of a search and replace to update our color from black to white:
// Replace color black with white root.walkDecls(function (decl) { if ( decl.value.match(/^black/) ) { decl.value = 'white'; } }); - We can display our content on screen, but a more useful step is to save it to disk—for this, we can use the
fsplugin from Node.js to create our transformed CSS file and associated source map:// display content on screen and save to file result = root.toResult({ to: 'all.css', map: { inline: false } }); console.log("Updated color value: " + decl.value.toString() + "\n"); fs.writeFileSync('dest/styles.css', result.css); fs.writeFileSync('dest/styles.css.map', result.map); }); - Save the Gulp file to the root of our project area, then fire up a Node.js command prompt, and change the working directory to that of our project area.
- At the prompt, type in
gulp, then press Enter and let the compilation complete.If all is well, we should see the results of step 6 appear on screen, like so:
The transformed CSS file and source map will be present in the
destfolder: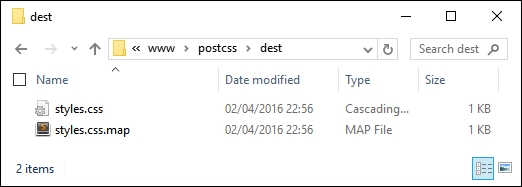
So, how does this all help us? Well, the ability to parse our code directly opens up some real possibilities; let's pause for a moment to explore what has happened in our demo, and how we can take advantage of this functionality in future projects.
Throughout the book, we've used a variety of plugins to transform our code. These will all make use of the PostCSS API in some form. However, we are not limited to simply using plugins; we can also transform our code directly using the API. At this point, it should be noted that we are not talking about creating a custom parser; indeed, this would easily form enough content for a short book in its own right!
A look through the Gulp file might be enough to put some people off. It is true that creating a custom syntax to parse code created using Stylus or less is not easy, and falls outside the scope of this book. However, we can make use of some of the API to query our content. In our example, there are two blocks of code that are of interest.
The first block parses each selector and keeps a running count. We can use the .walkRules method to iterate through each rule:
Once we have that raw information, we can then stringify it (or convert it to a string), before displaying the content on screen:

It's worth noting that the PostCSS API contains additional functionality to stringify our CSS and assemble it together. These are known as the Stringify and Builder commands; these are only meant for use when creating custom syntaxes. We've simply parsed our content using existing plugins designed for this purpose, so using toString() is sufficient for our needs.
Moving on—our example was kept deliberately simple to illustrate the process. We can easily add additional functionality. The API reference documentation at https://github.com/postcss/postcss/blob/master/docs/api.md is a good place to start. How about adding error-checking, for example? We've already added one option from it, in the form of source maps; let's briefly cover this in more detail.
Throughout many of our demos, we've incorporated a task that creates a source map of our CSS styling. It's worked perfectly well so far, but it isn't the final answer—we can do better! To see what is possible, take another look at the last block of code in the Gulp task file used in the previous demo (which should be around lines 33 to 36):
// display content on screen and save to file
result = root.toResult({ to: 'all.css', map: { inline: false } });
...
fs.writeFileSync('dest/styles.css', result.css);
fs.writeFileSync('dest/styles.css.map', result.map);
Here, we're creating a version of our transformed code that can be saved to file {inline: false} prevents the creation of a source map directly in our code. Instead, we use NodeJS' file system to create a source map based on result.map; this contains the content of our transformed code.
There are a few points to note when using this method; for more details, take a look at the main PostCSS site at https://github.com/postcss/postcss/blob/master/docs/source-maps.md.
Time to change tack: so far we've concentrated on writing our code, but what about presentation? It's not entirely necessary, but setting up highlighting has a twofold benefit: it makes it easier to edit our code, and we can also use it to provide a consistent theme when documenting our code electronically. After all, I'm sure you at least do the latter…don't you?