Table of Contents for
Mastering PostCSS for Web Design
 Mastering PostCSS for Web Design
Published by
Packt Publishing, 2016
Mastering PostCSS for Web Design
Published by
Packt Publishing, 2016
- Cover
- Table of Contents
- Mastering PostCSS for Web Design
- Mastering PostCSS for Web Design
- Credits
- About the Author
- About the Reviewer
- www.PacktPub.com
- Preface
- What you need for this book
- Who this book is for
- Conventions
- Reader feedback
- Customer support
- 1. Introducing PostCSS
- Introducing PostCSS
- Setting up a development environment
- Creating a simple example using PostCSS
- Linting code using plugins
- Exploring how PostCSS works
- Summary
- 2. Creating Variables and Mixins
- Creating a hover effect example
- Transitioning to using PostCSS
- Adding variable support to PostCSS
- Updating our hover effect demo
- Setting the order of plugins
- Creating mixins with PostCSS
- Looping content with PostCSS
- Summary
- 3. Nesting Rules
- Navigating through pages
- Transitioning to using PostCSS plugins
- Exploring the pitfalls of nesting
- Making the switch to BEM
- Exploring our changes in more detail
- Summary
- 4. Building Media Queries
- Exploring custom media queries in PostCSS
- Making images responsive
- Adding responsive text support
- Optimizing media queries
- Retrofitting support for older browsers
- Moving away from responsive design
- Taking things further with CSS4
- Summary
- 5. Managing Colors, Images, and Fonts
- Managing fonts with PostCSS
- Creating image sprites
- Working with SVG in PostCSS
- Adding support for WebP images
- Manipulating colors and color palettes
- Creating color functions with PostCSS
- Summary
- 6. Creating Grids
- Creating an example with Bourbon Neat
- Exploring the grid plugins in PostCSS
- Transitioning to using PostCSS-Neat
- Creating a site using Neat and PostCSS
- Adding responsive capabilities
- Summary
- 7. Animating Elements
- Moving away from jQuery
- Making use of pre-built libraries
- Switching to using SASS
- Making the switch to PostCSS
- Exploring plugin options within PostCSS
- Updating code to use PostCSS
- Creating a demo in PostCSS
- Optimizing our animations
- Using our own animation plugin
- Summary
- 8. Creating PostCSS Plugins
- Dissecting the architecture of a standard plugin
- Creating an transition plugin
- Building a custom font plugin
- Simplifying the development process
- Guidelines for plugin building
- Making the plugin available for use
- Summary
- 9. Working with Shortcuts, Fallbacks, and Packs
- Exploring plugin packs for PostCSS
- Adding shortcuts with Rucksack
- Linting and optimizing your code
- Providing fallback support
- Summary
- 10. Building a Custom Processor
- Exploring our processor
- Dissecting issues with our processor
- Optimizing the output
- Adding reload capabilities
- Extending our processor further
- Testing the final pre-processor
- Getting started with some hints and tips
- Introducing the CSStyle library
- Summary
- 11. Manipulating Custom Syntaxes
- Preparing our environment
- Implementing custom syntax plugins
- Parsing CSS
- Formatting the output with the API
- Highlighting our syntax code
- Summary
- 12. Mixing Preprocessors
- Exploring the conversion process
- Introducing the Pleeease library
- Compiling with other preprocessors
- Using the PreCSS library
- Converting a WordPress installation
- Setting up our environment
- Considering the conversion process
- Making changes to our code
- Compiling and testing the changes
- Summary
- 13. Troubleshooting PostCSS Issues
- Exploring some common issues
- Getting help from others
- Summary
- 14. Preparing for the Future
- Converting CSS4 styles for use
- Supporting future syntax with cssnext
- Creating plugins to provide extra CSS4 support
- Summary
- Index
Cast your mind back, if you will, to some advice I gave earlier about plugins—remember how I said that in an ideal world, a plugin should serve a single purpose?
Well, one might be forgiven for thinking that we're ignoring this advice when we talk about plugin packs. In reality, we're not; all of the plugin packs available for PostCSS provide a single interface for multiple single plugins. At present, the list of plugin packs include these examples:
- Oldie: Available from https://github.com/jonathantneal/oldie, this plugin is an interface for nine separate plugins; it handles support for older versions of IE.
- Short: Hosted at https://github.com/jonathantneal/postcss-short, this plugin lets us write styles using our own shorthand properties.
- AtCSS : This plugin is available at https://github.com/morishitter/atcss, this interesting plugin provides a new take on SASS'
@extendby allowing us to create rules that inherit from base rules. - precss: This plugin, from https://github.com/jonathantneal/precss, allows us to use SASS-like markup in our style sheets. We will explore this in more detail in Chapter 11, Manipulating Custom Syntaxes.
- Stylelint: This plugin pack should form part of any PostCSS developer's toolkit: it allows us to lint our style sheets automatically. The pack is available from https://github.com/stylelint/stylelint.
- Cssnano: In a similar vein,
cssnanoshould be part of any developer's toolkit: this pack is perfect for compressing and optimizing code within our style sheets. You can get the plugin from https://github.com/ben-eb/cssnano. - Rucksack: Last, but by no means least, Rucksack (as described by the developer), is a "…little bag of CSS superpowers". This pack adds support for functionality such as
font srcgeneration, providing fallback support for RGBA values, or theclearfixhack.
These packs provide a real mix of functionality—it is naturally up to us to decide which plugins we want to use. At this point, though, one might be tempted to ask "why use a pack—surely this adds unnecessarily redundant functionality that we're trying to avoid adding?"
It's a good question, the simple answer is that it will depend on your requirements. If all we're interested in is adding vendor prefixes, then checking and compressing our code, then we would most likely use autoprefixer, cssnano, and stylelint. But if we wanted to add property aliases, then autoprefixer can be dropped in favor of using Rucksack with cssnano and stylelint. The key here, though, is to carefully assess what you need, and work out the best combination of plugins to use from the selection available for PostCSS.
Okay, time for a change: let's move on! We will be exploring some of these plugin packs over the next few pages: let's make a start with a simple plugin, in the form of postcss-short.
This plugin, available from https://github.com/jonathantneal/postcss-short, is a wrapper for several plugins available for the PostCSS ecosystem; these include Shorthand Border, Shorthand Color, and Shorthand Size. Installing the plugin is a breeze—it uses the same format as most other PostCSS plugins, and can be installed using this command within our project root area, in a Node.js command prompt session:
npm install postcss-short --save-dev
The great thing about this plugin (and other plugin packs) is that it removes the need to call lots of separate plugins. We must bear in mind though that to make this worthwhile, we need to be calling most of the plugins in some form or other. If we're only calling one or two from postcss-short, then we may prefer to call them individually, and not use the postcss-short plugin.
Leaving aside any concerns about using the plugin, let's take a look at some examples of it in action. The best way to experience it is to use the online editor at http://jonathantneal.github.io/postcss-short/. We can use this to experiment before adding the final result to our style sheet prior to compilation:
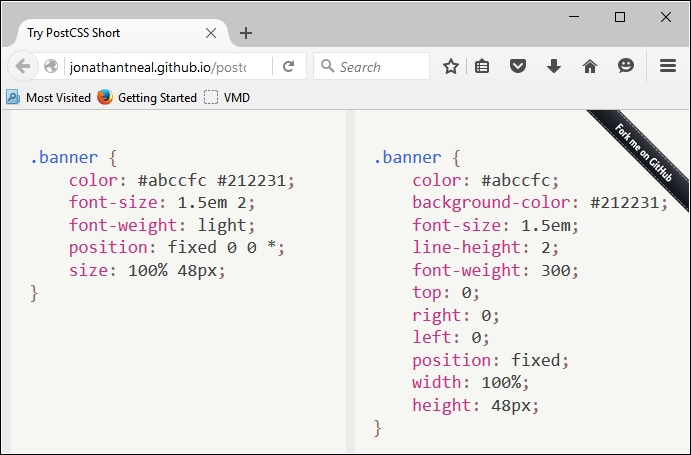
In this example (taken from the plugin site), we've used all of the plugins, with the exception of Shorthand Text and Shorthand Data. In our code, we've used the relevant shorthand as specified for the plugin—PostCSS will compile this into valid CSS styles, as outlined within each plugin.
Which plugins we use will of course depend on our requirements—there is every possibility that you will find yourselves using particular plugins more than others. Staying with the theme of shorthand, though, there is one plugin pack that is likely to feature often in your toolkit—Rucksack. No, I don't suggest this is an opportunity to go on holiday (no pun intended), but more an occasion to use what will be a very useful set of plugins within PostCSS.